


Various breaches and vulnerabilities over the past few years have brought security to the forefront of all IT Administrators' minds. In a Windows Server 2016 environment, there are many functions you can enable to lock down security on your own network. Let's explore some of these functions, as well as practice with some tools and tricks that can help us to better understand and navigate our own networks. We will also take a look at some common networking tasks that will help you out in your day-to-day work. In this chapter, we will look at the following recipes:
- Requiring complex passwords in your network
- Using Windows Firewall with Advanced Security to block unnecessary traffic
- Changing the RDP port on your server to hide access
- Multi-homing your Windows Server 2016
- Adding a static route into the Windows routing table
- Using Telnet to test a connection and network flow
- Using the Pathping command to trace network traffic
- Setting up NIC Teaming
- Renaming and domain joining via PowerShell
- Building your first Server Core
In this chapter, we are going to tackle a number of tasks related to networking your Windows Server 2016 machines and locking down that environment a little bit by enabling some security functions. Some of the tools we are going to use can be very useful for daily tasks, and I hope that the steps we take will prompt you to start some gears spinning in your own mind to investigate deeper into taking full advantage of what Microsoft has to offer within this operating system.
With the tools that attackers have available today, simple passwords should be outlawed by every company. Turning on the requirement for complex passwords in your network is pretty simple; the hard part is knowing where to find the setting. We are going to require complex passwords by making a change inside Group Policy. We will be using Group Policy in a step-by-step fashion, and combining this recipe with the chapter on Group Policy in the book Windows Server 2016 Administration Cookbook, published by Packt, will give you even more creativity in the way that you could later change the implementation of this password policy.
We need to be working in a domain environment, as Group Policy is something that runs within Active Directory. The change that we are going to make in Group Policy is done from a domain controller, and we will utilize a client computer to test our policy once it has been implemented.
The following steps will help you enable complex passwords for your network:
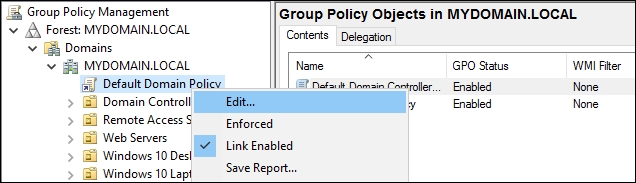
- On your domain controller, launch
Group Policy Managementfrom inside theToolsmenu inServer Manager. - Expand your forest name and find the name of your domain inside the
Domainsfolder. If you expand your domain name, you will see aGroup Policy Object(GPO) in there called theDefault Domain Policy. This policy is automatically configured in a new Active Directory environment to apply to all user accounts, so for this recipe, we will modify this GPO to require complex passwords for all of our users. - Right-click on
Default Domain Policyand clickEdit...:
Note
You can easily create a new GPO and use it instead of modifying the built-in default policy. This will give you better control over who or what gets the settings applied to them. See the chapter Group Policy from the book, Windows Server 2016 Administration Cookbook, for more detail on managing the GPOs themselves. We use the Default Domain Policy in this recipe for the sake of shortening the number of steps you need to take, but it really is recommended never to use the Default Domain Policy to make actual changes in a production environment.
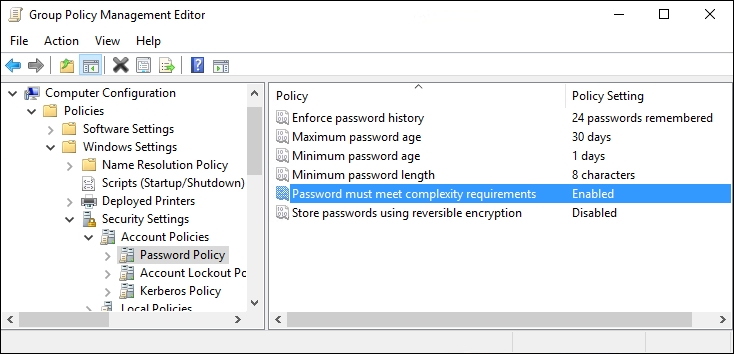
- Browse to the following location by navigating to
Computer Configuration|Policies|Windows Settings|Security Settings|Account Policies|Password Policy. - Here are the configurable options that you can set for password requirements in your network. I am going to set
Maximum password ageto30 daysso that everyone needs to change their password monthly, and I will increaseMinimum password lengthto8 characters. I will also enable the complexity requirements setting, which sets a number of different requirements. If you double-click on that setting and browse to theExplaintab, you will see a list of all the items that are now required:
- Now go ahead and try logging into a computer with a domain user account and come to discover that our password no longer meets the criteria and we have to change it accordingly:

Because we set requirements for password complexity in the Default Domain Policy, that requirement flows across our whole network. A solid password policy is very important in today's networks and just scratches the surface of Group Policy's abilities. These simple setting changes can make the difference in whether or not your company is compromised as a result of a brute force password attack.
I encounter far too many networks with policies in place that disable the built-in Windows Firewall with Advanced Security (WFAS) by default on all of their machines. Usually, if I ask about this, the reason is either unknown or It's always been that way. I think this is a carry-over from the Windows XP/Server 2003 days, or maybe even older, when the Windows Firewall was less than desirable. Believe me when I tell you that WFAS in today's operating systems is very advanced, stable, and beneficial. If you want to stop unnecessary or malicious traffic from getting to your server, look no further than this built-in tool.
We are going to use two Windows Server 2016 machines for this task. We will test connectivity between the two to set our baseline and then create a rule that blocks the functions we just tested. Next, we will test again to ensure that our changes did what we expected them to, blocking the traffic that we attempt to generate. It is important to set up a baseline of tests and run those same tests following each change to ensure the rules are working exactly as you want them to.
If you want to stop unnecessary traffic from getting to your server, execute the following instructions:
- First, we want to test the existing connectivity. I log into my DC2 server, and from there I am able to successfully execute the
ping web1command and get a reply. I can also open up File Explorer and browse to\\WEB1and see a folder shared there. This baseline test tells me that both ICMP (ping) traffic and file access are currently open and allowed by WFAS on WEB1. We want to stop these functions from happening. - Log in to WEB1 and open
Windows Firewall with Advanced Security. You can open this either from the Start screen and typing it in, or by opening aRunprompt and typingwf.msc.
- Inside WFAS, your two best friends when trying to control traffic are the
Inbound RulesandOutbound Rulessections on the left. You need to think of Inbound and Outbound from the server's perspective. Inbound Rules manipulate traffic that is flowing in toward your server, and Outbound Rules handle traffic flowing out of your server toward the rest of the network. If you click onInbound Rules, you will see the list of preconfigured rules that exist already. - Right-click on
Inbound Rulesand click onNew Rule.... - First, let's make a rule to block the file access from happening. Choose
Portand on the next screen, enter the value for portTCPas445. Then you realize that you might as well also block RDP access since that is also currently enabled. No problem! Simply comma separate these numbers as follows:

- Choose
Block the connection. - On the next screen where you choose which firewall profile the rule applies to, you can leave it set to all three checked as the default. This will ensure that the rule will apply to any NIC that has any firewall profile assigned. If you only have a single NIC on your server and it is joined to the domain, then you could get away with only selecting the domain profile if you wanted to deselect the other two. For our recipe, I'm going to leave them all checked.
- Type any kind of descriptive name for your rule—something like
Block File and RDP Access. - You did it! You will see that the new rule exists, and it is immediately put into action. If you head over to your other server, you will now find that you can no longer RDP or browse the file shares at all on WEB1.
- We can still successfully ping WEB1, though, and we wanted to put a stop to that as well. To stop ICMP traffic, you simply need to create another rule. This one is a little bit more complicated, though. First, go ahead and create a second Inbound Rule, and use the exact same settings that you used for your
RDPfile rule. You can enter anything into thePortfield; it doesn't matter because we will be invalidating it in a minute, so maybe use port 445 for our example.
- Great, now you have two rules in there that are both blocking port 445. That doesn't do us much good. Right-click on the newest rule that we just created, head into
Properties, and let's improve this rule a little bit. - Inside the
Protocols and Portstab, drop down theProtocoltype and chooseICMPv4. That's all you have to do! You have now modified this rule so that it is no longer blocking TCP port 445, but rather this rule is now blocking ICMPv4 traffic:

- If you log back into DC2, we no longer receive ping replies when trying to contact the WEB1 server.
Note
Take some time to play around inside the Scope tab. This section of a WFAS rule allows you to scope the rule down so that it only applies to particular IP addresses or ranges. Maybe you only want to block file share access from a particular subnet or only for the external NIC of an edge server. Requirements like these are easy to accomplish!
We used the Windows Firewall with Advanced Security to create a couple of simple rules to block unwanted traffic coming into our server. These rules are put into place immediately and are very easy to generate. What is even greater is that our WFAS rules can be created centrally by making use of Group Policy so that you don't even have to touch the individual servers to apply connection rules to them. WFAS is very different than the Windows Firewall of 10 years ago, and if you are not making use of it today I seriously recommend that you reconsider.
Everybody uses RDP. Attackers and bots, curiously, also know that everybody uses RDP. If you are working with perimeter servers that are potentially connected to the Internet, having RDP enabled can be especially dangerous because it is quite easy to leave your server in a state where it is open from outside of your network. This gives anyone the ability to start guessing passwords or trying to brute force their way into your server, or just a way to give you some denial-of-service headaches by throwing thousands of login attempts at that server.
Even aside from the worries of potential access from the public Internet, you may want to ensure that regular users aren't trying to poke around where they shouldn't be by opening up RDP connections to servers within your network. There are a few ways that you could restrict this access. You could come up with some creative firewall rules that only allow RDP access from certain subnets, and try to contain your IT computers to those subnets. Or maybe you could configure RDP on your destination servers to require certificates as part of the authentication process, thus only allowing users with those certificates to have access. These are both fairly complicated. I like to employ a much simpler solution to keep unwanted eyes from seeing my RDP login screens.
Change the port that RDP runs on! What? Can you do that? Yes, RDP by default listens and connects on TCP port 3389. The Remote Desktop client that is installed on almost every client machine everywhere automatically assumes that the server they are connecting to is listening on 3389, and so you don't even have to specify a port when you try to connect. There isn't even a field for it in the client. So it's pretty rare that I talk to people (even IT people) who know that 3389 is the default. Given that, if we were able to change that 3389 to something different, something of our own choosing, I think that would do a grand job of keeping people out of our systems. Let's say we have a sensitive server and want to keep access to a minimum. Let's change the RDP port on that to something only we know, maybe port 4822. That'll keep 'em guessing for a while.
Any Windows Server 2016 machine will do for this task. We are going to set our custom RDP port on WEB1, and then we are going to test accessing it from a Windows 10 client machine.
Go through the following steps to change the RDP port to one of your liking:
- Open
Registry Editor. You can do this by going to either theStartscreen or Command Prompt and typingregedit. - Browse to:
HKEY_LOCAL_MACHINE\SYSTEM\CurrentControlSet\Control\Terminal Server\WinStations\RDP-Tcp. - Find the value called
PortNumberand change it to4822:

- Restart the server.
- Now log into your client computer and open up
Remote Desktop Connectionby typing that name into yourStartscreen. You can also typemstscin Command Prompt to open this program. If you try to connect directly toWEB1, your connection will fail as the server is no longer listening on the standard port 3389.
Enter in WEB1:4822 and you connect successfully:

With a simple registry change, we can adjust the RDP listener port on servers. This will help keep unwanted RDP connections from being made, which can be useful both inside and outside the corporate network. After making this change, the only people who will be able to reach the RDP login screen would be those who know your new RDP port, and who know how to utilize that custom port within the remote desktop connection tool.
Historically, there haven't been many scenarios that require Windows servers to have more than a single network card. This is because most of the roles that they were accomplishing were done on whatever single network they were plugged into. There was no need for a server to have direct connections to multiple networks because that was the router and switch's job, right? In today's Windows Server world, there are numerous roles that can take advantage of multi-homing, which simply means having multiple NICs connected to different networks at the same time. There are some proxy roles that can use multiple NICs; Remote Access roles such as DirectAccess and VPN recommend a dual-NIC setup, and you can even use a Windows Server as a general router if you want to.
I work a lot with DirectAccess and I find many multi-homed servers with incorrect network configurations. This recipe is a collection of points that need to be followed when configuring a Windows Server with multiple NICs to make sure it behaves and flows traffic as you expect it to.
You just need a Windows Server 2016 online for this one. We have two NICs installed on this server and they are plugged into different networks. I am prepping a Remote Access server that will sit on the edge, so I have one NIC plugged into the corporate internal network, while the other NIC is connected to the Internet.
To configure a Windows Server with multiple NICs, perform the following process:
- Only one Default Gateway: In your NIC properties, you need to make sure that you only have a Default Gateway identified on one of your NICs. This is the most common mistake that I find in the field. If you have two NICs, it would seem logical that you would simply populate their IP address settings just like you would with any server or computer, right? Nope. The purpose of a Default Gateway is to be the fallback or the route of last resort. Whenever your server tries to send out network traffic, it will search the local routing table for information on how to send out that traffic. If it does not find a specific route that corresponds to the IP address that you are sending to, then it will default that traffic over to the Default Gateway address. Therefore, you only ever want to have one Default Gateway assigned on a server, no matter how many NICs are connected. On all other NICs installed on the system, simply leave the Default Gateway field unpopulated inside the TCP/IP properties. By the way, for a DirectAccess server or for pretty much any other server that faces the Internet, the Default Gateway needs to be on the External NIC, so I will be leaving that field empty in the properties of my Internal NIC.
- Limit your DNS servers: Another common configuration that I have seen is to have DNS server addresses defined for every network adapter installed on the system. While this doesn't usually break anything like multiple Default Gateways can, it does cause unnecessary slowness when the system is trying to resolve DNS names. Try to have DNS server addresses configured on only one NIC. Once again, using our example DirectAccess server setup, I will be configuring DNS server addresses on my Internal NIC because that is necessary for DA to work. I will not be putting my public DNS server specifications into the External NIC; instead, I will leave those fields empty.
- Use static IP addresses: The roles and functions you may perform on a Windows Server that requires multiple NICs will be best served by having static IP address information assigned to those network cards. If you let one or more of the NICs pull information from DHCP, you could easily create a situation where you have too many DNS servers defined, or where you have multiple Default Gateways on your system. As we already know, neither of these scenarios is desirable.
- Prioritize the NIC binding: It is a good practice to set a priority for your NICs so you can place the card that you expect to have the most network traffic as #1 in the list. For our DirectAccess server, we always want the Internal NIC to be placed on the top, so let's make sure that is set correctly using the following steps:
- Open up
Network and Sharing Centerand click onChange adapter settingsso that you are in theNetwork Connectionsscreen where you can see the network cards installed on your system. - Now press the Alt key on your keyboard and you will see the menus at the top of this window.
- Head into the
Advancedmenu and click onAdvanced Settings.... Now simply make sure that yourInternalNIC is listed on top:
- Open up
Note
The NIC binding prioritization order is a function that is no longer necessary in Windows Server 2016. The instructions are still included here because they apply to any older Windows Server operating systems, and should be followed on those platforms.
- Add static routes: A couple of minutes ago, you probably started thinking "Hey, if I don't have a Default Gateway on my Internal NIC, what tells the server how to get packets into the subnets of my internal network?" Great question! Because you only have one Default Gateway, when you need to send traffic out one of the other NICs, you need to make sure that a static route exists in the Windows routing table. This ensures that the server knows which interface gets traffic for each subnet. Make sure to check out our next recipe for specific information on how to add those routes.
Anybody can multi-home their server by simply plugging two NICs into two different networks. The tricky part is making sure that you configure those NICs and the operating system appropriately so that network traffic flows in the right directions at the right times. Following this list of rules will give you a solid foundation so that you can build out these types of scenarios and know that you are doing so in the correct fashion. Deviating from these rules will result in unexpected behavior, which sometimes is not immediately obvious. This can make for some very frustrating troubleshooting down the road.
This recipe follows right on the heels of our previous topic. If you have never worked on a server that is making use of more than one NIC, then you have probably never had a reason to poke around in the Windows routing table. The minute that you are tasked with setting up a new server that needs to be connected to multiple networks, or that you get thrown into a situation where you need to troubleshoot such a system, this suddenly becomes critical information to have in your back pocket.
On a server that is connected to multiple networks, you only have one Default Gateway address defined. This means any subnets that need to be reached by flowing through one of the other NICs, the ones that do not contain the Default Gateway, need to be specifically defined inside the routing table. Otherwise, Windows simply does not know how to get to those subnets and it will attempt to push all traffic through the Default Gateway. This traffic will never make it to its destination and communications will fail.
Today, we are setting up a new VPN server. This server has a NIC plugged into the Internet where remote clients will come in, and another NIC plugged into the internal network so that the client traffic can make its way to the application servers that the users need to access. In this scenario, the Default Gateway must be populated on the External NIC. There will be no Default Gateway address defined on the Internal NIC, and without some assistance, Windows will have no idea how to properly route traffic toward the servers inside the network.
For our example, the Internal NIC is plugged into the 10.0.0.x network. Since it has a direct physical connection to this network, it is automatically able to properly contact other servers that reside on this subnet. So if the VPN server was 10.0.0.5 and we had a domain controller running on 10.0.0.2, we would be able to contact that domain controller without any additional configuration. But most companies have multiple subnets inside their network. So what if our VPN users needed to contact a web server that is sitting on the 10.0.1.x network? When traffic comes into the VPN server looking for a destination of 10.0.1.8 (the web server), the VPN server will check its local routing table and find that it does not have an entry for the 10.0.1.x network. Since it doesn't know what to do with this request, it sends it to the Default Gateway, which sends the packets back out the External NIC. Those packets don't have a valid destination to reach through the External NIC, which is plugged into the Internet, and so the traffic simply fails.
We need to define a static route in the routing table of our VPN server, so that when VPN clients request resources inside the 10.0.1.x network, then that traffic makes its way to the destination network successfully. We need to bind this route to our Internal NIC so that the VPN server knows it has to send these packets through that physical network interface.
We are setting up a new Windows Server 2016 VPN server. This server has two NICs installed, one plugged into the Internet and the other plugged into the internal network. Inside our corporate network, there are two subnets. 10.0.0.x (/24), which our Internal NIC is plugged into, and 10.0.1.x (/24), where our web server resides. There is, of course, a router between the two internal subnets, which is how traffic physically flows between the two. The IP address of that router is 10.0.0.254. If we were able to configure a Default Gateway on the Internal NIC of our VPN server, it would be set to 10.0.0.254, and all traffic would work without any further input. However, since our VPN server is multi-homed and there can only be a Default Gateway configured on the External NIC, we need to tell the server that it has to push 10.0.1.x traffic through 10.0.0.254 by using the Internal NIC.
So basically, we need to do the following to create a static route in our VPN server:
- Identify the subnet that we want to contact. In our example, it is
10.0.1.0 - Identify the subnet mask, which is
255.255.255.0 - Identify the IP address of the router that will get us to that network, which is
10.0.0.254 - Identify the Interface ID number of the physical NIC that needs to carry this traffic, which can be attained as follows:
- Discovering this NIC ID is going to take us a minute. First, open up
Network Connectionsand expand the fields so that you can see the device name of each NIC:
- Discovering this NIC ID is going to take us a minute. First, open up

- Now open Command Prompt and type
route print. This is a print of your entire routing table. Scroll back up to the very top and you will see the Interface ID numbers of your NICs listed:
- Now open Command Prompt and type

We can see that our Internal NIC is the second NIC, named Microsoft Hyper-V Network Adapter #2. Looking at that entry in the route print, there is a number over to the left of that name. This is our Internal NIC's Interface ID number, which is4in this example.
We now have all the information needed to put together our route statement and bind it to our Internal NIC. The general format that our route add statement needs to take is route add -p <subnet> mask <mask> <gateway> if <interfaceID>. The -p part of the command is very important as it makes this route persistent. Without the -p part, our new route would disappear after the reboot.
So, in order to tell our VPN server how to send traffic into the new 10.0.1.x subnet that we have been talking about, our specific command is as follows:
route add -p 10.0.1.0 mask 255.255.255.0 10.0.0.254 if 4
This command tells the server to add a new persistent route for the 10.0.1.0/24 network, flow this network traffic through the 10.0.0.254 gateway and bind this route to NIC ID 4, which is our internal network interface.
With a multi-homed server, only one NIC will have a Default Gateway. Therefore, any subnets that we need to access through the other interfaces have to be specifically defined. Before we added this new route, the server was completely unable to contact the 10.0.1.x network. This is because the routing table did not have any information about this subnet, so any traffic trying to get there was being sent out the Default Gateway, which is on the External NIC plugged into the Internet. By adding a static route to our server, we have now defined a routing path for the server to take whenever it has traffic that needs to get to 10.0.1.x.
If you have many subnets in your network, you may be able to cover them all with a blanket route statement. A blanket route is also known as an aggregate or supernet route. This could save you the time of having to set up a new route statement for each and every one of your networks. For example, if we had many 10.something networks and we wanted to flow all of them through our Internal NIC, we could do that with a single route statement, as follows:
Route add -p 10.0.0.0 mask 255.0.0.0 10.0.0.254 if 4This route would send any 10.x.x.x traffic through the Internal NIC. Whether you blanket your routes like this or set each one up individually doesn't make a difference to the server as long as its routing table contains information about where to send the packets that it needs to process.
The ping command has always been an IT person's best friend to do quick network connection checks. How many of you are the family and neighborhood go-to guy to fix anything with buttons? I'm guessing most of you. And as such, if someone told you they were having trouble accessing the Internet from their laptop at home, what is the first thing you would do when you showed up? Try to ping their router, a website, or another computer in their network. You know you would! This has always been a wonderfully quick and easy way to test whether or not you have network traffic flowing between two endpoints. The same troubleshooting procedure exists in all workplaces and corporations. I have even seen many monitoring tools and scripts utilize the results of whether or not a ping replies to report on whether or not a particular service is up and running. If you get a ping reply, it's working, and if it times out, it's down, right?
Not necessarily. The problem we are here to address today is that more and more networks and routers are starting to block ICMP traffic by default. Pings = ICMP. This means that you can no longer take your ping test results to the bank. If your network connection traverses a router or firewall that blocks ICMP, your ping test will time out, even if the service is up and running. Windows Firewall even blocks ICMP by default now. So if you bring a new server online in your network and give it an IP address, you may notice that attempting to ping that new server results in timeouts. There is nothing wrong with the server, and it is capable of sending and receiving network traffic, but the local firewall on that server is blocking the incoming ping request.
I only lay out this information to let you know that ping is no longer the best tool for determining a connection between machines. Today's recipe will introduce a tool that has been around for a long time, but that I don't find many administrators taking advantage of. This is the Telnet Client, which I use on a daily basis. I hope that you will too!
We have a Server 2016 web server that has a website running. It is also enabled for RDP access and file sharing, but ICMP is being blocked by the local Windows Firewall. We are going to run some tests with a client machine against this server to try to determine which services are up and running.
To start working with Telnet Client, have a look at these instructions:
- First, just to prove our point here, let's open up Command Prompt on our testing client machine and try to ping WEB1 using the
ping web1command. Because ICMP is being blocked by the firewall, all we get is a series of timeouts:

- Now let's use the
Telnetcommand to accomplish some more intuitive digging into whether or not WEB1 is online and functional. Note that Telnet Client is not available inside Command Prompt by default; it is a Windows feature that must be installed. On the client machine we are using to test, head intoControl Panel|Programs|Turn Windows features on or off(orServer Managerif your testing machine is a server) and choose to add roles or features. We want to install the feature called Telnet Client. Alternatively, you can install the Telnet Client feature with a simple PowerShell command:
Install-WindowsFeature Telnet-Client- Now we have the
telnetcommand available to use inside Command Prompt. The general format of the command goes like this:telnet <server> <port>. When you run this command, you are effectively saying "Let's try to create a connection to this server name, on this particular port." Even though we cannot ping WEB1, let's try to use
telnetto open a connection to port 80, which is the website that we have running. The command is as follows:
telnet web1 80
- When we press Enter, the Command Prompt window changes to a flashing cursor. This is your confirmation that Telnet was able to open a successful connection to port 80 on the WEB1 server:

- Now try using the
telnet 10.0.0.85 3389command. This also results in a flashing cursor, indicating that we successfully connected to port 3389 (RDP) on IP address 10.0.0.85. This is the IP address of WEB1. I wanted to show this to point out that you can use either names or IP addresses with yourtelnetcommands.
- And finally, how about
telnet web1 53? This one results in a timeout, and we do not see our flashing cursor. So it appears that port 53 is not responding on the WEB1 server, which makes sense because port 53 is commonly used by DNS, and this is a web server, not a DNS server. If we were to query one of our domain controllers that is also running DNS, we would be able to make a successful telnet connection to port 53 on those guys.
Telnet is a simple but powerful command that can be run to query against particular ports and services on your servers. When trying to determine whether or not a particular service is available, or when trying to troubleshoot some form of network connectivity problem, it is a much more reliable tool than using a simple ping request. If you have been thinking about building some kind of script that programmatically reaches out and checks against servers to report whether they are online or offline, consider using telnet rather than ping so that you can query the individual service that the system is providing by using its particular port number.
When building or troubleshooting a network connection, it is often very beneficial to be able to watch the path that your packets take as they make their way from source to destination. Or perhaps they never make it to the destination and you want to figure out how far they do travel before stopping so that you can focus your work efforts in that area.
One command that has been used by network admins for years is traceroute (tracert), but the output contains some information that is often unnecessary, and the output is missing one large key ingredient. Namely, traceroute shows the first hop as the first router that you traverse and does not show you what physical NIC the packets are flowing out of. Granted, many times you only have one NIC, so this is obvious information, but what if you are working with a multi-homed server and you are simply checking to make sure packets for a particular destination are flowing out the correct NIC? What if we just want to double-check that some route statements we added are working properly? Cue Pathping. This command has been around for a long time but is virtually unknown. It shows the same information that tracert does, except it saves the information about the time between hops and some other details until the end of the output. This allows you to focus on the physical hops themselves in a clear, concise manner. More importantly, it shows you our key ingredient right away—the NIC that your packets are flowing out of! Once I discovered this, I left tracert behind and have never looked back. Pathping is the way to go.
Not much to get ready for this one. All we need is a server with a network connection and a Command Prompt window. Pathping is a command that is already available to any Windows Server; we just need to start using it.
The following two steps get you started with Pathping:
- Open
Command Prompton your server
- Type
pathping <servername or IP>. Your output will be as follows:

Pathping is a networking tool that allows you to watch the path that your packets are taking as they make their way to the destination. Similar to traceroute, it is much less commonly known, but in my opinion gives a better layout of the same data. It is a command that should be added to your regular tool bag and vocabulary, right alongside ping and telnet.
Teaming your network cards basically means installing two NICs onto the same server, plugging them both into the same network, and joining them together in a team. This gives you NIC redundancy in case of a failure, and redundancy is always a great thing! Sounds simple, right? Well, with Windows Server 2016, it finally is. This seemingly easy task has always been challenging to put into practice with previous versions of the operating system, but with 2016 we can finally do it properly from a single interface and actually count on it to work as we expect it to.
We are going to set up a NIC team on a Windows Server 2016 machine. There are two NICs installed onto this server, neither of which have yet been configured.
With the following steps, start teaming up:
- Open up
Server Manager, and in the left-hand pane go ahead and click onLocal Server. - Near the middle of the screen, you will see a section marked
NIC Teaming. Go ahead and click on the wordDisabledin order to launch the NIC Teaming screen as follows:

- Down in the
TEAMSsection, drop down theTASKSmenu, and click onNew Team:

- Define a name for your new team and choose the two NICs that you want to be a part of it:

- That's it! NIC1 and NIC2 are now successfully joined together in a team and will work in tandem to make sure you are still connected in the event of a failure.
- If you make your way to the regular
Network Connectionsscreen, where you define IP address information, you will see that you now have a new item listed beneath your physical network cards. This new item is the place where you will go to define the IP address information that you want the server to use:

Creating NIC teams is a pretty easy process that you should practice as time permits. This option for redundancy has never been very popular because, I believe, it had some stability problems in earlier versions of the server operating systems. Now that we have Windows Server 2016 available to us, and the process to configure it is so straightforward, I fully expect that NIC Teaming will become a standard procedure for administrators as they build every new server.
Another benefit of, and reason for, setting up NIC teaming is additional bandwidth. This may be yet another reason for which you start setting up your own servers with NIC teams. Keep in mind that if you are looking to implement teaming on a large scale, there is a limit of 32 NICs that can be joined to a team, and an additional limit of 32 teams that can be created on a single server.
Every server that you build will need a hostname, and most likely will need to be joined to your domain. We are all familiar with doing these things with the mouse using system properties, but have you ever thought of using a command interface to do these tasks quickly? Let's work together to discover how PowerShell can once again help make these necessary tasks more efficient.
We have just finished turning on a new Windows Server 2016 machine. Immediately following the mini-setup wizard in order to get logged into Windows, let's now use PowerShell to set our hostname and join the system to our domain.
Follow these steps to rename and domain join this new server with PowerShell:
- Right-click on your PowerShell icon on the Taskbar and choose
Run as Administrator:

- In order to rename our new server
WEB2, input the following command. Using the-Restartflag will ensure that our server reboots following the name change:
Rename-Computer -NewName WEB2 -Restart
- That's it for renaming! Now that our WEB2 server has rebooted, open PowerShell again and use the
Add-Computercommand in order to join it to our domain:
       Add-Computer -DomainName MYDOMAIN.LOCAL -Credential
           MYDOMAIN.LOCAL\Administrator -Restart
- Since we specified an account to use as credentials when joining the domain, we are prompted to supply the password. As soon as you enter the password, the server will be joined to the domain and will immediately restart to complete the process:

- Following the reboot, you can see in system properties that our server is now appropriately named and domain joined:

Through a couple of quick PowerShell cmdlets, we can rename computers and join them to our domain. In fact, these functions are even possible without ever logging into the console of the server. There are parameters that can be added to these cmdlets that allow you to run them remotely. For example, you could run the PowerShell commands from a local desktop computer, specifying that you want to run them against the remote server's IP address or name. By performing the functions this way, you never even have to log into the server itself in order to name and join it. See the links in the following section for additional information on these parameters.
Take a look at the following links for even more detailed information about the Rename-Computer and Add-Computer cmdlets that we used in this recipe:
Perhaps the most important way to increase security in your organization is to lower the security threshold, or footprint, of your servers and infrastructure. In other words, if there are any services running or ports open on your servers that aren't actually being used purposefully, you should disable or turn that particular service off. Now, hardening a Windows Server by disabling services and uninstalling things isn't an easy job; you can quickly turn something off that is important to the operating system and cause all kinds of problems on that server. Thankfully, there is a much safer and more secure way to harden your servers, but it requires planning from the beginning of your server build.
Server Core is a version of Windows Server 2016 that is essentially a headless operating system; all of your interaction with it is either command-line driven or done remotely from other servers or systems. Server Core is an alternate installation method to the full Windows desktop version of Server 2016. It installs the necessary technical componentry to behave as a Windows Server, join to your domain, and host the roles and services you need it to host, but it does all of that without a graphical desktop interface. This dramatically lowers the security vulnerability footprint and attack vectors on the server, but does mean you have to re-wire your brain in how you interact with these servers. Since Server Core is a big leap forward for security in many companies, it is appropriate that we start working with it here in our chapter regarding security. Let's take a quick look at the installation process for it, and an initial glance at the interface, so you get familiar with the console you will be looking at on these new, hardened servers you are going to start using.
We are going to build a new instance of Windows Server 2016 but will be making sure to choose the appropriate options for installing Server Core and not the full desktop experience version of the operating system. Our new server will be a VM; it doesn't have to be actual hardware.
Here is a procedure that will get you started rolling out your first instance of Windows Server 2016, Server Core:
- Create your new VM—or physical server—and insert the Windows Server 2016 installation media, just like you would if you were installing the full version of the operating system. Walk through the installation steps, the only difference being that you want to make sure and choose the default option for
Windows Server 2016 Standard. Or you can, of course, choose the Datacenter installation option, but the important part here is that you do NOT choose the(Desktop Experience)version of the operating system, as that would give us a regular old desktop interface just like any other server. By choosing the top option, and notice that it is now the default installation option, we are telling it that we want the more secure Server Core version of Windows Server 2016:

- Finish walking through the installation wizard, and when your new server has booted, instead of being presented with the standard Windows mini-setup wizard in order to start configuring your server, you will simply be presented with the following screen:

- Upon pressing Ctrl + Alt + Delete you are prompted to set a password for the local administrator account, after which you will find yourself sitting at a traditional Command Prompt interface. From this interface, you can interact with your new server by using Command Prompt commands, or you can even type
powershellin order to move over into the PowerShell interface and start working from there, just like you would with PowerShell on any Windows Server 2016:


- From this point, the most common tasks are going to be the same as the things you would do in a desktop experience version of Windows Server 2016. You can use the Command Prompt or PowerShell interfaces to set IP addresses, set a hostname for your server, and even join it to your domain. There are cmdlets that will allow you to install the Windows roles that you need to run on this server as well.
Microsoft would like headless servers to be the way of the future, and it is critical that server administrators know this technology exists, and start to use it in their day-to-day server workloads. A quick recipe in order to get the operating system up and running is a good start, but working with Server Core regularly and learning the common commands that you will need to use is essential information to really get started interacting with these headless versions of the operating system. Server Core can be an enormous security benefit; all you need to do is start using it!


