


 Download code from GitHub
Inflating the OpenStack Setup
Nowadays, OpenStack has become a very mature cloud computing software solution, more so than it ever was before. It is a unique project because of its tremendous growth in setup and development. Now, thanks to OpenStack, it has become possible to build your own cloud in a cheaper, more elegant, and more flexible way. The official OpenStack website, https://www.openstack.org/ defines the reason for using such a great solution:
By looking at the roadmaps of OpenStack's development over the past few years, several open source projects have been incubated under the umbrella of OpenStack, such as big data, databases, security, and containerization technology, and the list is still growing. In each new OpenStack release, a new project becomes more mature and better integrated in the cloud platform. This creates more opportunities to expand the cloud universe functionalities and grow your new next generation data center.
In this chapter, we will cover the following topics:
- Briefly parsing the OpenStack components and the innovation areas
- Implementing a first architectural design of OpenStack private cloud
- Checking the latest tools and processes to build a production-ready OpenStack environment
- Discussing the needs to adopt the Infrastructure as Code (IaC) concept for successful OpenStack management and implementation
- Exploring new opportunities to enlarge the OpenStack setup by tackling the cloud setup in both a test and a production environment using Ansible
Revisiting the OpenStack ecosystem
OpenStack has been designed to be deployed on a loosely coupled architectural layout. By defining each component of its ecosystem to run independently, it becomes possible to distribute each service among dedicated machines to achieve redundancy. As defined, the base services that constitute the core components in OpenStack are compute, network, and storage services. Based on this, the OpenStack community takes advantage of the base services and the design approach of the cloud software, and keeps developing and joining new open source projects to the OpenStack ecosystem. A variety of new X-As-A-Service projects appear with nearly every OpenStack release.
Getting up to speed with expanding the private cloud setup involves getting to grips core OpenStack services and terms. The following table shows the main projects in OpenStack in its early releases with their corresponding code names:
|
Code name |
Service |
Description |
|
Nova |
Compute |
Manages instance resources and operations |
|
Glance |
Image |
Manages instance disk images and their snapshots |
|
Swift |
Object storage |
Manages access to object storage level through REST API |
|
Cinder |
Block storage |
Manages volumes for instances |
|
Neutron |
Network |
Manages network resources to instances |
|
Keystone |
Identity |
Manages authentication and authorization for users and services |
|
Horizon |
Dashboard |
Exposes a graphical user interface to manage an OpenStack environment |
Of course, the evolution of the OpenStack ecosystem has kept growing to cover more projects and include more services. Since October 2013 (the date of Havana's release), the OpenStack community has shifted to enlarge the services provided by OpenStack within an exhaustive list. The following table shows the extended services of OpenStack (Mitaka release) at the time of writing:
|
Code name |
Service |
Description |
|
Ceilometer |
Telemetry |
Provides monitoring of resource usage |
|
Heat |
Orchestration |
Manages the collection of resources as single unit using template files |
|
Trove |
Database |
Database as a Service (DBaaS) component |
|
Sahara |
Elastic Data Processing (EDP) |
Quickly provisions the Hadoop cluster to run an EDP job against it |
|
Ironic |
Bare-metal |
Provisions bare metal machines |
|
Zaqar |
Messaging service |
Enables notification and messaging services |
|
Manilla |
Shared filesystems |
Provides shared File system As A Service (FSaaS), allowing to mount one shared filesystem across several instances |
|
Designate |
Domain name service |
Offers DNS services |
|
Barbican |
Key management |
Provides key management service capabilities, such as keys, certificates, and binary data |
|
Murano |
Application catalog |
Exposes an application catalog allowing the publishing of cloud-ready applications |
|
Magnum |
Containers |
Introduces Container as a Service (CaaS) in OpenStack |
|
Congress |
Governance |
Maintains compliance for enterprise policies |
Ultimately, if you want to expand your OpenStack environment to provide more X-As-A-Service user experience, you may need to revisit the core ecosystem first. This will enable you to pinpoint how the new service will be exposed to the end user and predict any change that needs more attention regarding the load and resources usage.
Grasping a first layout
Let's rekindle the flame and implement a basic architectural design. You probably have a running OpenStack environment where you have installed its different pieces across multiple and dedicated server roles. The architectural design of the OpenStack software itself gives you more flexibility to build your own private cloud. As mentioned in the first section, the loosely coupled design makes it easier to decide how to run services on nodes in your data center. Depending on how big it is, your hardware choices, or third-party vendor dependencies, OpenStack has been built so that it can't suffer from vendor lock-in. This makes it imperative that we do not stick to any specific design pattern or any vendor requirements.
The following figure shows a basic conceptual design for OpenStack deployment in a data center:
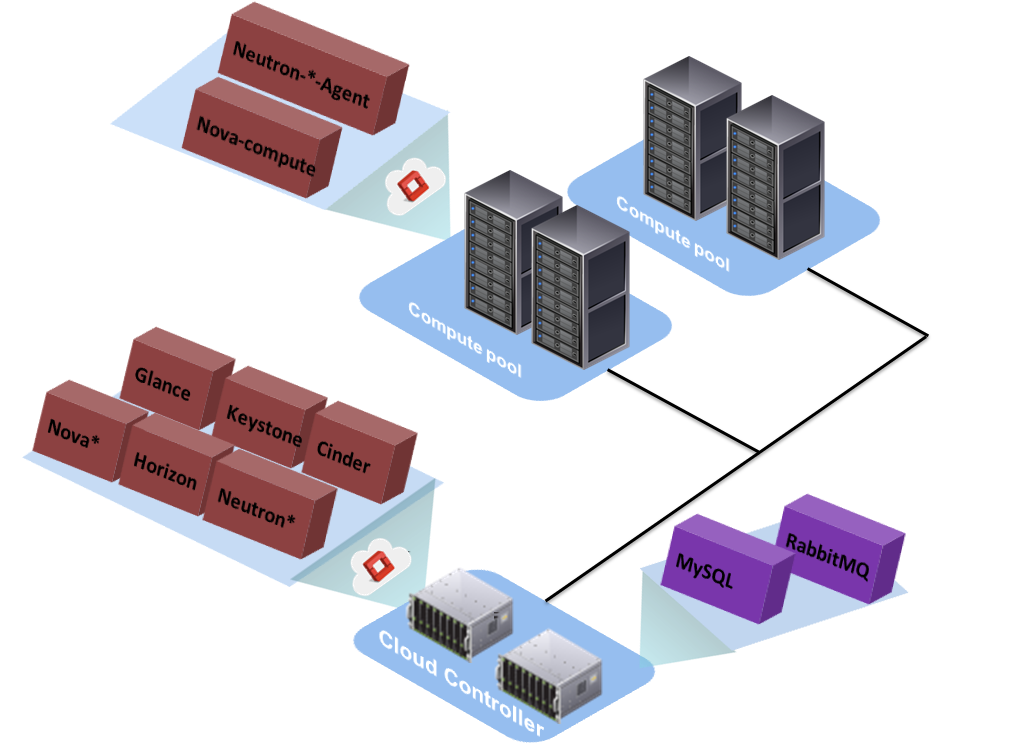
Postulating the OpenStack setup
OpenStack, as a distributed system, is designed to facilitate the designing of your private cloud. As summed up in the previous section, many components can run across different fleets of nodes. When it comes to a large infrastructure, the OpenStack setup can scale to more than one location, forming multisite environments that are geographically dispersed. In order to manage large-scale infrastructure with OpenStack, it becomes crucial to find a promising approach that makes any deployment, change, or update of the underlying infrastructure more consistent and easy to operate.
A very new and promising approach that will transform the way of managing IT infrastructures is IaC. Covering the challenges and principles of such model could fill an entire book. In the next section, we will cover how we will deploy our OpenStack environment on a large scale by adopting such an approach.
Treating OpenStack as code
The Infrastructure as Code concept provides several best practices and patterns that will help us achieve remarkable results for the portfolio of systems within an organization. Without going deeply into details of this concept, the following points show us the advantages of using IaC for our OpenStack deployment:
- It automates the deployment of all OpenStack components through dozens of nodes with less effort, time, cost, and with more reliability
- It audits the OpenStack environment with every change and update
- It defines the desired state of the OpenStack infrastructure
- The system recovers faster from failures by reproducing systems easily from unexpected changes during OpenStack deployment
- It improves the robustness of OpenStack's infrastructure
- It keeps services available and consistent
In order to take advantage of the mentioned benefits of the concept of IaC, OpenStack environment components can be transformed to a defined role. Each role describes one or more specific elements of the OpenStack infrastructure and details how they should be configured.
Such roles can be written in a configuration definition file, which is a generic term to describe a role of a service or server. Nowadays, many tools have been developed for this purpose such as Chef, Puppet, and Ansible and have a better system management experience. The continuous growth of the OpenStack ecosystem was a result of the support and dedication of several giant and medium enterprises around the globe. This interest to provide a unique cloud software solution was not limited only to the OpenStack code source but also the contribution to automate its deployment. This covers the development of ready-production artifacts to manage and operate an OpenStack environment through system management tools. That includes Chef cookbooks, Ansible playbooks, and Puppet manifests.
Growing the OpenStack infrastructure
The ultimate goal of the Infrastructure as Code approach is to improve the confidence of the systems running in production. In addition, this can be coupled with infrastructure growth. Expanding the OpenStack layout, for example, cannot be achieved without taking into account an agile approach that keeps its different components across the data center running without interruption. Moreover, adding new components or integrating a new service into the OpenStack ecosystem setup will result in a design change. New components should talk to existing ones with few new resource requirements. This challenge can be delegated to a Version Control System (VCS). Whatever changes are made, keeping the OpenStack setup self-descriptive in VCS through definition files and scripts will define the desired state of the private cloud. This avoids any process that would end up reinventing the wheel; while it needs only to expand and correlate code describing the existing OpenStack setup.
To ensure that the OpenStack infrastructure resists changes as the code that describes it grows, a very agile way must exist to emphasize system configuration changes. This can be inspired by software development practices. This enables us to apply modern software development tools to deploy and extend an OpenStack infrastructure, for example. At this stage, a DevOps movement has appeared that brings software developers and operators together to collaborate. Of course, exploiting the new modern approach and its derived practices and ideas will bring beneficial results when growing or upgrading your OpenStack private cloud environment.
The next diagram resumes a simplistic shape of a standard change management life cycle for the deployment infrastructure code of OpenStack:
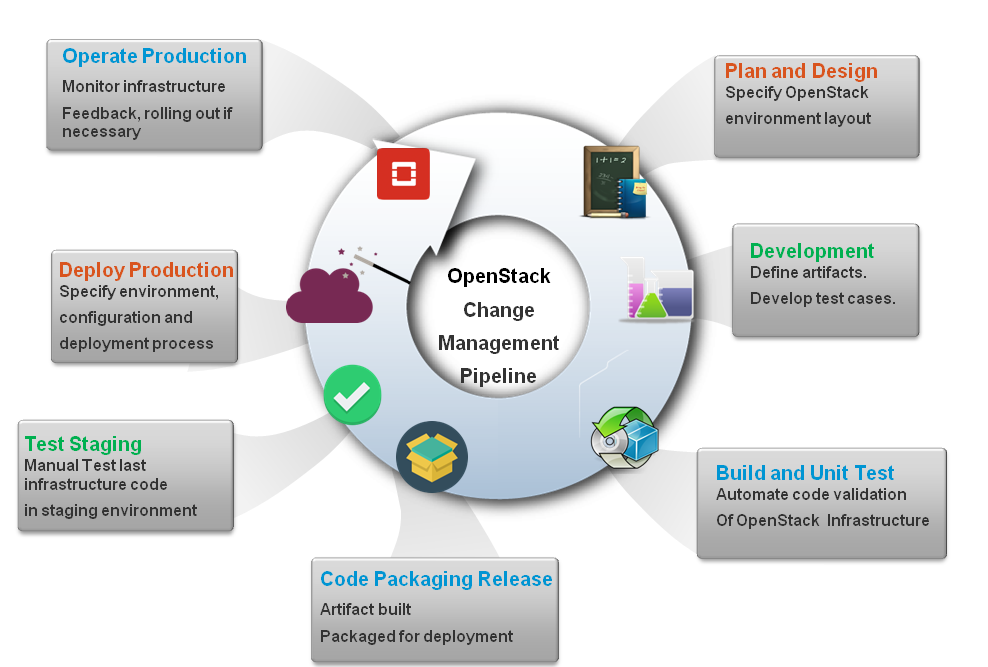
The different stages can be discussed as follows:
- Plan and design: The very early stage of planning the general layout of the OpenStack infrastructure and the related components that are willing to install, integrate, and deploy them.
- Development stage: This involves running tests for the latest versions of the infrastructure file definitions. In general, local tools, such as Vagrant and other virtualized local test environments, are used to test the changed files and commit them to a VCS.
- Build and unit test stage: Once a change is committed to VCS, a phase of code validation will be managed by a Continuous Integration (CI) system. It will run several activities or jobs by checking the syntax, code compilation, and unit tests.
- Code packaging and release: The CI tool should give a green light to process the changes. In this stage, the build has been done successfully and the configuration artifact will be packaged to be available for later phases.
- Test staging: At this stage, several tests should be executed on similar production environments. The most effective infrastructure code test runs on multiple stages. For example, you should start with a first test stage for one OpenStack service on its own. Then, you should propagate the first test with the second one by integrating other OpenStack components.
- Deploy to production: That applies in the final stage where the modeled changes that have been tested will be applied with zero downtime. Some great release techniques can be engaged at this stage, such as Blue-Green deployment.
- Operate in production: This is the very last stage where it proves the degree of consistency of the last changes in a running production environment. It should also be possible to roll the changes out quickly and easily.
Deploying OpenStack
Integrating new services, updating, or upgrading some or all of the OpenStack components are all critical operational tasks. Such moments raise the need for the usage of software engineering practices. As mentioned in the previous section, applying such practices with Infrastructure as Code will help you deliver a high-quality code infrastructure. The end result will enable you to deploy a fully automated, robust, and continuous deliverable OpenStack environment.
To tweak the installation of a complete and extensible OpenStack environment, we need to start deploying a first test environment. As was promised in the beginning of this chapter, we will use a system management tool that will help us not only to deploy our first OpenStack layout rapidly, but also to carry feedback from testing results, such as unit testing.
Chef, Puppet, SaltStack, and many other system management tools are great tools that can do the job. You will probably have used one or more of them. Ansible will be chosen for this section and the upcoming sections as the system management tool for end-to-end OpenStack deployment and management.
Ansible in a nutshell
According to the new trend of cloud infrastructure developers, every operational task must be capable of automation. Many system management tools offer automation capabilities and have been extended to cover more advanced features, such as emulating parts of a given system for a fast file definition validation. Of course, every infrastructure tool must show its capability of making an easy-to-use, realistic full test and deployment. Compared to Chef or Puppet, for example, Ansible could be reckoned to be the simplest form of IT orchestration and automation tool. This is because Ansible does not require any agent or daemon to be running on the managed host or instance. It simply needs a Secure Shell connection, and then all it needs to do is copy the Ansible modules to the managed hosts and execute them, and that is it!
By the virtue of its simplicity, agentless architecture, deploying and expanding a large OpenStack infrastructure becomes much less complicated. Ansible uses playbooks to modularize its definition configuration files written in the YAML markup format.
As with Chef or Puppet, configuration files in Ansible are organized in a specific definition layered hierarchy, as follows:
- Playbook: A Playbook can be seen as a high level code of the system deployment. The code instructs which host or group of hosts will be assigned to which role. It encapsulates a few specific parameters to enable Ansible run user as root for example.
- Role: A role represents the intended logical function of a host or group of hosts. The role file exposes tasks and customized functions to configure and deploy a service in one or a fleet of hosts.
- Module: Another good reason that proves the simplicity of Ansible is the usage of modules. Basically, a module comes with a predefined encapsulated code that is ready to run against a target host. Running a module many times against a host will take effect only when a change is explicitly made. Besides the current modules available at http://docs.ansible.com/ansible/latest/modules_by_category.html, you can always create and customize your own modules in other languages.
- Variable: Defining variables in Ansible is straightforward from Playbooks, Modules, or Roles. When dealing with OpenStack deployment, defining, and setting variable placeholders must be done with care for a safe, dynamic change of the system's attributes.
- Facts: Another interesting part of the Ansible workflow is the gathering of the facts of the target system when executing a playbook against it. The information about the system, such as network configuration, operating system, and other low-level details, will be saved in a variable named facts. By default, Ansible captures the target system details unless you explicitly disable this in the Playbook.
- Inventory: Ansible will need a list of hosts to run the coded playbooks against. This is where the inventory comes for a collection of nodes defined by their IP addresses, hostnames, or Fully Qualified Domain Name (FQDN). The inventory list is an INI formatted file named simply hosts, and is located by default in the Ansible server under the /etc/ansible/ directory. Ansible comes with two different approaches to gathering different hosts inventory. These are described as follows:
- Static inventory: This elaborates the inventory list manually in a single defined host or into groups.
- Dynamic inventory: When it comes to a large number of nodes in a production OpenStack setup, Ansible offers a better way to handle this situation. It is possible to create an inventory script collector and invoke it to pull host information at runtime.

Testing the OpenStack environment
As a result of inheriting an agile method to build a consistent production environment, we will need to start by building the basic code blocks of the OpenStack infrastructure in a separate test environment. This means that testing a new introduced feature, for example, should take place continuously. A new feature, fixed plugin version, or an updated new specific OpenStack package is considered a change. These should first be tested in a similar production environment and in an automated way. To speed up the building and extending of an OpenStack production setup, we will need a test environment.
Prerequisites for the test environment
The OpenStack test environment will involve the setup of the deployment machine, the Ansible deployment server, and the target hosts, which are the different OpenStack nodes that Ansible will run its playbooks against.
To speed up a simple installation approach, in this section, we will use a very promising OpenStack project named OpenStack-Ansible (OSA). Rackspace Private Cloud Software has initiated this project and has been officially integrated with the support of the OpenStack community. It aims to deploy an OpenStack private cloud by the means of Ansible Playbooks. OSA was released to run an OpenStack environment for production-ready deployment.
In addition, the OSA project could run in All-In-One (AIO) mode. It takes advantage of Linux containerization technology, Linux Container (LXC), so different infrastructures and OpenStack services will run isolated in different containers, but on the same machine.
Conceptually, this approach would somewhat resolve the trade-off of the time consumed for code testing, in our case playbooks, and the delivery speed of the complete suite and consistent OpenStack environment.
Setting up the Ansible environment
In this section, we will need to ensure that we have the proper hardware requirements to set up a complete development environment for testing the OpenStack infrastructure code, as the follows:
- Cloud controller:
-
- Memory: At least 3 GB RAM
- Processor: At least 2 CPUs 64-bit x86
- Disk space: At least 30 GB free disk space
- Network: At least 2 NICs
- Compute node:
- Memory: At least 4 GB RAM
- Processor: At least 4 CPUs 64-bit x86
- Disk space: At least 40 GB free disk space
- Network: At least 2 NICs
- Ansible deployment host:
- Memory: At least 1 GB RAM
- Processor: At least 1 CPUs 64-bit x86
- Disk space: At least 10 GB free disk space
- Network: At least 1 NIC
OSA also requires the following software versions for all machines:
- Ubuntu LTS 14.04 LTS or later
- Linux kernel version 3.10.0.34—generic or later
- Python support 2.7 or later
- Network Time Protocol client installed
- Secure Shell server and client for Ansible to run
Another key testing tool for a successful automated test is the usage of virtualization technology. Instead of running the OSA installation in a bare metal machine, we can install any hypervisor on top of it and be able to harness more tests in an isolated environment. For this purpose, we will use VirtualBox to create the required virtual machines and couple it with Vagrant to build a reproducible development environment.
Setting up all the required networks in our test environment might be confusing. To mimic a real production setup, many virtual network interfaces should exist per virtual machine.
For the sake of simplicity, we will use two network interfaces per cloud controller and compute node as physical interfaces as follows:
- eth0: This is connected to LXC internal virtual network. It is dedicated to Ansible deployment and to SSH to the containers per each virtual machine. It also allows you to download packages from the internet.
- eth1: This enables internal communication between different OpenStack components, including compute, networking, and infrastructure services.

Make sure you enable internal communication for each virtual machine by setting each adapter device in VirtualBox to Allow All, as follows:

The next section will guide us through a complete setup of our test environment using Ansible.
Running the OSA installation
The next wizard will guide you through a simple OpenStack setup in a local virtualized environment. As described in the previous section, we will distribute different service roles for each virtual machine. Note that a test environment should reflect a logical design of a proper production setup. In this example, several services have been encapsulated into a single node while this approach should be refined more. As a start, and for the sake of simplicity, the common services of OpenStack and the infrastructure will be distributed as follows:
- Cloud controller: This will run most of the OpenStack services, including computing services (excluding the hypervisor computing service, nova-compute), object and block storage, image, identity, dashboard, and network services. In addition, common shared infrastructure services will be installed in the same host, including database, message queueing, and load balancing services.
- Compute node: It will simply run the compute service nova-compute and network agents.
- Ansible deployment host: This will store the OSA playbook's repository and Ansible daemons.

Automating the operating system installation saves a lot of time, and eventually, the usage of Vagrant empowers the automation of tests. When getting more involved in extending the code of the OpenStack infrastructure, automating tests using local virtualized infrastructure might catch problems quickly. For the rest of the setup, we will rely on the Vagrant file that defines the nodes in our OpenStack environment. Let's start by defining the Ansible Deployment Host.
To start with, create a new Vagrant file named Vagrantfile:
Vagrant.configure(2) do |config|
  config.vm.box = "ubuntu/trusty64"
First, we define the operating system version that will be used for the whole deployment test environment. As we discussed previously, the Linux flavor selected for OSA is Ubuntu.
The next chunk of the Vagrant file defines the Ansible Deployment host that is assigned as a adh variable as well as the hostname:
# Ansible Deployment Host
config.vm.define :adh do |adh|
  adh.vm.hostname= "adh"
  adh.vm.provider "virtualbox" do |vb|
          vb.customize ["modifyvm", :id, "--memory", "1024"]
          vb.customize ["modifyvm", :id, "--cpus", "2"]
          vb.customize ["modifyvm", :id, "--nicpromic2", "allow-all"]
      end
end
The next section of the Vagrant file will define the Cloud Controller node name, its customized resources, and network setup:
# Cloud Controller Host
config.vm.define :cc do |cc|
  cc.vm.hostname= "cc"
  cc.vm.provider "virtualbox" do |vb|
          vb.customize ["modifyvm", :id, "--memory", "3072"]
          vb.customize ["modifyvm", :id, "--cpus", "3"]
             vb.customize ["modifyvm", :id, "--nicpromic2", "allow-all"]
      end
end
The last part of the Vagrant file defines the Compute Node name, its customized resources, and network setup:
# Compute Node
config.vm.define :cn do |cn|
  cn.vm.hostname= "cn"
  cn.vm.provider "virtualbox" do |vb|
          vb.customize ["modifyvm", :id, "--memory", "4096"]
          vb.customize ["modifyvm", :id, "--cpus", "4"]
             vb.customize ["modifyvm", :id, "--nicpromic2", "allow-all"]
      end
end
end
It is recommended to run the Vagrant file part by part. This will help us diagnose any configuration issue or syntax error during the vagrant run. To do this, it is possible to comment the Cloud Controller and Compute Node code blocks in the Vagrant file:
- We can start by running the first Ansible Deployment Host block and running the following command line:
# vagrant up
This will download the Ubuntu image and create a new virtual machine named adh.
- The first virtual machine should be up and running with the Ubuntu image installed:
# vagrant ssh
- Next step requires you to download and install the required utilities as mentioned in the previous section, including the Git, NTP, and SSH packages as follows:
ubuntu@adh: $ sudo apt-get install aptitude build-essential git ntp ntpdate openssh-server python-dev sudo
- We will use the latest stable master branch of the OSA repository:
ubuntu@adh: $ git clone
https://github.com/openstack/openstack-ansible.git /opt/openstack-ansible
$ git clone -b stable/OS_RELEASE
https://github.com/openstack/openstack-ansible.git /opt/openstackansible where OS_RELEASE refers to the OpenStack release name. Please note that openstack-ansible repository does not include all the previous OpenStack releases and keeps at maximum the four latest releases.
- A file located at /etc/openstack_deploy/openstack_user_config.yml will need to tweak it a bit in order to reflect the customized environment setup described previously. We will need to specify the network IP ranges and nodes that will be running services attached to their interfaces:
- First, specify that CIDRs will be used for our OpenStack test environment:
---
cidr_networks:
  management: 172.16.0.0/16
  tunnel: 172.29.240.0/22

used_ips:
  - 172.16.0.101,172.16.0.107
  - 172.29.240.101,172.29.240.107
-
- We can add a new section to specify where the common infrastructure services, such as the database and messaging queue, will be running. For the sake of simplicity, they will run on the same Cloud Controller node, as follows:
# Shared infrastructure parts
shared-infra_hosts:
  controller-01:
    ip: 172.16.0.101
-
- The next part will instruct Ansible to run the rest of the OpenStack services and APIs in the Cloud Controller machine as follows:
# OpenStack infrastructure parts
os-infra_hosts:
  controller-01:
    ip: 172.16.0.101
-
- Optionally, network and storage services can run on the same Cloud Controller node as follows:
# OpenStack Storage infrastructure parts
storage-infra_hosts:
  controller-01:
    ip: 172.16.0.101
# OpenStack Network Hosts
network_hosts:
  controller-01:
    ip: 172.16.0.101
-
- Add the following section to instruct Ansible to use the Compute Node to run the nova-compute service:
# Compute Hosts
compute_hosts:
  compute-01:
    ip: 172.16.0.104
-
- The last part of our initial configuration setup for the test environment will include specifying where to wrap the OpenStack cluster behind the load balancer. For this purpose, HAProxy will be used and installed in the Cloud Controller node, as follows:
haproxy_hosts:
  haproxy:
    ip: 172.16.0.101
- Next, we can edit another simple file that describes specific OpenStack configuration options located at /et/openstack_deploy/user_variables.yml. For now, we will need to configure Nova to use qemu as a virtualization type. We can also adjust the allocation ratio for both RAM and CPU, as follows:
--------
## Nova options
nova_virt_type: qemu
nova_cpu_allocation_ratio: 2.0
nova_ram_allocation_ratio: 1.0
--------
- The final configuration file that we need to edit is /etc/openstack-deploy/user_secrets.yml. This is where root users passphrases for services such as database and compute will be stored once they are created in Keystone. The following script will enable us to generate a random passphrase and store for later use in future setup:
# scripts/pw-token-gen.py --file /etc/openstack-deploy/user_secrets.yml

- Now we have our development machine in place with the required preconfigured files. We can continue running the rest of the vagrant file to prepare the Cloud Controller and Compute Node hosts. To do this, uncomment the Cloud Controller and Compute Node and run the following command line:
# vagrant up
- The OSA exposes a bootstrap script that allows you to download the right version of Ansible and generate a wrapper openstack-ansible script that will load the OpenStack user variable:
# scripts/bootstrap-ansible.sh

- Once completed successfully, the openstack-ansible script will be used to run the playbooks. The first run will install and configure the containers in the mentioned nodes described in /etc/openstack_deploy/openstack_user_config.yml. The first playbook will be running is setup-hosts.yml, located under /opt/deploy-openstack/playbooks:
# openstack-ansible setup-hosts.yml
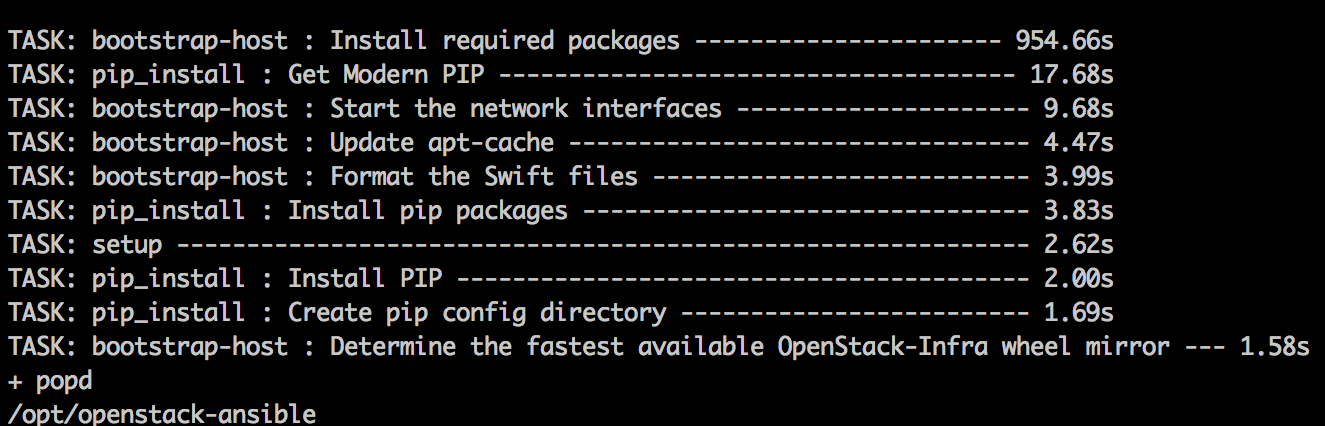
This will identify the target hosts, validate network configurations, and create loopback volumes for use per LXC container.
- The next playbook run should instruct Ansible to install HAProxy in the Cloud Controller node by running haproxy-install.yml:
# openstack-ansible haproxy-install.sh
- If the previous step has been completed with no failure, it means that Ansible did not face any connectivity issue to reach the nodes. Then, we can easily proceed to run the next playbook that will configure LXC containers to install common OpenStack services, such as database and messaging queue services. By default, Galera and RabbitMQ will be installed. OSA provides a playbook named setup-infrastructure.yml to make this happen, as follows:
# openstack-ansible setup-infratructure.yml
- The next step will configure LXC containers and install the OpenStack core services across the Cloud Controller and Compute Node as follows. The playbook to run is named setup-openstack.yml:
# openstack-ansible setup-openstack.yml
- Once completed, it is possible to list all the service containers using the following command line from the Ansible Deployment Host:
# lxc-ls --fancy

- From the previous output, identify the container prefixed as utility_container-XXX. This is a particular container that includes the OpenStack client command lines. Use the lxc-attach tool to connect the Cloud Controller utility container as follows:
 # lxc-attach --name cc_utility_container-55723a11
----
* Documentation: https://help.ubuntu.com/
Last login: Mon Sep 12 22:56:33 2016 from 172.29.236.100
root@utility-container-55723a11:~#
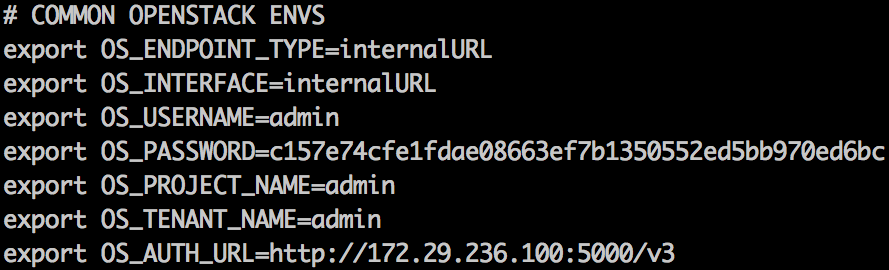
- Now propagate the OpenStack credentials in the environment and also use the generated username/password for admin to access the Horizon dashboard:
root@utility-container-55723a11:~# cat openrc
root@utility-container-55723a11:~# source openrc
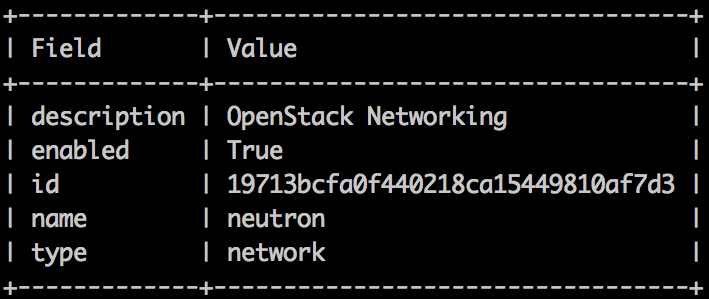
- Run a test OpenStack API query to check the availability of services. For example, we can check the status of the network service as follows:
root@utility-container-55723a11:~# openstack service show neutron
- Another setup validation of our test environment is to check the type of virtualization that has been configured in the compute container. To do so, point to the nova-api-os-compute-container-XXXX container and check the libvirt stanza in the /etc/nova/nova.conf file:
[libvirt]
....
use_virtio_for_bridges = True
cpu_mode = host-model
  virt_type = qemu
....
- You can always connect to the OpenStack dashboard by pointing the browser to the Cloud Controller's exposed IP address. The username and password reside in the environment file openrc:

# lxc-stop --name <container-name>
To completely destroy a container, use the following command line:
# lxc-destroy --name <container-name>, this will destroy a container.
Production OpenStack environment
Before starting to deploy our infrastructure code in the production environment, several important points must be considered:
- The infrastructure code should be fully tested in both test and staging (preproduction) environments.
- Any new service that will extend the OpenStack layout should go through a change management pipeline.
- Make sure that the base production setup is 100% consistent. Fragile components should not exist
- The OpenStack services production setup should be seen as Ansible modules. When you are adding a new module for further service extension, it should be designed integrally and tested independently.
- Design for failure. OpenStack is well architected to keep its components highly available.
In this section, we will go through a sample production layout. The first deployment will bring the basic OpenStack services up and running. Bear in mind that the first design layout should be extensible and managed from the system management tool.
The sample diagram layout shown in the first section of this chapter can be extended, and eventually more services can be forked across different nodes.
As the OpenStack production environment must provide redundancy and service extensibility, Ansible Playbooks have been designed for that purpose.
The following diagram illustrates an extended layout of the production environment, which defines the following hosts:

- Cloud Controllers: These running the following OpenStack management services:
- Keystone-* APIs
- Glance-* APIs
- Nova-* APIs
- Cinder-* APIs
- Neutron-server
- Swift proxy
- Horizon
Optionally, the cloud controller could run a common service infrastructure as follows:
-
- RabbitMQ
- MySQL Galera database
- Compute Nodes: These run the following hypervisor machines:
- Nova-compute
- Neutron--plugin-agent
- Logging host: Logs generated by OpenStack services need to be shipped and filtered for fast troubleshooting tasks. Log host will run a full logging stack including the following:
- ElasticSearch
- Logstash
- Rsyslog
- Kibana
- Network node(s): This will run the following Neutron agents:
- L2 agent
- L3 agent
- DHCP agent
- Block storage node(s): This will host block storage volumes, along with installed LVM, and run the following OpenStack services:
- Cinder-volume
- Cinder-scheduler
- Object storage node(s): Optionally, a dedicated storage blob device can run the following object storage service:
- Swift-* API
- Load balancer node(s): This runs the following services:
- HAProxy
- Keepalived
- Deployment host: This will run the following services:
- Ansible service and repository
- Razor PXE boot server
From a network perspective, a production setup might differ slightly from a staging environment because of the network device's high cost. On the other hand, it is essential to design an OpenStack production setup that is as close to this ideal as possible, in a pre production environment even if you have to consolidate different networks in the same logical interface. For this reason, designing a network layout differs depending on the cost and performance of the hardware devices that can be used. The previous diagram depicts a network layout suitable to support and integrate new OpenStack services. It would be easy to extend it at scale.
The different network segments are as follows:
- Administrative network: Dedicated network to run Ansible and PXE boot installer.
- VM internal network: This is a private network between virtual machines and the L3 network, providing routing to the external network and floating IPs backward to the virtual machines.
- Management network: This consists of OpenStack services communication, including infrastructure services, such as databases queries and queue messaging traffic.
- Storage network: This isolates storage traffic using a virtual LAN through switch for both block and object storage clusters.
- External network: This faces the public internet, providing external connectivity to instances. It exposes virtual IPs for load balancers used to connect internal OpenStack services APIs.
At this level, a successful run of the playbooks will be achieved when the following criteria are met:
- A network is configured correctly
- Target machines are reachable by Ansible
- Required packages are installed per target host
- The /etc/openstack_deploy/openstack_user_config.yml file will just need to be adjusted based on the networking IP configuration. The basic physical environment parameters that will be customized are as follows:
- cidr_networks
- management
- tunnel
- storage
- used_ips
- global_overrides: internal_lb_vip_address and external_lb_vip_address
- shared-infra_hosts
- os-infra_hosts
- storage-infra-hosts
- identity_hosts
- compute_hosts
- storage_hosts
- network_hosts
- repo-infra_hosts
- log_hosts
- haproxy_hosts
- cidr_networks
In addition, the /etc/openstack_deploy/user_variables.yml file can be adjusted to use kvm as a virtualization type for the Compute Nodes. The previous layout can be extended more with additional components using Ansible playbooks.
Summary
In this chapter, we briefly introduced the use case of adopting the IaC approach in our OpenStack private cloud deployment. At a very high level, we covered some important topics regarding the new trend of approaching a robust private cloud environment in no time. For this purpose, we started by designing a sample layout from the basic building blocks of OpenStack. We also introduced Ansible as our automation and system management tool for OpenStack. Of course, Chef, Puppet, or Salt are capable of automating such an installation, so feel free to use any software you feel more familiar with. Using Ansible, we took advantage of Ansible-OpenStack playbooks, which we were able to use rapidly to provision a minimal OpenStack environment in simple LXC containers. Finally, we set the first design blocks of our production environment.
In the first chapter, you should have learned a key topic about how you drive your private OpenStack cloud environment to be treated as code. Bear in mind that this approach will open the curtains for your private cloud to add more functionalities and features without the pain of manual configuration or service downtime. The journey will continue to extend what we designed and enlarge the computing power of the current environment, which will be covered in the next chapter.