Search icon CANCEL
Subscription
0
Cart icon
Your Cart (0 item)
Close icon
You have no products in your basket yet
Save more on your purchases! discount-offer-chevron-icon
Savings automatically calculated. No voucher code required.
Arrow left icon
Explore Products
Best Sellers
New Releases
Books
Videos
Audiobooks
Learning Hub
Newsletter Hub
Free Learning
Arrow right icon
timer SALE ENDS IN
0 Days
:
00 Hours
:
00 Minutes
:
00 Seconds
Arrow up icon
GO TO TOP
Learn Robotics Programming

You're reading from   Learn Robotics Programming Build and control cutting-edge AI robots with Raspberry Pi and Python

Arrow left icon
Product type Paperback
Published in Dec 2025
Publisher Packt
ISBN-13 9781803246987
Length 566 pages
Edition 3rd Edition
Languages
Concepts
Arrow right icon
Author (1):
Arrow left icon
Danny Staple Danny Staple
Author Profile Icon Danny Staple
Danny Staple
Arrow right icon
View More author details
Toc

Table of Contents (9) Chapters Close

Learn Robotics Programming, Third Edition: Build and control cutting-edge AI robots with Raspberry Pi and Python
1 Introduction to Robotics FREE CHAPTER 2 Exploring Robot Building Blocks – Code and Electronics 3 Preparing a Headless Raspberry Pi for a Robot 4 Protecting Robot Code with Git 5 Building Robot Basics – Wheels, Power, and Wiring 6 Drive and Turn – Moving Motors with MQTT and Python 7 Driving the Robot with a Phone and Python 8 Programming Distance Sensors with Python

Connecting independent power

We are powering this robot from a single large USB power bank. We will strap this into the lower chassis plate, and wire it into the Raspberry Pi.For this step, you will need:

  • The robot from the previous steps
  • The Nanowave 3 5000 mAh USB C & A power bank
  • The USB cable that came with the power bank
  • Velcro ties

See the following image for strapping this into the robot:

Figure 5.17 – Attaching the battery

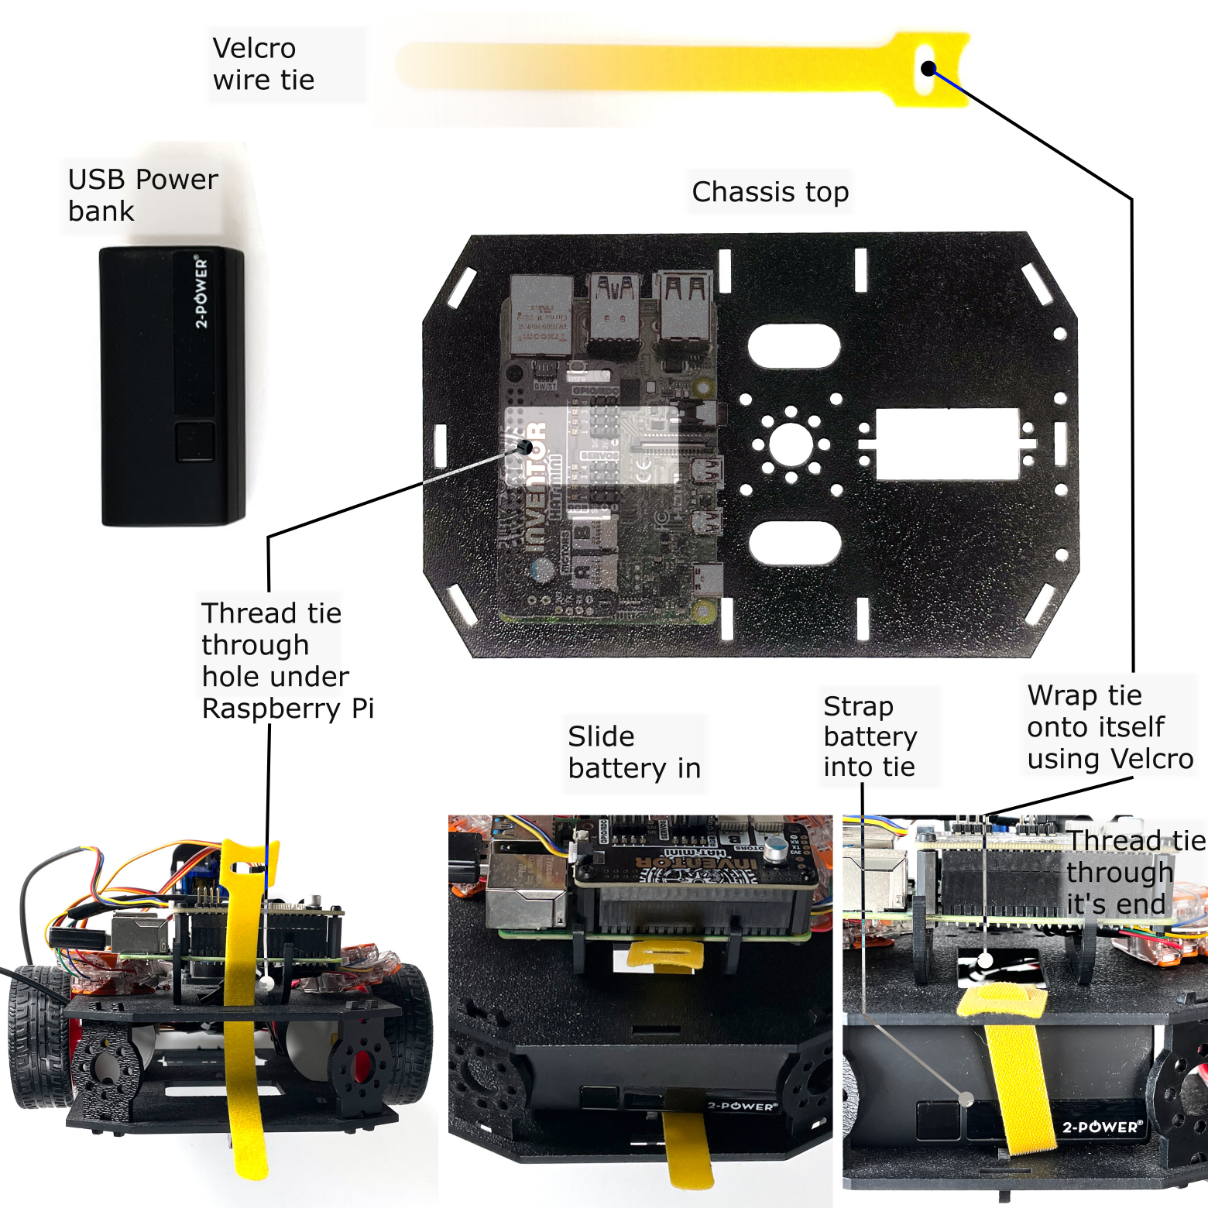
The preceding images show how to attach the battery. The initial image shows the velcro tie next to a top chassis plate, with the Raspberry Pi shaded out so the slots can be seen underneath. You will do this on the plate already in situ.Thread the large end of the tie up through the slot beneath the Raspberry Pi, then slide the battery underneath. Wrap the tie around the battery and pull it tight. Position the battery so that the button and lights face the rear of the robot, making them visible from the outside. You can then add the USB cable...

lock icon The rest of the chapter is locked
Visually different images
CONTINUE READING
83
Tech Concepts
36
Programming languages
73
Tech Tools
Icon Unlimited access to the largest independent learning library in tech of over 8,000 expert-authored tech books and videos.
Icon Innovative learning tools, including AI book assistants, code context explainers, and text-to-speech.
Icon 50+ new titles added per month and exclusive early access to books as they are being written.
Learn Robotics Programming
Register for a free Packt account to unlock a world of extra content!
A free Packt account unlocks extra newsletters, articles, discounted offers, and much more. Start advancing your knowledge today.
Unlock this book and the full library FREE for 7 days
Get unlimited access to 7000+ expert-authored eBooks and videos courses covering every tech area you can think of
Renews at $19.99/month. Cancel anytime
Modal Close icon
Modal Close icon