


Creating an Amazon Redshift Serverless cluster using AWS CloudFormation
With an AWS CloudFormation template, you treat your infrastructure as code. This enables you to create the Amazon Redshift cluster using json/yaml file. The declarative code in the file contains the steps to create the AWS resources, and enables easy automation and distribution. This template allows you to standardize the Amazon Redshift creation to meet your organizational infrastructure and security standards. Further, you can distribute them to different teams within your organization using the AWS service catalog for an easy setup. In this recipe, you will learn how to use CloudFormation template to deploy an Amazon Redshift Serverless cluster and the different parameters associated with it.
Getting ready
To complete this recipe, you will need:
- An IAM user with access to AWS CloudFormation, Amazon EC2, and Amazon Redshift
How to do it…
We use a CloudFormation template to create the Amazon Redshift Serverless infrastructure as code using a JSON-based template. Follow these steps to create the Amazon Redshift using the Cloud Formation template:
- Download the AWS CloudFormation template from here: https://github.com/PacktPublishing/Amazon-Redshift-Cookbook-2E/blob/main/Chapter01/Create_Amazon_Redshift_Serverless.yaml.
- Navigate to the AWS Console, choose CloudFormation, and choose Create stack. Click on the Template is ready and Upload a template file options, choose the downloaded
Creating_Amazon_Redshift_Serverless.yamlfile from your local computer, and click Next.
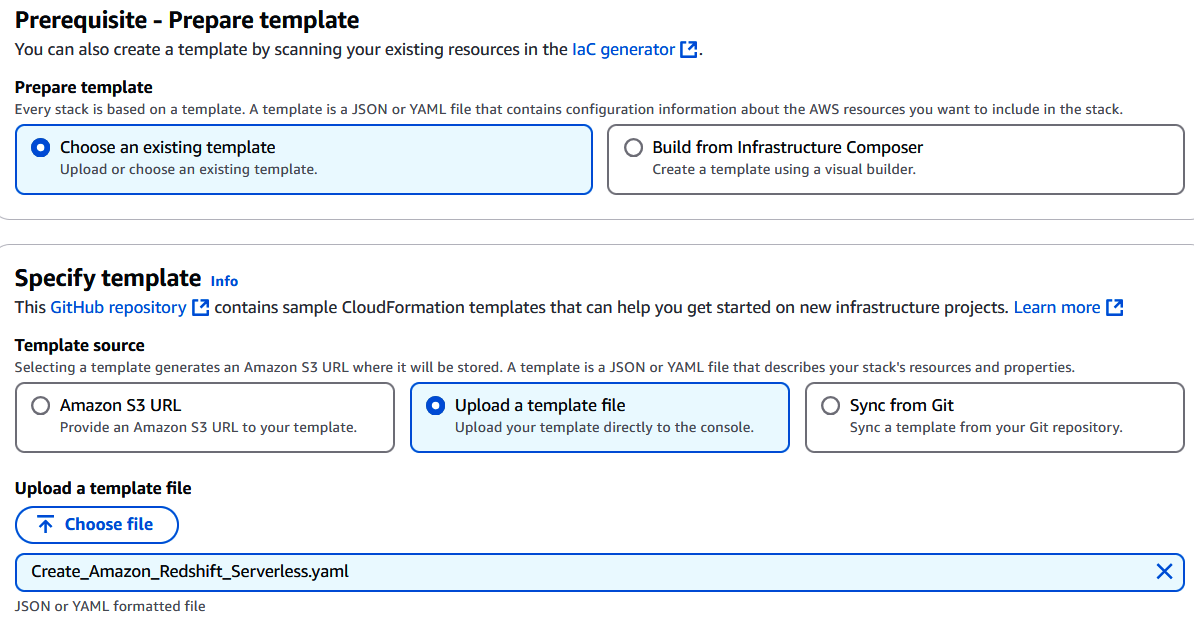
Figure 1.5 – Choose the CloudFormation template file
- Choose the following input parameters:
- Stack name: Enter a name for the stack, for example,
myredshiftserverless. - NamespaceName: Enter a name for namespace, which is a collection of database objects and users.
- WorkgroupName: Enter a name for the workgroup, which is a collection of compute resources.
- BaseRPU: The base RPU for Redshift Serverless Workgroup ranges from 8 to 1024. The default is 8.
- DatabaseName: Enter a database name, for example,
dev. - AdminUsername: Enter an admin username, for example,
awsuser. - AdminPassword: Enter an admin user password. The password must be 8-64 characters long and must contain at least one uppercase letter, one lowercase letter, and one number. It can include any printable ASCII character except
/,"", and@.The default isAwsuser123.
- Stack name: Enter a name for the stack, for example,
- Click Next and Create Stack.
AWS CloudFormation has deployed all the infrastructure and configuration listed in the template in completed and we’ll wait till the status changes to CREATE_COMPLETE.
How it works…
Let’s now see how this CloudFormation template works. The CloudFormation template is organized into three broad sections: input parameters, resources, and outputs. Let’s discuss them one by one.
The parameters section is used to allow user input choices and also can be used to apply constraints against its value. To create the Amazon Redshift Serverless cluster, we collect parameters such as namespace name, workgroup name, base RPU, database name, and admin username/ password. The parameters will later be substituted when creating the resources. Here is the Parameters section from the template:
Parameters:
  NamespaceName:
    Description: The name for namespace, which is a collection of database objects and users
    Type: String
  WorkgroupName:
    Description: The name for workgroup, which is a collection of compute resources
    Type: String
  BaseRPU:
    Description: Base RPU for Redshift Serverless Workgroup.
    Type: Number
    MinValue: '8'
    MaxValue: '1024'
    Default: '8'
    AllowedValues:
      - 8
      - 512
      - 1024
  DatabaseName:
    Description: The name of the first database to be created in the serverless data warehouse
    Type: String
    Default: dev
    AllowedPattern: ([a-z]|[0-9])+
  AdminUsername:
    Description: The user name that is associated with the admin user account for the serverless data warehouse
    Type: String
    Default: awsuser
    AllowedPattern: ([a-z])([a-z]|[0-9])*
  AdminPassword:
    Description: The password that is associated with the admin user account for the serverless data warehouse. Default is Awsuser123
    Type: String
    Default: Awsuser123
    NoEcho: 'true'
    MinLength: '8'
    MaxLength: '64'
    AllowedPattern: ^(?=.*[a-z])(?=.*[A-Z])(?=.*\d)[^\x00-\x20\x22\x27\x2f\x40\x5c\x7f-\uffff]+
In the above input section, DatabaseName is a string value that defaults to dev and also enforces an alphanumeric validation when specified using the condition check of AllowedPattern: ([a-z]|[0-9])+. Similarly, BaseRPU is defaulted to 8 and allows the valid BaseRPU from a list of values.
The Resources section contains a list of resource objects and the Amazon Serverless namespace is invoked using AWS::RedshiftServerless::Namespace along with references to input parameters such as NamespaceName, DbName, AdminUsername, and AdminPassword. The Amazon Serverless Workgroup is invoked using AWS::RedshiftServerless::Workgroup along with references to input parameters such as NamespaceName, WorkgroupName, BaseCapacity, and PublicAccessible:
Resources:
  Namespace:
    Type: AWS::RedshiftServerless::Namespace
    Properties:
      NamespaceName: !Ref NamespaceName
      AdminUsername: !Ref AdminUsername
      AdminUserPassword: !Ref AdminPassword
      DbName: !Ref DatabaseName
  Workgroup:
    Type: AWS::RedshiftServerless::Workgroup
    Properties:
      NamespaceName: !Ref NamespaceName
      WorkgroupName: !Ref WorkgroupName
      BaseCapacity: !Ref BaseRPU
      PubliclyAccessible: false
    DependsOn:
      - Namespace
The Resources section references the input section for values such as NamespaceName, WorkgroupName, BaseRPU, and DatabaseName that will be used when the resource is created.
The Outputs section is a handy way to capture the essential information about your resources or input parameters that you want to have available after the stack is created so you can easily identify the resource object names that are created. For example, you can capture output such as RedshiftServerlessEndpoint that will be used to connect into the cluster as follows:
Outputs:
RedshiftServerlessEndpoint:
    Description: Redshift Serverless endpoint
    Value:
      Fn::Join:
        - ':'
        - - Fn::GetAtt Workgroup.Endpoint.Address
          - "5439"
When authoring the template from scratch, you can take advantage of the AWS Application Composer – an integrated development environment for authoring and validating code. Once the template is ready, you can launch the resources by creating a stack (collection of resources), using the AWS CloudFormation console, API, or AWS CLI. You can also update or delete it afterward.


