


Using custom rows in a list
The number of lines of code required to display items in a List view row could vary from one to several lines of code. Repeating the code several times or in several places increases the chance of an error occurring and potentially becomes very cumbersome to maintain. One change would require updating the code in several different locations or files.
A custom list row can be used to solve this problem. This custom row can be written once and used in several places, thereby improving maintainability and encouraging reuse.
Let's find out how to create custom list rows.
Getting ready
Let's start by creating a new SwiftUI app named CustomRows.
How to do it…
We will reorganize the code in our static lists to make it more modular. We'll create a separate file to hold the WeatherInfo struct, a separate SwiftUI file for the custom view, WeatherRow, and finally, we'll implement the components in the ContentView.swift file. The steps are as follows:
- Create a new Swift file called
WeatherInfoby going to File | New | File | Swift File (or by using the Command ( ) + N keys).
 - Create a
WeatherInfostruct within the newly created file:struct WeatherInfo: Identifiable { var id = UUID() var image: String var temp: Int var city: String } - Also, add a
weatherDatavariable that holds an array ofWeatherInfo:let weatherData: [WeatherInfo] = [ WeatherInfo(image: "snow", temp: 5, city:"New York"), WeatherInfo(image: "cloud", temp:5, city:"Kansas City"), WeatherInfo(image: "sun.max", temp: 80, city:"San Francisco"), WeatherInfo(image: "snow", temp: 5, city:"Chicago"), WeatherInfo(image: "cloud.rain", temp: 49, city:"Washington DC"), WeatherInfo(image: "cloud.heavyrain", temp: 60, city:"Seattle"), WeatherInfo(image: "sun.min", temp: 75, city:"Baltimore"), WeatherInfo(image: "sun.dust", temp: 65, city:"Austin"), WeatherInfo(image: "sunset", temp: 78, city:"Houston"), WeatherInfo(image: "moon", temp: 80, city:"Boston"), WeatherInfo(image: "moon.circle", temp: 45, city:"denver"), WeatherInfo(image: "cloud.snow", temp: 8, city:"Philadelphia"), WeatherInfo(image: "cloud.hail", temp: 5, city:"Memphis"), WeatherInfo(image: "cloud.sleet", temp:5, city:"Nashville"), WeatherInfo(image: "sun.max", temp: 80, city:"San Francisco"), WeatherInfo(image: "cloud.sun", temp: 5, city:"Atlanta"), WeatherInfo(image: "wind", temp: 88, city:"Las Vegas"), WeatherInfo(image: "cloud.rain", temp: 60, city:"Phoenix"), ]
- Create a new SwiftUI file by selecting File | New | File | SwiftUI View from the Xcode menu or by using the Command () + N key combination. Name the file
WeatherRow. - Add the following weather row design to our new SwiftUI view:
struct WeatherRow: View { var weather: WeatherInfo var body: some View { HStack { Image(systemName: weather.image) .frame(width: 50, alignment: .leading) Text("\(weather.temp)°F") .frame(width: 80, alignment: .leading) Text(weather.city) } .font(.system(size: 25)) .padding() } } - To preview or update the row design, add a sample
WeatherInfoinstance to theWeatherRow_Previewsfunction:struct WeatherRow_Previews: PreviewProvider { static var previews: some View { WeatherRow(weather: WeatherInfo(image: "snow", temp: 5, city:"New York")) } }The resulting
WeatherRow.swiftcanvas preview should look as follows:
Figure 2.3 – WeatherRow row preview
- Open the
ContentView.swiftfile and create a list to display data using theWeatherRowcomponent:struct ContentView: View { var body: some View { List{ ForEach(weatherData){weather in WeatherRow(weather: weather) } } } }The resulting canvas preview should look as follows:
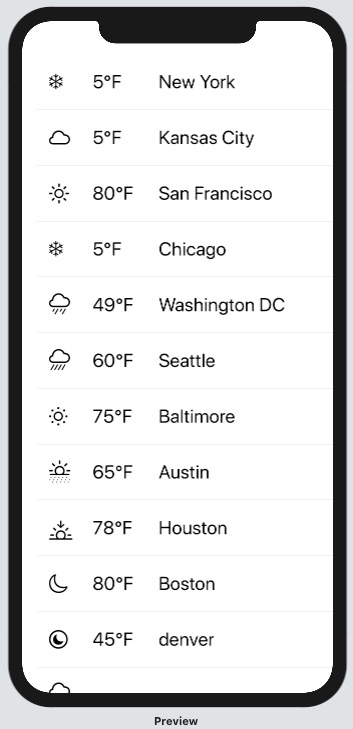
Figure 2.4 – CustomRow App preview
Run the app on a device or run a live preview to scroll through and test the app's functionality.
How it works…
WeatherInfo.swift is the model file containing a blueprint of what we want each instance of our weatherInfo struct to contain. We also instantiated an array of the WeatherInfo struct, weatherData, that can be used in other parts of the project previewing and testing areas as we build.
The WeatherRow SwiftUI file is our focus for this recipe. By using this file, we can extract the design of a list row into a separate file and reuse the design in other sections of our project. We added a weather property to our WeatherRow that will hold the WeatherInfo arguments that are passed to our WeatherRow view.
As in the previous recipe, we want the content of each row to be displayed horizontally next to each other, so we enclosed the components related to our weather variable in an HStack.
Important Note
The weatherData array is only necessary during development and should be removed before deployment if such data is obtained at runtime through API calls.


