


Building console apps and managing multiple projects in a solution
The goal of this section is to showcase how to build a console app using Visual Studio.
If you do not have a Windows computer or want to use VS Code, then you can skip this section, since the code will be the same; just the tooling experience is different. However, I recommend that you review this section because it does explain some of the code and how top-level programs work, and that information applies to all code editors.
This section is also available in the GitHub repository (so it can be updated after publishing if needed) at the following link:
https://github.com/markjprice/cs14net10/blob/main/docs/code-editors/vs.md.
If you do not have a Windows computer, or you do not want to use Visual Studio, then you can read similar instructions for using VS Code or Rider. They are available in the GitHub repository at the following links:
https://github.com/markjprice/cs14net10/blob/main/docs/code-editors/vscode.md and
https://github.com/markjprice/cs14net10/blob/main/docs/code-editors/rider.md.
Building .NET projects using Visual Studio
Let’s get started creating a new .NET project and then writing code using Visual Studio:
- Start Visual Studio.
- In the Create a new project dialog, select the C# language to filter the project templates, enter
consolein the Search for templates box, and then select Console App.
Make sure that you have chosen the cross-platform project template, not the one for .NET Framework, which is Windows-only, and the C# project template rather than another language, such as Visual Basic or TypeScript.
- Click Next.
- In the Configure your new project dialog, enter
HelloCSfor the project name,C:\cs14net10for the location, andChapter01for the solution name.
Screenshots of Visual Studio when creating new projects can be found in the GitHub repository at the following link: https://github.com/markjprice/cs14net10/blob/main/docs/ch01-project-options.md.
- Click Next.
- In the Additional information dialog, in the Framework drop-down list, note that your .NET SDK choices indicate if that version is Standard Term Support, Long Term Support, Preview, or Out of support, and then select .NET 10.0 (Long Term Support).
You can install as many .NET SDK versions as you like. If you are missing a .NET SDK version, then you can install it from the following link: https://dotnet.microsoft.com/en-us/download/dotnet.
- Leave the checkboxes labeled Enable container support, Do not use top-level statements, and Enable native AOT publish cleared. (You will learn about these other options later in this and other chapters.)
- Click Create.
- If you cannot see Solution Explorer, then navigate to View | Solution Explorer.
- If code is not shown, then in Solution Explorer, double-click the file named
Program.csto open it, and note that Solution Explorer shows the HelloCS project, as shown in Figure 1.6:
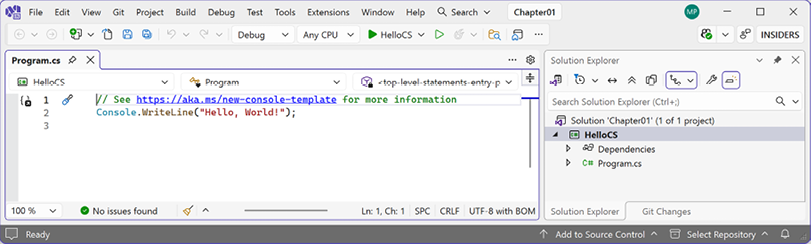
Figure 1.6: Editing Program.cs in Visual Studio
- In
Program.cs, note that the code consists of only a comment and a single statement, as shown in the following code:// See https://aka.ms/new-console-template for more information Console.WriteLine("Hello, World!");
This template uses the top-level program feature introduced in C# 9, which I will explain later in this chapter. As the comment in the code says, you can read more about this template at the following link: https://aka.ms/new-console-template.
- In
Program.cs, modify line 2 so that the text that is being written to the console saysHello, C#!.All code examples and commands that you must review or type are shown in plain text, so you will never have to read code or commands from a screenshot, like in Figure 1.6, which might be too small or too faint in print.
Compiling and running code using Visual Studio
The next task is to compile and run the code:
- In Visual Studio, navigate to Debug | Start Without Debugging.
- The output in the console window will show the result of running your application, as shown in Figure 1.7:
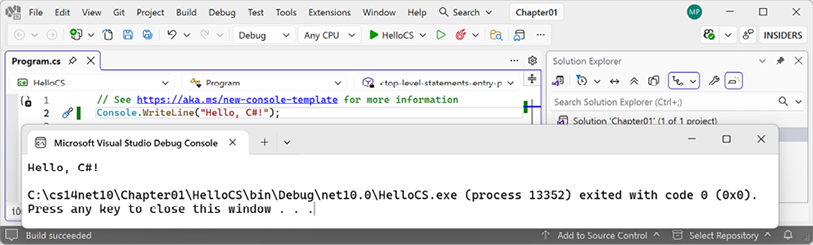
Figure 1.7: Running the console app on Windows
Your output may look different depending on your command prompt or terminal and its configuration. To change colors with the legacy command prompt app, click the top-left icon, and then in the menu, click Properties, and you will see tabs to change Colors, Font, and so on. You can also install and use alternative command prompts or terminals. For example, I installed Windows Terminal several years ago, and that’s what you can see in Figure 1.7. Since October 2022, Windows Terminal has been the default in Windows 11, so you should not need to install it. But if you use an older version of Windows, then you can install Windows Terminal from the Microsoft Store. You can learn more about Windows Terminal at the following link: https://devblogs.microsoft.com/commandline/windows-terminal-is-now-the-default-in-windows-11/.
- Press any key to close the console app window and return to Visual Studio.
- In Solution Explorer, double-click the HelloCS project (or right-click the HelloCS project and click Edit Project File), and note that the
HelloCS.csprojproject file shows that this project has its target framework set tonet10.0, as shown in Figure 1.8.Although Visual Studio hides the
.csprojfile extension, the project name in Solution Explorer represents a file namedHelloCS.csproj. If you ever need to edit this project file, you can just double-click the project name.
- In the Solution Explorer toolbar, toggle on the Show All Files button
 , and note that the compiler-generated
 binandobjfolders are visible, as shown in Figure 1.8:
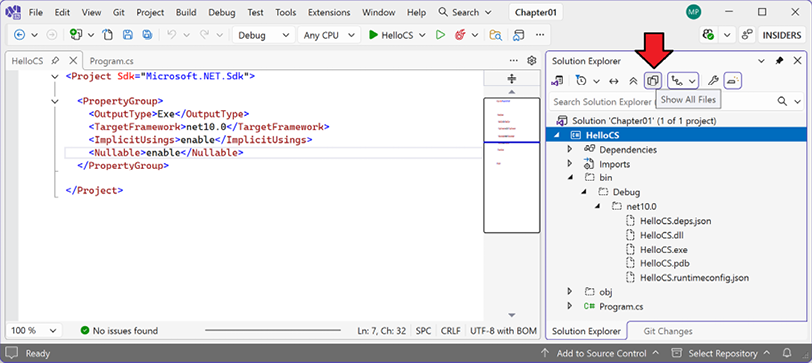
Figure 1.8: Showing the compiler-generated folders and files
Attaching the debugger in Visual Studio
When you start a project in Visual Studio, you can choose whether to attach a debugger or not.
If you do not need to debug, then it is better not to attach one because attaching a debugger requires more resources and slows everything down.
Attaching a debugger also limits you to only starting one project. If you want to run more than one project, each with a debugger attached, then you must start multiple instances of Visual Studio (one benefit of Rider is that it doesn’t have this limitation).
Another reason to start without debugging is that if you start a console app with the debugger attached, by default, it will automatically close the console window before you can read it.
To disable this behavior, follow these steps:
- Navigate to Tools | Options | Debugging | General.
- Clear the Automatically close the console when debugging stops checkbox.
Good practice: To start without debugging, instead of the green solid triangle button (to the left of HelloCS in the top bar shown in Figure 1.7), click the green outline triangle button unless you really need to debug.
Understanding the compiler-generated folders and files
Two compiler-generated folders were created, named obj and bin, as described in the following list:
- The
objfolder contains one compiled object file for each source code file. These objects haven’t been linked together into a final executable yet. - The
binfolder contains the binary executable for the application or class library. We will look at this in more detail in Chapter 7, Packaging and Distributing .NET Types.
You do not need to look inside these folders or understand all their files (but feel free to browse around if you are curious). At this point, the main thing that you need to understand is that the compiler needs to create temporary folders and files to do its work. You could delete these folders and their files, and they will be automatically recreated the next time you “build” or run the project. Most .NET developers never need to know the details of what most of these files do. You will never need to work with them directly.
Warning! Files that use .g. in their filename indicate that they are “generated” by the build process. You should never edit these files because they will just get recreated the next time you build.
Developers often delete these temporary folders and files to “clean” a project. Visual Studio even has a command on the Build menu named Clean Solution that deletes some of these temporary files for you. The equivalent command with the CLI is dotnet clean.
A tool that runs dotnet clean for each target framework and configuration and then deletes the output directories, and can be run in a directory containing a solution or project file, is found at the following link: https://github.com/DamianEdwards/dotnet-purge.
Understanding top-level programs
If you have seen older .NET projects before, then you might have expected more code, even just to output a simple message. This project has minimal statements because some of the required code is written for you by the compiler when you target .NET 6 or later.
If you had created the project with .NET SDK 5 or earlier, or if you had selected the checkbox labeled Do not use top-level statements, then the Program.cs file would have more statements, as shown in the following code:
using System;
namespace HelloCS
{
  class Program
  {
    static void Main(string[] args)
    {
      Console.WriteLine("Hello, World!");
    }
  }
}
During compilation with .NET SDK 6 or later, all the boilerplate code to define the Program class and its Main method is generated and wrapped around the statements you write.
This uses a feature introduced in .NET 5 called top-level programs, but it was not until .NET 6 that Microsoft updated the project template for console apps to use top-level statements by default. Then, in .NET 7 and later, Microsoft added options to use the older style if you prefer:
- If you are using Visual Studio, select the checkbox labeled Do not use top-level statements
- If you are using the
dotnetCLI at the command prompt, add a switch:dotnet new console --use-program-main
Warning! One functional difference is that the auto-generated code does not define a namespace, so the Program class is implicitly defined in an empty namespace with no name, instead of a namespace that matches the name of the project.
Requirements for top-level programs
Key points to remember about top-level programs include the following:
- There can be only one file, like the file you use for top-level program code in a project
- Any
usingstatements must be at the top of the file - If you declare any classes or other types, they must be at the bottom of the file
- Although you should name the entry-point method
Mainif you explicitly define it, the method is named<Main>$when created by the compiler
Implicitly imported namespaces
The using System; statement at the top of the file imports the System namespace. This enables the Console.WriteLine statement to work. But why do we not have to import it into our project?
The trick is that we still need to import the System namespace, but it is now done for us using a combination of features introduced in C# 10 and .NET 6. Let’s see how:
- In Solution Explorer, expand the
obj,Debug, andnet10.0folders, and open the file namedHelloCS.GlobalUsings.g.cs. - Note that this file is automatically created by the compiler for projects that target .NET 6 or later and uses a feature introduced in C# 10, called global namespace imports, which imports some commonly used namespaces like
Systemfor use in all code files, as shown in the following code:// <autogenerated /> global using System; global using System.Collections.Generic; global using System.IO; global using System.Linq; global using System.Net.Http; global using System.Threading; global using System.Threading.Tasks; - In Solution Explorer, toggle off the Show All Files button to hide the
binandobjfolders.
I will explain more about the implicit imports feature in the next chapter. For now, just note that a significant change that happened between .NET 5 and .NET 6 is that many of the project templates, like the one for console apps, use the new SDK and language features to hide what is really happening.
Revealing the hidden code by throwing an exception
Now, let’s discover how the hidden code that will be autogenerated by the top-level program feature has been written:
- In
Program.cs, after the statement that outputs the message, add a statement to throw a new exception, as shown in the following code:throw new Exception(); - In Visual Studio, navigate to Debug | Start Without Debugging. (Do not start the project with debugging, or the exception will be caught by the debugger!)
- The output in the console window will show the result of running your application, including that a hidden
Programclass was defined by the compiler, with a method named<Main>$that has a parameter namedargsto pass in arguments, as shown in Figure 1.9 and the following output:Hello, C#! Unhandled exception. System.Exception: Exception of type 'System.Exception' was thrown. at Program.<Main>$(String[] args) in C:\cs14net10\Chapter01\HelloCS\Program.cs:line 3
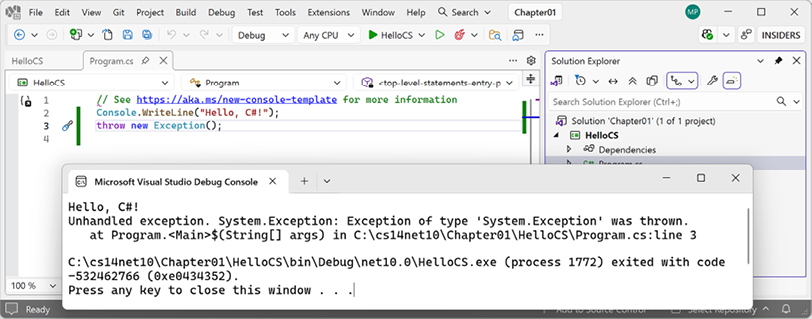
Figure 1.9: Throwing an exception to reveal the hidden Program.<Main>$ method
- Press any key to close the console app window and return to Visual Studio.
Revealing the namespace for the Program class
Now, let’s discover what namespace the Program class has been defined within:
- In
Program.cs, before the statement that throws an exception, add statements to get the name of the namespace of theProgramclass, and then write it to the console, as shown in the following code:string name = typeof(Program).Namespace ?? "<null>"; Console.WriteLine($"Namespace: {name}");
?? is the null-coalescing operator. The first statement means, “If the namespace of Program is null, then return <null>; otherwise, return the actual name.” You will see more explanations of these keywords and operators throughout the book. For now, just enter the code and run it to see what it does.
Good practice: Code editors have a feature named code snippets. These allow you to insert pieces of code that you commonly use by typing a shortcut and pressing Tab or Enter. For example, in Visual Studio, to enter Console.WriteLine() and leave the cursor in the middle of the parentheses ready for you to type what you want to output, type cw, and then press Tab or Enter. Read the documentation for your code editor to learn how to insert code snippets using shortcuts.
- In Visual Studio, navigate to Debug | Start Without Debugging.
- The output in the console window will show the result of running your application, including that the hidden
Programclass was defined without a namespace, as shown in the following output:Namespace: <null> - Press any key to close the console app window and return to Visual Studio.
Adding a second project using Visual Studio
Let’s add a second project to our solution to explore how to work with multiple projects:
- In Visual Studio, navigate to File | Add | New Project….
Warning! The preceding step adds a new project to the existing solution. Do NOT navigate to File | New | Project…, which instead is meant to be used to create a new project and solution (although the dialog box has a dropdown to choose to add to an existing solution too).
- In the Add a new project dialog, in Recent project templates, select Console App, and then click Next.
- In the Configure your new project dialog, for Project name, enter
AboutMyEnvironment, leave the location asC:\cs14net10\Chapter01, and then click Next. - In the Additional information dialog, select .NET 10.0 (Long Term Support), leave the Enable container support and Enable native AOT publish checkboxes cleared, and select the Do not use top-level statements checkbox.
Warning! Make sure you have selected the Do not use top-level statements checkbox so that we get to see the older style of Program.cs.
- Click Create.
- In the
AboutMyEnvironmentproject, inProgram.cs, note the statements to define a namespace that matches the project name, an internal class namedProgram, and a static method namedMainwith a parameter namedargsthat returns nothing (void), as shown in the following code:namespace AboutMyEnvironment { internal class Program { static void Main(string[] args) { Console.WriteLine("Hello, World!"); } } } - In
Program.cs, in theMainmethod, replace the existingConsole.WriteLinestatement with statements to output the current directory, the version of the operating system, and the namespace of theProgramclass, as shown in the following code:Console.WriteLine(Environment.CurrentDirectory); Console.WriteLine(Environment.OSVersion.VersionString); Console.WriteLine("Namespace: {0}", typeof(Program).Namespace ?? "<null>"); - In Solution Explorer, right-click the
Chapter01solution, and then select Configure Startup Projects…. - In the Solution ‘Chapter01’ Property Pages dialog box, set Startup Project to Current selection, and then click OK.
- In Solution Explorer, click the
AboutMyEnvironmentproject (or any file or folder within it), and note that Visual Studio indicates thatAboutMyEnvironmentis now the startup project by making the project name bold.
Good practice: I recommend this way of setting the startup project because it then makes it very easy to switch startup projects by simply clicking a project (or any file in a project) to make it the startup project. Although you can right-click a project and set it as a startup project, if you then want to run a different project, you must manually change it again. Simply clicking anywhere in the project is easier. In most chapters, you will only need to run one project at a time. In Chapter 15, Building and Consuming Web Services, I will show you how to configure multiple startup projects.
- Navigate to Debug | Start Without Debugging to run the
AboutMyEnvironmentproject, and note the result, as shown in the following output and Figure 1.10:C:\cs14net10\Chapter01\AboutMyEnvironment\bin\Debug\net10.0 Microsoft Windows NT 10.0.26100.0 Namespace: AboutMyEnvironment
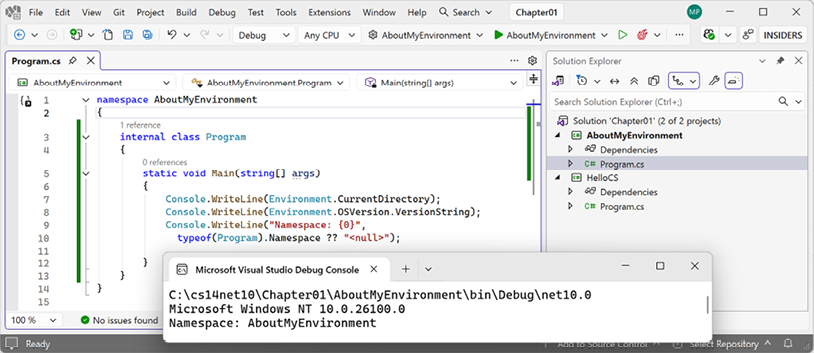
Figure 1.10: Running a console app in a Visual Studio solution with two projects
Windows 11 is just branding. Its official name is Windows NT, and its major version number is still 10! But its patch version is 22000 or higher.
- Press any key to close the console app window and return to Visual Studio.
When Visual Studio runs a console app, it executes it from the <projectname>\bin\Debug\net10.0 folder. It will be important to remember this when we work with the filesystem in later chapters.
When using VS Code, or more accurately, the dotnet CLI, it has different behavior, as you will see if you complete the optional online section about writing code with VS Code, found at the following link: https://github.com/markjprice/cs14net10/blob/main/docs/code-editors/vscode.md.
Now, let’s see how you can use the GitHub repository for this book.


