


Getting started with streams
In the previous section, we learned why streams are so powerful, but also that they are everywhere in Node.js, starting from its core modules. For example, we have seen that the fs module has createReadStream() for reading from a file and createWriteStream() for writing to a file, the HTTP request and response objects are essentially streams, the zlib module allows us to compress and decompress data using a streaming interface, and, finally, even the crypto module exposes some useful streaming primitives like createCipheriv and createDecipheriv.
Now that we know why streams are so important, let’s take a step back and start to explore them in more detail.
Anatomy of streams
Every stream in Node.js is an implementation of one of the four base abstract classes available in the stream core module:
ReadableWritableDuplexTransform
Each stream class is also an instance of EventEmitter. Streams, in fact, can produce several types of events, such as end when a Readable stream has finished reading, finish when a Writable stream has completed writing (we have already seen this one in some of the examples before), or error when something goes wrong.
One reason why streams are so flexible is the fact that they can handle not just binary data, but almost any JavaScript value. In fact, they support two operating modes:
- Binary mode: To stream data in the form of chunks, such as buffers or strings
- Object mode: To stream data as a sequence of discrete objects (allowing us to use almost any JavaScript value)
These two operating modes allow us to use streams not just for I/O, but also as a tool to elegantly compose processing units in a functional fashion, as we will see later in this chapter.
Let’s start our deep dive into Node.js streams by introducing the class of Readable streams.
Readable streams
A Readable stream represents a source of data. In Node.js, it’s implemented using the Readable abstract class, which is available in the stream module.
Reading from a stream
There are two approaches to receive the data from a Readable stream: non-flowing (or paused) and flowing. Let’s analyze these modes in more detail.
The non-flowing mode
The non-flowing or paused mode is the default pattern for reading from a Readable stream. It involves attaching a listener to the stream for the readable event, which signals the availability of new data to read. Then, in a loop, we read the data continuously until the internal buffer is emptied. This can be done using the read() method, which synchronously reads from the internal buffer and returns a Buffer object representing the chunk of data. The read() method has the following signature:
readable.read([size])
Using this approach, the data is pulled from the stream on demand.
To show how this works, let’s create a new module named read-stdin.js, which implements a simple program that reads from the standard input (which is also a Readable stream) and echoes everything back to the standard output:
process.stdin
  .on('readable', () => {
    let chunk
    console.log('New data available')
    while ((chunk = process.stdin.read()) !== null) {
      console.log(
        `Chunk read (${chunk.length} bytes): "${chunk.toString()}"`
      )
    }
  })
  .on('end', () => console.log('End of stream'))
The read() method is a synchronous operation that pulls a data chunk from the internal buffers of the Readable stream. The returned chunk is, by default, a Buffer object if the stream is working in binary mode.
In a Readable stream working in binary mode, we can read strings instead of buffers by calling setEncoding(encoding) on the stream, and providing a valid encoding format (for example, utf8). This approach is recommended when streaming UTF-8 text data, as the stream will properly handle multibyte characters, doing the necessary buffering to make sure that no character ends up being split into separate chunks. In other words, every chunk produced by the stream will be a valid UTF-8 sequence of bytes.
Note that you can call setEncoding() as many times as you want on a Readable stream, even after you’ve started consuming the data from the stream. The encoding will be switched dynamically on the next available chunk. Streams are inherently binary; encoding is just a view over the binary data that is emitted by the stream.
The data is read solely from within the Readable listener, which is invoked as soon as new data is available. The read() method returns null when there is no more data available in the internal buffers; in such a case, we have to wait for another readable event to be fired, telling us that we can read again, or wait for the end event that signals the end of the stream. When a stream is working in binary mode, we can also specify that we are interested in reading a specific amount of data by passing a size value to the read() method. This is particularly useful when implementing network protocols or when parsing specific data formats.
Now, we are ready to run the read-stdin.js module and experiment with it. Let’s type some characters into the console and then press Enter to see the data echoed back into the standard output. To terminate the stream and hence generate a graceful end event, we need to insert an EOF (end-of-file) character (using Ctrl + Z on Windows or Ctrl + D on Linux and macOS).
We can also try to connect our program with other processes. This is possible using the pipe operator (|), which redirects the standard output of a program to the standard input of another. For example, we can run a command such as the following:
cat <path to a file> | node read-stdin.js
This is an amazing demonstration of how the streaming paradigm is a universal interface that enables our programs to communicate, regardless of the language they are written in.
Flowing mode
Another way to read from a stream is by attaching a listener to the data event. This will switch the stream into using flowing mode, where the data is not pulled using read(), but instead is pushed to the data listener as soon as it arrives. For example, the read-stdin.js application that we created earlier will look like this using flowing mode:
process.stdin
  .on('data', (chunk) => {
    console.log('New data available')
    console.log(
      `Chunk read (${chunk.length} bytes): "${chunk.toString()}"`
    )
  })
  .on('end', () => console.log('End of stream'))
Flowing mode offers less flexibility to control the flow of data compared to non-flowing mode. The default operating mode for streams is non-flowing, so to enable flowing mode, it’s necessary to attach a listener to the data event or explicitly invoke the resume() method. To temporarily stop the stream from emitting data events, we can invoke the pause() method, causing any incoming data to be cached in the internal buffer. Calling pause() will switch the stream back to non-flowing mode.
Async iterators
Readable streams are also async iterators; therefore, we could rewrite our read-stdin.js example as follows:
for await (const chunk of process.stdin) {
  console.log('New data available')
  console.log(`Chunk read (${chunk.length} bytes): "${chunk.toString()}"`)
}
console.log('End of stream')
We will discuss async iterators in greater detail in Chapter 9, Behavioral Design Patterns, so don’t worry too much about the syntax in the preceding example for now. What’s important to know is that you can also consume data from a Readable stream using this convenient for await ... of syntax.
Implementing Readable streams
Now that we know how to read from a stream, the next step is to learn how to implement a new custom Readable stream. To do this, it’s necessary to create a new class by inheriting the prototype Readable from the stream module. The concrete stream must provide an implementation of the _read() method, which has the following signature:
readable._read(size)
The internals of the Readable class will call the _read() method, which, in turn, will start to fill the internal buffer using push():
readable.push(chunk)
Please note that read() is a method called by the stream consumers, while _read() is a method to be implemented by a stream subclass and should never be called directly. The underscore prefix is used to indicate that the method is not to be considered public and should not be called directly.
To demonstrate how to implement new Readable streams, we can try to implement a stream that generates random strings. Let’s create a new module that contains the code of our random string generator:
// random-stream.js
import { Readable } from 'node:stream'
import Chance from 'chance' // v1.1.12
const chance = new Chance()
export class RandomStream extends Readable {
  constructor(options) {
    super(options)
    this.emittedBytes = 0
  }
  _read(size) {
    const chunk = chance.string({ length: size }) // 1
    this.push(chunk, 'utf8') // 2
    this.emittedBytes += chunk.length
    if (chance.bool({ likelihood: 5 })) { // 3
      this.push(null)
    }
  }
}
For this example, we are using a third-party module from npm called chance (nodejsdp.link/chance), which is a library for generating all sorts of random values, from numbers to strings to entire sentences.
Note that chance is not cryptographically secure, which means it can be used for tests or simulations but not to generate tokens, passwords, or other security-related purposes.
We start by defining a new class called RandomStream, which specifies Readable as its parent. In the constructor of this class, we have to invoke super(options), which will call the constructor of the parent class (Readable), initializing the stream’s internal state.
If you have a constructor that only invokes super(options), you can remove it, since the class will inherit the parent constructor by default. Just be careful to remember to call super(options) every time you need to write a custom constructor.
The possible parameters that can be passed through the options object include the following:
- The
encodingargument, which is used to convert buffers into strings (defaults tonull) - A flag to enable object mode (
objectMode, defaults tofalse) - The upper limit of the data stored in the internal buffer, after which no more reading from the source should be done (
highWaterMark, defaults to16KB)
Inside the constructor, we initialized an instance variable: emittedBytes. We will be using this variable to keep track of how many bytes have been emitted so far from the stream. This is going to be useful for debugging, but it’s not a requirement when creating Readable streams.
Okay, now let’s discuss the implementation of the _read() method:
- The method generates a random string of length equal to
sizeusingchance. - It pushes the string into the internal buffer. Note that since we are pushing strings, we also need to specify the encoding,
utf8(this is not necessary if the chunk is simply a binaryBuffer). - It terminates the stream randomly, with a likelihood of 5 percent, by pushing
nullinto the internal buffer to indicate anEOFsituation or, in other words, the end of the stream. This is just an implementation detail that we are adopting to force the stream to eventually terminate. Without this condition, our stream would be producing random data indefinitely.Finite vs. Infinite Readable Streams
It’s up to us to determine whether a
Readablestream should terminate. You can signal the end of a stream by invokingthis.push(null)in the_read()method. Some streams are naturally finite. For example, when reading from a file, the stream will end once all the bytes have been read because the file has a defined size. In other cases, we might create streams that provide data indefinitely. For instance, a readable stream could deliver continuous temperature readings from a sensor or a live video feed from a security camera. These streams will keep producing data for as long as the source remains active, and no communication errors occur.
Note that the size argument in the _read() function is an advisory parameter. It’s good to honor it and push only the amount of data that was requested by the caller, even though it is not mandatory to do so.
When we invoke push(), we should check whether it returns false. When that happens, it means that the internal buffer of the receiving stream has reached the highWaterMark limit and we should stop adding more data to it. This is called backpressure, and we will be discussing it in more detail in the next section of this chapter. For now, just be aware that this implementation is not perfect because it does not handle backpressure.
That’s it for RandomStream, we are now ready to use it. Let’s see how to instantiate a RandomStream object and pull some data from it (using flowing mode):
// index.js
import { RandomStream } from './random-stream.js'
const randomStream = new RandomStream()
randomStream
  .on('data', chunk => {
    console.log(`Chunk received (${chunk.length} bytes): ${chunk.toString()}`)
  })
  .on('end', () => {
    console.log(`Produced ${randomStream.emittedBytes} bytes of random data`)
  })
Now, everything is ready for us to try our new custom stream. Simply execute the index.js module as usual and watch a random set of strings flow on the screen.
Simplified construction
For simple custom streams, we can avoid creating a custom class by using the Readable stream’s simplified construction approach. With this approach, we only need to invoke new Readable(options) and pass a method named read() in the set of options. The read() method here has exactly the same semantic as the _read() method that we saw in the class extension approach. Let’s rewrite RandomStream using the simplified constructor approach:
// simplified-construction.js
import { Readable } from 'node:stream'
import Chance from 'chance' // v1.1.12
const chance = new Chance()
let emittedBytes = 0
const randomStream = new Readable({
  read(size) {
    const chunk = chance.string({ length: size })
    this.push(chunk, 'utf8')
    emittedBytes += chunk.length
    if (chance.bool({ likelihood: 5 })) {
      this.push(null)
    }
  },
})
// now you can read data from the randomStream instance directly ...
This approach can be particularly useful when you don’t need to manage a complicated state, and allows you to take advantage of a more succinct syntax. In the previous example, we created a single instance of our custom stream. If we want to adopt the simplified constructor approach, but we need to create multiple instances of the custom stream, we can wrap the initialization logic in a factory function that we can invoke multiple times to create those instances.
We will discuss the Factory pattern and other creational design patterns in Chapter 7, Creational Design Patterns.
Readable streams from iterables
You can easily create Readable stream instances from arrays or other iterable objects (that is, generators, iterators, and async iterators) using the Readable.from() helper.
In order to get accustomed to this helper, let’s look at a simple example where we convert data from an array into a Readable stream:
import { Readable } from 'node:stream'
const mountains = [
  { name: 'Everest', height: 8848 },
  { name: 'K2', height: 8611 },
  { name: 'Kangchenjunga', height: 8586 },
  { name: 'Lhotse', height: 8516 },
  { name: 'Makalu', height: 8481 }
]
const mountainsStream = Readable.from(mountains)
mountainsStream.on('data', (mountain) => {
  console.log(`${mountain.name.padStart(14)}\t${mountain.height}m`)
})
As we can see from this code, the Readable.from() method is quite simple to use: the first argument is an iterable instance (in our case, the mountains array). Readable.from() accepts an additional optional argument that can be used to specify stream options like objectMode.
Note that we didn’t have to explicitly set objectMode to true. By default, Readable.from() will set objectMode to true, unless this is explicitly opted out by setting it to false. Stream options can be passed as a second argument to the function.
Running the previous code will produce the following output:
       Everest    8848m
            K2    8611m
 Kangchenjunga    8586m
        Lhotse    8516m
        Makalu    8481m
You should avoid instantiating large arrays in memory. Imagine if, in the previous example, we wanted to list all the mountains in the world. There are about 1 million mountains, so if we were to load all of them in an array upfront, we would allocate a quite significant amount of memory. Even if we then consume the data in the array through a Readable stream, all the data has already been preloaded, so we are effectively voiding the memory efficiency of streams. It’s always preferable to load and consume the data in chunks, and you could do so by using native streams such as fs.createReadStream, by building a custom stream, or by using Readable.from with lazy iterables such as generators, iterators, or async iterators. We will see some examples of the latter approach in Chapter 9, Behavioral Design Patterns.
Writable streams
A Writable stream represents a data destination. Imagine, for instance, a file on the filesystem, a database table, a socket, the standard output, or the standard error interface. In Node.js, these kinds of abstractions can be implemented using the Writable abstract class, which is available in the stream module.
Writing to a stream
Pushing some data down a Writable stream is a straightforward business; all we have to do is use the write() method, which has the following signature:
writable.write(chunk, [encoding], [callback])
The encoding argument is optional and can be specified if chunk is a string (it defaults to utf8, and it’s ignored if chunk is a buffer). The callback function, on the other hand, is called when the chunk is flushed into the underlying resource and is optional as well.
To signal that no more data will be written to the stream, we have to use the end() method:
writable.end([chunk], [encoding], [callback])
We can provide a final chunk of data through the end() method; in this case, the callback function is equivalent to registering a listener to the finish event, which is fired when all the data written in the stream has been flushed into the underlying resource.
Now, let’s show how this works by creating a small HTTP server that outputs a random sequence of strings:
// entropy-server.js
import { createServer } from 'node:http'
import Chance from 'chance' // v1.1.12
const chance = new Chance()
const server = createServer((_req, res) => {
  res.writeHead(200, { 'Content-Type': 'text/plain' }) // 1
  do { // 2
    res.write(`${chance.string()}\n`)
  } while (chance.bool({ likelihood: 95 }))
  res.end('\n\n') // 3
  res.on('finish', () => console.log('All data sent')) // 4
})
server.listen(3000, () => {
  console.log('listening on http://localhost:3000')
})
The HTTP server that we created writes into the res object, which is an instance of http.ServerResponse and also a Writable stream. What happens is explained as follows:
- We first write the head of the HTTP response. Note that
writeHead()is not a part of theWritableinterface; in fact, it’s an auxiliary method exposed by thehttp.ServerResponseclass and is specific to the HTTP protocol. This method writes into the stream a properly formatted HTTP header, which will contain the status code 200 and a header specifying the content type of the response body that we are about to stream. - We start a loop that terminates with a likelihood of 5% (we instruct
chance.bool()to returntrue95% of the time). Inside the loop, we write a random string into the stream. Note that we use ado ... whileloop here because we want to make sure to produce at least one random string. - Once we are out of the loop, we call
end()on the stream, indicating that no more data will be written. Also, we provide a final string containing two new line characters to be written into the stream before ending it. - Finally, we register a listener for the
finishevent, which will be fired when all the data has been flushed into the underlying socket.
To test the server, we can open a browser at the address http://localhost:3000 or use curl from the terminal as follows:
curl -i --raw localhost:3000
At this point, the server should start sending random strings to the HTTP client that you chose. If you are using a web browser, bear in mind that modern hardware can process things very quickly and that some browsers might buffer the data, so the streaming behavior might not be apparent.
By using the -i --raw flags in the curl command, we can have a peek at many details of the HTTP protocol. Specifically, -i includes response headers in the output. This allows us to see the exact data transferred in the header part of the response when we invoke res.writeHead(). The node:http module simplifies working with the HTTP protocol by automatically formatting response headers and applies sensible defaults such as adding standard headers like Connection: keep-alive and Transfer-Encoding: chunked. This last header is particularly interesting. It informs the client how to interpret the body of the incoming response. Chunked encoding is especially useful when sending large amounts of data whose total size isn’t known until the request has been fully processed. This makes it a perfect fit for writable Node.js streams. With chunked encoding, the Content-Length header is omitted. Instead, each chunk begins with its length in hexadecimal format, followed by \r\n, the chunk’s data, and another \r\n. The stream ends with a terminating chunk, which is identical to a regular chunk except that its length is zero. In our code, we don’t need to handle these details manually. The ServerResponse writable stream provided by the node:http module takes care of encoding chunks correctly for us. We simply provide chunks by calling write() or end() on the response stream, and the stream handles the rest. This is one of the strengths of Node.js streams: they abstract away complex implementation details, making them easy to work with. If you want to learn more about chunked encoding, check out: nodejsdp.link/transfer-encoding. By using the --raw option, which disables all internal HTTP decoding of content or transfer encodings, we can see that these chunk terminators (\r\n) are present in the data received from the server.
Backpressure
Node.js data streams, like liquids in a piping system, can suffer from bottlenecks when data is written faster than the stream can handle. To manage this, incoming data is buffered in memory. However, without feedback from the stream to the writer, the buffer could keep growing, potentially leading to excessive memory usage.
Node.js streams are designed to maintain steady and predictable memory usage, even during large data transfers. Writable streams include a built-in signaling mechanism to alert the application when the internal buffer has accumulated too much data. This signal indicates that it’s better to pause and wait for the buffered data to be flushed to the stream’s destination before sending more data. The writable.write() method returns false once the buffer size exceeds the highWaterMark limit.
In Writable streams, the highWaterMark value sets the maximum buffer size in bytes. When this limit is exceeded, write() returning false signals the application to stop writing. Once the buffer is cleared, a drain event is emitted, indicating it’s safe to resume writing. This process is known as backpressure.
Backpressure is an advisory mechanism. Even if write() returns false, we could ignore this signal and continue writing, making the buffer grow indefinitely. The stream won’t be blocked automatically when the highWaterMark threshold is reached; therefore, it is recommended to always be mindful and respect the backpressure.
The mechanism described in this section is similarly applicable to Readable streams. In fact, backpressure exists in Readable streams too, and it’s triggered when the push() method, which is invoked inside _read(), returns false. However, that’s a problem specific to stream implementers, so we usually have to deal with it less frequently.
We can quickly demonstrate how to take into account the backpressure of a Writable stream by modifying the entropy-server.js module that we created previously:
// ...
const CHUNK_SIZE = 16 * 1024 - 1
const chance = new Chance()
const server = createServer((_req, res) => {
  res.writeHead(200, { 'Content-Type': 'text/plain' })
  let backPressureCount = 0
  let bytesSent = 0
  function generateMore() { // 1
    do {
      const randomChunk = chance.string({ length: CHUNK_SIZE }) // 2
      const shouldContinue = res.write(`${randomChunk}\n`) // 3
      bytesSent += CHUNK_SIZE
      if (!shouldContinue) { // 4
        console.warn(`back-pressure x${++backPressureCount}`)
        return res.once('drain', generateMore)
      }
    } while (chance.bool({ likelihood: 95 }))
    res.end('\n\n')
  }
  generateMore()
  res.on('finish', () => console.log(`Sent ${bytesSent} bytes`))
})
// ...
The most important steps of the previous code can be summarized as follows:
- We wrapped the main data generation logic in a function called
generateMore(). - To increase the chances of receiving some backpressure, we increased the size of the data chunk to 16 KB minus 1 byte, which is very close to the default
highWaterMarklimit. - After writing a chunk of data, we check the return value of
res.write(). If we receivefalse, it means that the internal buffer is full, and we should stop sending more data. - When this happens, we exit the function and register another cycle of writes using
generateMore()for when thedrainevent is emitted.
If we now try to run the server again, and then generate a client request with curl (or with a browser), there is a high probability that there will be some backpressure, as the server produces data at a very high rate, faster than the underlying socket can handle. This example also prints how many backpressure events happen and how much data is being transferred for every request. You are encouraged to try different requests, check the logs, and try to make sense of what’s happening under the hood.
Implementing Writable streams
We can implement a new Writable stream by inheriting the class Writable and providing an implementation for the _write() method. Let’s try to do it immediately while discussing the details along the way.
Let’s build a Writable stream that receives objects in the following format:
{
  path: <path to a file>
  content: <string or buffer>
}
For each one of these objects, our stream will save the content property into a file created at the given path. We can immediately see that the inputs of our stream are objects, and not strings or buffers. This means that our stream must work in object mode, which gives us a great excuse to also explore object mode with this example:
// to-file-stream.js
import { Writable } from 'node:stream'
import { promises as fs } from 'node:fs'
import { dirname } from 'node:path'
import { mkdirp } from 'mkdirp' // v3.0.1
export class ToFileStream extends Writable {
  constructor(options) {
    super({ ...options, objectMode: true })
  }
  _write(chunk, _encoding, cb) {
    mkdirp(dirname(chunk.path))
      .then(() => fs.writeFile(chunk.path, chunk.content))
      .then(() => cb())
      .catch(cb)
  }
}
We created a new class for our new stream, which extends Writable from the stream module.
We had to invoke the parent constructor to initialize its internal state; we also needed to make sure that the options object specifies that the stream works in object mode (objectMode: true). Other options accepted by Writable are as follows:
highWaterMark(the default is 16 KB): This controls the backpressure limit.decodeStrings(defaults totrue): This enables the automatic decoding of strings into binary buffers before passing them to the_write()method. This option is ignored in object mode.
Finally, we provided an implementation for the _write() method. As you can see, the method accepts a data chunk and an encoding (which makes sense only if we are in binary mode and the stream option decodeStrings is set to false). Also, the method accepts a callback function (cb), which needs to be invoked when the operation completes; it’s not necessary to pass the result of the operation but, if needed, we can still pass an error that will cause the stream to emit an error event.
Now, to try the stream that we just built, we can create a new module and perform some write operations against the stream:
// index.js
import { join } from 'node:path'
import { ToFileStream } from './to-file-stream.js'
const tfs = new ToFileStream()
const outDir = join(import.meta.dirname, 'files')
tfs.write({ path: join(outDir, 'file1.txt'), content: 'Hello' })
tfs.write({ path: join(outDir, 'file2.txt'), content: 'Node.js' })
tfs.write({ path: join(outDir, 'file3.txt'), content: 'streams' })
tfs.end(() => console.log('All files created'))
Here, we created and used our first custom Writable stream. Run the new module as usual and check its output. You will see that after the execution, three new files will be created within a new folder called files.
Simplified construction
As we saw for Readable streams, Writable streams also offer a simplified construction mechanism. If we were to rewrite ToFileStream using the simplified construction for Writable streams, it would look like this:
// ...
const tfs = new Writable({
  objectMode: true,
  write(chunk, _encoding, cb) {
    mkdirp(dirname(chunk.path))
      .then(() => fs.writeFile(chunk.path, chunk.content))
      .then(() => cb())
      .catch(cb)
  },
})
// ...
With this approach, we are simply using the Writable constructor and passing a write() function that implements the custom logic of our Writable instance. Note that with this approach, the write() function doesn’t have an underscore in the name. We can also pass other construction options like objectMode.
Duplex streams
A Duplex stream is a stream that is both Readable and Writable. It is useful when we want to describe an entity that is both a data source and a data destination, such as network sockets, for example. Duplex streams inherit the methods of both stream.Readable and stream.Writable, so this is nothing new to us. This means that we can read() or write() data, or listen for both readable and drain events.
To create a custom Duplex stream, we have to provide an implementation for both _read() and _write(). The options object passed to the Duplex() constructor is internally forwarded to both the Readable and Writable constructors. The options are the same as those we already discussed in the previous sections, with the addition of a new one called allowHalfOpen (defaults to true) that, if set to false, will cause both parts (Readable and Writable) of the stream to end if only one of them does.
If we need to have a Duplex stream working in object mode on one side and binary mode on the other, we can use the options readableObjectMode and writableObjectMode independently.
Transform streams
Transform streams are a special kind of Duplex stream that are specifically designed to handle data transformations. Just to give you a few concrete examples, the functions zlib.createGzip() and crypto.createCipheriv() that we discussed at the beginning of this chapter create Transform streams for compression and encryption, respectively.
In a simple Duplex stream, there is no immediate relationship between the data read from the stream and the data written into it (at least, the stream is agnostic to such a relationship). Think about a TCP socket, which just sends and receives data to and from the remote peer; the socket is not aware of any relationship between the input and output. Figure 6.4 illustrates the data flow in a Duplex stream:
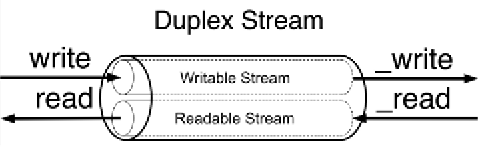
Figure 6.4: Duplex stream schematic representation
On the other hand, Transform streams apply some kind of transformation to each chunk of data that they receive from their Writable side, and then make the transformed data available on their Readable side. Figure 6.5 shows how the data flows in a Transform stream:
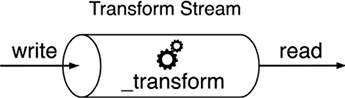
Figure 6.5: Transform stream schematic representation
Returning to our compression example, a transform stream can be visualized as follows: when uncompressed data is written to the stream, its internal implementation compresses the data and stores it in an internal buffer. When the data is read from the other end, the compressed version of the data is retrieved. This is how transformation happens on the fly: data comes in, gets transformed, and then goes out.
From a user perspective, the programmatic interface of a Transform stream is exactly like that of a Duplex stream. However, when we want to implement a new Duplex stream, we have to provide both the _read() and _write() methods, while for implementing a new Transform stream, we have to fill in another pair of methods: _transform() and _flush().
Let’s see how to create a new Transform stream with an example.
Implementing Transform streams
Let’s implement a Transform stream that replaces all the occurrences of a given string:
// replaceStream.js
import { Transform } from 'node:stream'
export class ReplaceStream extends Transform {
  constructor(searchStr, replaceStr, options) {
    super({ ...options })
    this.searchStr = searchStr
    this.replaceStr = replaceStr
    this.tail = ''
  }
  _transform(chunk, _encoding, cb) {
    const pieces = (this.tail + chunk).split(this.searchStr) // 1
    const lastPiece = pieces[pieces.length - 1] // 2
    const tailLen = this.searchStr.length - 1
    this.tail = lastPiece.slice(-tailLen)
    pieces[pieces.length - 1] = lastPiece.slice(0, -tailLen)
    this.push(pieces.join(this.replaceStr)) // 3
    cb()
  }
  _flush(cb) {
    this.push(this.tail)
    cb()
  }
}
In this example, we created a new class extending the Transform base class. The constructor of the class accepts three arguments: searchStr, replaceStr, and options. As you can imagine, they allow us to define the text to match and the string to use as a replacement, plus an options object for advanced configuration of the underlying Transform stream. We also initialize an internal tail variable, which will be used later by the _transform() method.
Now, let’s analyze the _transform() method, which is the core of our new class. The _transform() method has practically the same signature as the _write() method of the Writable stream, but instead of writing data into an underlying resource, it pushes it into the internal read buffer using this.push(), exactly as we would do in the _read() method of a Readable stream. This shows how the two sides of a Transform stream are connected.
The _transform() method of ReplaceStream implements the core of our algorithm. To search for and replace a string in a buffer is an easy task; however, it’s a totally different story when the data is streaming, and possible matches might be distributed across multiple chunks. The procedure followed by the code can be explained as follows:
- Our algorithm splits the data in memory (
taildata and the currentchunk) usingsearchStras a separator. - Then, it takes the last item of the array generated by the operation and extracts the last
searchString.length - 1characters. The result is saved in thetailvariable and will be prepended to the next chunk of data. - Finally, all the pieces resulting from
split()are joined together usingreplaceStras a separator and pushed into the internal buffer.
When the stream ends, we might still have some content in the tail variable not pushed into the internal buffer. That’s exactly what the _flush() method is for; it is invoked just before the stream is ended, and this is where we have one final chance to finalize the stream or push any remaining data before completely ending the stream.
The _flush() method only takes in a callback, which we have to make sure to invoke when all the operations are complete, causing the stream to be terminated. With this, we have completed our ReplaceStream class.
Why is the tail variable necessary?
Streams process data in chunks, and these chunks don’t always align with the boundaries of the target search string. For example, if the string we are trying to match is split across two chunks, the split() operation on a chunk alone won’t detect it, potentially leaving part of the match unnoticed. The tail variable ensures that the last portion of a chunk—potentially part of a match—is preserved and concatenated with the next chunk. This way, the stream can properly handle matches that span chunk boundaries, avoiding incorrect replacements or missing matches entirely.
In Transform streams, it’s not uncommon for the logic to involve buffering data from multiple chunks before there’s enough information to perform the transformation. For example, cryptography often works on fixed-size blocks of data. If a chunk doesn’t provide enough data to form a complete block, the Transform stream accumulates multiple chunks until it has enough to process the transformation. This buffering behavior ensures transformations are accurate and consistent, even when input data arrives in unpredictable sizes.
This should also clarify why the _flush() method exists. It’s provided to handle any remaining data still buffered in the Transform stream when the writer has finished writing. This ensures that leftover data—such as the tail in this example—is processed and emitted, preventing incomplete or lost output.
Now, it’s time to try the new stream. Let’s create a script that writes some data into the stream and then reads the transformed result:
// index.js
import { ReplaceStream } from './replace-stream.js'
const replaceStream = new ReplaceStream('World', 'Node.js')
replaceStream.on('data', chunk => process.stdout.write(chunk.toString()))
replaceStream.write('Hello W')
replaceStream.write('orld!')
replaceStream.end('\n')
To make life a little bit harder for our stream, we spread the search term (which is World) across two different chunks, then, using flowing mode, we read from the same stream, logging each transformed chunk. Running the preceding program should produce the following output:
Hello Node.js!
Simplified construction
Unsurprisingly, even Transform streams support simplified construction. At this point, we should have developed an instinct for how this API might look, so let’s get our hands dirty straight away and rewrite the previous example using this approach:
// simplified-construction.js
// ...
const searchStr = 'World'
const replaceStr = 'Node.js'
let tail = ''
const replaceStream = new Transform({
  defaultEncoding: 'utf8',
  transform(chunk, _encoding, cb) {
    const pieces = (tail + chunk).split(searchStr)
    const lastPiece = pieces[pieces.length - 1]
    const tailLen = searchStr.length - 1
    tail = lastPiece.slice(-tailLen)
    pieces[pieces.length - 1] = lastPiece.slice(0, -tailLen)
    this.push(pieces.join(replaceStr))
    cb()
  },
  flush(cb) {
    this.push(tail)
    cb()
  },
})
// now write to replaceStream ...
As expected, simplified construction works by directly instantiating a new Transform object and passing our specific transformation logic through the transform() and flush() functions directly through the options object. Note that transform() and flush() don’t have a prepended underscore here.
Filtering and aggregating data with Transform streams
As we discussed earlier, Transform streams are a great tool for building data transformation pipelines. In a previous example, we showed how to use a Transform stream to replace words in a text stream. We also mentioned other use cases, like compression and encryption. But Transform streams aren’t limited to those examples. They’re often used for tasks like filtering and aggregating data.
To make this more concrete, imagine a Fortune 500 company asks us to analyze a large file containing all their sales data for 2024. The file, data.csv, is a sales report in CSV format, and they want us to calculate the total profit for sales made in Italy. Sure, we could use a spreadsheet application to do this, but where’s the fun in that?
Instead, let’s use Node.js streams. Streams are well-suited for this kind of task because they can process large datasets incrementally, without loading everything into memory. This makes them efficient and scalable. Plus, building a solution with streams sets the stage for automation; perfect if you need to generate similar reports regularly or process other large datasets in the future.
Let’s imagine the sales data that is stored in the CSV file contains three fields per line: item type, country of sale, and profit. So, such a file could look like this:
type,country,profit
Household,Namibia,597290.92
Baby Food,Iceland,808579.10
Meat,Russia,277305.60
Meat,Italy,413270.00
Cereal,Malta,174965.25
Meat,Indonesia,145402.40
Household,Italy,728880.54
[... many more lines]
Now, it’s clear that we must find all the records that have “Italy” in the country field and, in the process, sum up the profit value of the matching lines into a single number.
In order to process a CSV file in a streaming fashion, we can use the excellent third-party module csv-parse (nodejsdp.link/csv-parse).
If we assume for a moment that we have already implemented our custom streams to filter and aggregate the data, a possible solution to this task might look like this:
// index.js
import { createReadStream } from 'node:fs'
import { Parser } from 'csv-parse' // v5.6.0
import { FilterByCountry } from './filter-by-country.js'
import { SumProfit } from './sum-profit.js'
const csvParser = new Parser({ columns: true })
createReadStream('data.csv.gz') // 1
  .pipe(csvParser) // 2
  .pipe(new FilterByCountry('Italy')) // 3
  .pipe(new SumProfit()) // 4
  .pipe(process.stdout) // 5
The streaming pipeline proposed here consists of five steps:
- We read the source CSV file as a stream.
- We use the
csv-parselibrary to parse every line of the document as a CSV record. For every line, this stream will emit an object containing the propertiestype,country, andprofit. With the optioncolumns: true, the library will read the names of the available columns from the first row of the CSV file. - We filter all the records by country, retaining only the records that match the country “Italy.” All the records that don’t match “Italy” are dropped, which means that they will not be passed to the other steps in the pipeline. Note that this is one of the custom
Transformstreams that we have to implement. - For every record, we accumulate the profit. This stream will eventually emit a single string, which represents the value of the total profit for products sold in Italy. This value will be emitted by the stream only when all the data from the original file has been completely processed. Note that this is the second custom
Transformstream that we have to implement to complete this project. - Finally, the data emitted from the previous step is displayed in the standard output.
Now, let’s implement the FilterByCountry stream:
// filter-by-country.js
import { Transform } from 'node:stream'
export class FilterByCountry extends Transform {
  constructor(country, options = {}) {
    options.objectMode = true
    super(options)
    this.country = country
  }
  _transform(record, _enc, cb) {
    if (record.country === this.country) {
      this.push(record)
    }
    cb()
  }
}
FilterByCountry is a custom Transform stream. We can see that the constructor accepts an argument called country, which allows us to specify the country name we want to match on. In the constructor, we also set the stream to run in objectMode because we know it will be used to process objects (records coming from the CSV file).
In the _transform method, we check if the country of the current record matches the country specified at construction time. If it’s a match, then we pass the record on to the next stage of the pipeline by calling this.push(). Regardless of whether the record matches or not, we need to invoke cb() to indicate that the current record has been successfully processed and that the stream is ready to receive another record.
Pattern: Transform filter
Invoke this.push() in a conditional way to allow only some data to reach the next stage of the pipeline.
Finally, let’s implement the SumProfit filter:
// sum-profit.js
import { Transform } from 'node:stream'
export class SumProfit extends Transform {
  constructor(options = {}) {
    options.objectMode = true
    super(options)
    this.total = 0
  }
  _transform(record, _enc, cb) {
    this.total += Number.parseFloat(record.profit)
    cb()
  }
  _flush(cb) {
    this.push(this.total.toString())
    cb()
  }
}
This stream needs to run in objectMode as well, because it will receive objects representing records from the CSV file. Note that, in the constructor, we also initialize an instance variable called total and we set its value to 0.
In the _transform() method, we process every record and use the current profit value to increase the total. It’s important to note that this time, we are not calling this.push(). This means that no value is emitted while the data is flowing through the stream. We still need to call cb(), though, to indicate that the current record has been processed and the stream is ready to receive another one.
In order to emit the final result when all the data has been processed, we have to define a custom flush behavior using the _flush() method. Here, we finally call this.push() to emit a string representation of the resulting total value. Remember that _flush() is automatically invoked before the stream is closed.
Pattern: Streaming aggregation
Use _transform() to process the data and accumulate the partial result, then call this.push() only in the _flush() method to emit the result when all the data has been processed.
This completes our example. Now, you can grab the CSV file from the code repository and execute this program to see what the total profit for Italy is. No surprise it’s going to be a lot of money since we are talking about the profit of a Fortune 500 company!
You could combine filtering and aggregation into a single Transform stream. While this approach might be less reusable, it can offer a slight performance boost since less data gets passed between steps in the stream pipeline. If you’re up for the challenge, try implementing this as an exercise!
The Node.js streams library includes a set of Readable stream helper methods (experimental at the time of writing). Among these are Readable.map() and Readable.reduce(), which could solve the problem we just explored in a more concise and streamlined way. We’ll dive into Readable stream helpers later in this chapter.
PassThrough streams
There is a fifth type of stream that is worth mentioning: PassThrough. This type of stream is a special type of Transform stream that outputs every data chunk without applying any transformation.
PassThrough is possibly the most underrated type of stream, but there are several circumstances in which it can be a very valuable tool in our toolbelt. For instance, PassThrough streams can be useful for observability or to implement late piping and lazy stream patterns.
Observability
If we want to observe how much data is flowing through one or more streams, we could do so by attaching a data event listener to a PassThrough instance and then piping this instance at a given point in a stream pipeline. Let’s see a simplified example to be able to appreciate this concept:
import { PassThrough } from 'node:stream'
let bytesWritten = 0
const monitor = new PassThrough()
monitor.on('data', chunk => {
  bytesWritten += chunk.length
})
monitor.on('finish', () => {
  console.log(`${bytesWritten} bytes written`)
})
monitor.write('Hello!')
monitor.end()
In this example, we are creating a new instance of PassThrough and using the data event to count how many bytes are flowing through the stream. We also use the finish event to dump the total amount to the console. Finally, we write some data directly into the stream using write() and end(). This is just an illustrative example; in a more realistic scenario, we would be piping our monitor instance at a given point in a stream pipeline. For instance, if we wanted to monitor how many bytes are written to disk in our first file compression example of this chapter, we could easily achieve that by doing something like this:
createReadStream(filename)
  .pipe(createGzip())
  .pipe(monitor)
  .pipe(createWriteStream(`${filename}.gz`))
The beauty of this approach is that we didn’t have to touch any of the other existing streams in the pipeline, so if we need to observe other parts of the pipeline (for instance, imagine we want to know the number of bytes of the uncompressed data), we can move monitor around with very little effort. We could even have multiple PassThrough streams to monitor different parts of a pipeline at the same time.
Note that you could implement an alternative version of the monitor stream by using a custom transform stream instead. In such a case, you would have to make sure that the received chunks are pushed without any modification or delay, which is something that a PassThrough stream would do automatically for you. Both approaches are equally valid, so pick the approach that feels more natural to you.
Late piping
In some circumstances, we might have to use APIs that accept a stream as an input parameter. This is generally not a big deal because we already know how to create and use streams. However, it may get a little bit more complicated if the data we want to read or write through the stream is only available after we’ve called the given API.
To visualize this scenario in more concrete terms, let’s imagine that we have to use an API that gives us the following function to upload a file to a data storage service:
function upload (filename, contentStream) {
  // ...
}
This function is effectively a simplified version of what is commonly available in the SDK of file storage services like Amazon Simple Storage Service (S3) or Azure Blob Storage service. Often, those libraries will provide the user with a more flexible function that can receive the content data in different formats (for example, a string, a buffer, or a Readable stream).
Now, if we want to upload a file from the filesystem, this is a trivial operation, and we can do something like this:
import { createReadStream } from 'fs'
upload('a-picture.jpg', createReadStream('/path/to/a-picture.jpg'))
But what if we want to do some processing on the file stream before the upload? For instance, let’s say we want to compress or encrypt the data. Also, what if we need to perform this transformation asynchronously after the upload function has been called?
In such cases, we can provide a PassThrough stream to the upload() function, which will effectively act as a placeholder. The internal implementation of upload() will immediately try to consume data from it, but there will be no data available in the stream until we actually write to it. Also, the stream won’t be considered complete until we close it, so the upload() function will have to wait for data to flow through the PassThrough instance to initiate the upload.
Let’s see a possible command-line script that uses this approach to upload a file from the filesystem and compresses it using Brotli compression. We are going to assume that the third-party upload() function is provided in a file called upload.js.
// upload-cli.js
import { createReadStream } from 'node:fs'
import { createBrotliCompress } from 'node:zlib'
import { PassThrough } from 'node:stream'
import { basename } from 'node:path'
import { upload } from './upload.js'
const filepath = process.argv[2] // 1
const filename = basename(filepath)
const contentStream = new PassThrough() // 2
upload(`${filename}.br`, contentStream) // 3
  .then(response => {
    console.log(`Server response: ${response.data}`)
  })
  .catch(err => {
    console.error(err)
    process.exit(1)
  })
createReadStream(filepath) // 4
  .pipe(createBrotliCompress())
  .pipe(contentStream)
In this book’s repository, you will find a complete implementation of this example that allows you to upload files to an HTTP server that you can run locally.
Let’s review what’s happening in the previous example:
- We get the path to the file we want to upload from the first command-line argument and use
basenameto extrapolate the filename from the given path. - We create a placeholder for our content stream as a
PassThroughinstance. - Now, we invoke the
uploadfunction by passing our filename (with the added.brsuffix, indicating that it is using Brotli compression) and the placeholder content stream. - Finally, we create a pipeline by chaining a filesystem
Readablestream, a Brotli compressionTransformstream, and finally our content stream as the destination.
When this code is executed, the upload will start as soon as we invoke the upload() function (possibly establishing a connection to the remote server), but the data will start to flow only later, when our pipeline is initialized. Note that our pipeline will also close the contentStream when the processing completes, which will indicate to the upload() function that all the content has been fully consumed.
Pattern
Use a PassThrough stream when you need to provide a placeholder for data that will be read or written in the future.
We can also use this pattern to transform the interface of the upload() function. Instead of accepting a Readable stream as input, we can make it return a Writeable stream, which can then be used to provide the data we want to upload:
function createUploadStream (filename) {
  // ...
  // returns a writable stream that can be used to upload data
}
If we were tasked to implement this function, we could achieve that in a very elegant way by using a PassThrough instance, as in the following example implementation:
function createUploadStream (filename) {
  const connector = new PassThrough()
  upload(filename, connector)
  return connector
}
In the preceding code, we are using a PassThrough stream as a connector. This stream becomes a perfect abstraction for a case where the consumer of the library can write data at any later stage.
The createUploadStream() function can then be used as follows:
const upload = createUploadStream('a-file.txt')
upload.write('Hello World')
upload.end()
This book’s repository also contains an HTTP upload example that adopts this alternative pattern.
Lazy streams
Sometimes, we need to create a large number of streams at the same time, for example, to pass them to a function for further processing. A typical example is when using archiver (nodejsdp.link/archiver), a package for creating archives such as TAR and ZIP. The archiver package allows you to create an archive from a set of streams, representing the files to add. The problem is that if we want to pass a large number of streams, such as from files on the filesystem, we would likely get an EMFILE, too many open files error. This is because functions like createReadStream() from the fs module will actually open a file descriptor every time a new stream is created, even before you start to read from those streams.
In more generic terms, creating a stream instance might initialize expensive operations straight away (for example, open a file or a socket, initialize a connection to a database, and so on), even before we start to use such a stream. This might not be desirable if you are creating a large number of stream instances for later consumption.
In these cases, you might want to delay the expensive initialization until you need to consume data from the stream.
It is possible to achieve this by using a library like lazystream (nodejsdp.link/lazystream). This library allows you to create proxies for actual stream instances, where the creation of the stream instance is deferred until some piece of code starts to consume data from the proxy.
In the following example, lazystream allows us to create a lazy Readable stream for the special Unix file /dev/urandom:
import lazystream from 'lazystream'
const lazyURandom = new lazystream.Readable(function (options) {
  return fs.createReadStream('/dev/urandom')
})
The function we pass as a parameter to new lazystream.Readable() is effectively a factory function that generates the proxied stream when necessary.
Behind the scenes, lazystream is implemented using a PassThrough stream that, only when its _read() method is invoked for the first time, creates the proxied instance by invoking the factory function, and pipes the generated stream into the PassThrough itself. The code that consumes the stream is totally agnostic of the proxying that is happening here, and it will consume the data as if it was flowing directly from the PassThrough stream. lazystream implements a similar utility to create a lazy Writable stream as well.
Creating lazy Readable and Writable streams from scratch could be an interesting exercise that is left to you. If you get stuck, have a look at the source code of lazystream for inspiration on how to implement this pattern.
In the next section, we will discuss the .pipe() method in greater detail and also see other ways to connect different streams to form a processing pipeline.
Connecting streams using pipes
The concept of Unix pipes was invented by Douglas McIlroy. This enabled the output of a program to be connected to the input of the next. Take a look at the following command:
echo Hello World! | sed s/World/Node.js/g
In the preceding command, echo will write Hello World! to its standard output, which is then redirected to the standard input of the sed command (thanks to the pipe | operator). Then, sed replaces any occurrence of World with Node.js and prints the result to its standard output (which, this time, is the console).
In a similar way, Node.js streams can be connected using the pipe() method of the Readable stream object, which has the following interface:
readable.pipe(writable, [options])
We have already used the pipe() method in a few examples, but let’s finally dive into what it does for us under the hood.
Very intuitively, the pipe() method takes the data that is emitted from the readable stream and pumps it into the provided writable stream. Also, the writable stream is ended automatically when the readable stream emits an end event (unless we specify {end: false} as options). The pipe() method returns the writable stream passed in the first argument, allowing us to create chained invocations if such a stream is also Readable (such as a Duplex or Transform stream).
Piping two streams together will create suction, which allows the data to flow automatically to the writable stream, so there is no need to call read() or write(), but most importantly, there is no need to control the backpressure anymore, because it’s automatically taken care of.
To provide a quick example, we can create a new module that takes a text stream from the standard input, applies the replace transformation discussed earlier when we built our custom ReplaceStream, and then pushes the data back to the standard output:
// replace.js
import { ReplaceStream } from './replace-stream.js'
process.stdin
  .pipe(new ReplaceStream(process.argv[2], process.argv[3]))
  .pipe(process.stdout)
The preceding program pipes the data that comes from the standard input into an instance of ReplaceStream and then back to the standard output. Now, to try this small application, we can leverage a Unix pipe to redirect some data into its standard input, as shown in the following example:
echo Hello World! | node replace.js World Node.js
This should produce the following output:
Hello Node.js!
This simple example demonstrates that streams (and in particular, text streams) are a universal interface and that pipes are the way to compose and interconnect all these interfaces almost magically.
Pipes and error handling
The pipe() method is very powerful, but there’s one important problem: error events are not propagated automatically through the pipeline when using pipe(). Take, for example, this code fragment:
stream1
  .pipe(stream2)
  .on('error', () => {})
In the preceding pipeline, we will catch only the errors coming from stream2, which is the stream that we attached the listener to. This means that, if we want to catch any error generated from stream1, we have to attach another error listener directly to it, which will make our example look like this:
stream1
  .on('error', () => {})
  .pipe(stream2)
  .on('error', () => {})
This is clearly not ideal, especially when dealing with pipelines with a significant number of steps. To make this matter worse, in the event of an error, the failing stream is only unpiped from the pipeline. The failing stream is not properly destroyed, which might leave dangling resources (for example, file descriptors, connections, and so on) and leak memory. A more robust (yet inelegant) implementation of the preceding snippet might look like this:
function handleError (err) {
  console.error(err)
  stream1.destroy()
  stream2.destroy()
}
stream1
  .on('error', handleError)
  .pipe(stream2)
  .on('error', handleError)
In this example, we registered a handler for the error event for both stream1 and stream2. When an error happens, our handleError() function is invoked, and we can log the error and destroy every stream in the pipeline. This allows us to ensure that all the allocated resources are properly released, and the error is handled gracefully.
Better error handling with pipeline()
Handling errors manually in a pipeline is not just cumbersome, but also error-prone—something we should avoid if we can!
Luckily, the core node:stream package offers us an excellent utility function that can make building pipelines a much safer and more enjoyable practice, which is the pipeline() helper function.
In a nutshell, you can use the pipeline() function as follows:
pipeline(stream1, stream2, stream3, ... , cb)
The last argument is an optional callback that will be called when the stream finishes. If it finishes because of an error, the callback will be invoked with the given error as the first argument.
If you prefer to avoid callbacks and rather use a Promise, there’s a Promise-based alternative in the node:stream/promises package:
pipeline(stream1, stream2, stream3, ...) // returns a promise
This alternative returns a Promise that will resolve when the pipeline completes or rejects in case of an error.
Both of these helpers pipe every stream passed in the arguments list to the next one. For each stream, they will also register a proper error and close listeners. This way, all the streams are properly destroyed when the pipeline completes successfully or when it’s interrupted by an error.
To get some practice with these helpers, let’s write a simple command-line script that implements the following pipeline:
- Reads a Gzip data stream from the standard input
- Decompresses the data
- Makes all the text uppercase
- Gzips the resulting data
- Sends the data back to the standard output
// uppercasify-gzipped.js
import { createGzip, createGunzip } from 'node:zlib' // 1
import { Transform } from 'node:stream'
import { pipeline } from 'node:stream/promises'
const uppercasify = new Transform({ // 2
  transform(chunk, _enc, cb) {
    this.push(chunk.toString().toUpperCase())
    cb()
  },
})
await pipeline( // 3
  process.stdin,
  createGunzip(),
  uppercasify,
  createGzip(),
  process.stdout
)
In this example:
- We are importing the necessary dependencies from
zlib,stream, and thestream/promisesmodules. - We create a simple
Transformstream that makes every chunk uppercase. - We define our pipeline, where we list all the stream instances in order. Note that we use
awaitto wait for the pipeline to complete. In this example, this is not mandatory because we don’t do anything after the pipeline is completed, but it’s a good practice to have this since we might decide to evolve our script in the future, or we might want to add a try catch around this expression to handle potential errors.
The pipeline will start automatically by consuming data from the standard input and producing data for the standard output.
We could test our script with the following command:
echo 'Hello World!' | gzip | node uppercasify-gzipped.js | gunzip
This should produce the following output:
HELLO WORLD!
If we try to remove the gzip step from the preceding sequence of commands, our script will fail with an uncaught error. This error is raised by the stream created with the createGunzip() function, which is responsible for decompressing the data. If the data is not actually gzipped, the decompression algorithm won’t be able to process the data and it will fail. In such a case, pipeline() will take care of cleaning up after the error and destroy all the streams in the pipeline.
Now that we have built a solid understanding of Node.js streams, we are ready to move into some more involved stream patterns like control flow and advanced piping patterns.


