Download code from GitHub
2. Declaration Files
Overview
This chapter gets you started with declaration files in TypeScript. You will learn how to work with declaration files, including how to build your own declaration files from scratch, and then work with types in external libraries. By the end of this chapter, you will be able to create declaration files from scratch, implement common development patterns for creating declaration files, and produce type checking when working with third-party NPM code libraries.
Introduction
In this chapter, you will learn about TypeScript declaration files. Declaration files give you the ability to give TypeScript more information about how a function or class is structured.
Why is it important to understand how declaration files work? Technically, declaration files speak directly to the core motivations for why TypeScript is becoming so popular. One of the common rationales for using TypeScript is because it guides developers through the application process. Let's walk through a real-world example as a case study.
In pure JavaScript, if we start working with a code library that we've never used before that formats dates, such as Moment JS, we would have to start by looking through the documentation in order to know what type of data we can pass to the Moment JS functions. When working with a new library, it is tedious work to figure out requirements, such as how many function arguments are required for each function and what data type each argument needs to be.
With the declaration files, however, TypeScript informs the text editor of the requirements for every function that a library has. So, instead of having to rely solely on documentation and Google searches, the text editor itself informs the developer how to work with each function. For example, the text editor, with the help of TypeScript, would inform us that the Moment JS format function takes in zero to one arguments, and the optional argument needs to be a string. And declaration files make all of this possible.
Declaration Files
Anytime we're asked to write additional boilerplate code, our first question is: why is it important to do this? With that in mind, before we walk through creating and managing declaration files, let's first analyze the role of declaration files in the development process.
The entire reason why we use TypeScript in the first place is to give our applications a specified structure based on types. Declaration files extend this functionality by allowing us to define the shape of our programs.
In this section, we will walk through two ways to work with declaration files. The first approach will be to create our own declaration files from scratch. This is a great place to start since it provides insight into how the declaration process works. In the second part, we will see how we can integrate types into third-party NPM libraries.
Note
Declaration files are not a new concept in the programming world. The same principle has been used for decades in older programming languages such as Java, C, and C++.
Before we get into this chapter's example project, let's look at the core elements that comprise a declaration file in TypeScript. Consider the following code, which assigns a string value to a variable:
firstName = "Kristine";
The preceding code in TypeScript will generate a compiler warning that says Cannot find name 'firstName', which can be seen in the following screenshot:

Figure 2.1: Compiler error when TypeScript cannot find a variable declaration
This error is shown because whenever we attempt to assign a value to a variable, TypeScript looks for where a variable name is defined. We can fix this by utilizing the declare keyword. The following code will correct the error that we encountered in the previous case:
declare let firstName: string;
firstName = "Kristine";
As you can see in the following screenshot, the compiler warning disappeared with the use of the declare keyword:

Figure 2.2: Example of a variable being defined in TypeScript
Now, that may not seem like a big deal, because we could accomplish the same goal by simply defining a let variable, such as the following:
let firstName: string;
firstName = "Kristine"
The preceding code would not generate an error when viewed in the Visual Studio Code editor.
So, what is the point of using declare? As we build out complex modules, the declare process allows us to describe the complete shape of our modules in a way that cannot be done by simply defining a variable. Now that you know the role of declaration files along with the basic syntax, let's walk through the full workflow of creating a declaration file from scratch in the following exercise.
Exercise 2.01: Creating a Declaration File from Scratch
In this exercise, we'll create a declaration file from scratch. We'll declare file conventions, import, and then use declared files. Consider that you are developing a web app that requires users to register themselves with credentials such as email, user roles, and passwords. The data types of these credentials will be stated in the declaration file that we'll be creating. A user won't be allowed to log in if they fail to enter the correct credentials.
Note
The code files for this exercise can be found here: https://packt.link/bBzat.
Perform the following steps to implement this exercise:
- Open the Visual Studio Code editor.
- Create a new directory and then create a file named
user.ts. - Start the TypeScript compiler and have it watch for changes to the file with the following terminal compile command:
tsc user.ts ––watch
The following screenshot shows how the command appears inside the terminal:

Figure 2.3: Running the TypeScript compiler with the watch flag
It's fine to leave this file empty for now. We'll start building out our implementation shortly. Now let's create our declaration file.
- Create a directory called
types/at the root of our program and then create a file inside it calledAuthTypes.d.ts.Our project's directory should now look like this:

Figure 2.4: AuthTypes file structure
Note
Traditionally, declaration files are kept in their own directory called
types/and are then imported by the modules that they are defining. It's also the standard convention to use the file extension of.d.tsinstead of.tsfor your declaration files. - Within the new declaration file, define the shape of our
AuthTypesmodule. Use thedeclarekeyword at the top of the file. This tells TypeScript that we are about to describe how theAuthTypesmodule should be structured:declare module "AuthTypes" { export interface User { email: string; roles: Array<string>; } }In the preceding code, another bit of syntax that might be different than what you're used to writing is that we wrap the module name in quotation marks. When we implement the program, you'll see that if we remove the quotation marks, we won't be able to import the module. Inside the module, we can place any number of exports that we want the module to have. One of the most important concepts to keep in mind is that declaration files do not have any implementation code; they simply describe the types and structure for the elements used in the module. The following screenshot gives a visual representation of the code:

Figure 2.5: AuthTypes interface
The compiler messages suggest that the import should happen successfully as there have not been any errors up to this point.
In this step, we're exporting a user interface that defines two data points: email and roles. As far as the data types are concerned, the
emailattribute needs to be a string, androlesneeds to be an array filled with strings. Such type definitions will ensure that anyone using this module will be informed immediately if they attempt to use the incorrect data structure.Now that we have defined the
AuthTypesmodule, we need to import it into our TypeScript file so that we can use it. We're going to use the reference import process to bring the file into our program. - Go to the
user.tsfile and add the following two lines of code:/// <reference path = "./types/AuthTypes.d.ts" /> import auth = require("AuthTypes");The code in the editor will look something like this:

Figure 2.6: Importing a declaration file
The first line in the preceding code will make
AuthTypes.d.tsavailable to our program, and the second line imports the module itself. Obviously, you can use any variable name for the import statement that you prefer. In this code, we're importing theAuthTypesmodule and storing it in theauthkeyword.With our module imported, we can now start building the implementation for our program. We'll start out by defining a variable and assigning it to our user interface type that we defined in the declaration files.
- Add the following code to the
user.tsfile:let jon: auth.User;
The updated code of
user.tsfile will look something like this:/// <reference path = "./types/AuthTypes.d.ts" /> import auth = require("AuthTypes"); let jon: auth.User;What we've done here is quite impressive. We've essentially created our own type/interface in a separate file, imported it, and told the TypeScript compiler that our new variable is going to be of the
Usertype. - Add the actual values of
emailandrolesfor thejonvariable with the help of the following code:jon = { email: "jon@snow.com", roles: ["admin"] };With the required shape in place, the program compiles properly, and you can perform any tasks that you need to do.
- Create another
Userand see how we can work with optional attributes. Add the following code to add details of the useralice:let alice: auth.User; alice = { email: "alice@snow.com", roles: ["super_admin"] };Now, let's imagine that we sometimes keep track of how a user found our application. Not all users will have this attribute though, so we'll need to make it optional without breaking the other user accounts. You can mark an attribute as optional by adding a question mark before the colon.
- Add a
sourceattribute to the declaration file:declare module "AuthTypes" { export interface User { email: string; roles: Array<string>; source?: string; } } - Update our
aliceuser with asourcevalue offacebook:/// <reference path = "./types/AuthTypes.d.ts" /> import auth = require("AuthTypes"); let jon: auth.User; jon = { email: "jon@snow.com", roles: ["admin"] }; let alice: auth.User; alice = { email: "alice@snow.com", roles: ["super_admin"], source: "facebook" }Notice that the
jonvariable still works perfectly fine, even without thesourcevalue. This helps us to build flexible interfaces for our programs that define both optional and required data points. - Open the terminal and run the following command to generate a JavaScript file:
tsc user.ts
Let's now look at the generated
user.jsfile, which can be seen in the following screenshot:

Figure 2.7: Declaration file rules not added to the generated JavaScript code
Well, that's interesting. There is literally not a single mention of the declaration file in the generated JavaScript code. This brings up a very important piece of knowledge to know when it comes to declaration files and TypeScript in general: declaration files are used solely for the benefit of the developer and are only utilized by the IDE.
Declaration files are completely bypassed when it comes to what is rendered in the program. And with this in mind, hopefully the goal of declaration files is becoming clearer. The better your declaration files are, the easier it will be for the IDE to understand your program and for yourself and other developers to work with your code.
Exceptions
Let's see what happens when we don't follow the rules of our interface. Remember in the previous exercise that our interface required two data elements (email and roles) and that they need to be of the string and Array<string> types. So, watch what happens when we don't implement the proper data type with the following code:
jon = {
    email: 123
}
This will generate the following compiler error, as shown in the following screenshot:

Figure 2.8: TypeScript showing the required data types for an object
That is incredibly helpful. Imagine that you are working with a library that you've never used before. If you were using vanilla JavaScript, this implementation would silently fail and would force you to dig through the library's source code to see what structure it required.
This compiler error makes sense, and in a real-life application, such as a React or an Angular app, the application wouldn't even load until the issue was fixed. If we update the data structure to match the declaration file for AuthTypes with the following code:
jon = {
    email: "jon@snow.com"
}
We can see that the compiler will move the error message up to the jon variable name. If you hover over it, or look at the terminal output, you'll see the error shown in the following screenshot:

Figure 2.9: TypeScript showing the required attributes for an object
This is an incredibly useful functionality. If you're new to development, this may not seem like a very big deal. However, this type of information is the exact reason why TypeScript continues to grow in popularity. Error messages such as this instantly provide the information that we need in order to fix the bug and work with the program. In the preceding screenshot, the message is telling us that the program won't compile as we are missing a required value, namely, roles.
Now that we have built out our own declaration file from scratch, it's time to move on and see how declaration files are utilized by other libraries.
Third-Party Code Libraries
Depending on the types of applications that you build, you may never need to build your own declaration files. However, if you're using TypeScript and working with third-party modules, you will need to understand how declaration files work because you will then be able to work seamlessly with external libraries.
DefinitelyTyped
Let's jump back in time for a moment. When TypeScript was originally developed, there was quite a bit of excitement around the idea of integrating types into JavaScript applications. However, developers began to get frustrated, because even though they were building their programs with types, every time that they imported an external library, such as lodash, they were forced to write code with no type signatures and little to no IDE guidance.
Essentially, this meant that each time we were to call a function from an external library, we didn't have a high level of assurance that we were working with it properly.
Thankfully, the open source community had the answer, and the DefinitelyTyped library was created. DefinitelyTyped is a very large repository that contains literally thousands of declaration files for JavaScript code libraries. This means that libraries such as react, lodash, and pretty much every other popular library has a full set of declaration files that we can use in our TypeScript programs.
Note
For more information on DefinitelyTyped, visit https://definitelytyped.org.
Analyzing an External Declaration File
Before we learn how to import and use types with external libraries, let's peek into what they look like:

Figure 2.10: Example of how DefinitelyTyped uses declaration files
In the preceding screenshot, if you look at the lodash declaration file for the array data structure, you'll see that a single declaration file is over 2,000 lines long. That can be a little intimidating to look at, so let's try to simplify it.
Note
lodash is a utility library that provides functionality for working with objects, strings, arrays, and suchlike. The lodash library's declaration file for the array data structure, as shown in the preceding screenshot, can be found here: https://github.com/DefinitelyTyped/DefinitelyTyped/blob/master/types/lodash/common/array.d.ts.
You'll be pleased to know that the elements in the preceding declaration file are exactly what we built out in Exercise 1.01: Creating a Declaration File from Scratch. It starts by declaring a module instance, and from that point, it lists out interfaces for each of the elements that utilize the array data structure. In fact, if you dissect the code, you'll see that lodash provides three interfaces for each of the functions in the library. You don't have to know what these do; however, it is helpful to realize that you can provide as many interfaces as needed when you're building your own code libraries.
Let's now look at the interface for the last function:

Figure 2.11: How lodash implements interfaces
This is a good function to look at, because we'll use it when we get to the example for this section. You can see that the majority of the interface is actually a comment. If you've never seen this syntax before, it is using JSDoc syntax. This is very helpful, because IDEs such as Visual Studio Code will pull the comment, parameters, and return type directly into the IntelliSense interface. This means that when we start typing the last function when working with lodash, the IDE will automatically pull in the comment data so we can easily read how to use the function.
After that, the declaration is pretty basic. It simply describes the shape of the last function, specifically, that it takes a list of values as the argument and then returns either T or undefined. Don't worry about all the references to T; you'll learn about what this represents in Chapter 8, Generics. For now, just know that it means that it is returning a value.
Following the same pattern from when we created the declaration file from scratch, in the next section, let's create a new TypeScript project and walk through a practical example of why types are needed.
Exercise 2.02: Creating Types with External Libraries
In this exercise, we'll install types and integrate our types with external libraries. We will also be exploring a scenario wherein we'll check how the function behaves when the wrong type of parameter is passed to it. You'll need to start with an empty directory for this exercise.
Note
The code files for this exercise can be found here: https://packt.link/k7Wbt.
Perform the following steps to implement this exercise:
- Open the Visual Studio Code editor.
- Create an empty directory on your computer and run the following command to create a new NPM project:
npm init -y
The preceding code will generate a
package.jsonfile. - To install the Lodash library, open the terminal and type the following command:
npm i lodash
The preceding command installs the Lodash library. The
package.jsonfile should now look something like this, withlodashinstalled in the dependencies list:
Figure 2.12: The generated package.json file
- Create a file in that directory named
lodash_examples.ts, start the TypeScript compiler, and have it watch for changes. Inside of the new.tsfile, add the following code:import _ = require("lodash"); const nums = [1, 2, 3]; console.log(_.last(nums)); - Run the preceding program in the terminal by writing the following commands:
tsc lodash_examples.ts
node lodash_examples.js
The console generates an output of
3, as you can see in the following screenshot:
Figure 2.13: Running the generated lodash_example.js program
- Create another variable named
numberand assign it the value10. We'll then pass this number as an argument to the Lodash library's_.last()function. Write the following code to do this:import _ = require("lodash"); //const nums = [1, 2, 3]; //console.log(_.last(nums)); const number = 10; console.log(_.last(number));Since we've looked at the declaration file, we know that the last function expects an array or some type of list. However, for now, let's pretend that we don't have that information, and this is the first time that we're working with the Lodash library.
Note
The Lodash library's
lastfunction also works with strings because it views the string of characters like a collection of characters. For example,_.last("hey")will return"y"since it's the last character in the string. - Run the preceding program in the terminal by writing the following commands:
tsc lodash_examples.ts
node lodash_examples.js
The following output is generated when the preceding commands are executed:

Figure 2.14: What happens when the wrong argument is passed to the last function
In such a small program, this may seem like a trivial issue. However, in a large system, getting an undefined value while expecting an actual value can be time-consuming, as we have to spend more time on debugging.
In order to fix this issue, let's leverage the DefinitelyTyped repository and bring in the
lodashtypes. If you hover over theimportstatement at the top of the file, you'll even see the following warning and recommendation, as shown in the following screenshot:
Figure 2.15: TypeScript recommending to install Lodash types from DefinitelyTyped
That's quite helpful. The warning itself is showing us how we can install the types for the library.
- Follow the recommendation and run the following command in the terminal to install
lodashtypes:npm install @types/lodash
Note
Any time that you see an
installcommand that starts with@types/, that means that NPM is going to pull from the DefinitelyTyped repository.If you run that command, the warning in the
importstatement should go away automatically. But even more importantly, you should now see that the IDE is now complaining about the line of code where we're trying to pass a number to thelastfunction. If you hover over the wordnumber, you should see the error shown in the following screenshot:
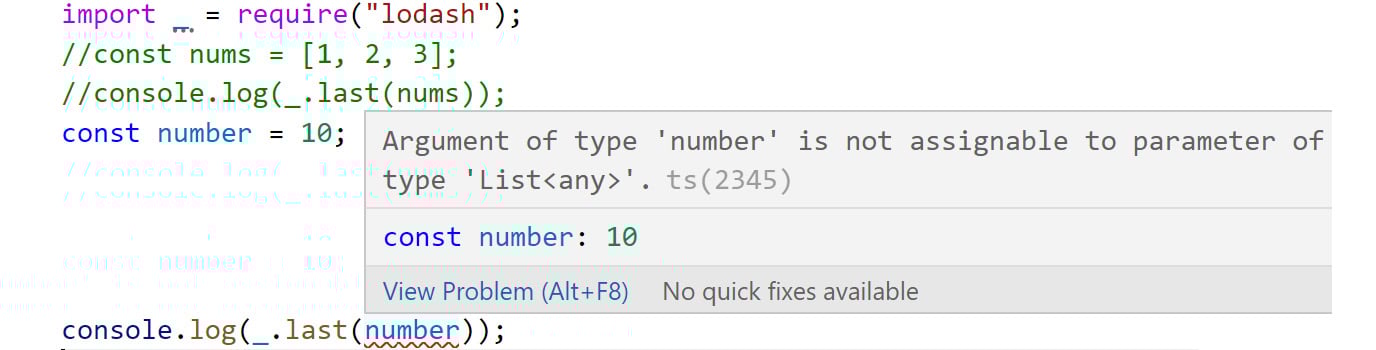
Figure 2.16: IntelliSense revealing the correct type to use with the last function
From the preceding screenshot, it is clear that the last function won't take any argument of the number type. It accepts either an array or a list as an argument. So, let's imagine that we're building a real-world application, and we try to use the last function. If we were using vanilla JavaScript, we wouldn't realize our error until we, or even a user, encountered the error while running the program. However, by leveraging TypeScript and DefinitelyTyped, the program won't even compile if we attempt to use a function in the incorrect manner.
Development Workflow with DefinitelyTyped
Now that you've seen how to install and work with types, we will walk through a full development workflow so that you can observe the benefits of working with types. Without the integration of types into external libraries, we are forced to either have prior knowledge of the library or dig through the documentation to discover the proper usage.
However, with types, we're going to see how much more streamlined the process is when it comes to working with libraries such as lodash. Let's solve an exercise in the next section to get a proper understanding of this.
Exercise 2.03: Creating a Baseball Lineup Card Application
In this exercise, we'll create a baseball lineup application, wherein we have an array of player names that we'll be retrieving from an API, and then we have a constant variable in the application called lineupOrder. Our lineup card application needs to pair the names from the API with lineupOrder:
Note
The code files for this exercise can be found here: https://packt.link/01spI.
- Open the Visual Studio Code editor.
- Create a file named
lodash_newexamples.tsand add the following code, wherein we have an array variable,playerNames, and a list,lineupOrder:import _ = require("lodash"); const playerNames = [ "Springer", "Bregman", "Altuve", "Correa", "Brantley", "White", "Gonzalez", "Kemp", "Reddick" ]; const lineupOrder = [1, 2, 3, 4, 5, 6, 7, 8, 9];This is a perfect situation for using the
zipfunction from the Lodash library. Let's imagine that we've heard about thezipfunction, but aren't quite aware of how to use it yet. Start by writing the following code in the same file:_.zip()
- Once you've typed the preceding code, place the cursor in between the parentheses. You'll get some guidance on how to use the function straight from DefinitelyTyped, as shown in the following screenshot:

Figure 2.17: IntelliSense guidance on how to use the zip function in lodash
Note
From the preceding screenshot, we can see that the
zipfunction takes two arguments. Both arguments need to beArrayLike, which means they need to function as a type of collection. Also, the function groups the elements together and returns the grouped collection. Thus, without having to dig through thelodashdocumentation, we were able to leverage the type definition as we were building the program. It gives us the guidance we need while working with the function.Let's now test it out. We know that the
zipfunction takes in two arrays. So, let's provide it with theplayerNamesandlineupOrderarrays. - Add the following code to provide the
zipfunction with two arrays,playerNamesandlineupOrder:console.log(_.zip(lineupOrder, playerNames));
If you run the preceding code, you'll see that the
zipfunction does exactly what it said it would do. It groups the elements and returns the exact data structure that we needed. The rendered lineup card would look something like that shown in the following screenshot:
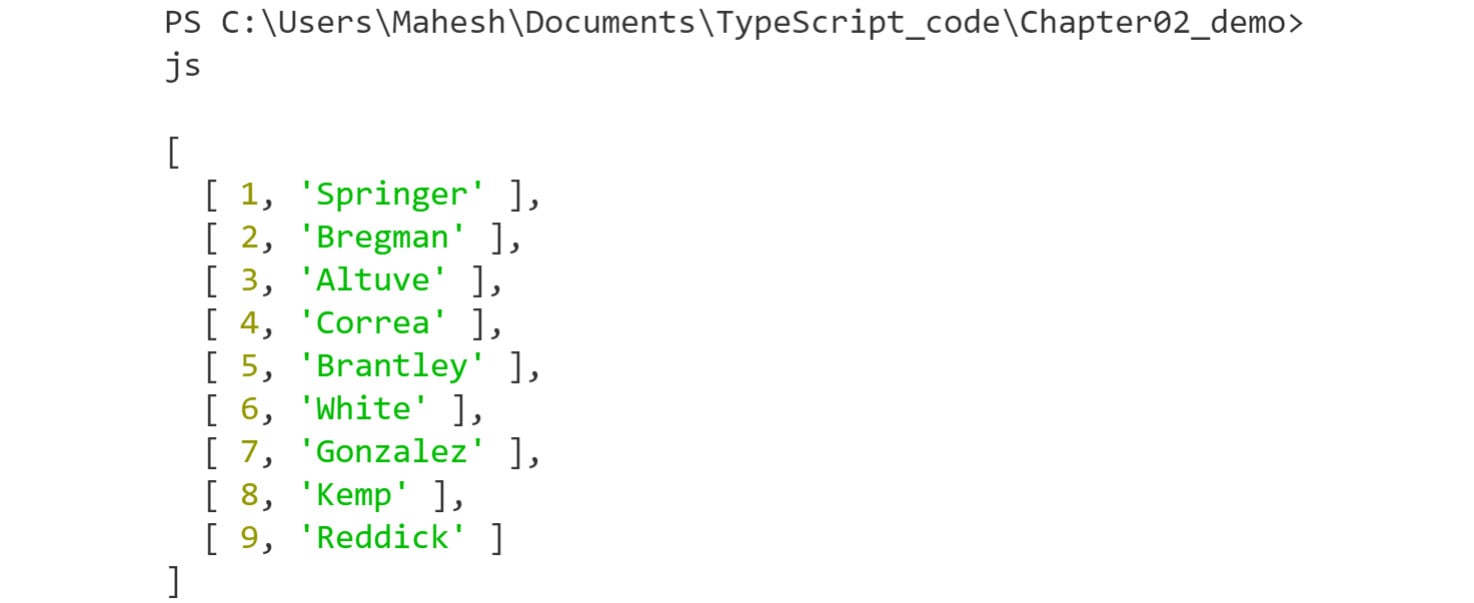
Figure 2.18: Running the zip function properly from lodash
In completing this process, you can see how DefinitelyTyped allows you to extend types directly into third-party libraries so that you can get type guidance in your programs.
Activity 2.01: Building a Heat Map Declaration File
In this activity, you will build a TypeScript application named heat map log system for tracking baseball pitch data and ensuring data integrity. You will utilize a TypeScript declaration file to build the type system for the program. From that point, you will import the Lodash library and will add type checking to the program by implementing type definitions from DefinitelyTyped.
The steps are as follows:
- Visit the following GitHub repository and download the activity project containing the specs and configuration elements: https://packt.link/vnj1R.
- Create a file called
heat_map_data.ts. - Run the TypeScript compiler on the file and watch for changes.
- Create a declaration file and define a module called
HeatMapTypesand export the interface namedPitcher. - Define three attributes for the
Pitchermodule:batterHotZones,pitcherHotZones, andcoordinateMap. - The data structures should be the same for all three attributes,
Array<Array<number>>, butcoordinateMapshould be optional. - Then, import the declaration files into the
heat_map_data.tsfile. Then, create and export aletvariable calleddataand assign it to thePitchertype. - Add values that adhere to the declaration rules, ensuring that one of the nested arrays is identical in the
batterHotZonesandpitcherHotZonesattributes. - Create a new function called
findMatchthat takes in both thebatterHotZonesandpitcherHotZonesarrays and utilize thelodashfunction,intersectionWith, to return the identical nested array. You will need to import the Lodash library, which was installed when you initially rannpm install. Finally, store the value offindMatchin thecoordinateMapattribute that was defined in the declaration file.The expected output of this activity will be a nested array that looks similar to this:
[[10.2, -5], [3, 2]]
Note
The solution to this activity can be found via this link.
Summary
In this chapter, we've walked through how to utilize declaration files in TypeScript. We've analyzed how declaration files can assist the IDE in guiding how programs should be structured. We've seen examples of structuring the declaration files. Importing declaration files into TypeScript files assists in the development life cycle. We learned to assign objects to custom types that were defined in the declaration files. It injects typed guidance into the IDE's IntelliSense process. We also learned about DefinitelyTyped and how it can be leveraged to layer on types for third-party libraries and work with them like typed programs.
With all this knowledge of declaration files, in the next chapter, we'll be taking a deep dive into working with functions in TypeScript. We'll be defining a function using types, building a suite of functions in a module, building a class of functions to perform a specific task, and exploring unit testing.