

 Download code from GitHub
1. Variables and Operators
Overview
In this chapter, you will be introduced to features of Go and will gain a basic understanding of what Go code looks like. You will also be provided with a deep understanding of how variables work and will perform exercises and activities to get hands-on and get going.
By the end of this chapter, you will be able to use variables, packages, and functions in Go. You will learn to change variable values in Go. Later in the chapter you will use operators with numbers and design functions using pointers.
Introduction
Go (or golang as it's often called) is a programming language popular with developers because of how rewarding it is to use to develop software. It's also popular with companies because teams of all sizes can be productive with it. Go has also earned a reputation for consistently delivering software with exceptionally high performance.
Go has an impressive pedigree since it was created by a team from Google with a long history of building great programming languages and operating systems. They created a language that has the feel of a dynamic language such as JavaScript or PHP but with the performance and efficiency of strongly typed languages such as C++ and Java. They wanted a language that was engaging for the programmer but practical in projects with hundreds of developers.
Go is packed with interesting and unique features, such as being complied with memory safety and channel-based concurrency. We'll explore these features in this chapter. By doing so, you'll see that their unique implementation within Go is what makes Go truly special.
Go is written in text files that are then compiled down to machine code and packaged into a single, standalone executable file. The executable is self-contained, with nothing needed to be installed first to allow it to run. Having a single file makes deploying and distributing Go software hassle-free. When compiling, you can pick one of several target operating systems, including but not limited to Windows, Linux, macOS, and Android. With Go, you write your code once and run it anywhere. Complied languages fell out of favor because programmers hated long waits for their code to compile. The Go team knew this and built a lightning-fast compiler that remains fast as projects grow.
Go has a statically typed and type-safe memory model with a garbage collector. This combination protects developers from creating many of the most common bugs and security flaws found in software while still providing excellent performance and efficiency. Dynamically typed languages such as Ruby and Python have become popular in part because programmers felt they could be more productive if they didn't have to worry about types and memory. The downside of these languages is that they gave up performance and memory efficiency and can be more prone to type-mismatch bugs. Go has the same levels of productivity as dynamically typed languages while not giving up performance and efficiency.
A massive shift in computer performance has taken place. Going fast now means you need to be able to do as much work parallel or concurrently as possible. This change is due to the design of modern CPUs, which emphasize more cores over high clock speed. None of the currently popular programming languages have been designed to take advantage of this fact, which makes writing parallel and concurrent code in them error-prone. Go is designed to take advantage of multiple CPU cores, and it removes all the frustration and bug-filled code. Go is designed to allow any developer to easily and safely write parallel and concurrent code that enables them to take advantage of modern multicore CPUs and cloud computing – unlocking high-performance processing and massive scalability without the drama.
What Does Go Look Like?
Let's take our first look at some Go code. This code randomly prints a message to the console from a pre-defined list of messages:
package main
// Import extra functionality from packages
import (
"errors"
"fmt"
"log"
"math/rand"
"strconv"
"time"
)// Taken from: https://en.wiktionary.org/wiki/Hello_World#Translations
var helloList = []string{
"Hello, world",
"Καλημέρα κόσμε",
"こんにちは世界",
"سلام دنیا",
"Привет, мир",
}
The main() function is defined as:
func main() {
  // Seed random number generator using the current time
  rand.Seed(time.Now().UnixNano())
  // Generate a random number in the range of out list
  index := rand.Intn(len(helloList))
  // Call a function and receive multiple return values
  msg, err := hello(index)
  // Handle any errors
  if err != nil {
  log.Fatal(err)
  }
  // Print our message to the console
  fmt.Println(msg)
}
Let's consider the hello() function:
func hello(index int) (string, error) {
  if index < 0 || index > len(helloList)-1 {
  // Create an error, convert the int type to a string
  return "", errors.New("out of range: " + strconv.Itoa(index))
  }
  return helloList[index], nil
}
Now, let's step through this code piece by piece.
At the top of our script is the following:
package main
This code is our package declaration. All Go files must start with one of these. If you want to run the code directly, you'll need to name it main. If you don't name it main, then you can use it as a library and import it into other Go code. When creating an importable package, you can give it any name. All Go files in the same directory are considered part of the same package, which means all the files must have the same package name.
In the following code, we're importing code from packages:
// Import extra functionality from packages
import (
  "errors"
  "fmt"
  "log"
  "math/rand"
  "strconv"
  "time"
)
In this example, the packages are all from Go's standard library. Go's standard library is very high-quality and comprehensive. You are strongly recommended to maximize your use of it. You can tell if a package isn't from the standard library because it'll look like a URL, for example, github.com/fatih/color.
Go has a module system that makes using external packages easy. To use a new module, add it to your import path. Go will automatically download it for you the next time you build code.
Imports only apply to the file they're declared in, which means you must declare the same imports over and over in the same package and project. Fear not, though you don't need to do this by hand. There are many tools and Go editors that automatically add and remove the imports for you:
// Taken from: https://en.wiktionary.org/wiki/Hello_World#Translations
var helloList = []string{
"Hello, world",
"Καλημέρα κόσμε",
"こんにちは世界",
"سلام دنیا",
"Привет, мир",
}
Here, we're declaring a global variable, which is a list of strings, and initializing it with data. The text or strings in Go support multi-byte UFT-8 encoding, making them safe for any language. The type of list we're using here is called a slice. There are three types of lists in Go: slices, arrays, and maps. All three are collections of keys and values, where you use the key to get a value from the collection. Slice and array collections use a number as the key. The first key is always 0 in slices and arrays. Also, in slices and arrays, the numbers are contiguous, which means there is never a break in the sequence of numbers. With the map type, you get to choose the key type. You use this when you want to use some other data to look up the value in the map. For example, you could use a book's ISBN to look up its title and author:
func main() {
…
}
Here, we're declaring a function. A function is some code that runs when called. You can pass data in the form of one or more variables to a function and optionally receive one or more variables back from it. The main() function in Go is special. The main() function is the entry point of your Go code. When your code runs, Go automatically calls main to get things started:
  // Seed random number generator using the current time
  rand.Seed(time.Now().UnixNano())
  // Generate a random number in the range of out list
  index := rand.Intn(len(helloList))
In the preceding code, we are generating a random number. The first thing we need to do is ensure it's a good random number, so to do that, we must "seed" the random number generator. We seed it using the current time formatted to a Unix timestamp with nanoseconds. To get the time, we call the Now function in the time package. The Now function returns a struct type variable. Structs are a collection of properties and functions, a little like objects in other languages. In this case, we are calling the UnixNano function on that struct straight away. The UnixNano function returns a variable of the int64 type, which is a 64-bit integer or, more simply, a number. This number is passed into rand.Seed. The rand.Seed function accepts an int64 variable as its input. Note that the type of the variable from time.UnixNano and rand.Seed must be the same. Now, we've successfully seeded the random number generator.
What we want is a number we can use to get a random message. We'll use rand.Intn for this job. This function gives us a random number between 0 and 1, minus the number you pass in. This may sound a bit strange, but it works out perfectly for what we're trying to do. This is because our list is a slice where the keys start from 0 and increment by 1 for each value. This means the last index is 1 less than the length of the slice.
To show you what this means, here is some simple code:
package main
import (
"fmt"
)
func main() {
helloList := []string{
"Hello, world",
"Καλημέρα κόσμε",
"こんにちは世界",
"سلام دنیا",
"Привет, мир",
}
fmt.Println(len(helloList))
fmt.Println(helloList[len(helloList)-1])
fmt.Println(helloList[len(helloList)])
}
This code prints the length of the list and then uses that length to print the last element. To do that, we must subtract 1, otherwise, we'd get an error, which is what the last line causes:
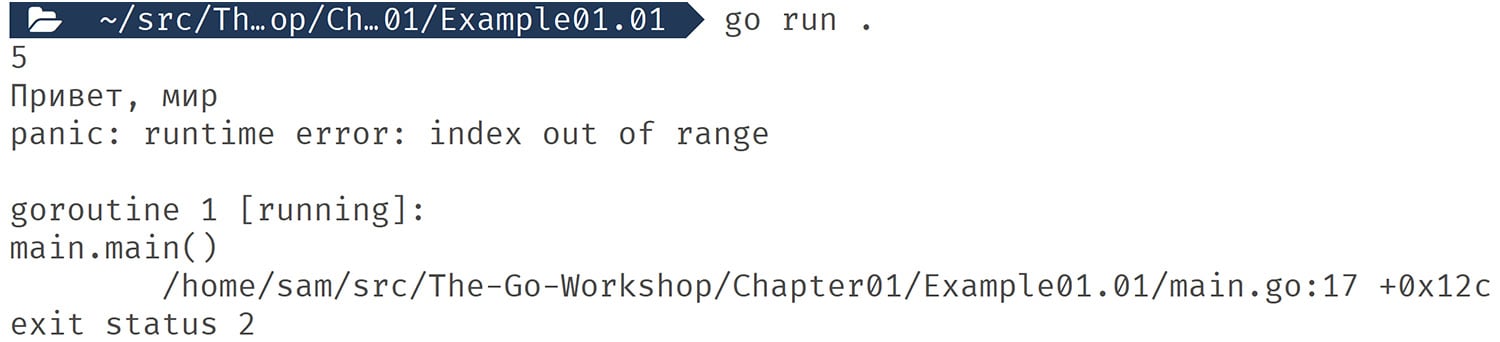
Figure 1.01: Output displaying an error
Once we've generated our random number, we assign it to a variable. We do this with the := notation, which is a very popular shortcut in Go. It tells the compiler to go ahead and assign that value to my variable and select the appropriate type for that value. This shortcut is one of the many things that makes Go feel like a dynamically typed language:
  // Call a function and receive multiple return values
  msg, err := hello(index)
We then use that variable to call a function named hello. We'll look at hello in just a moment. The important thing to note is that we're receiving two values back from the function and we're able to assign them to two new variables, msg and err, using the := notation:
func hello(index int) (string, error) {
…
}
This code is the definition of the hello function; we're not showing the body for now. A function acts as a unit of logic that's called when and as often as is needed. When calling a function, the code that calls it stops running and waits for the function to finish running. Functions are a great tool for keeping your code organized and understandable. In the signature of hello, we've defined that it accepts a single int value and that it returns a string and an error value. Having an error as your last return value is a very common thing to have in Go. The code between the {} is the body of the function. The following code is what's run when the function's called:
  if index < 0 || index > len(helloList)-1 {
  // Create an error, convert the int type to a string
  return "", errors.New("out of range: " + strconv.Itoa(index))
  }
  return helloList[index], nil
Here, we are inside the function; the first line of the body is an if statement. An if statement runs the code inside its {} if its Boolean expression is true. The Boolean expression is the logic between the if and the {. In this case, we're testing to see if the passed index variable is greater than 0 or less than the largest possible slice index key.
If the Boolean expression were to be true, then our code would return an empty string and an error. At this point, the function would stop running, and the code that called the function would continue to run. If the Boolean expression were not true, its code would be skipped over, and our function would return a value from helloList and nil. In Go, nil represents something with no value and no type:
  // Handle any errors
  if err != nil {
  log.Fatal(err)
  }
After we've run hello, the first thing we need to do is check to see if it ran successfully. We do this by checking the error value stored in err. If err is not equal to nil, then we know we have an error. Then, we call log.Fatal, which writes out a logging message and kills our app. Once the app's been killed, no more code runs:
  // Print our message to the console
  fmt.Println(msg)
If there is no error, then we know that hello ran successfully and that the value of msg can be trusted to hold a valid value. The final thing we need to do is print the message to the screen via the Terminal.
Here's how that looks:

Figure 1.02: Output displaying valid values
In this simple Go program, we've been able to cover a lot of key concepts that we'll explore in full in the coming chapters.
Exercise 1.01: Using Variables, Packages, and Functions to Print Stars
In this exercise, we'll use some of what we learned about in the preceding example to print a random number, between 1 and 5, of stars (*) to the console. This exercise will give you a feel of what working with Go is like and some practice with using the features of Go we'll need going forward. Let's get started:
- Create a new folder and add a
main.gofile to it. - In
main.go, add themainpackage name to the top of the file:package main
- Now, add the imports we'll use in this file:
import (
  "fmt"
  "math/rand"
  "strings"
  "time"
)
- Create a
main()function:func main() { - Seed the random number generator:
rand.Seed(time.Now().UnixNano())
- Generate a random number between 0 and then add 1 to get a number between 1 and 5:
r := rand.Intn(5) + 1
- Use the string repeater to create a string with the number of stars we need:
stars := strings.Repeat("*", r) - Print the string with the stars to the console with a new line character at the end and close the
main()function:fmt.Println(stars) }
- Save the file. Then, in the new folder, run the following:
go run .
The following is the output:

Figure 1.03: Output displaying stars
In this exercise, we created a runnable Go program by defining the main package with a main() function in it. We used the standard library by adding imports to packages. Those packages helped us generate a random number, repeat strings, and write to the console.
Activity 1.01 Defining and Printing
In this activity, we are going to create a medical form for a doctor's office to capture a patient's name, age, and whether they have a peanut allergy:
- Create a variable for the following:
- First name as a string
- Family name as a string
- Age as an
int - Peanut allergy as a
bool
- Ensure they have an initial value.
- Print the values to the console.
The following is the expected output:

Figure 1.04: Expected output after assigning the variables
Note
The solution for this activity can be found via this link.
Next, we'll start going into detail about what we've covered so far, so don't worry if you are confused or have a question about what you've seen so far.
Declaring Variables
Now that you've had an overview of Go and completed your first exercise, we're going to dive deep. Our first stop on the journey is variables.
A variable holds data for you temporarily so you can work with it. When you declare a variable, it needs four things: a statement that you are declaring a variable, a name for the variable, the type of data it can hold, and an initial value for it. Fortunately, some of the parts are optional, but that also means there's more than one way of defining a variable.
We'll now cover all the ways you can declare a variable.
Declaring a Variable Using var
Using var is the foundational way to declare a variable. Every other way we'll cover is a variation of this approach, typically by omitting parts of this definition. A full var definition with everything in place looks like this:
var foo string = "bar"
The key parts are var, foo, string, and = "bar":
-
varis our declaration that we are defining a variable. foois the name of the variable.stringis the type of the variable.= "bar"is its initial value.
Exercise 1.02: Declaring a Variable Using var
In this exercise, we'll declare two variables using the full var notation. Then, we'll print them to the console. You'll see that you can use the var notation anywhere in your code, which isn't true for all variable declaration notations. Let's get started:
- Create a new folder and add a
main.gofile to it: - In
main.go, add the main package name to the top of the file:package main
- Add the imports:
import (
  "fmt"
)
- Declare a variable at the package-level scope. We'll cover what scopes are in detail later:
var foo string = "bar"
- Create the
main()function:func main() { - Declare another variable using
varin our function:var baz string = "qux"
- Print both variables to the console:
fmt.Println(foo, baz)
- Close the
main()function:}
- Save the file. Then, in the new folder, run the following:
go run .
The following is the output:
bar qux
In this example, foo is declared at the package level while baz is declared at the function level. Where a variable is declared is important because where you declare a variable also limits what notation you can use to declare it.
Next, we'll look at another way to use the var notation.
Declaring Multiple Variables at Once with var
We can use a single var declaration to define more than one variable. Using this method is common when declaring package-level variables. The variables don't need to be of the same type, and they can all have their own initial values. The notation looks like this:
Var (
  <name1> <type1> = <value1>
  <name2> <type2> = <value2>
…
  <nameN> <typeN> = <valueN>
)
You can have multiple of these types of declaration, which is a nice way to group related variables, thereby making your code more readable. You can use this notation in functions, but it's rare to see it used there.
Exercise 1.03: Declaring Multiple Variables at Once with var
In this exercise, we'll declare multiple variables using one var statement, each with a different type and initial value. Then, we'll print the value of each variable to the console. Let's get started:
- Create a new folder and add a
main.gofile to it. - In
main.go, add themainpackage name to the top of the file:package main
- Add the imports:
import (
  "fmt"
  "time"
)
- Start the
vardeclaration:var (
- Define three variables:
  Debug     bool    = false
  LogLevel  string  = "info"
  startUpTime time.Time = time.Now()
- Close the
vardeclaration:)
- In the
main()function, print each variable to the console:func main() { fmt.Println(Debug, LogLevel, startUpTime) } - Save the file. Then, in the new folder, run the following:
go run .
The following is the output:

Figure 1.05: Output displaying three variable values
In this exercise, we declared three variables using a single var statement. Your output looks different for the time.Time variable, but that's correct. The format is the same, but the time itself is different.
Using the var notation like this is a good way to keep your code well organized and to save you some typing.
Next, we'll start removing some of the optional parts of the var notation.
Skipping the Type or Value When Declaring Variables
In real-world code, it's not common to use the full var notation. There are a few cases where you need to define a package-level variable with an initial value and tightly control its type. In those cases, you need the full notation. It'll be obvious when this is needed as you'll have a type mismatch of some kind, so don't worry too much about this for now. The rest of the time, you'll remove an optional part or use the short variable declaration.
You don't need to include both the type and the initial value when declaring a variable. You can use just one or the other; Go works out the rest. If you have a type in the declaration but no initial value, Go uses the zero value for the type you picked. We'll talk more about what a zero value is in a later chapter. On the other hand, if you have an initial value and no type, Go has a ruleset for how to infer the types that are needed from the literal value you use.
Exercise 1.04: Skipping the Type or Value When Declaring Variables
In this exercise, we'll update our previous exercise to skip the optional initial values or type declarations from our variable declaration. Then, we'll print the values to the console, as we did previously, to show that the result is the same. Let's get started:
- Create a new folder and add a
main.gofile to it. - In
main.go, add themainpackage name to the top of the file:package main
- Import the packages we'll need:
import (
  "fmt"
  "time"
)
- Start the multi-variable declaration:
var (
- The
boolin the first exercise has an initial value of false. That's abool's zero value, so we'll drop the initial value from its declaration:Debug bool
- The next two variables both have a non-zero value for their type, so we'll drop their type declaration:
  LogLevel  = "info"
  startUpTime = time.Now()
- Close the var declaration:
)
- In the
main()function, print out each variable:func main() { fmt.Println(Debug, LogLevel, startUpTime) } - Save the file. Then, in the new folder, run the following:
go run .
The following is the output:

Figure 1.06: Output displaying variable values despite not mentioning the type while declaring the variables
In this exercise, we were able to update the previous code to use a much more compact variable declaration. Declaring variables is something you'll have to do a lot, and not having to use the notation makes for a better experience when writing code.
Next, we'll look at a situation where you can't skip any of the parts.
Type Inference Gone Wrong
There are times when you'll need to use all the parts of the declaration, for example, when Go isn't able to guess the correct type you need. Let's take a look at an example of this:
package main
import "math/rand"
func main() {
  var seed = 1234456789
  rand.Seed(seed)
}
The following is the output:

Figure 1.07: Output showing an error
The issue here is that rand.Seed requires a variable of the int64 type. Go's type inference rules interoperate a whole number, such as the one we used as an int. We'll look at the difference between them in more detail in a later chapter. To resolve this, we will add int64 to the declaration. Here's how that looks:
package main
import "math/rand"
func main() {
  var seed int64 = 1234456789
  rand.Seed(seed)
}
Next, we'll look at an even quicker way to declare variables.
Short Variable Declaration
When declaring variables in functions and functions only, we can use the := shorthand. This shorthand allows us to make our declarations even shorter. It does this by allowing us to not have to use the var keyword and by always inferring the type from a required initial value.
Exercise 1.05: Implementing Short Variable Declaration
In this exercise, we'll update our previous exercise to use a short variable declaration. Since you can only use a short variable declaration in a function, we'll move our variable out of the package scope. Where before Debug had a type but no initial value, we'll switch it back so that it has an initial value since that's required when using a short variable declaration. Finally, we'll print it to the console. Let's get started:
- Create a new folder and add a
main.gofile to it. - In
main.go, add themainpackage name to the top of the file:package main
- Import the packages we'll need:
import (
  "fmt"
  "time"
)
- Create the
main()function:func main() { - Declare each variable using the short variable declaration notation:
  Debug := false
  LogLevel := "info"
  startUpTime := time.Now()
- Print the variables to the console:
  fmt.Println(Debug, LogLevel, startUpTime)
}
- Save the file. Then, in the new folder, run the following:
go run .
The following is the output:

Figure 1.08: Output displaying the variable values that were printed after using short variable declaration notation
In this exercise, we updated our previous code to use a very compact way to declare variables when we have an initial value to use.
The := shorthand is very popular with Go developers and the most common way in which variables get defined in real-world Go code. Developers like how it makes their code concise and compact while still being clear as to what's happening.
Another shortcut is declaring multiple variables on the same line.
Declaring Multiple Variables with a Short Variable Declaration
It's possible to declare multiple variables at the same time using a short variable declaration. They must all be on the same line, and each variable must have a corresponding initial value. The notation looks like <var1>, <var2>, …, <varN> := <val1>, <val2>, …, <valN>. The variable names are on the left-hand side of the :=, separated by a ,. The initial values are on the right-hand side of the := again, each separated by a ,. The leftmost variable name gets the leftmost value. There must be an equal number of names and values.
Here is an example that uses our previous exercise's code:
package main
import (
  "fmt"
  "time"
)
func main() {
  Debug, LogLevel, startUpTime := false, "info", time.Now()
  fmt.Println(Debug, LogLevel, startUpTime)
}
The following is the output:

Figure 1.09: Example output displaying the variable values for the program with a variable declaring function
Sometimes, you do see real-word code like this. It's a little hard to read, so it's not common to see it in terms of literal values. This doesn't mean this isn't common since it's very common when calling functions that return multiple values. We'll cover this in detail when we look at functions in a later chapter.
Exercise 1.06: Declaring Multiple Variables from a Function
In this exercise, we'll call a function that returns multiple values, and we'll assign each value to a new variable. Then, we'll print the values to the console. Let's get started:
- Create a new folder and add a
main.gofile to it. - In
main.go, add themainpackage name to the top of the file:package main
- Import the packages we'll need:
import (
  "fmt"
  "time"
)
- Create a function that returns three values:
func getConfig() (bool, string, time.Time) { - In the function, return three lital values, each separated by a
,:return false, "info", time.Now()
- Close the function:
}
- Create the
main()function:func main() { - Using a short variable declaration, capture the values returned from the function's three new variables:
Debug, LogLevel, startUpTime := getConfig()
- Print the three variables to the console:
fmt.Println(Debug, LogLevel, startUpTime)
- Close the
main()function:}
- Save the file. Then, in the new folder, run the following:
go run .
The following is the output:

Figure 1.10: Output displaying the variable values for the program with the variable declaring function
In this exercise, we were able to call a function that returned multiple values and capture them using a short variable declaration in one line. If we used the var notation, it would look like this:
var (
  Debug bool
  LogLevel string
  startUpTime time.Time
)
Debug, LogLevel, startUpTime = getConfig()
Short variable notation is a big part of how Go has the feel of a dynamic language.
We're not quite done with var yet, though. It still has a useful trick up its sleeve.
Using var to Declare Multiple Variables in One Line
While it's more common to use a short variable declaration, you can use var to define multiple variables on a single line. One limitation of this is that, when declaring the type, all the values must have the same type. If you use an initial value, then each value infers its type from the literal value so that they can differ. Here's an example:
package main
import (
  "fmt"
  "time"
)
func getConfig() (bool, string, time.Time) {
  return false, "info", time.Now()
}
func main() {
  // Type only
  var start, middle, end float32
  fmt.Println(start, middle, end)
  // Initial value mixed type
  var name, left, right, top, bottom = "one", 1, 1.5, 2, 2.5
  fmt.Println(name, left, right, top, bottom)
  // works with functions also
  var Debug, LogLevel, startUpTime = getConfig()
  fmt.Println(Debug, LogLevel, startUpTime)
}
The following is the output:

Figure 1.11: Output displaying variable values
Most of these are more compact when using a short variable declaration. This fact means they don't come up in real-world code much. The exception is the type-only example. This notation can be useful when you need many variables of the same type, and you need to control that type carefully.
Non-English Variable Names
Go is a UTF-8 compliant language, which means you can define variables' names using alphabets other than the Latin alphabet that, for example, English uses. There are some limitations regarding what the name of a variable can be. The first character of the name must be a letter or _. The rest can be a mixture of letters, numbers, and _. Let's have a look at what this looks like:
package main
import (
  "fmt"
  "time"
)
func main() {
  デバッグ := false
  日志级别 := "info"
  ይጀምሩ := time.Now()
  _A1_Μείγμα := "
"
  fmt.Println(デバッグ, 日志级别, ይጀምሩ, _A1_Μείγμα)
}
The following is the output:

Figure 1.12: Output showing variable values
Note
Languages and Language: Not all programming languages allow you to use UTF-8 characters as variables and function names. This feature could be one of the reasons why Go has become so popular in Asian countries, particularly in China.
Changing the Value of a Variable
Now that we've defined our variables, let's see what we can do with them. First, let's change the value from its initial value. To do that, we use similar notation to when we set an initial value. This looks like <variable> = <value>.
Exercise 1.07: Changing the Value of a Variable
- Create a new folder and add a
main.gofile to it. - In
main.go, add themainpackage name to the top of the file:package main
- Import the packages we'll need:
import "fmt"
- Create the
main()function:func main() { - Declare a variable:
offset := 5
- Print the variable to the console:
fmt.Println(offset)
- Change the value of the variable:
offset = 10
- Print it to the console again and close the
main()function:fmt.Println(offset) }
- Save the file. Then, in the new folder, run the following:
go run .
The following is the output before changing the variable's value:
5 10
In this example, we've changed the value of offset from its initial value of 5 to 10. Anywhere you use a raw value, such as 5 and 10 in our example, you can use a variable. Here's how that looks:
package main
import "fmt"var defaultOffset = 10 func main() {
offset := defaultOffset
fmt.Println(offset)
offset = offset + defaultOffset
  fmt.Println(offset)
}
The following is the output after changing the variable's value:
10
20
Next, we'll look at how we can change multiple variables in a one-line statement.
Changing Multiple Values at Once
In the same way that you can declare multiple variables in one line, you can also change the value of more than one variable at a time. The syntax is similar, too; it looks like <var1>, <var2>, …, <varN> = <val1>, <val2>, …, <valN>.
Exercise 1.08: Changing Multiple Values at Once
In this exercise, we'll define some variables and use a one-line statement to change their values. Then, we'll print their new values to the console. Let's get started:
- Create a new folder and add a
main.gofile to it. - In
main.go, add themainpackage name to the top of the file:package main
- Import the packages we'll need:
import "fmt"
- Create the
main()function:func main() { - Declare our variables with an initial value:
query, limit, offset := "bat", 10, 0
- Change each variable's values using a one-line statement:
query, limit, offset = "ball", offset, 20
- Print the values to the console and close the
main()function:fmt.Println(query, limit, offset) }
- Save the file. Then, in the new folder, run the following:
go run .
The following is the output showing the changed variable values using a single statement:
ball 0 20
In this exercise, we were able to change multiple variables in a single line. This approach would also work when calling functions, just as it does with a variable declaration. You need to be careful with a feature like this to ensure that, first and foremost, your code is easy to read and understand. If using a one-line statement like this makes it hard to know what the code is doing, then it's better to take up more lines to write the code.
Next, we'll look at what operators are and how they can be used to change your variables in interesting ways.
Operators
While variables hold the data for your application, they become truly useful when you start using them to build the logic of your software. Operators are the tools you use to work with your software's data. With operators, you can compare data to other data. For example, you can check whether a price is too low or too high in a trading application. You can also use operators to manipulate data. For example, you can use operators to add the costs of all the items in a shopping cart to get the total price.
The following list mentions groups of operators:
- Arithmetic operators
Used for math-related tasks such as addition, subtraction, and multiplication.
- Comparison operators
Used to compare two values; for example, are they are equal, not equal, less than, or greater than each other.
- Logical operators
Used with Boolean values to see whether they are both true, only one is true, or whether a
boolis false. - Address operators
We'll cover these in detail soon when we look at pointers. These are used to work with them.
- Receive operators
Used when working with Go channels, which we'll cover in a later chapter.
Exercise 1.09 Using Operators with Numbers
In this exercise, we are going to simulate a restaurant bill. To build our simulation, we'll need to use mathematic and comparison operators. We'll start by exploring all the major uses for operators.
In our simulation, we'll sum everything together and work out the tip based on a percentage. Then, we'll use a comparison operator to see whether the customer gets a reward. Let's get started:
Note
We have considered US Dollar as the currency for this exercise. You may consider any currency of your choice; the main focus here is the operations.
- Create a new folder and add a
main.gofile to it: - In
main.go, add themainpackage name to the top of the file:package main
- Import the packages you'll need:
import "fmt"
- Create the
main()function:func main() { - Create a variable to hold the total. For this item on the bill, the customer purchased 2 items that cost 13 USD. We use
*to do the multiplication. Then, we print a subtotal:// Main course var total float64 = 2 * 13 fmt.Println("Sub :", total) - Here, they purchased 4 items that cost 2.25 USD. We use multiplication to get the total of these items and then use
+to add it to the previous total value and then assign that back to the total:// Drinks total = total + (4 * 2.25) fmt.Println("Sub :", total) - This customer is getting a discount of 5 USD. Here, we use the
–to subtract 5 USD from the total:// Discount total = total - 5 fmt.Println("Sub :", total) - Then, we use multiplication to calculate a 10% tip:
// 10% Tip tip := total * 0.1 fmt.Println("Tip :", tip) - Finally, we add the tip to the total:
total = total + tip fmt.Println("Total:", total) - The bill will be split between two people. Use
/to divide the total into two parts:// Split bill split := total / 2 fmt.Println("Split:", split) - Here, we'll calculate whether the customer gets a reward. First, we'll set the
visitCountand then add 1 USD to this visit:// Reward every 5th visit visitCount := 24 visitCount = visitCount + 1
- Then, we'll use
%to give us any remainder after dividing thevisitCountby 5 USD:remainder := visitCount % 5
- The customer gets a reward on every fifth visit. If the remainder is 0, then this is one of those visits. Use the
==operator to check whether the remainder is 0:if remainder == 0 { - If it is, print a message that they get a reward:
fmt.Println("With this visit, you've earned a reward.") } } - Save the file. Then, in the new folder, run the following:
go run .
The following is the output:
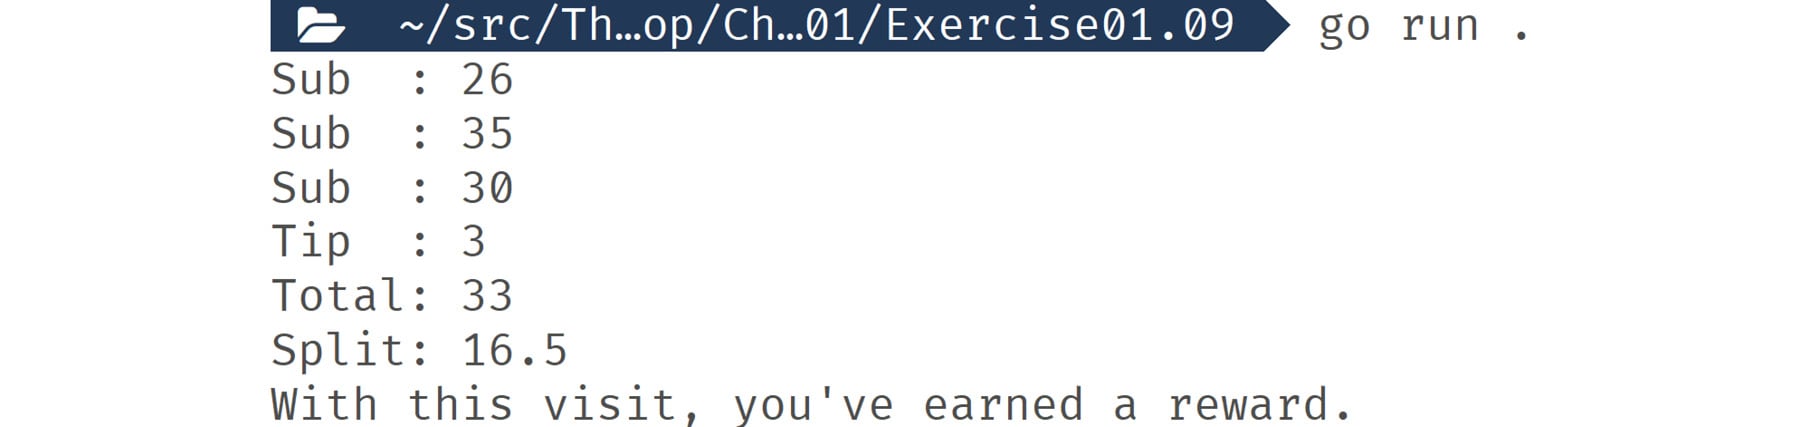
Figure 1.13: Output of operators used with numbers
In this exercise, we used the math and comparison operators with numbers. They allowed us to model a complex situation – calculating a restaurant bill. There are lots of operators and which ones you can use vary with the different types of values. For example, as well as there being an addition operator for numbers, you can use the + symbol to join strings together. Here's this in action:
package main
import "fmt"
func main() {
  givenName := "John"
  familyName := "Smith"
  fullName := givenName + " " + familyName
  fmt.Println("Hello,", fullName)
}
The following is the output:
Hello, John Smith
For some situations, there are some shortcuts we can make with operators. We'll go over this in the next section.
Note
Bitwise Operators: Go has all the familiar bitwise operators you'd find in programming languages. If you know what bitwise operators are, then there will be no surprises here for you. If you don't know what bitwise operators are, don't worry – they aren't common in real-world code.
Shorthand Operator
There are a few shorthand assignment operators when you want to perform operations to an existing value with its own value. For example:
- --: Reduce a number by 1
- ++: Increase a number by 1
- +=: Add and assign
- -=: Subtract and assign
Exercise 1.10: Implementing Shorthand Operators
In this exercise, we'll use some examples of operator shorthand to show how they can make your code more compact and easier to write. We'll create some variables then use shorthand to change them, printing them out as we go. Let's get started:
- Create a new folder and add a
main.gofile to it. - In
main.go, add themainpackage name to the top of the file:package main
- Import the packages we'll need:
import "fmt"
- Create the
main()function:func main() { - Create a variable with an initial value:
count := 5
- We'll add to it and then assign the result back to itself. Then, we'll print it out:
  count += 5
  fmt.Println(count)
- Increment the value by 1 and then print it out:
  count++
  fmt.Println(count)
- Decrement it by 1 and then print it out:
  count--
  fmt.Println(count)
- Subtract and assign the result back to itself. Print out the new value:
  count -= 5
  fmt.Println(count)
- There is also a shorthand that works with strings. Define a string:
name := "John"
- Next, we'll append another string to the end of it and then print it out:
name += " Smith" fmt.Println("Hello,", name) - Close the
main()function:}
- Save the file. Then, in the new folder, run the following:
go run .
The following is the output:

Figure 1.14: Output using shorthand operators
In this exercise, we used some shorthand operators. One set focused on modification and then assignment. This type of operation is common, and having these shortcuts makes coding more engaging. The other operators are increment and decrement. These are useful in loops when you need to step over data one at a time. These shortcuts make it clear what you're doing to anyone who reads your code.
Next, we'll look at comparing values to each other in detail.
Comparing Values
Logic in applications is a matter of having your code make a decision. These decisions get made by comparing the values of variables to the rules you define. These rules come in the form of comparisons. We use another set of operators to make these comparisons. The result of these comparisons is always true or false. You'll also often need to make multiples of these comparisons to make a single decision. To help with that, we have logical operators.
These operators, for the most part, work with two values and always result in a Boolean value. You can only use logical operators with Boolean values. Let's take a look at comparison operators and logical operators in more detail:
Comparison Operators
==True if two values are the same!=True if two values are not the same<True if the left value is less than the right value<=True if the left value is less or equal to the right value>True if the left value is greater than the right value>=True if the left value is greater than or equal to the right value
Logical Operators
&&True if the left and right values are both true||True if one or both the left and right values are true!This operator only works with a single value and results in true if the value is false
Exercise 1.11: Comparing Values
In this exercise, we'll use comparison and logical operators to see what Boolean results we get when testing different conditions. We are testing to see what level of membership a user has based on the number of visits they've had.
Our membership levels are as follows:
- Sliver: Between 10 and 20 visits inclusively
- Gold: Between 21 and 30 visits inclusively
- Platinum: Over 30 visits
Let's get started:
- Create a new folder and add a
main.gofile to it. - In
main.go, add themainpackage name to the top of the file:package main
- Import the packages we'll need:
import "fmt"
- Create the
main()function:func main() { - Define our
visitsvariable and initialize it with a value:visits := 15
- Use the equals operator to see if this is their first visit. Then, print the result to the console:
fmt.Println("First visit :", visits == 1) - Use the not equal operator to see if they are a returning visitor:
fmt.Println("Return visit :", visits != 1) - Let's check whether they are a Silver member using the following code:
fmt.Println("Silver member :", visits >= 10 && visits < 21) - Let's check whether they are a Gold member using the following code:
fmt.Println("Gold member :", visits > 20 && visits <= 30) - Let's check whether they are a Platinum member using the following code:
fmt.Println("Platinum member :", visits > 30) - Close the
main()function:}
- Save the file. Then, in the new folder, run the following:
go run .
The following is the output:

Figure 1.15: Output displaying the comparison result
In this exercise, we used comparison and logical operators to make decisions about data. You can combine these operators in an unlimited number of ways to express almost any type of logic your software needs to make.
Next, we'll look at what happens when you don't give a variable an initial value.
Zero Values
The zero value of a variable is the empty or default value for that variable's type. Go has a set of rules stating that the zero values are for all the core types. Let's take a look:
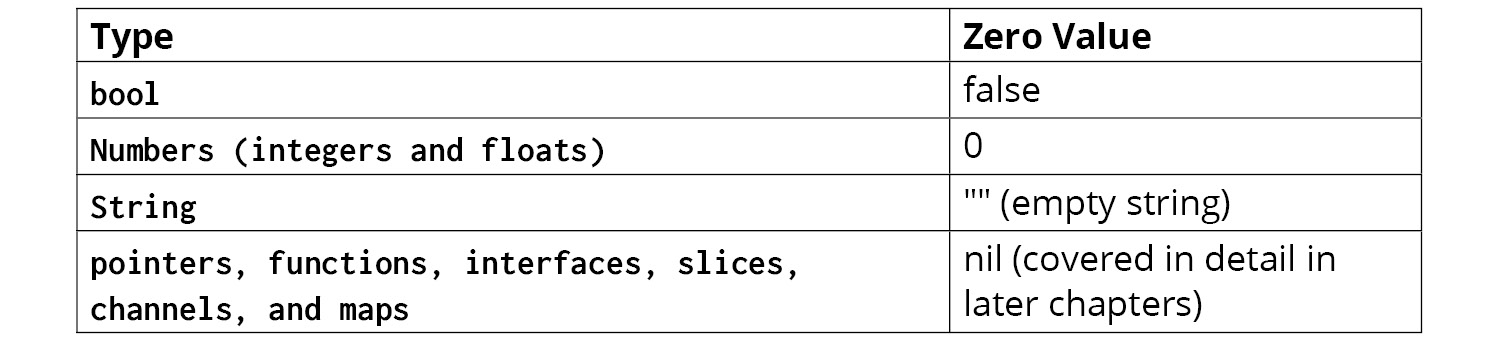
Figure 1.16: Variable types and their zero values
There are other types, but they are all derived from these core types, so the same rules still apply.
We'll look at the zero values of some types in the upcoming exercise.
Exercise 1.12 Zero Values
In this example, we'll define some variables without an initial value. Then, we'll print out their values. We're using fmt.Printf to help us in this exercise as we can get more detail about a value's type. fmt.Printf uses a template language that allows us to transform passed values. The substitution we're using is %#v. This transformation is a useful tool for showing a variable's value and type. Some other common substitutions you can try are as follows:
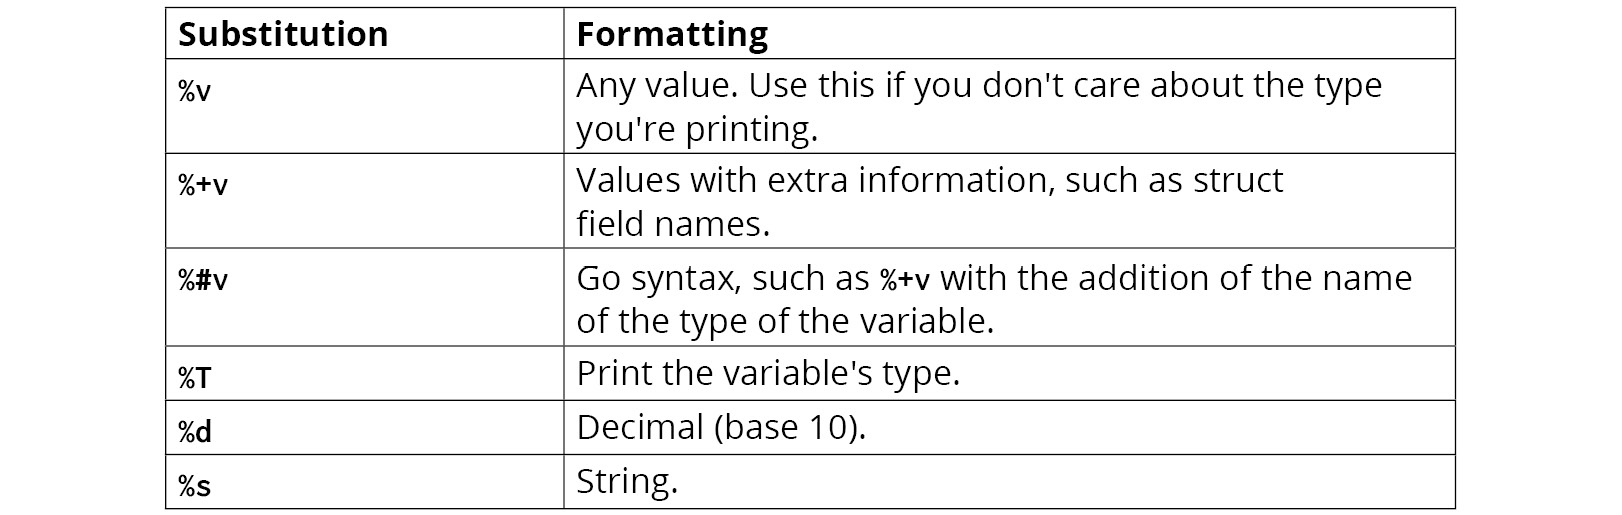
Figure 1.17: Table on substitutions
When using fmt.Printf, you need to add the new line symbol yourself, which you do by adding \n at the end of the string. Let's get started:
- Create a new folder and add a
main.gofile to it. - In
main.go, add themainpackage name to the top of the file:package main
- Import the packages we'll need:
import (
  "fmt"
  "time"
)
- Create the
main()function:func main() { - Declare and print an integer:
var count int fmt.Printf("Count : %#v \n", count) - Declare and print a
float:var discount float64 fmt.Printf("Discount : %#v \n", discount) - Declare and print a Boolean:
var debug bool fmt.Printf("Debug : %#v \n", debug) - Declare and print a
string:var message string fmt.Printf("Message : %#v \n", message) - Declare and print a collection of strings:
var emails []string fmt.Printf("Emails : %#v \n", emails) - Declare and print a struct (a type composed of other types; we will cover this in a later chapter):
var startTime time.Time fmt.Printf("Start : %#v \n", startTime) - Close the
main()function:}
- Save the file. Then, in the new folder, run the following:
go run .
The following is the output:

Figure 1.18: Output displaying zero values
In this exercise, we defined a variety of variable types without an initial value. Then, we printed them out using fmt.Printf to expose more detail about the values. Knowing what the zero values are and how Go controls them allows you to avoid bugs and write concise code.
Next, we'll look are what pointers are and how they can enable you to write efficient software.
Value versus Pointer
With values such as int, bool, and string, when you pass them to a function, Go makes a copy of the value, and it's the copy that's used in the function. This copying means that a change that's made to the value in the function doesn't affect the value that you used when calling the function.
Passing values by copying tends to end up with code that has fewer bugs. With this method of passing values, Go can use its simple memory management system called the stack. The downside is that copying uses up more and more memory as values get passed from function to function. In real-world code, functions tend to be small, and values get passed to lots of functions, so copying by value can sometimes end up using much more memory than is needed.
There is an alternative to copying that uses less memory. Instead of passing a value, we create something called a pointer and then pass that to functions. A pointer is not a value itself, and you can't do anything useful with a pointer other than getting a value using it. You can think of a pointer as directions to a value you want, and to get to the value, you must follow the directions. If you use a pointer, Go won't make a copy of the value when passing a pointer to a function.
When creating a pointer to a value, Go can't manage the value's memory using the stack. This is because the stack relies on simple scope logic to know when it can reclaim the memory that's used by a value, and having a pointer to a variable means these rules don't work. Instead, Go puts the value on the heap. The heap allows the value to exist until no part of your software has a pointer to it anymore. Go reclaims these values in what it calls its garbage collection process. This garbage collection happens periodically in the background, and you don't need to worry about it.
Having a pointer to a value means that a value is put on the heap, but that's not the only reason that happens. Working out whether a value needs to be put on the heap is called escape analysis. There are times when a value with no pointers is put on the heap, and it's not always clear why.
You have no direct control over whether a value is put on the stack or the heap. Memory management is not part of Go's language specification. Memory management is considered an internal implementation detail. This means it could be changed at any time, and that what we've spoken about are only general guidelines and not fixed rules and could change at a later date.
While the benefits of using a pointer over a value that gets passed to lots of functions are clear for memory usage, it's not so clear for CPU usage. When a value gets copied, Go needs CPU cycles to get that memory and then release it later. Using a pointer avoids this CPU usage when passing it to a function. On the other hand, having a value on the heap means that it then needs to be managed by the complex garbage collection process. This process can become a CPU bottleneck in certain situations, for example, if there are lots of values on the heap. When this happens, the garbage collector has to do lots of checking, which uses up CPU cycles. There is no correct answer here, and the best approach is the classic performance optimization one. First, don't prematurely optimize. When you do have a performance problem, measure before you make a change, and then measure after you've made a change.
Beyond performance, you can use pointers to change your code's design. Sometimes, using pointers allows a cleaner interface and simplifies your code. For example, if you need to know whether a value is present or not, a non-pointer value always has at least its zero value, which could be valid in your logic. You can use a pointer to allow for an is not set state as well as holding a value. This is because pointers, as well as holding the address to a value, can also be nil, which means there is no value. In Go, nil is a special type that represents something not having a value.
The ability for a pointer to be nil also means that it's possible to get the value of a pointer when it doesn't have a value associated with it, which means you'll get a runtime error. To prevent runtime errors, you can compare a pointer to nil before trying to get its value. This looks like <pointer> != nil. You can compare pointers with other pointers of the same type, but they only result in true if you are comparing a pointer to itself. No comparison of the associated values gets made.
As a beginner in the language, I suggest avoiding pointers until they become necessary, either because you have a performance problem or because having a pointer makes your code cleaner.
Getting a Pointer
To get a pointer, you have a few options. You can declare a variable as being a pointer type using a var statement. You can do this by adding an * at the front of most types. This notation looks like var <name> *<type>. The initial value of a variable that uses this method is nil. You can use the built-in new function for this. This function is intended to be used to get some memory for a type and return a pointer to that address. The notation looks like <name> := new(<type>). The new function can be used with var too. You can also get a pointer from an existing variable using &. This looks like <var1> := &<var2>.
Exercise 1.13: Getting a Pointer
In this exercise, we'll use each of the methods we can use to get a pointer variable. Then, we'll print them to the console using fmt.Printf to see what their type and value is. Let's get started:
- Create a new folder and add a
main.gofile to it. - In
main.go, add themainpackage name to the top of the file:package main
- Import the packages we'll need:
import (
  "fmt"
  "time"
)
- Create the
main()function:func main() { - Declare a pointer using a
varstatement:var count1 *int
- Create a variable using
new:count2 := new(int)
- You can't take the address of a literal number. Create a temporary variable to hold a number:
countTemp := 5
- Using
&, create a pointer from the existing variable:count3 := &countTemp
- It's possible to create a pointer from some types without a temporary variable. Here, we're using our trusty
timestruct:t := &time.Time{} - Print each out using
fmt.Printf:fmt.Printf("count1: %#v\n", count1) fmt.Printf("count2: %#v\n", count2) fmt.Printf("count3: %#v\n", count3) fmt.Printf("time : %#v\n", t) - Close the
main()function:}
- Save the file. Then, in the new folder, run the following:
go run .
The following is the output:

Figure 1.19: Output after creating a pointer
In this exercise, we looked at three different ways of creating a pointer. Each one is useful, depending on what your code needs. With the var statement, the pointer has a value of nil, while the others already have a value address associated with them. For the time variable, we can see the value, but we can tell it's a pointer because its output starts with an &.
Next, we'll see how we can get a value from a pointer.
Getting a Value from a Pointer
In the previous exercise, when we printed out the pointer variables for the int pointers to the console, we either got nil or saw a memory address. To get to the value a pointer is associated with, you dereference the value using * in front of the variable name. This looks like fmt.Println(*<val>).
Dereferencing a zero or nil pointer is a common bug in Go software as the compiler can't warn you about it, and it happens when the app is running. Therefore, it's always best practice to check that a pointer is not nil before dereferencing it unless you are certain it's not nil.
You don't always need to dereference; for example, when a property or function is on a struct. Don't worry too much about when you shouldn't be dereferencing as Go gives you clear errors regarding when you can and can't dereference a value.
Exercise 1.14: Getting a Value from a Pointer
In this exercise, we'll update our previous exercise to dereference the values from the pointers. We'll also add nil checks to prevent us from getting any errors. Let's get started:
- Create a new folder and add a
main.gofile to it. - In
main.go, add themainpackage name to the top of the file:package main
- Import the packages we'll need:
import (
  "fmt"
  "time"
)
- Create the
main()function:func main() { - Our pointers are declared in the same way as they were previously:
var count1 *int count2 := new(int) countTemp := 5 count3 := &countTemp t := &time.Time{} - For count 1, 2, and 3, we need to add a
nilcheck and add*in front of the variable name:if count1 != nil { fmt.Printf("count1: %#v\n", *count1) } if count2 != nil { fmt.Printf("count2: %#v\n", *count2) } if count3 != nil { fmt.Printf("count3: %#v\n", *count3) } - We'll also add a
nilcheck for ourtimevariable:if t != nil { - We'll dereference the variable using
*, just like we did with thecountvariables:fmt.Printf("time : %#v\n", *t) - Here, we're calling a function on our
timevariable. This time, we don't need to dereference it:fmt.Printf("time : %#v\n", t.String()) - Close the
nilcheck:}
- Close the
main()function:}
- Save the file. Then, in the new folder, run the following:
go run .
The following is the output:

Figure 1.20: Output displaying the values that were obtained using pointers
In this exercise, we used dereferencing to get the values from our pointers. We also used nil checks to prevent dereferencing errors. From the output of this exercise, we can see that count1 was a nil value and that we'd have gotten an error if we tried to dereference. count2 was created using new, and its value is a zero value for its type. count3 also had a value that matches the value of the variable we got the pointer from. With our time variable, we were able to dereference the whole struct, which is why our output doesn't start with an &.
Next, we'll look at how using a pointer allows us to change the design of our code.
Function Design with Pointers
We'll cover functions in more detail in a later chapter, but you know enough from what we've done so far to see how using a pointer can change how you use a function. A function must be coded to accept pointers, and it's not something that you can choose whether to do or not. If you have a pointer variable or have passed a pointer of a variable to a function, any changes that are made to the value of the variable in the function also affect the value of the variable outside of the function.
Exercise 1.15: Function Design with Pointers
In this exercise, we'll create two functions: one that accepts a number by value, adds 5 to it, and then prints the number to the console; and another function that accepts a number as a pointer, adds 5 to it, and then prints the number out. We'll also print the number out after calling each function to assess what effect it has on the variable that was passed to the function. Let's get started:
- Create a new folder and add a
main.gofile to it. - In
main.go, add themainpackage name to the top of the file:package main
- Import the packages we'll need:
import "fmt"
- Create a function that takes an
intas an argument:func add5Value(count int) { - Add
5to the passed number:count += 5
- Print the updated number to the console:
fmt.Println("add5Value :", count) - Close the function:
}
- Create another function that takes an
intpointer:func add5Point(count *int) { - Dereference the value and add
5to it:*count += 5
- Print out the updated value of
countand dereference it:fmt.Println("add5Point :", *count) - Close the function:
}
- Create the
main()function:func main() { - Declare an
intvariable:var count int
- Call the first function with the variable:
add5Value(count)
- Print the current value of the variable:
fmt.Println("add5Value post:", count) - Call the second function. This time, you'll need to use
&to pass a pointer to the variable:add5Point(&count)
- Print the current value of the variable:
fmt.Println("add5Point post:", count) - Close the
main()function:}
- Save the file. Then, in the new folder, run the following:
go run .
The following is the output:

Figure 1.21: Output displaying the current value of the variable
In this exercise, we showed you how passing values by a pointer can affect the value variables that are passed to them. We saw that, when passing by value, the changes you make to the value in a function do not affect the value of the variable that's passed to the function, while passing a pointer to a value does change the value of the variable passed to the function.
You can use this fact to overcome awkward design problems and sometimes simplify the design of your code. Passing values by a pointer has traditionally been shown to be more error-prone, so use this design sparingly. It's also common to use pointers in functions to create more efficient code, which Go's standard library does a lot.
Activity 1.02: Pointer Value Swap
In this activity, your job is to finish some code a co-worker started. Here, we have some unfinished code for you to complete. Your task is to fill in the missing code, where the comments are to swap the values of a and b. The swap function only accepts pointers and doesn't return anything:
package main
import "fmt"
func main() {
  a, b := 5, 10
  // call swap here
  fmt.Println(a == 10, b == 5)
}
func swap(a *int, b *int) {
  // swap the values here
}
- Call the
swapfunction, ensuring you are passing a pointer. - In the
swapfunction, assign the values to the other pointer, ensuring you dereference the values.The following is the expected output:
true true
Note
The solution for this activity can be found via this link.
Next, we'll look at how we can create variables with a fixed value.
Constants
Constants are like variables, but you can't change their initial value. These are useful for situations where the value of a constant doesn't need to or shouldn't change when your code is running. You could make the argument that you could hardcode those values into the code and it would have a similar effect. Experience has shown us that while these values don't need to change at runtime, they may need to change later. If that happens, it can be an arduous and error-prone task to track down and fix all the hardcoded values. Using a constant is a tiny amount of work now that can save you a great deal of effort later.
Constant declarations are similar to var statements. With a constant, the initial value is required. Types are optional and inferred if left out. The initial value can be a literal or a simple statement and can use the values of other constants. Like var, you can declare multiple constants in one statement. Here are the notations:
constant <name> <type> = <value>
constant (
  <name1> <type1> = <value1>
  <name2> <type2> = <value3>
…
  <nameN> <typeN> = <valueN>
)
Exercise 1.16: Constants
In this exercise, we have a performance problem. Our database server is too slow. We are going to create a custom memory cache. We'll use Go's map collection type, which will act as the cache. There is a global limit on the number of items that can be in the cache. We'll use one map to help keep track of the number of items in the cache. We have two types of data we need to cache: books and CDs. Both use the ID, so we need a way to separate the two types of items in the shared cache. We need a way to set and get items from the cache.
We're going to set the maximum number of items in the cache. We'll also use constants to add a prefix to differentiate between books and CDs. Let's get started:
- Create a new folder and add a
main.gofile to it. - In
main.go, add themainpackage name to the top of the file:package main
- Import the packages we'll need:
import "fmt"
- Create a constant that's our global limit size:
const GlobalLimit = 100
- Create a
MaxCacheSizethat is 10 times the global limit size:const MaxCacheSize int = 10 * GlobalLimit
- Create our cache prefixes:
const (
  CacheKeyBook = "book_"
  CacheKeyCD   = "cd_"
)
- Declare a
mapthat has astringfor a key and astringfor its values as our cache:var cache map[string]string
- Create a function to get items from the cache:
func cacheGet(key string) string { return cache[key] } - Create a function that sets items in the cache:
func cacheSet(key, val string) { - In this function, check out the
MaxCacheSizeconstant to stop the cache going over that size:if len(cache)+1 >= MaxCacheSize { return } cache[key] = val } - Create a function to get a book from the cache:
func GetBook(isbn string) string { - Use the book cache prefix to create a unique key:
  return cacheGet(CacheKeyBook + isbn)
}
- Create a function to add a book to the cache:
func SetBook(isbn string, name string) { - Use the book cache prefix to create a unique key:
  cacheSet(CacheKeyBook+isbn, name)
}
- Create a function to get CD data from the cache:
func GetCD(sku string) string { - Use the
CDcache prefix to create a unique key:return cacheGet(CacheKeyCD + sku) }
- Create a function to add CDs to the shared cache:
func SetCD(sku string, title string) { - Use the
CDcache prefix constant to build a unique key for the shared cache:cacheSet(CacheKeyCD+sku, title) }
- Create the
main()function:func main() { - Initialize our cache by creating a
map:cache = make(map[string]string)
- Add a book to the cache:
SetBook("1234-5678", "Get Ready To Go") - Add a
CDto the cache:SetCD("1234-5678", "Get Ready To Go Audio Book") - Get and print that
Bookfrom the cache:fmt.Println("Book :", GetBook("1234-5678")) - Get and print that
CDfrom the cache:fmt.Println("CD :", GetCD("1234-5678")) - Close the
main()function:}
- Save the file. Then, in the new folder, run the following:
go run .
The following is the output:

Figure 1.22: Output displaying the Book and CD caches
In this exercise, we used constants to define values that don't need to change while the code is running. We declared then using a variety of notation options, some with the typeset and some without. We declared a single constant and multiple constants in a single statement.
Next, we'll look at a variation of constants for values that are more closely related.
Enums
Enums are a way of defining a fixed list of values that are all related. Go doesn't have a built-in type for enums, but it does provide tools such as iota to let you define your own using constants, which we'll explore now.
For example, in the following code, we have the days of the week defined as constants. This code is a good candidate for Go's iota feature:
…
const (
  Sunday  = 0
  Monday  = 1
  Tuesday   = 2
  Wednesday = 3
  Thursday  = 4
  Friday  = 5
  Saturday  = 6
)
…
With iota, Go helps us manage lists just like this. Using iota, the following code is equal to the preceding code:
…
const (
  Sunday = iota
  Monday
  Tuesday
  Wednesday
  Thursday
  Friday
  Saturday
)
…
Now, we have iota assigning the numbers for us. Using iota makes enums easier to create and maintain, especially if you need to add a new value to the middle of the code later.
Next, we'll take a detailed look at Go's variable scoping rules and how they affect how you write code.
Scope
All the variables in Go live in a scope. The top-level scope is the package scope. A scope can have child scopes within it. There are a few ways a child scope gets defined; the easiest way to think about this is that when you see {, you are starting a new child scope, and that child scope ends when you get to a matching }. The parent-child relationship is defined when the code compiles, not when the code runs. When accessing a variable, Go looks at the scope the code was defined in. If it can't find a variable with that name, it looks in the parent scope, then the grandparent scope, all the way until it gets to the package scope. It stops looking once it finds a variable with a matching name or raises an error if it can't find a match.
To put it another way, when your code uses a variable, Go needs to work out where that variable was defined. It starts its search in the scope of the code using the variable it's currently running in. If a variable definition using that name is in that scope, then it stops looking and uses the variable definition to complete its work. If it can't find a variable definition, then it starts walking up the stack of scopes, stopping as soon as it finds a variable with that name. This searching is all done based on a variable name. If a variable with that name is found but is of the wrong type, Go raises an error.
In this example, we have four different scopes, but we define the level variable once. This fact means that no matter where you use level, the same variable is used:
package main
import "fmt"
var level = "pkg"
func main() {
  fmt.Println("Main start  :", level)
  if true {
    fmt.Println("Block start :", level)
    funcA()
  }
}
func funcA() {
  fmt.Println("funcA start :", level)
}
The following is the output displaying variables using level:
Main start  : pkg
Block start : pkg
funcA start : pkg
In this example, we've shadowed the level variable. This new level variable is not related to the level variable in the package scope. When we print level in the block, the Go runtime stops looking for variables called level as soon as it finds the one defined in main. This logic results in a different value getting printed out once that new variable shadows the package variable. You can also see that it's a different variable because it's a different type, and a variable can't have its type changed in Go:
package main
import "fmt"
var level = "pkg"
func main() {
  fmt.Println("Main start  :", level)
  // Create a shadow variable
  level := 42
  if true {
    fmt.Println("Block start :", level)
    funcA()
  }
  fmt.Println("Main end    :", level)
}
func funcA() {
  fmt.Println("funcA start :", level)
}
The following is the output:
Main start  : pkg
Block start : 42
funcA start : pkg
Main end    : 42
Go's static scope resolution comes into play when we call funcA. That's why, when funcA runs, it still sees the package scope level variable. The scope resolution doesn't pay attention to where funcA gets called.
You can't access variables defined in a child scope:
package main
import "fmt"
func main() {
  {
    level := "Nest 1"
    fmt.Println("Block end   :", level)
  }
  // Error: undefined: level
  //fmt.Println("Main end  :", level)
}
The following is the output:

Figure 1.23: Output displaying an error
Activity 1.03: Message Bug
The following code doesn't work. The person who wrote it can't fix it, and they've asked you to help them. Can you get it to work?
package main
import "fmt"
func main() {
  count := 5
  if count > 5 {
    message := "Greater than 5"
  } else {
    message := "Not greater than 5"
  }
  fmt.Println(message)
}
- Run the code and see what the output is.
- The problem is with the
message; make a change to the code. - Rerun the code and see what difference it makes.
- Repeat this process until you see the expected output.
The following is the expected output:
Not greater than 5
Note
The solution for this activity can be found via this link.
In this activity, we saw that where you define your variables has a big impact on the code. Always think about the scope you need your variables to be in when defining them.
In the next activity, we are going to look at a similar problem that is a bit trickier.
Activity 1.04: Bad Count Bug
Your friend is back, and they have another bug in their code. This code should print true, but it's printing false. Can you help them fix the bug?
package main
import "fmt"
func main() {
  count := 0
  if count < 5 {
    count := 10
    count++
  }
  fmt.Println(count == 11)
}
- Run the code and see what the output is.
- The problem is with
count; make a change to the code. - Rerun the code and see what difference it makes.
- Repeat this process until you see the expected output.
The following is the expected output:
True
Note
The solution for this activity can be found via this link.
Summary
In this chapter, we got into the nitty-gritty of variables, including how variables are declared, and all the different notations you can use to declare them. This variety of notation gives you a nice compact notation to use for 90% of your work, while still giving you the power to be very specific when you need to the other 10% of the time. We looked at how to change and update the value of variables after you've declared them. Again, Go gives you some great shorthand to help in the most common use cases to make your life easier. All your data ends up in some form of variable. Data is what makes code dynamic and responsive. Without data, your code could only ever do exactly one thing; data unleashes the true power of software.
Now that your application has data, it needs to make choices based on that data. That's where variable comparison comes in. This helps us see whether something is true or false, bigger or smaller, and to make choices based on the results of those comparisons.
We explored how Go decided to implement their variable system by looking at zero values, pointers, and scope logic. Now, we know that these are the details that can be the difference between delivering bug-free efficient software and not doing so.
We also took a look at how we can declare immutable variables by using constants and how iota can help manage lists or related constants to work, such as enums.
In the next chapter, we'll start to put our variables to work by defining logic and looping over collections of variables.


