


 Download code from GitHub
Introduction to Python for GIS
Programming with computers is one of the most rewarding and frustrating of human endeavors.
Those rewards can be in the form of money, as we can see with today’s high-tech salaries. I would argue, however, that the most rewarding part of mastering programming is to make yourself into a computer power user who can execute both simple and complex applications and analyses, written in reusable code, with ease.
The frustrations will come and go, and it is a good thing: you, like me and millions before you, will learn from each mistake. You will grow and learn with each exercise in this book, and by asking the right questions and paying close attention you can avoid some of these issues.
If you are an ArcGIS expert or novice, seeking to expand on your skillsets, congratulations – you are in the right place. In this book, you will learn how to take your existing GIS expertise (or interest) and multiply its potential using a deceptively simple programming language called Python.
Computer programming is a vast field of knowledge, about which whole books have been written. In this chapter, we will explain the basic knowledge necessary to read, write, and run Python scripts. We’ll leave the ArcGIS tools for later chapters and focus on Python: its beginnings, its current state, how to use it, and importantly, what Python is and what it is not.
We will cover the following topics:
- The basics of Python
- The basics of computer programming
- Installing and importing modules
- Writing and executing scripts
Python: Built different
Guido Van Rossum, the creator of the Python programming language, was frustrated with the state of computer programming in the late 1980s. Programming languages were too complex and, at the same time, too loose with their formatting requirements. This led to large codebases with complex scripts poorly written and rarely documented.
Merely running a simple program could take a long time, as the code would need to be type-checked (variables declared correctly and assigned to the correct data type) and compiled (converted from high-level code written in text files into the assembly language or machine code understood by the CPU).
As this Dutch programmer had completed professional work on the ABC programming language, where he had learned much about language design, he decided he wanted to turn his gripes about the limits of ABC and other languages into a hobby.
With a master’s degree in mathematics and computer science from the University of Amsterdam, his hobbies tended towards the computer, but he did have a love for Monty Python, the British comedy series. So, he combined his passions and created Python, which is now used for all kinds of programmatic solutions. Today Python is everywhere, used to power the internet, kitchen appliances, cars, and so much more. Because of its ubiquity and its simplicity, it has been adopted by the GIS software ecosystem as a standard programming tool.
Thanks to Van Rossum’s extensive experience with the state of computer languages in the 1980s, he was well positioned to create a language that solved many of their deficiencies. He added features that he admired from many other languages and added a few of his own. Here is an incomplete list of Python features built to improve on other languages:
|
Issue |
Improvement |
Python feature |
|
Memory overrun |
Built-in memory management |
Garbage collection and memory management |
|
Slow compiler times |
One-line testing, dynamic typing |
Python interpreter |
|
Unclear error messages |
Messages indicating the offending line and affected code |
Error traceback |
|
Spaghetti code, i.e. code with unclear internal logic |
Clean importation and modularization |
Importation |
|
Unclear code formatting and spacing, making code unreadable |
Indentation rules and reduced brackets |
Forced whitespace |
|
Too many ways to do something |
There should be only one way: the Pythonic way |
The Zen of Python, a philosophy of programming that is unique to Python, which expects clean and simple implementations. Type |
Python versions
The original Python version released in 1991 by Van Rossum, Python 1.0 and its successors, was eventually superseded by the widely popular Python 2.x. Care was taken to ensure that version 2.0 and beyond were backward-compatible with Python 1.x. However, for the new Python 3.0 and beyond, backward compatibility with Python 1 and Python 2 was broken.
This break has caused a divergence in the Python ecosystem. Some companies chose to stick with Python 2.x, which meant that the “sunset” date, or retirement date, for the older version was extended from 2015 until April 2020. Now that the sunset date has passed, there is no active work by the Python Software Foundation (PSF) on Python 2.x. Python 3.x development continues and will continue into the future, overseen by the PSF.
Van Rossum served as the Benevolent Dictator for Life of the PSF until he resigned from the position in 2018.
Check out more about the history of Python here: https://docs.python.org/3/faq/general.html
ArcGIS Python versions
Since ArcMap version 9.x, Python has been integrated into the ArcGIS software suite. However, ArcGIS Desktop and ArcGIS Pro now both depend on different versions of Python:
- ArcGIS Pro: Python 3.x
ArcGIS Pro, which was designed after the decision to sunset Python 2.0 was announced, was divorced from the Python 2.x ecosystem and instead ships with Python 3.x.
Along with the
arcpymodule, ArcGIS Pro uses thearcgismodule, known as the ArcGIS API for Python.
- ArcGIS Desktop: Python 2.x
ArcGIS Desktop (or ArcMap) version 9.0 and above ships with Python 2.x included. The installer for ArcGIS will automatically install Python 2.x and will add the
arcpymodule (originallyarcgisscripting) to the Python system path variable, making it available for scripting.ArcMap, ArcCatalog, ArcGIS Engine, and ArcGIS Server all depend on
arcpyand the Python 2.x version included when the ArcGIS Desktop or Enterprise software is installed.
The sunsetting of ArcGIS Desktop has been extended to March 2025, meaning that Python 2.7 will be included by Esri until that time, despite it being officially retired by the Python Software Foundation. With the sunsetting of ArcGIS Desktop approaching, users are now writing scripts in Python 3 to work with ArcGIS Pro.
What is Python?
In short, Python is an application: python.exe. This application is an executable file, meaning it can be run to process lines of code, or it can be called from other applications to run custom scripts. When ArcGIS Pro is installed, Python is also installed on your computer, along with a series of supporting files and folders, at this default location:
C:\Program Files\ArcGIS\Pro\bin\Python\envs\arcgispro-py3
Python includes a large standard library of tools, or modules. These include support for internet requests, advanced math, CSV reading and writing, JSON serialization, and many more modules included in the Python core. While these tools are powerful, Python was also built to be extensible, meaning that third-party modules can be easily added to a Python installation.
The ArcGIS Python modules, arcpy and arcgis, are both good examples of extending the capabilities of Python. There are hundreds of thousands of others, covering almost any type of programming need, of varying quality.
Python is written in the programming language C. There are variants of Python written in other languages for a variety of technical reasons, but most implementations of Python are built on top of C. This means that Python is often expanded through modules built on top of C code, usually for speed improvement reasons.
A Python code layer or wrapper is put on top of C code to make it work with normal Python packages, gaining the simplicity of Python and the processing speed boosts of precompiled C code. NumPy and SciPy (which are included with the ArcGIS installation of Python) are examples of this type of module.
Python is free and open software, which is another reason it is packaged with so many other software applications for automation purposes. While Python is already installed with ArcGIS Pro, it can also be installed separately, using a free installer from the Python Software Foundation.
Check out the Python Software Foundation on the internet: https://www.python.org/psf
Download Python versions directly from the PSF: https://www.python.org/downloads/
Where is it installed?
On Windows machines, Python is not included by default; it will be installed along with ArcGIS Pro or separately using an installer from the Python Software Foundation.
Once the ArcGIS Installer is run, a few versions of Python will be installed. For our use in this book, the main version is the Python 3 virtual environment installed at this folder location:
C:\Program Files\ArcGIS\Pro\bin\Python\envs\arcgispro-py3
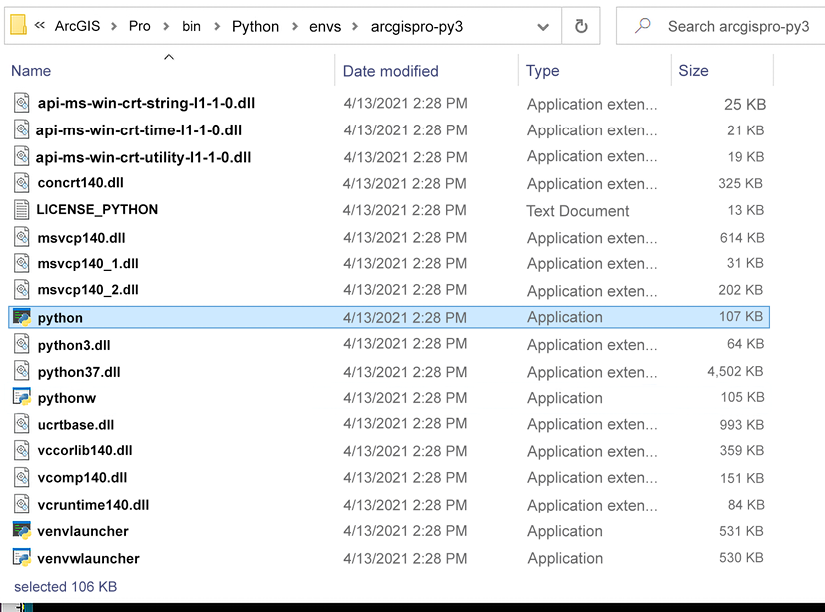
Figure 1.1: Structure of the Python folder, containing the python.exe executable
Python interpreter
When you run python.exe (see below for multiple ways to run the executable), it starts what is known as the Python interpreter.
This is a useful interface, allowing you to enter, one line at a time, bits of code for testing and confirmation. Once the line is entered, hit Enter/Return and the code will be executed. This tool helps you both to learn to code and to test code in the same environment.
Double-clicking on python.exe from the folder or starting Python (command line) from the Start menu will start the interpreter, which allows for one-line commands to be executed:
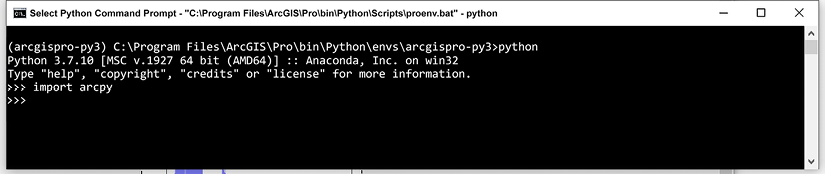
Figure 1.2: Python interpreter for Python 3.7
What is a Python script?
The python.exe executable file, along with being a program where code can be run, will also execute Python scripts. These scripts are simple text files that can be edited by any text editing software. Python scripts are saved with the .py extension.
When a Python script is run, it is passed as the first command-line argument to the Python executable (python.exe). This program will read and then execute the code from the top to the bottom, as long as it is valid Python and it contains no errors. If there is an error encountered, the script will stop and return an error message. If there is no error, nothing will be returned unless you have added “print” statements to return messages from the main loop to the Python window as the script is running.
Executables included
Python comes with two versions of the python.exe file. These are the same version of Python, to be clear, but each file has a different role. python.exe is the main file, and the other version is pythonw.exe. This file will not open an interpreter if double-clicked, as the normal python.exe will. No interpreter is available from pythonw.exe, which is the point: it is used to execute scripts more “silently” than python.exe (for example, when called by another application such as ArcGIS to run a Python script).
Use python.exe to start the interpreter.
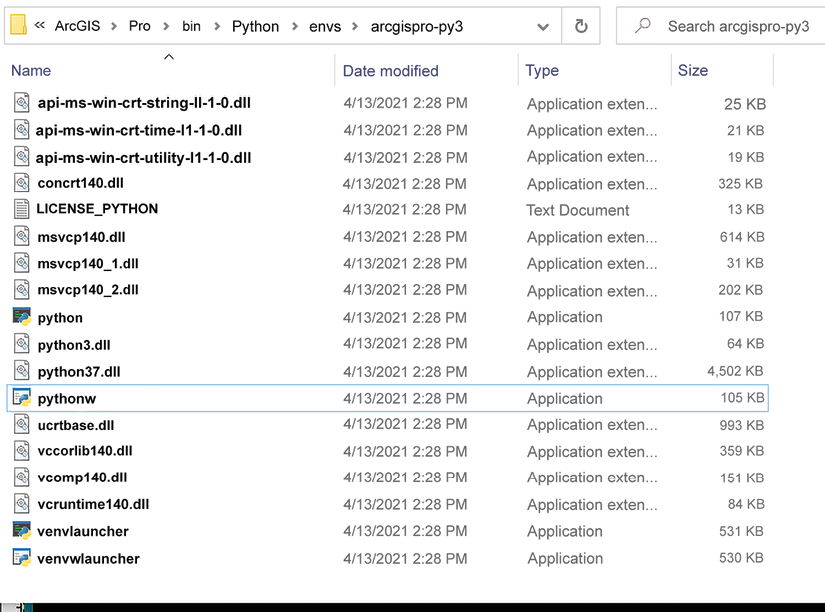
Figure 1.3: pythonw.exe in the Python folder
How to call the executable
The Python executable (python.exe) is accessed to run the Python interpreter or to run a custom Python script. There are many different ways to call or start the Python executable:
- Double-click on
python.exe("C:\Program Files\ArcGIS\Pro\bin\Python\envs\arcgispro-py3\python.exe"): This starts the Python interpreter. - Run Python inside ArcGIS Pro: ArcGIS Pro has a built-in Python interpreter that you will use in Chapter 2 to run custom lines of code. In Chapter 3, you will see how to use ArcGIS Pro Notebooks as a way to test, store, and share custom scripts as Notebooks.
- Open IDLE, the included integrated development environment (IDE): It can be run directly:
C:\Program Files\ArcGIS\Pro\bin\Python\envs\arcgispro-py3\Scripts\idle.exeIn Chapter 2, you will see how to create a shortcut on your Desktop to the IDLE associated with your Python 3.x install.

Figure 1.4: Python applications available through the Start/ArcGIS Menu
If you have ArcGIS Desktop and ArcGIS Pro along with other versions of Python installed, always pay attention to which version of Python you are opening from the Start menu. Not all versions may be associated with ArcGIS and therefore may not have the
arcpymodule accessible.
- Open a CMD terminal and type
python: This only works if the Python executable is in the Windows PATH environment variable. If you get an error that says'python' is not recognized as an internal or external command, operable program or batch file, thepython.exeprogram is not in the Windows PATH environment variable.Check out this blog for a discussion on how to add your executable to the Path variable: https://www.educative.io/edpresso/how-to-add-python-to-path-variable-in-windows
- Use a third-party IDE such as PyCharm: Each PyCharm project can have its own virtual environment, and therefore its own executable, or it can use the one installed by Esri when ArcGIS is installed (
C:\Program Files\ArcGIS\Pro\bin\Python\envs\arcgispro-py3\python). There are a lot of IDEs, but PyCharm is the one we recommend for a variety of reasons: clean interface, easy downloading of modules, built-in virtual environments, and more. - Use a Jupyter Notebook: This requires the installation of Jupyter, which is not included in the standard Python installation.
You will be using ArcGIS Pro Notebooks starting in Chapter 3. These are based on Jupyter Notebooks and are very similar, but are stored and run in ArcGIS Pro.
- Run Python in the command line by using the whole path to the executable:
"C:\Program Files\ArcGIS\Pro\bin\Python\envs\arcgispro-py3\python.exe"
There are multiple ways to directly run the script using the executable, but we find that IDEs make it easier to edit and execute code.
IDLE development environment
The included IDE, called IDLE, is a useful environment that comes standard with every Python instance:

Figure 1.5: The Python IDLE interpreter environment is similar to a shell environment. Code can be run one line at a time.
You can create and execute scripts in this environment easily by opening a new script from the File menu, and then using the script’s Run menu to execute the script:
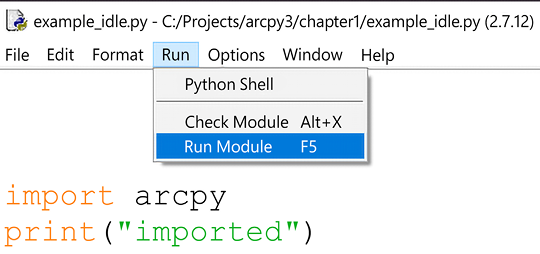
Figure 1.6: Running a script in IDLE
Windows file path issues
Because Python was developed in a Unix/Linux environment, it expects file paths to use forward slashes (/). However, Windows uses backslashes (\) in its file paths.
Windows:
'C:\Python\python.exe'
Linux:
'C:/Python/python.exe'
This has consequences in a Python script, because of the presence of a number of special string combinations made with backslashes. For instance, to create a tab character in a string, Python uses a combination of a backslash and a “t” to create this character: \t.
The backslashes can be escaped; in other words, Python can be told to ignore the special characters in a string, by doubling up the backslash. However, this is inconvenient. The easiest way to address the backslashes inherent in Windows file paths (when passing a shapefile file path to an arcpy function, for instance) is to make them into raw strings by putting an “r” in front of the string.
The following would cause an error when passed to an arcpy function, because of all the \t characters:
'C:\test\test.shp'
To avoid this, you have three options. If you are copying a folder path from Windows Explorer, use an “r” in front of the script to transform it into a raw string:
r'C:\test\test.shp'
You can also use forward slashes:
'C:/test/test.shp'
Escaping the backslashes by doubling them up also works:
'C:\\test\\test.shp'
The operating system and Python system modules
Two important modules or code libraries built into Python to know about are the os and sys modules. The first, os, is also called the operating system module. The second, sys, is the Python system module. They are used to control Windows system operations and Python system operations respectively.
The os module
The os module is used for many things, including folder path operations such as creating folders, removing folders, checking if a folder or file exists, or executing a file using the operating system-associated application used to run that file extension. Getting the current directory, copying files, and more, are made possible with this module. The os module will be used throughout this book in examples to do all of the above.
In the following code snippet, we first import the os module since we intend to use it. A string, "C:\Test_folder", is passed to the os.path.exists method, which returns a Boolean value (either True or False). If it returns False, the folder does not exist, and is then created using the os.mkdir method:
import os
folderpath = r"C:\Test_folder"
if not os.path.exists(folderpath):
   os.mkdir(folderpath)
Read about the os module here: https://www.geeksforgeeks.org/os-module-python-examples/
The sys module
The sys module, among other functions, allows you to accept arguments to a script at runtime (meaning when the script is executed). This is done by using the sys.argv method, which is a list containing all arguments made to Python during the executing of the script.
If a name variable is using the sys module to accept parameters, here is what the script looks like:
import sys
name = sys.argv[1]
print(name)
Note again that the sys.argv method is a list, and the second element in the list (assigned to the variable name above) is the first parameter passed. Python uses zero-based indexing, which we explore in further detail later in the chapter. The first element in the list is the file path of the script being run.
The system path
The sys module contains the Python path or system path (system in this case means Python). The Python system path, available from the sys module at sys.path, is a list that Python uses to search for importable modules, after accessing the Windows Path variable. If you can’t edit the Windows Path (due to permissions, usually), you can alter the Python path at runtime using the system path.
The sys.path list is a part of the sys module built into Python:
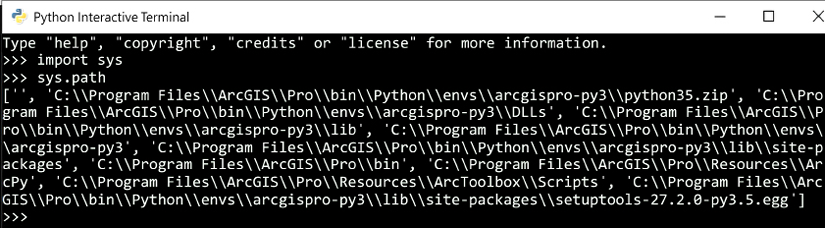
Figure 1.7: Inspecting the sys.path list
Read more about the sys module here: https://www.geeksforgeeks.org/python-sys-module/
We have given you a lot of information about what Python is, how the Python folder is structured, how the Python executable is run, and how to execute and run scripts. This will help you run Python scripts to automate your analyses. In the next section, we will be zooming out to gain a wider view of computer programming.
This will help you to gain more insight into why Python was chosen to be the language of automation for ArcGIS Pro, and help you to be a better programmer in general.
As well as an introduction to Python programming, the rest of the chapter will be a useful reference for you to come back to as you work through the book. If you’d like to get hands-on with writing code straightaway, start with Chapter 2, Basics of ArcPy.
The basics of programming
Computer programming varies from language to language in terms of implementation, but there are remarkable similarities among these languages in how their internal logic works. These programming basics are applicable for all programming languages, with specific code implementations shown in Python:
|
Concept |
Description |
Examples in code |
|
Variables |
Names assigned to Python objects of any data type. Variables must start with a letter. Underscores are encouraged. |
|
|
Data types |
Strings are for text. Integers are for whole numbers. Floats are for floating-point numbers. Data containers such as lists, tuples, and dictionaries are used extensively to organize data. Booleans are used for true or false situations. |
|
|
Iteration |
For loops are used to iterate through an iterable data object (an iterator, such as a data list). While loops are used to loop until a condition has been met. |
|
|
Counters / Enumerators |
Using a variable to keep track of the number of loops performed by a for loop or while loop is a good idea. Some languages have built-in enumeration functionality. In Python, this is the In Python, the shortcut |
|
|
Conditionals |
If/Elif/Else statements that interpret whether an object meets a condition. |
|
|
Zero-based indexing |
Data containers are accessed using indexes that start with 0. The indexes are passed to the list or tuple using square brackets |
|
|
Code comments |
Comments in code are encouraged. They help explain your thinking to both other readers and yourself. Comments are created by using the |
|
|
Errors |
Error messages of many types are built into Python. The error traceback shows the affected lines of code and the type of error. It’s not perfect. |
|
In the following sections, we take a look at some of these in more detail, as well as introducing you to functions and classes.
Variables
Variables are used to assign objects to labels or identifiers. They are used to keep track of pieces of data, to organize the flow of the data through the script, and to help programmers read the script.
variable = 1 # a variable assignment
We recommend you use descriptive variables that are neither too long nor too short. When variables are too short, they can become confusing to read. When they are too long, they can be confusing to write. Using underscores to separate words in variables is a common practice.
Read more about Python variable naming conventions here: https://www.python.org/dev/peps/pep-0008/#function-and-variable-names
Variable formatting rules
Variables must start with a letter. They cannot start with a number or other symbol, otherwise a SyntaxError will occur. However, numbers and underscores can be used in them:
>>> 2var = 34
File "<stdin>", line 1
2var = 34
^
SyntaxError: invalid syntax
>>> two_var = 34
>>> two_var
34
Read more about variables here: https://realpython.com/python-variables/
Assigned to vs is equal to (value comparison)
In Python, variables are assigned to an object using the equals sign (=). To check if a value is equal to another value (in other words, to compare them), use a double equals sign (==):
variable = 1 # a variable assignment
variable == 1 # a comparison
Data types
The data type of a variable determines its behavior. For instance, the character 5 could be an integer type (5), a float (5.0), or a string ("5"). Each version of 5 will have different available tools, such as the replace() method for strings, which can replace characters in the string with other characters.
The following table presents key data types in Python, along with the corresponding data type object in Python:
|
Data type |
Python data type object |
|
Text data is stored as a String data type. |
|
|
Numeric data is stored as an Integer, Float, or Complex type. |
|
|
Sequence data (lists or arrays) can be stored as a list or tuple. In Python 3, |
|
|
Mapping or key/value pair data types are also known as dictionaries in Python. |
|
|
A set is a data type that contains distinct, immutable objects. |
|
|
Boolean is either |
|
|
Binary data types are used to access data files in binary mode. |
|
Checking the data type
To check the data type of a Python variable, use the type() function:
>>> x = 0
>>> type(x)
<class 'int'>
Strings
All text data is represented as the String data type in Python. These are known as strings. Common data stored as strings includes names, addresses, or even whole blog posts.
Strings can also be templated in code to allow for “fill-in-the-blank” strings that are not set until the script is run. Strings are technically immutable but can be manipulated using built-in Python string tools and the separate String module.
Here are some of the key concepts relating to strings:
|
Quotation marks |
Single or double quotation marks can be used to designate a string, as long as the same number is used at the beginning and end. Quotes within a string can be indicated using the opposite mark as the one opening and closing the string. Triple quotation marks are used for strings with multiple lines. |
|
String addition |
Strings can be “added” together to form a larger string. Strings can also be “multiplied” by an integer N to repeat the string N times. |
|
String formatting |
String templates or placeholders can be used in code and filled in at runtime with the data required. |
|
String manipulation |
Strings can be manipulated using built-in functionality. Characters can be replaced or located. Strings can be split or joined. |
Quotation marks
Strings must be surrounded by quotation marks. In Python, these can be either single or double quotes, but they must be consistent. If a single quote is used to start the string, a single quote must be used to stop it, or you will get an error:
>>> string_var = 'the red fox"
File "<stdin>", line 1
string_var = 'the red fox"
^
SyntaxError: EOL while scanning string literal
A correct way:
>>> string_var = 'the red fox'
>>> string_var
'the red fox'
Multiple line strings
Multiple line strings are created by a pair of three single quotes or double quotes at the beginning of the string, and three at the end.
In the following example, the variable string_var is a multiple-line string (\n is a Python character representing a new line):
>>> string_var = """the red fox chased the
... dog across the yard"""
>>> string_var
'the red fox chased the\ndog across the yard'
String addition (and more)
Strings can be “added” together to create a new string. This process allows you to build strings from smaller strings, which can be useful for populating new fields composed of other fields in a data file, and other tasks.
In this example, the string "forest" is assigned to string_var. Another string is then added to string_var to create a longer string:
>>> string_var = "forest"
>>> string_var += " path" # same as string_var = string_var+ " path"
>>> string_var
'forest path'
String formatting
Strings in code often make use of “placeholders” for data that will be filled in later. This is known as string formatting, and there are multiple ways to perform string formatting using Python.
|
Format function |
All strings have a built-in function called |
|
String literals |
For Python 3.6+, there is a new tool called string literals, which allow you to insert variables into strings directly. An |
|
Data type string operators |
An older but still useful tool is the string operators, which are used in strings as placeholders for specific data types (either strings, floats, or integers). |
String format function
This method of formatting is the preferred form for Python 3. It allows you to pass the variables to the format() function, which is built into all strings, and to have them fill up placeholders within the string. Any data type can be passed to the format() function.
In the following example, the string template is filled with details contained in other variables using the format() string function. The placeholders are filled in the order that the variables are listed, so they must be in the correct order.
The curly brackets are the placeholders, and the format() function will accept arguments and fill in the string:
>>> year = 1980
>>> day = "Monday"
>>> month = "Feb"
>>> template = "It was a cold {} in {} {}"
>>> template.format(day, month, year)
'It was a cold Monday in Feb 1980'
In the next example, the placeholders are named, and are passed to keyword arguments in the format() function. The arguments are named and do not need to be in order in the format() function:
>>> template = 'It was a cold {day} in {month} {year}'
>>> template.format(month=month, year=year, day=day)
'It was a cold Monday in Feb 1980'
In this last example, the placeholders are numbered, which makes it much easier to repeat a string:
>>> template = "{0},{0} oh no,{1} gotta go"
>>> template.format("Louie", "Me")
'Louie,Louie oh no,Me gotta go'
String literals
There is a new (as of Python 3.6) method of formatting strings, known as formatted string literals. By adding an f before strings, placeholder variables can become populated by variables without using the format() function.
In this example, the variables are formatted directly into the string literal, which has an f before the string to indicate that it is a string literal:
>>> year = 1980
>>> day = "Monday"
>>> month = "Feb"
>>> str_lit = f"It was a cold {day} in {month} {year}"
>>> str_lit
'It was a cold Monday in Feb 1980'
Read more about string formatting here: https://realpython.com/python-string-formatting/
String placeholder operators
An older but still useful method for inserting data into strings is the data type string operators. These use placeholders that will format inserted strings in specific ways. However, they are data-specific, meaning that a number inserted into the string must use a number placeholder, and a string being inserted must use a string placeholder, or an error will result.
The placeholders are %s for strings and %d or %f for numbers. They each have optional features specific to the data type. For instance, the %f number placeholder can be manipulated to hold only a specific number of decimal points:
>>> month = '%0.2f' % 3.1415926535
>>> month
3.14
To use them, you place the placeholder in the string template, and then follow the string with a percent sign (%) and the values to be passed into the string template in a tuple after the percent sign:
>>> year = 1980
>>> month = "February,"
>>> str_result = "It was a cold %s %d" % month, year
>>> str_result
'It was a cold February, 1980'
Read more about string placeholders here: https://pyformat.info/
String manipulation
String manipulation is common and lots of tools are built into the String data type. These allow you to replace characters in a string or find their index location in the string.
The find() and index() methods are similar, but find() can be used in conditional statements. If the character is not found in the string, find() will return -1, while index() will return an error.
The join() method is used to join together a list of string data. The split() method is the opposite: it splits a string into a list based on a supplied character or the default empty space.
Here is a non-exhaustive list of methods and examples of their use:
|
Method |
Example |
|
|
|
|
|
|
|
|
|
|
|
|
|
|
|
|
|
|
String indexing
String indexing is similar to list indexing, as we will see later on. Individual characters, or groups of characters, can be selected from a string by passing the index of the character needed to the string in square brackets, where 0 is the index of the first character.
In the following example, the d from readiness is accessed by passing the index [3] to square brackets next to the string:
>>> str_var = "readiness"
>>> d_var = str_var[3]
>>> d_var
'd'
Groups of characters are selected by passing a start and end index, where the end index is the index of the first character you do not want to include:
>>> str_var = "readiness"
>>> din_var = str_var[3:6] # index 6 is e
>>> din_var
'din'
>>> dine_var = str_var[3:7] # index 7 is s
>>> dine_var
'dine'
Integers
The Integer data type represents whole numbers. It can be used to perform addition, subtraction, multiplication, and division (with one caveat as noted below):
>>> int_var = 50
>>> int_var * 5
250
>>> int_var / 5
10.0
>>> int_var ** 2
2500
Starting in Python 3, you could divide two integers and get a float. In previous versions of Python 2.x, whenever you divided two integers you would only get an integer, with no remainder. Because of the way Python 2.x did integer division, you will come across code where integers are converted to floats for divison. You are encouraged to do the same in your own code.
Read more about integers in Python here: https://realpython.com/python-numbers/
Floating numbers
Floating-point numbers in Python are used to represent real numbers as 64-bit double-precision values. Sometimes, using binary systems to represent decimal-based numbers can be a bit odd, but in general, these will work as expected:
>>> x = 5.0
>>> x * 5
25.0
>>> x ** 5
3125.0
>>> x/2.3
2.173913043478261
One unique result from floating-point division is the case of 1/3. Because it is a binary representation, the assumption that (1/3)* 3= 1 is True, even though the value 0.3333333333333333 (produced by the division operation) would never add up to 1 when added together three times in a base 10 system. Here are some examples of binary math in action:
>>> 1/3
0.3333333333333333
>>> (1/3) * 3
1.0
>>> (1/3) + (1/3)
0.6666666666666666
>>> (1/3) + (1/3) + (1/3)
1.0
>>> (1/3) + (1/3) + 0.3333333333333333
1.0
>>> (1/3) + (1/3) + 0.3333
0.9999666666666667
>>> (1/3) + (1/3) + 0.3333333333
0.9999999999666667
>>> (1/3) + (1/3) + 0.333333333333333
0.9999999999999996
>>> (1/3) + (1/3) + 0.33333333333333333 1.0
Read more about floating-point numbers in Python here: https://www.geeksforgeeks.org/python-float-type-and-its-methods
Conversion between strings, integers, and floats
Conversion between data types is possible in Python using built-in functions that are part of the standard library. As we saw earlier, the type() function is useful to find the data type of an object. Once identified, the data object can be converted from Integer (int() function) to String (str() function) to Float (float() function), as long as the character would be valid in that data type.
In these examples, a character is converted from String to Integer to Float to String using the int(), str(), and float() functions:
>>> str_var = "5"
>>> int_var = int(str_var)
>>> int_var
5
>>> float_var = float(int_var)
>>> float_var
5.0
>>> str_var = str(float_var)
>>> type(str_var)
'<class 'str'>'
Data structures or containers
Data structures, also called data containers and data collections, are special data types that can hold, in a retrievable order, any data item of any data type (including other data containers). Data containers are used to organize data items by index in tuples or lists, or by key:value pairs in dictionaries.
To get data out of data containers, square brackets are used to pass either indexes (lists and tuples) or keys (dictionaries). If there is more than one level of data container (in other words, one container contains another), first the data container inside is referenced using an index or key inside a first square bracket, and then the data inside the container is accessed using a second.
The following table summarizes the different types of data containers and how data is retrieved from each of them:
|
Data container |
Example |
|
Tuple |
|
|
List |
|
|
Set |
|
|
Dictionary |
|
Tuples
Tuples are ordered lists that can hold any data type, even in the same tuple. They are immutable, meaning they cannot be altered, and data cannot be added to or removed from the tuple once it has been created. They have length and the built-in len() function can be used to get the length of the tuple.
In Python, they are declared by using round brackets, (), or the tuple() function. Data is accessed using zero-based indexing by passing the index to square brackets next to the tuple.
In the following example, a tuple is assigned to the variable name tuple_var(), and data is accessed using indexing:
>>> tuple_var = ("red", 45, "left")
>>> type(tuple_var)
<class 'tuple'>
>>> ("red",45,"left")[0]
'red'
>>> tuple_var[0]
'red'
Read more about tuples in Python here: https://www.geeksforgeeks.org/python-tuples/
Lists
Lists (often called arrays in other programming languages) are data containers that can hold any other type of data type, even in the same list, just like tuples. Unlike tuples, though, lists can be altered after they are created. In Python, they are declared by using square brackets, [], or the list() function. Data is accessed using zero-based indexing by passing the index to square brackets next to the list.
In this example, a list is assigned to the variable name list_var, and data is accessed using indexing:
>>> list_var = ["blue",42,"right"]
>>> type(list_var)
<class 'list'>
>>> ["blue",42,"right"][0]
'blue'
>>> list_var[0]
'blue'
Read more about lists in Python here: https://www.geeksforgeeks.org/python-list/
Conversion between lists and tuples
Lists can be copied into a new tuple object using the tuple() function. Conversely, tuples can be copied into a list data type using the list() function. This does not convert the original data item but instead creates a copy of the data item in the new data type.
In the following example, the list is copied into a tuple data type, and then the tuple is copied into a list data type. Note that the brackets change with each new data type created:
>>> tuple_copy = tuple(list_var)
>>> tuple_copy
('blue', 42, 'right')
>>> list_copy = list(tuple_copy)
>>> list_copy
['blue', 42, 'right']
List operations for lists only
Using the append() method, a list can be appended to, which means one data item is added to the list. Using the extend() method, a list can also be extended, which is where all data items in a second list are all added to the first list:
>>> list_orig = [34, 'blanket', 'dog']
>>> list_orig.append(56)
>>> list_orig
[34,'blanket','dog',56]
>>> list_first = [34, 'blanket', 'dog']
>>> list_second = ['diamond', '321', 657]
>>> list_orig.extend(list_second)
>>> list_orig
[34,'blanket','dog','diamond','321'.657]
The items in a list can be reversed or sorted, using the reverse() method or the sort() method respectively:
>>> list_var = [34,'blanket','dog']
>>> list_var.reverse()
>>> list_var
['dog','blanket',34]
In Python 3, sorting is only allowed on lists that do not have mixed data types:
>>> list_var = [34,5,123]
>>> list_var.sort()
>>> list_var
[5, 34, 123]
In Python 2, sorting is allowed on mixed lists, with numbers placed first.
List operations for both tuples and lists
Lists and tuples can be iterated over using for loops, which we will look at shortly. They can both be sliced as well, creating a subset of the list or tuple that will be operated on for the for loop or another operation. Built-in functions allow for the calculation of the maximum (using the max() function) or minimum (the min() function) value of a list/tuple, or even the sum of a list or tuple, given the data type of the items in the list is correct.
Slicing
Slicing a list or tuple will create a new list or tuple. The slice is created by passing indexes to the list or tuple in square brackets, separated by a colon. The first index is the start index, and it can be ignored if it is index 0 (the beginning of the original list). The second index is the index of the first value that you do not want to include (it can be blank if you want the rest of the original list).
In this first example, we see a tuple with three data items sliced to only include the first two items. The string "left" is at index 2 in the tuple, meaning that the last index in the slice will be 2. The slice is assigned to variable name tuple_slice:
>>> tuple_var = ("red", 45, "left")
>>> tuple_slice = tuple_var[:2]
>>> tuple_slice
('red', 45)
In this next example, we see a list with four data items sliced to only include the last two items. The first index is the index of the first data item we want (the string "right"). The last index is blank:
>>> list_var = ["blue", 42, "right", "ankle"]
>>> list_slice = list_var[2:]
>>> list_slice
['right', 'ankle']
Sets
Sets represent a collection of distinct objects. In Python, sets are unordered, no duplicates are allowed, and all data items inside a set must be immutable.
Set operations
Sets are especially useful for getting all distinct members of a list:
>>> orig_list = ["blue", "pink", "yellow", "red", "blue", "yellow"]
>>> set_var = set(orig_list)
>>> set_var
{'pink', 'yellow', 'blue', 'red'}
Sets cannot be accessed using indexing, because they are unordered and therefore are not subscriptable:
>>> set_var[0]
Traceback (most recent call last):
File "<stdin>", line 1, in <module>
TypeError: 'set' object is not subscriptable
However, they can be iterated over using looping:
>>> for item in set_var:
... print(item)
...
pink
yellow
blue
red
Dictionaries
Dictionaries are key:value stores, meaning they are data containers that use unordered key and value pairs to organize data. Keys are used as reference points for organization and retrieval. When a key is supplied to a dictionary in square brackets, the value is returned:
>>> dict_var = {"key":"value"}
>>> dict_var['key']
'value'
>>> dict_var = {"address":"123 Main St", "color":"blue"}
>>> dict_var["address"]
'123 Main St'
>>> dict_var["color"]
'blue'
Read more about dictionaries in Python here: https://www.geeksforgeeks.org/python-dictionary/
Keys and values
Keys can be any immutable data type, meaning lists cannot be used as keys, but strings, integers, floats, and tuples can. Values can be any type of data, including other dictionaries.
All keys in a dictionary can be accessed as a list using the dictionary keys() function. In Python 3.x, the function is a generator, which means it must be called over and over to get each key. This generator can also be passed to the list() function to convert it into a list.
All values in a dictionary can be accessed as a list using the dictionary values() function. In Python 3.x, the function is a generator.
In Python 2.x, the keys() and values() functions return a list. In older code written for ArcGIS Desktop, you may see this.
Iteration
The core of computer programming is iteration: recursively performing the same action, analysis, function call, or whatever your script is built to process. Computers excel at this type of task: they can quickly iterate through a dataset to perform whatever action you deem necessary, on each data item in the set.
Iteration is run on iterators. An iterator is a Python object that contains other objects, each of which can be processed in a loop. Iterators can be lists or tuples or even strings, but not integers.
For loops
A for loop is an iteration implementation that, when presented with a data list, will perform an operation on each member of the list.
In the following example, a list of integers is assigned to the variable name data_list. The list is then used to construct a for loop using the format for {var} in {iterable}, where {var} is a variable name that is assigned to each object in the list, one at a time as the loop progresses. One convention is to use item, but it can be any valid variable name:
data_list = [45,56,34,12,2]
for item in data_list:
print (item * 2)
This is the output:
90
112
68
24
4
While loops
A while loop is an iteration implementation that will loop until a specific threshold is met. While loops can be dangerous as they can cause an infinite loop in a script if the threshold is never met.
In the following example, the while loop will run, doing nothing but adding 1 to x until it reaches 100, upon which the threshold is met and the while loop will end:
x = 0
while x < 100:
x = x + 1 # same as x += 1
Read more about loops here: https://www.geeksforgeeks.org/loops-in-python/
Counters and enumerators
Iteration in for loops or while loops often requires the use of counters (also called enumerators) to track loops in an iteration.
for loops have the option to use the enumerate() function by passing the iterator to the function and using a count variable (which can be any valid variable name, but count is logical) in front of the item variable. The count variable will keep track of the loops, starting at index zero:
>>> data_list = ['a','b','c','d','e']
>>> for count,item in enumerate(data_list):
... print(count, item)
...
0 a
1 b
2 c
3 d
4 e
In Python, the shortcut x += y is used to increase the value of x while keeping the same variable name, and is the same as x = x + y:
>>> x = 0
>>> while x <100:
... x = x + 1
>>> x
100
>>> x = 0
>>> while x <100:
... x += 1
>>> x
100
Conditionals
if statements, elif statements (short for else if), and else statements are used to create conditions that will be used to evaluate data objects. If statements can be used by themselves (elif and else are optional) and are used by declaring the keyword if and then the condition the data must meet.
In the following example, the data type of objects in a list is compared (notice the two equals signs, meaning it is a comparison) to the data type for integers, shown here as type(0), or for strings, shown as type('a'). If an object in the list meets one of the conditions, a specific print() statement is triggered:
list_var = [1,'1',1.0]
for item in list_var:
  if type(item) == type(0):
    print('Integer')
  elif type(item) == type('a'):
    print('String')
  else:
    print('Float')
Read more about conditionals here: https://realpython.com/python-conditional-statements/
If versus else
if statements are usually specific to one condition, whereas else statements are used as catch-alls to ensure that any data that goes through the if statement will have some way of being dealt with, even if it doesn’t meet the condition of the if statement. elif statements, which are dependent on the if statement existing and are also condition-specific, are not catch-all statements.
Zero-based indexing
As we have seen, iteration occurs over lists or tuples that contain data. Within the list, these data are differentiated by list order or position. Items in a list are retrieved by item index, the (current) position of the data in the list.
In Python, like most computer programming languages, the first item in a list is at index 0, not index 1.
This is a bit confusing to beginners but is a programming standard. It is slightly more computationally efficient to retrieve an item in a list that starts with 0 than a list that starts with 1, and this became the standard in C and its precursors, which meant that Python (written in C) uses zero-based indexing.
Data extraction using index position
This is the basic format of data retrieval from a list. This list of strings has an order, and the string "Bill" is the second item, meaning it is at index 1. To assign this string to a variable, we pass the index into square brackets:
names = ["Silas", "Bill", "Dara"]
name_bill = names[1]
Data extraction using reverse index position
This is the second format of data retrieval from a list. List order can be used in reverse, meaning that the indexing starts from the last member of the list and counts backward. Negative numbers are used, starting at -1, which is the index of the last member of the list, -2 is the second-to-last member of the list, and so on.
This means that, in the following example, the "Bill" and "Silas" strings are at indexes -2 and -3 respectively when using reverse index position, and so -2 (or -3) must be passed to the list in square brackets:
names = ["Silas", "Bill", "Dara"]
name_bill = names[-2]
name_silas = names[-3]
Read more about indexing here: https://realpython.com/lessons/indexing-and-slicing/
Functions
Functions are subroutines defined by code. When called, or run, functions will do something (or nothing, if written that way). Functions often accept parameters, and these can be required or optional.
Functions make it easy to perform the same action over and over without writing the same code over and over. This makes code cleaner, shorter, and smarter. They are a good idea and should be used often.
Components of a function
Here are the main parts that make up a function in Python:
defkeyword: Functions are defined using thedefkeyword, which is short for “define function.” The keyword is written, followed by the name of the function and round brackets,(), into which expected parameters can be defined.- Parameters: Parameters or arguments are values expected by functions and supplied by the code at runtime. Some parameters are optional.
- Return statement: Functions allow for data to be returned from the subroutine to the main loop using
returnstatements. These allow the user to calculate a value or perform some action in the function and then return back a value to the main loop. - Docstrings: Functions allow for a string after the definition line that is used to declare the purpose of the function:
def accept_param(value=12):
    'this function accepts a parameter' # docstring
    return value
Note that optional parameters with default values must always be defined after the required parameters within functions.
Namespaces
In Python, there is a concept called namespaces. These are refined into two types of namespaces: global and local.
All variables defined in the main part of a script (outside of any functions) are considered to be in the global namespace. Within the function, variables have a different namespace, meaning that variables inside a function are in a local namespace and are not the same as variables in the main script, which are in the global namespace. If a variable name inside a function is the same as one outside of the function, changing values inside the function (in the local namespace) will not affect the variable outside the function (in the global namespace).
Read more about namespaces here: https://realpython.com/python-namespaces-scope/
Function examples
In this first example, a function is defined and written to return "hello world" every time it is called. There are no parameters, but the return keyword is used:
def new_function():
    return "hello world"
>>> new_function()
'hello world'
In this next example, an expected parameter is defined in the brackets. When called, this value is supplied, and the function then returns the value from the local namespace back to the global namespace in the main loop:
def accept_param(value):
    return value
>>> accept_param('parameter')
'parameter'
In this final example, an expected parameter has a default value assigned, meaning it only has to be supplied if the function uses a non-default parameter:
def accept_param(value=12):
    return value
>>> accept_param()
12
>>> accept_param(13)
13
Read more about functions here: https://realpython.com/defining-your-own-python-function/
Classes
Classes are special blocks of code that organize multiple variables and functions into an object with its own methods and functions. Classes make it easy to create code tools that can reference the same internal data lists and functions. The internal functions and variables are able to communicate across the class so that variables defined in one part of the class are available in another.
Classes use the idea of self to allow for the different parts of the class to communicate. By introducing self as a parameter into each function inside a class, the data can be called.
Here is an example of a class:
class ExampleClass():
    def __init__(self, name):
        'accepts a string'
        self.name = name
    def get_name(self):
        'return the name'
        return self.name
Classes are called or instantiated to create a class object. This means the class definition is kind of like a factory for that class, and when you want one of those class objects, you call the class type and pass the correct parameters if required:
>>> example_object = ExampleClass('fred')
>>> example_object.get_name()
'fred'
Read more about classes here: https://www.geeksforgeeks.org/python-classes-and-objects/
Installing and importing modules
Python was built to be shipped with a basic set of functionalities known as the standard library. Knowing that all programming needs would never be covered by the standard library, Python was built to be open and extensible. This allows programmers to create their own modules to solve their specific programming needs. These modules are often shared under an open-source license on the Python Package Index, also known as PyPI. To add to the capabilities of the standard Python library of modules, third-party modules are downloaded from PyPI using either the built-in pip program or another method. For us, modules such as arcpy and the ArcGIS API for Python are perfect examples: they extend the capabilities of Python to be able to control the tools that are available within ArcGIS Pro.
ArcGIS Pro comes with a Python Package Manager which will allow you to install additional packages to any virtual environments you have set up. You will learn in Chapter 3 how to use this, creating your own virtual environments in ArcGIS Pro and installing additional packages that you may need. The following sections offer more detail about installing packages and creating virtual environments through the command line in the terminal. Don’t worry if you aren’t comfortable with the command line, as the Python Package Manager in ArcGIS Pro can manage much of the same and you will work through that in more detail in Chapter 3.
If you don’t plan on working in the command line, you can skip the next section. But as you get more comfortable as a Python programmer, come back to this, as you will find it very useful in helping you learn how to work from the command line and install more packages. The Python Package Manager does not have access to all the packages available in PyPI. If you need a package that is not listed in the Python Package Manager, you will need the information below to install it.
Using pip
To make Python module installation easier, Python is now installed with a program called pip. This name is a recursive acronym that stands for Pip Installs Programs. It simplifies installation by allowing for one-line command line calls, which both locate the requested module on an online repository and run the installation commands.
Here is an example, using the open-source PySHP module:
pip install pyshp
You can also install multiple modules at a time. Here are two separate modules that will be installed by pip:
pip install pyshp shapely
Pip connects to the Python Package Index. As we mentioned, stored on this repository are hundreds of thousands of free modules written by other developers. It is worth checking the license of the module to confirm that it will allow for your use of its code.
Pip lives in the Scripts folder, where lots of executable files are stored:
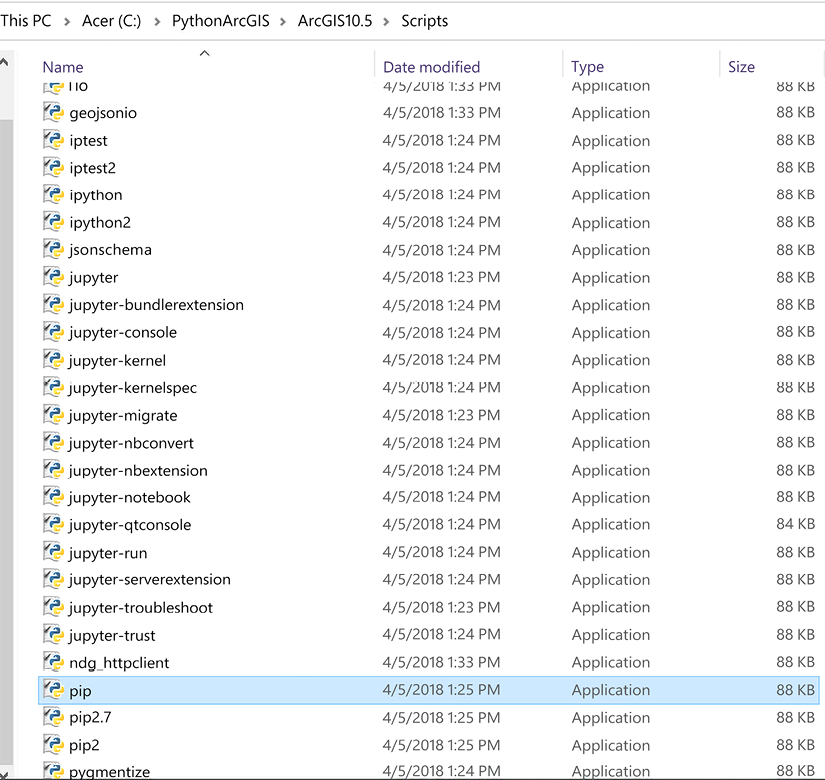
Figure 1.8: Locating pip in the Scripts folder
Installing modules that are not in PyPI
Sometimes modules are not available in PyPI, or they are older modules that don’t understand the pip install method. This means that available modules have different ways of being installed that you should be aware of (although most now use pip).
The setup.py file
Often in Python 2.x, and sometimes in Python 3.x, a module includes a setup.py file. This file is not run by pip; instead, it is run by Python itself.
These setup.py files are located in a module, often in a downloadable zipped folder. These zip files should be copied to the /sites/packages folder. They should be unzipped, and then the Python executable should be used to run the setup.py file using the install command:
python setup.py install
Wheel files
Sometimes modules are packaged as wheel files. Wheel files use the extension .whl. These are essentially zip files that can be used by pip for easy installation of a module.
Use pip to run the wheel file and install the module, by downloading the file and running the pip install command in the same folder as the wheel file (or you can pass the whole file path of the wheel file to pip install):
pip install module.whl
Read more about wheel files here: https://realpython.com/python-wheels/
Installing in virtual environments
Virtual environments are a bit of an odd concept at first, but they are extremely useful when programming in Python. Because you will probably have two different Python versions installed on your computer if you have ArcGIS Desktop and ArcGIS Pro, it is convenient to have each of these versions located in a separate virtual environment.
The core idea is to use one of the Python virtual environment modules to create a copy of your preferred Python version, which is then isolated from the rest of the Python versions on your machine. This avoids path issues when calling modules, allowing you to have more than one version of these important modules on the same computer. In Chapter 3, you will see how to use the Python Package Manager provided in ArcGIS Pro to create a virtual environment and install a package that you want to run only in that environment.
Here are a few of the Python virtual environment modules:
|
Name |
Description |
Example virtual environment creation |
|
|
Built into Python 3.3+. |
|
|
|
Must be installed separately. It is very useful and my personal favorite. |
|
|
|
Used to isolate Python versions for testing purposes. Must be installed separately. |
|
|
Conda/Anaconda |
Used often in academic and scientific environments. Must be installed separately. |
|
Read more about virtual environments here: https://towardsdatascience.com/python-environment-101-1d68bda3094d
Importing modules
To access the wide number of modules in the Python standard library, as well as third-party modules such as arcpy, we need to be able to import these modules in our script (or in the interpreter).
To do this, you will use import statements, as we have seen already. These declare the module or sub-modules (smaller components of the module) that you will use in the script.
As long as the modules are in the /sites/packages folder in your Python installation, or in the Windows PATH environment variable (as arcpy is after it’s been installed), the import statements will work as expected:
import csv
from datetime import timedelta
from arcpy import da
You will see in Chapter 2 what happens when you attempt to import arcpy from a Python install that does not have the module in the site/packages folder. That is why it is important to know which version of Python has the arcpy module and use that one when working with IDLE or in the command line. When working in ArcGIS Pro using the Python window or ArcGIS Notebooks, this is not an issue, as they will automatically be directed to the correct version of Python.
Three ways to import
There are three different and related ways to import modules. These import methods don’t care if the module is from either the standard library or from third parties:
- Import the whole module: This is the simplest way to import a module, by importing its top-level object. Its sub-methods are accessed using dot notation (for example,
csv.reader, a method used to read CSV files):import csv reader = csv.reader - Import a sub-module: Instead of importing a top-level object, you can import only the module or method you need, using the
from X import Yformat:from datetime import timedelta from arcpy import da - Import all sub-modules: Instead of importing one sub-object, you can import all the modules or methods, using the
from X import *format:from datetime import * from arcpy import *
Read more about importing modules here: https://realpython.com/python-import/
Importing custom code
Modules don’t have to just come from “third parties”: they can come from you as well. With the use of the special __init__.py file, you can convert a normal folder into an importable module. This file, which can contain code but is most of the time just an empty file, indicates to Python that a folder is a module that can be imported into a script. The file itself is just a text file with a .py extension and the name __init__.py (that’s two underscores on each side), which is placed inside a folder. As long as the folder with the __init__.py is either next to the script or in the Python Path (e.g. in the site-packages folder), the code inside the folder can be imported.
In the following example, we see some code in a script called example_module.py:
import csv
from datetime import timedelta
def test_function():
    return "success"
if __name__ == "__main__":
    print('script imported')
Create a folder called mod_test. Copy this script into the folder. Then, create an empty text file called __init__.py:
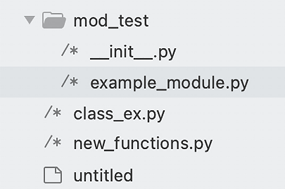
Figure 1.9: Creating an __init__.py file
Now let’s import our module. Create a new script next to the mod_test folder. Call it module_import.py:
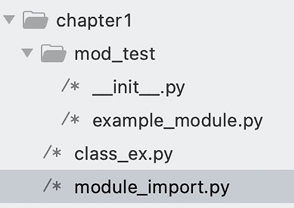
Figure 1.10: Creating a new script
Inside the script, import the function test_function from the example_module script in the mod_test folder using the format below:
from mod_test.example_module import test_function
print(test_function())
Scripts inside the module are accessed using dot notation (for instance, mod_test.example_module). The functions and classes inside the script called example_module.py are able to be imported by name.
Because the module is sitting next to the script that is importing the function, this import statement will work. However, if you move your script and don’t copy the module to somewhere that is on the Python system path (aka sys.path), it won’t be a successful import.
That is because the way import statements work is based on the Python system path. This is the sys.path list of folder locations that Python will look in for the module that you are requesting. By default, the first location is the local folder, meaning the folder containing your script. The next location is the site-packages folder.
The site-packages folder
Most modules are installed in a special folder. This folder is inside the folder that contains the Python executable. It is called the site-packages folder and it sits at *\Lib\sites-packages.
To make your module available for import without needing it to be next to your script, put your module folder in the site-packages folder. When you run from mod_test.example_module import test_function, it will locate the module called mod_test in the site-packages folder.
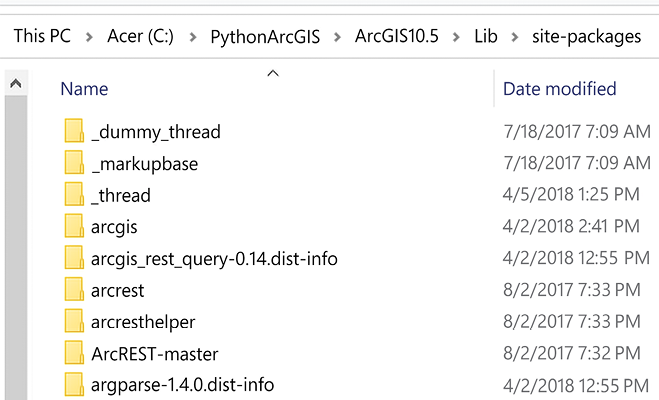
Figure 1.11: The site-packages folder
These tips will make it easier to add your custom code to the Python installation and to import reusable code in other scripts. In the last section, we will explore tips about writing good code.
Basic style tips for writing scripts
To make clean, readable code, it is encouraged to follow these basic tips about how the code should be written and organized. The main rule enforced by Python is the indentation required, which is intended to make the code easier to read and write. The major Python style suggestions and implementations are collectively contained in the Python Enhancement Proposal 8, also known as PEP8. We have included our own recommendations as well, based on lots of experience.
Read more about Python code style here: https://realpython.com/python-pep8/
Find the PEP8 style guide here: https://www.python.org/dev/peps/pep-0008/
Indentation
Python code has strict indentation rules that are enforced by all IDEs. These rules relate to functions and loops especially.
As a standard, four spaces are used after a function is declared, a loop is created, or a conditional is used. This is just a standard, as it could be only one space or however many spaces you want, but that indentation level becomes important when scripts get big. It helps to have four spaces for all indented lines so that they can be more easily read.
Do not mix tabs and spaces when indenting, as this will make it impossible to execute scripts in some IDEs.
Read more about indentation here: https://www.python.org/dev/peps/pep-0008/#indentation
Using print statements
The built-in function called print() is used to send messages from the script to the command window while the script is running. Pass any valid data to the print() statement and use it to track progress or to debug if there are issues:
>>> print("blueberry")
blueberry
>>> x = 0
>>> print(x)
0
Debugging using print statements is very common, and I encourage it as you learn to code. Well-placed print statements will help you understand how the code execution is progressing, and will help you to find the source of bugs by telling you which part of the script has executed and which part has not. It is not a requirement to use print statements, but they really are a programmer’s friend.
Read more about print statements here: https://realpython.com/python-print/
Structuring a script
We suggest the following guidelines for good script structure:
- Add a comment at the top with script details: This is an optional but recommended way to start your scripts: write a comment at the top with your name, the date, and a quick explanation about what the script is supposed to do. This is especially nice when other people have to read your code.
Add lots of other comments throughout the script as well, to make sure you know what is happening throughout the script.
- Follow with import statements: It is encouraged, but not required, to put the import statements at or near the top of the script. Imports must happen before the module objects are called in the script, but the import statements can be placed anywhere. It is best to put them at the top so that people reading the script can understand what is being imported.
- Define global variables: After the import statements, define the necessary variables that will be used in this script. Sometimes it is necessary to define variables later in the script, but it is best to put major variables near the top.
- Define functions: By placing function definitions below the global variables, it is easy to read and understand what the functions do when reading them. It is sometimes hard to find a function that is called in another part of the script if the function is not in a known location in the script.
- Write the executable parts of the script: After importing modules and defining functions, the next part of the script is where the action takes place. The
forloops are run, the functions are called, and the script is then done.Make sure to add lots of comments to help yourself understand what is happening throughout the script, and
printstatements as well to help while the script is running.
if __name__ == '__main__': Often at the end of scripts you will see this line. What it means is that the indented code below this line will be run if the script is executed directly, but if the code in the script is imported by another script, the code blocks will not execute until called in the second script.
Read more about this here: https://www.geeksforgeeks.org/what-does-the-if-__name__-__main__-do/
Summary
In this chapter, we had a concise but comprehensive overview of computer programming and the Python programming language. We reviewed the basics of computer programming, including variables, iteration, and conditionals. We explored the data types of Python, including integers, strings, and floats, and the data containers of Python, such as lists, tuples, and dictionaries. We learned about importing and installing modules. We learned some basic code structure for scripts, and how to execute those scripts.
Don’t worry if this was too theoretical for you – we will get very hands-on in the rest of the book. In the next chapter, we will discuss the basics of arcpy. We will learn how to ensure your Python environment is set up for ArcPy, create a shortcut to the Python IDLE associated with ArcGIS Pro, and begin to write some Python in the Python window in ArcGIS Pro by examining the environment settings and doing some simple geoprocessing.

