


 Download code from GitHub
Chapter 1: Getting Started with Java 17
This chapter is about how to start learning Java 17 and Java in general. We will begin with the basics, first explaining what Java is and its main terms, followed by how to install the necessary tools to write and run (execute) a program. In this respect, Java 17 is not much different from the previous Java versions, so this chapter’s content applies to the older versions too.
We will describe and demonstrate all the necessary steps for building and configuring a Java programming environment. This is the bare minimum that should have on your computer to start programming. We also describe the basic Java language constructs and illustrate them with examples that can be executed immediately.
The best way to learn a programming language—or any language, for that matter—is to use it, and this chapter guides readers on how they can do this with Java. We will cover the following topics in this chapter:
- How to install and run Java
- How to install and run an integrated development environment (IDE)
- Java primitive types and operators
- String types and literals
- Identifiers (IDs) and variables
- Java statements
Technical requirements
To be able to execute the code examples provided in this chapter, you will need the following:
- A computer with a Microsoft Windows, Apple macOS, or Linux operating system
- Java SE version 17 or later
- An IDE or your preferred code editor
The instructions for how to set up a Java Standard Edition (SE) and IntelliJ IDEA editor will be provided later in this chapter. The files with the code examples for this chapter are available on GitHub in the https://github.com/PacktPublishing/Learn-Java-17-Programming.git repository, in the examples/src/main/java/com/packt/learnjava/ch01_start folder.
How to install and run Java
When somebody says “Java”, they may mean quite different things. They could be referring to any of the following:
- Java programming language: A high-level programming language that allows an intent (a program) to be expressed in a human-readable format that can be translated into binary code that is executable by a computer
- Java compiler: A program that can read a text written in the Java programming language and translate it into bytecode that can be interpreted by the Java Virtual Machine (JVM) into binary code that is executable by a computer
- JVM: A program that reads bytecode of the compiled Java program and interprets it into binary code that is executable by a computer
- Java Development Kit (JDK): A collection of programs (tools and utilities), including the Java compiler, the JVM, and supporting libraries, which allow the compilation and execution of a program written in the Java language
The following section walks you through the installation of the JDK of Java 17 and the basic related terms and commands.
What is the JDK and why do we need it?
As we have mentioned already, the JDK includes a Java compiler and the JVM. The task of the compiler is to read a .java file that contains the text of a program written in Java (called source code) and transform (compile) it into bytecode stored in a .class file. The JVM can then read the .class file, interpret the bytecode into binary code, and send it to the operating system for execution. Both the compiler and the JVM have to be invoked explicitly from the command line.
The hierarchy of languages used by Java programs goes like this:
- You write Java code (
.javafile). - The compiler converts your Java code into bytecode (
.classfile). - The JVM converts the bytecode into machine-level assembly instructions (run on hardware).
Have a look at the following example:
int a = b + c;
When you write the preceding code, the compiler adds the following bytecode to the .class file:
ILOAD b
ILOAD c
IADD
ISTORE a
Write once, run anywhere is the most famous programming marketing jingle driving worldwide adoption. Oracle claims more than 10 million developers use Java, which runs on 13 billion devices. You write Java and compile it into bytecode in .class files. There is a different JVM for Windows, Mac, Unix, Linux, and more, but the same .class file works on all of them.
To support the .java file compilation and its bytecode execution, the JDK installation also includes standard Java libraries called the Java Class Library (JCL). If the program uses a third-party library, it has to be present during compilation and execution. It has to be referred from the same command line that invokes the compiler, and later when the bytecode is executed by the JVM. JCL, on the other hand, does not need to be referred to explicitly. It is assumed that the standard Java libraries reside in the default location of the JDK installation so that the compiler and the JVM know where to find them.
If you do not need to compile a Java program and would like to run only the already compiled .class files, you can download and install the Java Runtime Environment (JRE). For example, it consists of a subset of the JDK and does not include a compiler.
Sometimes, the JDK is referred to as a software development kit (SDK), which is a general name for a collection of software tools and supporting libraries that allow the creation of an executable version of source code written using a certain programming language. So, the JDK is an SDK for Java. This means it is possible to call the JDK an SDK.
You may also hear the terms Java platform and Java edition applied to the JDK. A typical platform is an operating system that allows a software program to be developed and executed. Since the JDK provides its own operating environment, it is called a platform too. An edition is a variation of a Java platform (JDK) assembled for a specific purpose. There are four Java platform editions, as listed here:
- Java Platform SE (Java SE): This includes the JVM, JCL, and other tools and utilities.
- Java Platform Enterprise Edition (Java EE): This includes Java SE, servers (computer programs that provide services to the applications), JCL, other libraries, code samples, tutorials, and other documentation for developing and deploying large-scale, multi-tiered, and secure network applications.
- Java Platform Micro Edition (Java ME): This is a subset of Java SE with some specialized libraries for developing and deploying Java applications for embedded and mobile devices, such as phones, personal digital assistants, TV set-top boxes, printers, and sensors. A variation of Java ME (with its own JVM implementation) is called the Android SDK, which was developed by Google for Android programming.
- Java Card: This is the smallest of the Java editions and is intended for developing and deploying Java applications onto small embedded devices such as smart cards. It has two editions: Java Card Classic Edition, for smart cards, (based on International Organization for Standardization (ISO) 7816 and ISO 14443 communication), and Java Card Connected Edition, which supports a web application model and Transmission Control Protocol/Internet Protocol (TCP/IP) as a basic protocol and runs on high-end secure microcontrollers.
- So, to install Java means to install the JDK, which also means to install the Java platform on one of the listed editions. In this book, we are going to talk about and use only Java SE (which includes the JVM, JCL, and other tools and utilities necessary to compile your Java program into bytecode, interpret it into binary code, and automatically send it to your operating system for execution).
Installing Java SE
All the recently released JDKs are listed on the official Oracle page at https://www.oracle.com/java/technologies/downloads/#java17 (we will call this the installation home page for further references in later chapters).
Here are the steps that need to be followed to install Java SE:
- Select the Java SE tab with your operating system.
- Click on the link to the installer that fits your operating system and the format (extension) you are familiar with.
- If in doubt, click the Installation Instructions link below and read the installation instructions for your operating system.
- Follow the steps that correspond to your operating system.
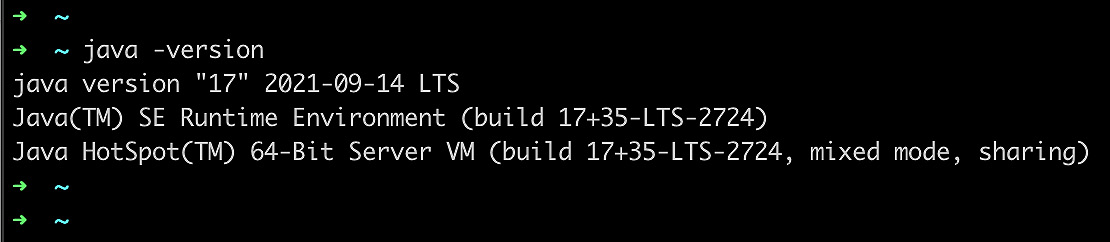
- The JDK is installed successfully when the
java -versioncommand on your computer displays the correct Java version, as demonstrated in the following example screenshot:
Commands, tools, and utilities
If you follow the installation instructions, you may have noticed a link (Installed Directory Structure of the JDK) given under Table of Contents. This brings you to a page that describes the location of the installed JDK on your computer and the content of each directory of the JDK root directory. The bin directory contains all executables that constitute Java commands, tools, and utilities. If the bin directory is not added to the PATH environment variable automatically, consider doing so manually so that you can launch a Java executable from any directory.
In the previous section, we have already demonstrated the java -version Java command. A list of the other Java executables available (commands, tools, and utilities) can be found in the Java SE documentation (https://www.oracle.com/technetwork/java/javase/documentation/index.html) by clicking the Java Platform Standard Edition Technical Documentation site link, and then the Tools Reference link on the next page. You can learn more about each executable tool by clicking its link.
You can also run each of the listed executables on your computer using one of the following options:
-?, -h, --help, or -help
These will display a brief description of the executable and all its options.
The most important Java commands are listed here:
javac: This reads a.javafile, compiles it, and creates one or more corresponding.classfiles, depending on how many Java classes are defined in the.javafile.java: This executes a.classfile.
These are the commands that make programming possible. Every Java programmer must have a good understanding of their structure and capabilities, but if you are new to Java programming and use an IDE (see the How to install and run an IDE section), you do not need to master these commands immediately. A good IDE hides them from you by compiling a .java file automatically every time you make a change to it. It also provides a graphical element that runs the program every time you click it.
Another very useful Java tool is jcmd. This facilitates communication with, and diagnosis of, any currently running Java processes (JVM) and has many options. But in its simplest form, without any option, it lists all currently running Java processes and their process IDs (PIDs). You can use it to see whether you have runaway Java processes. If you have, you can then kill such a process using the PID provided.
How to install and run an IDE
What used to be just a specialized editor that allowed checking the syntax of a written program the same way a Word editor checks the syntax of an English sentence gradually evolved into an IDE. This bears its main function in the name. It integrates all the tools necessary for writing, compiling, and then executing a program under one graphical user interface (GUI). Using the power of Java compiler, the IDE identifies syntax errors immediately and then helps to improve code quality by providing context-dependent help and suggestions.
Selecting an IDE
There are several IDEs available for a Java programmer, such as NetBeans, Eclipse, IntelliJ IDEA, BlueJ, DrJava, JDeveloper, JCreator, jEdit, JSource, and jCRASP, to name a few. You can read a review of the top Java IDEs and details about each by following this link: https://www.softwaretestinghelp.com/best-java-ide-and-online-compilers. The most popular ones are NetBeans, Eclipse, and IntelliJ IDEA.
NetBeans development started in 1996 as a Java IDE student project at Charles University in Prague. In 1999, the project and the company created around the project were acquired by Sun Microsystems. After Oracle acquired Sun Microsystems, NetBeans became open source, and many Java developers have since contributed to the project. It was bundled with JDK 8 and became an official IDE for Java development. In 2016, Oracle donated it to the Apache Software Foundation.
There is a NetBeans IDE for Windows, Linux, Mac, and Oracle Solaris. It supports multiple programming languages and can be extended with plugins. As of the time of writing, NetBeans is bundled only with JDK 8, but NetBeans 8.2 can work with JDK 9 too and uses features introduced with JDK 9 such as Jigsaw, for example. On netbeans.apache.org, you can read more about the NetBeans IDE and download the latest version, which is 12.5 as of the time of this writing.
Eclipse is the most widely used Java IDE. The list of plugins that add new features to the IDE is constantly growing, so it is not possible to enumerate all the IDE’s capabilities. The Eclipse IDE project has been developed since 2001 as open source software (OSS). A non-profit, member-supported corporation Eclipse Foundation was created in 2004 to provide the infrastructure (version control systems (VCSs), code review systems, build servers, download sites, and so on) and a structured process. None of the 30-something employees of the Eclipse Foundation is working on any of the 150 Eclipse-supported projects.
The sheer number and variety of Eclipse IDE plugins create a certain challenge for a beginner because you have to find your way around different implementations of the same—or similar—features that can, on occasion, be incompatible and may require deep investigation, as well as a clear understanding of all the dependencies. Nevertheless, the Eclipse IDE is very popular and has solid community support. You can read about the Eclipse IDE and download the latest release from www.eclipse.org/ide.
IntelliJ IDEA has two versions: a paid one and a free community edition. The paid version is consistently ranked as the best Java IDE, but the community edition is listed among the three leading Java IDEs too. The JetBrains software company that develops the IDE has offices in Prague, Saint Petersburg, Moscow, Munich, Boston, and Novosibirsk. The IDE is known for its deep intelligence that is “giving relevant suggestions in every context: instant and clever code completion, on-the-fly code analysis, and reliable refactoring tools”, as stated by the authors while describing the product on their website (www.jetbrains.com/idea). In the Installing and configuring IntelliJ IDEA section, we will walk you through the installation and configuration of IntelliJ IDEA’s community edition.
Installing and configuring IntelliJ IDEA
These are the steps you need to follow in order to download and install IntelliJ IDEA:
- Download an installer of the IntelliJ community edition from www.jetbrains.com/idea/download.
- Launch the installer and accept all the default values.
- Select
.javaon the Installation Options screen. We assume you have installed the JDK already, so you do not check the Download and install JRE option. - The last installation screen has a Run IntelliJ IDEA checkbox that you can check to start the IDE automatically. Alternatively, you can leave the checkbox unchecked and launch the IDE manually once the installation is complete.
- When the IDE starts for the first time, it provides you with an Import IntelliJ IDEA settings option. Check the Do not import settings checkbox if you have not used IntelliJ IDEA before.
- The next couple of screens ask whether you accept the JetBrains Privacy Policy and whether you would like to pay for the license or prefer to continue to use the free community edition or free trial (this depends on the particular download you get).
- Answer the questions whichever way you prefer, and if you accept the privacy policy, the Customize IntelliJ IDEA screen will ask you to choose a theme: white (IntelliJ) or dark (Darcula).
- Accept the default settings.
- If you decide to change the set values, you can do so later by selecting from the topmost menu, File | Settings, on Windows, or Preferences on Linux and macOS.
Creating a project
Before you start writing your program, you need to create a project. There are several ways to create a project in IntelliJ IDEA, which is the same for any IDE, as follows:
- New Project: This creates a new project from scratch.
- Open: This facilitates reading of the existing project from the filesystem.
- Get from VCS: This facilitates reading of the existing project from the VCS.
In this book, we will walk you through the first option only—using the sequence of guided steps provided by the IDE. Options 2 and 3 include many settings that are automatically set by importing an existing project that has those settings. Once you have learned how to create a new project from scratch, the other ways to bring up a project in the IDE will be very easy for you.
Start by clicking the New Project link and proceed further as follows:
- Select Maven in the left panel and a value for Project SDK (Java Version 17, if you have installed JDK 17 already), and click Next.
- Maven is a project configuration tool whose primary function is to manage project dependencies. We will talk about it shortly. For now, we will use its other responsibility: to define and hold the project code identity using three Artifact Coordinates properties (see next).
- Type the project name—for example,
myproject. - Select the desired project location in the Location field setting (this is where your new code will reside).
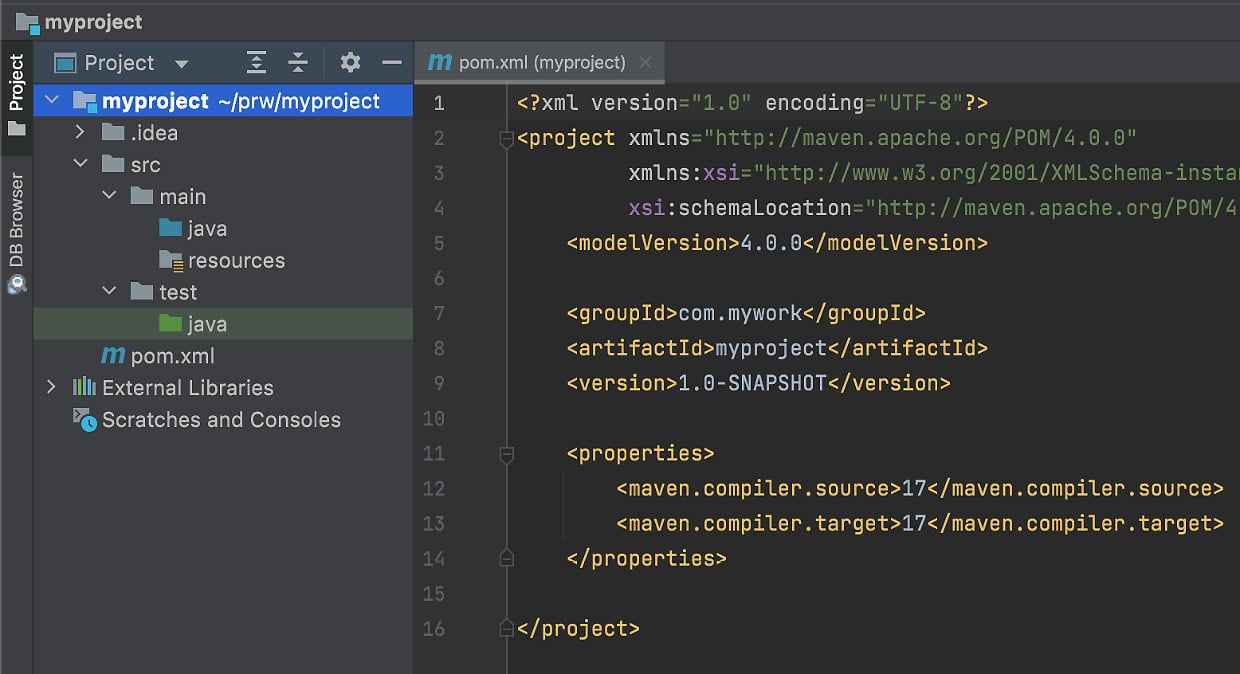
- Click Artifact Coordinates, and the following properties will appear:
GroupId: This is the base package name that identifies a group of projects within an organization or an open source community. In our case, l et's typecom.mywork.ArtifactId: To identify a particular project within the group. Leave it asmyproject.Version: To identify the version of the project. Leave it as1.0-SNAPSHOT.
The main goal is to make the identity of a project unique among all projects in the world. To help avoid a GroupId clash, the convention requires that you start building it from the organization domain name in reverse. For example, if a company has a company.com domain name, the GroupId properties of its projects should start with com.company. That is why for this demonstration we use com.mywork, and for the code in this book, we use the com.packt.learnjava GroupID value.
- Click Finish.
- You will see the following project structure and generated
pom.xmlfile:
Now, if somebody would like to use the code of your project in their application, they would refer to it by the three values shown, and Maven (if they use it) will bring it in (if you upload your project to the publicly shared Maven repository, of course). Read more about Maven at https://maven.apache.org/guides. Another function of the GroupId value is to define the root directory of the folders tree that holds your project code. The java folder under main will hold the application code, while the java folder under test will hold the test code.
Let’s create our first program using the following steps:
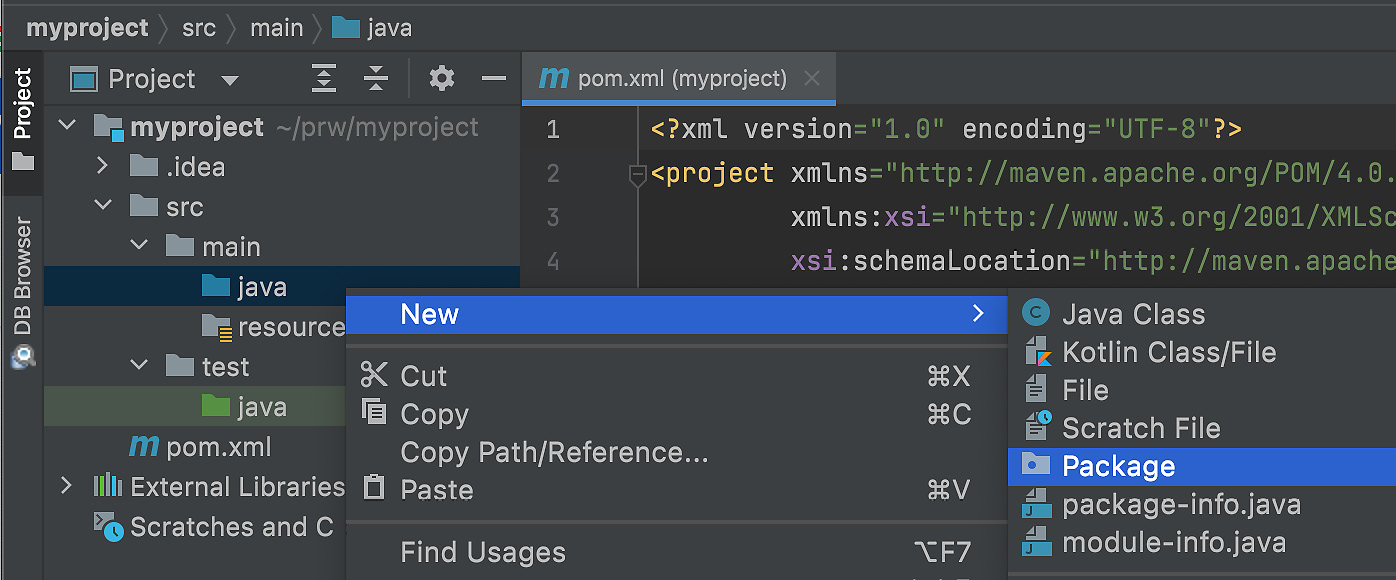
- Right-click on
java, select New, and then click Package, as illustrated in the following screenshot:
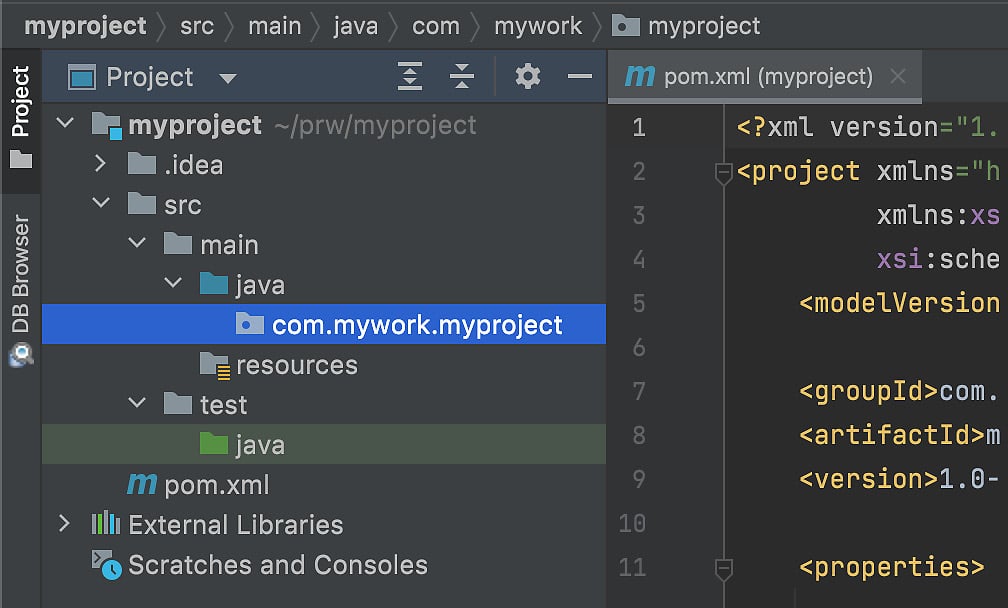
- In the New Package window provided, type
com.mywork.myprojectand press Enter.
You should see in the left panel the following set of new folders:
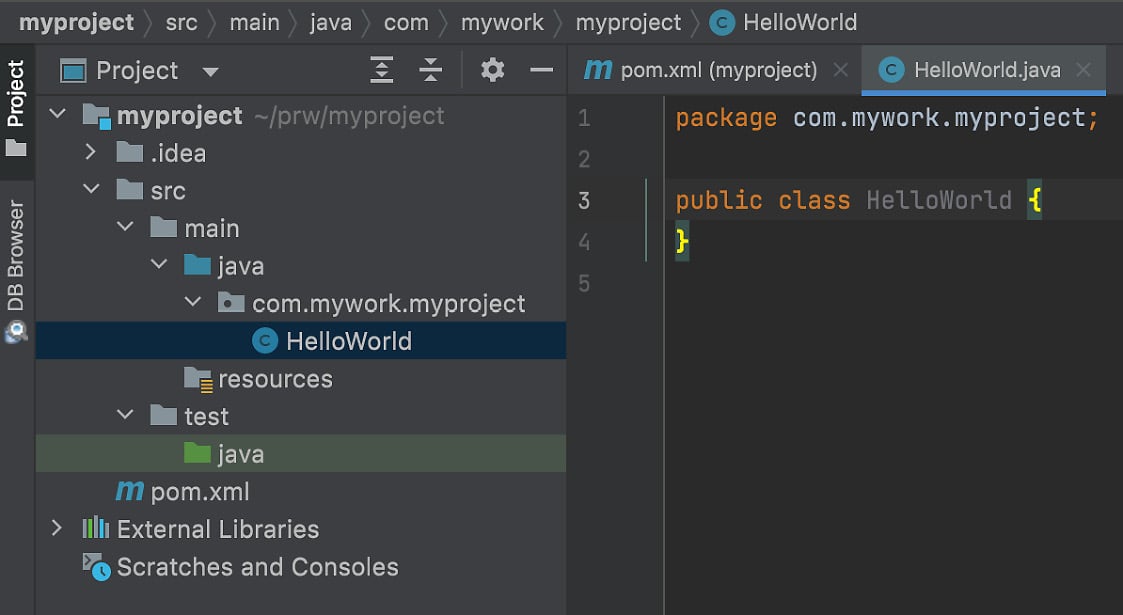
- Right-click on
com.mywork.myproject, select New, and then click Java Class, as illustrated in the following screenshot:


- Press Enter and you will see your first Java class,
HelloWorld, created in thecom.mywork.myprojectpackage, as illustrated in the following screenshot:
The package reflects the Java class location in the filesystem. We will talk about this more in Chapter 2, Java Object-Oriented Programming (OOP). Now, in order to run a program, we create a main() method. If present, this method can be executed to serve as an entry point into the application. It has a certain format, as shown here:
This has to have the following attributes:
public: Freely accessible from outside the packagestatic: Should be able to be called without creating an object of the class it belongs to
It should also have the following:
- Return
void(nothing)
Accept a String array as an input, or varargs, as we have done. We will talk about varargs in Chapter 2, Java Object-Oriented Programming (OOP). For now, suffice to say that String[] args and String... args essentially define the same input format.
We explain how to run the main class using a command line in the Executing examples from the command line section. You can read more about Java command-line arguments in the official Oracle documentation at https://docs.oracle.com/javase/tutorial/essential/environment/cmdLineArgs.html. It is also possible to run the examples from IntelliJ IDEA.
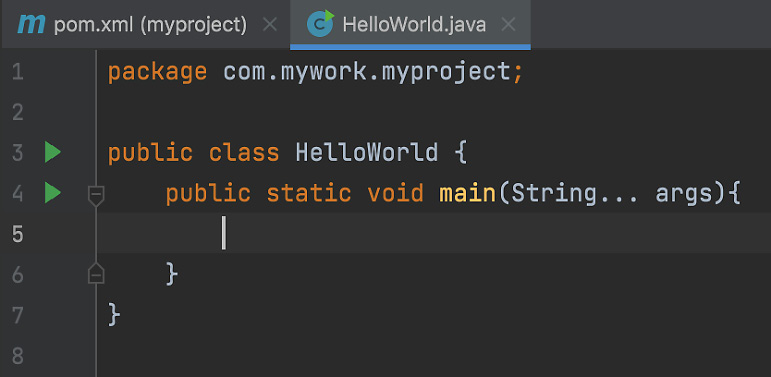
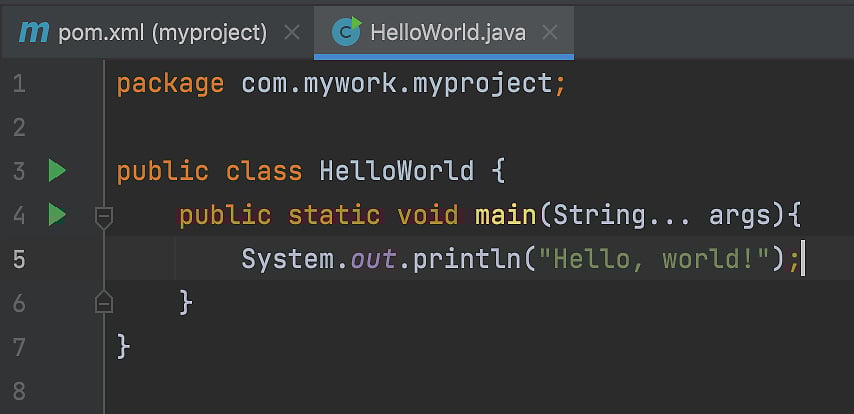
Notice the two green triangles to the left in the screenshot shown next. By clicking any of them, you can execute the main() method. For example, let’s display Hello, world!.
In order to do this, type the following line inside the main() method:
System.out.println("Hello, world!");
The following screenshot shows how the program should look afterward:
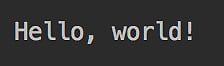
Then, click one of the green triangles, and you should get the following output in the Terminal area:
From now on, every time we are going to discuss code examples, we will run them the same way, by using the main() method. While doing this, we will not capture a screenshot but put the result in comments, because such a style is easier to follow. For example, the following code snippet displays how the previous code demonstration would look in this style:
System.out.println("Hello, world!"); //prints: Hello, world!
It is possible to add a comment (any text) to the right of the code line separated by a double slash //. The compiler does not read this text and just keeps it as it is. The presence of a comment does not affect performance and is used to explain the programmer’s intent to humans.
Importing a project
We are going to demonstrate project importing using the source code for this book. We assume that you have Maven installed (https://maven.apache.org/install.html) on your computer and that you have Git (https://gist.github.com/derhuerst/1b15ff4652a867391f03) installed too, and can use it. We also assume that you have installed JDK 17, as was described in the Installing Java SE section.
To import the project with the code examples for this book, follow these steps:
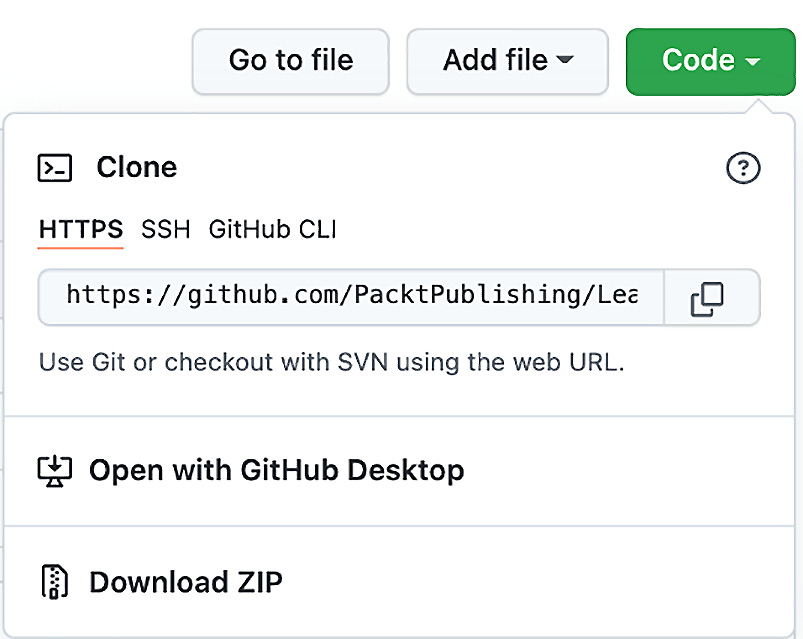
- Go to the source repository (https://github.com/PacktPublishing/Learn-Java-17-Programming) and click the Code drop-down menu, as shown in the following screenshot:

- Copy the provided Uniform Resource Locator (URL) (click the copy symbol to the right of the URL), as illustrated in the following screenshot:
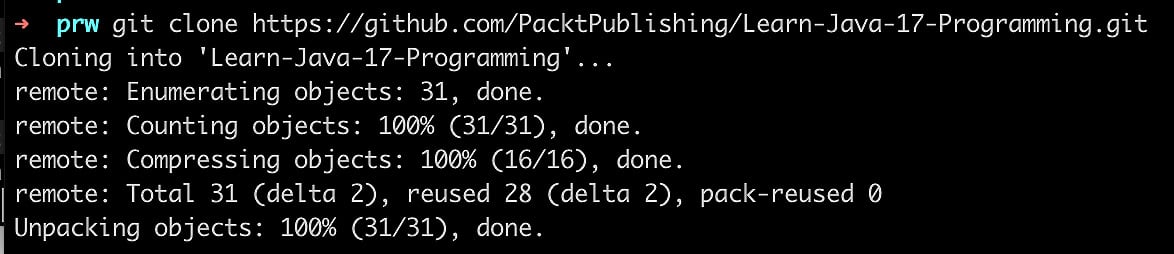
- Select a directory on your computer where you would like the source code to be placed and then run the
git clone https://github.com/PacktPublishing/Learn-Java-17-Programming.gitGit command and observe similar output to that shown in the following screenshot:
- A new
Learn-Java-17-Programmingfolder is created.
Alternatively, instead of cloning, you can download the source as a .zip file using the Download ZIP link shown in the screenshot just before. Unarchive the downloaded source in a directory on your computer where you would like the source code to be placed, and then rename the newly created folder by removing the -master suffix from its name, making sure that the folder’s name is Learn-Java-17-Programming.
- The new
Learn-Java-17-Programmingfolder contains the Maven project with all the source code from this book. If you prefer, you can rename this folder however you like. In our case, we renamed itLearnJavafor brevity. - Now, run IntelliJ IDEA and click Open. Navigate to the location of the project and select the just-created folder (
LearnJava, in our case), then click the Open button. - If the following popup shows in the bottom-right corner, click Load:

- Also, click Trust project..., as shown in the following screenshot:

- Then, click the Trust Project button on the following popup:

- Now, go to Project Structure (cogwheel symbol in the upper-right corner) and make sure that Java 17 is selected as an SDK, as shown in the following screenshot:
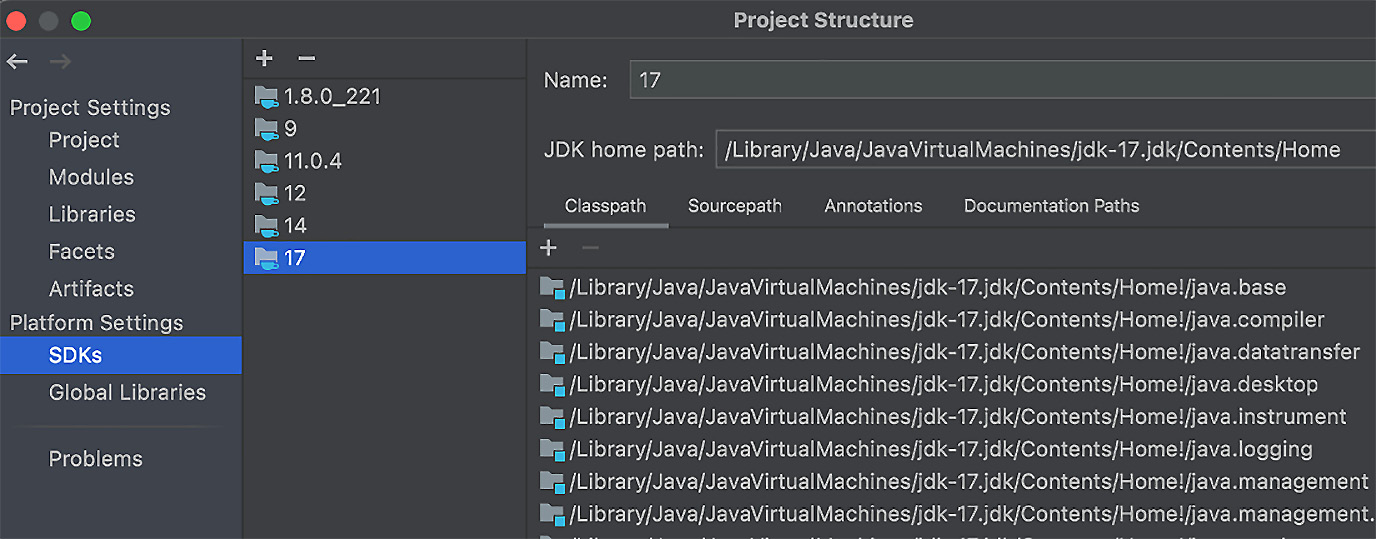
- Click Apply and make sure that the default Project SDK is set to Java version 17 and Project language level is set to 17, as in the following screenshot:

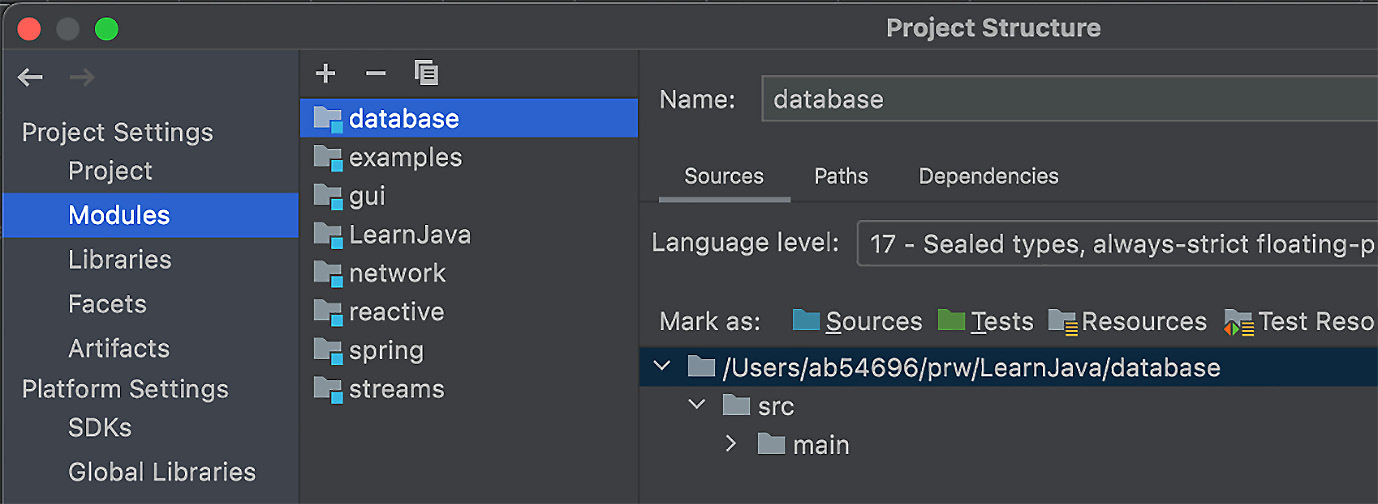
- Click Apply and then (optionally) remove the
LearnJavamodule by selecting it and clicking"-", as follows:
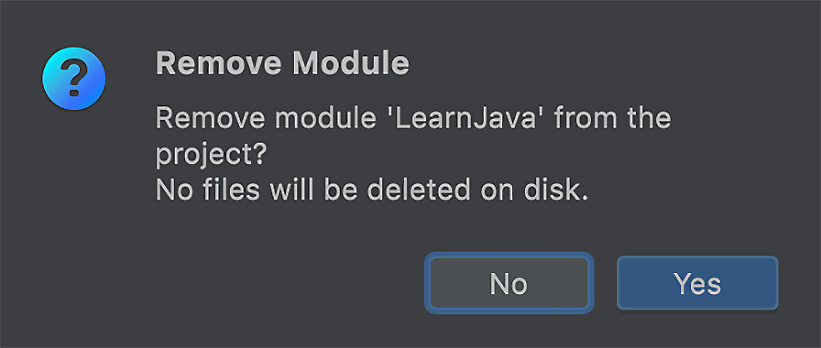
- Confirm the
LearnJavamodule removal on the popup by clicking Yes, as follows:
- Here's how the final list of modules should look:

Click OK in the bottom-right corner and get back to your project. Click examples in the left pane and continue going down the source tree until you see the following list of classes:
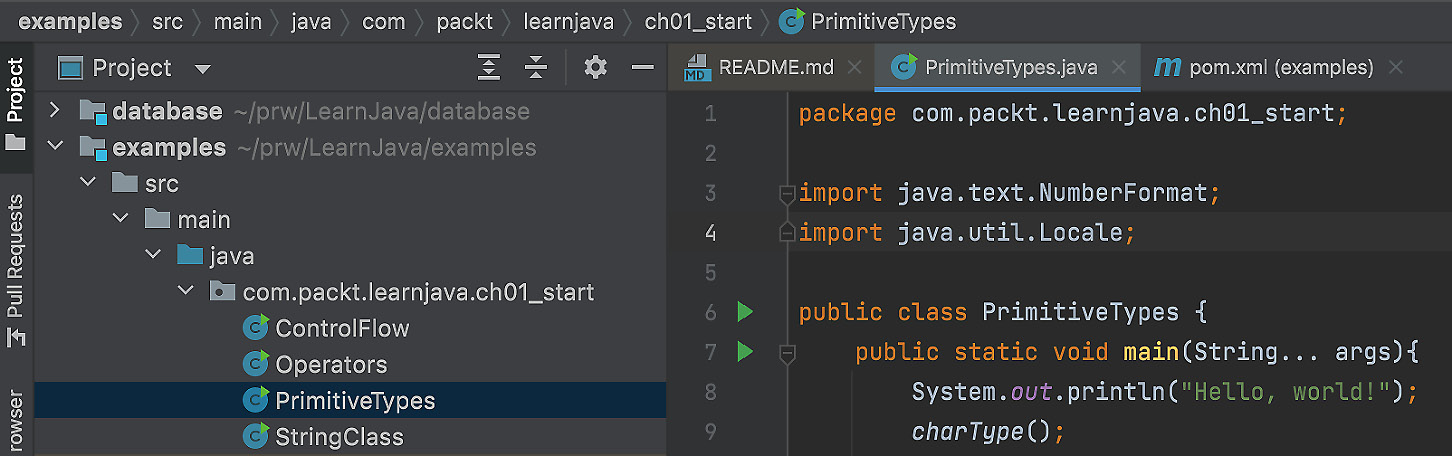
Click on the green arrow in the right pane and execute the main() method of any class you want. For example, let’s execute the main() method of the PrimitiveTypes class. The result you will be able to see in the Run window should be similar to this:
Executing examples from the command line
To execute the examples from the command line, go to the examples folder, where the pom.xml file is located, and run the mvn clean package command. If the command is executed successfully, you can run any main() method in any of the programs in the examples folder from the command line. For example, to execute the main() method in the ControlFlow.java file, run the following command as one line:
java -cp target/examples-1.0-SNAPSHOT.jar com.packt.learnjava.ch01_start.ControlFlow
You will see the following results:
This way, you can run any class that has the main() method in it. The content of the main() method will be executed.
Java primitive types and operators
With all the main programming tools in place, we can start talking about Java as a language. The language syntax is defined by the Java Language Specification, which you can find at https://docs.oracle.com/javase/specs. Don’t hesitate to refer to it every time you need some clarification—it is not as daunting as many people assume.
All the values in Java are divided into two categories: reference types and primitive types. We start with primitive types and operators as the natural entry point to any programming language. In this chapter, we will also discuss one reference type called String (see the String types and literals section).
All primitive types can be divided into two groups: Boolean types and numeric types.
Boolean types
There are only two Boolean type values in Java: true and false. Such a value can only be assigned to a variable of a boolean type, as in the following example:
boolean b = true;
A boolean variable is typically used in control flow statements, which we are going to discuss in the Java statements section. Here is one example:
boolean b = x > 2;
if(b){
    //do something
}
In the preceding code, we assign to the b variable the result of the evaluation of the x > 2 expression. If the value of x is greater than 2, the b variable gets the assigned value, true. Then, the code inside the braces ({}) is executed.
Numeric types
Java numeric types form two groups: integral types (byte, char, short, int, and long) and floating-point types (float and double).
Integral types
Integral types consume the following amount of memory:
byte: 8 bitschar: 16 bitsshort: 16 bitsint: 32 bitslong: 64 bits
The char type is an unsigned integer that can hold a value (called a code point) from 0 to 65,535 inclusive. It represents a Unicode character, which means there are 65,536 Unicode characters. Here are three records from the basic Latin list of Unicode characters:

The following code demonstrates the properties of the char type (execute the main() method of the com.packt.learnjava.ch01_start.PrimitiveTypes class—see the charType() method):
char x1 = '\u0032';
System.out.println(x1);  //prints: 2
char x2 = '2';
System.out.println(x2);  //prints: 2
x2 = 65;
System.out.println(x2);  //prints: A
char y1 = '\u0041';
System.out.println(y1);  //prints: A
char y2 = 'A';
System.out.println(y2);  //prints: A
y2 = 50;
System.out.println(y2);  //prints: 2
System.out.println(x1 + x2);  //prints: 115
System.out.println(x1 + y1);  //prints: 115
The last two lines from the preceding code example explain why the char type is considered an integral type because char values can be used in arithmetic operations. In such a case, each char value is represented by its code point.
The range of values of other integral types is shown here:
byte: from -128 to 127 inclusiveshort: from -32,768 to 32,767 inclusiveint: from -2.147.483.648 to 2.147.483.647 inclusivelong: from -9,223,372,036,854,775,808 to 9,223,372,036,854,775,807 inclusive
You can always retrieve the maximum and minimum value of each primitive type from a corresponding Java constant, as follows (execute the main() method of the com.packt.learnjava.ch01_start.PrimitiveTypes class—see the minMax() method):
System.out.println(Byte.MIN_VALUE);      //prints: -128
System.out.println(Byte.MAX_VALUE);      //prints:  127
System.out.println(Short.MIN_VALUE);     //prints: -32768
System.out.println(Short.MAX_VALUE);     //prints:  32767
System.out.println(Integer.MIN_VALUE);   //prints: -2147483648
System.out.println(Integer.MAX_VALUE);   //prints:  2147483647
System.out.println(Long.MIN_VALUE);
                                 //prints: -9223372036854775808
System.out.println(Long.MAX_VALUE);
                                  //prints: 9223372036854775807
System.out.println((int)Character.MIN_VALUE); //prints: 0
System.out.println((int)Character.MAX_VALUE); //prints: 65535
The construct (int) in the last two lines is an example of cast operator usage. It forces the conversion of a value from one type to another in cases where such a conversion is not always guaranteed to be successful. As you can see from our examples, some types allow bigger values than other types. But a programmer may know that the value of a certain variable can never exceed the maximum value of the target type, and the cast operator is the way the programmer can force their opinion on the compiler. Otherwise, without a cast operator, the compiler would raise an error and would not allow the assignment. However, the programmer may be mistaken and the value may become bigger. In such a case, a runtime error will be raised during execution time.
There are types that, in principle, cannot be cast to other types, though, or at least not to all types—for example, a Boolean type value cannot be cast to an integral type value.
Floating-point types
There are two types in this group of primitive types—float and double. These consume the following amount of memory:
float: 32 bitdouble: 64 bit
Their positive maximum and minimum possible values are shown here (execute the main() method of the com.packt.learnjava.ch01_start.PrimitiveTypes class—see the minMax() method):
System.out.println(Float.MIN_VALUE);  //prints: 1.4E-45
System.out.println(Float.MAX_VALUE);  //prints: 3.4028235E38
System.out.println(Double.MIN_VALUE); //prints: 4.9E-324
System.out.println(Double.MAX_VALUE);
                               //prints: 1.7976931348623157E308
The maximum and minimum negative values are the same as those just shown, only with a minus sign (-) in front of them. So, effectively, the Float.MIN_VALUE and Double.MIN_VALUE values are not the minimal values, but the precision of the corresponding type. A zero value can be either 0.0 or -0.0 for each of the floating-point types.
A special feature of the floating-point type is the presence of a dot (.) that separates integer and fractional parts of the number. By default, in Java, a number with a dot is assumed to be a double type. For example, the following is assumed to be a double value:
42.3
This means that the following assignment causes a compilation error:
float f = 42.3;
To indicate that you would like it to be treated as a float type, you need to add either f or F. For example, the following assignments do not cause an error (execute the main() method of the com.packt.learnjava.ch01_start.PrimitiveTypes class—see the casting() method):
float f = 42.3f;
float d = 42.3F;
double a = 42.3f;
double b = 42.3F;
float x = (float)42.3d;
float y = (float)42.3D;
As you may have noticed from the preceding example, d and D indicate a double type, but we were able to cast them to the float type because we are confident that 42.3 is well inside the range of possible float-type values.
Default values of primitive types
In some cases, a variable has to be assigned a value even when a programmer did not want to do that. We will talk about such cases in Chapter 2, Java Object-Oriented Programming (OOP). The default primitive type value in such cases is outlined here:
byte,short,int, andlongtypes have a default value of 0.- The
chartype has a default value of\u0000, with the code point 0. floatanddoubletypes have a default value of 0.0.- The
booleantype has a default value offalse.
Literals of primitive types
The representation of a value is called a literal. The boolean type has two literals: true and false. Literals of byte, short, int, and long integral types have an int type by default, as illustrated here:
byte b = 42;
short s = 42;
int i = 42;
long l = 42;
In addition, to indicate a literal of a long type, you can append the letter l or L to the end, like this:
long l1 = 42l;
long l2 = 42L;
The letter l can be easily confused with the number 1, so using L (instead of l) for this purpose is a good practice.
So far, we have expressed integral literals in a decimal number system. Meanwhile, literals of byte, short, int, and long types can also be expressed in binary (base 2, digits 0-1), octal (base 8, digits 0-7), and hexadecimal (base 16, digits 0-9, and a-f) number systems. A binary literal starts with 0b (or 0B), followed by the value expressed in a binary system. For example, the decimal 42 is expressed as 101010 = 2^0*0 + 2^1*1 + 2^2*0 + 2^3 *1 + 2^4 *0 + 2^5 *1 (we start from the right 0). An octal literal starts with 0, followed by the value expressed in an octal system, so 42 is expressed as 52 = 8^0*2+ 8^1*5. A hexadecimal literal starts with 0x (or with 0X), followed by a value expressed in a hexadecimal system. So, 42 is expressed as 2a = 16^0*a + 16^1*2 because, in the hexadecimal system, the symbols a to f (or A to F) map to the decimal values 10 to 15. Here is the demonstration code (execute the main() method of the com.packt.learnjava.ch01_start.PrimitiveTypes class—see the literals() method):
int i = 42;
System.out.println(Integer.toString(i, 2));       // 101010
System.out.println(Integer.toBinaryString(i));    // 101010
System.out.println(0b101010);                     // 42
System.out.println(Integer.toString(i, 8));       // 52
System.out.println(Integer.toOctalString(i));     // 52
System.out.println(052);                           // 42
System.out.println(Integer.toString(i, 10));       // 42
System.out.println(Integer.toString(i));           // 42
System.out.println(42);                            // 42
System.out.println(Integer.toString(i, 16));       // 2a
System.out.println(Integer.toHexString(i));        // 2a
System.out.println(0x2a);                          // 42
As you can see, Java provides methods that convert decimal system values to systems with different bases. All these expressions of numeric values are called literals.
One feature of numeric literals makes them human-friendly. If the number is large, it is possible to break it into triples separated by an underscore (_) sign. Observe the following, for example:
int i = 354_263_654;
System.out.println(i);  //prints: 354263654
float f = 54_436.98f;
System.out.println(f);  //prints: 54436.98
long l = 55_763_948L;
System.out.println(l);  //prints: 55763948
The compiler ignores an embedded underscore sign.
The char type has two kinds of literals: a single character or an escape sequence. We have seen examples of char-type literals when discussing numeric types, and you can see some others here:
char x1 = '\u0032';
char x2 = '2';
char y1 = '\u0041';
char y2 = 'A';
As you can see, the character has to be enclosed in single quotes.
An escape sequence starts with a backslash (\) followed by a letter or another character. Here is a full list of escape sequences:
\b: backspace BS, Unicode escape\u0008- \t: horizontal tab HT, Unicode escape
\u0009 - \n: line feed LF, Unicode escape
\u000a - \f: form feed FF, Unicode escape
\u000c - \r: carriage return CR, Unicode escape
\u000d - \”: double quote “, Unicode escape
\u0022 - \’: single quote ‘, Unicode escape
\u0027 - \\: backslash \, Unicode escape
\u005c
From the eight escape sequences, only the last three are represented by a symbol. They are used when this symbol cannot be otherwise displayed. Observe the following, for example:
System.out.println("\"");   //prints: "
System.out.println('\'');   //prints: '
System.out.println('\\');   //prints: \
The rest are used more as control codes that direct the output device to do something, as in the following example:
System.out.println("The back\bspace");
//prints: The backspace
System.out.println("The horizontal\ttab");
//prints: The horizontal tab
System.out.println("The line\nfeed");
//prints: The line feed
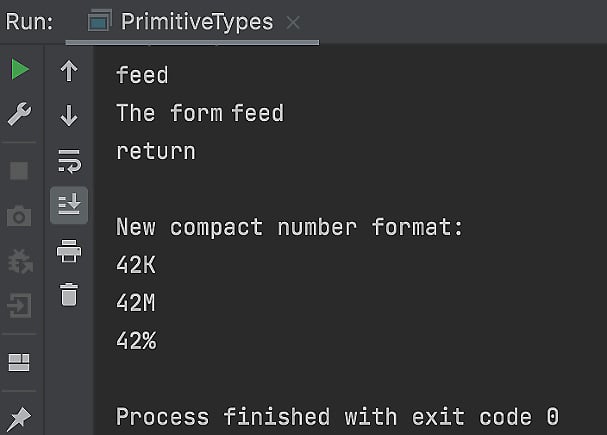
System.out.println("The form\ffeed");
//prints: The form feed
System.out.println("The carriage\rreturn");//prints: return
As you can see, \b deletes a previous symbol, \t inserts a tab space, \n breaks the line and begins the new one, \f forces the printer to eject the current page and to continue printing at the top of another, and \r starts the current line anew.
New compact number format
The java.text.NumberFormat class presents numbers in various formats. It also allows formats to be adjusted to those provided, including locales. A new feature added to this class in Java 12 is called a compact or short number format.
It represents a number in a locale-specific, human-readable form. Observe the following, for example (execute the main() method of the com.packt.learnjava.ch01_start.PrimitiveTypes class—see the newNumberFormat() method):
NumberFormat fmt = NumberFormat.getCompactNumberInstance(Locale.US, NumberFormat.Style.SHORT);
System.out.println(fmt.format(42_000));          //prints: 42K
System.out.println(fmt.format(42_000_000));      //prints: 42M
NumberFormat fmtP = NumberFormat.getPercentInstance();
System.out.println(fmtP.format(0.42));          //prints: 42%
As you can see, to access this capability, you have to acquire a particular instance of the NumberFormat class, sometimes based on the locale and style provided.
Operators
There are 44 operators in Java. These are listed in the following table:

We will not describe the not-often-used &=, |=, ^=, <<=, >>=, >>>= assignment operators and bitwise operators, but you can read about them in the Java specification (https://docs.oracle.com/javase/specs). Arrow ( ->) and method reference (::) operators will be described in Chapter 14, Java Standard Streams. The new instance creation operator, the . field access/method invocation operator, and the instanceof type comparison operator will be discussed in Chapter 2, Java Object-Oriented Programming (OOP). As for the cast operator, we have already described it in the Integral types section.
Arithmetic unary (+ and -) and binary (+, -, *, /, and %) operators
Most of the arithmetic operators and positive and negative signs (unary operators) are quite familiar to us. The modulus operator (%) divides the left-hand operand by the right-hand operand and returns the remainder, as follows (execute the main() method of the com.packt.learnjava.ch01_start.Operators class—see the integerDivision() method:
int x = 5;
System.out.println(x % 2);   //prints: 1
It is also worth mentioning that the division of two integer numbers in Java loses the fractional part because Java assumes the result should be an integer number 2, as follows:
int x = 5;
System.out.println(x / 2);   //prints: 2
If you need the fractional part of the result to be preserved, convert one of the operands into a floating-point type. Here are a few ways (among many) in which to do this:
int x = 5;
System.out.println(x / 2.);           //prints: 2.5
System.out.println((1. * x) / 2);     //prints: 2.5
System.out.println(((float)x) / 2);   //prints: 2.5
System.out.println(((double) x) / 2); //prints: 2.5
Increment and decrement unary operators (++ and --)
The ++ operator increases the value of an integral type by 1, while the -- operator decreases it by 1. If placed before the variable (prefix), it changes its value by 1 before the variable value is returned. But when placed after the variable (postfix), it changes its value by 1 after the variable value is returned. Here are a few examples (execute the main() method of the com.packt.learnjava.ch01_start.Operators class—see the incrementDecrement() method):
int i = 2;
System.out.println(++i);   //prints: 3
System.out.println(i);     //prints: 3
System.out.println(--i);   //prints: 2
System.out.println(i);     //prints: 2
System.out.println(i++);   //prints: 2
System.out.println(i);     //prints: 3
System.out.println(i--);   //prints: 3
System.out.println(i);     //prints: 2
Equality operators (== and !=)
The == operator means equals, while the != operator means not equals. They are used to compare values of the same type and return a true Boolean value if the operand’s values are equal, or false otherwise. Observe the following, for example (execute the main() method of the com.packt.learnjava.ch01_start.Operators, class—see the equality() method):
int i1 = 1;
int i2 = 2;
System.out.println(i1 == i2);        //prints: false
System.out.println(i1 != i2);        //prints: true
System.out.println(i1 == (i2 - 1));  //prints: true
System.out.println(i1 != (i2 - 1));  //prints: false
Exercise caution, though, while comparing values of floating-point types, especially when you compare the results of calculations. Using relational operators (<, >, <=, and >=) in such cases is much more reliable, because calculations such as 1/3—for example—result in a never-ending fractional part 0.33333333... and ultimately depend on precision implementation (a complex topic that is beyond the scope of this book).
Relational operators (<, >, <=, and >=)
Relational operators compare values and return a Boolean value. Observe the following, for example (execute the main() method of the com.packt.learnjava.ch01_start.Operators class—see the relational() method):
int i1 = 1;
int i2 = 2;
System.out.println(i1 > i2);         //prints: false
System.out.println(i1 >= i2);        //prints: false
System.out.println(i1 >= (i2 - 1));  //prints: true
System.out.println(i1 < i2);         //prints: true
System.out.println(i1 <= i2);        //prints: true
System.out.println(i1 <= (i2 - 1));  //prints: true
float f = 1.2f;
System.out.println(i1 < f);          //prints: true
Logical operators (!, &, and |)
Logical operators can be defined as follows:
- The
!binary operator returnstrueif the operand isfalse; otherwise, it returnsfalse. - The
&binary operator returnstrueif both of the operands aretrue. - The
|binary operator returnstrueif at least one of the operands istrue.
Here is an example (execute the main() method of the com.packt.learnjava.ch01_start.Operators class—see the logical() method):
boolean b = true;
System.out.println(!b);    //prints: false
System.out.println(!!b);   //prints: true
boolean c = true;
System.out.println(c & b); //prints: true
System.out.println(c | b); //prints: true
boolean d = false;
System.out.println(c & d); //prints: false
System.out.println(c | d); //prints: true
Conditional operators (&&, ||, and ? :)
The && and || operators produce the same results as the & and | logical operators we have just demonstrated, as follows (execute the main() method of the com.packt.learnjava.ch01_start.Operators class—see the conditional() method):
boolean b = true;
boolean c = true;
System.out.println(c && b); //prints: true
System.out.println(c || b); //prints: true
boolean d = false;
System.out.println(c && d); //prints: false
System.out.println(c || d); //prints: true
The difference is that the && and || operators do not always evaluate the second operand. For example, in the case of the && operator, if the first operand is false, the second operand is not evaluated because the result of the whole expression will be false anyway. Similarly, in the case of the || operator, if the first operand is true, the whole expression will be clearly evaluated to true without evaluating the second operand. We can demonstrate this in the following code snippet:
int h = 1;
System.out.println(h > 3 && h++ < 3);  //prints: false
System.out.println(h);                //prints: 2
System.out.println(h > 3 && h++ < 3); //prints: false
System.out.println(h);                //prints: 2
The ? : operator is called a ternary operator. It evaluates a condition (before the ? sign), and if it results in true, assigns to a variable the value calculated by the first expression (between the ? and : signs); otherwise, it assigns a value calculated by the second expression (after the : sign), as illustrated in the following code snippet:
int n = 1, m = 2;
float k = n > m ? (n * m + 3) : ((float)n / m);
System.out.println(k);           //prints: 0.5
Assignment operators (=, +=, -=, *=, /=, and %=)
The = operator just assigns a specified value to a variable, like this:
x = 3;
Other assignment operators calculate a new value before assigning it, as follows:
x += 42assigns toxthe result of thex = x + 42addition operation.x -= 42assigns toxthe result of thex = x - 42subtraction operation.x *= 42assigns toxthe result of thex = x * 42multiplication operation.x /= 42assigns toxthe result of thex = x / 42division operation.x %= 42assigns the remainder of thex = x + x % 42division operation.
Here is how these operators work (execute the main() method of the com.packt.learnjava.ch01_start.Operators class—see the assignment() method):
float a = 1f;
a += 2;
System.out.println(a); //prints: 3.0
a -= 1;
System.out.println(a); //prints: 2.0
a *= 2;
System.out.println(a); //prints: 4.0
a /= 2;
System.out.println(a); //prints: 2.0
a %= 2;
System.out.println(a); //prints: 0.0
String types and literals
We have just described the primitive value types of the Java language. All the other value types in Java belong to a category of reference types. Each reference type is a more complex construct than just a value. It is described by a class, which serves as a template for creating an object, and a memory area that contains values and methods (the processing code) defined in the class. An object is created by the new operator. We will talk about classes and objects in more detail in Chapter 2, Java Object-Oriented Programming (OOP).
In this chapter, we will talk about one of the reference types called String. It is represented by the java.lang.String class, which belongs, as you can see, to the most foundational package of the JDK, java.lang. The reason we’re introducing the String class so early is that it behaves in some respects very similar to primitive types, despite being a reference type.
A reference type is so-called because, in the code, we do not deal with values of this type directly. A value of a reference type is more complex than a primitive-type value. It is called an object and requires more complex memory allocation, so a reference-type variable contains a memory reference. It points (refers) to the memory area where the object resides, hence the name.
This nature of the reference type requires particular attention when a reference-type variable is passed into a method as a parameter. We will discuss this in more detail in Chapter 3, Java Fundamentals. For now, we will see how String, being a reference type, helps to optimize memory usage by storing each String value only once.
String literals
The String class represents character strings in Java programs. We have seen several such strings. We have seen Hello, world!, for example. That is a String literal.
Another example of a literal is null. Any reference class can refer to a null literal. It represents a reference value that does not point to any object. In the case of a String type, it looks like this:
String s = null;
But a literal that consists of characters enclosed in double quotes ("abc", "123", and "a42%$#", for example) can only be of a String type. In this respect, the String class, being a reference type, has something in common with primitive types. All String literals are stored in a dedicated section of memory called a string pool, and two literals are equally spelled to represent the same value from the pool (execute the main() method of the com.packt.learnjava.ch01_start.StringClass class—see the compareReferences() method):
String s1 = "abc";
String s2 = "abc";
System.out.println(s1 == s2);    //prints: true
System.out.println("abc" == s1); //prints: true
The JVM authors have chosen such an implementation to avoid duplication and improve memory usage. The previous code examples look very much like operations involving primitive types, don’t they? But when a String object is created using a new operator, the memory for the new object is allocated outside the string pool, so references of two String objects—or any other objects, for that matter—are always different, as we can see here:
String o1 = new String("abc");
String o2 = new String("abc");
System.out.println(o1 == o2);    //prints: false
System.out.println("abc" == o1); //prints: false
If necessary, it is possible to move the string value created with the new operator to the string pool using the intern() method, like this:
String o1 = new String("abc");
System.out.println("abc" == o1);          //prints: false
System.out.println("abc" == o1.intern()); //prints: true
In the previous code snippet, the intern() method attempted to move the newly created "abc" value into the string pool but discovered that such a literal exists there already, so it reused the literal from the string pool. That is why the references in the last line in the preceding example are equal.
The good news is that you probably will not need to create String objects using the new operator, and most Java programmers never do this. But when a String object is passed into your code as an input and you have no control over its origin, comparison by reference only may cause an incorrect result (if the strings have the same spelling but were created by the new operator). That is why, when the equality of two strings by spelling (and case) is necessary, to compare two literals or String objects, the equals() method is a better choice, as illustrated here:
String o1 = new String("abc");
String o2 = new String("abc");
System.out.println(o1.equals(o2));       //prints: true
System.out.println(o2.equals(o1));       //prints: true
System.out.println(o1.equals("abc"));    //prints: true
System.out.println("abc".equals(o1));    //prints: true
System.out.println("abc".equals("abc")); //prints: true
We will talk about the equals() method and other methods of the String class shortly.
Another feature that makes String literals and objects look like primitive values is that they can be added using the + arithmetic operator, like this (execute the main() method of the com.packt.learnjava.ch01_start.StringClass class—see the operatorAdd() method):
String s1 = "abc";
String s2 = "abc";
String s = s1 + s2;
System.out.println(s);              //prints: abcabc
System.out.println(s1 + "abc");     //prints: abcabc
System.out.println("abc" + "abc");  //prints: abcabc
String o1 = new String("abc");
String o2 = new String("abc");
String o = o1 + o2;
System.out.println(o);              //prints: abcabc
System.out.println(o1 + "abc");     //prints: abcabc
No other arithmetic operator can be applied to a String literal or an object.
A new String literal, called a text block, was introduced with Java 15. It facilitates the preservation of indents and multiple lines without adding white spaces in quotes. For example, here is how a programmer would add indentation before Java 15 and use \n to break the line:
String html = "<html>\n" +
              "   <body>\n" +
              "       <p>Hello World.</p>\n" +
              "   </body>\n" +
              "</html>\n";
And here is how the same result is achieved with Java 15:
String html = """
               <html>
                   <body>
                       <p>Hello World.</p>
                   </body>
               </html>
              """;
To see how it works, execute the main() method of the com.packt.learnjava.ch01_start.StringClass class—see the textBlock() method.
String immutability
Since all String literals can be shared, the JVM authors make sure that, once stored, a String variable cannot be changed. This helps not only avoid the problem of concurrent modification of the same value from different places of the code but also prevents unauthorized modification of a String value, which often represents a username or password.
The following code looks like a String value modification:
String str = "abc";
str = str + "def";
System.out.println(str);       //prints: abcdef
str = str + new String("123");
System.out.println(str);       //prints: abcdef123
But, behind the scenes, the original "abc" literal remains intact. Instead, a few new literals were created: "def", "abcdef", "123", and "abcdef123". To prove this, we have executed the following code:
String str1 = "abc";
String r1 = str1;
str1 = str1 + "def";
String r2 = str1;
System.out.println(r1 == r2);      //prints: false
System.out.println(r1.equals(r2)); //prints: false
As you can see, the r1 and r2 variables refer to different memories, and the objects they refer to are spelled differently too.
We will talk more about strings in Chapter 5, Strings, Input/Output, and Files.
IDs and variables
From our school days, we have an intuitive understanding of what a variable is. We think of it as a name that represents a value. We solve problems using such variables as x gallons of water or n miles of distance, and similar. In Java, the name of a variable is called an ID and can be constructed by certain rules. Using an ID, a variable can be declared (defined) and initialized.
ID
According to the Java Language Specification (https://docs.oracle.com/javase/specs), an ID (a variable name) can be a sequence of Unicode characters that represent letters, digits 0-9, a dollar sign ($), or an underscore (_).
Other limitations are outlined here:
- The first symbol of an ID cannot be a digit.
- An ID cannot have the same spelling as a keyword (see the Java keywords section of Chapter 3, Java Fundamentals).
- It cannot be spelled as a
trueorfalseBoolean literal or as anullliteral. - And since Java 9, an ID cannot be just an underscore (
_).
Here are a few unusual but legal examples of IDs:
$
_42
αρετη
String
Variable declaration (definition) and initialization
A variable has a name (an ID) and a type. Typically, it refers to the memory where a value is stored, but may refer to nothing (null) or not refer to anything at all (then, it is not initialized). It can represent a class property, an array element, a method parameter, and a local variable. The last one is the most frequently used kind of variable.
Before a variable can be used, it has to be declared and initialized. In some other programming languages, a variable can also be defined, so Java programmers sometimes use the word definition as a synonym of declaration, which is not exactly correct.
Here is a terminology review with examples:
int x;      //declaration of variable x
x = 1;      //initialization of variable x
x = 2;      //assignment of variable x
Initialization and assignment look the same. The difference is in their sequence: the first assignment is called initialization. Without an initialization, a variable cannot be used.
Declaration and initialization can be combined in a single statement. Observe the following, for example:
float $ = 42.42f;
String _42 = "abc";
int αρετη = 42;
double String = 42.;
var type holder
In Java 10, a sort of type holder, var, was introduced. The Java Language Specification defines it thus: “var is not a keyword, but an identifier with special meaning as the type of a local variable declaration.”
In practical terms, it lets a compiler figure out the nature of the declared variable, as follows (see the var() method in the com.packt.learnjava.ch01_start.PrimitiveTypes class):
var x = 1;
In the preceding example, the compiler can reasonably assume that x has the int primitive type.
As you may have guessed, to accomplish that, a declaration on its own would not suffice, as we can see here:
var x; //compilation error
That is, without initialization, the compiler cannot figure out the type of the variable when var is used.
Java statements
A Java statement is a minimal construct that can be executed. It describes an action and ends with a semicolon (;). We have seen many statements already. For example, here are three statements:
float f = 23.42f;
String sf = String.valueOf(f);
System.out.println(sf);
The first line is a declaration statement combined with an assignment statement. The second line is also a declaration statement combined with an assignment statement and method invocation statement. The third line is just a method invocation statement.
Here is a list of Java statement types:
- An empty statement that consists of only one symbol,
;(semicolon) - A class or interface declaration statement (we will talk about this in Chapter 2, Java Object-Oriented Programming (OOP))
- A local variable declaration statement:
int x; - A synchronized statement: this is beyond the scope of this book
- An expression statement
- A control flow statement
An expression statement can be one of the following:
- A method invocation statement:
someMethod(); - An assignment statement:
n = 23.42f; - An object creation statement:
new String("abc"); - A unary increment or decrement statement:
++x ; or --x; or x++; or x--;
We will talk more about expression statements in the Expression statements section.
A control flow statement can be one of the following:
- A selection statement:
if-elseorswitch-case - An iteration statement:
for,or while, ordo-while - An exception-handling statement:
throw,try-catch, ortry-catch-finally - A branching statement:
break,continue, orreturn
We will talk more about control statements in the Control flow statements section.
Expression statements
An expression statement consists of one or more expressions. An expression typically includes one or more operators. It can be evaluated, which means it can produce a result of one of the following types:
- A variable:
x = 1, for example - A value:
2*2, for example
It returns nothing when the expression is an invocation of a method that returns void. Such a method is said to produce only a side effect: void someMethod(), for example.
Consider the following expression:
x = y++;
The preceding expression assigns a value to an x variable and has a side effect of adding 1 to the value of the y variable.
Another example would be a method that prints a line, like this:
System.out.println(x);
The println() method returns nothing and has a side effect of printing something.
By its form, an expression can be one of the following:
- A primary expression: a literal, a new object creation, a field or method access (invocation).
- A unary operator expression:
x++, for example. - A binary operator expression:
x*y, for example. - A ternary operator expression:
x > y ? true : false, for example. - A lambda expression:
x -> x + 1(see Chapter 14, Java Standard Streams). - If an expression consists of other expressions, parentheses are often used to identify each of the expressions clearly. This way, it is easier to understand and to set the expressions’ precedence.
Control flow statements
When a Java program is executed, it is executed statement by statement. Some statements have to be executed conditionally, based on the result of an expression evaluation. Such statements are called control flow statements because, in computer science, a control flow (or flow of control) is the order in which individual statements are executed or evaluated.
A control flow statement can be one of the following:
- A selection statement:
if-elseorswitch-case - An iteration statement:
for,while, ordo-while - An exception-handling statement:
throw,try-catch, ortry-catch-finally - A branching statement:
break,continue, orreturn
Selection statements
Selection statements are based on an expression evaluation and have four variations, as outlined here:
if(expression) {do something}if(expression) {do something}else{do something else}if(expression) {do something}else if{do something else}else{do something else}switch...casestatement
Here are some examples of if statements:
if(x > y){
    //do something
}
if(x > y){
    //do something
} else {
    //do something else
}
if(x > y){
    //do something
} else if (x == y){
    //do something else
} else {
    //do something different
}
A switch...case statement is a variation of an if...else statement, as illustrated here:
switch(x){
    case 5:               //means: if(x = 5)
        //do something
        break;
    case 7:
        //do something else
        break;
    case 12:
        //do something different
        break;
    default:
        //do something completely different
        //if x is not 5, 7, or 12
}
As you can see, the switch...case statement forks the execution flow based on the value of the variable. The break statement allows the switch...case statement to be executed. Otherwise, all the following cases would be executed.
In Java 14, a new switch...case statement has been introduced in a less verbose form, as illustrated here:
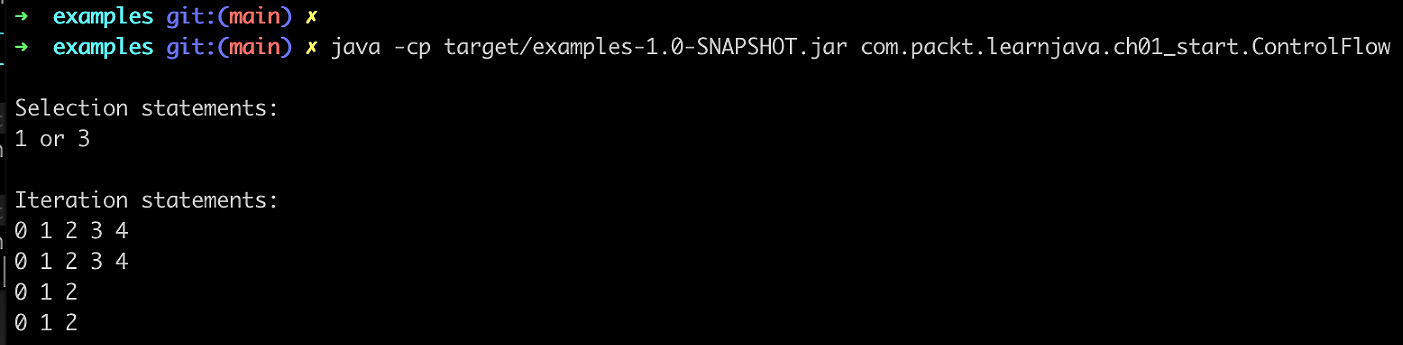
void switchStatement(int x){
    switch (x) {
        case 1, 3 -> System.out.print("1 or 3");
        case 4    -> System.out.print("4");
        case 5, 6 -> System.out.print("5 or 6");
        default   -> System.out.print("Not 1,3,4,5,6");
    }
    System.out.println(": " + x);
}
As you can see, it uses an arrow (->) and does not use a break statement.
Execute the main() method of the com.packt.learnjava.ch01_start.ControlFlow class—see the selection() method that calls the switchStatement() method with different parameters, as follows:
switchStatement(1);    //prints: 1 or 3: 1
switchStatement(2);    //prints: Not 1,3,4,5,6: 2
switchStatement(5);    //prints: 5 or 6: 5
You can see the results from the comments.
If several lines of code have to be executed in each case, you can just put braces ({}) around the block of code, as follows:
switch (x) {
    case 1, 3 -> {
                    //do something
                 }
    case 4    -> {
                    //do something else
                 }
    case 5, 6 -> System.out.println("5 or 6");
    default   -> System.out.println("Not 1,3,4,5,6");
}
The Java 14 switch...case statement can even return a value, thus becoming in effect a switch expression. For example, here is a case when another variable has to be assigned based on the switch...case statement result:
void switchExpression1(int i){
    boolean b = switch(i) {
        case 0, 1 -> false;
        case 2 -> true;
        default -> false;
    };
    System.out.println(b);
}
If we execute the switchExpression1() method (see the selection() method of the com.packt.learnjava.ch01_start.ControlFlow class), the results are going to look like this:
switchExpression1(0);    //prints: false
switchExpression1(1);    //prints: false
switchExpression1(2);    //prints: true
The following example of a switch expression is based on a constant:
static final String ONE = "one", TWO = "two", THREE = "three",
                    FOUR = "four", FIVE = "five";
void switchExpression2(String number){
    var res = switch(number) {
        case ONE, TWO -> 1;
        case THREE, FOUR, FIVE -> 2;
        default -> 3;
    };
    System.out.println(res);
}
If we execute the switchExpression2() method (see the selection() method of the com.packt.learnjava.ch01_start.ControlFlow class), the results are going to look like this:
switchExpression2(TWO);            //prints: 1
switchExpression2(FOUR);           //prints: 2
switchExpression2("blah");         //prints: 3
Here’s yet another example of a switch expression, this time based on the enum value:
enum Num { ONE, TWO, THREE, FOUR, FIVE }
void switchExpression3(Num number){
    var res = switch(number) {
        case ONE, TWO -> 1;
        case THREE, FOUR, FIVE -> 2;
    };
    System.out.println(res);
}
If we execute the switchExpression3() method (see the selection() method of the com.packt.learnjava.ch01_start.ControlFlow class), the results are going to look like this:
switchExpression3(Num.TWO);        //prints: 1
switchExpression3(Num.FOUR);       //prints: 2
//switchExpression3("blah"); //does not compile
In case a block of code has to be executed based on a particular input value, it is not possible to use a return statement because it is reserved already for the returning value from a method. That is why, to return a value from a block, we have to use a yield statement, as shown in the following example:
void switchExpression4(Num number){
    var res = switch(number) {
        case ONE, TWO -> 1;
        case THREE, FOUR, FIVE -> {
            String s = number.name();
            yield s.length();
        }
    };
    System.out.println(res);
}
If we execute the switchExpression4() method (see the selection() method of the com.packt.learnjava.ch01_start.ControlFlow class), the results are going to look like this:
switchExpression4(Num.TWO);        //prints: 1
switchExpression4(Num.THREE);      //prints: 5
Iteration statements
An iteration statement can take one of the following three forms:
- A
whilestatement - A
do...whilestatement - A
forstatement, also called aloopstatement
A while statement looks like this:
while (boolean expression){
      //do something
}
Here is a specific example (execute the main() method of the com.packt.learnjava.ch01_start.ControlFlow class—see the iteration() method):
int n = 0;
while(n < 5){
 System.out.print(n + " "); //prints: 0 1 2 3 4
 n++;
}
In some examples, instead of the println() method, we use the print() method, which does not feed another line (does not add a line feed control at the end of its output). The print() method displays the output in one line.
A do...while statement has a very similar form, as we can see here:
do {
    //do something
} while (boolean expression)
It differs from a while statement by always executing the block of statements at least once before evaluating the expression, as illustrated in the following code snippet:
int n = 0;
do {
    System.out.print(n + " ");   //prints: 0 1 2 3 4
    n++;
} while(n < 5);
As you can see, it behaves the same way when the expression is true at the first iteration. But if the expression evaluates to false, the results are different, as we can see here:
int n = 6;
while(n < 5){
    System.out.print(n + " ");   //prints nothing
    n++;
}
n = 6;
do {
    System.out.print(n + " ");   //prints: 6
    n++;
} while(n < 5);
for statement syntax looks like this:
for(init statements; boolean expression; update statements) {
 //do what has to be done here
}
Here is how a for statement works:
initstatements initialize a variable.- A Boolean expression is evaluated using the current variable value: if
true, the block of statements is executed; otherwise, theforstatement exits. updatestatements update the variable, and the Boolean expression is evaluated again with this new value: iftrue, the block of statements is executed; otherwise, theforstatement exits.- Unless exited, the final step is repeated.
As you can see here, if you aren’t careful, you can get into an infinite loop:
for (int x = 0; x > -1; x++){
    System.out.print(x + " ");  //prints: 0 1 2 3 4 5 6 ...
}
So, you have to make sure that the Boolean expression guarantees eventual exit from the loop, like this:
for (int x = 0; x < 3; x++){
    System.out.print(x + " ");  //prints: 0 1 2
}
The following example demonstrates multiple initialization and update statements:
for (int x = 0, y = 0; x < 3 && y < 3; ++x, ++y){
    System.out.println(x + " " + y);
}
And here is a variation of the preceding code for statements for demonstration purposes:
for (int x = getInitialValue(), i = x == -2 ? x + 2 : 0,
             j = 0; i < 3 || j < 3 ; ++i, j = i) {
 System.out.println(i + " " + j);
}
If the getInitialValue() method is implemented like int getInitialValue(){ return -2; }, then the preceding two for statements produce exactly the same results.
To iterate over an array of values, you can use an array index, like so:
int[] arr = {24, 42, 0};
for (int i = 0; i < arr.length; i++){
    System.out.print(arr[i] + " ");  //prints: 24 42 0
}
Alternatively, you can use a more compact form of a for statement that produces the same result, as follows:
int[] arr = {24, 42, 0};
for (int a: arr){
    System.out.print(a + " ");  //prints: 24 42 0
}
This last form is especially useful with a collection, as shown here:
List<String> list = List.of("24", "42", "0");
for (String s: list){
    System.out.print(s + " ");  //prints: 24 42 0
}
We will talk about collections in Chapter 6, Data Structures, Generics, and Popular Utilities.
Exception-handling statements
In Java, there are classes called exceptions that represent events that disrupt the normal execution flow. They typically have names that end with Exception: NullPointerException, ClassCastException, ArrayIndexOutOfBoundsException, to name but a few.
All the exception classes extend the java.lang.Exception class, which, in turn, extends the java.lang.Throwable class (we will explain what this means in Chapter 2, Java Object-Oriented Programming (OOP)). That’s why all exception objects have common behavior. They contain information about the cause of the exceptional condition and the location of its origination (line number of the source code).
Each exception object can be generated (thrown) either automatically by the JVM or by the application code, using the throw keyword. If a block of code throws an exception, you can use a try-catch or try-catch-finally construct to capture the thrown exception object and redirect the execution flow to another branch of code. If the surrounding code does not catch the exception object, it propagates all the way out of the application into the JVM and forces it to exit (and abort the application execution). So, it is good practice to use try-catch or try-catch-finally in all the places where an exception can be raised and you do not want your application to abort execution.
Here is a typical example of exception handling:
try {
    //x = someMethodReturningValue();
    if(x > 10){
        throw new RuntimeException("The x value is out
                                    of range: " + x);
    }
    //normal processing flow of x here
} catch (RuntimeException ex) {
    //do what has to be done to address the problem
}
In the preceding code snippet, normal processing flow will be not executed in the case of x > 10. Instead, the do what has to be done block will be executed. But, in the x <= 10 case, the normal processing flow block will be run and the do what has to be done block will be ignored.
Sometimes, it is necessary to execute a block of code anyway, whether an exception was thrown/caught or not. Instead of repeating the same code block in two places, you can put it in a finally block, as follows (execute the main() method of the com.packt.learnjava.ch01_start.ControlFlow class—see the exception() method):
try {
    //x = someMethodReturningValue();
    if(x > 10){
        throw new RuntimeException("The x value is out
                                    of range: " + x);
    }
    //normal processing flow of x here
} catch (RuntimeException ex) {
   System.out.println(ex.getMessage());
   //prints: The x value is out of range: ...
   //do what has to be done to address the problem
} finally {
   //the code placed here is always executed
}
We will talk about exception handling in more detail in Chapter 4, Exception Handling.
Branching statements
Branching statements allow breaking of the current execution flow and continuation of execution from the first line after the current block or from a certain (labeled) point of the control flow.
A branching statement can be one of the following:
breakcontinuereturn
We have seen how break was used in switch-case statements. Here is another example (execute the main() method of the com.packt.learnjava.ch01_start.ControlFlow class—see the branching() method):
String found = null;
List<String> list = List.of("24", "42", "31", "2", "1");
for (String s: list){
    System.out.print(s + " ");         //prints: 24 42 31
    if(s.contains("3")){
        found = s;
        break;
    }
}
System.out.println("Found " + found);  //prints: Found 31
If we need to find the first list element that contains "3", we can stop executing as soon as the s.contains("3") condition is evaluated to true. The remaining list elements are ignored.
In a more complicated scenario, with nested for statements, it is possible to set a label (with a : column) that indicates which for statement has to be exited, as follows:
String found = null;
List<List<String>> listOfLists = List.of(
        List.of("24", "16", "1", "2", "1"),
        List.of("43", "42", "31", "3", "3"),
        List.of("24", "22", "31", "2", "1")
);
exit: for(List<String> l: listOfLists){
    for (String s: l){
        System.out.print(s + " "); //prints: 24 16 1 2 1 43
        if(s.contains("3")){
            found = s;
            break exit;
        }
    }
}
System.out.println("Found " + found);  //prints: Found 43
We have chosen a label name of exit, but we could call it any other name too.
A continue statement works similarly, as follows:
String found = null;
List<List<String>> listOfLists = List.of(
                List.of("24", "16", "1", "2", "1"),
                List.of("43", "42", "31", "3", "3"),
                List.of("24", "22", "31", "2", "1")
);
String checked = "";
cont: for(List<String> l: listOfLists){
        for (String s: l){
           System.out.print(s + " ");
                  //prints: 24 16 1 2 1 43 24 22 31
           if(s.contains("3")){
               continue cont;
           }
           checked += s + " ";
        }
}
System.out.println("Found " + found);  //prints: Found 43
System.out.println("Checked " + checked);
                            //prints: Checked 24 16 1 2 1 24 22
It differs from break by stating which of the for statements need to continue and not exit.
A return statement is used to return a result from a method, as follows:
String returnDemo(int i){
    if(i < 10){
        return "Not enough";
    } else if (i == 10){
        return "Exactly right";
    } else {
        return "More than enough";
    }
}
As you can see, there can be several return statements in a method, each returning a different value in different circumstances. If the method returns nothing (void), a return statement is not required, although it is frequently used for better readability, as follows:
void returnDemo(int i){
    if(i < 10){
        System.out.println("Not enough");
        return;
    } else if (i == 10){
        System.out.println("Exactly right");
        return;
    } else {
        System.out.println("More than enough");
        return;
    }
}
Execute the returnDemo() method by running the main() method of the com.packt.learnjava.ch01_start.ControlFlow class (see the branching() method). The results are going to look like this:
String r = returnDemo(3);
System.out.println(r);      //prints: Not enough
r = returnDemo(10);
System.out.println(r);      //prints: Exactly right
r = returnDemo(12);
System.out.println(r);      //prints: More than enough
Statements are the building blocks of Java programming. They are like sentences in English—complete expressions of intent that can be acted upon. They can be compiled and executed. Programming is like expressing an action plan in statements.
With this, the explanation of the basics of Java is concluded. Congratulations on getting through it!
Summary
This chapter introduced you to the exciting world of Java programming. We started with explaining the main terms, and then explained how to install the necessary tools—the JDK and the IDE—and how to configure and use them.
With a development environment in place, we have provided readers with the basics of Java as a programming language. We have described Java primitive types, the String type, and their literals. We have also defined what an ID is and what a variable is and finished with a description of the main types of Java statements. All the points of the discussion were illustrated by specific code examples.
In the next chapter, we are going to talk about the object-oriented (OO) aspects of Java. We will introduce the main concepts, explain what a class is, what an interface is, and the relationship between them. The terms overloading, overriding, and hiding will also be defined and demonstrated in code examples, as well as usage of the final keyword.
Quiz
- What does JDK stand for?
- Java Document Kronos
- June Development Karate
- Java Development Kit
- Java Developer Kit
- What does JCL stand for?
- Java Classical Library
- Java Class Library
- Junior Classical Liberty
- Java Class Libras
- What does Java SE stand for?
- Java Senior Edition
- Java Star Edition
- Java Structural Elections
- Java Standard Edition
- What does IDE stand for?
- Initial Development Edition
- Integrated Development Environment
- International Development Edition
- Integrated Development Edition
- What are Maven's functions?
- Project building
- Project configuration
- Project documentation
- Project cancellation
- Which of the following are Java primitive types?
booleannumericintegerstring
- Which of the following are Java numeric types?
longbitshortbyte
- What is a literal?
- A letter-based string
- A number-based string
- A variable representation
- A value representation
- Which of the following are literals?
\\2_02__0f\f
- Which of the following are Java operators?
%$&->
- What does the following code snippet print?
int i = 0; System.out.println(i++);
0123
- What does the following code snippet print?
boolean b1 = true;
 boolean b2 = false;
 System.out.println((b1 & b2) + " " + (b1 && b2));
false truefalse falsetrue falsetrue true
- What does the following code snippet print?
int x = 10;
 x %= 6;
 System.out.println(x);
1234
- What is the result of the following code snippet?
System.out.println("abc" - "bc");aabc-bc- Compilation error
- Execution error
- What does the following code snippet print?
System.out.println("A".repeat(3).lastIndexOf("A"));1234
- Which of the following are correct IDs?
int __(two underscores)2aa2$
- What does the following code snippet print?
for (int i=20, j=-1; i < 23 && j < 0; ++i, ++j){
         System.out.println(i + " " + j + " ");
 }
20 -1 21 0- Endless loop
21 020 -1
- What does the following code snippet print?
int x = 10; try { if(x++ > 10){ throw new RuntimeException("The x value is out of the range: " + x); } System.out.println("The x value is within the range: " + x); } catch (RuntimeException ex) { System.out.println(ex.getMessage()); }- Compilation error
- The
xvalue is out of the range: 11 - The
xvalue is within the range: 11 - Execution time error
- What does the following code snippet print?
int result = 0;
List<List<Integer>> source = List.of(
        List.of(1, 2, 3, 4, 6),
        List.of(22, 23, 24, 25),
        List.of(32, 33)
);
cont: for(List<Integer> l: source){
    for (int i: l){
        if(i > 7){
            result = i;
            continue cont;
        }
     }
}
System.out.println("result=" + result);
result = 22result = 23result = 32result = 33
- Select all the following statements that are correct:
- A variable can be declared.
- A variable can be assigned.
- A variable can be defined.
- A variable can be determined.
- Select all the correct Java statement types from the following:
- An executable statement
- A selection statement
- A method end statement
- An increment statement