


OpenERP is a powerful set of open source business applications built on the OpenObject framework. When you first install OpenERP the only functionality you will have is limited messaging options between users. From there, OpenERP allows you to install exactly the modules you need, as you need them. This flexibility makes OpenERP much more accessible than many ERP solutions.
In this chapter we will start working with OpenERP by covering the installation and basics of setting up an OpenERP database.
The topics we cover will include:
How to get started with running OpenERP online
Setting up a trial company
Installing OpenERP in Windows and Ubuntu
Troubleshooting and configuring your installation
It was not long ago that nearly all companies kept their primary information systems in-house. This approach requires not just a lot of capital expense in purchasing servers and software licenses, it also creates a lot of responsibility and risk in backing up data and ensuring business continuity. Today, more and more companies are choosing to host their business applications on online networks commonly known as the cloud. OpenERP allows you the flexibility of both options; either hosting on your own hardware or utilizing OpenERP's online software services.
The best thing about accessing OpenERP online is that you can jump in and start using the software right away. You don't have to decide what operating system to use. You don't have to install any software at all. Just enter the address into your web browser and go.
Another added benefit of taking this approach is you will verify that your web browser is up-to-date and compatible with Version 7 of OpenERP. So even if you intend to install OpenERP on your own hardware, it is still worth taking a minute to test out the online OpenERP trial a bit to make sure you do not have any browser compatibility issues.
OpenERP is designed to run on a variety of modern web browsers. Supported browsers include:
Google Chrome (recommended)
Internet Explorer
Firefox
Safari
Accessing the OpenERP free online trial could not be simpler. Just open up your browser and navigate to:
The OpenERP trial site prompts you to supply a domain name that you will use to access your trial version, as well as prompting you to select the language. Choose a name to fill in the Your Domain field with a description and make a note of it so you can easily find your trial instance later.

This form will let you choose a name for your trial company. Click on the Create My Company button to continue to the next step in setting up your free online trial.
In the next step you are prompted to create an optional account so you can easily extend your trial.

At this point you can go ahead and sign up to create an account for your free trial, or you can click on the Skip this step link to go ahead and begin using OpenERP immediately. So to start using OpenERP right away and avoid filling out more forms, we will click on the skip this step link to get right into OpenERP.
Once you click on Start Now, you are taken to a screen to select the first application you wish to install.
OpenERP can be considered as a collection of business applications. Unlike many ERP systems; with OpenERP, you can choose to install exactly the modules that fit your business needs. Perhaps you are interested in starting with sales orders and then later integrating Customer Relationship Management (CRM) for your company. With OpenERP you can begin by just installing Sales Management, adding additional applications as needed.

This page will let you choose your first application to install. In the remainder of the book we will go through many of these applications in detail. For this example, we are going to install the Sales Management application.
Click on the Install button under Sales Management to install your first OpenERP module.

When you initially install any module in OpenERP that deals with transactions or currency, you will be prompted to configure accounting data. The first step in this process is to select Accounting Package for your company.
Tip
Technically, you are not really installing an accounting package but are choosing the localized chart of accounts you wish to use for the application. OpenERP offers localization for more than 25 countries.
For most installations, this will coincide with the country in which your company primarily does business.

We leave Company selected as Your Company and select Continue to go on to the next form in the process.
After selecting your accounting package, you will prompted to set up various accounting options.

This form lets you pick a template for your chart of accounts. There are various options available depending on your business type.
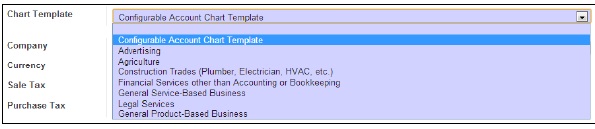
For now you can just leave this as Configurable Account Chart Template. Next you will select your currency and set your sales and purchase tax rates. Remember, this is just a demonstration to get you started with OpenERP. Later we will go into detail on the various options available.
After clicking on Apply, your trial version will become active and you can begin working with your new OpenERP installation. Since we have installed the sales management application we are taken to the customer screen where we can begin creating new customers for our demonstration company.

Take a few minutes to look around in OpenERP to get familiar with the interface. You don't have to worry about breaking anything or doing anything wrong. If you run into problems or get confused, just close your web browser and try again.
As you should see, it is very easy to get started with running OpenERP online. Keep in mind though, that everything you are doing in OpenERP up to this point will not be saved after your current session. However, it is easy to sign up to continue using OpenERP online.
Running OpenERP online is not free. Currently, it will cost you $39.00 a month per user to subscribe. For that $39.00 monthly fee, according to the OpenERP subscription page, you are entitled to:
Installation of any modules in one click
Automated updates for bug fixes
Upgrade service to benefit from new features
Unlimited bug-fix guarantee
Hosting (optional)
Support (2 hours)
Depending on your requirements, an OpenERP subscription may be a good decision. Installing and maintaining an OpenERP installation takes a degree of expertise and has risks for production systems. You must maintain adequate disaster recovery procedures in case of server crashes or hard drive failures. There are also complexities in applying bug fixes and migrating to newer versions of OpenERP. This book will help you with many of these tasks. Still, it can be quite convenient to have an OpenERP subscription so you can focus on the functional rather than the technical aspects of working with OpenERP.
If you decide you wish to pay for the convenience of running OpenERP online, click on Register now to add 15 days for free! at the top of the page.

You will then be taken to the same sign-up sheet you were presented with after you provided the name of your company.
Setting up and managing an OpenERP installation will require a basic understanding of the components that make up OpenERP. Every ERP system has a set of technologies and underlying software platforms that are required for the system to function. Fortunately, unless you plan to do OpenERP customization, you only need to understand the very basics of the OpenERP architecture to manage the installation.
Tip
In this book we provide a basic overview of the OpenERP architecture. If you wish to get more detailed documentation on the OpenERP architecture visit:
Like most ERP systems, OpenERP has specific database requirements. In this case, that is PostgreSQL. PostgreSQL is an open source, cross-platform object relational database management system (ORDMS). While not popular on the scale of Microsoft SQL Server or MySQL, PostgreSQL is an enterprise-class database server with many advanced features. In fact, PostgreSQL stacks up very well against far more expensive databases such as Microsoft SQL Server and Oracle Database.
From a specification standpoint, PostgreSQL is perfectly capable of handling nearly any OpenERP installation. In most instances you will hit limits of OpenERP scalability and performance long before you will go past the hard limits of PostgreSQL itself. Still, when installing any ERP system, it is important that you clearly understand the most critical database specifications. Here are the specs for PostgreSQL:
|
Limit |
Value |
|---|---|
|
Maximum database size |
Unlimited |
|
Maximum table size |
32 TB |
|
Maximum row size |
1.6 TB |
|
Maximum field size |
1 GB |
|
Maximum rows per table |
Unlimited |
|
Maximum columns per table |
250 - 1600 depending on column types |
|
Maximum indexes per table |
Unlimited |
The primary programming language of OpenERP is Python. Like the other technologies underlying OpenERP, Python language is open source and will run on all the major contemporary operating systems.
You can learn more about the Python programming language at:
OpenERP is built upon a Model-View-Controller (MVC) architecture. One of the primary goals of this architecture is to separate the visual display of the information from the business rules and management of the underlying data. For example, if you need to change the way data is organized in the model, it is desirable not to have to make dramatic changes to how you view the data. The same is true for maintaining flexibility in viewing data. Today it is common to have many different client applications sharing the same underlying data.
In OpenERP's case, they have often supported a web-based client as well as a desktop client application based on the Gnome Toolkit and known at the GTK client. OpenERP's MVC architecture allows developers to create a wide range of client applications to extend OpenERP.
Tip
Starting with Version 7, the GTK client is no longer in development by the core OpenERP team. Instead, GTK development has been handed over to the community.
The model is essentially the data that makes up your OpenERP installation, which is stored in the PostgreSQL database. OpenERP is unique in the way that database structures are typically defined by the OpenERP modules at the time they are installed. The OpenERP framework takes the model definitions and automatically creates the necessary table structures inside the PostgreSQL database. Furthermore, a web interface in OpenERP allows administrators to easily extend the OpenERP data model in a variety of ways without having to modify the OpenERP source code.
In this section we will discuss some of the advantages and disadvantages of choosing Ubuntu or Windows for your first OpenERP installation.
For the most part, Ubuntu has been the platform of choice for most OpenERP installations. However, there are some reasons why you may choose to run OpenERP under a Windows installation.
Some people who bought this book may have already jumped ahead and installed OpenERP on their Microsoft Windows computer. So, for you go-getters, that working installation of OpenERP may function just fine for researching and testing its features. Often, the Windows all-in-one installer provides a simple method for getting OpenERP up and running in a snap on your hardware. Basically, you do not have to install a new operating system.
If you are familiar with Windows and have no Ubuntu experience, you may get going a little faster by sticking with a Windows installation for your first setup. Downloading and installing modules and making changes to configuration files will be much easier if you are familiar with the operating system.
While Microsoft Windows does not really need an introduction, it is probably worth giving a brief introduction to Ubuntu. In short, Ubuntu (pronounced 'oo- boon-too') is a very popular open source operating system based on the Linux kernel. It has enjoyed increasing popularity because it is easy to install and very stable. Ubuntu can be installed either as a server operating system without a graphical interface, or as a desktop operating system with a graphical interface that closely resembles Windows.
You can learn more about the Ubuntu operating system and why it is so popular at:
It is generally accepted that Ubuntu is the recommended operating system for running a production installation of OpenERP. There are several reasons why this is true:
While OpenERP is released for Windows and is still well-supported, the Ubuntu installation continues to be favored. The development team for OpenERP works primarily with Ubuntu for bug fixes and platform releases. It can be expected that for the most part, OpenERP development will be optimized around the Ubuntu OS, not Windows.
Installing OpenERP on any Windows operating system is going to require a license from Microsoft. While using OpenERP on your Windows desktop is a viable and perhaps desirable solution for testing and development, it is unlikely you will want to run OpenERP on a Windows desktop system for any production environment. Why? Well, this requires Windows Server, which has much higher license costs than desktop editions. With an Ubuntu installation, you get an entirely open source and virtually cost-free solution.
It is possible to configure a more scalable solution under Ubuntu than you can currently configure under Microsoft Windows Server.
The fact is that a vast majority of the production installations of OpenERP are running under Ubuntu. When you run into trouble or management issues with your OpenERP installation, you may find it easier to get assistance if you are running an Ubuntu installation.
Tip
At the time of publication, the latest all-in-one installation of OpenERP 7 for Windows requires that you create a login on the OpenERP website to add any applications. However, the same build version in Ubuntu does not require a login. This moderate inconvenience may lead to the Windows versions of OpenERP becoming even less accepted by the active OpenERP community.
Although this book will focus on Windows and Ubuntu installations, you do have several other options. In the past, OpenERP has been deployed under a variety of Linux distributions and even the Macintosh OS. There are also many community members actively developing client frontends for mobile platforms such as Google's Android OS.
When deploying an OpenERP system, it is important to understand the various OpenERP versions as well as the release and upgrade policies. There are two major versions of OpenERP available: the stable version and the trunk version. The stable version is the standard support version of OpenERP and typically the one you should chose to install for most situations. The trunk version is the development version and will often contain bugs and unfinished features. It is primarily downloaded by developers or those wishing to get a look at the latest features.
The goal of the OpenERP development team is to release two stable version upgrades each year. OpenERP further labels some stable versions as Long Term Support (LTS) versions. These releases are supported by OpenERP for those that have an OpenERP Enterprise support contract. For any production environment, it is smart to choose an LTS version. Most importantly, installing an LTS release of OpenERP will make bug fixes and patches much easier to implement.
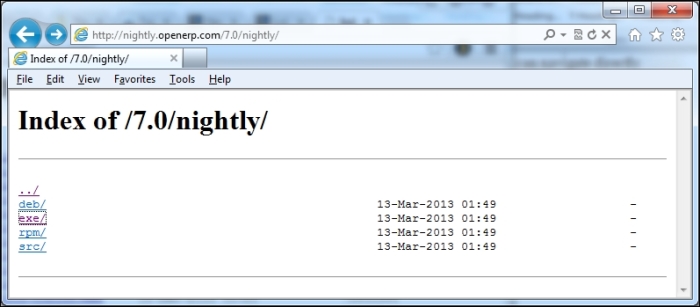
We begin our installation by locating the packages that are currently available to install. You can find the current list at:

The preceding screenshot is the OpenERP Nightly builds page, that is, the jumping-off point for downloading the source files for installation.
The examples and case studies in this book use OpenERP 7.0. This means you should select the 7.0 LTS (stable) version of OpenERP to download. You can navigate directly to the 7.0 OpenERP downloads here:
http://nightly.openerp.com/7.0/nightly/
Tip
It is entirely possible that OpenERP will change the URL as new versions are released. To best follow the examples in this book, download a 7.x installation of OpenERP.
Windows installations use the EXE packages. Click on the exe/ directory as shown in the preceding screenshot to get the list of downloads that are available.
Naturally, the specific download packages are going to change on a nightly basis.

The latest version of the stable LTS release will contain the most current OpenERP build with bug fixes included and will appear at the bottom of the list. By the way, the upload dates you'll see are in Coordinated Universal Time (UTC) and therefore may be many hours ahead of your time zone, especially if you live in the Western Hemisphere.
Installing OpenERP using the all-in-one package is very simple. After the package has finished downloading, double-click on the EXE file to begin the installation wizard.
The first screen will prompt you to select the language for your installation.
After you have selected the language and clicked on the OK button, the wizard will continue with the installation.

After clicking on the Next button you will see the license screen followed by a prompt to select the type of install.
Tip
I highly recommend that you select the Custom install so you can select the directory for installation. The default directory name contains the lengthy build number making it rather difficult to work with in the command prompt.

We have changed the type of install to Custom so that we may set the directory name later in the setup wizard.
Next the wizard prompts for the credentials to connect to the PostgreSQL database that will be installed.
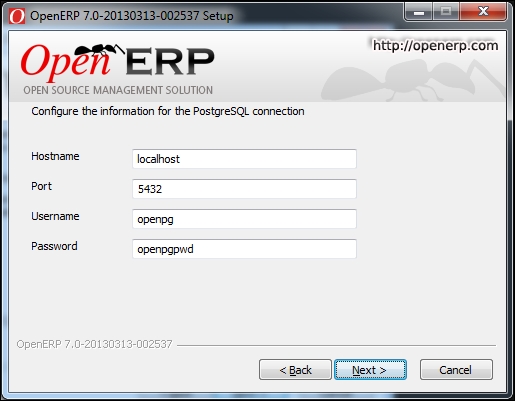
It is recommended that you change the username and password for security purposes. The default username and password are shown in the preceding screenshot. These values will be written into the OpenERP configuration file. The username and password provided will be the administration credentials for the PostgreSQL database so be sure to remember them.
After clicking on the Next button you will be prompted for the installation directory.

You will notice that the default installation directory is quite cryptic. While you can use this default directory, it quickly becomes tedious to type when you need to perform operations at the command prompt. Therefore it is recommended that you change the destination folder to something more manageable. For example, why not change the directory name to simply OpenERP?
Once you click on the Install button, the wizard will finish installing OpenERP to your selected directory.

After the wizard is complete, if you leave Start OpenERP checked and then click on the Finish button, OpenERP should open up in your default browser.
If OpenERP fails to launch, you can look at the Troubleshooting OpenERP installations section later in this chapter for solutions to some of the problems commonly encountered during installation.
This book will you walkthrough how to install OpenERP on Ubuntu using the latest all-in-one nightly package. Depending on your Ubuntu installation and how you want to work with OpenERP, there are alternative installation methods.
Installing OpenERP in Ubuntu is easy when you use the Debian repository. You can use any standard text editor, such as Nano, to modify the file /etc/apt/sources.list and add the following line:
deb http://nightly.openerp.com/7.0/nightly/deb/ ./
After saving sources.list, you can start the installation process by entering these commands into a terminal window:
sudo apt-get update
sudo apt-get install openerp
The OpenERP packages will be first downloaded and then installed. This is an all-in-one installation and should set up all the necessary packages, PostgreSQL, and library dependencies required to run OpenERP.
Even if you experience no snags when first installing or running OpenERP, it would be wise to peruse the following section to familiar yourself with some of the tricks for dealing with common problems. Many of these guidelines are also useful for managing your system and thwarting potential problems.
As far as ERP installations go, OpenERP is typically very easy to install. Unfortunately, it is possible for an installation to fail for a variety of reasons. In this next section, we will discuss some of the more common installation issues and provide some troubleshooting tips for diagnosing problems with an OpenERP installation.
If you have followed the default installation then your OpenERP installation should be accessing OpenERP at:
http://localhost:8069
Make sure the URL is exactly as shown previously. If you did change the port number during installation, make sure you change the port in the URL.
If you are unable to pull up OpenERP in the browser, it can be good to verify that the OpenERP services are running.
Pull up the task manager and navigate to the Services tab, then look for openerp-server-7.0. The status should be Running.

The preceding screenshot is an example of the openerp-server-7.0 service successfully running under Windows.
Additional OpenERP troubleshooting steps for Windows can be found here:
https://doc.openerp.com/install/windows/server/complementary_install_information/
When managing an OpenERP server, one of the most common tasks you will find yourself performing is starting and stoping the OpenERP services. OpenERP allows you to start and stop the services with a command switch.
To start the services use the following command:
sudo /etc/init.d/openerp-server start
To stop the services use the following command:
sudo /etc/init.d/openerp-server stop
OpenERP writes many messages, warnings, and error messages to a log. Often when troubleshooting problems, this logfile is valuable in determining what action you should take. In a default installation the logfile is located at:
{install directory}/server/server/openerp-server.log
The log is especially valuable to locate problems you may have while installing new modules.
The OpenERP framework allows you to specify a configuration file for your installation. By default, this file is located at:
/etc/openerp/openerp-server.conf
Using this file, you can change many of the attributes of OpenERP.
By default, OpenERP 7 runs on port 8069. For many installations, the default port will work fine. However, there are situations where it can be useful to change this default port. One common scenario would be the need to run more than one version of OpenERP. Multiple installations cannot run on port 8069, so you will need to modify the port. Sometimes there are security reasons behind changing ports as many hackers are aware of the default ports people use.
Fortunately, changing the default port number is easy. Simply specify the following:
Port=[port]
For example, Port=8059 will change the default port for the web client to port 8059.
OpenERP offers database management tools that can be accessed easily through your web browser. This makes it easy to create, backup, and even delete a database, all through a web interface. By default, OpenERP sets the password for these operations to admin. To secure your server, it is necessary to change this password in your configuration file:
Admin_password=[your password]
In this chapter we saw how easy it was to get started using OpenERP online. We discussed how to set up a trial company, the basics for creating a database, and installing your first module. If you chose not to use the online services, you likely found the topics on installing OpenERP on Windows or Ubuntu helpful. Finally, we discussed various methods of troubleshooting and configuring OpenERP.
In the next chapter we will begin to jump into our first real business applications in OpenERP. You will get introduced to our real world case study and set up the basic configuration for the company. We will walk through setting up your first product, and finally creating and printing your first sales order.