


Welcome to WordPress and jQuery. The WordPress web-based publishing platform and jQuery's JavaScript library are two of the most powerful tools used on the Web today. Combining these tools together doubles the power and flexibility of your websites. Both technologies, being easy and fun to learn, create a recipe for web magic. I hope you're ready for some fun and interesting insights by learning how jQuery can improve your WordPress development experience.
In this chapter, we'll cover the following topics:
This book's approach and the core JavaScript language and WordPress skills that you should understand in order to gain maximum advantage from it
The essential software tools that you'll need to get your project up and running
The basic overviews of jQuery and WordPress
If anything in any of the following sections puzzles you, you may need a little more background information and understanding before moving forward with this title. No worries though, I'll point you towards some excellent sources for more information.
This title introduces you to the essentials and best practices of using jQuery with WordPress. It is not an introduction to programming with JavaScript and PHP, nor is it a primer on using CSS with HTML mark-up. I'm assuming that you're a WordPress site developer and/or a WordPress theme designer. Maybe you're just someone who spends enough time managing and tinkering with a WordPress site that you probably qualify as one of the above or both. Regardless of how you label yourself, you use WordPress. WordPress helps you, or your clients, get content out there quickly and simply, and you're always looking for ways to do more, faster, and easily.
jQuery is a library that speeds the time and reduces the complications of writing custom JavaScripts. I'm sure you must know that JavaScripts can be useful to a website in a number of ways. They can also enable it with really cool-looking features. While I'll be covering, in depth, as much on jQuery as possible, we won't be looking at jQuery as the "big deal", JavaScript library entity that most other books stress. Instead, we'll be considering jQuery a great tool that can help us get more done, more easily (and yes, "with less" code) using WordPress.
To recap: So, you're a WordPress user, developer, or designer? Great. Let's look at this "tool" called jQuery. It's going to make your WordPress development a lot easier and probably look a lot better. Ready to get started?
As I mentioned, this book is geared toward WordPress users, visual theme designers, and developers who are looking to learn to do more with WordPress by using jQuery. I've tried to write this title so that client-side and server-side scripting or programming experience isn't explicitly required. However, you'll see at the very least that a general familiarity with the given subjects will help.
Regardless of your web development skill-set or level, you'll be walked through with clear, step-by-step instructions. Let's go over the web development skills and WordPress know-how that you'll need to be familiar with to gain the maximum benefit from this book. Again, I'll also point you to good resources if you feel you need a little more background.
To start with, you should already be familiar with the most current, stable version of WordPress. You should understand the basics of getting WordPress installed and running on a web server or locally on your machine (especially as you'll need an installation to tinker with the examples in this book). Not to worry, I'll point you in the right direction for getting a basic local installation of WordPress on your Mac or PC. Plus, many hosting providers offer easy one-click installs. You'll have to check with your hosting provider to see if they offer WordPress. I'll also point you toward a few other good resources for WordPress installations. Getting WordPress up and running is often the easiest part of using WordPress.
Going a tad more in-depth, you'll do well to know your way around the WordPress administration panel. You'll need to be familiar with adding content to the WordPress publishing system and how posts, categories, static pages, and sub-pages work. You'll also want to understand using the Media upload tools to add images to posts and pages, as well as creating galleries. Lastly, understanding the basics of installing and using different themes and plugins will also be helpful, though we will cover this to some extent in this title.
Even if you'll be working with a more technical WordPress administrator, you should have an overview of what the WordPress site that you're developing for entails, and what (if any) themes or additional plugins or widgets will be needed for the project. If your site does require a specific theme or additional plugins and widgets, you'll want to have those installs handy and/or already installed in your WordPress development installation (or sandbox—a place to test and play without messing up a live site).
Note
What version of WordPress does this book use?
This book focuses on the new features introduced in versions 2.8, 2.9, and 3.0 RC (Release Candidate—as of the writing of this book). Everything covered in this book has been tested and checked in WordPress 2.9.2 and 3.0 RC. While this title's case studies are developed using version 2.9.2 and 3.0 RC, any newer version of WordPress should have the same core capabilities, enabling you to enhance themes and plugins with jQuery for it using these techniques. Bug fixes and new features for each new version of WordPress are documented at http://WordPress.org.
If you are completely new to WordPress, then I recommend you read WordPress 2.7 Complete by April Hodge Silver and Hasin Hayder.
Having an understanding of programming in any client-side or server-side language will help you out here, no matter what language—JavaScript, VBScript, .NET, ASP, PHP, Python, Java, Ruby, you name it. If you're familiar working with, or at the very least looking at, any of those languages, you'll do fine. Of course, the following specific languages will really help.
OK, you definitely don't need to have any experience with AJAX whatsoever. But if you know a bit about JavaScript (that's the "J" in "AJAX") you're off to a great start. In particular, you should be able to understand how to recognize the overall syntax and structure of JavaScript statements. For example: what variables look like in JavaScript and how blocks for functions or conditions are set up using "{ }" (curly brackets). You'll also want to know how to properly end a line of JavaScript code with a ";" (semicolon). Again, you don't need direct experience, but you should be comfortable looking at a block of JavaScript code and understanding how it's set up.
For example, let's take a quick look at the following code example, which includes explanatory comments:
<script type="text/javascript"> /*this is an XHTML script tag with the type attribute set to define javascript*/
/*
This is a multi-line Comment.
You can use multi-line comments like this to add instructions or notes about your code.
*/
//This is a single line comment for quick notes
function writeHelloWorld(){ /*this line sets up a function and starts block of code*/
var text1 = "Hello"; //this is a variable called text1
document.write(text1); /*This writes "Hello" to the HTML body via the variable "text1"*/
document.write(" World!"); /*Writes the string " World!" to the HTML body. Note the ";" semi-colons ending each statement above, very important!*/
}// this bracket ends the function block
writeHelloWorld(); /*evokes the function as a statement again, ending with a ";" semi-colon.*/
//this closes the HTML script tag
</script>
If you can follow what's happening in the given code snippet, and you're confident that you could alter, say, the variable without breaking the script, or change the name of the function and where it's evoked, you're doing well enough for this title.
Of course, the more you know about working with different types of information such as strings, integers, and arrays as well as loops and if/else statements, the better. But again, just understanding the general syntax for now, will certainly get you started with jQuery and this title.
AJAX is not really a language. As we'll learn in Chapter 7, AJAX with jQuery and WordPress, it's simply a set of techniques for working with Asynchronous JavaScript and XML, using JavaScript and HTTP requests together to develop highly dynamic pages. Developers like this approach as it allows them to create pages that respond more like desktop programs, than standard web pages. If you're interested in using AJAX with WordPress, in Chapter 7, AJAX with jQuery and WordPress, we'll get into how jQuery can help you with various AJAX techniques. But it's by no means essential for taking advantage of jQuery with WordPress.
Note
If you're new to JavaScript and want a quick, fun primer, I highly recommend the W3Schools' site. This site is a great resource for priming yourself with all W3C compliant web technology.http://w3schools.com/js/. You can find out about AJAX too: http://w3schools.com/ajax/.
You definitely don't have to be a PHP programmer to get through this book, but PHP is what WordPress is built with and its themes use liberal doses of PHP to work their magic! WordPress plugins are almost pure PHP. Any hope of adding jQuery functionality to a WordPress theme or plugin will require braving a little PHP syntax.
As with JavaScript, if you at least understand how basic PHP syntax is structured, you'll be much less likely to make mistakes while retyping or copying and pasting code snippets of PHP and WordPress template tags, in your theme's template files.
The good news is PHP syntax is structured similarly to JavaScript syntax. PHP also uses curly brackets in the same way to denote blocks of code for functions, loops, and other conditions. You also end every statement in PHP with a semicolon just as you would in JavaScript. The main difference is that PHP is evoked by wrapping code snippets inside <?php ?> tags, which are not part of the XHTML tag set and JavaScript is evoked by placing code snippets inside the XHTML <script> tags. Also, variables in PHP are denoted with a "$" (dollar) sign, permanently prepended to the variable name you create, rather than established once with the var statement.
The biggest difference is that PHP is a server-side scripting language and JavaScript is client-side. That means that JavaScript downloads and runs inside the user's browser on their machine, while PHP code is pre-interpreted on the web server and only the final, resulting XHTML (and sometimes CSS and JavaScript—you can do a lot with PHP!) is served up into the user's web browser.
Let's take a quick look at some basic PHP syntax:
<?php /*All PHP is evoked using greater-than brackets and a "?" question mark, followed by the letters "php"*/
//This is a single-line comment
/*
This is multi-line
comment block
*/
function newHelloWorld(){/*this sets up a function and code block*/
$text1 = "Hello"; //creates a variable called: $text1
echo $text1." World!"; /*tells the HTML page to print , aka: "echo" the variable $text1 with the string " World!" concatenated onto it.*/
}//this ends the code block
newHelloWorld(); //calls the function as a statement ending with a semi-colon.
//the question mark and closing less-than tag end the PHP code.
?>
I'm sure you recognize some differences between PHP and JavaScript right away, but there are also quite a few similarities. Again, if you're confident that you could swap out a variable value without breaking the function, you'll do fine with WordPress and this title. As always, the more you know about PHP the better.
Note
Do I have to add "php" to my<? starter block?
You'll notice I've set up my PHP starter block as: "<?php". Those of you with some PHP knowledge or having some WordPress experience, may be familiar with PHP blocks that just start with <? and end with ?>. On servers with shorthand support enabled, you can start a scripting block with just "<?" (as well as use a few other cool PHP shorthand tricks).
However, while shorthand support is usually enabled, not everyone's PHP installation will have it enabled. When I have clients or friends who can't seem to get a new plugin or theme to work with their WordPress installation, this often comes up as the culprit. The theme or plugin was written using shorthand and the client's PHP installation doesn't have it enabled and for some reason, their IT guy or hosting provider doesn't want to enable it. To stay as compatible as possible, we'll be using the standard form in this book (<?php) rather than the shorthand form.
Note
If you'd like to understand WordPress a little better by knowing more about PHP, again, that W3School site is a great place to start! (http://w3schools.com/php/).
After reading this book, if you find PHP really interests you as well as JavaScript, AJAX, and jQuery, you might want to move onto reading AJAX and PHP: Building Modern Web Applications 2nd Edition by Audra Hendrix, Bogdan Brinzarea, and Cristian Darie.
More of a visual "see it to do it" learner? lynda.com has a remarkable course selection from the top CSS, XHTML/XML, PHP, JavaScript (and yes, even jQuery) people in the world. You can subscribe and take the courses online or purchase DVD-ROMs for offline viewing.
The courses or the monthly subscription might seem pricey at first, but if you're a visual learner, it's worth spending money and time on them. You can refer to the official site at http://lynda.com.
Skills are one thing, but the better your tools are, and the more command you have over those tools, the better your skills can be put to use (you can just ask any carpenter, golfer, or app programmer about the sheer importance of the "tools of the trade").
First up, we'll need to meddle with markup and code—lots of markup, CSS, PHP, and jQuery. So, you'll need a good code or HTML editor. Dreamweaver is a great option (http://www.adobe.com/products/dreamweaver/), although I prefer to use Coda for Mac (http://www.panic.com/coda/). Before I discovered working with Coda, I was very happy with the free editor TextWrangler (http://www.barebones.com/products/textwrangler/). When I was working on a PC, I loved the free text/code editor HTML-kit (http://www.htmlkit.com/).
There are thousands of editors out there, some free, some expensive, and with varying degrees of features. Just about every developer and designer I've talked to, uses something different and has a ten-minute "schpiel" about why their editor is the best. Ultimately, any HTML or text editor that lets you enable the following features will work just great. I recommend you enable/use all of the following:
View line numbers: This comes in very handy during the validation and debugging process. It can help you find specific lines in a jQuery script, theme, or plugin file, for which a validation tool has returned a fix. This is also helpful for other theme or plugin instructions given by their author, which refer to a specific line of code that might need customizing or editing under different conditions.
View syntax colors: Any worthwhile code and HTML editor has this feature usually set as a default. The good editors let you choose your own colors. This displays code and other markup in a variety of colors, making it easier to distinguish various types of syntax. Many editors also help you identify broken XHTML markup, CSS rules, or PHP code.
View non-printing characters: You might not want this feature turned on all the time. It makes it possible to see hard returns, spaces, tabs, and other special characters that you may or may not want in your markup and code.
Text wrapping: This of course lets you wrap text within the window, so you won't have to scroll horizontally to edit a long line of code. It's best to learn what the key-command shortcut is for this feature in your editor, and/or set up a key-command shortcut for it. You'll find it easier to scroll through unwrapped, nicely-indented, markup and PHP code to quickly get a general overview or find your last stopping point; however, you will still want to turn wrapping on quickly so you can easily see and focus your attention on one long line of code.
Load files with FTP or local directories: An editor that allows you to connect through FTP or see your local working directory in a side panel, is extremely helpful. It saves you from having to manually find files locally in your OS explorer or finder, or from having to upload through an additional FTP client. Being able to connect to your files in a single application just speeds up your workflow.
Note
Free open source HTML editors:
I've also used Nvu (http://www.net2.com/nvu/) and KompoZer (http://kompozer.net/). They're both free, open source, and available for Mac, PC, and Linux platforms. KompoZer was made from the same source as Nvu and, apparently, fixes some issues that Nvu has. (I haven't run into any major issue with Nvu myself). Both editors are too limited for my regular use, but I do like being able to format HTML text quickly and drag-and-drop form objects onto a page. Both editors have a Source view, but you must be careful while switching between the Normal and the Source view tabs. Nvu and KompoZer are a little too helpful, and will try to rewrite your handcoded markup if you haven't set your preferences properly!
Linux users of Ubuntu and Debian (and Mac users with Fink) might also be interested in checking out the Bluefish editor (http://bluefish.openoffice.nl). I use Bluefish when working on Ubuntu Linux. I prefer it when on Linux, though it's robust enough to probably be considered more of an IDE (Integrated Development Environment), similar to Eclipse (http://www.eclipse.org), rather than just a basic code or HTML editor. Many of you may find that a tool like Bluefish or Eclipse is overkill for your general WordPress development and maintenance needs. On the other hand, if you're serious about WordPress development, they may have features you find invaluable and they are worth downloading and checking out.
Finally, you'll need a web browser. I strongly suggest that you use the latest stable version of the Firefox browser, available at http://mozilla.com/firefox/.
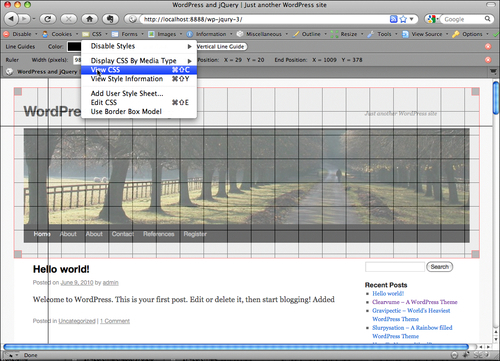
Now one may ask, why use Firefox? While this browser has its setbacks (like any other), on the whole, I view it as an excellent web development tool. For me, it's as essential as my HTML editor, FTP programs, and graphics tools. Firefox has great features that we'll be taking advantage of to help us streamline our WordPress and jQuery enhancements and site production. In addition to built-in features such as the DOM Source Selection Viewer and adhering to CSS2 and some CSS3 standards as specified by the W3C, Firefox also has a host of extremely useful extensions such as the Web Developer Toolbar and Firebug, which I recommend to further enhance your workflow.
If you have some experience with jQuery, you've probably noticed that the great documentation on jQuery's site as well as most jQuery books, tend to focus on the intricacies of jQuery, using very simple and basic HTML markup examples with minimal CSS attributes added. Within WordPress, you'll find yourself working with a theme or plugins that were most likely created by someone else. You'll need an easy way to explore the Document Object Model (DOM) and CSS that the theme, plugins, and WordPress are generating in order to get jQuery to do what you want with the resulting markup that is generated. The Firefox browser and its extensions allow you to do this more easily than any other browser.
This is a great extension that adds a toolbar to your Firefox browser. The extension is also available for the Seamonkey suite and the new Flock browser, both of which, are powered by the open source code of Mozilla, just like Firefox. Get it from http://chrispederick.com/work/web-developer/.
The toolbar lets you link directly to the browser's DOM and Error Consoles, as well as W3C's XHTML, and CSS validation tools. It also lets you toggle and view your CSS output in various ways, and lets you view and manipulate a myriad of information your site outputs on-the-fly. The uses of this toolbar are endless. Every time I develop a design or create jQuery enhancements, it seems I discover some feature that I have never previously used and yet find quite useful.
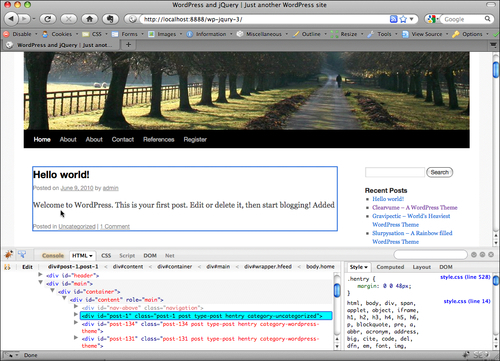
A more robust tool is Joe Hewitt's Firebug extension for Firefox found at http://www.getfirebug.com/. You'll note, there's also a "Firebug Lite" version available for Internet Explorer, Safari, and Opera. But the full Firebug for Firefox is your best bet.
This extension is a powerhouse when combined with the features of the Web Developer toolbar. On its own, Firebug will find anything you need to manipulate or debug: HTML, CSS, JavaScript, you name it. It can even help you find little "weirdo" tidbit things happening to your DOM on-the-fly. There's a variety of fun inspectors and just about all of them are invaluable.
My favorite Firebug features are the options for reviewing HTML, CSS, and the DOM. Firebug will show you your box models and let you see the measurements of each ledge. Plus, the latest version of Firebug lets you make edits on-the-fly to easily experiment with different fixes before committing them to your actual source files. (There are features that let you edit on-the-fly in the Web Developer Toolbar as well, but I find the Firebug interface more in-depth and easier to use.)
The last tool that I'd like to mention is an image editor. While you can certainly do plenty of cool enhancements with pure CSS, chances are you'll want to expand on your WordPress design and jQuery enhancements a little more by being able to add some slick visual elements such as cool icons or custom backgrounds. These are best achieved by using a graphic editor such as GIMP, Photoshop, or Fireworks.
Adobe owns both Photoshop and Fireworks. It also offers a light and less-expensive version of Photoshop, called Photoshop Elements that will allow you to do basic image edits (http://www.adobe.com/products/).
Any graphic editor you prefer is fine. One that allows you to work with layers is best.
Note
Free open source image editors
If you're on a budget and in need of a good image editor, I'd recommend GIMP. It's available for PC, Mac, and Linux. You can get it from http://gimp.org/.
On the other hand, if you prefer vector art as I do, then try Inkscape, which is also available for PC, Mac, and Linux. Bitmap graphic editors are great in that they also let you enhance and edit photographs and do some drawing. But if you just want to create neat buttons and icons or other interface elements and vector-based illustrations, Inkscape gives you detailed drawing control and is worth trying out (http://inkscape.org). You'll find that many graphic examples created for this book were done primarily with Inkscape.
I personally use both, a bitmap image editor like GIMP or Photoshop in conjunction with a solid vector drawing program like Inkscape. I find it is often necessary to use both types of image editors together to create most of my site designs and effects.
jQuery, created by John Resig is a free, open source JavaScript library. It simplifies the task of creating highly responsive web pages and works well across all modern browsers. John took specific care when developing jQuery so that it abstracts away all the differences between browsers. So you can focus on your project's function and design without getting caught up in elaborate JavaScript coding to handle all the different browsers out there, and the different ways in which individual browsers like to handle the DOM and their own browser event models.
jQuery at its core, excels at manipulating the DOM by finding and selecting (hence the word "query" in the name) DOM elements into a jQuery object, often called a wrapper. This allows you to easily get and set page elements and content, and work with all the modern browser event models allowing you to add sophisticated features to your site. Last but not least, jQuery has a really cool set of effects and a UI library. Animation and interface widgets are now at your complete command.
Note
Wait! DOM?!
Don't panic. I know, we're barely into the first chapter and I've mentioned this mysterious acronym DOM several times. I'll be mentioning it a lot more. Learning about the Document Object Model can really enhance your understanding of your HTML for WordPress theme design and jQuery enhancements.
It will also help you better understand how to effectively structure your CSS rules and write cleaner and accurate jQuery scripts. For more information, you can of course refer to the W3Schools website: (http://w3schools.com/htmldom/.
Beyond all that cool DOM manipulation stuff, jQuery has a nice easy learning curve. You CSS gurus will especially enjoy picking up jQuery. Again, in finding the best way to select elements easily, John developed jQuery so that it leveraged web developers' existing knowledge of CSS. You'll find jQuery selectors a snap, especially as you can grab and select sets of elements almost as easily as you can style them with CSS!
JavaScript, originally named LiveScript, was invented by Netscape's developers in the early 90s. By 1996, Netscape had renamed LiveScript to JavaScript in order to boost its popularity by linking it to Java (developed separately by Sun Microsystems). Java, which had been around a few years itself already, was becoming even more popular because people were starting to run it in websites by using a separate plugin called an "applet". There are some ways in which Netscape's developers took care to make JavaScript syntax and functions very similar to Java, but there are differences of course. The biggest difference is that JavaScript is a client-side scripting language that is interpreted, which means it runs live in the browser and is not pre-compiled the way Java is in order to execute and run.
It's a bit complicated and beyond the scope of this book to explain it all, but of course, Microsoft's browser, Internet Explorer, in competition with Netscape, took a completely different route and released IE with the ability to run Microsoft's own VBScript. VBScript was made to look and work similar to VisualBasic, but again as an interpreted language, instead of a compiled one like VB. When JavaScript seemed to be gaining more popularity with budding web developers than VBScript, Microsoft introduced JScript. JScript was crafted to be very similar to JavaScript, in order to appeal to JavaScript developers without any licensing hassles for Microsoft, but there were still quite a few differences. You could however, if you were very careful and didn't have high expectations, write a script that executed as JavaScript in Netscape and JScript in IE 3.0.
Yes. What a pain! To this day, IE still only executes VBScript and JScript! The difference is, both Microsoft and Mozilla (Netscape's creation foundation) submitted JavaScript and JScript to ECMA International, an organization which focuses on creating and maintaining standards for information communication systems. In addition to JavaScript, you can thank ECMA Int. for standards running the gamut from CD-ROM and DVD formatting specs to the newer Open XML standards used in Office suites like MSOffice and OpenOffice.
It has taken well over ten years from JavaScript's initial submission in 1997. But as of 2010, both JavaScript and JScript standards are very similar, and both are now technically named ECMAScript (but who wants to try and say that all the time?).
Many developers who came of age in the later 90s and early 2000 use the terms JScript and JavaScript interchangeably without realizing there's a difference! And yet, there are still differences. IE handles ECMAScript in some ways differently compared to Firefox and other browsers. For clarity and sanity, this title will continue to call ECMAScript JavaScript.
Back in the "dark ages", that is before jQuery came along in early 2006, in order to create a more dynamic page that responded to events or manipulated the DOM using JavaScript, you had to spend a lot of time writing long and often clumsy JavaScript using while and foreach loops, with perhaps a few or many if/else statements squashed inside those loops.
If you wanted to evoke your JavaScript immediately, it had to be placed in the header tags or in the body with an onload event handler. The problem is that this method waits for the entire page and all its content to load, including things such as CSS files and images. If you created a loop to select and manipulate a set of elements, and wanted to perform an additional change to that set of elements, you had to select them again in an additional loop or have a long loop with if/else statements that could become complicated to track and maintain.
Lastly, many events you might want the page to respond to, often had to be called separately. I recall sometimes having to create an event script for Firefox (or way, way back in time, on Netscape) and a separate event script for IE. Occasionally, I'd even devise little creative ways to detect different browsers or "trick" them into responding to different events that on the whole were just to make the page appear to look and respond somewhat similarly between the two browsers.
As much as I was enjoying programming and adding engaging interactivity to my sites, I was often a little less than enthused to embark on an in-depth JavaScript endeavor.
All that ended with jQuery. jQuery does not stand alone, meaning it's not a new language that browsers support. It essentially boils down to just creating better JavaScript that works. As mentioned, it's a JavaScript library that gives you simpler, easier-to-construct syntax to work with. That jQuery syntax gets interpreted by the browser's JavaScript engine as plain JavaScript. jQuery simply hides a lot of the "ugly" and complicated things that you used to have to do yourself with JavaScript and does them for you.
One of the first things that I grew to love about jQuery (other than its excellent, clear documentation) is that it is essentially a fantastic "loop engine". Now, I call it "looping", but those of you with a more formal programming background or some previous experience with jQuery have probably heard the term used as: implicit iteration. Essentially, jQuery iterates, that is, repeats (aka: loops) through the selected elements of its container object without the introduction of an explicit iterator object, hence, using the term implicit. OK, complicated definitions aside, it simply means you can do just about anything you need to a set of elements, without ever having to write a foreach or while loop! Most people I chat with about jQuery, have no idea this is what jQuery is really doing under the hood.
What's even cooler than being able to easily loop through selected elements is the ability to select them in the first place using standard CSS notation. Then, as if those two features weren't wonderful enough, once you've grabbed a set of elements, if you have more than one operation that you want to apply to the selected set of elements, no problem! Rather than evoking individual functions and scripts on the selection over and over, you can perform multiple operations all at once, in a single line of code. This is called statement chaining. Statement chaining is awesome and we'll learn all about it and take advantage of it often throughout this title.
Lastly, jQuery is extremely flexible and most importantly, extensible. In the four years it's been around, there have been thousands of third-party plugins written for it. It's also very easy to write your own jQuery plugins as we'll discover in this book. However, you'll probably find that for most of your more practical day-to-day WordPress development and maintenance needs, you won't have to! Just as WordPress saves you loads of time and work, you'll find with jQuery that a lot of the work has already been done as well.
Whatever you wish to create, you can probably find a way to do it fairly easily with a jQuery plugin and a tweak or two to your WordPress theme. Perhaps you might just need to write a quick and simple jQuery script to enhance one of your favorite WordPress plugins. We'll go over the basics of jQuery and the most common uses of applying it to WordPress in this book and you'll quickly see that the possibilities are endless.
Note
Getting to know jQuery
This book is here to help you create solutions for scenarios and problems that tend to confront WordPress users. I'm hoping to help you save a little time having to poke through WordPress' wonderful yet extensive codex and jQuery's API documentation. But by no means will this book replace those resources or the great resources maintained by jQuery and WordPress' community members.
For jQuery, I highly recommend you check out jQuery's documentation and the Learning jQuery site:
As we move through this title, you'll hear and learn a lot more about the jQuery object, also called the "wrapper" or "wrapper set", which probably makes the most sense, as it's a "set" of elements you've selected to work with. But as it's essential to how jQuery works, we'll do a quick introduction now.
To fully understand the wrapper, let's back up a bit outside of jQuery. Ultimately, it all starts with your browser. Your browser has a JavaScript engine and a CSS engine. The browser can load, read, and interpret properly formatted HTML, CSS, and JavaScript (and yes, a host of plugins for Java, Flash, and many different media players that we won't worry about for the purposes of this explanation).
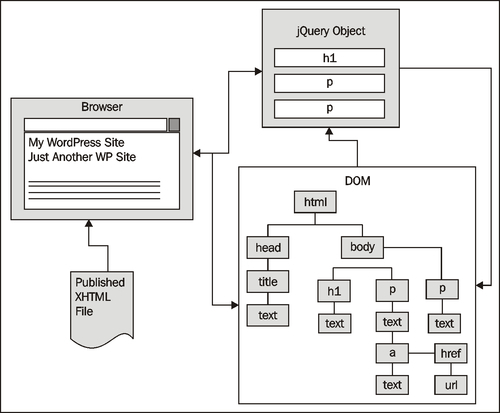
Now this is a very crude, high-level overview. But I think it will help you understand how jQuery works. The browser takes the HTML document that loads into it and creates a map of the document called the DOM (Document Object Model). The DOM is essentially a tree of the HTML document's objects.
You'll recognize most objects as the the markup tags in an HTML document, like <body>, <h1>, <div>, <p>, <a>, and so on. The DOM tree is laid out, displaying the parent-child relationships of those objects to each other as well as mapping relationships to each object's attributes and content. For example, take a look at the following sample DOM tree illustration:

Now for the fun stuff. If a CSS stylesheet is attached or embedded into the document, the browser's CSS engine traverses the DOM tree and styles each of the elements as specified by the style rules. And of course, if there is any JavaScript attached or embedded into the document, the browser's JavaScript engine is also able to traverse the DOM tree and perform the instructions the script contains.
The jQuery library is attached to your XHTML document as a JavaScript file. The library is then able to prepare the JavaScript engine to create an object that will have all of jQuery's functionality inside it, ready to be used upon being evoked (also known as the jQuery object). When you create jQuery code, you automatically evoke that jQuery object and you're ready to start working with it.
Most commonly, you will instruct the jQuery object to traverse the DOM through CSS selectors and place specific elements inside of it. The selected elements are now "wrapped" in the jQuery object and you can now start performing additional jQuery functionality on the selected set of elements. jQuery can then loop through each element that it is wrapped around, performing additional functions. The jQuery object stops looping when it comes to the last object in the set and has performed all the instructions passed to it through statement chaining.
The following illustration shows some of the DOM's objects passed to the jQuery object.
It's very easy to get started with jQuery. We'll cover the most direct basic method here and in the next chapter, we'll explore a few other ways to work with jQuery in WordPress.
If you head over to the jQuery site at http://jquery.com, you'll find that the home page offers you two download options: production and development libraries of version 1.4.2, the most current stable version available at the time of this writing.
The production version has been compressed and "minified" into a smaller file size that will load much more quickly. It weighs in at 24KB. The development version, which hasn't been compressed, comes in at 155KB. That's quite a bit larger, but it's much easier to open up and read if you ever run into a debugging problem and should need to.
The ideal scenario is, that you're supposed to use the development version of jQuery while creating your site, and when you release it live, switch over to the production version, which will load much more quickly. Many of you will probably never want to look inside the jQuery library, but it's a good idea to download both anyway. In the event your debugging process keeps showing you a line of code in the jQuery library that is giving you problems, you can switch over to the development version to see more clearly what the line of code is trying to do. I can tell you, the odds that something in the jQuery library has a bug in it is slim! It will almost always be your jQuery script or plugin that has the problem, but being able to look at the full jQuery library may give you an insight as to what's wrong with your script's code and why the library can't work with it. There's no difference between the production and development libraries, just file size and human readability.

On jQuery's home page, when you click on Download, you'll be taken over to the Google code site. You can then go back and select the other version for download. Note that the library is not zipped or packaged in any way. It downloads the actual .js JavaScript file ready to be placed into your development environment and used. If you click on the Download button and see the jQuery code appear in your browser, just hit the back button and right-click or control-click, and then click on Save Target As to download it.
Note
Using Visual Studio?
If your code/HTML editor happens to be Visual Studio, you can download an additional documentation file that will work in Visual Studio and give you access to comments embedded into the library. This allows the Visual Studio editor to have statement completion, sometimes called IntelliSense, when writing your jQuery scripts.
To download the definitions file, click on the blue Download tab at the top of the home page. On the Download jQuery page, you'll find the link to the Visual Studio documentation file in the most current release.

You'll place this file in the same location as the jQuery library you downloaded (production or development) and it should now work with your Visual Studio editor.
Let's get right down to it and set up a basic HTML document that includes the jQuery library file we just downloaded. I went ahead and downloaded the smaller production version.
In the following markup, we'll attach the library and write our first jQuery script. Don't worry so much about the jQuery code itself at this point. It's just there so you can see it working. We'll go over really understanding jQuery functionality in the next chapter.
<!DOCTYPE html PUBLIC "-//W3C//DTD XHTML 1.0 Transitional//EN" "http://www.w3.org/TR/xhtml1/DTD/xhtml1-transitional.dtd">
<html xmlns="http://www.w3.org/1999/xhtml" xml:lang="en">
<head>
<title>First jQuery Test</title>
<script type="text/javascript"
src="jquery-1.3.2.min.js"></script>
<script type="text/javascript">
jQuery("document").ready(function(){
jQuery("p").css("background-color", "#ff6600");
});
</script>
</head>
<body>
<h1>Sample Page</h1>
<p>Lorem ipsum dolor sit amet, consectetur adipisicing elit, sed do eiusmod tempor incididunt ut labore et dolore magna aliqua. </p>
<p>Ut enim ad minim veniam, quis nostrud exercitation ullamco laboris nisi ut aliquip ex ea commodo consequat.</p>
<p>Duis aute irure dolor in reprehenderit in voluptate velit esse cillum dolore eu fugiat nulla pariatur. Excepteur sint occaecat cupidatat non proident, sunt in culpa qui officia deserunt mollit anim id est laborum.</p>
</body>
</html>
That's it! Without any CSS included or embedded into the page or the markup, we've used jQuery to change the CSS background property of the paragraph tags. Now, ultimately we wouldn't want jQuery to replace our regular use of CSS by any means! But from this quick example, you can see how jQuery can be used to alter the look and layout of your site's pages on-the-fly, and in response to events, making your site's pages very responsive to users; it is a powerful feature. You should now be able to load up this file into Firefox to see your first jQuery script in action.

If you've worked at all with WordPress, based on the previous sample, you can probably easily see how to include the jQuery library in your WordPress theme and start working with it. You'd do just fine including jQuery into your theme in this way. However, in the next chapter, we will discuss the more optimal way to include the jQuery library into your WordPress installation.
Now that you have a little background with jQuery and understand how to get it up and running in an HTML document, let's take a look at WordPress. Again, most of you are already WordPress users and developers. At the very least, you've probably worked with it in some way. You might even have a WordPress site that you own or maintain.
For those of you with minimal experience with WordPress, we'll quickly go over some background and essentials to getting started with it. Even you more experienced users may want to read on, as I'll cover setting up a "sandbox" or development installation of WordPress. This way, you can experiment, learn, and play with WordPress and jQuery without having to have any of it appear on your actual site until you're ready to deploy it.
WordPress, developed as a fork off the original b2/cafelog software, was co-developed by Matt Mullenweg and Mike Little. It first appeared in 2003. Originally a blog platform, it has grown over the years into a robust publishing platform that millions of people and organizations use in a myriad of ways for maintaining their site's content.
Like jQuery, WordPress is flexible and extensible. Matt and his fellow WordPress developers at Automattic have taken care to make sure WordPress conforms to current W3C web standards. A WordPress site's design and additional, custom functionality can be easily controlled and updated using the platform's APIs, which streamline theme and plugin development.
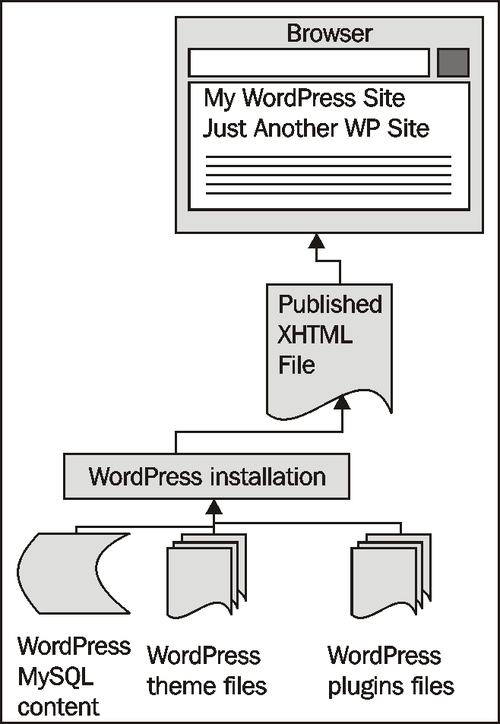
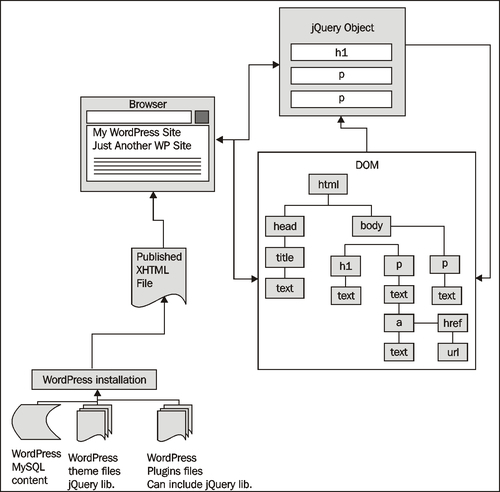
You should keep in mind, as someone who is looking to enhance your site with jQuery, just how dynamic a WordPress site is. WordPress uses a MySQL database and set of theme template pages as well as plugin pages, not-to-mention hundreds of core functionality pages to generate your site. This means a final displayed XHTML page's markup comes from many places; from the theme's template files, from post and page content stored in the MySQL database, and some of it may be defined in the code of a plugin or widget that the installation is using.
The more you know and understand about your WordPress installation and how its files come together, the more easily you'll be able to enhance the site with jQuery.
The next diagram illustrates how WordPress serves up a complete HTML page to the browser:
Note
Completely new to WordPress?
Again, I highly recommend the book WordPress 2.7 Complete by April Hodge Silver and Hasin Hayder. This book is an excellent resource. It covers everything you need to know about WordPress and will also get you started on working with WordPress themes and plugins.
Interested in going deeper with WordPress?
If you're comfortable with using WordPress but would like to understand more about theme and plugin development, then you should definitely check out WordPress Plugin Development by Vladimir Prelovac, and, if you'll excuse the shameless plug for my own book, WordPress 2.8 Theme Design.
If you have a version of WordPress running that you can play with, great. If you don't, I highly recommend having a locally running installation. Installing and running a small web server on your local machine or laptop has become very easy with the release of WAMP (Windows, Apache, MySQL, and PHP) and MAMP (Mac, Apache, MySQL, and PHP). A local server offers you several conveniences compared to working with WordPress installed on a hosting provider.
I often find that when I travel, despite more and more Internet WiFi bubbles popping up, I am often somewhere that doesn't have one, or I'm in a Starbucks and I don't feel like shelling out cash to T-Mobile for the "privilege" of being connected. With a local installation of WordPress, I have no worries. I can develop and tinker to my heart's content regardless of Internet connectivity and most importantly, without worry that I'll break something on the live site that I'm developing or designing for.
If you're interested in a local sandbox installation of WordPress, I recommend you download WAMP for Windows or MAMP for Mac.
WAMP stands for Windows, Apache, MySQL, and PHP and it makes it very easy to have a local web server running on your computer in just a few clicks. If you're using a Windows operating system such as XP, Vista, or Windows 7, you can head over to http://www.wampserver.com and download WAMP 2.
Be sure to follow the directions in WAMP's installation wizard! If you already have a web server running as localhost and/or a previous version of WAMP installed, carefully read the wizard instructions for disabling or uninstalling that server, backing up your data, and installing the latest version of WAMP.
You can also agree to let WAMP install a start page for you. From this start page as well as from the WAMP icon in the taskbar, you'll be able to easily launch phpMyAdmin. phpMyAdmin will allow you to easily create a database and the database user account required for installing WordPress.
Similar to WAMP, MAMP stands for (you guessed it!) Mac, Apache, MySQL, and PHP. Mac users will head on over to http://mamp.info and download the free version of the server.
Once you download and unpack the ZIP and launch the .dmg file, it's a pretty straightforward process for copying the MAMP folder to your Applications folder and launching the app.
Again, like WAMP, MAMP from the start page offers you an easy way to launch phpMyAdmin. phpMyAdmin will allow you to easily create a database and database user account, which is required for installing WordPress.
Note
Using Ubuntu?
If you're using Ubuntu and need a local server, you're in luck. Linux afterall is the OS most web servers use (I think you know what LAMP stands for at this point).
I'd recommend you do a little research through Google to find the best way to install your own local web server. I found the following resource to to be the most useful for me and what I used to install LAMP on my Ubuntu 10.04 installation: http://www.unixmen.com/linux-tutorials/570-install-lamp-with-1-command-in-ubuntu-910.
If you are using a school's or library's computer and can't (or otherwise just don't want to) locally install software, you'll need an account with a web hosting provider. The hosting provider you choose must be running Apache, MySQL, and PHP, in order to accommodate WordPress. It will greatly benefit you to choose a hosting provider that offers an easy-to-understand account panel, which allows you to easily access phpMyAdmin.
Note
Easy, one click installs—Easy, yes. Just be careful!
Many web hosting providers offer super easy "one-click" installs of many of today's top CMS publishing platforms and other useful web applications including WordPress. Be sure to check out your hosting provider's services and options as this will let you fill out one easy form and will save you the hassle of dealing directly with phpMyAdmin or the WordPress install wizard.
Be careful with one-click installs! While many providers simply install a single installation of WordPress on to your account for you, which is perfect, some providers may have WordPressMU running. These providers will create an MU account, which will map to your domain name, but not give you access to any installation files. If that's the case, you will not have complete control over your WordPress site!
You'll must be able to FTP into your hosting account and see your WordPress installation's files, particularly the wp-content directory, which will contain your theme and plugin directories and files that you'll need to be able to edit in order to enhance your site with jQuery. Be sure to double-check with your hosting provider before choosing a one-click install.
WordPressMU is multi-user WordPress. It is what powers WordPress.com accounts. While it's super easy to set up a site on WordPress.com and have them host it, you cannot upload or customize your own themes and plugins. This is why this title doesn't even attempt to cover WordPress.com accounts as you need access to the wp-content folder in order to enhance your site with jQuery.
WordPress itself is very easy to install. Once you have a MySQL database set up with a username and password for that database, you'll unzip the latest WordPress version and place it into your local httpdoc or www root folder and then run the installation by navigating to http://localhost-or-domainname-url/my-wp-files/wp-admin/install.php.
Note
WordPress in 5 minutes (or less!)
For a complete overview of installing WordPress, be sure to check out WordPress' 5-Minute Installation Guide from the Codex: http://codex.wordpress.org/Installing_WordPressAgain. The book WordPress 2.7 Complete will walk you through a WordPress installation, step-by-step.
You probably come from one of two camps: you might know and have experience with jQuery and you're looking at WordPress to help maintain your site. Or, more likely, you have experience with WordPress and you're looking to see what jQuery can do for you.
If you have some experience with jQuery but are fairly new to WordPress you're probably familiar with all sorts of jQuery examples that show clean and clear, hand-coded HTML and CSS, which you then craft your jQuery scripts to fit. It can become easy to just open up an HTML file and be able to quickly see and even directly manipulate all the HTML markup and CSS id and class references right there in order to make your jQuery script as straightforward as possible.
With WordPress, as we've discussed in some detail here, all that HTML is generated dynamically. There's no single file that you can open into your editor to get an overview of what jQuery has to work with. You'll have to get to know the WordPress publishing system and most importantly, the WordPress theme and any plugins that you're using, to be able to get your jQuery scripts to target and affect the elements that you want to affect. As I've already mentioned, this is where you'll discover the Web Developer toolbar and Firebug extensions for Firefox to be your best friends.
On the other hand, you WordPress experts who are becoming familiar with jQuery ultimately have the same problem, but you're coming at it from a slightly different angle. You might be used to just having WordPress generate everything for you and not give much thought to it. In order to get jQuery to affect your WordPress content, you're going to have to become a lot more familiar with what's going on under the hood in WordPress and your theme.
Your advantage to implementing jQuery will be in your familiarity with how your theme is set up in your WordPress system and any WordPress plugins you're using. You're going to want to really focus and get a handle on understanding jQuery selectors to be able to navigate all the possible DOM elements being generated by WordPress and create the enhancements you desire.
The following illustration shows how WordPress serves up a complete HTML page to the browser that then interprets the DOM so that CSS styles can be applied, and jQuery and other JavaScript can enhance it:
We've taken a look at the essential background knowledge you'll need and tools required for working effectively with jQuery and WordPress.
We also took a look at the following topics:
Software tools that you need to get your project up and running
Background and basics of jQuery and WordPress
Now that you're up to snuff on these topics, in the next chapter, we'll enable jQuery in our WordPress installation and take a deeper look at jQuery's immense possibilities. Get ready to have some serious fun with our WordPress site. Let's get started!