


 Download code from GitHub
Introducing PowerShell 7
This chapter covers the following recipes:
- Exploring new operators
- Exploring parallel processing with
ForEach-Object - Exploring Improvements in
ForeachandForEach-Object - Improvements in
Test-Connection - Using
Select-String - Exploring the error view and
Get-Error - Exploring experimental features
Introduction
In Chapter 1, Installing and Configuring PowerShell 7.1, you installed and configured PowerShell 7, along with VS Code and a new font. In this chapter, we look at PowerShell 7 and how it differs from Windows PowerShell. The recipes in this chapter illustrate some of the important new features that come with PowerShell 7.
Now that PowerShell is cross-platform, it has a new, expanded audience, one with a background in Linux shells such as Bash. With PowerShell 7, the PowerShell team added several new operators that improved parity with other shells and made life that little bit easier for IT pros.
With the move to open source, the PowerShell code was open to inspection by the community. Many talented developers were able to make improvements to performance and functionality. One example is how PowerShell performs iteration using ForEach and ForEach-Object. In Windows PowerShell, the ForEach syntax item and the Foreach-Object command allowed you to process collections of objects. With Windows PowerShell, each iteration through a collection was serial, which could result in long script runtimes. PowerShell 7 introduces an improvement in the ForEach-Object command that enables you to run iterations in parallel. This review has led to a reduction in the overhead of using these popular language features, thereby speeding up production scripts.
Another improvement is the revised Test-Connection, a command you use to test a network connection with a remote system. Test-Connection, in PowerShell 7, not only does more, but is faster than with Windows PowerShell.
Error reporting in Windows PowerShell was excellent: clear and generally actionable error messages with details of exactly where the error occurred. In PowerShell 7, you now get, by default, a concise view of an error without all the extra text that was often of little value. As always, you can revert to less concise messages if you choose. In the Exploring the error view and Get-Error recipe, you see how error reporting (in Windows PowerShell) becomes better with PowerShell 7.
In the final recipe of the chapter, we take a look at some of the experimental features that can be enabled in PowerShell 7.
Exploring new operators
Operators are symbols or combinations of keystrokes that PowerShell recognizes and assigns some meaning to. PowerShell uses the + operator to mean addition, either arithmetic addition or string addition/concatenation. Most of the PowerShell operators were defined with Windows PowerShell V1.
PowerShell 7 now implements some new operators, including the following:
- Pipeline chain operators:
||and&& - Null-coalescing operator:
?? - Null-coalescing assignment operator:
??= - Experimental null conditional member access operators:
?.and?[] - Background processing operator:
& - Ternary operator:
? <if-true> : <if-false>
You see examples of these operators in this recipe.
Getting ready
This recipe uses SRV1, a Windows Server 2020 host. You have installed and configured PowerShell 7 and VS Code. You run this, and all remaining recipes in this book, in either a PowerShell 7 console or VS Code.
How to do it...
- Using PowerShell 7 to check results traditionally
Write-Output 'Something that succeeds' if ($?) {Write-Output 'It worked'} - Checking results with the pipeline operator
&&Write-Output 'Something that succeeds' && Write-Output 'It worked' - Using the pipeline chain operator ||
Write-Output 'Something that succeeds' || Write-Output 'You do not see this message' - Defining a simple function
function Install-CascadiaPLFont{ Write-Host 'Installing Cascadia PL font...' } - Using the
||operator$OldErrorAction = $ErrorActionPreference $ErrorActionPreference = 'SilentlyContinue' Get-ChildItem -Path C:\FOO\CASCADIAPL.TTF || Install-CascadiaPLFont $ErrorActionPreference = $OldErrorAction - Creating a function to test null handling
Function Test-NCO { if ($args -eq '42') { Return 'Test-NCO returned a result' } } - Testing null results traditionally
$Result1 = Test-NCO # no parameter if ($null -eq $Result1) { 'Function returned no value' } else { $Result1 } $Result2 = Test-NCO 42 # using a parameter if ($null -eq $Result2) { 'Function returned no value' } else { $Result2 } - Testing using the null-coalescing operator
??$Result3 = Test-NCO $Result3 ?? 'Function returned no value' $Result4 = Test-NCO 42 $Result4 ?? 'This is not output, but result is' - Demonstrating the null conditional assignment operator
$Result5 = Test-NCO $Result5 ?? 'Result is null' $Result5 ??= Test-NCO 42 $Result5 - Running a method on a null object traditionally
$BitService.Stop() - Using the null conditional operator for a method
${BitService}?.Stop() - Testing null property name access
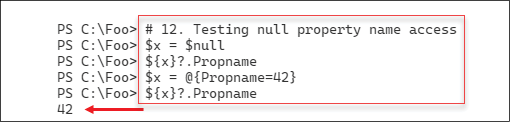
$x = $null ${x}?.Propname $x = @{Propname=42} ${x}?.Propname - Testing array member access of a null object
$y = $null ${y}?[0] $y = 1,2,3 ${y}?[0] - Using the background processing operator
&Get-CimClass -ClassName Win32_Bios & - Waiting for the job to complete
$JobId = (Get-Job | Select-Object -Last 1).Id Wait-Job -id $JobId - Viewing the output
$Results = Receive-Job -Id $JobId $Results | Format-Table - Creating an object without using the ternary operator
$A = 42; $B = (42,4242) | Get-Random $RandomTest = ($true, $false) | Get-Random if ($A -eq $B) { $Property1 = $true } else { $Property1 = $false } if ($RandomTest) { $Property2 = "Hello" } else { $Property2 = "Goodbye" } [PSCustomObject]@{ "Property1" = $Property1 "Property2" = $Property2 } - Creating an object using the ternary operator
[PSCustomObject]@{
    "Property1" = (($A -eq $B) ? $true : $false)
    "Property2" = (($RandomTest) ? "Hello" : "Goodbye")
}
How it works...
In step 1, you write output, which succeeds. Then you test the value of $? to determine whether that previous step did, in fact, succeed. The output is as follows:

Figure 2.1: Checking results traditionally
In step 2, you use the && operator to check that a preceding command finished without an error. The output looks like this:

Figure 2.2: Checking results with the pipeline operator
The pipeline chain operator, ||, tells PowerShell to run the commands after the operator if the preceding command fails (in effect, the opposite to &&). In step 3, you see the operator in use, with output like this:

Figure 2.3: Using the pipeline chain operator
In step 4, you define a function. Defining the function produces no output. This function writes output to simulate the installation of the Cascadia Code PL font.
In step 5, you check to see whether the TTF file exists, and if not, you call the Install-CascadiaPLFont function to simulate installing the font. By piping the output from Get-ChildItem to Out-Null, you avoid the actual output from Get-ChildItem, and if the file does not exist, you call the Install-CascadiaPLFont function. The output of this snippet looks like this:
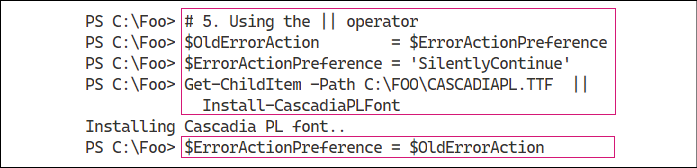
Figure 2.4: Using the || operator and installing the Cascadia font
To illustrate the handling of null results from a function, in step 6, you create a function that either returns nothing (if you call the function with no parameters) or a string value (if you call it specifying a parameter). This function illustrates how you can handle a function that returns null. This step produces no output.
In step 7, you illustrate the traditional handling of a function that returns null. You call the function, first without a parameter, that returns no result and then with a value that does return a value. You then test to see whether the function returned an actual value in each case, which looks like this:

Figure 2.5: Testing null results traditionally
When you use the null-coalescing operator (??) between two operands, the operator returns the value of its left-hand operand if it isn't null; otherwise, it evaluates the right-hand operand and returns the results. In step 8, you call the Test-NCO function and check whether the function returns a value, which looks like this:
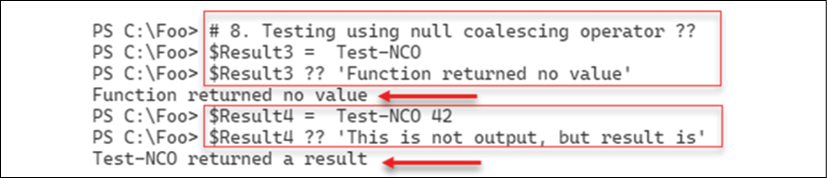
Figure 2.6: Testing using the null-coalescing operator
You use the null conditional assignment operator, ??=, to assign a value to a variable if that variable is currently null, as you can see in step 9, the output from which looks like this:
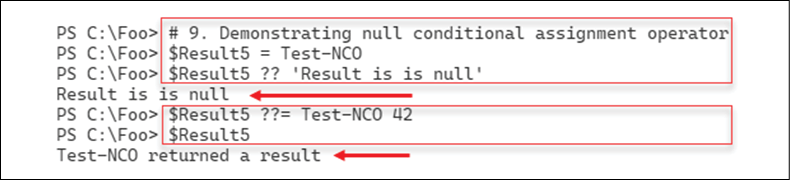
Figure 2.7: Using the null conditional assignment operator
One common issue often seen in the various PowerShell support forums arises when you attempt to invoke a method on an object that is null. You might have used an expression or a command to attempt to return a value (for example, all AD users in the Marin County office) and that returns a null values. In step 10, you attempt to invoke the Stop() method on the $BitService object. Since you have not assigned a value to $BitService, you see the result (an error, You cannot call a method on a null-valued expression). The traditional method of displaying errors looks like this:
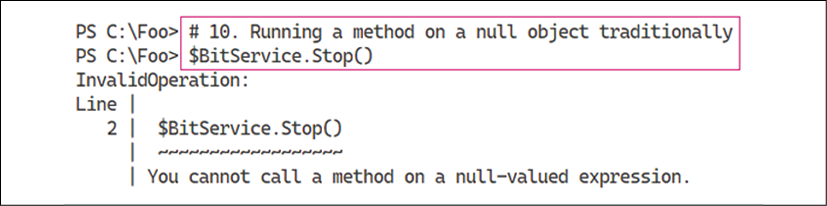
Figure 2.8: Running a method on a null object traditionally
By using the null conditional operator, you can run the Stop() method if the $BitService variable is non-null, but skip calling the method if the variable is null. In effect, what you are doing in step 11 is calling the Stop() method if the variable is non-null, and doing nothing otherwise. Because the variable does not have a value, this step does nothing (and produces no output).
When a variable is null, whether due to an error in your scripts or because a command returns a null instead of an actual value, accessing property names can also cause errors. The output of step 12 looks like this:
You can also encounter issues with null objects when you attempt to access an array member of an object that may or may not exist. In step 13, you attempt to access an array member of an array that does not exist, followed by one that does exist. The output from this step looks like this:
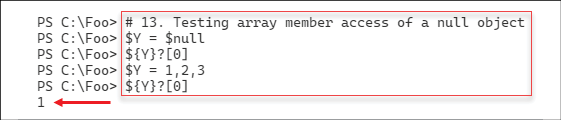
Figure 2.10: Testing array member access of a null object
In step 14, you investigate the use of the background processing operator, &. The idea is that you append this character to the end of a command or script, and PowerShell runs that code in the background. The output from this step looks like this:
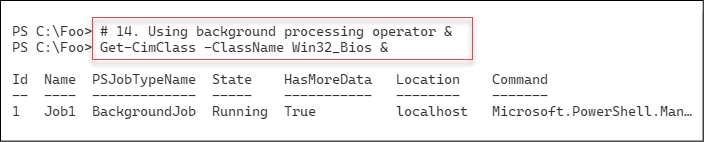
Figure 2.11: Using the background processing operator
In step 15, you wait for the job you created in step 14 to complete, which looks like this:
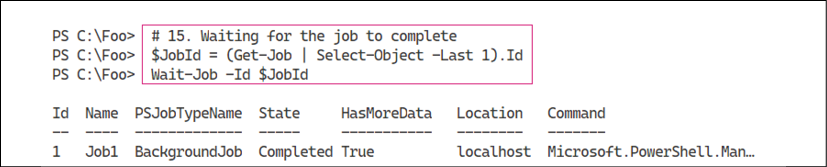
Figure 2.12: Waiting for the job to complete
After the job has completed, in step 16, you receive and display the job's output, which looks like this:
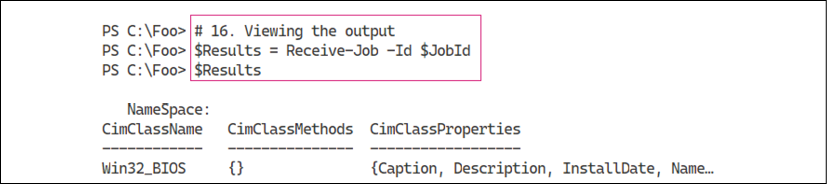
Figure 2.13: Displaying the job's output
In step 17, you create an object using a more traditional approach. This step creates a random value for two properties. Then, you create an object using the values of these two properties. The output from this step looks like this:
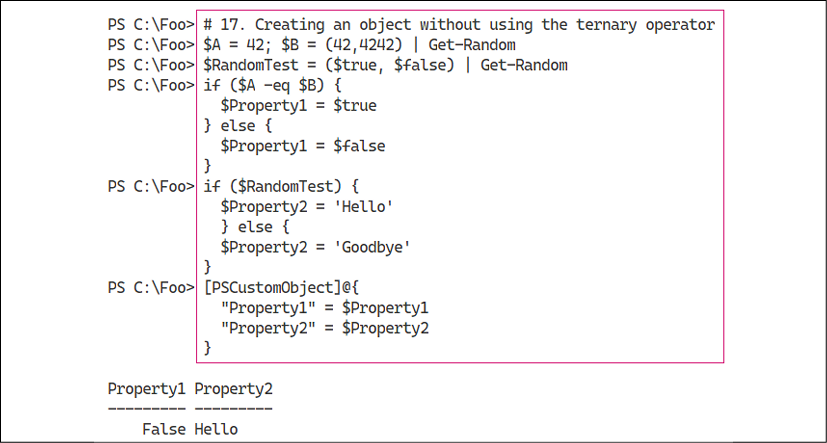
Figure 2.14: Creating an object without using the ternary operator
In step 18, you use the new PowerShell 7 ternary operator. This operator tests a condition and runs different code depending on whether the result is true or false. This is very similar to what you saw in step 17, but in a lot fewer lines of code. The output of this step looks like this:
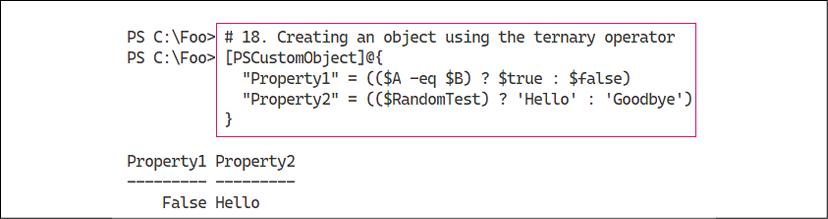
Figure 2.15: Creating an object using the ternary operator
There's more...
In step 4, the function you create simulates the installation of a font if the font does not exist. The font file, CASCADIAPL.TTF, is a TrueType font file for the Cascadia Code Powerline font. This font is the Cascadia Code font you installed in Chapter 1, Installing and Configuring PowerShell 7.1, with the addition of symbols for Powerline. For more details on this font, see https://www.hanselman.com/blog/PatchingTheNewCascadiaCodeToIncludePowerlineGlyphsAndOtherNerdFontsForTheWindowsTerminal.aspx.
In step 5, you simulate the installation of the font if it does not already exist. When you check to test whether the TTF file currently exists, the default setting for $ErrorActionPreference (Continue) means you see an error message if the file does not exist. By default, when Get-ChildItem checks to see whether the file exists, it generates an error message if the file does not exist. One approach to avoiding this error message is to set the value of $ErrorActionPreference to SilentlyContinue and, after ensuring that the font file now exists, set it back to the default value. The syntax is a bit convoluted unless you are familiar with it; this may be another case where not using these operators, and using the Windows PowerShell approach instead, might make the script easier to read and understand.
In steps 11 and 12, you attempt to access a property from an object. The assumption here is that you only want to invoke the method or access a property value if the object exists and you do not care otherwise. Thus, if $BitService has a value, you call the Stop() method, otherwise the code carries on without the script generating errors. This approach is great from the command line, but in production scripts, the approach could mask other underlying issues. As with all PowerShell features, you have to use null handling with due care and attention.
With step 14, you tell PowerShell to run a command as a background job by appending the & character to the command. Using this operator is a more straightforward way to invoke the command as a job than by calling Invoke-Command and specifying the command using the -ScriptBlock or -Script parameters.
In steps 15 and 16, you use Get-Job, Wait-Job, and Receive-Job to wait for the last job run and get the output. One downside to not using Start-Job to create a background job is that you cannot specify a job name. That means using the technique shown in step 15 to obtain the job and job results for the job created in step 14. Using that technique is thus more useful from the command line than in a production script.
In step 17, you create an object using older Windows PowerShell syntax, whereas, in step 18, you use the ternary operator. As with other operators, use this with care, and if you use these operators in production code, make sure you document what you are doing.
In this recipe, you have seen the new operators added to PowerShell 7. Most of them provide a shortcut way to perform some operation or other, particularly at the command line.
Exploring parallel processing with ForEach-Object
Situations often arise where you want to run many commands in parallel. For example, you might have a list of computer names, and for each of those computers, you want to run a script on that computer. You might wish to verify the status and resource usage of various services on each computer. In this scenario, you might use Get-Content to get an array of computer names, and then use either ForEach or ForEach-Object to run the script on the computer. If there are 10 computers and the script takes 10 minutes, the total runtime is over 100 minutes.
With Windows PowerShell, the only built-in methods of running scripts in parallel were using background jobs or using workflows. With background jobs, you could create a set of jobs, each of which starts a script on a single computer. In that case, PowerShell runs each job in a separate process, which provides isolation between each job but is resource-intensive. The Windows PowerShell team added workflows with Windows PowerShell V4, which also allow you to run script blocks in parallel. However, workflows are not carried forward into PowerShell 7. Like other features no longer available in PowerShell 7, you can continue to use Windows PowerShell to run workflows and gradually convert them as and when appropriate.
An alternative to background jobs is to use the ThreadJob module you can download from the PowerShell gallery. For more details on this module, see its repository page at https://github.com/PaulHigin/PSThreadJob.
With PowerShell 7, the PowerShell team added an option to the ForEach-Object command to allow you to run script blocks in parallel. This option simplifies running script blocks or scripts, especially long-running ones, in parallel and avoids the need for third-party modules or having to deal with the complexity of workflows.
This recipe demonstrates running operations in parallel traditionally, using background jobs, and using ForEach-Object -Parallel.
Getting ready
You run this recipe on SRV1 after you have installed PowerShell 7 and, optionally, VS Code.
How to do it...
- Simulating a long-running script block
$SB1 = { 1..3 | ForEach-Object { "In iteration $_" Start-Sleep -Seconds 5 } } Invoke-Command -ScriptBlock $SB1 - Timing the expression
Measure-Command -Expression $SB1 - Refactoring into code that uses jobs
$SB2 = { 1..3 | ForEach-Object { Start-Job -ScriptBlock {param($X) "Iteration $X " ; Start-Sleep -Seconds 5} -ArgumentList $_ } Get-Job | Wait-Job | Receive-Job -Keep } - Invoking the script block
Invoke-Command -ScriptBlock $SB2 - Removing any old jobs and timing the script block
Get-Job | Remove-Job Measure-Command -Expression $SB2 - Defining a script block using
ForEach-Object -Parallel$SB3 = { 1..3 | ForEach-Object -Parallel { "In iteration $_" Start-Sleep -Seconds 5 } } - Executing the script block
Invoke-Command -ScriptBlock $SB3 - Measuring the script block execution time
Measure-Command -Expression $SB3 - Creating and running two short script blocks
$SB4 = { 1..3 | ForEach-Object { "In iteration $_" } } Invoke-Command -ScriptBlock $SB4 $SB5 = { 1..3 | ForEach-Object -Parallel { "In iteration $_" } } Invoke-Command -ScriptBlock $SB5 - Measuring the execution time for both script blocks
Measure-Command -Expression $SB4
Measure-Command -Expression $SB5
How it works...
In step 1, you create and then invoke a script block. The script block simulates how you can run several long script blocks traditionally using the ForEach-Object cmdlet, with output like this:

Figure 2.16: Simulating a long-running script block
In step 2, you determine how long it takes PowerShell to run this script block, with output like this:
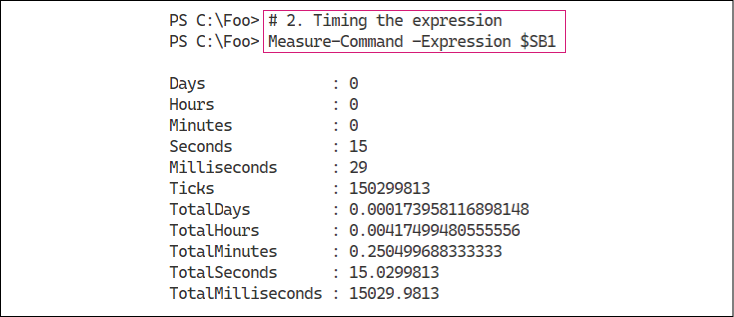
Figure 2.17: Timing the expression
In step 3, you refactor the $SB1 script block to use PowerShell background jobs. The script block runs the simulated long-running task using jobs and then waits for and displays the output from each job. The concept is that instead of doing each iteration serially, all the jobs run in parallel. Defining the function creates no output.
In step 4, you invoke the script block to view the results, which looks like this:
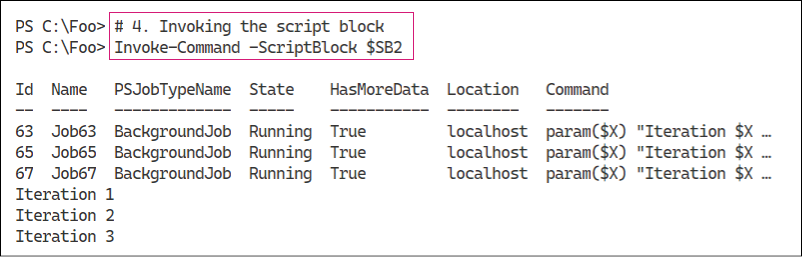
Figure 2.18: Invoking the script block
In step 5, you remove any existing jobs and then re-run the updated script block. This step enables you to determine the runtime for the entire expression. The output of this step looks like this:
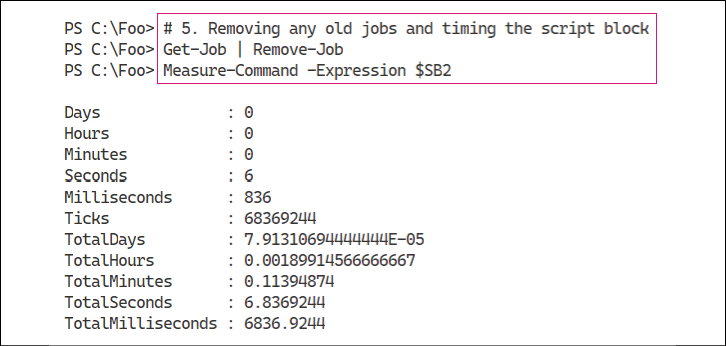
Figure 2.19: Removing any existing jobs and timing the script block
In step 6, you create another script block that uses the PowerShell 7 ForEach-Object -Parallel construct. When you define this script block, PowerShell creates no output.
In step 7, you run the script block, which looks like this:

Figure 2.20: Executing the script block created in step 6
In step 8, you time the execution of the script block, making use of the ForEach-Object -Parallel feature, which looks like this:
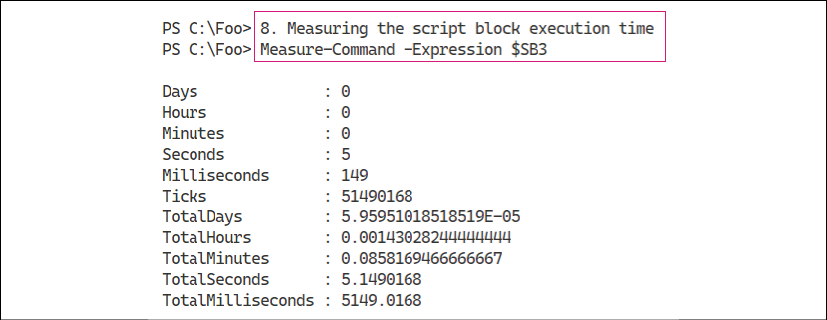
Figure 2.21: Timing the script block execution
In step 9, you define and then invoke two script blocks, which looks like this:
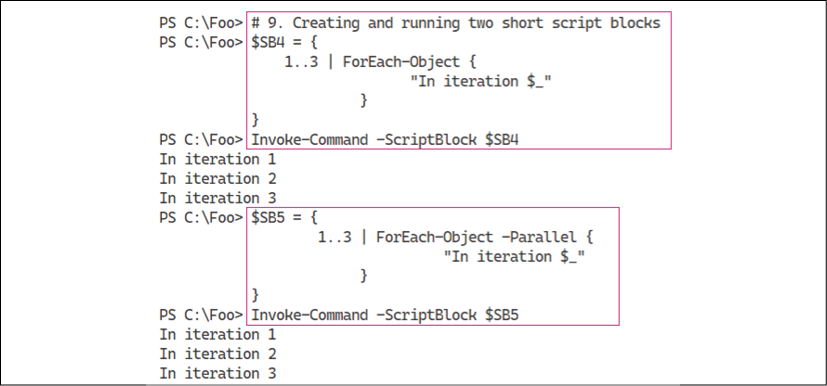
Figure 2.22: Creating and running two short script blocks
In the final step in this recipe, step 10, you measure the execution time of these two script blocks, which looks like this:
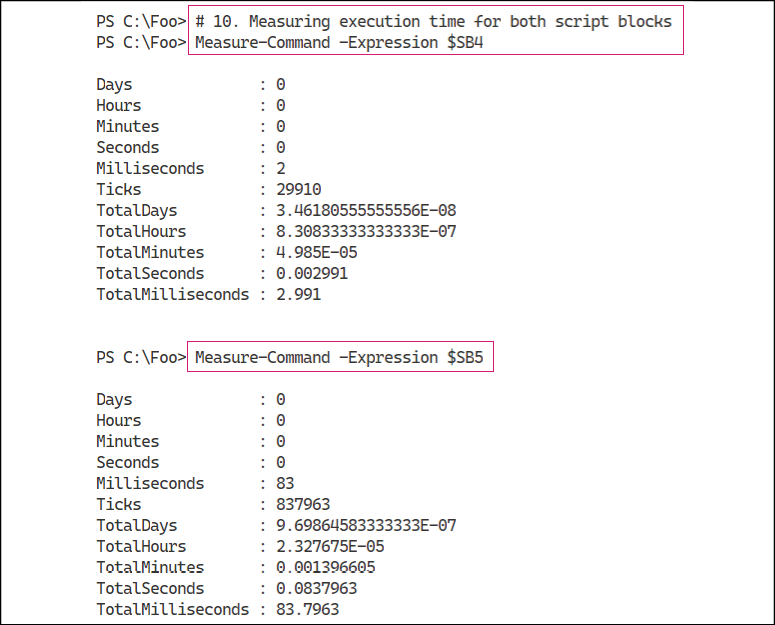
Figure 2.23: Measuring execution time of the script blocks created in step 9
There's more...
In steps 1 and 2, you invoke a long-running task multiple times. As you can see from Figure 2.17, running these script blocks, one at a time, takes just over 15 seconds. In step 5, you see that by refactoring the long-running task into PowerShell background jobs, you reduce the runtime to 6.83 seconds. Finally, in step 8, you measure the elapsed runtime when you use ForEach-Object -Parallel, which is now a little over 5 seconds.
As this recipe shows, if you have independent script blocks, you can run them in parallel to reduce the overall runtime, in this case, from just over 15 seconds to just over 5. And the gains would have been even higher had you run the loop more than three times. Running the loop serially 10 times would have taken over 50 seconds, compared to just over 5 for ForEach-Object -Parallel.
However, there is a default limit of five script blocks that PowerShell can run simultaneously. You can use the -ThrottleLimit parameter to allow more or less than that default. One thing to note: if you attempt to run more parallel script blocks than you have processor cores, PowerShell just uses a processor core queue. This all takes time and would end up raising the overall runtime. The good news is that PowerShell handles all this, so if you run, say, 1,000 parallel script blocks on a system with 12 processor cores, PowerShell works as fast as your host computer allows.
It is also worth remembering that there is some overhead involved in ForEach-Object -Parallel. Under the hood, the command has to set up and then manage separate threads of execution. If the script block is very short, you can find that the overhead involved results in slower runtimes. In this case, the runtime went from 2.9 ms to 83.7 ms. The critical point here is that this construct is useful for non-trivial script blocks (or scripts) that you run in parallel. You benefit up to the number of cores you have available.
Another thing to note is that when you use the ForEach-Object {script} syntax, you are using a positional parameter (-Process). On the other hand, when you use the -Parallel parameter, the parameter value is the script block you wish PowerShell to run in parallel.
Improvements in ForEach and ForEach-Object
Windows PowerShell users are well versed in the use of both the ForEach statement and the ForEach-Object cmdlet. You can use both of these methods in your scripts to process collections, such as all the users in a specific Active Directory group, or the audio files in a file share. In PowerShell 7, both of these iteration methods are considerably faster.
Using either ForEach mechanism is a quick and easy way of processing a collection. One downside some IT pros may have noticed is that the overhead of ForEach processing in Windows PowerShell grows with the size of the collection. With small collection sizes, you are not likely to notice any difference. As the collection size grows, so does the overhead.
Getting ready
You run this recipe on SRV1 after you have installed PowerShell 7 and have created a console profile file. Run this recipe in an elevated console.
How to do it...
- Creating a remoting connection to the localhost using Windows PowerShell
New-PSSession -UseWindowsPowerShell -Name 'WPS' - Getting a remoting session
$Session = Get-PSSession -Name 'WPS' - Checking the version of PowerShell in the remoting session
Invoke-Command -Session $Session -ScriptBlock {$PSVersionTable} - Defining a long-running script block using
ForEach-Object$SB1 = { $Array = (1..10000000) (Measure-Command { $Array | ForEach-Object {$_}}).TotalSeconds } - Running the script block locally:
[gc]::Collect() $TimeInP7 = Invoke-Command -ScriptBlock $SB1 "Foreach-Object in PowerShell 7.1: [{0:n4}] seconds" -f $TimeInP7 - Running the script block in PowerShell 5.1
[gc]::Collect() $TimeInWP = Invoke-Command -ScriptBlock $SB1 -Session $Session "ForEach-Object in Windows PowerShell 5.1: [{0:n4}] seconds" -f $TimeInWP - Defining another long-running script block using
ForEach$SB2 = { $Array = (1..10000000) (Measure-Command { ForEach ($Member in $Array) {$Member}}).TotalSeconds } - Running it locally in PowerShell 7
[gc]::Collect() $TimeInP72 = Invoke-Command -ScriptBlock $SB2 "Foreach in PowerShell 7.1: [{0:n4}] seconds" -f $TimeInP72 - Running it in Windows PowerShell 5.1
[gc]::Collect()
$TimeInWP2  = Invoke-Command -ScriptBlock $SB2 -Session $Session
"Foreach in Windows PowerShell 5.1: [{0:n4}] seconds" -f $TimeInWP2
How it works…
In step 1, you use New-PSSession to create a remoting session using a Windows PowerShell endpoint. This step produces output like this:

Figure 2.24: Creating a remoting connection to the localhost
In step 2, you get the session object representing the session you created in the previous step. This creates no output.
In step 3, you obtain the version of PowerShell that the remoting session is using to process commands, namely, Windows PowerShell 5.1. The output of this step looks like this:
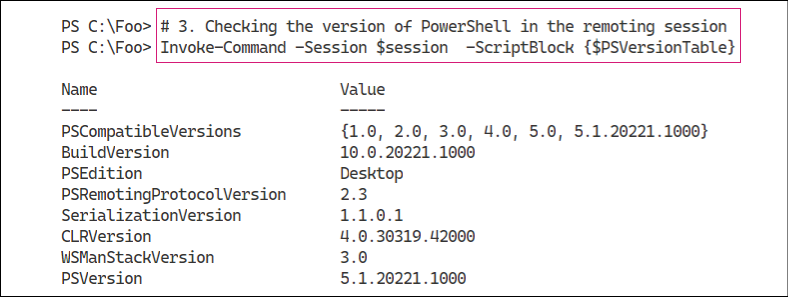
Figure 2.25: Checking the PowerShell version in the remoting session
In step 4, you create a script block, $SB1, which uses the ForEach-Object cmdlet to iterate over a large collection. This step creates no output.
You invoke the $SB1 script block in the local session, in step 5. This step runs the script block in PowerShell 7. The output from this step looks like this:

Figure 2.26: Running the script block locally
With step 6, you run the $SB1 script block in Windows PowerShell 5.1, which produces output like this:

Figure 2.27: Running the script block in PowerShell 5.1
You next create a script block that makes use of the ForEach syntax item, in step 7, producing no output. You then run this second script block in PowerShell 7, in step 8, which produces output like this:

Figure 2.28: Running the script block locally in PowerShell 7
In the final step, step 9, you run $SB1 in the remoting session created earlier (in other words, in Windows PowerShell 5.1), which produces output like this:

Figure 2.29: Running the script block in PowerShell 5.1
There's more...
In step 1, you create, implicitly, a remoting session to the localhost using a process transport that is much faster than the traditional remoting session using WinRM.
In steps 5, 6, 8, and 9, you force .NET to perform a garbage collection. These are steps you can use to minimize the performance hits of running a script block in a remote session (in Windows PowerShell) and to reduce any impact of garbage collections while you are performing the tests in this recipe.
As you can see from the outputs, running ForEach-Object is much faster in PowerShell 7, as is running ForEach in PowerShell 7. Processing large collections of objects is a lot faster in PowerShell 7.
The improvements to loop processing that you can see in the recipe, combined with the use of ForEach-Object -Parallel you saw in Exploring parallel processing with ForEach-Object, provide an excellent reason to switch to PowerShell 7 for most operations.
The performance of iterating through large collections is complex. You can read an excellent article on this subject at https://powershell.one/tricks/performance/pipeline. This article also addresses the performance of using the pipeline versus using ForEach to iterate across collections in a lot more detail.
Improvements in Test-Connection
In Windows PowerShell, you could use the Test-Connection cmdlet as a replacement for the Win32 console command, ping.exe. One advantage of using the cmdlet was that the cmdlet returns objects that you can use more easily in scripting. You can use string hacking and regular expressions to extract the same data from the output of ping.exe, but that is a lot more work and results in scripts that are harder to read.
With Windows PowerShell 5.1, the Test-Connection command makes use of WMI. The command returns objects of the type System.Management.ManagementObject#root\cimv2\Win32_PingStatus. With PowerShell 7.1, the command no longer depends on WMI and returns objects of the type Microsoft.PowerShell.Commands.TestConnectionCommand+PingStatus. As a result of this change of object type, property names returned in PowerShell 7.1 differ from the properties returned in Windows PowerShell. Scripts that made use of some properties may not work properly without adjustment, in PowerShell 7, but that should not be a common issue.
Getting ready
You run this recipe on SRV1 after you have installed PowerShell 7 and created a console profile file.
How to do it...
- Using
Test-Connectionwith the-TargetparameterTest-Connection -TargetName www.packt.com -Count 1 - Using
Test-Connectionwith an IPv4 addressTest-Connection -TargetName www.packt.com -Count 1 -IPv4 - Using
Resolve-DnsNameto resolve the destination address$IPs = (Resolve-DnsName -Name Dns.Google -Type A).IPAddress $IPs | Test-Connection -Count 1 -ResolveDestination - Resolving the destination and performing a traceroute
Test-Connection -TargetName 8.8.8.8 -ResolveDestination -Traceroute | Where-Object Ping -eq 1 - Using infinite ping and stopping with Ctrl-C
Test-Connection -TargetName www.reskit.net -Repeat - Checking the speed of
Test-Connectionin PowerShell 7Measure-Command -Expression {test-connection 8.8.8.8 -count 1} - Checking the speed of
Test-Connectionin Windows PowerShell$Session = New-PSSession -UseWindowsPowerShell Invoke-Command -Session $Session -Scriptblock { Measure-Command -Expression { Test-Connection -ComputerName 8.8.8.8 -Count 1} }
How it works…
In step 1, you test the connection between SRV1 and our publisher's online website. The output of this command looks like this:
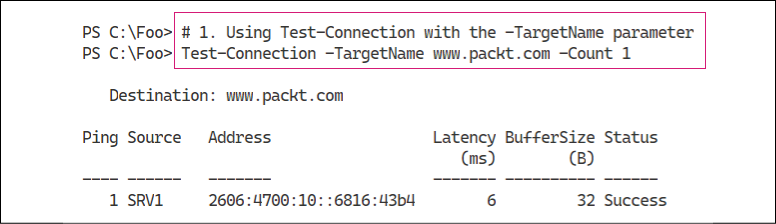
Figure 2.30: Using Test-Connection with the -TargetName parameter
If you have a computer with a working IPv6 address, Test-Connection prefers using IPv6, by default, as shown in the output from step 1. Should you want to test the IPv4 connection specifically, you can specify the -IPv4 switch explicitly, as shown in step 2:

Figure 2.31: Using Test-Connection with an IPv4 address
In step 3, you use Resolve-DnsName cmdlet to determine the IPv4 address(es) for Dns.Google. This site is Google's free DNS service, which Google offers via two well-known IPv4 addresses (8.8.8.8 and 8.8.4.4), which you can see in the output from this step:
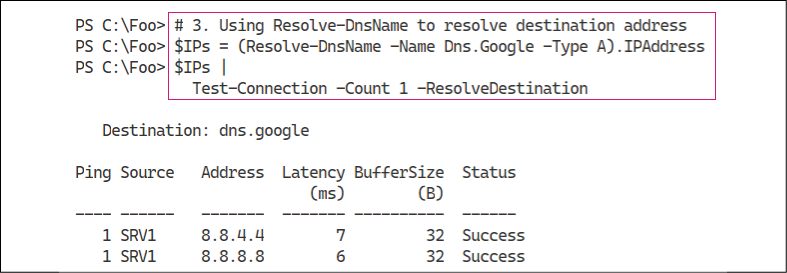
Figure 2.32: Using Resolve-DnsName to resolve the destination address
The tracert.exe Win32 console application allows you to trace the route between your host system and some external host. In step 4, you use Test-Connection to trace the route between SRV1 and the computer at 8.8.8.8. The output of this step looks like this:
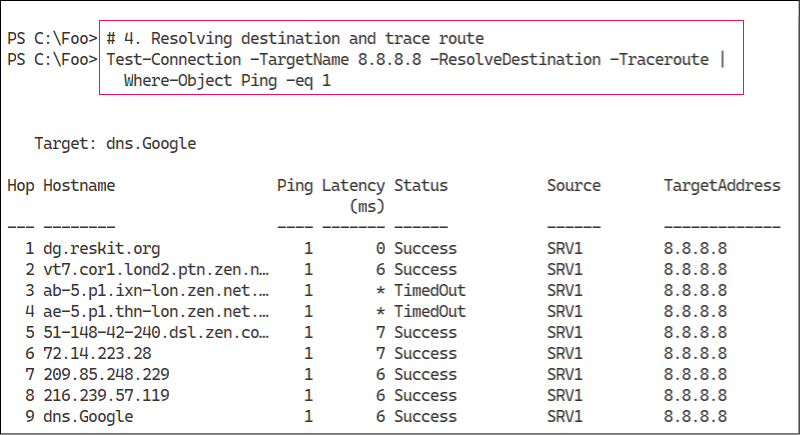
Figure 2.33: Resolving the destination and trace route
With the ping.exe Win32 console application, you can specify the -t parameter to ping the target host continuously, which you can then stop by entering Ctrl-C. With Test-Connection in PowerShell 7, you can now use the -Repeat parameter to achieve the same outcome (and stop the test using Ctrl-C). You can see this in the output of step 5:
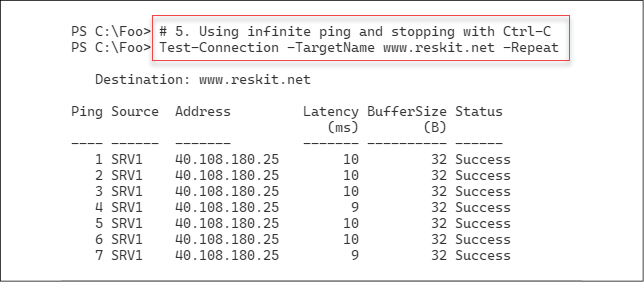
Figure 2.34: Using infinite ping and stopping with Ctrl-C
In steps 6 and 7, you compare the speed of Test-Connection in Windows PowerShell and PowerShell 7. Running Test-Connection in PowerShell 7 looks like this:
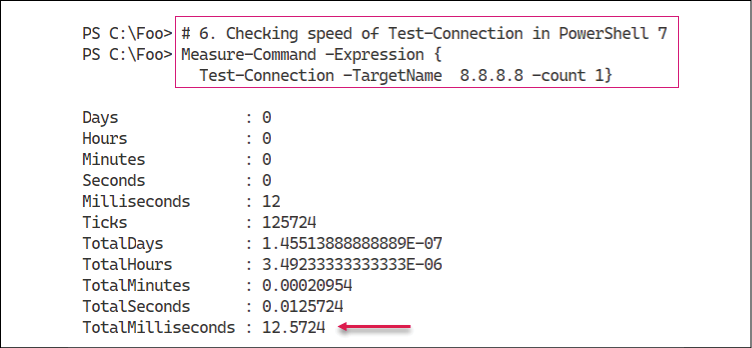
Figure 2.35: Checking the speed of Test-Connection in PowerShell 7
In Windows PowerShell 5.1, the output is similar (although slower) and looks like this:
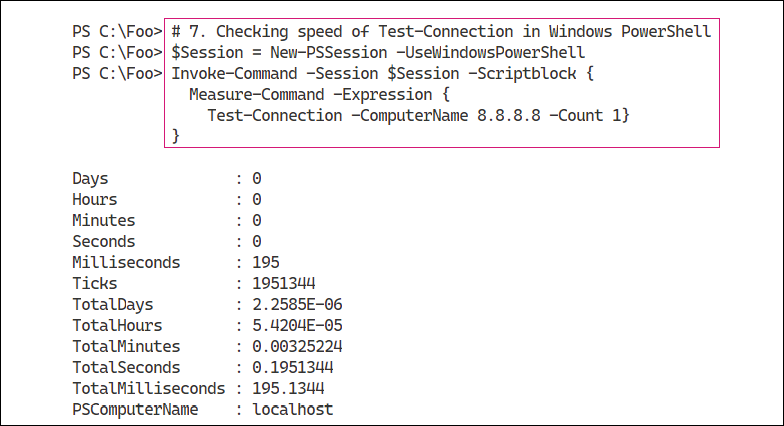
Figure 2.36: Checking the speed of Test-Connection in Windows PowerShell 5.1
There's more...
In the output from step 1, you can see that the results are formatted differently from Windows PowerShell, with improvements to the output.
Step 2 shows how, in PowerShell 7, you can use the -IPv4 switch to use IPv4 explicitly. Similarly, if you want to use IPv6 specifically, you can use the -IPv6 switch. Neither switch was available with Windows PowerShell.
In step 3, you determine the IP addresses for the host Dns.Google (8.8.8.8 and 8.8.4.4), which you then ping successfully. Note that this step both resolves the IP addresses into hostnames and performs the pings against each IP address. Google runs a free DNS service available to anyone on the internet. You can find out more at https://developers.google.com/speed/public-dns.
In steps 6 and 7, you compare the speed of the Test-Connection command between Windows PowerShell 5.1 and PowerShell 7.1, As you can see in the output from these steps, the command is considerably faster in PowerShell 7.
Using Select-String
The Select-String command, included with Windows PowerShell, has been improved in PowerShell 7. You use this command to search for strings either inside pipelined objects or within text files. This command is conceptually similar to the grep command in Linux. With PowerShell 7, the PowerShell team has added some excellent new features to this excellent command, which you look at in this recipe.
Getting ready
You run this recipe on SRV1 after you have installed PowerShell 7 and Visual Studio Code, and once you have created a console profile file.
How to do it...
- Getting a file of text to work with
$Source = 'https://www.gutenberg.org/files/1661/1661-0.txt' $Destination = 'C:\Foo\Sherlock.txt' Start-BitsTransfer -Source $Source -Destination $Destination - Getting the book's contents
$Contents = Get-Content -Path $Destination - Checking the length of The Adventures of Sherlock Holmes
"The book is {0} lines long" -f $Contents.Length - Searching for "Watson" in the book's contents
$Match1 = $Contents | Select-String -Pattern 'Watson' "Watson is found {0} times" -f $Match1.Count - Viewing the first few matches
$Match1 | Select-Object -First 5 - Searching for "Dr. Watson" with a regular expression
$Contents | Select-String -Pattern 'Dr\. Watson' - Searching for "Dr. Watson" using a simple match
$Contents | Select-String -Pattern 'Dr. Watson' -SimpleMatch - Viewing the output when searching from files
Get-ChildItem -Path $Destination |
  Select-String -Pattern 'Dr\. Watson'
How it works…
In this recipe, you look at how you can use the Select-String cmdlet included with PowerShell 7. To investigate this cmdlet, you first download a text file.
In step 1, you use the Start-BitsTransfer command to download the text for a book, The Adventures of Sherlock Holmes, by Sir Arthur Conan Doyle, from the Project Gutenberg website. This step produces no output.
In step 2, you get the text from this book, which you store in the $Contents variable. This step produces no output. In step 3, you report the length of the book, which looks like this:

Figure 2.37: Checking the length of the book
In step 4, you search the book's contents to find all occurrences of "Watson", Sherlock Holmes' faithful companion. This results in 81 occurrences, and looks like this:

Figure 2.38: Searching for occurrences of "Watson" in the book
In step 5, you use the Select-Object cmdlet to view the first five times the command finds the term "Watson" in the book's contents, which looks like this:
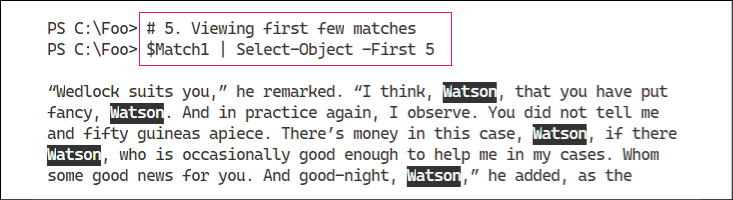
Figure 2.39: Viewing the first five "Watson" matches in the book
With Select-String, you can specify a regular expression with which to match the contents. In step 6, you specify a regular expression pattern to search for the string "Dr. Watson". The output of this step looks like this:
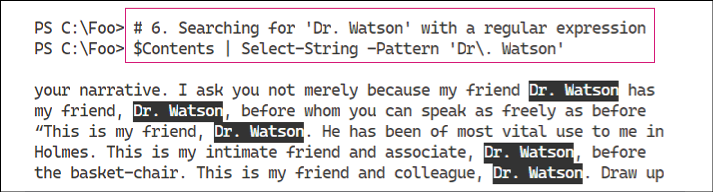
Figure 2.40: Searching for "Dr. Watson" with a regular expression pattern
As an alternative to using a regular expression to perform searching, Select-String also takes a simple match, as shown in the output of step 7:
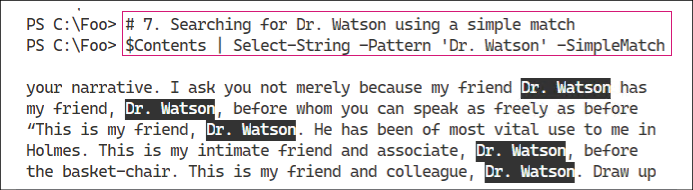
Figure 2.41: Searching for "Dr. Watson" using a simple match
In the previous steps, you have used Select-String to search for the contents of a variable. Another valuable feature of Select-String is the ability to search for text in a file or even multiple files. You can see this in step 8, the output of which looks like this:
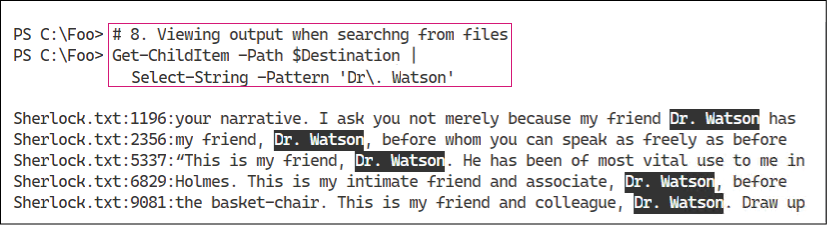
Figure 2.42: Searching for "Dr. Watson" in the Sherlock.txt file
There's more...
In steps 1 and 2, you download a text file from Project Gutenberg, a free internet library of eBooks. This site contains a large number of free books in a variety of formats, including basic text. To find more free eBooks, visit the home page at https://www.gutenberg.org/, and to read more about the project, see https://www.gutenberg.org/about/.
An essential improvement to Search-String in PowerShell 7 is the highlighting of the selected string, as you can see in the outputs of steps 5, 6, 7, and 8. From the command line, this makes viewing the output from Select-String much easier to consume. Also, the ability to search across multiple files, as shown in step 8, makes the Select-String cmdlet even more useful.
Exploring the error view and Get-Error
Since the very beginning, Windows PowerShell has done a great job in displaying the results of errors: a big blob of red text on a black background that contains full details about what went wrong. It was tremendous, but many new users found it a bit off-putting – there was too much information, some of which was not very useful in most cases.
PowerShell 7 now offers a more concise view of errors that reduces the amount of text and improves the format of the output. The result is shorter and more readable output. And, on those rare occasions when it might be necessary, you can Get-Error to get complete error details without having to parse through $Error[0].
Getting ready
You run this recipe on SRV1 after you have installed PowerShell 7 and/or Visual Studio Code, and once you have created a console profile file.
How to do it...
- Creating a simple script
$SCRIPT = @' # divide by zero 42/0 '@ $SCRIPTFILENAME = 'C:\Foo\ZeroDivError.ps1' $SCRIPT | Out-File -Path $SCRIPTFILENAME - Running the script and seeing the default error view
& $SCRIPTFILENAME - Running the same line from the console
42/0 - Viewing the
$ErrorViewvariable$ErrorView - Viewing the potential values of
$ErrorView$Type = $ErrorView.GetType().FullName [System.Enum]::GetNames($Type) - Setting
$ErrorViewto'NormalView'and recreating the error$ErrorView = 'NormalView' & $SCRIPTFILENAME - Setting
$ErrorViewto'CategoryView'and recreating the error$ErrorView = 'CategoryView' & $SCRIPTFILENAME - Setting
$ErrorViewto its default value$ErrorView = 'ConciseView'
How it works...
In step 1, you create a script that contains a (deliberate) divide-by-zero error. This step creates the file, but creates no other output.
In step 2, you run the script from within VS Code, and view the resulting error, which looks like this:
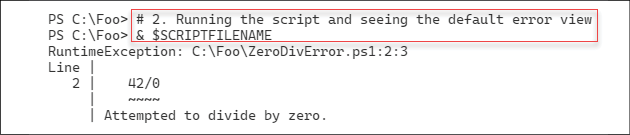
Figure 2.43: Running the script and viewing the error
In step 3, you create a divide-by-zero error from the command line. The output from this step looks like this:

Figure 2.44: Running the same line from the console
PowerShell 7 uses the built-in $ErrorView variable to hold the name of the error view PowerShell should use to display errors. In step 4, you view the current value of this variable, which looks like this:

Figure 2.45: Viewing the value of the $ErrorView variable
The $ErrorView variable can take one of three values, as you can see from the output of step 5:

Figure 2.46: Viewing the potential values of $ErrorView
In step 6, you set the value of $ErrorView to display the error using the output generated by Windows PowerShell and then re-view the error, which looks like this:
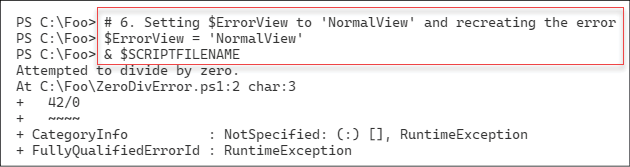
Figure 2.47: Setting $ErrorView to NormalView and recreating the error
In step 7, you set $ErrorView to display the error using CategoryView and then recreate the error. The output from this step shows the category error view:

Figure 2.48: Setting $ErrorView to CategoryView and recreating the error
In step 8, you reset the value of $ErrorView to the default value. This step creates no output.
There's more...
The concise error view you see in the output from step 2 contains all the information from the standard view that you can see in the output from step 7, except for the omission of the error category information. And if you invoke the error directly from the command line, as shown in step 3, you see only the error message, which is easier on the eyes.
In step 5, you view the error category information. In most cases, this is not particularly useful.
In step 8, you reset the value of $ErrorView. Depending on what you are doing, this step may not be needed. You can just exit the PowerShell console (or VS Code), and the next time you start PowerShell, it resets the value back to the default (ConciseView). And if you should prefer the normal or category error views, you can always set a value to $ErrorView in your profile file.
Although not shown in this recipe, you can use the Get-Error cmdlet to show you complete error information about a specific error. For most IT Professionals, the basic error information provided by PowerShell 7 is more than adequate (and a great improvement over error output with Windows PowerShell).
Exploring experimental features
During the development of PowerShell Core and later with PowerShell 7, the PowerShell team have routinely added new features. Some of these new features could, at least in theory, break existing scripts and are called "experimental." PowerShell does not, by default, enable any of these features. As shown in this recipe, you must enable them explicitly. This approach to experimental features enables you to test these new features and provide the PowerShell team with feedback. Should you find a feature that breaks a script for you, disable it. If you turn on (or turn off) an experimental feature, you need to restart PowerShell 7.
In general, experimental features are not intended to be used in production since the experimental features, by design, can be breaking. Also, experimental features are not officially supported. That being said, so far, these features have been very stable and reliable.
In this recipe, you look at the experimental features available in PowerShell 7.1 as released. If you are using later versions (for example, a PowerShell 7.2 preview release), you may see different experimental features. For a fuller look at PowerShell's experimental features, see https://docs.microsoft.com/powershell/module/microsoft.powershell.core/about/about_experimental_features.
Getting ready
You run this recipe on SRV1 after you install PowerShell 7 and/or Visual Studio Code, and once you have created a console profile file.
How to do it...
- Discovering the experimental features
Get-ExperimentalFeature -Name * | Format-Table Name, Enabled, Description -Wrap - Examining the "command not found" result with no experimental features available
Foo - Enabling one experimental feature as the current user
Get-ExperimentalFeature -Name * | Select-Object -First 1 | Enable-ExperimentalFeature -Scope CurrentUser -Verbose - Enabling one experimental feature for all users
Get-ExperimentalFeature -Name * | Select-Object -Skip 1 -First 1 | Enable-ExperimentalFeature -Scope AllUsers -Verbose - Starting a new PowerShell console
If you are using VS Code to run this recipe, enter Ctrl + Shift + ` to start a new terminal. If you are using the PowerShell 7 console, start a new copy of the console.
- Examining the experimental features
Get-ExperimentalFeature - Examining output from the "command not found" suggestion feature
Foo
How it works...
In step 1, you use the Get-ExperimentalFeature cmdlet to discover the available experimental features and their current state, which (by default) looks like this:
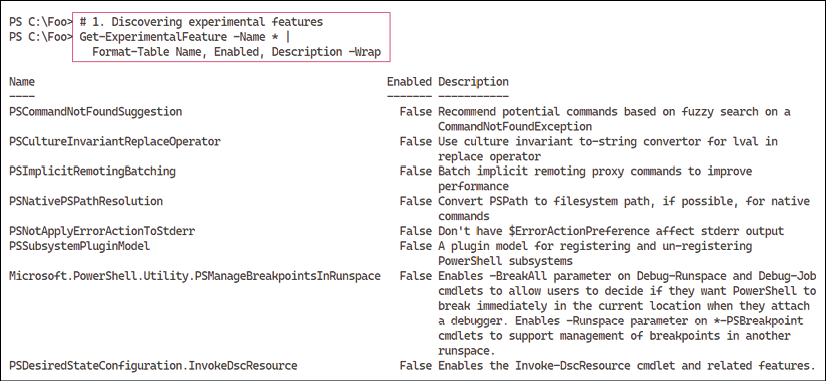
Figure 2.49: Discovering experimental features
To test out an experimental feature, in step 2, you run a non-existent command, with output such as this:

Figure 2.50: Examining the "command not found" result
In step 3, you enable the first feature, the PSCommandNotFoundSuggestion experimental feature for the current user, which looks like this:

Figure 2.51: Enabling an experimental feature for the current user
In step 4, you enable the second experimental feature, PSCultureInvariantReplaceOperator, which looks like this:

Figure 2.52: Enabling an experimental feature for all users
In step 5, you start a new version of PowerShell. This step produces no output as such.
In step 6, you examine the state of experimental features, noting that two new features are now available, which looks like this:
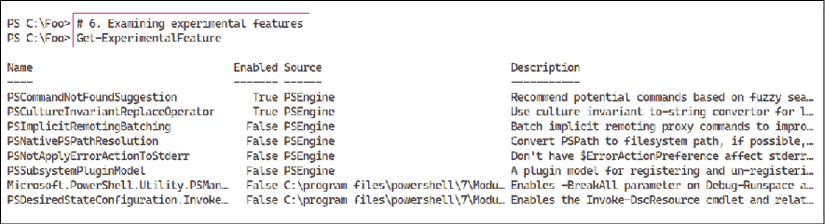
Figure 2.53: Examining experimental features
In step 7, you re-run the unknown command to observe the "command not found" suggestions, which look like this:

Figure 2.54: Examining the output from the "command not found" suggestion feature
There's more...
In this recipe, you turn on two experimental features and examine one ("command not found" suggestions). In most cases, you should be safe to enable all of the experimental features, but it is always safer to turn them on one by one and test your scripts carefully.
