


This chapter covers the following recipes:
- Exploring Remote Server Administration Tools (RSAT)
- Discovering new cmdlets in PowerShell 4 and Windows Server 2012 R2
- Discovering new cmdlets in PowerShell 5/5.1 and Windows Server 2016
- Exploring PowerShellGet
- Exploring PackageManagement
- Creating an internal PowerShell repository
Windows Server changes quickly, with a new release about every two years. Since the publication of the last edition of this book, Microsoft has delivered both Windows Server 2012 R2 and Windows Server 2016 (as well as client OS versions: Windows 8.1 and Windows 10).
PowerShell evolved alongside the server OS with a release of both PowerShell version 4, version 5, and version 5.1. This chapter reviews the changes in both the OS and PowerShell and highlights the biggest and most useful changes and new cmdlets.
This chapter also explores PowerShellGet and PackageManagement modules, perhaps the most interesting and useful new features released in PowerShell 5 and PowerShell 5.1.
Remote Server Administration Tools (RSAT) are tools available on both servers and client systems to manage server services. RSAT tools are available in Windows desktop and server versions. Most of the RSAT tools are not installed by default but are easily added.
RSAT includes GUI tools, like Microsoft Management Console (MMC) and MMC snap-ins (for example the DNS or DHCP MMC snap-ins) as well as command-line tools and additional PowerShell modules. You have the option of installing the Windows feature including the tools (most useful on a server), or just the tools to manage the feature (most useful on a workstation).
The recipe that follows is run from DC1, a Windows Server 2016 with Desktop Experience installation. If you try to use Server Core for this recipe, note that Out-GridView, for example in step 3, is not available in the Server Core version, as it lacks the graphical user interface. For Server Core installations, use Format-Table instead.)
- You use the
Get-Command, andTee-Objectcmdlets to retrieve both the collection of PowerShell commands and the number of cmdlets intoPowerShellvariablesbefore installing the RSAT:
$CountOfCommandsBeforeRSAT = Get-Command | Tee-Object -Variable 'CommandsBeforeRSAT' | Measure-Object '{0} commands' -f $CountOfCommandsBeforeRSAT.count
- Examine the objects returned by
Get-Command:
$CommandsBeforeRSAT |Get-Member | Select-Object -ExpandProperty TypeName -Unique
- View commands in
Out-GridView:
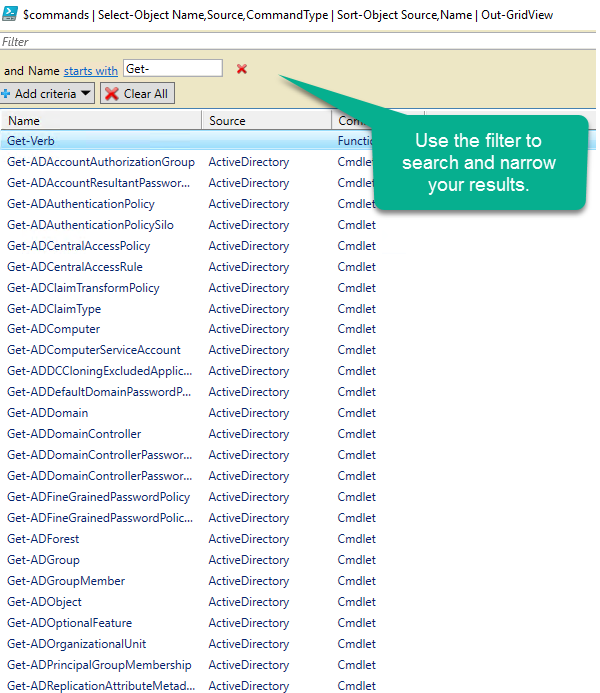
$CommandsBeforeRSAT | Select-Object -Property Name, Source, CommandType | Sort-Object -Property Source, Name | Out-GridView
Note
Out-GridView is not available in the Server Core version, as it lacks the graphical user interface. For Server Core installations, use Format-Table instead.
- Store the collection of PowerShell modules and a count into variables as well:
$CountOfModulesBeforeRSAT = Get-Module -ListAvailable | Tee-Object -Variable 'ModulesBeforeRSAT' | Measure-Object '{0} commands' -f $CountOfModulesBeforeRSAT.count
- View modules in
Out-GridView:
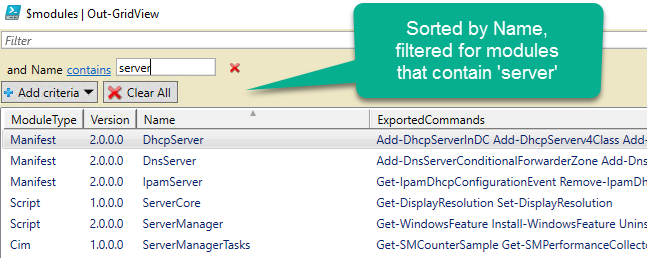
$ModulesBeforeRSAT | Select-Object -Property Name -Unique | Sort-Object -Property Name | Out-GridView
- Review the RSAT Windows Features available and their installation status:
Get-WindowsFeature -Name RSAT*- Install RSAT with sub features and management tools:
   Install-WindowsFeature -Name RSAT -IncludeAllSubFeature `
                             -IncludeManagementTools
- Now that RSAT features are installed, see what commands are available:
$CountOfCommandsAfterRSAT = Get-Command | Tee-Object -Variable 'CommandsAfterRSAT' | Measure-Object '{0} commands' -f $CountOfCommandsAfterRSAT.count
- View commands in
Out-GridView:
$CommandsAfterRSAT | Select-Object -Property Name, Source, CommandType | Sort-Object -Property Source, Name | Out-GridView
- Now check how many modules are available:
$CountOfModulesAfterRSAT = Get-Module -ListAvailable | Tee-Object -Variable 'ModulesAfterRSAT' | Measure-Object '{0} commands' -f $CountOfModulesAfterRSAT.count
- View modules in
Out-GridView:
      $ModulesAfterRSAT | Select-Object -Property Name -Unique |
         Sort-Object -Property Name |
            Out-GridView
- Store the list of commands into an XML file for later research:
      $CommandsAfterRSAT |
         Export-Clixml `
            -Path $env:HOMEPATH\Documents\WS2016Commands.XML"
In step 1, you use Get-Command to enumerate all the commands available in PowerShell. This includes functions and aliases. It is useful to store the result of such commands into a variable, $CommandsBeforeRSAT in this case, so you are able to investigate the commands without making the request again. Using Tee-Object, you store the array of commands in that variable while continuing to use the pipeline to Measure-Object to store the count of commands, then display the result using the PowerShell string formatting function: '{0} commands' -f $CountOfCommandsBeforeRSAT
In step 2, you pipe the $CommandsBeforeRSAT variable to Get-Member to examine the TypeName of the objects returned, as shown in the following screenshot:

As you see, these commands are objects of the AliasInfo, FunctionInfo, and CmdletInfo types in the System.Management.Automation namespace (plus a FilterInfo type, which provides information about a filter that is stored in the session state.) PowerShell commands returned by Get-Command include aliases, functions, and cmdlets.
In step 3, you use Select-Object to show the useful properties, and pipe that to a Sort-Object, then pipe to Out-GridView to search and filter the PowerShell commands, as you see in the following screenshot:
In step 4, you use Get-Module just like Get-Command, but use the -ListAvailable parameter to see all the installed modules, not just those loaded into the current session. Again you use Tee-Object to store the array of modules into a variable, $ModulesBeforeRSAT, while passing the result down the pipeline to Measure-Object to calculate the count which you then display.
In step 5, you pipe the variable to a Select-Object for the interesting columns, Sort-Object, then pipe that to Out-GridView again to review the available modules as shown here:
In step 6, you view the RSAT features available in your server with Get-WindowsFeature -Name RSAT*, as shown in the following screenshot:
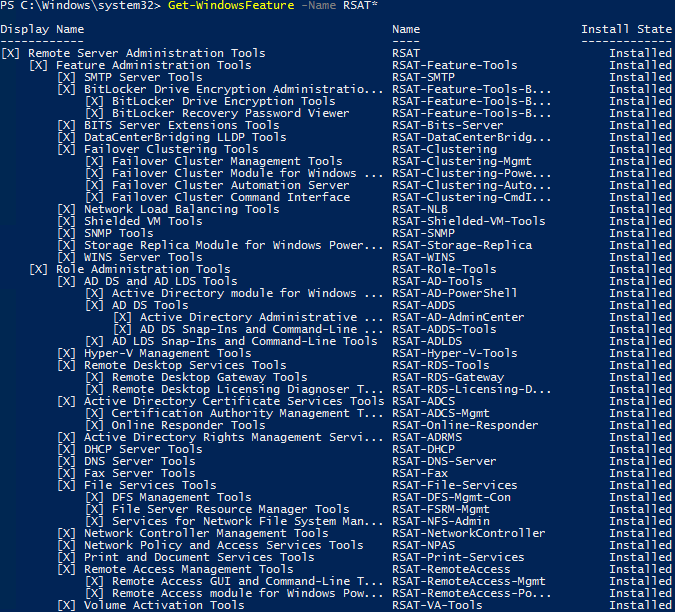
Get-WindowsFeature presents an information dense tree view of the RSAT tools available. Note the many sub-features under Remote Server Admin Tools and under Role Administration Tools. Each feature may be installed individually by name, or all features installed with one command as in this example.
In step 7, install all the RSAT features with the -IncludeAllSubFeature and-IncludeManagementTools parameters. You may limit what is installed by changing the first parameter to a comma separated list of desired feature names.
In steps 8-11, once the RSAT features are installed, repeat the Get-Command and Get-Modules code to see all the additional cmdlets and modules.
In step 12 you use Export-CliXML to store the array to an XML file. If you want to compare what is available in different OS and PowerShell versions, you use the array of objects saved to this file and compare it with an XML file generated under some other PowerShell or Windows versions.
Jose Barreto, a Principal Program Manager, Applications and Services Group at Microsoft, reviewed the new Windows Server 2016 cmdlets (based on Windows Server 2016 CTP). This post shows you how to use Export-CliXML to see what has changed between PowerShell versions:
PowerShell V4 and Server 2012 R2 added many new features to existing cmdlets but did not add many new cmdlets. A notable exception is Desired State Configuration (DSC) feature that debuted in PowerShell V4.
DSC is a set of language extensions that enable you to define computer configurations in a declarative fashion then apply that configuration to managed computers. DSC is a tool to provision or manage servers and to ensure those systems stay configured correctly. DSC provides a solution to the problem of configuration drift—computer configurations that change, often incorrectly, over time.
Get more information on DSC in Chapter 13, Using Desired State Configuration.
Two other useful cmdlets included in PowerShell V4 are:
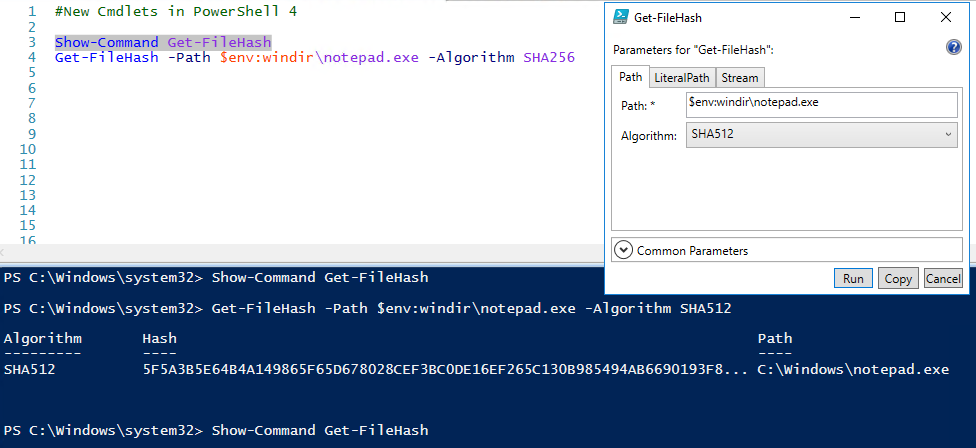
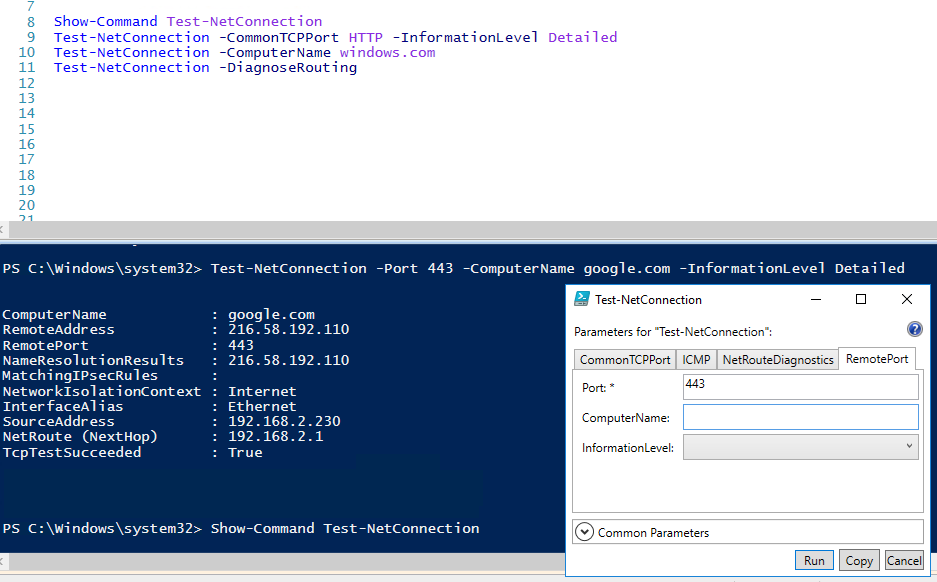
Get-FileHash: Creates a hash value from a given file or binary value. This is useful for quickly determining whether files have changed or for finding duplicate files (that have different file names)Test-NetConnection: Diagnoses a network connection and provides helpful troubleshooting information. This cmdlet is described in more detail in Chapter 8, Managing Windows Network Services.
- You use the
Show-Commandto investigate theGet-FileHashcmdlet:
Show-Command -Name Get-FileHashNote
Show0-Command is not available in the Server Core version, as it lacks the graphical user interface.
- In the dialog that pops up, the
Pathtab corresponds to one of three parameter sets for this command. For thePathtab, enter$Env:windirnotepad.exeor any other valid file path. - Choose an algorithm like
SHA512from the drop-down menu. - Click the
Copybutton then paste the command into your PowerShell ISE and press Enter to run it. Note the hash value that is returned. - Use
Show-Commandto investigateTest-NetConnection:
Show-Command -Name Test-NetConnection- In the dialog box, the
CommonTCPPorttab corresponds to the default parameter set, the first of four. ChooseHTTPfrom theCommonTCPPortdrop-down, and chooseDetailedforInformationLevel. Then clickCopy, and paste the script into your editor below theShow-Commandline, then close theShow-Commandwindow. Select this line and press F8 to run this line.
- Repeat your call to
Show-Command -Name Test-NetConnection. Choose theICMPtab and enter a valid internet hostname likeWindows.Comin theComputerNamefield, or leave it blank, and chooseDetailedforInformationLevel. - Click the
Copybutton then paste the command into your PowerShell ISE below the previous command, then close theShow-Commandwindow and select the line and press F8 to run it. - Repeat your call to
Show-Command Name Test-NetConnection. Choose theNetRouteDiagnosticstab, check the box forDiagnoseRouting, and clickRun. - Repeat your call to
Show-Command -Name Test-NetConnection. Choose theRemotePorttab, enter443for thePort, and chooseDetailedforInformationLevel, and clickRun.
In step 1, you use Show-Command to provide a graphical interface to explore new commands like Get-FileHash or new ways to use commands you know. It is the same interface that displays in the Commands tab in PowerShell ISE, and the interface is programmatically generated from the parameter definitions in the cmdlet or function, so it works with commands you create or install from outside sources.
In steps 2 and 3, choosing the Path tab corresponds to a parameter set defined in the command; each parameter set may have different required and optional parameters, represented by check boxes, drop-down menus, or text fields. This parameter set requires the Path and Algorithm parameters.
In step 4, the Copy button puts a syntax-correct command on our clipboard, either to be run as is or added to a script and modified. This is a very useful feature for new PowerShell scripters or those working with unfamiliar commands. The result of the command displays in the console, but it could be stored into a variable for comparison with other hash values to look for duplicate or changed files:
In steps 5 and 6, you use Show-Command to explore the Test-NetConnection cmdlet. This is a flexible and useful troubleshooting command with four parameter sets to use. First, test the connection to a web host over HTTP port 80. Note the -InformationLevel Detailed parameter provides additional troubleshooting information on the connectivity.
In steps 7 and 8, you use the ICMP parameter set with the -InformationLevel Detailed parameter to ping, using ICMP echo request, a web server. This is different to the earlier steps—here you are just determining whether the target server is responding to echo requests. Some web servers turn off returning of pings, so you may see a server that doesn't respond to a ping but does allow a port 80 HTTP connection.
In step 9, you use the NetRouteDiagnostics parameter set with the -DiagnoseRouting parameter, which was introduced in PowerShell 5.1, to get routing information. Here when you click the Run button, the result displays in the console window.
In step 10, you specify a RemotePort parameter set with a specified Port and ComputerName to test:
Both Server 2012 R2 and PowerShell V4 introduced many new features and added enhancements to existing features. This included the Hyper-V, SmbShare, and BranchCache features, all of which were improved. These features came with PowerShell modules that enable you to leverage these features using PowerShell. Get more information on the modules that support the 2012 R2 features at https://technet.microsoft.com/en-us/library/dn249523.aspx.
PowerShell V5, PowerShell V5.1, and Windows Server 2016 also added new features.
Run the commands in the following recipe on a Windows Server 2016 with Desktop Experience version.
PowerShellGet, formerly known as OneGet, is a module that provides you with a simple way to discover, install, and update PowerShell modules and scripts. It has dependencies on the PackageManagement module, which relies on NuGet. It is an open source project, located at https://github.com/powershell/powershellget.
Refer to Explore PowerShellGet recipe.
The cmdlets in the PackageManagement module provide a single interface for software publication, discovery, installation, and inventory.
Refer to the following recipe:
- Explore PackageManagement
- Create a PackageManagement repository
The Microsoft.Powershell.Archive module contains two useful functions: Compress-Archive and Expand-Archive. These enable you to create and extract ZIP files. With previous versions of PowerShell versions, you managed archives by using the System.IO.Compression namespace from the .Net framework, the Shell.Application com object or software like 7-Zip.
The Microsoft.PowerShell.Utility module contains several new cmdlets useful for debugging interactively and within runspaces.
Debugging and runspace Cmdlets include: Get-Runspace, Debug-Runspace, Get-RunspaceDebug, Enable-RunspaceDebug, and Disable-RunspaceDebug, Wait-Debugger, Debug-Job.
These cmdlets enable debugging PowerShell scripts within runspaces and jobs and add additional debugging features for debugging production PowerShell interactively.
Other new modules in this version of PowerShell (and where to find more information about each module) include:
Module | Description | Documentation |
| Manage the configurable code integrity policy for Windows | |
| Manage Windows defender | |
| Manage event tracing for Windows providers and sessions | |
| Manage the host guardian service, for shielded Hyper-V guest machines. | https://technet.microsoft.com/en-us/library/dn914505.aspxhttps://technet.microsoft.com/en-us/library/mt791280.aspxhttps://technet.microsoft.com/en-us/library/mt282520.aspx |
|
| |
| Manage the new network controller role in Server 2016 | |
| Manage supported network switches in Server 2016 | |
| Manage unit tests for PowerShell modules and cmdlets | |
| Cmdlets for managing plug and play devices | |
| Support new storage functionality in Server 2016. | https://technet.microsoft.com/en-us/library/mt608557.aspxhttps://technet.microsoft.com/en-us/library/mt744543.aspx |
Some other useful cmdlets included are:
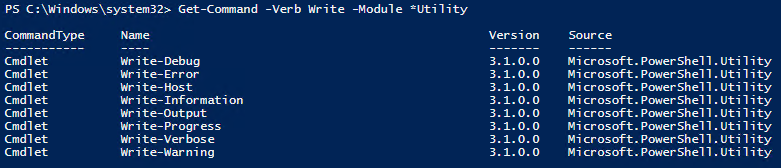
Write-Information: A replacement for theWrite-Hostcmdlet that is consistent with the otherWrite-*cmdlets in theMicrosoft.PowerShell.Utilitynamespace. See https://blogs.technet.microsoft.com/heyscriptingguy/2015/07/04/weekend-scripter-welcome-to-the-powershell-information-stream/.ConvertFrom-StringandConvert-String: The new string parsing functions that create structured data from strings, or parse out string data into structured data. See https://blogs.msdn.microsoft.com/powershell/2014/10/31/convertfrom-string-example-based-text-parsing/.Format-Hex: This cmdlet formats information into hexadecimal.Get-ClipboardandSet-Clipboard: A cmdlet to simplify working with the clipboard, replacing piping toclip.exe.Clear-RecycleBin: This cmdlet empties theRecycle Bin.New-TemporaryFile: Simplifies the creation of temporary files within PowerShell scripts.New-Guid: A wrapper for[GUID]::NewGuid()to simplify the creation of Globally Unique Identifiers (GUIDs). A GUID is an identifier, unique in space and time, that you use in a variety of scenarios. System Center Virtual Machine Manager, for example, uses GUIDs in jobs created by the UI.Enter-PSHostProcessandExit-PSHostProcess: These enable you to debug PowerShell processes outside the current host process.Export-ODataEndpointProxy: This cmdlet generates a wrapper module for working with an OData endpoint. See https://msdn.microsoft.com/en-us/powershell/reference/5.1/microsoft.powershell.odatautils/microsoft.powershell.odatautils.
Explore some of these cmdlets here and in later chapters as well.
- Investigate
Write-Informationby looking at theWrite-*commands, and help for theabout_Redirectiontopic:
Get-Command -Verb Write -Module *Utility Get-Help about_Redirection -ShowWindow
- Use
Write-Information:
Write-Information "Test"- This produces no output. To resolve, you should inspect and change the
$InformationPreferencevariable:
Get-Variable "InformationPreference" Set-Variable -Name "InformationPreference" -Value "Continue"
- Use
Write-Informationagain:
Write-Information "Test"- Next, set
$InformationPreferenceback to default value:
$InformationPreference = "SilentlyContinue"- Review the information-related options in the CommonParameters of each command:
Show-Command Get-Item- Use
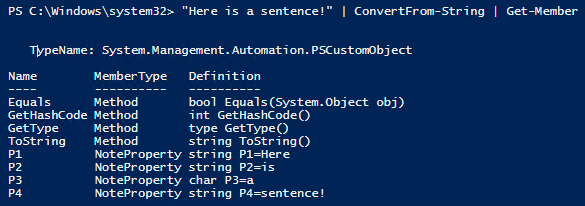
ConvertFrom-Stringto get objects from strings;NotePropertiesare created with default names:
"Here is a sentence!" | ConvertFrom-String "Here is a sentence!" | ConvertFrom-String | Get-Member
- Use
-PropertyNamesto control the names:
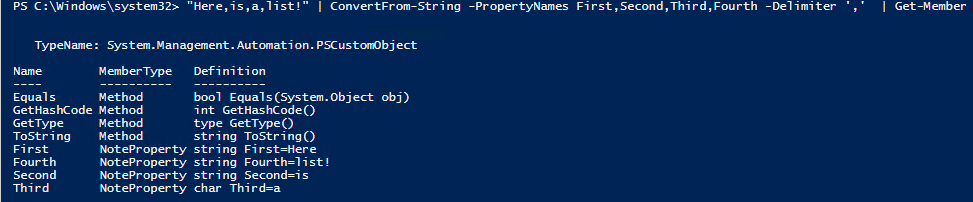
  "Here is a sentence!" |
         ConvertFrom-String -PropertyNames First,Second,
                                       Third,Fourth
- Use
-Delimiterto get items from a list:
      "Here,is,a,list!" |
         ConvertFrom-String -PropertyNames First,Second,
                                       Third,Fourth `
                            -Delimiter ','
- You next test the template capabilities of
ConvertFrom-String:
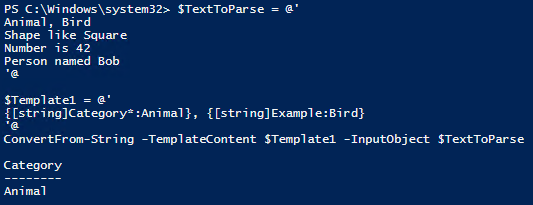
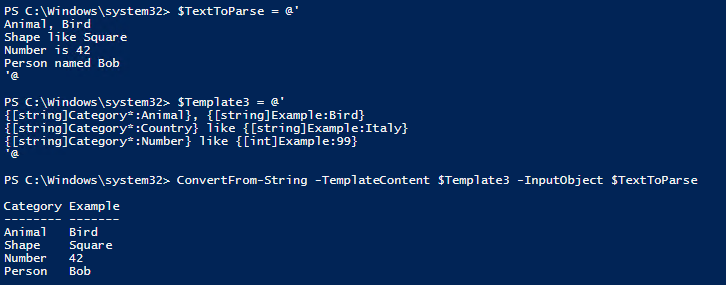
      $TextToParse = @'
      Animal, Bird
      Shape like Square
      Number is 42
      Person named Bob
      '@$Template1 = @'
      {[string]Category*:Animal}, {[string]Example:Bird}
      '@ConvertFrom-String -TemplateContent $Template1 `
                           -InputObject $TextToParse
ConvertFrom-Stringrecognizes only one line from the text—the template needs more examples to train the function, so add a second example to the template and test:
      $Template2 = @'
      {[string]Category*:Animal}, {[string]Example:Bird}
      {[string]Category*:Country} like {[string]Example:Italy}
      '@
      ConvertFrom-String -TemplateContent $Template2 `
                         -InputObject $TextToParse
- Note three lines are recognized, even the last line that is unusual. Adding another example to our template trains the function enough to recognize all four lines:
      $Template3 = @'
      {[string]Category*:Animal}, {[string]Example:Bird}
      {[string]Category*:Country} like {[string]Example:Italy}
      {[string]Category*:Number} like {[int]Example:99}
      '@
      ConvertFrom-String -TemplateContent $Template3 `
                         -InputObject $TextToParse
- Experiment with
Format-Hexto output values in hexadecimal:
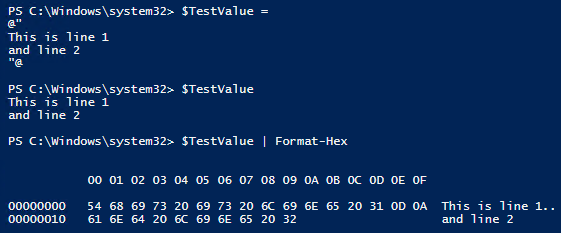
$TestValue = @" This is line 1 and line 2 "@ $TestValue | Format-Hex
- Experiment with
Get-ClipBoardandSet-Clipboardby selecting some text, then press Ctrl+C to copy to clipboard, then inspect the clipboard:
#Select this line and press Control-C to copy to clipboard $Value = Get-Clipboard $Value
- Use
Set-Clipboardto replace the clipboard value, then Ctrl+V to paste that new value:
$NewValue = "#Paste This!" $NewValue | Set-Clipboard #Press Control-V to paste!
In step 1, you get the commands with the Write verb in the Microsoft.PowerShell.Utility module. Write-Information is an addition to this module that writes out to a new information stream, which the about_Redirection help topic describes in detail:
In steps 2-5, note that messages from Write-Information are not displayed by default. The $InformationPreference variable controls this behaviour within your PowerShell session.
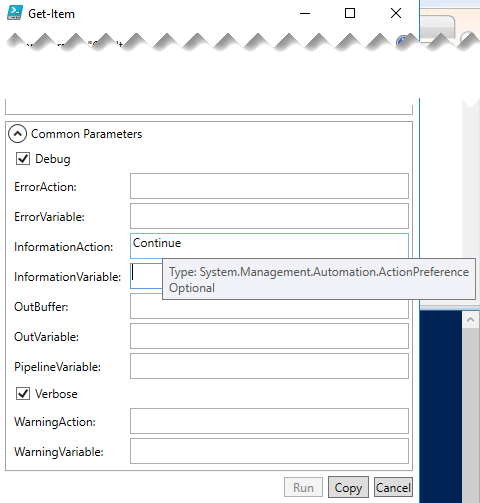
In step 6, you'll see the CommonParameters now include InformationAction and InformationVariable
More information is available in Get-Help about_CommonParameters:
In step 7 you create a PSCustomObject using ConvertFrom-String with NoteProperties named P1, P2, P3, and P4 that correspond to words separated by whitespace from the input text, with string or char data types:
In step 8, you control the names of the NoteProperties. In step 9 you change the delimiter from the default of whitespace to a comma, thus parsing a comma separated list:
In step 10, you investigate the -TemplateObject parameter to parse inconsistently formatted data. Here you provide one or more patterns by example in the TemplateObject and provide the template along with the text to parse. The template starts with one line as an example, and initially recognizes only one line out of four in the text to match:
In steps 11 and steps 12, you improve the template with each attempt, achieving complete matching results from the Convert-FromString:
In step 13, you use Format-Hex on a here string that contains two lines of text. Note the 0D 0A bytes corresponding to carriage return and line feed (CRLF) between lines:
In step 14 and step 15, you work with Set-Clipboard and Get-Clipboard. By copying any text with Ctrl+C, you then capture that value into a variable with Get-Clipboard. You use Set-Clipboard to change that value, and use Ctrl+V to verify the change.
Each PowerShell release comes with release notes that dive into the details of changes introduced with that version. These pages are updated with community contributions, as PowerShell is now partially open source:
- WMF 5.0 Release Notes: https://msdn.microsoft.com/en-us/powershell/wmf/5.0/releasenotes
- WMF 5.1 Release Notes: https://msdn.microsoft.com/en-us/powershell/wmf/5.1/release-notes
The documentation is published on GitHub and accepts contributions from users via pull-requests so users may help improve the documentation. You'll find PowerShell documentation on GitHub at https://github.com/PowerShell/PowerShell-Docs.
Complete documentation is available on TechNet, see the Windows 10 and Server 2016 PowerShell module reference at https://technet.microsoft.com/en-us/library/mt156917.aspx.
The PowerShellGet module enables you to work with repositories, sites which contain scripts and modules to download and use. If you have a Linux background, you are familiar with repositories and tools like apt-get (On Ubuntu Linux) and RPM (on Red Hat Linux). PowerShellGet delivers similar functionality within PowerShell.
Note
Ensure you're running with administrator privileges so you can update PowerShellGet to the latest version.
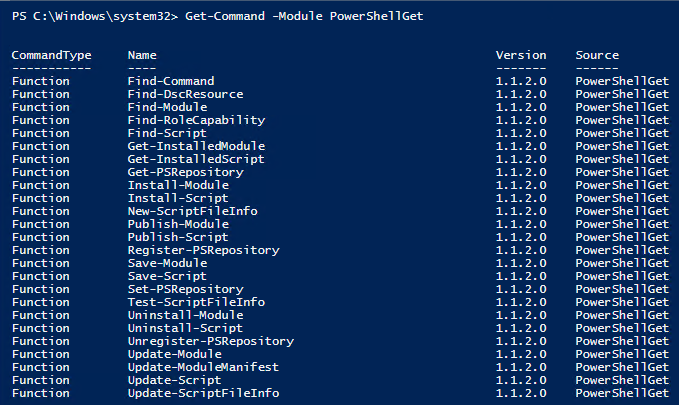
- You begin by reviewing the commands available in the
PowerShellGetmodule:
Get-Command -Module PowerShellGet- Before moving on, you should update to the latest
NuGetto get thePackageManagementmodule current, then update thePowerShellGetmodule per the GitHub instructions at https://github.com/powershell/powershellget.PowerShellGethas a dependency onPackageManagement, which in turn relies onNuGet.PowerShellGetandPackageMangagementboth come within Windows 10 and Server 2016, but Windows updates are less frequent than releases at the PowerShell gallery. Updating ensures you have the latest versions of all the dependencies. To updateNuGet:
Install-PackageProvider -Name NuGet -Force -Verbose- Close your PowerShell session by running
Exitand open a new PowerShell session. - Check the version of the
NuGetPackageProvider:
Get-PackageProvider -Name NuGet | Select-Object Version
- Update
PowerShellGet:
Install-Module -Name PowerShellGet -Force- Close your PowerShell session by running
Exitand reopen it again. - Check the version of
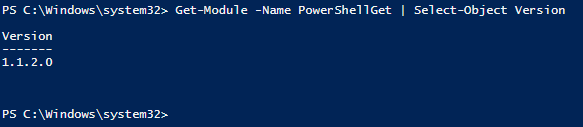
PowerShellGet:
Get-Module -Name PowerShellGet | Select-Object -ExpandProperty Version
- View the default
PSGalleryrepository forPowerShellGet:
Get-PSRepository- Review the various providers in the repository:
Find-PackageProvider | Select-Object -Property Name, Source, Summary | Format-Table -Wrap -AutoSize
- View available providers with packages in
PSGallery:
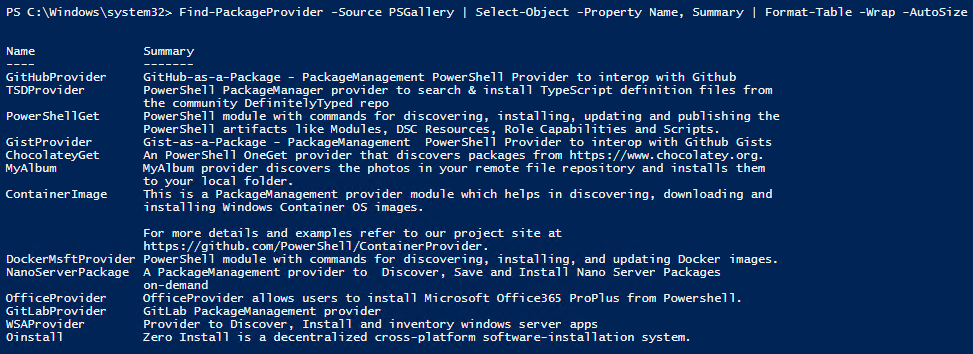
Find-PackageProvider -Source PSGallery | Select-Object -Property Name, Summary | Format-Table -Wrap -AutoSize
- Use the
Get-Commandcmdlet to find cmdlets inPowerShellGet:
Get-Command -Module PowerShellGet -Verb Find- Request all the commands in the
PowerShellGetmodule, store them in a variable, and store the count as well:
      $CommandCount = Find-Command |
         Tee-Object -Variable 'Commands' |
            Measure-Object
      "{0} commands available in PowerShellGet" `
                              -f $CommandCount.Count
- Review the commands in
Out-GridViewand note the module names:
$Commands | Out-GridView- Request all the available
PowerShellGetmodules, store them in a variable and store the count as well:
      $ModuleCount = Find-Module |
         Tee-Object -Variable 'Modules' |
            Measure-Object
      "{0} Modules available in PowerShellGet" -f $ModuleCount.Count
- Review the modules in
Out-GridView:
$Modules | Out-GridView- Request all available DSC resources, store them in a variable, and view them in
Out-GridView:
    $DSCResourceCount = Find-DSCResource |
         Tee-Object -Variable 'DSCResources' |
            Measure-Object
      "{0} DSCResources available in PowerShellGet" -f `
                              $DSCResourceCount.Count
      $DSCResources | Out-GridView
- Find the available scripts and store them in a variable. Then view them using
Out-GridView:
      $ScriptCount = Find-Script |
         Tee-Object -Variable 'Scripts' |
            Measure-Object
      "{0} Scripts available in PowerShellGet" -f $ScriptCount.Count
       $Scripts | Out-GridView
- When you discover a module you would like to simply install the module. This functionality is similar for
Scripts,DSCResources, and so on:
Get-Command -Module PowerShellGet -Verb Install- Install the
TreeSizemodule, as an example, or choose your own. As this is a public repository, Windows does not trust it by default, so you must approve the installation:
Install-Module -Name TreeSize -Verbose- If you choose to trust this repository, set the
InstallationPolicytoTrusted, and you'll no longer need to confirm each installation: Use at your own risk, you are responsible for all software you install on servers you manage:
Set-PSRepository -Name PSGallery -InstallationPolicy Trusted- Review and test the commands in the module:
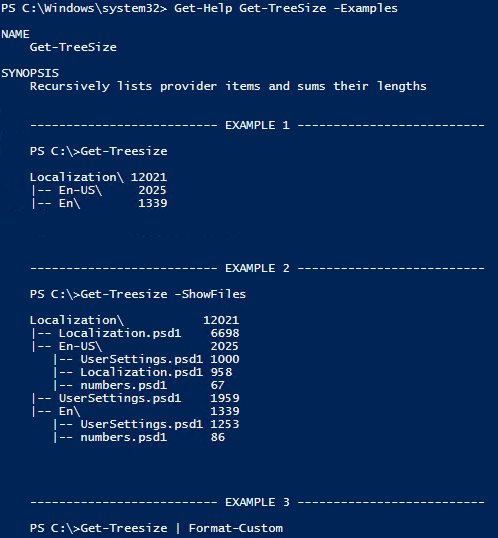
Get-Command -Module TreeSize Get-Help Get-TreeSize -Examples Get-TreeSize -Path $env:TEMP -Depth 1
- Remove the module just as easily:
Uninstall-Module -Name TreeSize -Verbose- If you would like to inspect the code before installation, download and review the module code:
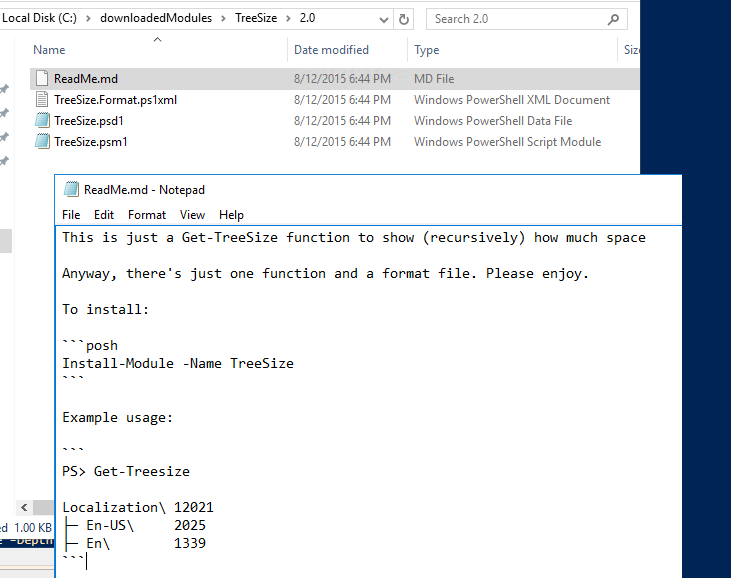
      New-Item -ItemType Directory `
               -Path $env:HOMEDRIVE\downloadedModules
      Save-Module -Name TreeSize `
               -Path $env:HOMEDRIVE\downloadedModules” +
                     "$env:windirexplorer.exe"
      $env:HOMEDRIVE\downloadedModules
- Import the downloaded module:
      $ModuleFolder = "$env:HOMEDRIVE\downloadedModules\TreeSize"
      Get-ChildItem -Path $ModuleFolder -Filter *.psm1 -Recurse |
         Select-Object -ExpandProperty FullName -First 1 |
            Import-Module -Verbose
- When you are done with discovering the new module, you can remove it from your system:
Remove-Module -Name TreeSize $ModuleFolder | Remove-Item -Recurse -Force
In step 1, you start by reviewing the cmdlets in the PowerShellGet module:
In steps 2-7, you ensure PowerShellGet and its dependency PackageManagement are up to date by updating the NuGet provider, verifying the version, then restarting your PowerShell session and updating PowerShellGet and verifying its version.

The -Verbose flag gives you more details on the installation, but it is not required. Note that you must Exit your session after running this command and reopen to continue with the latest version.
Check our NuGet provider version after reopening our PowerShell session:

In step 6-7, you update the PowerShellGetmodule:

Note that you must exit your session after running this command and reopen to continue with the latest version.
In step 8, check your PowerShellGet version after reopening your PowerShell session:
In step 9, you use Get-PSRepository. PowerShellGet starts with a single repository PSGallery installed by default:

In step 10, review the package providers available:
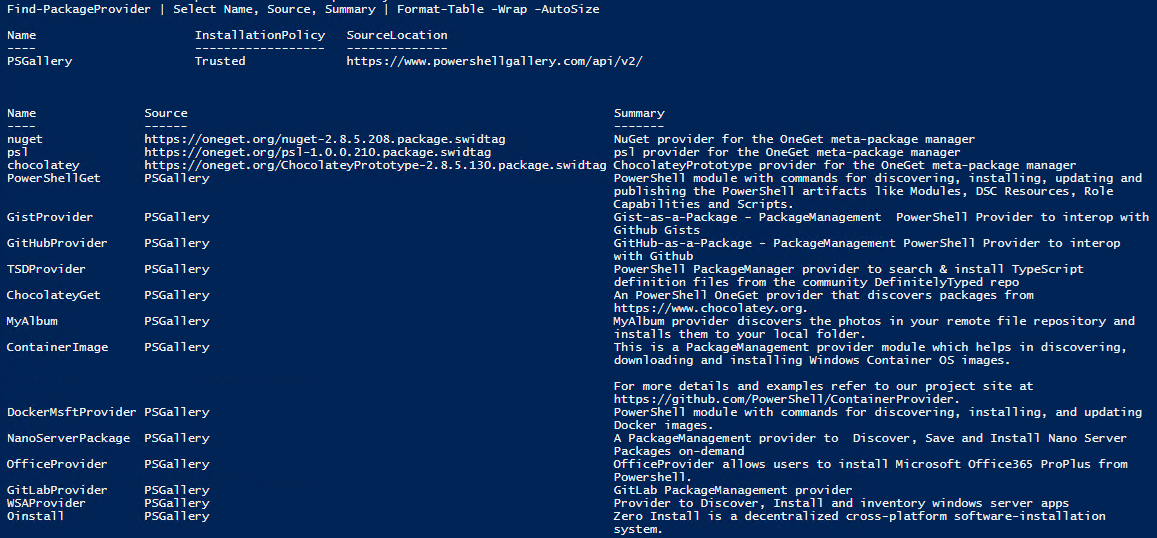
Note the source column; the first three providers listed correspond to NuGet, OneGet, and Chocolatey providers. NuGet is a repository devoted to developer libraries. OneGet was the name of this module (and repository) but has been deprecated and replaced by PackageManagement. You explore Chocolatey in a later recipe. The remaining rows are the available providers in the PSGallery repository.
In step 11, you limit your repository search with Find-PSRepository by specifying the -Source PSGallery parameter:
In step 12, you discover the PowerShellGet commands containing the verb Find:

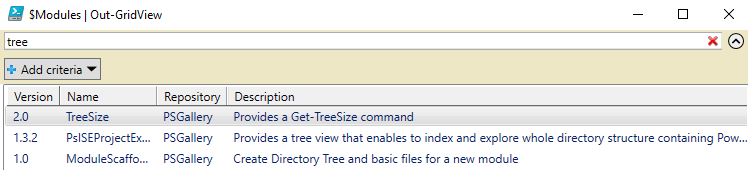
In steps 13 - 18, you use the Find-* commands to store the available commands, modules, DSC resources, and scripts into variables, then explore what is available using Out-GridView (including using the built-in filter capability to search for a module), for example:
In step 19, you review the install commands in the PowerShellGet module. Their functions are very similar:

In step 20, the TreeSize module looks like an interesting tool to inspect folders and their sizes. Install it by using the Install-Module cmdlet. You use the -Verbose switch to get more information about what the cmdlet is doing:
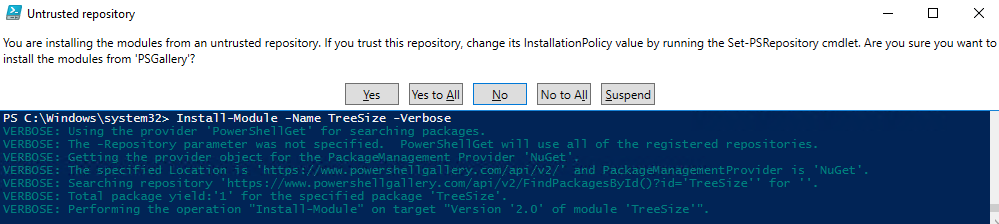
After confirming the Untrusted repository pop up dialog, PowerShell installs the module.
In step 21, you see that the code available on PSGallery, as well as other public repositories, is just that, public. You must choose to trust the code you download from the internet to take advantage of the functionality provided by that code. To trust this repository and disable prompting, use the command (at your own risk and responsibility):
Set-PSRepository -Name PSGallery -InstallationPolicy TrustedIn step 22, you evaluate and test the module:
In step 23, uninstalling a module is simple:

In step 24, if you prefer, download code and inspect it before installing, using Save-Module, then browse the module's files in Windows Explorer:
In step 25, after reviewing the code, import the module by locating the .psm1 file which defines the module, using Get-ChildItem, then piping that filename to Import-Module:

In step 26, you uninstall the module from your session and delete the module's folder. You may, of course, wish to keep the module!
There are a wealth of other resources in the PSGallery—you use the Find-* cmdlets to explore the online resources you can download and use:

The PowerShellGet module enables search for commands, DSC resources, modules, role capabilities, a feature of Just Enough Administration (JEA), and scripts. You can download and use these various tools, or leverage them to build your own custom scripts.
PowerShellGet is a powerful resource for PowerShell, built on top of the core PackageManagement capabilities of PowerShell 5. It is one of many PackageManagment providers available, as shown here:
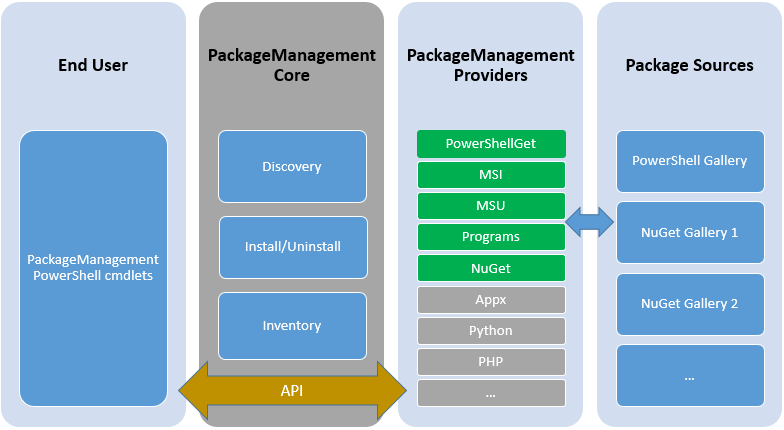
Image Source: https://blogs.technet.microsoft.com/packagemanagement/2015/04/28/introducing-packagemanagement-in-windows-10/
PackageManagement is a unified interface for software package management systems, a tool to manage package managers. You use the PackageManagement cmdlets to perform software discovery, installation, and inventory (SDII) tasks. PackageManagement involves working with package providers, package sources, and the software packages themselves.
Within the PackageManagement architecture, PackageManagement providers represent the various software installers that provide a means to distribute software via a standard plug-in model using the PackageManagement APIs. Each PackageManagement provider manages one or more package sources or software repositories. Providers may be publicly available or can be created within an organization to enable developers and system administrators to publish or install propriety or curated software packages.
PackageManagement Core is effectively an API. The core includes a set of PowerShell cmdlets that enable you to discover available software packages, as well as to install, uninstall, update, and inventory packages using PackageManagement.
Each PackageManagement provider is a different installer technology or package manager that plugs-in via the PackageManagement API. PowerShellGet, NuGet, and Chocolatey are examples of PackageManagement providers.
Each provider is made up of one or more sources, which may be public or private. For example, NuGet has a public source, but your organization may add private sources for the NuGet provider, enabling curation of approved software to make it available to corporate developers.
You use the cmdlets within the PackageManagement module to explore the capabilities it provides.
- Review the cmdlets in the
PackageManagementmodule:
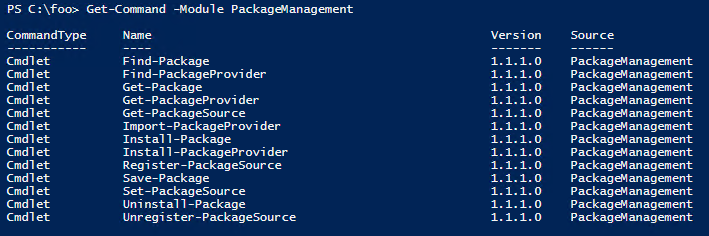
Get-Command -Module PackageManagement- Review the installed providers with
Get-PackageProvider:
Get-PackageProvider | Select-Object -Property Name, Version- The provider list includes
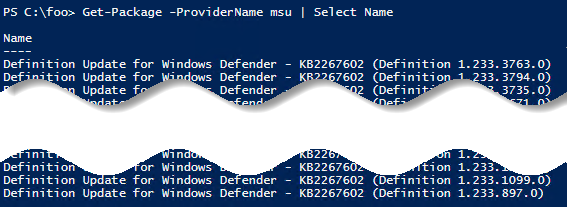
msi,msu, andProgramspackage providers. These providers expose applications and updates installed on your computer which you can explore:
      Get-Package -ProviderName msi |
         Select-Object -ExpandProperty Name
      Get-Package -ProviderName msu |
         Select-Object -ExpandProperty Name
      Get-Package -ProviderName Programs |
         Select-Object -ExpandProperty Name
- The
NuGetsource contains developer library packages. This functionality is outside the scope of this book, but worth exploring if you do Windows or web development:
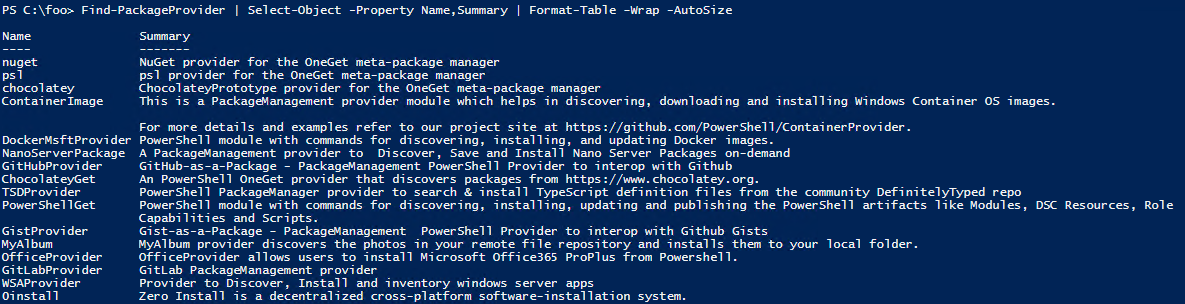
Get-PackageProvider -Name NuGet- There are also other package providers you can explore:
     Find-PackageProvider |
         Select-Object -Property Name,Summary |
             Format-Table -Wrap -AutoSize
- Notice
Chocolatey, which is a very useful tool for Windows administrators and power users. Those with some Linux background may think ofChocolateyasapt-getfor Windows. You cannot use this provider until you install it and confirm the installation:
Install-PackageProvider -Name Chocolatey -Verbose- Verify
Chocolateyis now in the list of installed providers:
Get-PackageProvider | Select-Object Name,Version- Look for available software packages from the
Chocolateypackage provider. Store these in a variable so you don't request the collection more than once, and explore it:
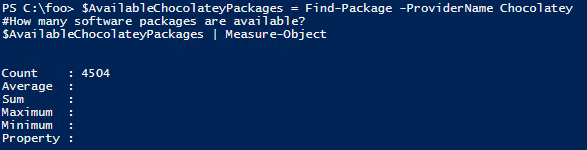
      $AvailableChocolateyPackages = `
          Find-Package -ProviderName Chocolatey
      # How many software packages are available at Chocolatey?
      $AvailableChocolateyPackages | Measure-Object
- Pipe to
Out-GridViewto search for interesting software packages fromChocolatey:
      $AvailableChocolateyPackages |
         Sort-Object Name,Version |
            Select-Object Name, Version, Summary |
               Out-GridView
- Install one or more packages.
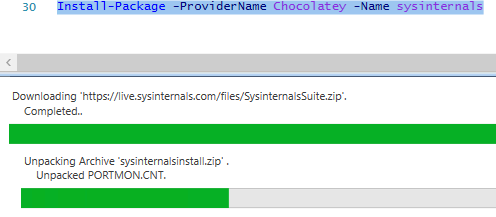
sysinternalsis a good example to use. Use-Verboseto get details on the installation:
    Install-Package -ProviderName Chocolatey `
                      -Name sysinternals `
                      -Verbose
- Review installed
Chocolateypackages, stored toC:\chocolatey\by default, this path is stored in the$env:ChocolateyPathenvironment variable. Then review the executable files included with thesysinternalspackage:
      Get-ChildItem -Path $env:ChocolateyPath\lib |
         Select-Object -Property Name
      Get-ChildItem -Path `
         $env:ChocolateyPath\lib\sysinternals.2016.11.18\tools `
                    -Filter *.exe |
         Select-Object -Property Name
- Run any installed command included with
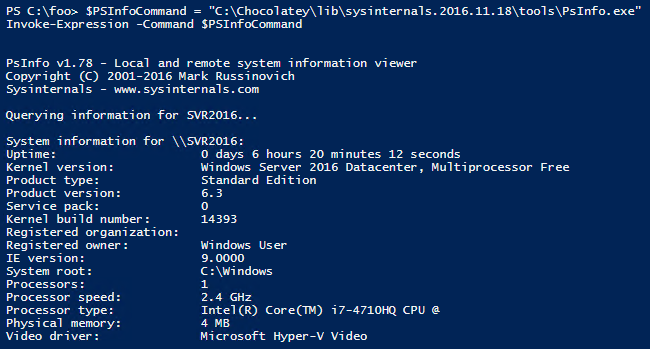
sysinternals:
      $PSInfoCommand = `
      ‘C:\Chocolatey\lib\sysinternals.2016.11.18\tools\PsInfo.exe’
      Invoke-Expression -Command $PSInfoCommand
- Installed packages are enumerated with
Get-Packageand updated using the same command to install them,Install-Package:
  Get-Package -ProviderName Chocolatey |
Install-Package -VerboseIn step 1, you review the cmdlets available in the PackageManagement module:
In step 2, you use the Get-PackageProvider cmdlets to display the currently installed package providers:
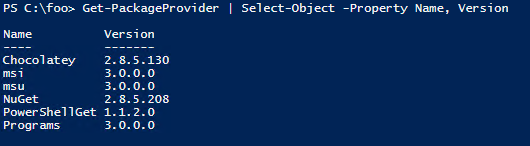
In step 3, you use Get-Package with the -ProviderName parameter to review packages installed via the msi, msu, and Programs package providers:
In step 4, review the NuGet provider:

In step 5, search for other package providers:
In step 6, you use Install-PackageProvider to install the Chocolatey provider. Since it is untrusted as a public source, you must approve the installation (at your own risk and responsibility):

In this example, you run Install-PackageProvider from within the ISE. By default, this pops up a confirmation dialog. If you run this cmdlet from the PowerShell console, you see a prompt there. You can suppress these confirmation requests by including the parameter -Confirm:$False.
In step 7, you verify Chocolatey is now installed as a package provider:
In step 8, retrieve a list of available software packages from the ChocolateyPackageProvider, store as a variable, and count the available packages:
In step 9, pipe the variable to Out-GridView and use the filter feature to explore what is available. This example is filtering for the Sysinternals package:

In step 10, you install this package (or any package you choose):
In step 11, you review the installed Chocolatey packages, and the files contained within the sysinternals package folder:

In step 12, run any Sysinternals command, for example, PsInfo.Exe :
In step 13, you enumerate the installed packages with Get-Package. As time goes by, packages can be updated with bug fixes, new features, and so on. You can update all the installed packages if any updates exist, as follows:

Details of NuGet package and its functionality are outside the scope of this book, but worth exploring if you do Windows or web development. More information on NuGet packages is available from https://www.nuget.org/Packages.
Chocolatey has both a command-line interface and a PowerShell module. The command line interface offers functionality comparable to the PackageManagement module, targeted toward end users and system administrators. Chocolatey is supported on any Windows PC running Windows 7 or later. You can get more information on installing and using Chocolatey via the command line from https://chocolatey.org/install.
Sysinternals is a must-have toolkit for Windows administrators. You can find additional training on the Sysinternals tools on the Channel 9 website at https://channel9.msdn.com/Series/sysinternals.
It is useful to create your own PowerShell repository for personal or corporate use. The tools to enable you to build your own repository are not included in PowerShell. There are three main approaches available that enable you to build a repository:
- Using Visual Studio's
NuGetpackage manager to download and install theNuget.Serverpackage into a new web project, and deploy to your own IIS Server. This option is free. However, you need to use Visual Studio 2015 (Either the full version or the free community edition) to create your own web project, download theNugetserver software, and deploy it into your environment. More information is available at https://www.nuget.org/packages/NuGet.Server. - Using a third-party
NuGethost's SAAS platform. This is the simplest solution, but software licensing fees may apply, and some organizations might have reservations about keeping the code on external servers. Choices for this approach include Visual Studio Team Services, http://myget.org/, and ProGet. - Installing a 3rd-party
NuGetsoftware repository on your server. This simplifies the setup process for hosting your own software repository, but software licensing fees may apply.
Note
More information is available on hosting from the NuGet site at https://docs.nuget.org/ndocs/hosting-packages/overview.
The simplest approach to setting up your own software repository is to install and configure the free or trial version of ProGet. Do so via a GUI installation—the steps are described at https://inedo.com/support/documentation/proget/installation/installation-guide.
You have the choice of using an existing SQL Server instance or installing SQL Express as part of the installation. SQL is used to hold the repository's data. You may also choose to install your repository to an existing IIS Server or install ProGet with its own internal web server.
Inedo also provides a PowerShell script to perform the installation, which you may customize. For the script based installation, you need to register for a free license key at https://my.inedo.com.
Note
You can find more information on using ProGet from the Inedo web site athttps://inedo.com/support/kb/1088/using-powershell-to-install-and-configure-proget.
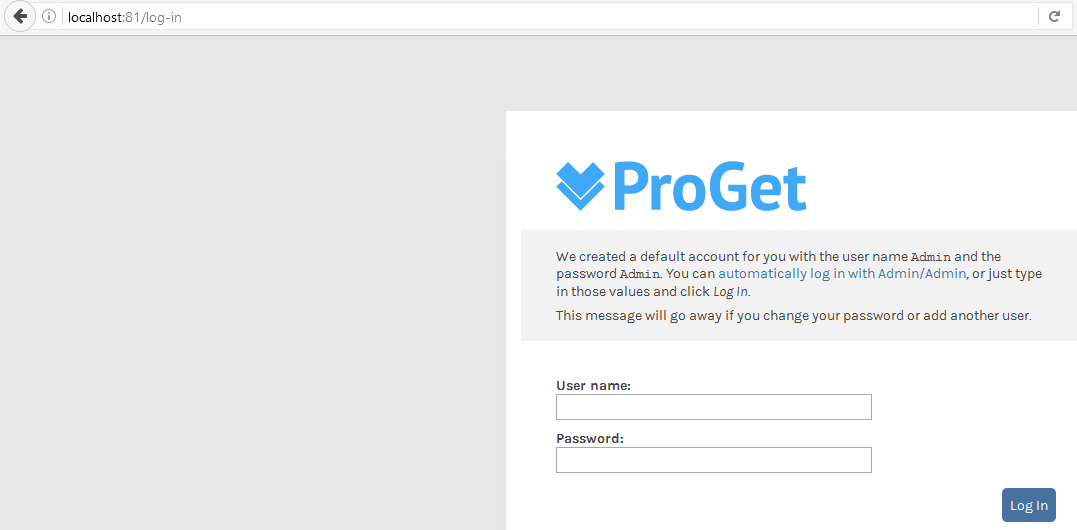
- Once you have installed ProGet using either the GUI or PowerShell script approach, log in to the ProGet application home page using the default admin account until you create a username and password:
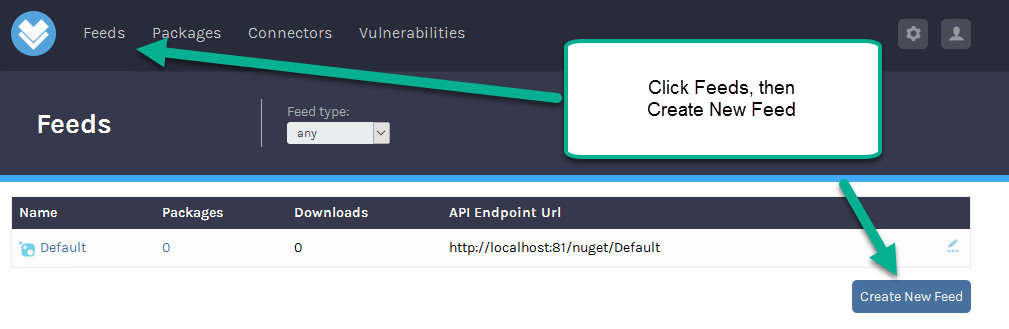
- From
Feedspage, clickCreate New Feed:
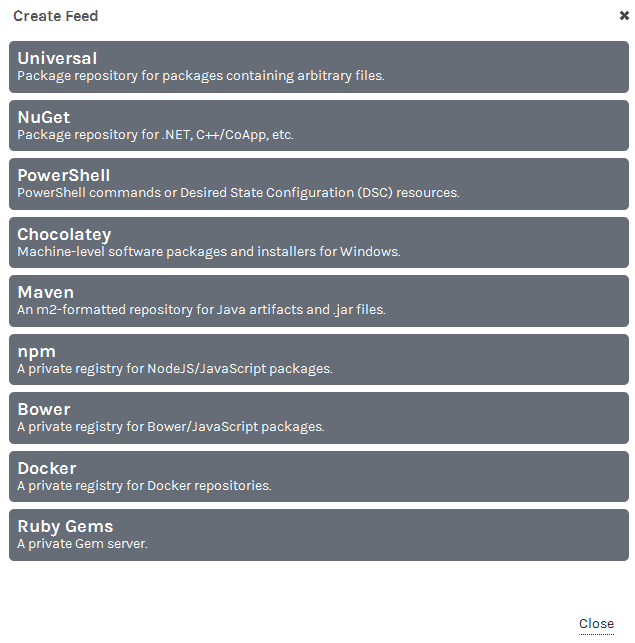
- A list of supported feed types is displayed. Choose
PowerShell:
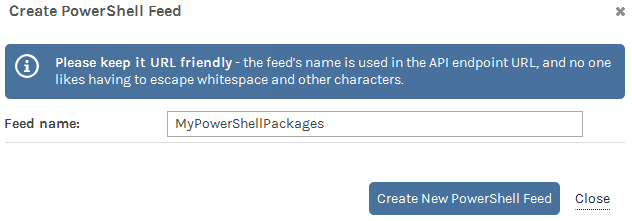
- Enter a feed name of your choice: (for example,
MyPowerShellPackages) and click theCreate New PowerShell Feedbutton:
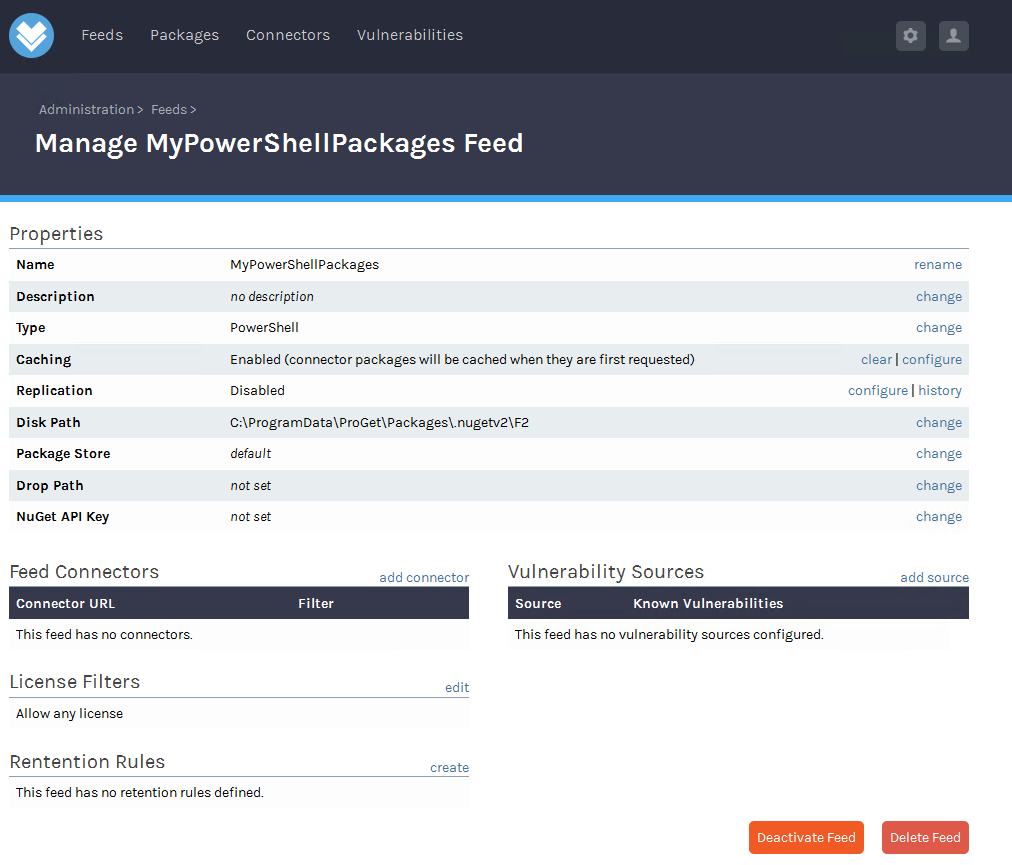
- Review the properties of your new feed:
- Open the PowerShell ISE or console, and register your new repository:
      $RepositoryURL = `
        "http://localhost:81/nuget/MyPowerShellPackages/"
      Register-PSRepository -Name MyPowerShellPackages `
          -SourceLocation $RepositoryURL`
          -PublishLocation $RepositoryURL `
          -InstallationPolicy Trusted
- Publish a module you already have installed (
Pester, for example):
      Publish-Module -Name Pester -Repository MyPowerShellPackages `
                     -NuGetApiKey "Admin:Admin"
- Download a module from
PSGallery, save it to theC:\Foo folder, and publish to your new repository (for example,Carbon):
      Find-Module -Name Carbon -Repository PSGallery
      New-Item -ItemType Directory -Path 'C:\Foo'
      Save-Module -Name Carbon -Path C:\foo
      Publish-Module -Path C:\Foo\Carbon `
                     -Repository MyPowerShellPackages `
                     -NuGetApiKey "Admin:Admin"
- Find all the modules available in your newly created and updated repository:
Find-Module -Repository MyPowerShellPackagesThere are various options for setting up a NuGet-based repository for PowerShell. ProGet is a universal package manager from Inedo (See https://inedo.com/proget for more information on ProGet). ProGet is a very simple choice as it is easy to get started and offers the ability to scale to enterprize level. ProGet has both a free and a paid subscription version available. The ProGet installer creates a NuGet web server backed by a SQL Express database.
In step 1, you visit the server web administration page and optionally review the functionality available.
In steps 2-5, you use ProGet to create a new repository for your PowerShell modules. As you see, you use the ProGet GUI to create this new repository.
In step 6, you register your new repository in your PowerShell session. You need to know the repository URL and have a NuGet API key, using the default username/password of Admin /Admin.
In step 7, you publish a module to the repository—you are using a module that is installed in your PowerShell session, Pester.
In step 8, you locate and download an additional module from the PSGallery, and publish this module to your local repository.
In step 9, you see the modules available from your local repository:

ProGet is a rich product. It provides both automatic failover and scalability which are needed features for PowerShell repositories in large organization's repository. ProGet is one option you have for creating your own organization specific repository. To learn more about ProGet, visit http://inedo.com/support/documentation/proget.
NuGet is a free, open source package management system provided by the Microsoft ASP.NET development platform and is provided as a Visual Studio extension. To learn more about NuGet, visit https://docs.nuget.org/ndocs/api/nuget-api-v3.