


In this chapter, we will cover the following topics:
Verifying Hyper-V requirements
Enabling the Hyper-V Role
Installing Windows Server 2012 and Microsoft Hyper-V Server 2012
Managing a Server Core installation using sconfig
Enabling and disabling the graphical interface in Hyper-V
Configuring post installation settings
Microsoft has done a great job with Hyper-V. Since its first version in 2008, the enterprises noticed that it was a very good virtualization solution for a first release. The second version with Windows Server 2008 R2 brought a couple of new features that enable mobility such as Live Migration and Dynamic Memory. The third version in Windows Server 2012 goes beyond all expectations and brings all the components to allow IT administrators to have everything they need to build the base of their cloud. Almost everything in Hyper-V has been improved and it comes with lots of extraordinary features that will transform the way we manage and deploy our datacenters. All workloads can now be virtualized and new features deliver environments beyond virtualization as we know it. Hyper-V Replica, Shared Nothing Live Migration, Full PowerShell support, SMB 3.0, and new limits are some examples that makes Windows Server 2012 Hyper-V a key component with results like high availability, low cost, elasticity, reliability, and everything we need for our servers.
The Hyper-V journey starts with its installation. Even though the installation steps can be simple, it is crucial to take care of the server prerequisites and the post configuration tasks. It is also very important to verify all the hardware prerequisites, the installation, and the administration method that will be used to manage your server.
Having said that, Hyper-V installation should begin with one of the most important phases of virtual servers before even buying the server itself; it should begin with the planning phase. During this phase, you will identify the proper hardware configuration and all of the prerequisites based on your needs. By default, Hyper-V also needs some processor requirements and that's why these components must be present on every server that runs Hyper-V.
This chapter will provide all the information you need to know before, during, and after the Hyper-V installation to make sure that you can save time and solve any problems that you may face.
In order to install Hyper-V, you should make sure your server supports it by verifying the prerequisites. Failing with the Hyper-V requirements will result in an error while you install it.
Neither Windows nor Hyper-V offers a tool to verify the prerequisites, but the processor companies created tools such as AMD-V System Compatibility Check and INTEL Processor Identification Utility.
You will see in this recipe how to use them and also how to use the Coreinfo tool to facilitate the process.
To verify the prerequisites of your processor, you must download the Intel Processor Identification Utility. You can download it from the following link: http://downloadcenter.intel.com/Detail_Desc.aspx?ProductID=1881&DwnldID=7838&lang=eng&iid=dc_rss.
Based on the server processor, you can also download the AMD Virtualization Technology and Microsoft Hyper-V System Compatibility Check Utility from the following link: http://support.amd.com/us/Pages/dynamicDetails.aspx?ListID=c5cd2c08-1432-4756-aafa-4d9dc646342f&ItemID=177&lang=us.
To identify the processor brand, open the Directx Diagnostic Tool (dxdiag) and check the processor information.
You also need to download the Coreinfo tool at http://technet.microsoft.com/en-us/sysinternals/cc835722 to verify advanced processor support such as Second-Level Address Translation (SLAT) to install Hyper-V in Windows 8.
In the following steps, you will see how to verify if your computer meets the requirements to install Hyper-V on Windows Server 2012 and Windows 8.
After downloading and installing the necessary tools as explained in the Getting ready section, install the utility based on your processor.
For AMD processors, the AMD-V System Compatibility Check provides the results for AMD processors, if it supports Hyper-V, as shown in the following screenshot:

If you have an Intel processor, after the Intel Processor Identification Utility install, you will see three tabs once you run it.
Select the first tab named Frequency Test to show the highest frequency and speed that your processor can handle.
Select the second tab named CPU Technologies and check the results for the technologies supported by the processor model such as Virtualization technology, Hyper-Threading and other technologies.
Then, select the CPUI Data tab to see information such as the Processor type, Family model, Cache sizes, and Data Execution Prevention (Execute Disable Bit).
For Intel processors, the result will be similar to the one shown in the following screenshot:

To verify whether the processor supports Second-Level Address Translation (SLAT) or not, use the free tool called Coreinfo.
After its download, copy it to the chosen directory, then access it through the command prompt and run the command
coreinfo –v.In the following screenshot, you can see an example of a computer running with an AMD processor, the SLAT support, the Hypervisor support, and it shows that the Hypervisor is not installed.

With these steps, you have identified whether the computer you want to install Hyper-V on has all its prerequisites.
The mentioned tools simply verify the processor properties to show if it has the necessary features to install Hyper-V. One of these features is the Hardware-assisted virtualization. This functionality allows Hyper-V to run under privileged access through a special layer in the processor. In some cases, this feature must be enabled through the Basic Input-Output System (BIOS).
These three tools also check whether the Data Execution Prevention (DEP) is present. Intel calls this feature Intel XD bit (Execute Disable Bit), and for AMD it is AMD NX bit (no execute bit). This feature must be also enabled through the BIOS.
There is a particular prerequisite called Second Level Address Translation (SLAT) that is shown only by the Coreinfo tool. SLAT is the only requirement that is optional for Windows Server, but necessary for Windows 8 installations. It provides better performance by reducing the CPU time and improving the memory usage in virtual environments. The-v switch used by Coreinfo shows whether the Hypervisor is enabled, whether it supports virtualization, and whether your processor supports SLAT. For the last one you will see an asterisk (*) at Intel Nested Page (NP) tables on the AMD processor and Extended Page Tables (EPT) for Intel processors.
Coreinfo and both AMD and Intel utilities extract details about the processor information provided by the BIOS. Sometimes for security reasons these features can be enabled manually. It is also common in some cases for it to be necessary to update the BIOS in order to manage these features.
Appendix A, Hyper-V Architecture and Components
By default, Windows Server does not come with Hyper-V installed. In order to start using the virtual environment, Hyper-V needs to be enabled. Even with its straightforward steps, it is important to understand how it works after the setup and what has changed in Windows architecture.
There are different methods to install Hyper-V. The most common one is through the graphical interface.
To get ready to enable Hyper-V you must be logged on with administrative privileges.
The following steps will demonstrate how to enable the Hyper-V Role for Windows Server and what is changed in the Windows architecture after its installation.
On the Start Screen select Server Manager.
In the Server Manager Dashboard, click on Add roles and features.
In the Add Roles and Feature Wizard, click on Next three times.
On the next screen, Server Roles page, select Hyper-V, as shown in the next screenshot, and click on Next three times.

In the Virtual Switches window, select the network adapter you want to use on Hyper-V. You can add, remove, and modify the virtual switches after the Hyper-V installation through Hyper-V Manager.
On the Virtual Machine Migration page, check the Allow this server to send and receive live migration of virtual machines option if you want to enable live migration requests, then click on Next.
In the last Hyper-V installation page called Default Stores, specify the default location for virtual disks and virtual machine configuration files, click on Next and then Install to start the installation process.
Reboot the server after the installation.
The process that you have performed to install Hyper-V is quite simple, but it changes the processor architecture by creating a new privileged layer called ring -1 that runs under the normal layers. The setup process, completed in the previous task, installs the Microsoft Hypervisor on this layer to make sure that Hyper-V has more privilege than Windows itself. Basically, the host operating system runs above the Hypervisor together and at the same level as the virtual machines. The host turns into a special virtual machine containing the virtualization stack, responsible to manage all the virtual machines from it. The following diagram illustrates Hyper-V being installed in the ring -1 and all the partitions running under it.
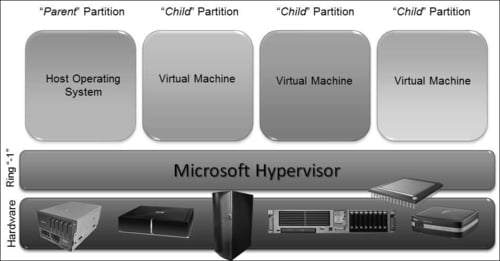
After the first reboot, the Windows boot (winload.exe) loads the driver (hvboot.sys) responsible to verify the processor that is running and if it supports virtualization. Then the Hypervisor image file is loaded. The host OS and the virtual machines are called
partitions. Because they run at the same privileged access above the Hypervisor, the host OS is known as
parent partition and the virtual machines are known as
child partitions.
For automation and fast installation, you can also enable Hyper-V using command lines. You can do that by using the command line ocsetup, Servermanagercmd, or Windows PowerShell.
The Creating and managing virtual switches recipe in Chapter 3, Managing Disk and Network Settings
The Hyper-V architecture components recipe in Appendix A
After the prerequisites verification we are ready to install either Windows Server 2012 or Microsoft Hyper-V Server 2012. The basic installation is not so complicated and it's the same for both the products, but it takes time to be finished. It would be interesting to identify the needs of a server provisioning made by an automation task; in some companies it is common to have lots of physical and virtual machines being deployed, and automating the process could result in both cost and time saving.
In case you want to use the Windows Server 2012 installation, it offers two methods: Full Server and Server Core. The Full Server option provides a graphical interface to manage Hyper-V and Windows, including Hyper-V Manager, Server Manager, and all the other tools and services available on Windows. The problem with the Full Server option is that it comes with other components and services installed by default. That's why Windows Server 2008 introduced a new installation method called Server Core which is the default installation method in Windows Server 2012. This option does not come with the Graphical User Interface (GUI); instead, it has a command line interface. With Server Core, we have more security and better performance in the host computer because only the core components of Windows are installed and features such as the Internet and Windows Explorer are not present.
As a result, the command line interface from Server Core and Hyper-V Server provide the following:
Reduced maintenance and management
Less risk of bugs and failures
Less disk and memory requirements
Less updates requirements
More security
Both these described options are available on Windows Server, which means that a Windows Server License has to be purchased, although there is a free version of Hyper-V called Hyper-V Server. This is a version very similar to Windows Server Core installation, but it comes with Hyper-V only and contains all the features of Windows Server 2012 Hyper-V.
In this task, you will see how to install Hyper-V Server.
Before you start, make sure you have the correct media file or DVD with the Windows Server 2012 installation image.
The following steps will walk you through the installation process of Windows Server 2012.
After the DVD boot process in the first screen, select your language, time and current format, keyboard or input method, and click on Next.
On the second screen, click on Install now and installation will automatically continue. If prompted, add the Windows Product Key and click on Next again.
Select the operating system to be installed and then click on Next.
In order to install Windows Server 2012, you will have to accept the license terms. Select the option I accept the license terms and click on Next.
For a new installation, select the option Custom: Install Windows only (Advanced), as shown in the following screenshot. The upgrade option for this version has been disabled.

In the Where do you want to install Windows screen, select the hard drive you want to install Windows Server and click on Next. For advanced driver options click on Drive options (advanced).
If you have an external storage device or a hard drive that needs a driver to be loaded, click on Load Driver, as shown in the next image, and install the proper drivers. Click on Next.
At this point, you need to wait for the installation to be completed. It can take from 10 to 30 minutes, based on your hardware.

When it finishes, you will see the login screen, asking you to provide the username and password. The default user is
Administratorwith a blank password. By default, Windows creates a blank administrator password. For the first login, the system prompts you to insert a password.
The process to install Hyper-V Server and Windows is the same. The setup will install all the necessary components, but only to run Hyper-V without any other services (or applications, in case of Hyper-V Server).The first step made by the installation is to load the setup image file boot.wim and after the process above the setup applies the install.wim image file containing the OS image.
After the installation, you will be prompted to change the administrator password and the system will be ready to be used.
The Managing a Server Core installation using sconfig recipe in this chapter
The Enabling remote management for Hyper-V in workgroup environments recipe in Chapter 5, Hyper-V Best Practices, Tips, and Tricks
You read in the previous recipe about all the benefits of Server Core such as performance, security and so on. But without the GUI, it's not easy to do the daily management and maintenance of Hyper-V. If you want to change the computer name or the IP address, the GUI is always the easiest to use. But on the other hand, the command line can bring a fast and an automated process.
That's why in Windows Server 2012, the Server Core version of Windows and Microsoft Hyper-V Server 2012 comes with the Server Configuration (sconfig). This is a command line with a simple interface to reduce the time for doing the most common tasks in Windows. In the following screenshot, you can see an example of sconfig's first page:

sconfig can do this via an intuitive numerical menu to facilitate the Windows configuration.
A simple example is when you have to change the IP address of your computer by using the command line. Have a look into the following command:
netsh interface ip set address "Local Area Connection" static 192.168.0.10 255.255.255.0 192.168.0.1 1
Sometimes it is hard to remember the exact command syntax and this can lead to server misconfiguration.
Using sconfig, the process would be simply to press the numbers 8, 0, and then 1 from the menu and simply specify the new IP configuration. That's it.
Besides IP configuration, the sconfig offers 13 other options:
Domain/workgroup
Computer name
Adding local administrator
Configuring remote management
Windows update settings
Downloading and installing updates
Remote desktop
Network settings
Date and time
Help in improving the product with CEIP
Logging off the user
Restarting the server
Shutting down server
In this recipe, you will see how to set up the most common configurations in your server core without advanced command lines.
The Server Configuration tool is added by default on a Server Core installation or Hyper-V Server. Just type sconfig at the command line and the menu will be loaded.
In order to manage the server core installation using sconfig, carry out the following steps:
To change the domain/workgroup settings, press 1.
Press D for domain or W for workgroup.
Specify the domain or workgroup name, the necessary username and the password, and press Enter.
To change the computer name, press 2 and specify the new computer name.
Select Yes to restart the computer.
To add a local administrator, press 3.
Enter the account to join the local administrators group and type the user password.
To configure the remote management, press 4.
Select one of the following options:
Allow MMC Remote Management
Enable Windows PowerShell
Allow Server Manager Remote Management
Show Windows Firewall settings
To change Windows update settings:
Press 5.
Select A for automatic or M for manual.
To download and install updates:
To enable remote desktop:
Press 7.
Select E to enable or D to disable.
To configure network settings:
Press 8.
Select the network adapter number you want to configure and then select one of the existing options:
Set network adapter IP address
Set DNS Servers
Clear DNS Server Settings
To change the date and time, press 9 and a graphical interface will show up with the date and time settings to be configured.
To restart and shut down the server:
Press 1+0 to join Customer Experience Improvement Program
Press 1+1 for logoff
Press 1+2 to restart the computer
Press 1+3 to shut down the server
Press 1+4 to exit to command line
After these configurations using sconfig and with reduced command line interaction, your server will be ready for the production environment.
Server Configuration basically runs scripts in the background for every option that has been selected through a numeric menu, making your life much easier. For every number you select, sconfig can run another script to show a submenu or just run the final script to apply the changes you have selected.
The Enabling remote management for Hyper-V in workgroup environments recipe in Chapter 5, Hyper-V Best Practices, Tips, and Tricks
Server Core has many installation benefits, but there are a few situations where the GUI is better and provides more options; for example, when we need to troubleshoot a problem on the server. Even with the handy tools from the previous task, nothing replaces the full server installation.
Windows Server 2012 allows the GUI installation and uninstallation; making our job easier when the GUI is necessary and providing all the benefits of a Server Core installation when you need it. It also allows a third option that enables the graphical management tools.
The three options available on Windows Server 2012 are as follows:
Server Core: This option provides default installation with command line interface only
Minimal Server Interface: This option comes with the Server Manager, Microsoft Management Console (MMC) and some Control Panel options
Server Graphical Shell: This option allows for a full graphical interface server
By installing Windows Server with Server Core, you can save up to 3 GB of disk space, when the necessary components for the graphical interface are not present.
This recipe will show how to enable all the three options.
To follow the recipe make sure you have a Server Core installation of Windows with the installation media inserted onto the server.
The following steps will show you how to install the minimal server interface from a Server Core installation and how to enable the full graphical interface.
From the Server Core command line, type
PowerShellto load PowerShell.To identify the index number that need to be used in order to enable the graphical interface, type the following command line, where
D:\is the path for the Windows Server installation DVD drive.Get-WindowsImage –ImagePath D:\Sources\Install.wimA list with the index number will be displayed, as shown in the following screenshot. Make a note of the number of the type of Windows Installation you want to enable in the next step. In this demonstration, the index number 2 will be used.

Create a new temporary folder to mount the WIM file with the following command:
New-Item C:\Sources –Type DirectoryTo mount the image file in the directory created in the previous step, type the following command by specifying the index number obtained in step 3.
Mount-WindowsImage –ImagePath D:\Sources\Install.wim –path C:\Sources –Index 2 -ReadyOnlyWith the mounted image, type the following command to enable the Server Graphical Management Tool and the Infrastructure option.
Install-WindowsFeature Server-Gui-Mgmt-Infra –Source C:\Sources\Windows\WinsxsRestart the server and wait for the feature to be configured. It will take a couple of minutes.
To enable the full graphical interface, open Server Manager by typing
servermanager.exe.In the Server manager dashboard, click on Add roles and features.
In the Add Roles and Features Wizard, click on Next four times.
In Features, expand User Interfaces and Infrastructure, select the option Server Graphical Shell as shown in the following screenshot, and click on Next:

To complete the installation, in the Confirm installation selections page, click on Install.
After the setup, you need to restart the server. You can check the Restart each destination server automatically if required option to automatically restart the server.
Having enabled the GUI, we can now see how to uninstall the GUI from the full server installation. In the Server Manager window, click on Manage and then Remove Roles and Features.
In the Before You Begin screen, click on Next four times.
Then, in Features, clear the check box for the Server Graphical Shell option and click on Next.
Confirm the uninstallation by clicking on Remove and wait for the server to be restarted.
When Server Core is installed, it doesn't contain the necessary installation files to enable the graphical interface options. It helps to deploy your server core installations with much lesser disk space requirements. For environments where server deployment is done via OS deployment server, you can save a couple of gigabytes with Server Core. After the installation, you will be able to enable the graphical interface. But the installation files should be provided so that the operating system can install and configure the new features. You can use a local DVD drive or a shared folder containing the source folder of the Windows Server installation media.
With the minimal server interface, components such as Windows Explorer and Internet Explorer are not installed. However, Server Manager, Microsoft Management Console (MMC) and some control panel options that are available, which provide you the basic tools to manage your Server Core without the need to use command line.
The Server Graphical Shell installs all the graphical components, thus transforming your server into a full server installation.
With this new feature, it is now easier to allow the GUI only when needed, for example for a troubleshooting scenario or perhaps an installation of a new service.
The Windows Server 2012 installation process is almost the same as Windows Server 2008. Some steps such as IP settings, computer name, and domain join have been removed (in comparison with older versions such as Windows Server 2003), to make it straightforward. That's why the post installation settings are more important than ever now because the setup just adds the default configurations like a random computer name in workgroup, the Automatic Private IP Address (APIPA) and some other settings.
A Windows Server installation with the default settings can lead to security risks, network access errors, and management problems.
Beyond that, Hyper-V also has some configurations that must be changed, such as default locations for new virtual machines, shortcuts, and other things that you will see in this task.
The only thing you need is a basic Windows Server installation with the Hyper-V role enabled.
The following steps will show how to configure the Windows and Hyper-V post installation settings:
First, you need to make sure the Windows Server post installation settings were completed. Before we start the Hyper-V post configuration, let's list the Windows Server post installation settings that you might need to change:
Windows activation
Configure the time, date, and time zone
Network configuration such as IP address, default gateway, and DNS settings
Computer name
Workgroup or Domain settings
Update and configure automatics updates
Add the necessary roles and features
To guide you through the post configurations, the Windows setup opens the Server Manager tool during the first login, with some settings from the mentioned list for quick access and setup.
To see the list, click on Local Server in the pane on the left-hand side in Server Manager, as shown in the following screenshot:

Using the list provided by Server Manager, you can make sure that your server is ready to be used with all the common post-installation settings. Select the components you want to change by clicking on the hyperlink in front of them and follow the configuration steps.
However, some other interesting settings are not provided by the Server Manager list because they are optional, but some of them you might want to consider are as follows:
After using Server Manager, check the Do not show me this console at logon option
Choose a wallpaper to show the system configuration using tools such as
bginfoorBackinfofrom SysinternalsFrom the Windows Explorer options, uncheck the Hide extensions for known files type option and check the Show hidden files option
An antivirus installation that supports your Windows server version and the roles being executed on it
Clients and agents for products such as backup, software deployment, monitoring systems, and so on
Now that your Windows Server is ready to go, you can open Hyper-V and change its default settings, if needed.
To open the Hyper-V settings, open the Hyper-V Manager tool and then click on Hyper-V Settings column on the right-hand side.
You'll then see the Hyper-V Settings window as you can see in the following screenshot:

Hyper-V Settings allow you to manage the Hyper-V default settings divided in 10 components. To change the virtual hard disk's default location, click on Virtual Hard Disks.
To modify the default virtual machine location, click on Virtual Machines and specify the new location.
To manage and enable the Remote FX feature select Physical GPUs.
To allow the Non-Uniform Memory Architecture (NUMA) spanning, select Numa Spanning.
To enable and change the default values of virtual machine movement settings such as limits and networks that will be used, select Live Migrations, as shown in the following screenshot:

To change the maximum number of simultaneous storage migrations, click on Storage Migrations.
To set up your server as a replica server and change its configuration, click on Replication Configuration.
The next settings—Keyboard,Mouse Release Key, and Reset Check Boxes—can be changed as well, if needed. Change the settings that you want wherever necessary. After that, your Hyper-V Server will be ready with the specific server settings based on your needs.
Changing these configurations might help in some cases when we need a different setting or when you don't want to change them manually every time you have to use them. The first steps showed the most common settings for every Windows server, no matter if it's a Hyper-V Server or not. You won't be able to access your network or access your Active Directory if you don't specify information such as the computer name, IP address, and the other components listed in the first step.
The settings showed between steps 6 through 16 are designed only for Hyper-V Servers and are optional, however most of them are not enabled by default, for example Live Migration and Replication Configuration. In this case, if you don't enable them, some tasks such as the Hyper-V Replica or the Move option will not work.
By completing all these steps, you will make sure your server was deployed with the correct and necessary configuration for Hyper-V and the operating system.
The Migrating the Virtual Machine storage using Storage Migration recipe in Chapter 2, Migrating and Upgrading Physical and Virtual Servers
The Installing and configuring anti-virus on host and virtual machines recipe in Chapter 5, Hyper-V Best Practices, Tips, and Tricks
The Configuring Hyper-V Replica between two Hyper-V Hosts using HTTP authentication recipe in Chapter 8, Disaster Recovery for Hyper-V


