


Chapter 1: Open Source Intelligence
What separates penetration testing (pen testing) from hacking of the illegal variety? The simple answer is permission, but how do you define this? Asking for a pen test does not mean an open invitation to hack to your heart’s content. I know of at least one pen testing organization that found itself in legal trouble for touching a server that was not supposed to be part of the test. This is part of the scope of the pen test, and it is defined in the planning phase of the engagement. Its importance can’t be overstated. However, this is a hands-on technical book – we won’t be covering scoping and engagement letters here.
Now, you’re double-checking the name of the chapter to make sure you’re in the right place. Is this not about open source intel, you wonder? Indeed, it is, and I mention scope because open source intelligence (OSINT) is an area where you need not worry about the frustration of a skinny scope. Open source means the information is already out in the open, ready for your retrieval. You only need to know the tips and tricks needed to step beyond the run-of-the-mill Google user. In this chapter, we’ll define OSINT more carefully – we’ll learn how to take advantage of Google’s sophisticated features to dig deep enough to surprise your client before you’ve sent a single packet to their network, and we’ll introduce how Kali functions as your OSINT sidekick. We’ll cover this and more in the following topics:
- Hiding in plain sight – OSINT and passive recon
- The world of Shodan
- Google’s dark side
- Diving into OSINT with Kali
Hiding in plain sight – OSINT and passive recon
We’ll be making heavy use of Kali Linux throughout this book, but some of the most important work you’ll do for many clients can be done from any device, regardless of a specialized toolset. You might be waiting in line at Starbucks with your personal smartphone, punching in some slick Google queries, and bam – you have a surprising head start before you’ve even arrived at your desk. Then, you sit down at Kali and spend half an hour digging up even more, and you haven’t sent a single packet across the wire to your target. But now, I can hear you at the back: You've said "OSINT" and "passive recon" — is there a difference? That’s a good question, with an annoying answer: It depends on whom you ask. These terms are often used synonymously, but the important distinction is where you’re sending your packets:
- With pure passive reconnaissance, your packets are going to a myriad of resources that are available on the public internet to anyone willing to ask. But they are not going to your target’s network. This can also mean that you aren’t sending any packets at all – you’re merely listening, as we do with wardriving.
- OSINT can mean both this purely passive task where no contact is made with your target and using your target’s resources that are explicitly meant for public use. Does your target allow a potential customer to create a free account? It behooves the pen tester to create an account as a potential customer would, but this probably means you’re directly communicating with your target’s network. The “meant for public use” part is what makes it OSINT.
Sounds like a pretty important distinction, right? The reason why they’re often treated as the same thing is that they both fall under the umbrella of a black box – our experience with the environment is like an ordinary outsider, as opposed to a white box, where, as pen testers, we fully understand the inner workings of the environment and we’re informing our efforts accordingly (of course, we can conduct our testing with only partial knowledge of the environment, which will be a blend of black and white, or a gray box). We’re touching on pen testing philosophy at this point – how realistic is the test in representing a real-world potential attack? For those of us passionate about security, we stand by Shannon's Maxim. That is, we should always assume that the enemy will have full knowledge of how our system works. A real-world enemy will have scoured the internet for any tidbits about their target. A real-world enemy will have created accounts with the target’s services and spent a considerable amount of time gaining the same level of familiarity as any old hand. This being said, your client may need to understand how their environment works from different perspectives, and you might very well be prohibited from using information gained from the view of a registered user. Another consideration is time – you will be operating on a schedule, and you don’t want to put the other phases of the assessment in a crunch.
Walking right in – what the target intends to show the world
The nature of your target will tell you how much is meant to be shown to the world. For example, if your target is a bank, then they will provide comprehensive resources for both their current customers and in their efforts to attract new account holders. Even a more private entity needs to put themselves out there in some regard (for example, a private network that needs to be remotely accessed). There’s an old saying in computer security: the most secure computer is sealed in a concrete box and sits on the ocean floor. If no one can actually use the computer, it seems like a waste of concrete, and so our clients will host services and websites anyway.
Examining the target’s websites
One of the first things I do with a target is browse their website and View page source. This screenshot shows how to grab it in Microsoft Edge, but right-clicking on a page will bring up the option in any of the major browsers:
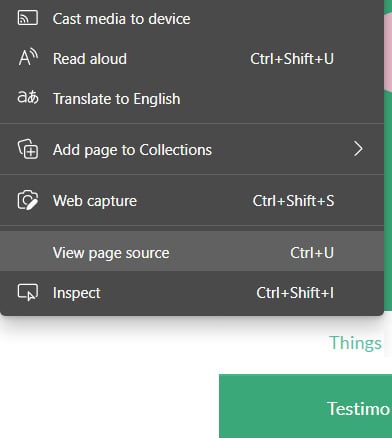
Figure 1.1 – The right-click menu while viewing a page in Microsoft Edge
This option will open a new tab and display the HTML source for the page. Often, this won’t reveal anything that isn’t already visible (it is a markup language, after all). But there may be comments in the source and other treats not intended to be displayed by the browser, and these can give us morsels of information about our target that will inform our attack.
With this client, the page source revealed a folder called assets:

Figure 1.2 – Examining the page source in Microsoft Edge
We see references to scripts that can be found on the host under the assets folder. So, just drop this into your address bar and see what happens – http://www.your-client.com/assets:

Figure 1.3 – The result of manually typing in the assets URL
We haven’t even done anything yet – just pulled up the public site in an ordinary browser – but we see this host is telling us a couple of things:
- It’s an Apache server, version 2.4.41, running on Unix (or Unix-like).
- It wasn’t configured in the most secure manner.
That second point is the most important observation. Does revealing the server version like this really matter that much? Sure, it gives us a heads-up for our research, but it’s not exactly a welcome mat either. What it tells us about is the administrator’s general approach to operational security. The kind of server administrator who either doesn’t know or doesn’t care about the risk, regardless of how tiny, is more likely to be the kind of administrator who, for example, asks people in public forums for help with some new hardware at work, even providing logs that you’d be lucky to get during the assessment.
Don’t be so antisocial – examining the target’s presence on social media
We live in funny times, when it seems like everyone and their grandparents are willingly sharing all their personal details with social media companies. Back in my day, you’d hear about the cool kids having a party at their parents’ house and you’d think, now that's the place to be on Friday night. Your target is hearing the same thing about social media today – everyone’s on Facebook, Twitter, Instagram, and TikTok, so that’s where you’re going to meet the cool kids (or potential customers, as the case may be). In this screenshot, we see how our target is encouraging engagement:

Figure 1.4 – Social media links on our target’s home page
You’re not likely to find juicy tidbits about your target from posts that they made on social media. You’re likely to find the good stuff from other users of the social media platform in question. For example, you click the Facebook button and end up on a page set up by your target. You browse the comments: Jane is the GM at the Highland branch and she was really responsive to my needs. Or maybe a photo from a company picnic with 14 likes, and one of the likes is Jane’s, and she loves to share pictures of her pets, kids, car, home, and her favorite latte at Starbucks over on her profile page.
I probably sound like a ranting lunatic (I am, but that’s not important right now), but the point is to soak up all of this information and take good notes. We’re in the first chapter of the book, discussing what will probably be chapter one of your assessment with a client. That Jane names her dog Mr. Scruffles might seem useless, until day four, when you’re prompted with the security question for pet's name. Also consider that Jane’s IT guy, Dave, is a member of a popular Facebook group for IT admins to vent about their jobs; Dave just had a hard day working with your Cisco appliances and he’s ready to upload a diagnostic file.
Tread carefully!
We’re looking for information that’s already there. Do not attempt to communicate with any of the individuals you find during your social media searches, unless you’re conducting a social engineering assessment – this would most certainly not be passive!
Just browsing, thanks – stepping into the target’s environment
Wait a sec. Stepping into the target’s environment? Now I know I'm in the wrong chapter, you think. Indeed, this is where passive recon starts to blend into the broader term OSINT. The keyword so far has been passive – listening from the sidelines or taking a peek in the proverbial windows as we drive by. Now, the keywords are open source – we’re taking a look at things that are meant to be out in the open. We’re going to start getting a little braver with our efforts. Instead of figuratively driving by, we’ll park and walk into the shop and look around. It’s a door for the public and it says Open on the front, so we haven’t stepped outside the realm of open source. Sometimes, however, we can get interesting information about what’s going on behind the counter of our metaphorical shop.
Summoning the daemon – the fat-fingered email address
We’ve all misspelled someone’s name at some point. Perhaps you’re trying to send an email to the administrator of a domain and, gosh darn it, you misspelled administrator. Oh, these pesky fingers of mine. As my mother-in-law would say, schlimazel (an unlucky or clumsy person). Let’s take a look at our outgoing email:

Figure 1.5 – The header from our sent probe email
The point is to send an email to the target domain but to a recipient we know doesn’t exist. You could very well let your cat walk across the keyboard and use that as the recipient – the result would be the same. However, there’s a bit of a social engineering angle going on here. Just in case someone is reviewing these, my message is more likely to look like a legitimate attempt to communicate with the business or government agency. A smashed-keyboard email address and message body will look like a deliberate attempt to provoke a response. Bonus points if you actually do engage in a friendly conversation posing as a customer, but just let one of your messages have a fat-fingered recipient address. By sending an email to a nonexistent email address, we provoke a bounce message. Unlike sending an email to a nonexistent domain, only the target environment is going to know whether or not the user exists. The bounce will come from the target environment and often contains troubleshooting information with tasty tidbits for us fledgling hackers. Let’s take a peek at the non-delivery report from our client:

Figure 1.6 – The header from the bounce message
My favorite part of this bounce message is Diagnostic information for administrators. Golly, that sure is helpful of you, thank you!
I said this earlier, and it should be a mantra throughout the OSINT phase: this isn't exactly a welcome mat. It isn’t the keys to the kingdom, and this isn’t a movie – no amount of furious typing is going to change our position in the assessment. But let’s take a look at what we learned, step by step:
- The server that generated this report is
ME-VM-MBX02and its IP address is10.255.134.142. It’s reasonable to guess that this is a virtual machine, as the VM initialism is often incorporated into internal naming conventions by IT folks. It makes it easier to determine what troubleshooting may entail, at a glance. - The server that passed on this information to
ME-VM-MBX02, our report-generating server, isME-VM-CAS02, and its IP addresses are10.255.134.140and10.255.27.36. - The server that passed this information on to the
CAS02host isME-VM-MAILGW01and its IP address is10.255.134.160. GW probably means gateway.
Hopefully, you have already picked up on the important part. That’s right – those are ten-dot addresses. As a refresher, addresses in the 10.0.0.0/8 block are reserved as private address space as defined by the Internet Assigned Numbers Authority (IANA) (refer to them as ten-dot or ten slash eight and you’ll be one of the cool kids). Addresses in the 10.0.0.0/8 block are not publicly routable, so why do we care, as uninformed outsiders? We’re clearly getting information from behind the perimeter. What else did we notice? Examine this line:
Microsoft SMTP Server (TLS) id 15.0.1497.2
Let’s jump back into our trusty search engine and look for Microsoft and 15.0.1497.2. Top result? Exchange Server build numbers and release dates. Search the page for that build number and we end up with Exchange Server 2013 CU (cumulative update) 23, released on June 18, 2019. Well, I’m writing this in 2021, almost 2 years later, so it’s back to the search engine to try this: vulnerabilities and 2013 CU23. We end up finding CVE-2021-28480, CVE-2021-28481, CVE-2021-28482, and CVE-2021-28483 – remote code execution vulnerabilities. We already have an internal subnet to investigate: 10.255.0.0/16. You have to admit this isn’t too shabby when you consider that all we did was send an email. Thus, here comes yet another reminder: take good notes. Write down everything you do. Don’t skimp on the screen captures – I would sometimes record my screen while I worked.
I know a guy – services doing the probing for you
Back in my day, we had to walk 15 miles through the snow to get to the pen test. We didn’t even have computers – we used empty bean cans with a string tied between them to send and receive packets. Okay, I’m joking, but things are definitely different these days for the younglings. There’s a lot of work that can be taken out of your hands in today’s world of what I like to call EaaS: Everything-as-a-Service. This is important for pen testers because it allows you to do more with a small amount of time – you’re only with your client for a set window of time and it won’t feel like enough. You’ll be taking advantage of time-saving measures at all phases of an assessment (hello, scripting ability) but OSINT is no exception – even though we haven’t sat down with Kali yet. Let’s take a look.
Security header scanners
There are a few of these online. Try typing into a search engine security header scanners. One of the better ones is SecurityHeaderScanner.com, a service I used for this client example:

Figure 1.7 – The result from SecurityHeaderScanner.com after scanning my client
Yikes. That looks like my report card from my sophomore year of high school (sorry, Mom and Dad). In this particular assessment, I was able to use this information to pull off some successful cross-site scripting, clickjacking, and formjacking attacks. I could have figured this out manually, of course, but the time saved increases the value you provide to your client.
This is an example of a real-time test of public resources provided by your target – we asked this particular service to visit the website now and tell us what it sees. Another way to look at this pre-Kali stage of OSINT is to gather the information that has already been gathered by all of those crawlers taking peeks at every corner of the internet, 24/7/365. We need to be aware of the difference, as the information we find from such resources is not real-time and may not be accurate at the time of your assessment.
Open source wireless analysis with WIGLE
I would never forgive myself if I didn’t mention wigle.net in the context of open source digging with sites that did the probing for us already. This one is special, though – it’s a true crowd-sourced initiative. Resources like Shodan are organizations that own their probing and crawling machines. Their game is to give you access to the database they built with their own hardware. WIGLE, on the other hand, is a collection of what the world of volunteer wardrivers have gathered with their own hardware and mode of transportation.
Note
If the term is unfamiliar, wardriving refers to the practice of moving around an area with a device configured to detect and report wireless networks. The name suggests driving a car, as that’s a great way to cover larger areas, but you can also go warbiking, warwalking, or even send out a wardrone or a warkitteh (a man attached Wi-Fi sniffing hardware to his outdoor cat’s collar). I’m still not sure if warscooting is a thing yet.
At the time of writing, wigle.net contains information about 745 million networks, gathered from 10.5 billion individual observations. The key to the observations is the combination of device reconnaissance and GPS data, allowing you to place the observation on a map. Keep in mind, these locations are where the observation was made, not the location of the access point. This becomes clear when you zoom in on the map, as shown here:

Figure 1.8 – Zooming in on a neighborhood on wigle.net
You can see the observations largely center on roads, suggesting that the observers are driving around with their laptops or smartphones. But you can also see spots in the middle of wide-open spaces, like Firefighters Park in the preceding screenshot, or even in the middle of the ocean, as shown in the following screenshot:
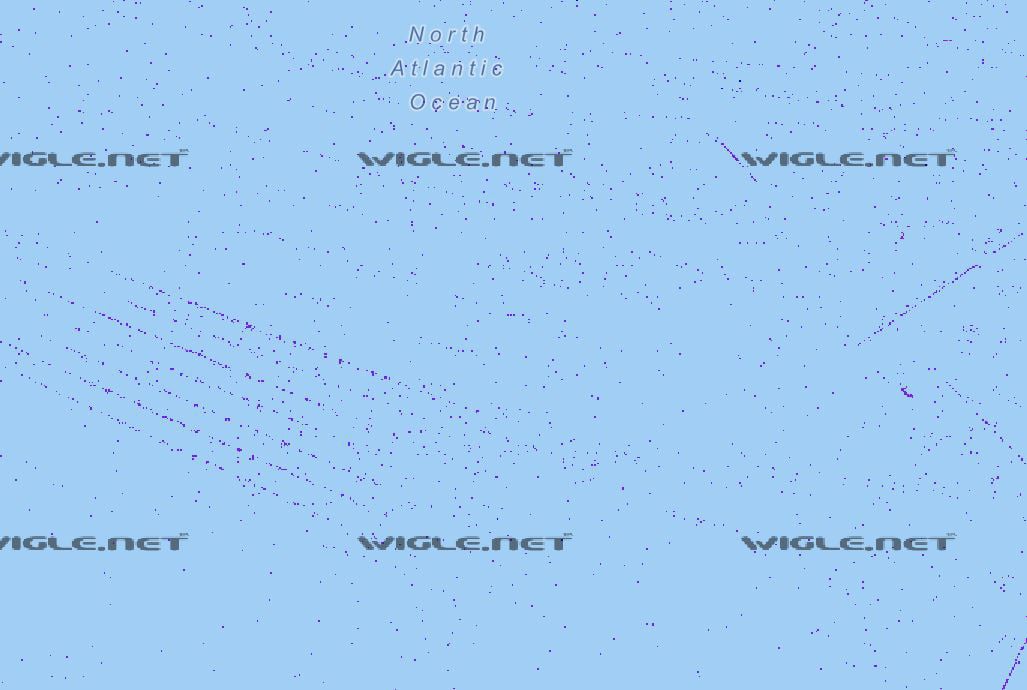
Figure 1.9 – Wardriving observations from the North Atlantic
These observations likely correspond to shipping lanes or even airways. This should give you an idea of the sheer size of this dataset.
Where it will be useful to you, as an intrepid open source investigator, is gathering information about wireless networks without setting foot near the site. With some clients, this won’t really mean much. But for others who may be physically spread out, like with a massive data center or numerous individual facilities, some recon on the location of certain networks may come in useful. Again, by location, we mean the area where an observation was possible. Wireless networks are low-power, and most wardrivers aren’t packing exceptionally high-gain antennas while driving around, so you can assume you’ll be within a block or two, if not closer.
The world of Shodan
There is a site you probably already know about, and if you don’t, prepare to spend a few hours exploring its treasures: shodan.io. Back in my day, when you saw a device firing off frames on the wire, you knew it was a computer. Today, a surprising variety of devices are network-capable, and your refrigerator may very well be another budding leaf at the end of sprawling branches of this global tree we call the internet. The rapid proliferation of this connectedness and its penetration into our daily lives is concerning for us security nerds, but we’re not going to wax philosophical today. The point is, it occurred to some clever folks along the way that crawling the internet to see what’s open and ready to chat will be very interesting as new leaves start popping up. Enter Shodan.
The name started as an acronym from a classic 1990s video game series, System Shock. SHODAN stands for Sentient Hyper-Optimized Data Access Network. In a classic sci-fi turn of events, SHODAN was originally artificial intelligence whose purpose was to help people …but something went wrong. You get the idea. Think Skynet from the Terminator series or V.I.K.I. from I, Robot. The AI goes wonky and decides humans are mere infestuous bugs for squashing. The common thread is that the AI was granted entirely too much access to global systems in order for it to do its job. As SHODAN grabbed control over numerous disparate systems, shodan.io’s creator John Matherly figured it’s an appropriate reference.
To be clear, Shodan isn’t a website that is hell-bent on the annihilation of all humankind (but that would be an awesome movie). The “disparate systems” part is the all-too-creepy reference here, as Shodan crawls the internet, just poking around the unlocked doors tucked away in the back alleyways. If you want to find webcams, a fridge that’s running low on milk, or – more terrifyingly – SCADA systems inside massive plants, then Shodan is the place to check it out. What the hacker in you should be realizing is something like, what about an SSH server on unexpected ports, in an attempt to hide in plain sight? Excellent thinking. We want to focus on our client’s resources that were already sniffed by someone else. Suppose your client really is running SSH on port 2222 (this is surprisingly common, as Shodan will show you). We have a head start on the discovery phase of our assessment, and once again, we didn’t send any packets. A Shodan crawler sent the packets.
The general principle here is banner grabbing. Banners are nothing more than text-based messages that greet the client connecting to a particular service. They’re useful for the rightful administrators of these servers to catalog assets and troubleshoot problems. Suppose you have a large inventory of servers hosting a particular service and you want to validate the version that’s running on each host. You could type up a small script that will initiate those connections, find the version number in the banner, and put it all in a tidy list on your screen. They are also extremely useful for narrowing our focus while we are developing the attack on our target. We’ll see hands-on banner grabbing later when we’re sitting down at Kali. In the meantime, we’re going to take advantage of the fact that someone has already taken a look at what the internet looks like down to the service level, and our job is to see what our client is telling the world. You’ll be surprised again and again during assessments by how much the clients do not know about what’s floating around out there with their name on it.
Is banner grabbing a worthy finding for a pen test?
Findings are graded by their overall risk rating. Businesses consider a couple of things when it comes to risk management: how likely and how impactful a compromise would be. Is a vulnerability very unlikely to be exploited, and if it is, will it threaten the entire organization? That’s going to be considered higher risk. Banner grabbing would fall in the category of very likely (due to its simplicity), and very low impact. Remember that an important part of your job is educating your client on how these things work. Yes, it will be one of the low-risk findings. But if your banner grab narrowed your focus and saved you time, thus giving you more time after the compromise to do even more movement and loot-grabbing, it belongs in the report. It’s a part of the attack!
Shodan search filters
You can start simple, such as punching in an IP address or a service name. For example, we could try Remote Desktop Protocol (RDP) or Samba. To turn this global eye into a fine-tuned microscope, however, we need to apply search filters. The format is very simple: you merely separate the name of the filter from its query with a colon (:). A real handy way to fine-tune your results is to negate a particular query by putting a dash (-) before the filter name. Let’s take a look at the filters available to us, and then we’ll go over some examples.
asn: Search by autonomous system number. An autonomous system (AS) is a group of IP prefixes operated by one or more entities for maintaining one clear routing policy, allowing these entities to exchange routes with other ISPs. This search is useful when you are looking for hosts under the control of one or more such entities as defined by their assigned ASN.city: Search by the city where the host is located.country: Search by country with alpha-2 codes as per the ISO 3166 standard.geo: Allows you to specify geographical coordinates. Linking a specific host to its geographical coordinates is notoriously iffy, so it’s best to establish a range with this filter. Draw a box over the area you want to search and grab the lat/lon pairs for the top-left corner of the box and the lower-right corner of the box. For example, searchinggeo:12.63,-70.10,12.38,-69.82will return results anywhere on the island of Aruba.has_ipv6: Searches for IPv6 support; expectstrue(or1) orfalse(or0).has_screenshot: Returns results where a screenshot was captured. This is useful for things such as RDP and VNC. Expects the Booleantrue/false(1/0).has_ssl: Shows services with SSL support. Expectstrue(or1) orfalse(or0).hash: Each page that’s grabbed by Shodan is hashed. This could be handy for looking for pages with the exact same text on them, but you’ll probably use this with the negation dash (-) and a zero to skip results where the banners are blank, like this:-hash:0.hostname: Specify the hostname or just a part of it.ip: The same asnet, this lets you specify an IP range in CIDR format.isp: Take a look at a specific ISP’s networks.net: The same asip– this lets you specify an IP range in CIDR format.org: This is where you specify the organization’s name.os: Very handy indeed – specify the operating system.port: Check specific ports. Negating this filter is especially useful for finding services that are operating on non-standard ports. For example,ssh -port:22will find all instances of SSH on anything other than the standard SSH port.product: A crucial option for narrowing down a specific product running the service. For example,product:Apache -port:80,443will find any Apache server on non-standard ports.version: Useful for targeting specific product version numbers.Note
We’re covering the filters that are available to basic users. There are more sophisticated filters available to small business and enterprise accounts if such a thing is within your budget.
Let’s take a look at how we can whittle away at our results and home in on what we need. First, let’s say our target is in Mexico City:
city:"Mexico City"
On second thought, I want to make sure I cover the region around and including Mexico City. So, I’ll try this instead:
geo:19.58,-99.37,19.21,-98.79
Now, I want to look for SSH on any non-standard port:
geo:19.58,-99.37,19.21,-98.79 ssh -port:22
And I only want Debian hosts:
geo:19.58,-99.37,19.21,-98.79 ssh -port:22 os:Debian
Finally, suppose I know the subnet for my target is 187.248.0.0/17:
geo:19.58,-99.37,19.21,-98.79 ssh -port:22 os:Debian net:187.248.0.0/17
With that, I hit Enter and see what Shodan has in store for me:
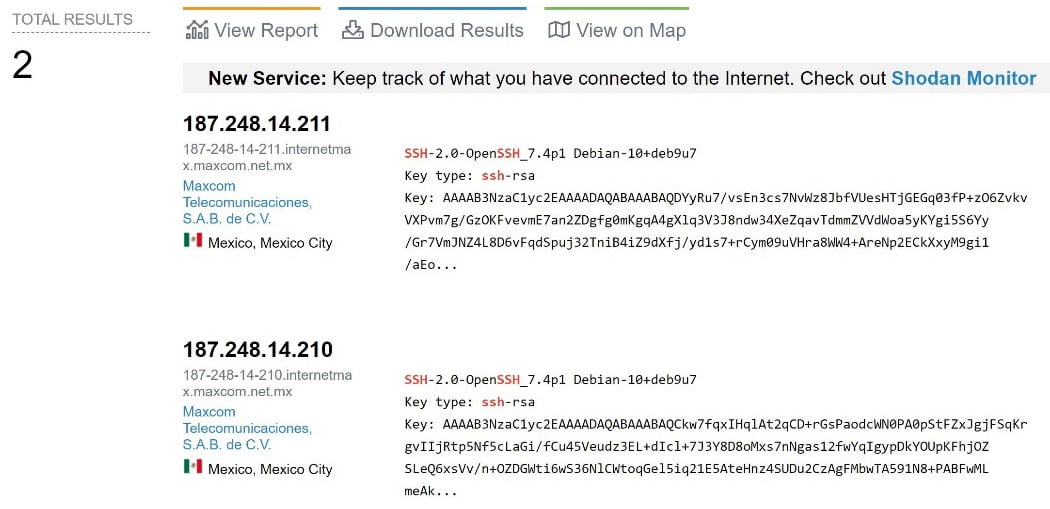
Figure 1.10 – Homing in on my targets
When I started looking at the Mexico City region, I had 1.5 million results to sift through. My fine-tuning reduced that list to only two servers. This is a fully random example for demonstration purposes – when you’re researching for a specific client, you’ll be trying the org filter, perhaps the asn filter, and whatever else you have to go on.
Google’s dark side
Our last stop for goodies before we arrive at the desk where Kali eagerly awaits is Google. No, we’re not going to check the weather or find out why we call those spiky animals porcupines (apparently, it’s the Latin porcus (hog) and spina (thorn, spine) – who knew?). We’ll leverage the surgical scalpel of Google searching: operators. Keep the same spirit from Shodan – separate the operator from the query with a colon (:) and no spaces. Google, however, allows us to get pretty advanced.
Badda-bing
The concepts here apply to the Bing search engine as well (though you’ll want to review the operator specifics on their help pages). As a distinct search engine, you may find results on Bing that you won’t find on Google, and vice versa. It’s worth checking all your options!
Google’s advanced operators
Let’s first discuss what makes up an ordinary web page. Of course, you have the URL to type into your browser and to share with your friends. Then, you have the title of the page, and the distinction is technical – it will be explicitly formatted this way with the <title> tag in HTML. You’ll also have the text of the page, which is basically everything written on the page that isn’t the title or the URL. There are three reasons why we pen testers care about this:
- Google can find stuff left on pages by administrators who may have neglected to understand the public nature of their posts – including talking about specific clients and the products they manage.
- Google can find stuff left on pages by bad guys who may have already compromised your client, a partner, or an employee.
- Services with web portals will have signatures that can distinguish them. The use of specific words (such as
admin) in the URL, or a product, version, or company name in the text of the page, and so on.
Google is designed for the average user, using its snazzy algorithm to find what you want, and even what you didn’t realize you wanted. However, it is ready for the advanced user, too. You just need to know what to say to it. There are two ways of doing this: with operators directly, or within the Advanced Search feature. Let’s take a look at the different operators for direct use:
intitle: Return pages with your query within the page title.inurl: Return pages with your query inside the URL to the page itself.allintitle: Theallinqueries are special – they will only return results that contain all of your multiple keywords. For example,allintitle:"Satoshi" "identity" "bitcoin" "conspiracy"will return pages that contain all four words somewhere in the title, but not pages that have only three of those words in the title.allinurl: This will only return results where all of your terms are contained in the URL.allintext: Return only the pages that contain all of your terms in the text of the page.filetype: A particularly powerful option that lets you specify the file type. For example,filetype:pdfwill return PDF documents with your search criteria.link: Another special fine-tuning option, this searches for pages that contain links to the URL or domain you specify here.
Just like with Shodan, you can negate an option with a dash (-). For example, I can look for the word explorer and avoid pages about the car with explorer –ford. You can also look for the pages that maybe contain one or more of several terms (as opposed to the allin options) with the OR operator. For example, the following will only return pages with all four terms in quotation marks:
allintext:"Satoshi" "identity" "bitcoin" "conspiracy"
However, the next example will return pages that mention any of the terms:
"Satoshi" OR "identity" OR "bitcoin" OR "conspiracy"
A useful shorthand for OR, by the way, is the pipe character (|). So, this is identical to the previous search:
"Satoshi" | "identity" | "bitcoin" | "conspiracy"
The Advanced Search page
Google has made things a little more user-friendly – just add advanced_search after the google.com URL, as shown in the following screenshot:
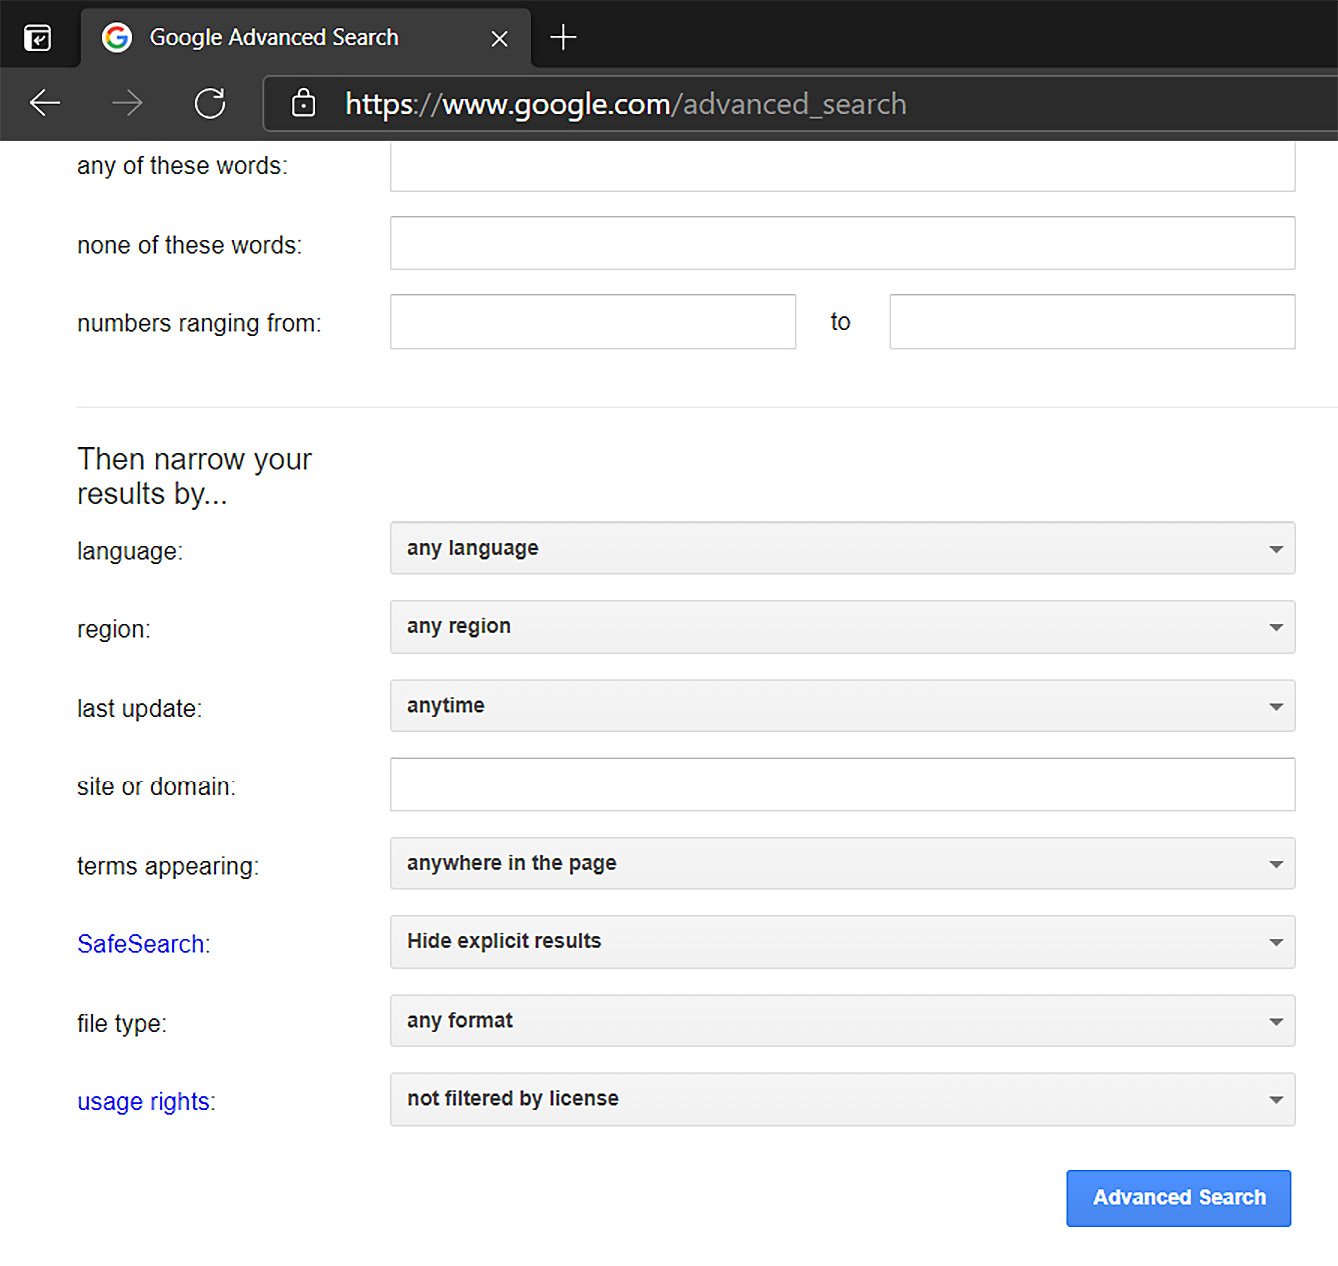
Figure 1.11 – Google’s Advanced Search window
For some advanced search capabilities, this accomplishes the same thing as putting the operators directly into the search box. However, narrowing results down to a specific date range is best done from the results page. First, enter your search query, then, click Tools followed by the Any time dropdown to select a custom range, as shown here:
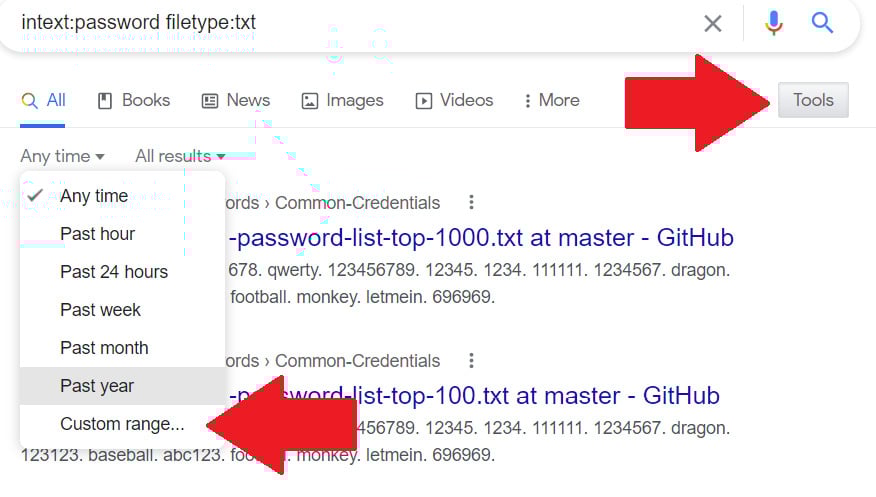
Figure 1.12 – Customizing the date range for my results
I remember needing to use the daterange: operator with Julian dates. In other words, Christmas Day of 2020 was on Julian Day 2,459,209. Trust me, using a graphical calendar is much less annoying.
Thinking like a dark Googler
I’ve had a lot of financial organizations as pen test clients. The nature of their business involves a lot of paperwork, so it’s particularly tricky to keep everything tidy. Let’s take a look at a possible Google hacking mission, in this case, digging up financial information. Of course, for your needs, you’ll be using your client’s name or the name of an employee to accompany your fine-tuned search terms.
First, I try the following:
intitle:"index of" "Parent Directory" ".pdf" "statement"
Let’s break this down. By looking for index of with the words Parent Directory somewhere on the page, I’ll be finding exposed file directories that are hosted via HTTP/S. I’m also looking for any text with .pdf in it, which will catch directories hosting PDF files. Finally, I’m hoping someone will have put the word statement somewhere in their filename. As you can imagine, we’ll probably grab some false positives with this. But you may also find things like this, which I’m fairly certain was not intended to be sitting on the open web:

Figure 1.13– The result of searching through public directories
Looks like someone’s going on a trip! This find didn’t have statement in its filename, but the files next to it did. When I click Parent Directory on some of these pages, I end up at the home page for the domain or a 404 page, strongly suggesting that these exposed directories are accidents. There’s nothing quite like a false sense of security to help you out in your endeavor. Finding an employee’s passports, tax returns, and the like, before you even sit down with your Kali toolkit, is a powerful message for your client’s management.
There are plenty of resources online to help you with sneaky Google searches. The Google Hacking Database over at the Exploit Database (exploit-db.com) is an excellent place to check out. I won’t rehash all the different searches you could try. The key lesson here is to apply whatever information you have on your client and try thinking in terms of how a resource presents itself to the internet. For example, I had a client for whom my initial research suggested the presence of a Remote Desktop portal. Searching the client’s domain with this was helpful:
inurl:RDWeb/Pages/en-US/login.aspx
How did I come up with that? Simple: I researched how these devices work. Find one, talk to it with your browser, and build a Google query with your client’s information. Have you considered your client’s IT support? We all need to ask for help now and then. Perhaps some of the IT staff at your client have asked for support online. Hmm, I'm not sure, a helpful compatriot replies, can you upload a packet dump from the device? Next thing you know, information deeply internal to your client has been exfiltrated to the web. I’ve seen it with clients more times than I’d like to admit. Just look for those communities and try combining parts of the URLs with inurl. For example, if you see your client’s name pop up along with the following, then you have a head start on the security software they may be using:
inurl:"broadcom.com/enterprisesoftware/communities"
An important skill with something as inherently hit-or-miss as OSINT is outside-the-box thinking. Suppose you’ve tried all of the Google tricks you can think of, looking for different vendors and URL strings, and you’ve come up dry. Well, do you know anything about the people who work there? I once had a client whose IT administrator had a unique name in her personal email address.
It didn’t take long before I linked this to a different username that she had used on Yahoo! in the past. I took this username and tried all kinds of search combinations, and boom – an obscure forum for the administrators of a highly specific operating system in an enterprise environment had posts from a user with this same name. She was careful enough to avoid mentioning her employer, which is why the usual searches described previously didn’t get me there. But I was able to connect the dots and determine she was indeed referring to the configuration of these hosts inside the network of my client, and later I could even correlate independent findings with information in these public posts. The connection that brought me to that information was just her use of an old Yahoo! Messenger name when anonymously discussing her IT work. Needless to say, she was a bit surprised that I had found it. On a different engagement, I took to Google from the other direction – I was already inside the network and had a foothold on a domain controller. I started grabbing password hashes, which is a massive finding in its own right for my report. However, I wondered what would happen if I tried punching some of these hashes into Google. Sure enough, I found a site where hackers share their loot and my client had been compromised. This was an additional tidbit to enhance the report and helped them get the ball rolling on determining how that unauthorized access had occurred.
Here’s an idea!
Think about how people create passwords, generate some hashes corresponding to your guesses, and search Google for those hashes. Usually (and hopefully), you’ll come up dry. The most common passwords, such as 12345 and iloveyou, are already out there, so think like someone who works for your client and lives near there. For example, one thing I learned while working with companies in the state of Ohio is that Ohioans love college football. Hey, most Midwesterners do. I had a disturbing number of positive hits when I generated hashes based on the word Buckeyes.
Hey, order’s up. Grab your coffee and bagel, leave the drive-thru, and get to the office – we got a good amount of recon done with Google and our smartphone, but now it’s time to sit down at the helm of Kali and see how the folks at Offensive Security have moved its toolset into this decade.
Diving into OSINT with Kali
Finally, we have arrived at our desk. Kali Linux has been waiting patiently while we played around with the search engines, but now it’s time to get down to business. As we continue our OSINT journey with Kali, it’s helpful to understand the fundamentals. For example, you may have noticed during your time playing with Shodan that there is an API available. You may have also thought to yourself, this is cool, but can't we automate it? Perhaps, while you were playing with Google searches, you were stopped by a CAPTCHA with the suspicious traffic alert. Indeed, Google knows that their search engine can be used for nefarious purposes and some of the methods discussed in older Google hacking textbooks don’t even work anymore (for example, you’ll get zero results when looking for numbers in a range from 4,147,000,000,000,000 to 4,147,999,999,999,999, since that could pick up on Visa card dumps). Well, this is a Kali book and there is a comprehensive OSINT toolkit available to you. Let’s get to work and take this open source stuff to the next level.
The OSINT analysis tools folder
There’s a simple reason why Kali Linux is the premier pen testing distro: it just makes things so easy. Everything is neatly organized with just a right-click on the desktop, ordered by the different phases of your assessment. It’s like hacking candy from a baby. Another thing to note about Kali 2021.1 is that it puts emphasis on looking slick. If Neo from The Matrix, wearing his iconic trench coat and black glasses, was an operating system, it would probably have these same appearance settings. It’s a looker, but it doesn’t really do much for printing examples for you, dear reader. Not to mention, the dark blue on a black background with transparency enabled, giving us that blue-black dragon wallpaper bleeding through our terminal window? Hello, eye doctor. So, I have tweaked mine to make it easier to look at in our book. In the terminal, I’m going with BlackOnWhite with 0% transparency. You don’t have to change yours – just know it’s Kali 2021.1 and it should work the same.
Without further ado, let’s right-click on our desktop and find OSINT Analysis, a folder found under 01 – Information Gathering, as shown here:
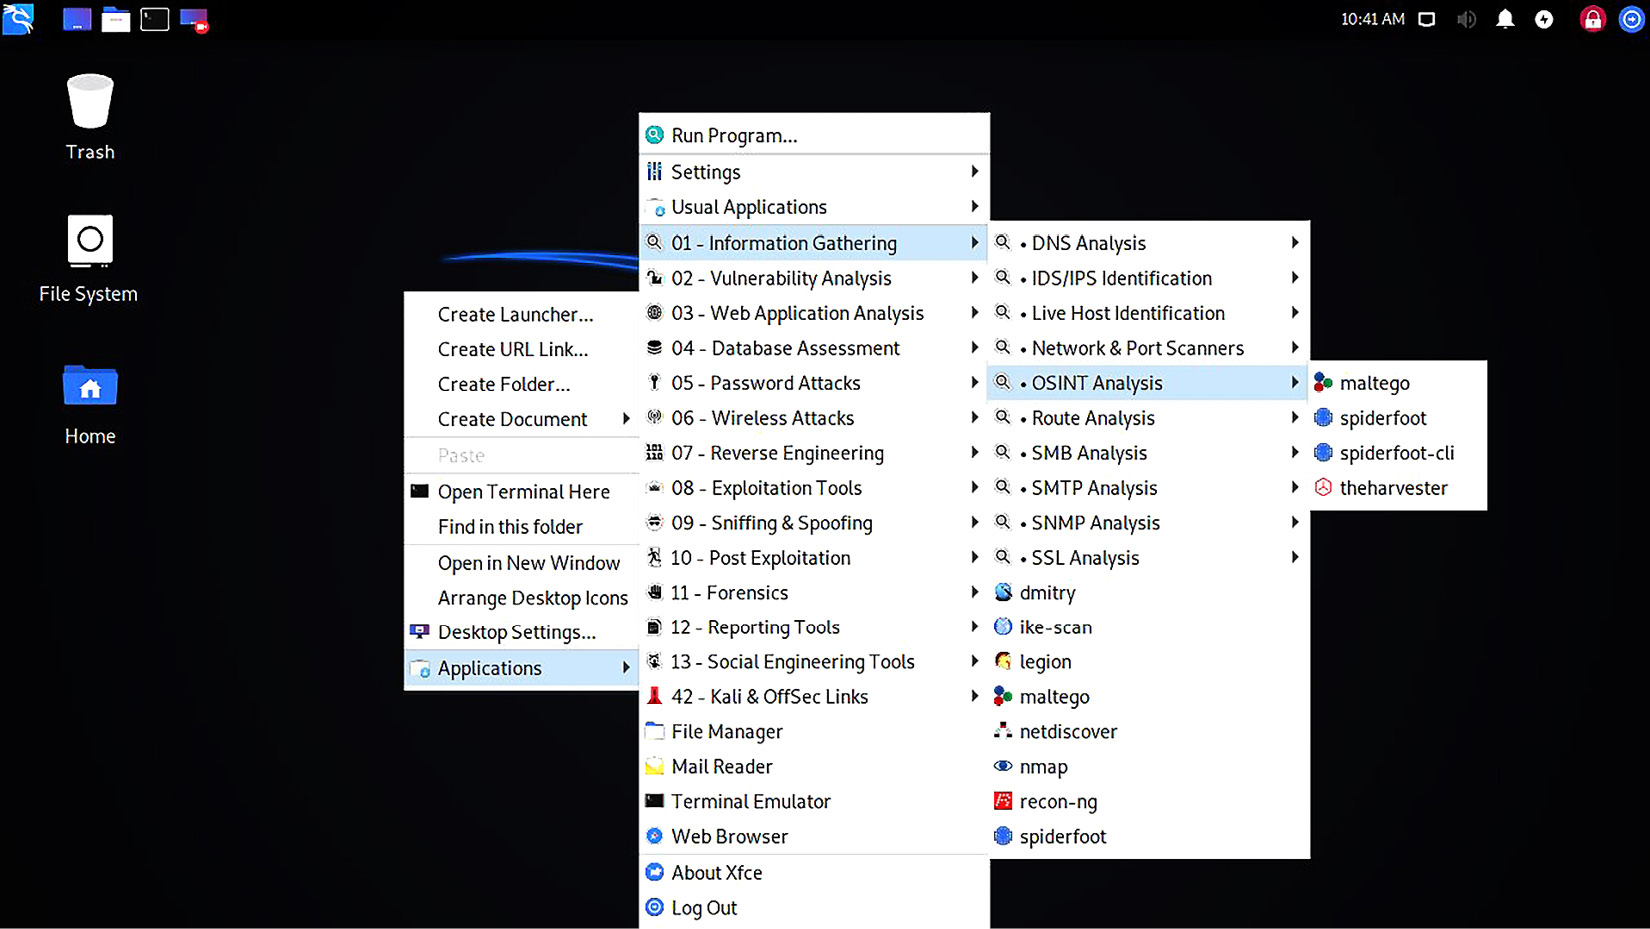
Figure 1.14 – Right-clicking the menu on Kali’s desktop
First, let’s clarify the distinction that renders OSINT Analysis a subfolder of Information Gathering. This goes back to the beginning of the chapter when we talked about passive versus active information gathering. Look at the other subfolders under 01 – Information Gathering: Live Host Identification, Network & Port Scanners, the various protocol analysis folders, and so on. There’s nothing passive and quiet about firing off thousands of SYN packets at your target’s network, and importantly, it isn’t open source analysis because you are conducting the analysis in real time – you aren’t relying on open source data sources. From the perspective of your target, the information gathering phase is like hearing rustling in the bushes. The OSINT Analysis toolset will not make any noise that your client can hear.
Keep in mind, just because most of the other tools in Kali aren’t under 01 – Information Gathering, doesn’t mean they are all noisy and only to be used during active phases of the engagement. A notable example that we will discuss is wireless analysis: all the Wi-Fi goodies are contained under 06 – Wireless Attacks, and indeed, the tools there can be used for active attacking. However, there’s nothing to stop us from merely listening to the radio signals around us (or as the old-school users of American Citizens Band radio would say, gettin' our ears on), and this would qualify as passive reconnaissance. But enough about gathering information about low-level network stuff. Let’s take a look at a true magician of OSINT.
Transforming your perspective – Maltego
OSINT isn’t just for pen-testers – it’s an important part of projects ranging from market research to private investigations to criminal investigations. Accordingly, some smart folks realized that providing an automated, intuitive, and just downright beautiful interface for this activity is a product in demand. Enter Maltego.
I remember Maltego’s more humble years, but these days, it’s a fully-fledged professional product. Indeed, if you have the money and it’s part of your work, it’s a worthy investment. Thankfully, Maltego caters to its community of faithful users with its Community Edition (Maltego CE). Maltego CE is completely free, but there are some feature limitations, and the software licensing requires that it is not used for commercial purposes. We’re going to work on the free Community Edition in our book, as it’s immediately accessible to any Kali user – but if you are (or planning to become) a professional pen-tester with commercial needs, make sure you review and abide by any software licensing agreements. With that said, dig into 01 – Information Gathering | OSINT Analysis, and click maltego. You should see this splash screen:
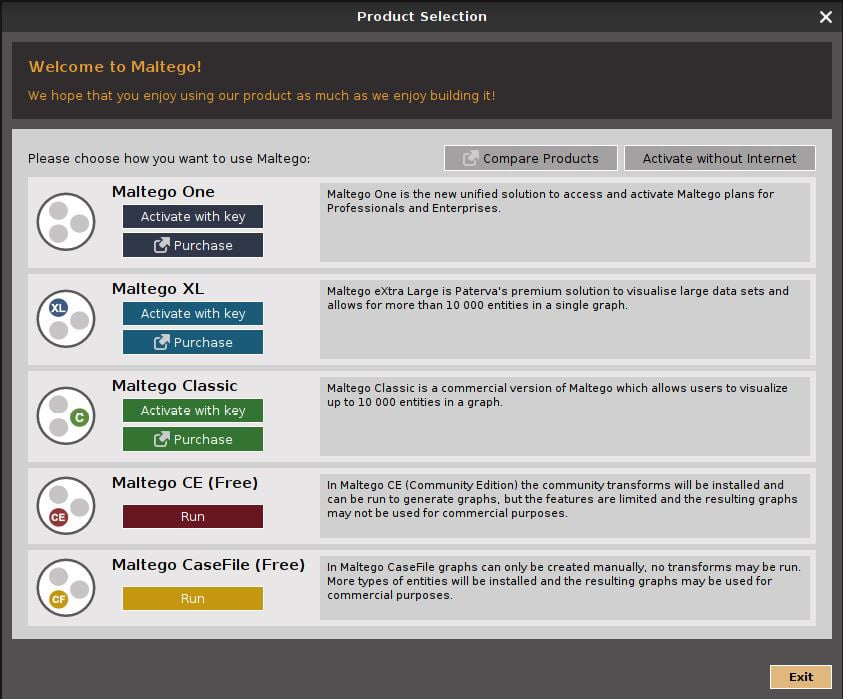
Figure 1.15 – The Maltego splash screen
Of course, we’re going to click the Run button under Maltego CE (Free). Then, you’ll have the opportunity to read and agree to the license agreement and get your community account registered. During this phase, you’ll see the word transforms: the product is downloading and installing transforms, and you’ll end up in the transforms hub. Transforms are the soul of Maltego, so let’s explore what they are and how we leverage them.
Entities and transforms and graphs, oh my
Put simply, a transform is a little program that takes some piece of information that we already have about our target (for example, a person’s name) and digs up more information. Each of these pieces of information is an entity, and when we supply our entity information to Maltego and it spits out more entities, that process is called running a transform. This is the process that ultimately allows us to visualize any relationships between entities. It’s useful to remember that this transform program isn’t actually local to your machine (hence the necessity to register for an account). It runs on a Maltego server, which is using the transform code plus the entities you provided it with against open source data. Finally, the canvas on which you will paint your OSINT masterpiece is the graph, a workspace where the relationships between entities are visualized and you can point-and-click to run additional transforms. Let’s jump in.
Once you’re up and running, you should be looking at a Home tab with a Start Page and a Transform Hub button, as shown in the following screenshot:
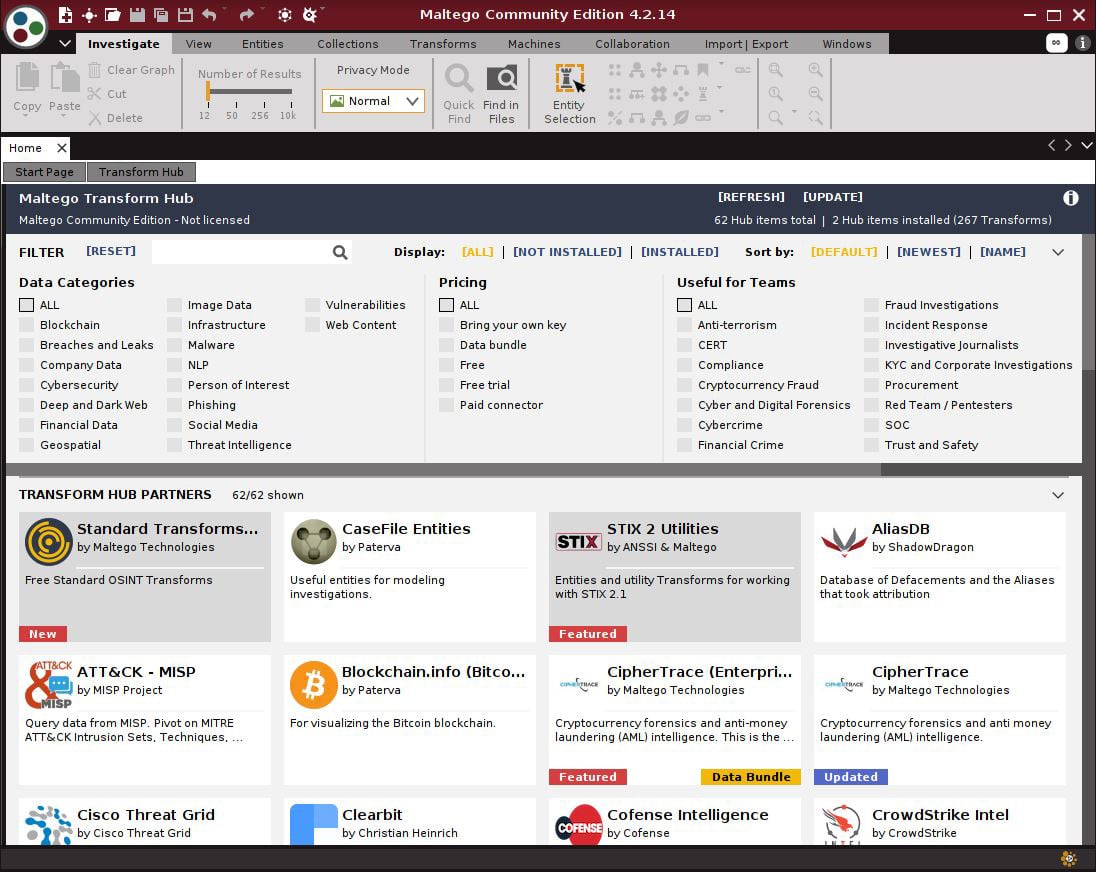
Figure 1.16 – The rather busy Home tab
Your installation already comes with the basics, but other organizations or individuals are often working on their own transforms that may be available to you. It’s worth checking out what you can grab. Use the FILTER box at the top to select all Data Categories, and then select Free under Pricing. Finally, click [NOT INSTALLED] at the top. Let’s see what pops up:
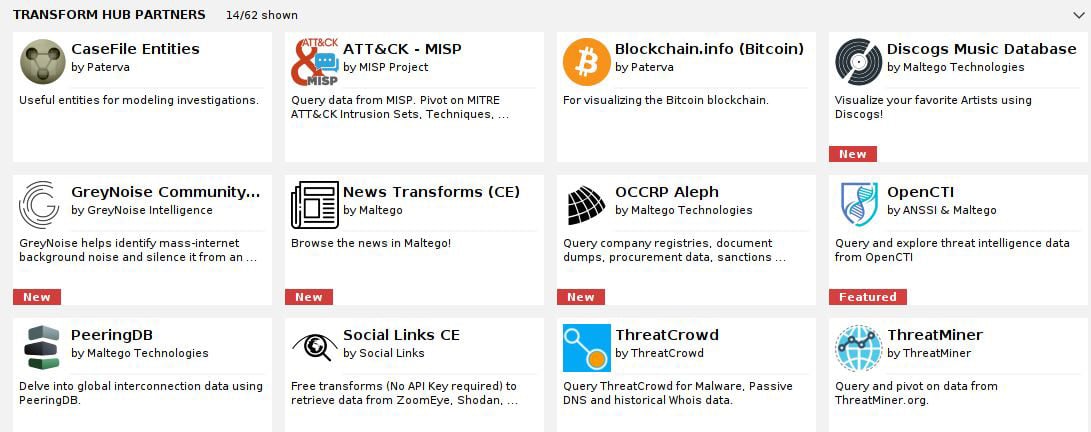
Figure 1.17 – Transform Hub partners in Maltego
What you pick will depend on your needs. Pay close attention to something like Social Links CE for social engineering efforts, OCCRP Aleph for information gathering, and ATT&CK – MISP for the analysis of your target’s attack surface. For now, let’s run through the basics with a real-world client. Hit Ctrl + T to create a new graph. A blank workspace will appear where your graph will be built. Look over to the left at the Entity Palette, as shown here:
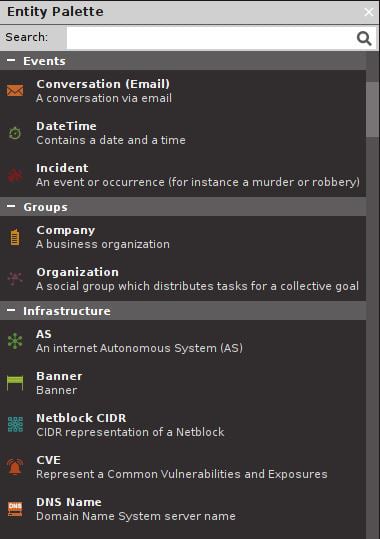
Figure 1.18 – The Entity Palette in Maltego
Go ahead and browse the different entities. Here we can see just how powerfully Maltego caters to different investigation types (anyone want to dig up information on a robbery?), and some of these you may never use. For the pen-tester, a very common entity category is Infrastructure. For my example, I’m going to click and drag Domain over into the blank graph space. This will create an entity icon with a domain in the middle. Whenever you create an entity in your graph, it will have a default entry for it (it doesn’t prompt you). So, you’ll double-click on the default text to put in the domain you’re researching. Now, right-click on your domain entity to see the transforms available for it, as shown here:
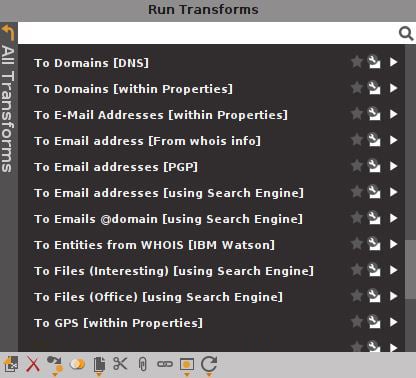
Figure 1.19 – The Run Transforms menu
At the top of the list, you’ll see transforms built by Maltego’s transform partners (other organizations). Some of them require an account or an API key to run the transform, and some of them are free. As always, your needs will dictate how deep this gets.
Let’s start exploring with my example domain entity. I tried To DNS Name – MX (mail server). Here are my results:
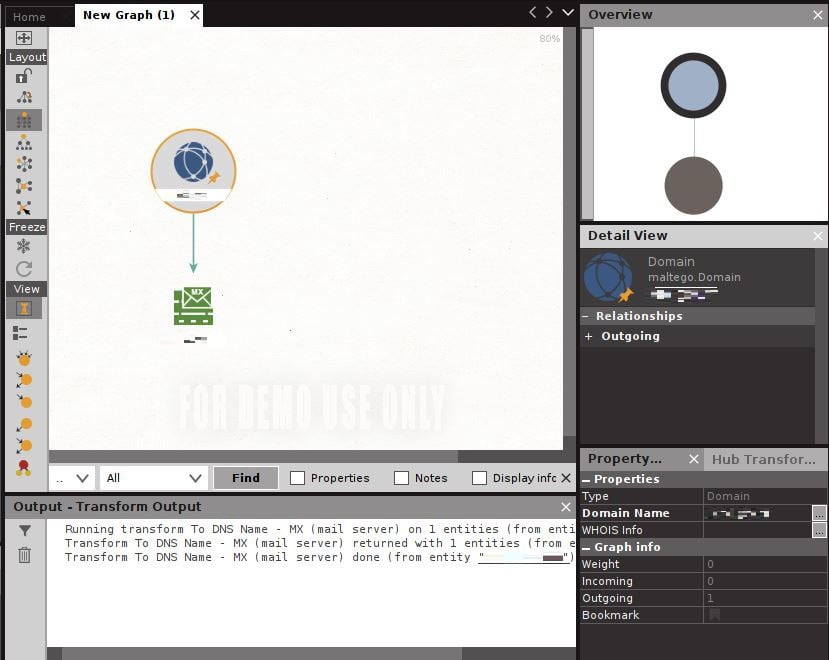
Figure 1.20 – The graph after running the MX transform
Now, we see a new entity has appeared – an MX server. An arrow is drawn from our original domain entity to demonstrate the relationship between the two. I’m confident that you have a good idea of where to go next: that’s right, run some more transforms! Click on the domain entity that you provided. Then, check out the Run View menu over at the lower left. Try running one of the Footprint transforms, as shown here:
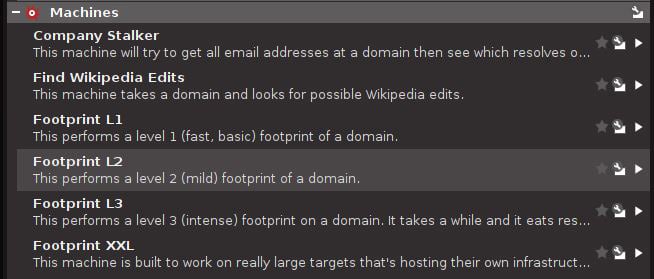
Figure 1.21 – Finding the Footprint transforms after selecting the domain entity
Maltego will start doing some of the basic digging for you. What’s nice about the Footprint transforms is that you’ll get to validate some of the returned data while it’s running, as shown here:

Figure 1.22 – Picking and choosing the relevant entities
Now, watch as all of these new tasty entities appear. In my testing shown here, I discovered email addresses, IP addresses, netblocks, and ASNs. I even discovered the location of a satellite dish responsible for one of their remote locations – that one was surprising.
At this point, I don’t even need to tell you what to do next – you’ve just discovered the start of a long and scenic path of discovery for your client. Try jumping into those other transforms. The important lesson here, young hackerlings, is discovering perspectives about your target that will inform other efforts. Let’s look at social engineering (SE) as an example. After running a few transforms and adjusting my graph layout a bit, I found this company tech’s email address linked to numerous domains, including ones I was just learning about at the time:
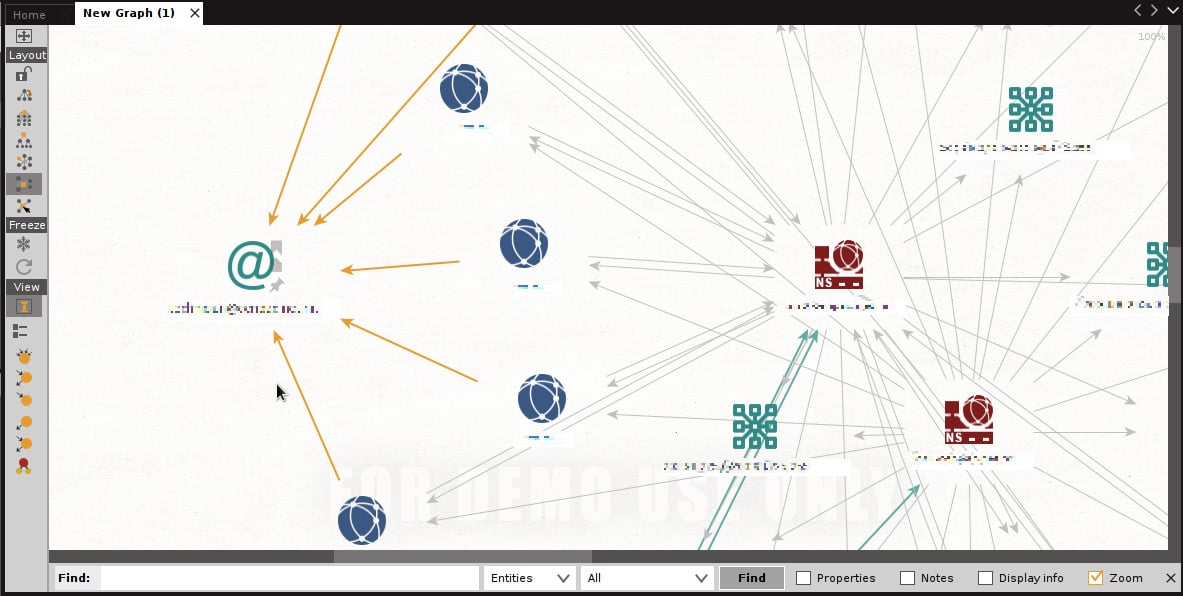
Figure 1.23 – Different entity types and their relationships exposed
Imagine the SE attacks I could leverage with that address, exploiting knowledge that the target may not even realize is associated with these entities, as laid out by Maltego. Consider that satellite dish I mentioned earlier – I even found a Federal Communications Commission (FCC) filing related to the company that owns the dish. The FCC document was a public notice, and hence readily available on the internet – but it doesn’t contain any information about my client! It’s linked to my client via an ASN discovered with Maltego. Why should we care? Once again, social engineering. A well-formed email or well-placed telephone call (I found dozens of phone numbers with Maltego, by the way), pretending to be affiliated with the company that provides the satellite communications? Heck, maybe it wouldn’t work at all. Doesn’t matter – it’s the brainstorming that matters, and Maltego can fuel your imagination.
OSINT with Spiderfoot
Surely there's some sort of open source alternative to manually poking around the internet, you wonder. Maltego is cool, but it's a bit much for my needs, you bemoan. Have no fear, for I have saved the best for last: my personal go-to, Spiderfoot. Some of you may have already clicked it, considering it’s right there in the OSINT Analysis menu. All that happens is it executes spiderfoot –-help, so you can review the options in the command window. I think this is just Kali’s way of reminding us that Spiderfoot is indeed there. From there, you may have even executed spiderfoot –M so you can get a look at the available modules and started to build your first command. I’m going to stop you right there – the real prize in this tool is its web interface. Just run this command: spiderfoot –l 127.0.0.1:5009. Then, pull out a web browser and visit http://127.0.0.1:5009. You can also host this across the network, as I did here:
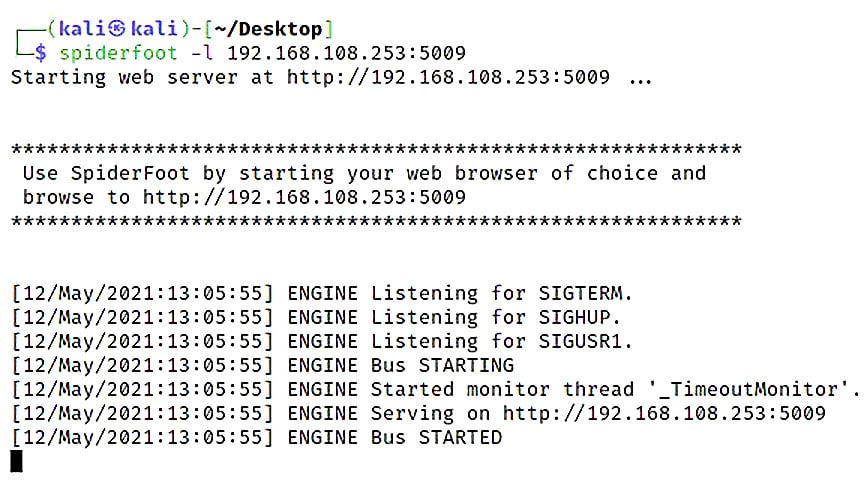
Figure 1.24 – Starting the Spiderfoot listener
Note
Be aware that access is not authenticated – run over your private network at your own risk.
Once you’re in the web interface, click New Scan. You’ll see three tabs that allow you to define how your scan will work: By Use Case, By Required Data, and By Module. The By Module tab is useful for your own custom modules or when you need to fine-tune Spiderfoot’s behavior, and By Required Data is basically like a modules listing, but in a more descriptive way. My standard choice is one of the use cases. Notice how it distinguishes the Passive option – perfect for removing the guesswork about whether your target is getting touched or not. For my assessment, I’m running a quick footprint:
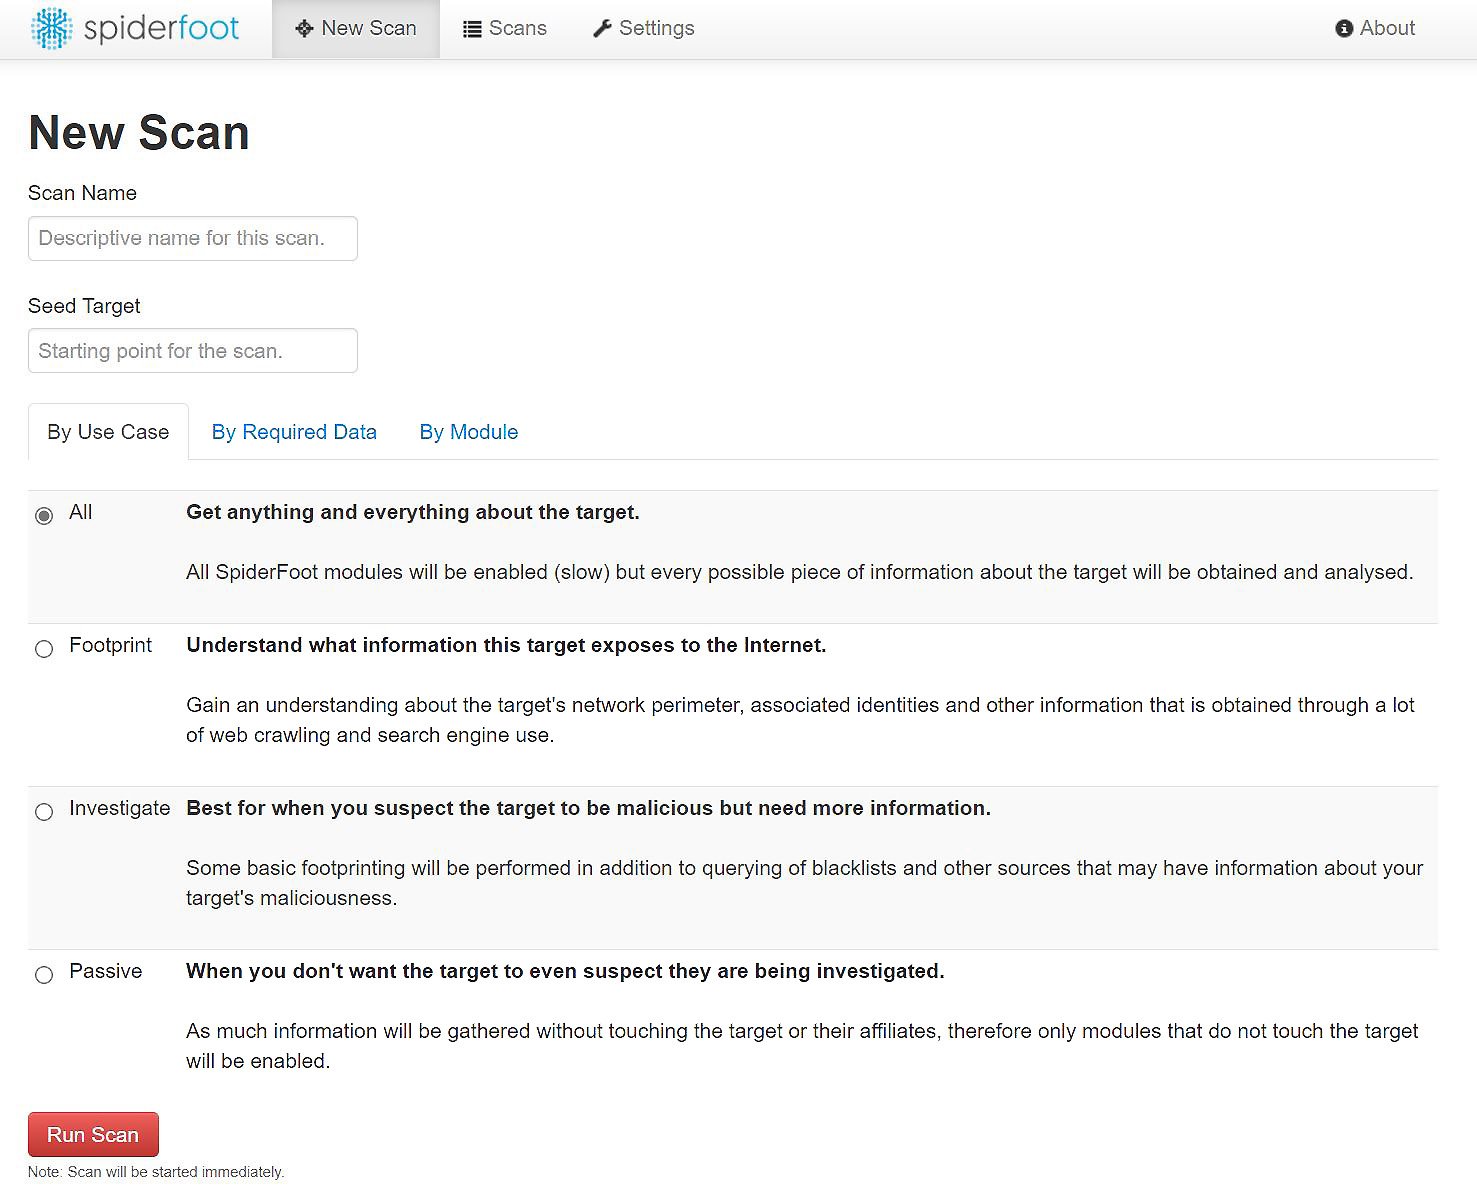
Figure 1.25 – Spiderfoot use cases
Just click Run Scan, sit back, and relax. This is a good time for a coffee break. You can also watch the progress of the scan in real time. The individual data points are called elements, and you can review them while the scan is running, if you’d like. I prefer to let it run in full so that any relationships between the elements can be established. The Status screen will categorize elements by the module type that discovered them, as shown here:
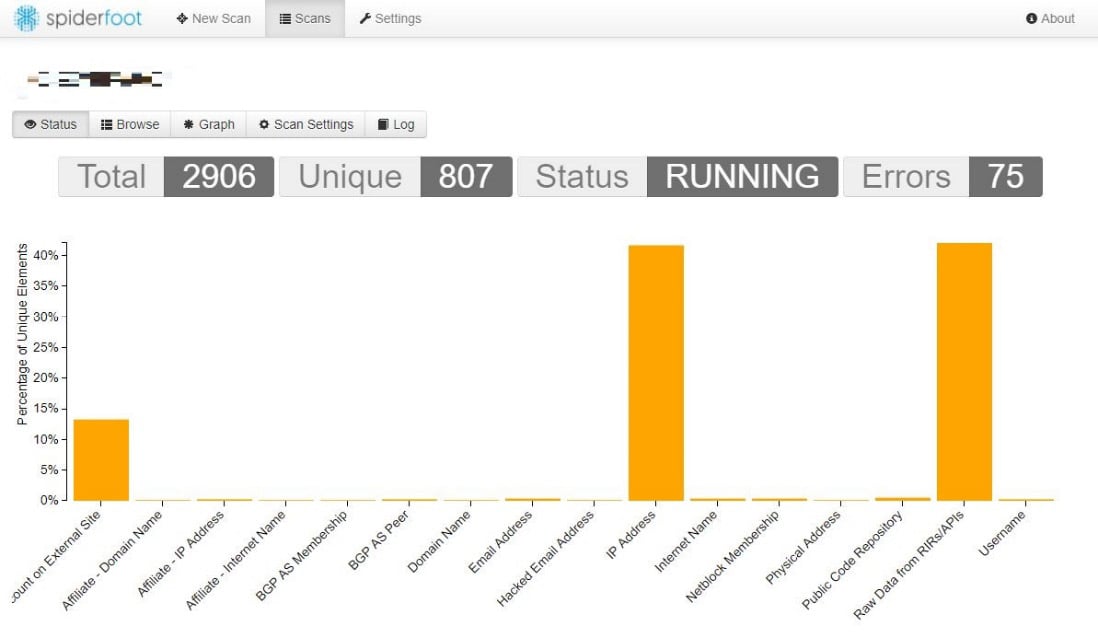
Figure 1.26 – The Status graph during a Spiderfoot scan
Finally, for the visual geek in all of us, there is a graph layout as well. Each element displayed can be dragged, so with a little work, you can create your own layout to highlight relationships between elements. For those larger clients, however, it can look like a mess:
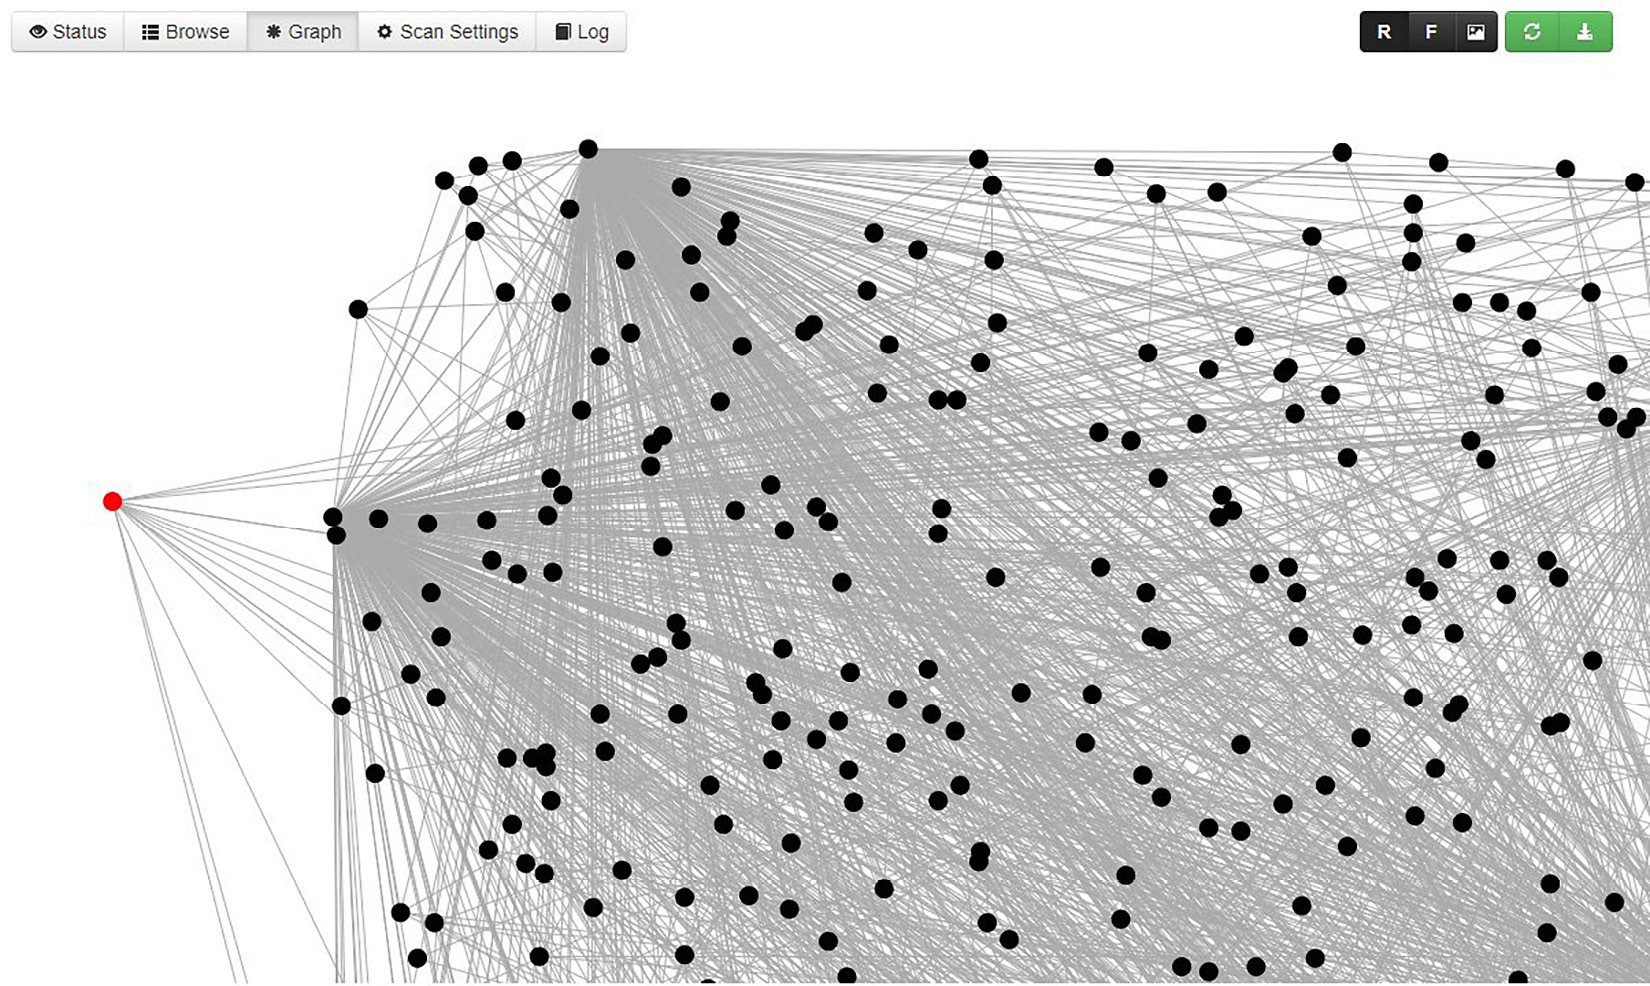
Figure 1.27 – Spiderfoot’s web of relationships
The visual representation of your OSINT data points and their relationships is definitely something at which Maltego excels. Spiderfoot is fast and easy, however, so it might be perfect for getting the ball rolling on your intelligence gathering.
Summary
In this chapter, we jumped into the fun (and disconcerting) world of OSINT. We started our journey by taking a look at what we can find with just our web browser: examining our target’s sites, sending weird requests to see whether we can prompt some funny response that reveals information, and checking out social media and other public resources. We reviewed a few services on the internet that scan and gather this information for us to see whether we can get a head start on our enumeration phase, looking for things such as insecure SSL/TLS, open ports, and just generally anything that’s exposed to the web that would usually take some time and probing to discover on our own. We took a look at what Google can find for us if we’re willing to think outside of the box, and finally, we cracked open our copy of Kali to see what kind of automation is available to us for applying these principles. Of course, this is just the surface of what can be a very sophisticated and surprisingly effective phase of any assessment, but we’ve started training our brains to think a little bit differently about the things our client may take for granted. We’ve dipped our toes into the waters of our client’s information – now, let’s get a little splashy. In the next chapter, we’re going to start probing the network and getting a feel for the insider’s perspective.
Questions
Answer the following questions to test your knowledge of this chapter:
- What is the distinction, if any, between “passive recon” and “OSINT?”
- What are the two primary considerations when evaluating the risk of a vulnerability?
- The program that works within Maltego by taking an entity as input and outputs more related entities is called a ______.
- The maxim which states that we should always assume the enemy knows the system is called _______.
- Banner grabbing is never considered a finding on a pen test report. (True | False)