


To begin our journey, we will need to install IBM WebSphere Application Server (WAS). WebSphere is based on Java and can run on many platforms from Windows through to Unix and even Mainframes. We have chosen Linux Red Hat as our IBM certified Operating System (OS). For the remainder of this book, we will discuss WebSphere Administration from a Linux/Unix standpoint using Red Hat (RHEL) version 4 update 6 as our Linux distribution. It is easy to acquire Linux Red Hat trial ISO images which can be downloaded from the Internet; it is also readily available on CD from your local PC store. We use Linux as opposed to Windows as using WebSphere on Linux lends to being Unix-ready. What we mean is that by learning to install and administer Websphere using Linux, you will be well-prepared and equipped to work with WebSphere for Linux or WebSphere for Unix versions. The skills learned in this book are transferable to WebSphere installations and configurations on all the supported versions of Unix; for example, Solaris, AIX and HP-UX, and other versions of Linux like SUSE. It must also be mentioned that Websphere for Linux can also be installed on CentOS and Fedora and also Ubuntu, which are all open source versions of Linux; however, they are not supported by IBM.
In this chapter, we will cover the following topics:
Planning an application server install
Installation scenarios
Preparation and prerequisites
Graphical installation
Installing base binaries
Understanding profile types
Installing profiles
Verifying and installation
Administration console
Silent installs
Before we begin any WebSphere installation, we would ask the three questions below to help prepare and plan for an installation.
What version of Websphere is required to support your applications?
Investigations are made to ensure that your application will run in the version of Websphere you intend to install. A key point is to understand what version of the Java WebSphere version support. You can go to the following URL to view a WebSphere version compatibility matrix: http://en.wikipedia.org/wiki/Websphere. You may have to speak to your application developers or application vendors to accurately asses JVM requirements.
Are there any OS tweaks for the platform required for the chosen version of Websphere?
It is important to understand what version of OS you are going to use. First decide which platform you are going to install on and then research what the prerequisites are for that platform. Each platform may have certain Operating System (OS) changes or optimizations which are stipulated for correct installation of WAS.
What version of OS and fix packs are required to support the chosen version of WebSphere?
Not only do you need to understand the base installation version, you may also want to understand what the latest fix packs are to ensure that your version of Websphere is fully up-to-date. You can go to the following URL to find the latest WebSphere fix pack version: http://www-01.ibm.com/support/docview.wss?rs=180&uid=swg27004980#ver70. We will cover more about maintenance and fix packs in Chapter 10.
As mentioned above, we have chosen to use Red Hat Enterprise Linux in this book, as it is the most commonly used IBM certified Linux distribution used for Websphere; however, it is recommended that you visit the following IBM URL and read up on the prerequisites for installing Websphere Application Server 7.0 on Linux platforms http://www-01.ibm.com/support/docview.wss?rs=180&uid=swg27012369.
Before beginning an installation, it is advised that you think about the type of WAS install you wish to perform. There are several installation scenarios and knowing which components are available might influence your chosen installation path. You may also wish to think about coexistence or interoperability with other WAS implementations or helper services. Helper services are other applications and/or technologies that may be required for your applications to run correctly on WebSphere and function as per their design. This means you may have to consider installation requirements in addition to those of WAS.
The WAS installation process allows for two main actions. The first being the base binaries which are the core executables and the second being a profile. The base binaries are the product mechanics made up of executables and shells scripts, and can be shared by one or many profiles. Profiles exist so data can be partitioned away from the underlying core. Simply put, a profile contains an Application Server. When an Application Server is running, the server process may read and write data to underlying configuration files and logs. So, by using profiles, transient data is kept away from the base product. This allows us to have more than one profile using the same base binaries and also allows us to remove profiles without affecting other profiles. Another reason for separating the base binaries is so that we can upgrade the product with maintenance and fix packs without having to reconfigure our Application Server profiles. A conceptual diagram is shown below.

During the installation process, you can decide to install different profile types. There are two main profile types: application server profile or a management profile. Your installation scenarios will determine which combination of profile types you will be selecting during the installation wizard. Below is a table explaining the different profile types:
|
Profile Type |
Description |
|---|---|
|
Application server |
WebSphere has the ability to have multiple application server definitions using the same underlying base binaries. Each profile defines the attributes and configurations for a given application server. Each standalone application server can optionally have its own administrative console application, which you use to manage the application server. We will cover how to install a profile later in the chapter. |
|
Management profile |
A Management profile defines an administrative agent which provides a single interface (administrative console) to administer multiple application servers. We will cover the administrative agent in Chapter 8. |
Before we begin any WebSphere installation, we would ask the three questions below to help prepare and plan for an installation.
What version of Websphere is required to support your applications?
Investigations are made to ensure that your application will run in the version of Websphere you intend to install. A key point is to understand what version of the Java WebSphere version support. You can go to the following URL to view a WebSphere version compatibility matrix: http://en.wikipedia.org/wiki/Websphere. You may have to speak to your application developers or application vendors to accurately asses JVM requirements.
Are there any OS tweaks for the platform required for the chosen version of Websphere?
It is important to understand what version of OS you are going to use. First decide which platform you are going to install on and then research what the prerequisites are for that platform. Each platform may have certain Operating System (OS) changes or optimizations which are stipulated for correct installation of WAS.
What version of OS and fix packs are required to support the chosen version of WebSphere?
Not only do you need to understand the base installation version, you may also want to understand what the latest fix packs are to ensure that your version of Websphere is fully up-to-date. You can go to the following URL to find the latest WebSphere fix pack version: http://www-01.ibm.com/support/docview.wss?rs=180&uid=swg27004980#ver70. We will cover more about maintenance and fix packs in Chapter 10.
As mentioned above, we have chosen to use Red Hat Enterprise Linux in this book, as it is the most commonly used IBM certified Linux distribution used for Websphere; however, it is recommended that you visit the following IBM URL and read up on the prerequisites for installing Websphere Application Server 7.0 on Linux platforms http://www-01.ibm.com/support/docview.wss?rs=180&uid=swg27012369.
Before beginning an installation, it is advised that you think about the type of WAS install you wish to perform. There are several installation scenarios and knowing which components are available might influence your chosen installation path. You may also wish to think about coexistence or interoperability with other WAS implementations or helper services. Helper services are other applications and/or technologies that may be required for your applications to run correctly on WebSphere and function as per their design. This means you may have to consider installation requirements in addition to those of WAS.
The WAS installation process allows for two main actions. The first being the base binaries which are the core executables and the second being a profile. The base binaries are the product mechanics made up of executables and shells scripts, and can be shared by one or many profiles. Profiles exist so data can be partitioned away from the underlying core. Simply put, a profile contains an Application Server. When an Application Server is running, the server process may read and write data to underlying configuration files and logs. So, by using profiles, transient data is kept away from the base product. This allows us to have more than one profile using the same base binaries and also allows us to remove profiles without affecting other profiles. Another reason for separating the base binaries is so that we can upgrade the product with maintenance and fix packs without having to reconfigure our Application Server profiles. A conceptual diagram is shown below.
During the installation process, you can decide to install different profile types. There are two main profile types: application server profile or a management profile. Your installation scenarios will determine which combination of profile types you will be selecting during the installation wizard. Below is a table explaining the different profile types:
|
Profile Type |
Description |
|---|---|
|
Application server |
WebSphere has the ability to have multiple application server definitions using the same underlying base binaries. Each profile defines the attributes and configurations for a given application server. Each standalone application server can optionally have its own administrative console application, which you use to manage the application server. We will cover how to install a profile later in the chapter. |
|
Management profile |
A Management profile defines an administrative agent which provides a single interface (administrative console) to administer multiple application servers. We will cover the administrative agent in Chapter 8. |
Before we start with the WebSphere Application Server installation, we need to ensure the correct installation media is available and that the operating system prerequisites have been met. It is also important to ensure that there is enough free disk space on your Linux file system and that you have a large enough /tmp folder. A recommended size for the /tmp folder is 1 Gigabyte; this will also later cater to deployment of large applications. The installer program checks for required space before calling the installation wizard and will inform you that there is not enough disk space; however, it is good to be prepared upfront.
For our first installation, we are going to use the Installer in graphical mode to install and configure our WAS. We are going to install our WAS in two parts. Part 1 will be installation of the base binaries and part 2 will be installation of a profile. In each part, we will list the actions as a set of steps.
The WebSphere 7 trial installation process is almost identical to the official product release, the major difference being that you will get more supporting information with the official product media and that a few extras show up in the installation wizards.
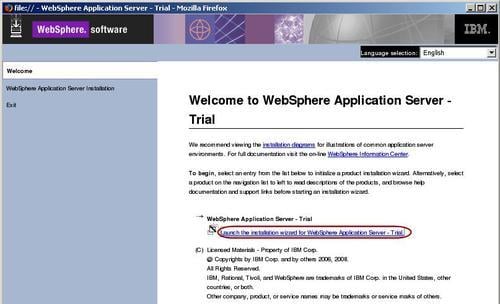
Normally, the installation media for WebSphere can be obtained on CD or downloaded from IBM using an online passport advantage account. If your organization has a passport advantage account, then media CDs can also be requested to be delivered as part of your license agreement. Nowadays, it is more common that software is delivered by wire (via the Internet). For our installation media, we are going to use the demo trial, which can be downloaded from the IBM developer works site at the following location: http://www.ibm.com/developerworks/downloads/ws/was/. Below is a screenshot of what the IBM download site looks like:
Note
Helpful hint: If you do not already have an IBM login, then you will need to register and complete a small questionnaire. Once completed, you will be directed to the trials download page.
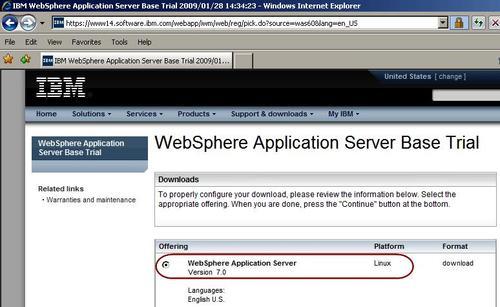
Download the trial for Linux from the site mentioned above. The file you are looking to download is called was.cd.7000.trial.base.linux.ia32.tar.gz. You may need to locate the download by name, that is, WebSphere Application Server for the Linux platform.
Select and download the file to a temporary location, for example, c:\temp, on your desktop and transfer the installation binary to your Linux machine via secure File Transfer Protocol (FTP).
It is recommended that you copy the files onto your Linux box into a folder where you can keep the install binaries for later reference, for re-install, or for adding new features post-installation. You can use a secure FTP client or secure copy client, depending on your preference of file transfer tools. It is best to use a secure shell (SSH) for all conversation with your Linux server and so we will be using the open tools WinSCP (Secure Copy) and PuTTY. WinSCP is an open source SFTP and FTP client for Microsoft Windows which we will use for file transfers to and from our Linux server. PuTTY is a terminal emulator application which is often used as a client for the SSH and Telnet protocols and we will use it for shell access.
PuTTy can be downloaded from http://www.chiark.greenend.org.uk/~sgtatham/putty/download.html. Both tools are open source and are free for use.
1. To install PuTTY, download the PuTTY executable and save it in a location on your desktop.
2. Create a shortcut to PuTTy which is easily accessible as you will be using PuTTY to connect to Linux.
The step-by-step procedure to install the trial version to your LINUX server is as follows:
Note
Check disk space to ensure you can complete the installation. You can use the Linux command df — k to see how much file system space you have.
2. Once you have uploaded the trial, log in with a secure shell (for example, PuTTY) as root, navigate to the
tar.gzfile location, and decompress the file by using the Linux unzip tool called gunzip as shown by the command below. gunzip expands files that have been reduced by gzip, which shrinks files using compression algorithms.
gunzip ./was.cd.7000.trial.base.linux.ia32.tar.gz
3. The
tar.gzfile will now become a tar file and we can decompress the tar file by using the Linux commandtaras follows.
tar -xvf ./was.cd.7000.trial.base.linux.ia32.tar
Explanation of options used in the tar command:
options — xv:decompress with verbose screen loggingoption f:the filename we wish to decompress.
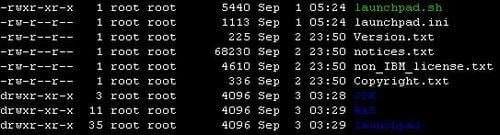
After extracting the installation files, navigate to the folder where you decompressed the tar file to. If you do a listing of the directory, you will see a shell script named launchpad.sh, as seen in the screenshot below:
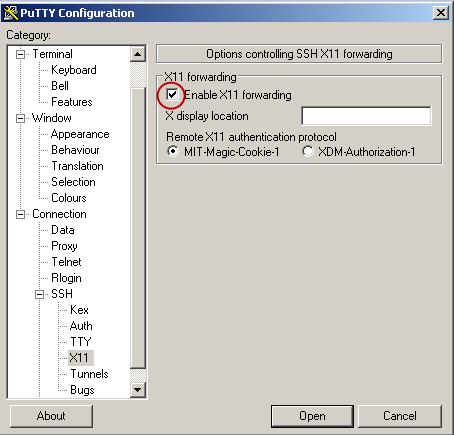
Since our installation requires the use of a graphical user interface (GUI), before we start the installation we need to ensure that we set up PuTTY correctly for use with X Windows. The X Windows system (commonly X or X11) is a protocol that provides a GUI for Unix-based systems.
To set up PuTTY for use with X Windows, we need to enable X11 forwarding. We do this by changing the X11 option in the properties of PuTTY as found in the Connection | SSH | X11 option in the Category panel tree, as seen in the screenshot below:
To test X Windows, we will also need a Windows X server. Xming is an open X Windows server which we will use. Xming can be downloaded from the following URL:
http://www.straightrunning.com/XmingNotes/
Once installed, we can run Xming and do a quick test with our SSH session to ensure that X Windows is working. When Xming is running, you will see an X icon in the Windows system tray on your desktop, similar to the one shown in the following screenshot:

Note
It is recommended that you also install Xming-fonts to ensure that all WebSphere-related installation products run error-free. Without the correct X-fonts installed, certain installation products can fail. Installing Xming-fonts ensures that there are appropriate fonts available which are used by installers. You can download Xming-fonts from the same Xming web site and install over the top of the base Xming installation.
Once you have set X11 forwarding in PuTTY, you can run the xclock command to test if X Windows is running. If it is, you will see a clock popup if Xming and PuTTY are working correctly.
Note: To connect from our PC desktop machine to an X Windows session, we will need to export the display. To export our display, we will need to get the IP address of our PC. We can do this by using a command prompt and typing the Windows command ipconfig, as shown in the following figure:
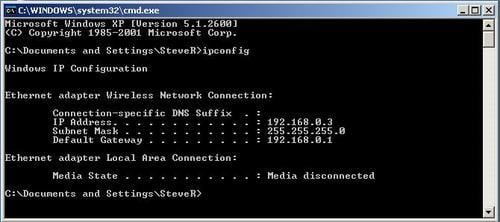
Once we know our local PC's IP address, we can then type the following command:
export DISPLAY=<localhost>:0.0
(The last set of digits here are your IP address.)
We can now type xclock and we will see a clock popup as an independent X Window.

Before running the WebSphere trial installation script, we need to check the umask. The umask setting controls which permissions will be masked (not set) for any newly created files, for example, 022. By using the Linux command umask, we can check the current umask. It needs to be set to 022. We can set this by typing the command umask 022 in a secure shell. Using the umask command ensures that all new files will be set with the 8-bit inverse permission of 755. This translates as follows: the owner of the file gets rwx (Read, Write, Execute) permissions and groups and others will have rx (Read, Execute) permissions. In simple terms, the root user will be able to view and navigate files as well as edit and run scripts. All users in the group root will have only read and execute permissions, the same as any other user, which means they can only view and navigate files in the WebSphere installation tree of files. Discussing the details of Unix file permissions is beyond the scope of this book. There are many online tutorials that can give you a quick overview of Unix file permissions.
WebSphere should be installed as root and after the installation is complete the ownership of the installation binaries should be changed to an appropriate non-root user. How this is done is not covered in this book. It is recommended that a non-root user and appropriate associated group be created. Once WAS has been installed using root, the ownership is changed to the new user and this user is then used to administer WAS at the Linux shell level. To keep things simple in all our exercise, we will be installing and running WebSphere instances as the root user so that our WebSphere installation will work with all the third-party products we will install throughout this book, without having to get sidetracked by security and folder permission errors.
Once you have X Windows working, launch the installation wizard by running the installation wizard launchpad using the following command:
./launchpad.sh
The following figure shows the installation launchpad:
You will be presented with the IBM Launchpad. As you can see, there is a link to installation diagrams. It is recommended that you familiarize yourself with these diagrams as they explain visually the possible installation scenarios very well.
To continue with the actual install, click Launch the installation wizard for WebSphere Application Server — Trial as shown in the preceding screenshot.
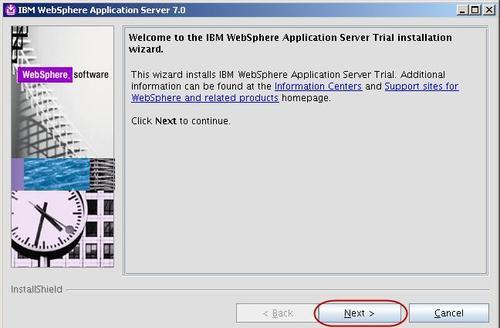
You will be presented with the installation wizard welcome screen as seen below:
Clicking on Next will take you to the software license agreement screen.
It is a requirement that you accept the license agreement; this is also a requirement which we will see later in the Silent installation section.
Click Next to move on to the prerequisites check.
The installer will check to ensure that your Linux OS meets the required prerequisites. If your OS is not patched to the correct level, you may see a screen similar to the one below:
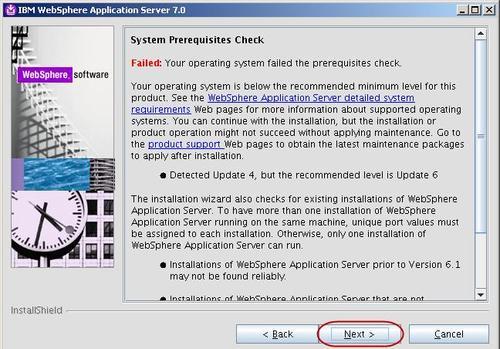
You can fix the operating system by applying appropriate patches/updates which is a Linux administration activity. If the wizard prompts you with an error, you may have to consult your Linux distribution's web site for more information. The installation wizard will prompt you for certain Linux dependencies required for the installation to progress.
Linux OS patches are often downloaded from sites on the Internet which offer RPMs. If there are no Linux patches required, simply ignore and continue. If you are prompted for patches to be made, it is recommended that you quit the installation at this point and ensure the prerequisites are completed as the installation is restarted. If you don't care, you can move on.
This is one of the reasons why we chose Red Hat Linux as it is a certified platform for IBM WebSphere. If you are unsure about platform prerequisites, it is recommended that you consult the online IBM Information Center Portal for IBM WebSphere which is located at this address: http://publib.boulder.ibm.com/infocenter/wasinfo/v7r0/index.jsp. This Info Centre web site will provide just about all the detailed information you would ever need about WebSphere Application Server. The best way to use it is to search for keywords using the search facility or to browse through the index. The Installing and verifying Linux packages section is particularly useful if the wizard outlines prerequisite issues.
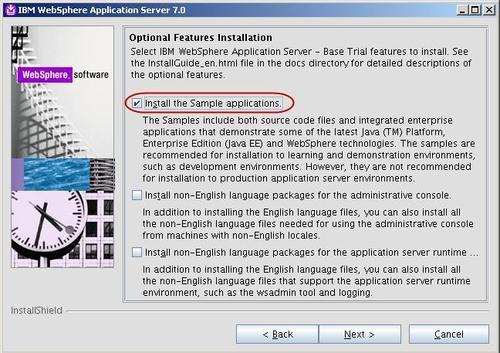
As shown in the following screenshot, enable the installation of samples by checking the Install the Sample applications checkbox. Checking this option ensures that the sample applications are installed into the base binaries so in later exercises we can use these sample applications in demonstrations. You can read more about the sample applications in the IBM Information Centre. There is a complete set of pages dedicated to explaining the samples and how to use them to learn specific technologies and concepts of J2EE (Enterprise Edition) and WebSphere.
Click Next to continue to move on and set the installation folder locations.
You can change the installation directory. Often in production environments the default option is not used. It may be useful to shorten the folder names, which will make it easier for administration later when we need to navigate through the WebSphere file systems. For our purposes, we are going to change the default folder from /opt/IBM/WebSphere/AppServer to /apps/was7. Take note of this path as we will now refer to this path as the<was_root> path.
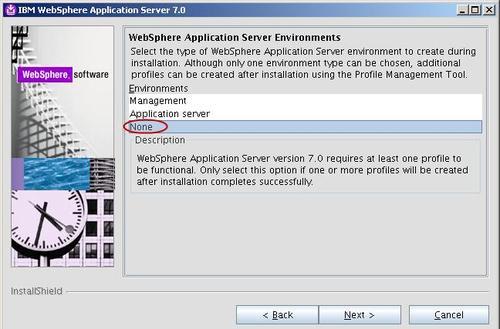
Depending on which installation scenario you chose, you will now have to select a type of installation. The type of installation chosen will determine whether a profile is created or not.
There are three types of installation options listed by the wizard as shown in the following table:
|
Installation Option |
Description |
|---|---|
|
Management profile |
A management profile includes an administrative agent server and services for managing multiple application server environments. An administrative agent manages application servers that are on the same machine. |
|
Standalone application server |
A standalone application server environment runs your enterprise applications. The application server is managed from its own administrative console and functions independently of all other application servers. |
|
Base binaries |
WebSphere Application Server version 7.0 requires at least one profile to be functional. Select this option only if one or more profiles will be created after installation completes successfully. |
Since it is good practice to understand the possibilities in which WebSphere can be installed, we are not going to use the wizard default of standalone application server. We are going to choose None which will install the base binaries only. The binaries in their own right are not useful unless at least one application server profile is created. After the base binaries are installed, we will use another tool called the Profile Management Tool to demonstrate how to independently create an application server profile.
When asked if you want to proceed without creating a profile, click Yes.
The installation wizard will now search for installable fixes; however, since we have not prepared any, the installer will continue. We will cover maintenance and fix packs later on in Chapter 10, however, in reality, you would want to now update WebSphere with the latest fix pack to ensure that the base binaries are fully up-to-date. This will ensure that any subsequent profiles will also contain the latest fixes. Click Next to move on to the installation summary screen.
Before the next screen loads, the installation wizard will double-check that the current user has permissions to install to the folder specified in locations. Since we are installing as root in our example, it really doesn't matter as we have full system privileges. For production environments, it may not be possible to install as root due to company policy. Some companies may allow sudo access. Sudo to root access is an administrative feature that allows users to do root work as another user and an audit log captures all the commands that are issued. As discussed previously, we can install as non-root user; however, for demonstration we have elected to use root access to minimize issues in our learning because root access is granted full system privileges.
When you click Next, the installation process will now run and install the base binaries. Once completed, we will be presented with an installation report, as seen in the following screenshot.
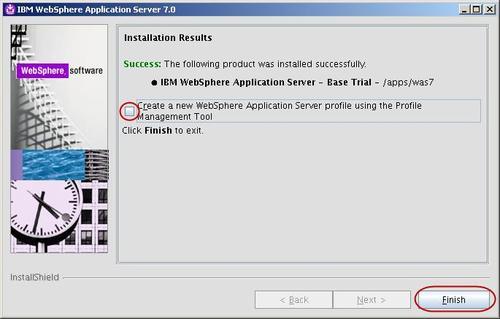
You can click Finish to complete the installation.
Earlier in the installation wizard we chose to defer the running of the Profile Management Tool so we could later demonstrate the manual creation of a profile. This means that all we have installed at this point is the base binaries.
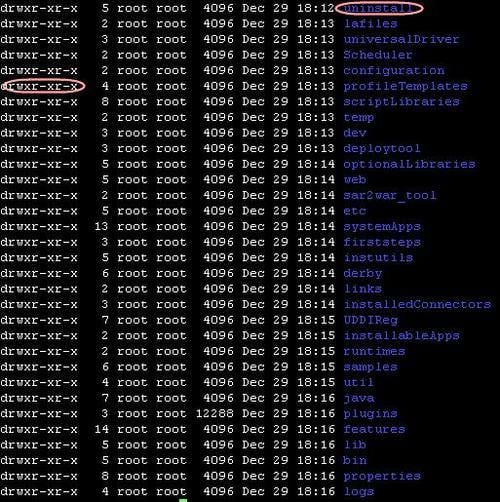
By looking at the files installed by the installer, we will see what makes up the base binaries. You will also notice that the folder permissions are rwxr-xr-x (755), which is a result of the 022 umask we set before we ran the installation wizard. The screenshot below shows a typical list of the<was_root> directory.
We will now do a quick check to see if the base binaries have installed correctly by running the WebSphere command script installver.sh (which is found in the bin folder). We can generate a report which will identify the state of the installation.
From now on, we will refer to folders relative to the base install folder; for example, using the syntax<was_root>/<folder_path> will mean the WebSphere base installation folder plus the path we are working with. In our examples, we have a<was_root> of /apps/was7 because we set the installation path as such in the installation wizard. Since you may not follow this convention, to make it simpler we will make all paths relative to<was_root> which you can substitute with the base folder naming convention you have chosen.
Run the following command:
<was_root>/bin/installver.sh
The result of running the command above will be a report similar to the following:
By themselves, the base binaries serve no purpose. We must create a profile which is essentially an application server definition. We use the Profile Management Tool (PMT). The tool is an X Windows tool. To run it, type<was_root>/bin/ProfileManagement/pmt.sh
As shown in the next screenshot, when the PMT has loaded, the option to create a profile will be available.
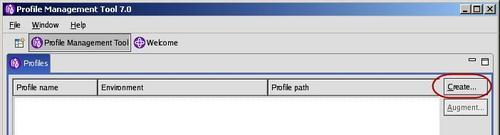
Click Create to start the profile creation wizard. You will then be presented with the Environment Selection screen. In the Environment Selection screen, we are now going to create a profile which will define our application server.
Select Application server from the list of options, as shown in the screenshot below:
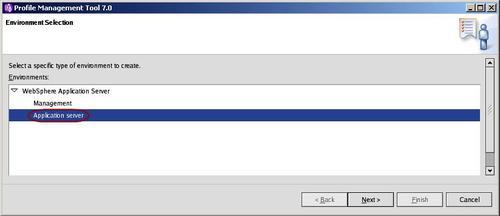
At this time, we are only interested in a standalone application server. If we wanted to administer multiple application servers with a single administration console, then we can create a management profile to have a single administration interface which can manage multiple application server nodes. We will cover more about the administrative agent in Chapter 8.
Click Next to move on to the Profile Creation options screen shown in the following screenshot:
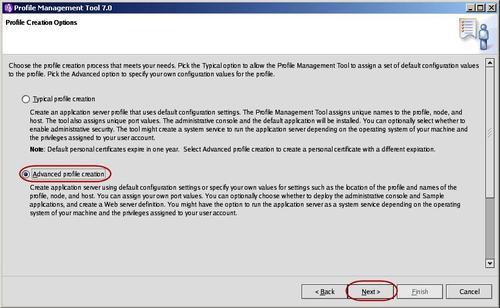
In the Profile Creation options screen as shown above, select Advanced profile creation as shown in the above screenshot. Choosing this option allows for greater choice and flexibility and control of our profile creation as opposed to using a default configuration.
Click on Next.
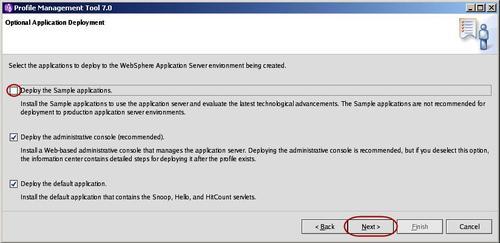
Since we opted for the sample applications to be made available during our base install, we now have the option to now install sample applications as part of our new profile. We do not wish the sample applications to be installed in our new application server profile. The sample applications will still exist in the base installation, but we are not using them in this profile. Uncheck the Deploy the Sample applications checkbox as shown below, then click Next to continue.
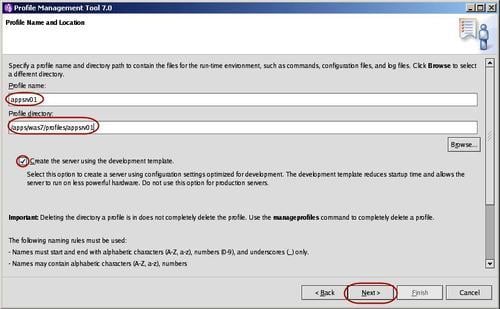
In the next screen, we determine the actual name for our first profile and the location where it will be created. The profile will make up our application server definition. Type appsrv01 in the Profile name field and /apps/was7/profiles/appsrv01 in the Profile directory field as shown in the next screenshot. In our example, we have chosen to select the Create the server using the development template option, which speeds up server start-up. Since we will be starting and stopping the server many times during our learning, it is recommended we turn this option on to save time when waiting for server restarts. For production, we would turn this option off. Click Next to move on to the next screen.
Note
Using lowercase for all folder names makes it easier to remember the case when typing folder paths in Linux, as Linux is case-sensitive.
The next screen is the Node and Host Names screen. The Node name is an important part of the installation process. It is recommended to keep this name as short as possible. We will cover the concept of nodes in later chapters.
The Server name is the actual name of the application server's JVM. This name will be referred to in logging and configuration, which we will address in later chapters.
The Host name will automatically be taken from the OS hosts file and can be changed in the wizard at this point to suit your requirements. You can use a hostname, IP address, or Fully Qualified Domain Name (FQDN). If you decide to change the hostname in the wizard, ensure that the change is reflected in your host file or DNS as required.
Note
If you use an FQDN, first test that it is resolvable. In our eexamples, we will be using a manually derived hostname for simplicity. Our hostname will be WebSphere and our domain name is redhat.com. The FQDN will be websphere.redhat.com. This is not a real Internet domain. We are running on a private network so we can call it whatever we like, as long as our OS host file is configured correctly.
We do not require a DNS server to be set up for our examples.
Below is an example of our host file:

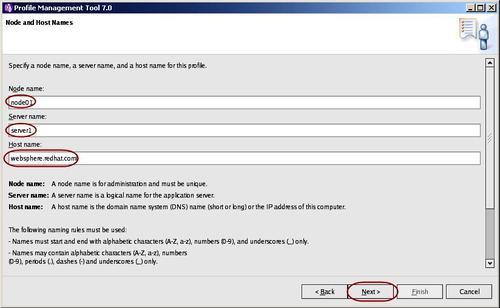
As shown in the preceding screenshot, we want to enter the following values, as listed in the table below into the fields on the Nodes and Host Names screen.
|
Field Name |
Field Value |
|---|---|
|
Node name |
node01 |
|
Server name |
server1 |
|
Host name |
Use We have used websphere.redhat.com |
To move on to the Administrative Security screen, click Next.
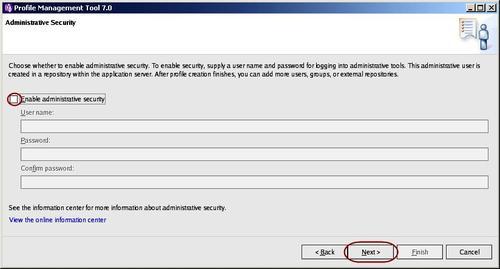
In the Administrative Security screen, we will disable administrative security for now and re-enable it in Chapter 3. It is recommended for production environments that you enable administrative security right from the start to secure against unwanted changes being made to your server configuration by non-administrators. Leave the option Enable administrative security unchecked and click Next to move on to the security certificate screens.
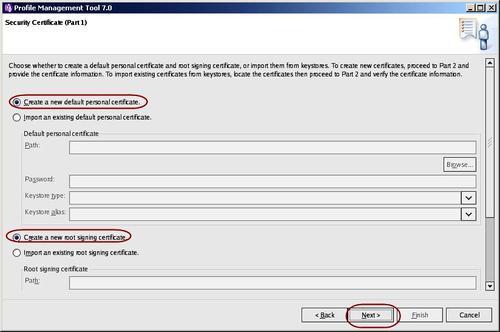
As shown below, the next screen is the Security Certificate (Part 1) screen. This is a new feature of the WebSphere 7 installation wizard. In previous versions of WebSphere, the security certificate screens were not available. The options available are to either use default certificates, use an existing keystore, or create one from another Certificate Authority (CA). For now, we will use the default keystore as generated by the installer. Certificates which are used for SSL are beyond the scope of this book. We will accept the default settings for this screen as shown below. Click Next to go to the Security Certificate (Part 2) screen.
The next screen is the Security Certificate (Part 2) screen. We will accept the defaults, so you don't need to change anything on the screen that follows. Just click Next to move on to the Port Value Assignment screen.
WAS requires several ports during runtime. It is wise to ensure that no other application is already using the ports that you wish to use. The wizard is quite clever and will detect port usage and recommend free ports; however, it is recommended that you use the Linux command netstat an to ensure that no other applications are using these ports. Use the following steps to check for used ports:
1. Open a secure shell to your Linux server using PuTTY.
2. Type the following command:
Netstat —an
3. In the report that is generated, you are looking to see if ports have already been used, as shown below:
In the table below, you will be able to see what ports WebSphere uses.
|
Port Name |
Default Port Value |
|---|---|
|
Administrative console port |
9060 |
|
|
9043 |
|
HTTP transport port |
9080 |
|
HTTPS transport port |
9443 |
|
Boostrap port |
2809 |
|
SIP port |
5060 |
|
SIP secure port |
5061 |
|
SOAP connector port |
8880 |
|
Administrative interprocess communication port |
9633 |
|
SAS SSL ServerAuth port |
9401 |
|
CSIV2 ServerAuth listener port |
9403 |
|
CSIV2 MultiAuth listener port |
9402 |
|
ORB listener port |
9100 |
Since this is our first WAS profile on the Linux machine, we will use the defaults recommended by the wizard, as shown in the screenshot below:
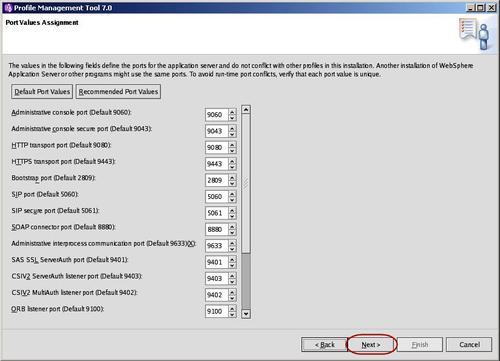
The administrative console port is very important. We will use this port to gain access to the administration console. Please take note of this port detailed as the Administrative console port (Default 9060) field as seen in the screenshot above.
Click Next to go to the next step of the installation, where we choose whether we want WebSphere to automatically restart on reboot.
If you wish to have WebSphere automatically start up again when Linux is rebooted, then you can enable this option. If enabled, the wizard will generate an automatic start and stop script in the init.d directories as required by the Linux runlevels. We will not be discussing Linux runlevels in this book; please consult your Linux documentation or search the Internet.
We don't require WebSphere to start on reboot, so we will leave the Run the application server process as a Linux service checkbox unchecked.
Note
Helpful hint: Automatic start and stop scripts are recommended for production environments. However, Linux administrators may wish to craft their own start-up scripts. If you wish to learn how these start-up scripts work, then enable the creation of the Linux Service Definition to view the resulting script and it is also recommended that you consult how Linux runlevels work.
Note
If you wish to add a service definition post-install and have appropriate access, you can run the WebSphere<was_root>/bin/wasservice.sh command script, which will create the appropriate start and stop scripts.
The next screen that is displayed is about Web Server definitions. We will be covering Web Server definitions in Chapter 8. For now, we will skip this screen, leaving the Create a Web server definition checkbox unchecked. Click Next to move on to the Profile Creation Summary screen.
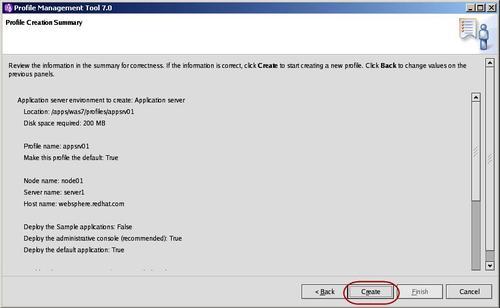
The final step of the wizard is Profile Creation Summary. The wizard presents a summary of your configuration options. If you are not happy with your configuration, you can go back and change your settings. If your settings are correct, then you can click Create, which will start the profile creation, as seen in the screenshot below:
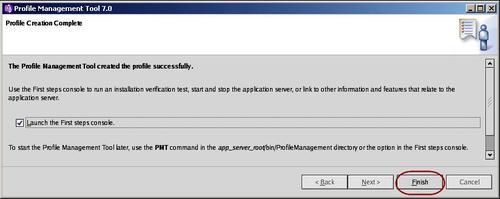
Once the profile creation is complete, you can choose to run the First steps console which provides a few checks which you can run to verify that the installation and profile creation was successful.
To verify your installation, it is best to ensure that you run the First steps console. Launch the console by selecting the on-screen option and clicking Finish, as seen in the following screenshot:
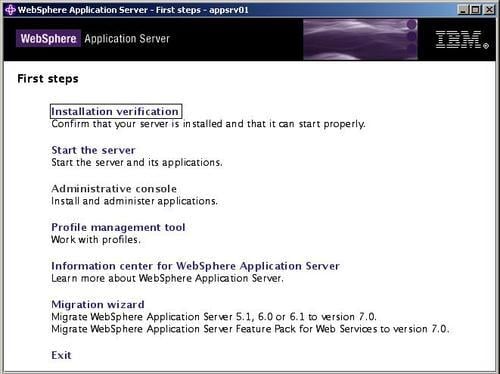
After the wizard has completed the install and profile creation, there are several checks that you can do to ensure that your installation and profile creation was successful. By running the First steps console, we can get quick proof that the WAS is functional.
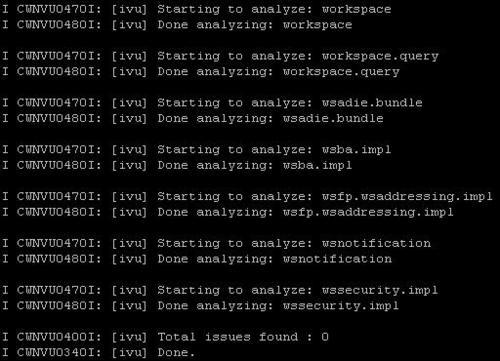
Click on the Installation verification option in the First steps console as shown below, to run the ivf tool.
A report similar to the one below will be generated:
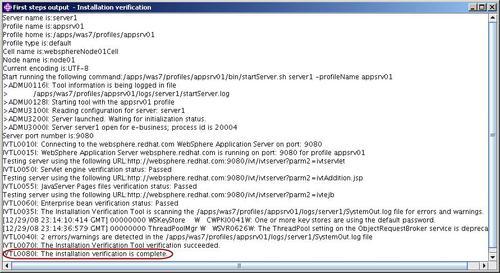
The tool will report the line The installation verification is complete (highlighted in the screenshot) if there were no problems with the installation.
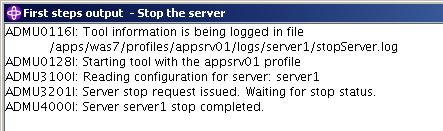
Now that we have proven the application server was able to start, we can now stop the server by clicking on Stop the server, as seen in the following screenshot:
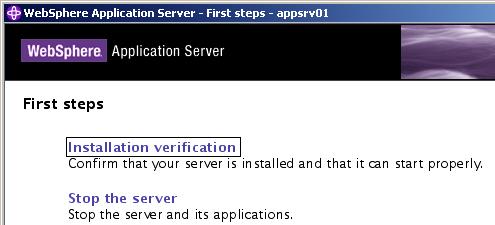
The First steps console should now report that server1 has stopped. The following screen shows this:
We have now successfully installed the WebSphere Application Server.
During the installation process, the installer will create a vdp.properties file. This file is located in the current user's home directory. Since we installed using root, the file is located in /root.
Since the installer is based on the install shield product, it creates the vdp.propeties file, a product registry, which lists WebSphere products and features that have been installed.
The vpd.properties file is for informational purposes only and should not be relied on to accurately list installed applications. When the product is uninstalled using the uninstaller, the vdp.properties file is updated. However, there are known limitations with this registry and when product features are removed or updated the registry may not follow suit. The installRegistryUtils command can be used to list the installed products and can be used to help identify issues after uninstalls. It is another tool that can aid in verifying if your installation is successful and can be a source of information during troubleshooting of a malformed installation.
Note
Another useful utility is the ./versionInfo.sh command located in<was_root>/bin, which when run reports the current installation version and applied fix packs. This command is covered in Chapter 10.
The installer logs events as it is installing the WAS product. If there is a problem with your installation, you can consult the logs. The log.txt file is located in the
<was_root>/ logs/install/ folder.
You can use the Linux command view (read only version of vi) or your favorite Linux text editor to look at the file.
Here is an example of the last few lines of the installation log, post a successful installation.
(Dec 29, 2008 6:16:14 PM), Process, com.ibm.ws.install.ni.ismp.actions.SettleNIFRegistryAction, msg1, Current install/uninstall process is successful. Process type is: install
(Dec 29, 2008 6:16:14 PM), Process, com.ibm.ws.install.ni.ismp.actions.SetExitCodeAction, msg1, CWUPI0000I: EXITCODE=0
(Dec 29, 2008 6:16:14 PM), Process, com.ibm.ws.install.ni.ismp.actions.ISMPLogSuccessMessageAction, msg1, INSTCONFSUCCESS
Log files are the lifebloods of WAS. They are used for problem solving and runtime status. We will delve more into logging in Chapter 5.
Similar to the installation logs, the Profile Management Tool (PMT) also leaves a small foot print of logs detailing the profile creations.
During the creation of a profile, the PMT logs to a file called pmt.log in the<was_root>/logs/manageprofiles folder. This log file can be used to help diagnose causes of issues when a profile creation fails. This file most probably will not need to be consulted very often.
To test our application server is functioning correctly, we will log in to the administration console. The administration console is a web application which is used to configure the WebSphere Application Server. You can use it to perform tasks such as:
Add, delete, start, and stop application servers
Deploy new applications to a server
Start and stop existing applications, and modify certain configurations
Add, delete, and edit resource providers
Configure security, including access to the administrative console
Details are covered in Chapter 3
Collect data for performance and troubleshooting purposes
Details are covered in Chapter 7
Currently, the application server is in a stopped state. Before we can log in to the admin console, we must start the newly created application server. To start the application server, we can use a special command script. Command scripts are found in the<was_root>/bin directory.
There are two scripts that we will use often throughout the book to start and stop WAS.
|
Script Name |
Description |
|---|---|
|
|
Used to start a given application server. Usage: |
|
|
Used to start a given application server. Usage: |
To start our application server, we will use the startServer.sh command as follows:
<was_root>/bin/startServer.sh server1
Once you run the script, you will see the following output in your SSH session:
ADMU0116I: Tool information is being logged in file
/apps/was7/profiles/appsrv01/logs/server1/startServer.log
ADMU0128I: Starting tool with the appsrv01 profile
ADMU3100I: Reading configuration for server: server1
ADMU3200I: Server launched. Waiting for initialization status.
M
When the server has actually started, you will see an extra line mentioning that the server has started and its associated Unix Process ID (PID).
ADMU3000I: Server server1 open for e-business; process id is 3813
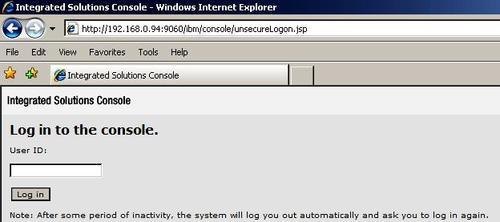
Now that the application server has started, we can navigate to the admin console URL. We can craft the URL as follows.
http://<hostname>:<port>/ibm/console
We have noted earlier that an important port to note was the admin_default port, which in our case is 9060. By using this port and the IP address of our server, we can access the admin console using a URL similar to the URL demonstrated below:
http://192.168.0.94:9060/ibm/console
Note
If we made a host-file modification on our desktop machine, we would be able to use a hostname or FQDN to access the admin console; for example, http://websphere.redhat.com:9060/ibm/console
If we were able to browse from the local machine where the application server was running, we could use http://localhost:9060/ibm/console.
When we navigate to the admin console URL, we see the following page:
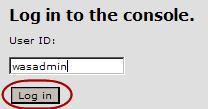
During the installation, we opted to not turn on global security, and so we can log in using any username and no password is required. For the purpose of this book, we will log in as wasadmin as shown below:
Once logged in, we can see the administration console welcome screen and the main navigation panel on the left-hand side (LHS). Looking at the LHS panel shown in the following screenshot, we can see a list of all the configuration items, that is, features and resources that are available for WAS administration.
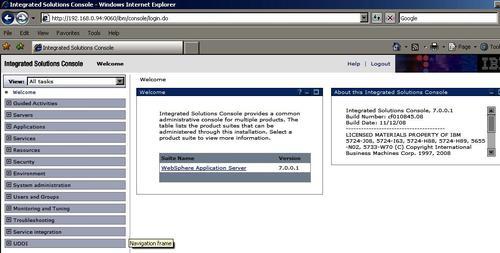
The administration panel provides a GUI that allows administrators to administer WAS. There is also an interactive command line interface called wsadmin.sh created for administering WAS without using the admin console. We will cover administrative scripting in Chapter 4.
So far, we have covered using the GUI approach to install WAS. The installation wizard can also be run silently. By using special response files, we can pre-set installation settings and the installation will not require any user input.
Using response files is the technique used in automatic installations where servers are built to a known standard and naming convention. This ensures that each new WAS is installed exactly the same each time. This is critical for production environments to ensure each server is configured the same way. This lends to easier support and fewer errors are introduced into environments, which is a key factor in supporting production systems. Another reason that it is vital to know how to use silent installations is that some organizations do not install X Windows on production servers for security reasons.
Below is a list of the main sections where you can change properties to customize your own installation. The file is fully commented and is self-explanatory. It only takes a short while to edit as required to craft a customized silent installation.
|
Section |
Description |
|---|---|
|
License Acceptance |
This must be edited to true for a silent install to work. |
|
Non-root Installation Limitations |
This option indicates whether you accept the limitations associated with installing as a non-root user. |
|
Prerequisite Checking |
By default, the installer checks the system for prerequisites. You can change how this is done. |
|
File Permission Checking |
By default, the installer does not check whether the user account that is running the installation has sufficient permissions to perform the installation. You can change this to be more permission-aware. |
|
Installation Type |
The default installType setting is to install without the samples. You can change this option. |
|
Administrative Security |
To configure administrative security, an administrative username and password must be specified. Additionally, if the Application Server Samples are installed, a password is also required for the Samples user. |
|
Installation Location |
Specify a valid directory path into which the product can be installed. |
|
Trace Control Output |
Trace output is saved as both text and XML files by default, but it can be restricted to only one output format. Tracing can be used to help diagnose installation issues. |
|
Profile Settings |
Determine whether to create a management or standalone profile. The following sections explain the settings for management profile or standalone profile configuration options, which are located at the end of the response file. |
Locate the sample response file. It is located in<was_install_root>\WAS. The response file is named responsefile.base.txt. Copy and rename the file to response.txt. This will preserve the original file as a backup in case we need it again later.
Run the installer in silent mode by passing the name of the response file as a command line parameter. Here is an example:
<was_install_root>installer -options "/<responsefile.path>/<responsefile.txt>" -silent
You can tail the logs mentioned above to show progress of an install. We will look at the tail command in more detail in Chapter 5.
After the silent installation has completed, examine the logs for success. The logs are located in<profile_root>/logs/install/log.txt. By examining these logs, you can see if there were any errors during the installation.<profile_root> is the notation syntax we will use to determine the root of the application server profile.
In this chapter, we covered how to install an application server and learned that there are different optional installation scenarios. Depending on requirements, there are multiple ways to install WAS. The manual techniques shown above have given a cross-section of possible install variations and demonstrated how flexible the installation process is. We covered the ability to use a silent installation by using a customized response file and that silent installs dramatically speed up an installation. When installations are frequent, a response file approach ensures less installation errors due to the fact that it requires no human intervention and once configured and tested, it can be run again and again without introducing errors that are often introduced when information needs to be typed into fields as required by the graphical installer. We were also introduced to the start and stop command scripts and had a brief look at the administration console. A reoccurring theme in this chapter was the use of evaluating logs to ensure our installations were successful and error-free. Ensuring we have a stable base set of binaries and correct, configured profile will ensure our application server is less likely to contain errors related to the actual installation process.

