


In this chapter, we will cover the following topics:
Installing Webmin on a Debian-based system
Installing Webmin on an RPM-based system
Installing Webmin on another system
Connecting to Webmin
Installing additional Webmin modules
Monitoring what Webmin is doing
Controlling which system services are started at boot
Inspecting the installed software packages
Installing software packages
Updating the installed packages to the latest versions
Enabling Webmin to send an e-mail
Getting an e-mail when new versions of packages become available
Reading the documentation of the installed software
Webmin is an open source, web-based system configuration tool written primarily in Perl. Thanks to its web nature, Webmin can be used to control your system remotely from any computer running a browser. It allows you to control numerous aspects of your system's configuration, such as managing users, installing additional software, configuring services, controlling access, and monitoring system activity.
In this chapter, we'll focus on installing Webmin and then demonstrate how it can be used to perform the tasks related to installing, upgrading, and running other software on your system.
Installing Webmin on a Debian-based system, such as Ubuntu or Linux Mint, is easy because we can rely on the excellent package management system called Advanced Packaging Tool (APT). APT resolves and installs dependencies automatically and also ensures that Webmin will be updated automatically when you perform a system update.
To install Webmin, perform the following steps:
Webmin is not part of the standard Debian package repository, so your first step will be to add the URL of Webmin's repository to your package sources file. Open the
/etc/apt/sources.listfile in a text editor and add the following lines to it:deb http://download.webmin.com/download/repository sarge contrib deb http://webmin.mirror.somersettechsolutions.co.uk/repository sarge contrib
Tip
On most systems, the
vitext editor is installed by default, but it may be a bit tricky if you haven't used it before. If you want an easy-to-use editor, try nano. You can install it by issuing the following command:$ sudo apt-get install nanoAfter it's installed, you can use
nanoto edit thesources.listfile by issuing the following command:$ sudo nano /etc/apt/sources.listWe also need to add the GPG key with which Webmin's repository is signed to the list of keys used by APT to authenticate packages. This can be done by issuing the following command:
$ wget -qO - http://www.webmin.com/jcameron-key.asc | sudo apt-key add -You can now refresh the APT cache to include the contents of Webmin's repository. This is done with the following command:
$ sudo apt-get updateWith these preliminaries out of the way, you can install Webmin with the following command:
$ sudo apt-get install webmin
Webmin provides an online repository with DEB installation packages that are compatible with Debian-based systems. We need to give our system the address of this repository so that it can take advantage of it. The list of available repositories is kept in the /etc/apt/sources.list file as well as other *.list files stored in the /etc/apt/source.list.d/ directory.
Every package is cryptographically signed to ensure that even if someone breaks into the repository and uploads a package pretending to be Webmin, we don't install it by accident. We downloaded the public GPG key needed to verify this signature by using wget and added it to our list of trusted keys by using the apt-key add command.
GNU Privacy Guard (GPG) is an open source alternative to Pretty Good Privacy (PGP), a cryptographic software suite that provides encryption and authentication functions. Every Webmin package contains a GPG cryptographic signature, which could only be generated using a private key that is kept secret by Webmin's author Jamie Cameron. A corresponding public key, which is made freely available, may be used to verify that the signature was generated using that private key. If even a single bit of the package code were modified after the package was signed, the signature would not match anymore. This ensures that nobody tampers with Webmin on its way between the author and your system. APT checks the signature automatically, we just need to provide it with Webmin's public key.
Tip
If you want to be extra careful, you can check whether the public key you imported is actually the one belonging to Jamie Cameron. Issue the following command and verify that its output contains the same key fingerprint:
$ sudo apt-key fingerprint
/etc/apt/trusted.gpg
--------------------
pub   1024D/11F63C51 2002-02-28
      Key fingerprint = 1719 003A CE3E 5A41 E2DE  70DF D97A 3AE9 11F6 3C51
uid                  Jamie Cameron <jcameron@webmin.com>
By updating the APT cache, we ensure that our system becomes aware of packages available in the new repository. Then, we can install Webmin. APT not only resolves dependencies and installs more than just the Webmin package, but also other components it needs to run, including the Perl programming language and others.
Webmin also provides a .deb (Debian software package) file that can be downloaded and installed manually. If you want to do it this way for some reason, you would need to follow these steps:
Visit Webmin's Downloads page at http://www.webmin.com/download.html and copy the address of the current Debian package. The package file will be named
webmin_NNN_all.deb, whereNNNindicates the current version number.Download the package by using
wget:$ wget http://prdownloads.sourceforge.net/webadmin/webmin_NNN_all.debFirst, install all the packages that Webmin depends on using the following command:
$ sudo apt-get install perl libapt-pkg-perl libnet-ssleay-perl openssl libauthen-pam-perl libpam-runtime libio-pty-perl apt-show-versions pythonThen, run the following command to install Webmin from the package file:
$ sudo dpkg --install webmin_NNN_all.debTip
Your system may complain that some other package needed by Webmin is missing. For instance, you could see an error message like the following:
dpkg: dependency problems prevent configuration of webmin:
 webmin depends on PACKAGE-NAME; however:
  Package PACKAGE-NAME is not installed.
If you see this error, you should install the package designated by
PACKAGE-NAMEbefore installing Webmin.
More information about installing Webmin on a Debian-based system and about APT package management in general can be found at the following Webmin and Debian websites:
Installing Webmin on an RPM-based system, such as RHEL, Fedora, CentOS, or openSUSE, is just as easy as on Debian-based systems. Here, we'll rely on the equally excellent package management system called Red Hat Package Manager (RPM) and the yum utility. Yum resolves and installs dependencies automatically and also ensures that Webmin will be updated automatically when you perform a system update.
On a SUSE-based system, you may use the yum utility as well, but it isn't installed by default. On these systems, it may be more convenient to use the zypper command-line utility or the YaST interface. In this recipe, we will provide zypper alternatives to yum commands to be used on SUSE.
To install Webmin, perform the following steps:
While Webmin is available in several systems, its packages are not usually kept up-to-date. We will add Webmin's repository to our system by creating a file which describes the repository. Create a file with the path
/etc/yum.repos.d/webmin.repoand add the following lines to it:[Webmin] name=Webmin Distribution Neutral #baseurl=http://download.webmin.com/download/yum mirrorlist=http://download.webmin.com/download/yum/mirrorlist enabled=1
Tip
On most systems, the vi text editor is installed by default, but it may be a bit tricky if you haven't used it before. If you want an easy-to-use editor, try nano. You can install it by issuing the following command:
$ sudo yum install nanoAfter it's installed, you can use nano to edit the
webmin.repofile by issuing the following command:$ sudo nano /etc/yum.repos.d/webmin.repoWe also need to add the GPG key with which Webmin's repository is signed to the list of keys used by RPM to authenticate packages. This is done by issuing the following commands:
$ wget http://www.webmin.com/jcameron-key.asc
$ sudo rpm --import jcameron-key.asc
$ rm jcameron-key.asc
You can now refresh the
yumcache to include Webmin's repository. This is done by using the following command:$ sudo yum makecacheWith these preliminaries out of the way, you can install Webmin with the following command:
$ sudo yum install webmin
Installation of Webmin using yum is based on exactly the same principles as installing it using apt-get on Debian. Take a look at the How it works... section in the previous recipe.
Webmin also provides an RPM package that can be downloaded and installed manually. If you wanted to do it this way for some reason, you would need to follow these steps:
Visit Webmin's Downloads page at http://www.webmin.com/download.html and copy the address of the current RPM package. The package file will be named
webmin-NNN.noarch.rpm, whereNNNindicates the current version number.Download the package by using
wget:$ wget http://prdownloads.sourceforge.net/webadmin/webmin-NNN.noarch.rpmThen, run the following command to install Webmin from the package:
$ sudo yum localinstall webmin-NNN.noarch.rpm
More information about installing Webmin on an RPM-based system can be found at the following Webmin website and wiki:
Even if your system doesn't use the Debian or RPM package managers, there may be a Webmin package available in your distribution repositories. For example, Arch Linux and Gentoo provide Webmin packages, while FreeBSD provides a Webmin package and port.
If your system doesn't provide a Webmin package, you may use steps outlined in this recipe to install Webmin on your Unix-like system, such as Linux, BSD, and OS X.
Before installing Webmin, make sure that you have Perl Version 5 installed on your system. You can verify this using the following command:
$ perl --version
In order to enable SSL encryption of connections, you should install the Perl module Net::SSLeay. You can verify that it's installed by using the following command. It will complain if Net::SSLeay is not installed. If it's installed, the command will generate no output.
$ perl -e "use Net::SSLeay"
Perform the following steps to install Webmin:
Go to Webmin's Downloads page at http://www.webmin.com/download.html.
Copy the link to the latest version of the Unix tar/gzip format package. The link will be similar to the following, except
NNNwill have to be substituted by the current version number: http://prdownloads.sourceforge.net/webadmin/webmin-NNN.tar.gz.Download the package by using
wget:$ wget http://prdownloads.sourceforge.net/webadmin/webmin-NNN.tar.gzExtract the archive by using the following command:
$ tar -xzf webmin-NNN.tar.gzEnter the extracted directory and start the interactive installation script by using the following commands:
$ cd webmin.NNN
$ sudo ./setup.sh /usr/local/webmin
You will be asked a series of questions. You can press enter to accept the default suggested answers for the following questions. In the following prompt lines, default values are provided in brackets:
Config file directory [/etc/webmin]:
Log file directory [/var/webmin]:
Full path to perl (default /usr/bin/perl):
Web server port (default 10000):
Webmin will attempt to detect the name and version of your operating system. Make sure that this information is correct; otherwise, Webmin may not work correctly. Detected system version will be presented in lines similar to these:
***************************************
Operating system name:    Mac OS X
Operating system version: 10.9
***************************************
Pick a username and password for the first Webmin administrative user at the following prompts:
Login name (default admin):
Login password:
Password again:
Answer yes (
y) to the following questions:Use SSL (y/n): y Start Webmin at boot time (y/n): y
After installation is completed, you may delete the
webmin-NNN.tar.gzarchive and the extractedwebmin-NNNfolder from which installation was started.
Webmin installation script is able to install it on most Unix-like operating systems.
When we were starting the installation script, we indicated that we want to install Webmin's program files in /usr/local/webmin. Use a different path if you want to place it elsewhere.
Webmin asks you a series of questions during installation. For instance, it asks you where to store configuration files (defaults to /etc/webmin/) and log files (defaults to /var/webmin/). These locations may be changed, but the defaults will work well on most systems.
You will also need to specify the username and password of the first Webmin user. This user will have complete control of your system through Webmin and will be able to add more user accounts.
You can find more information about installing Webmin on its website at http://www.webmin.com/tgz.html
Look for a Webmin package for your system. Here are a few links:
The only client software you need to start using Webmin is a web browser. You can connect to Webmin using your server's IP address or domain name. Webmin allows you to change which IP address, port, or domain name it will use for connections.
The first step is to check the IP address of your server. One way to do it is to run the /sbin/ifconfig command. It will give you lots of information about network interfaces configured on your system, including the IP number for each one under the heading inet addr. You will have at least two network interfaces on your system. One will be called lo or lo0, this is the local loopback interface that is used only for connections originating from the same machine. This will have the IP of 127.0.0.1. The other interface will most likely be named eth0 or en0 and this will be the primary network adapter of your machine. To connect from another computer, note this IP address. You can also set up a DNS entry for this IP, and then you'll be able to connect using a domain name.
You can connect to Webmin by performing the following steps:
Open your web browser and type in the following address, but substitute the words
webmin.hostwith the IP address or domain name of your server:https://webmin.host:10000.Tip
If your browser reports that it could not establish a connection to the server, then you may be running a firewall on the server, which is blocking incoming connections. On most Linux systems, the default firewall is called
iptablesand you can direct it to allow all incoming TCP traffic on the port 10000 by issuing the following command:$ sudo iptables -I INPUT -p tcp --dport 10000 -j ACCEPTUnfortunately, the first thing you will see after connecting successfully is a warning stating something along these lines: This site's security certificate is not valid! Feel free to ignore this warning and proceed to Webmin. Take a look at the How it works... section of this recipe for more information.
On the next screen, you will be asked to provide the login and password of a user with administrative privileges. This is almost always either root or a user who has ALL privileges granted through sudo. Type the username and password and hit the button to log in.
Once you log in, Webmin will greet you with a home screen displaying an overview of your system, similar to the following screenshot:
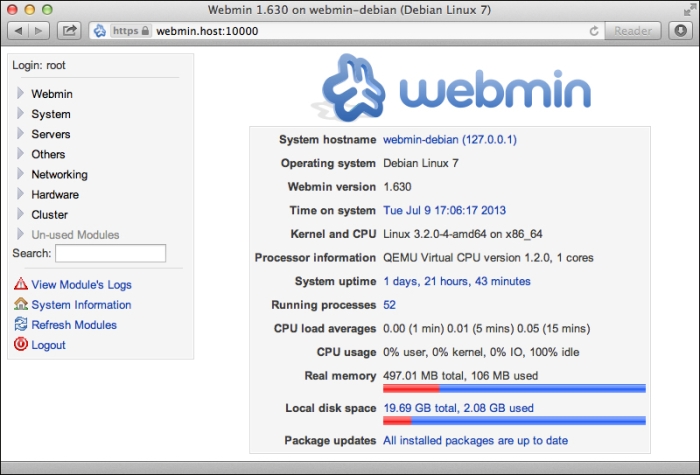
This welcome screen shows Webmin's main interface. On the left-hand side, we see a sidebar containing a hierarchical menu listing all installed modules organized into categories. To the right, we see an interface of the currently activated module (in this case, it's System Information).
Webmin runs a web server on port 10000 of your server. Since browsers connect to port 80 by default (or port 443 when using HTTPS), we need to specify the port number as part of the URL.
If the Perl module Net::SSLeay is installed on your system, all connections to Webmin are encrypted to avoid eavesdropping or man-in-the-middle attacks. In order to establish an encrypted connection, we instruct the browser to connect using the HTTPS protocol. If you try to connect over regular HTTP, Webmin will provide you with a page redirecting you to the encrypted connection similar to the following screenshot:
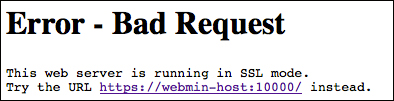
The error message we see when we establish an encrypted connection is caused by the fact that the certificate we're using to encrypt communication was generated by Webmin itself and wasn't signed by a commercial, trusted certificate authority. This is not a cause for worry. A self-signed certificate has one important advantage: it's free, and it provides the same encryption as a commercial certificate.
Webmin uses port 10000 by default to host its web server and will accept connections coming in on any network interface. You can change these options if you wish.
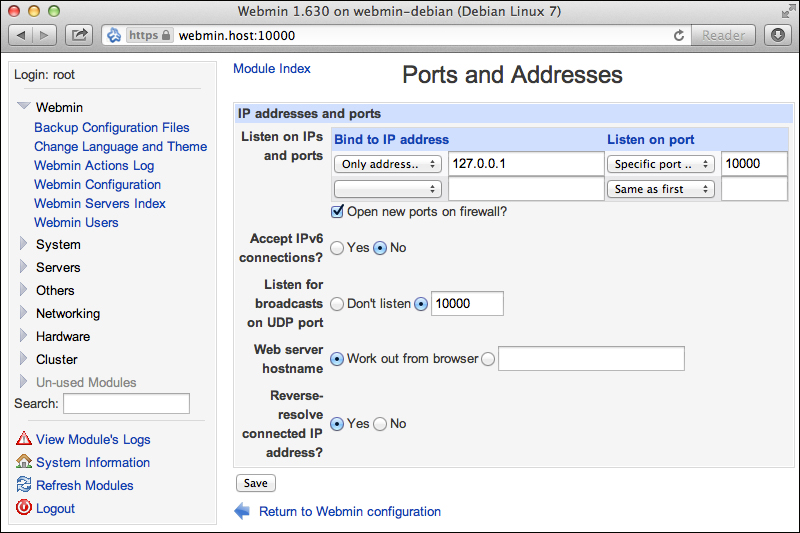
Navigate to the Ports and Addresses configuration module by selecting the following options from the menu: Webmin | Webmin Configuration. Then, click the Ports and Addresses icon. You will get the following screen. On this screen, you can change the port on which Webmin listens for connections by specifying it in Listen on port | Specific port. Leave the value of the Bind to IP address field as Any address for now. Consider the following screenshot:
Change the port to 10001 or any unused port number you prefer and click Save.
Tip
You can get a list of used ports by issuing the netstat command. Daemons on your server use some ports to listen for incoming connections. You won't be able to use any of these for Webmin. On Linux, you can use the following command to get a list of listening ports:
$ netstat -ltn
On BSD-based systems, use this instead:
$ netstat -nap tcp | grep LISTEN
Webmin will change its port and redirect you to the new address.
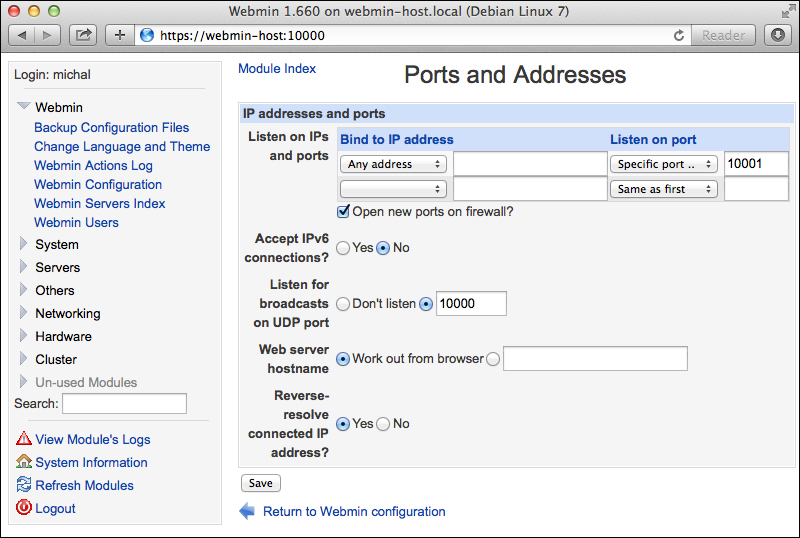
You can use the Ports and Addresses screen to select on which IP address Webmin will be listening. This is useful if you have more than one network interface installed on your machine (for instance, one for accessing the Internet and one on a local network). You can also use this option to select the loopback interface and allow only connections originating from the same machine or coming in over an SSH tunnel (refer to the Connecting to Webmin securely over an SSH tunnel recipe in Chapter 3, Securing Your System). To restrict connections only to local traffic, select Bind to IP address | Only address... and enter 127.0.0.1 as shown in the following screenshot:
Webmin has a modular architecture and it's possible to extend it by installing additional modules. The majority of stable Webmin modules come bundled into Webmin, so in most cases you don't actually need to install them. Modules, which are installed but not active, are located in the Un-used Modules section of the menu. They will usually become activated automatically when you install the software that they depend on. For instance, you may see the MySQL Database Server module listed in this section. When you install MySQL or other supported software on your system, Webmin will detect it and move the appropriate module into its section in the menu.
After you install the additional software, you may need to click the Refresh Modules link at the bottom of the menu and reload the browser for this update to happen.
If you find a good third-party module that doesn't come bundled with Webmin, you can install it by following this recipe. Just a word of warning: a Webmin module will have privileged access to your system; you should never install modules from sources you don't fully trust.
To install additional Webmin modules, perform the following steps:
Copy the URL of a Webmin module's location. It will be in a file with the
.wbmor.wbm.gzextension.Navigate to the Install tab by going to Webmin | Webmin Configuration | Webmin Modules. You will get the following screen:

Select the option to install From ftp or http URL and paste the module's URL in the text field provided.
Before you install a module, you can choose which users will be allowed to use it. Select Grant access to all Webmin users.
Click Install Module. The next screen will display installation progress, information about where the module was installed on disk, which section of the menu it will be available in, and a link to the module screen.
Reload Webmin to see the new module appear in the menu.
Webmin will download and decompress the module archive file and place a new module folder on disk in the /usr/share/webmin/ directory. When you reload Webmin, it will scan the modules directory, discover the new module, and add it to its menu.
Each Webmin module can be made available to all users or a selected group. This choice can be made during the installation of the module or it can be done later in Webmin | Webmin users settings. More information about users and access control can be found in Chapter 2, User Management.
Webmin can also download module files from two repositories: the standard module repository hosted at webmin.com and a repository of third-party modules that may be hosted anywhere on the Internet.
In order to install a module from one of the repositories, perform the following steps:
Navigate to Webmin | Webmin Configuration | Webmin Modules | Install.
Click on the ellipsis (...) button at the end of the line Standard module from www.webmin.com or Third party module from.
Select the module you'd like to install and install as described previously.
Webmin will download the file automatically from the repository's URL.
You can search a database of the third-party modules on the Webmin website at http://www.webmin.com/third.html
One useful feature of Webmin is the fact that it keeps a log of every action it performs. It's sometimes useful to refer to this history to check how users have changed your system's configuration through Webmin's interface.
In order to take full advantage of Webmin's logging facility, you should enable the monitoring of file changes made though Webmin. This allows you to roll back the changes later.
In order to enable this function, go to Webmin | Webmin Configuration | Logging and set Yes as the answer to these two questions: Log changes made to files by each action? and Record all modified files before actions, for rollbacks?
To monitor what Webmin is doing, perform the following steps:
To access Webmin's log, go to Webmin | Webmin Actions Log.
Select filters to narrow your search down to log entries made today only and click Search. You will see a table listing all actions taken today through Webmin.
Click on one of the actions to see a complete description of the action. This screen will inform you which user performed the action at what time, logged in from which IP, and which Webmin script was used.
Add an annotation to the action by writing text to the Log entry annotation field and clicking Save. You will come across something like this:

View all actions performed in this user session by clicking the link labeled Session ID. The annotated action will be visible in the list, marked with a star.
Webmin records all actions performed by users to the log file /var/webmin/webmin.log. User annotations are stored in the /var/webmin/annotations directory. If monitoring of file changes is enabled, each change is recorded in the /var/webmin/diffs directory. Please note that these directories could potentially grow quite large over time on a busy system.
The Webmin Actions Log interface allows you to search these log files, display them, and use them to revert file changes.
If you enabled monitoring of file changes as described in the Getting ready section of this recipe, you can use Webmin to revert the changes.
As an exercise, go to Webmin | Webmin Configuration | User Interface and set the page background to a light blue color with the RGB hex value of C9DFFF. Go back to Webmin | Webmin Actions Log, and then find your action and view its details. In the section Files changed and commands run, you will see that a change to the file /etc/webmin/config was recorded, as shown in the following screenshot:
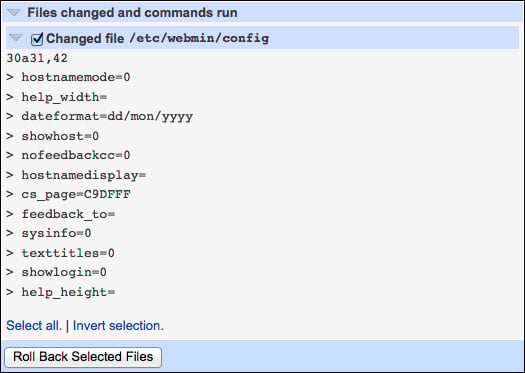
Tick the checkbox next to the file change and click the Roll Back Selected Files button. Confirm the rollback and go back to the Action Details page. Notice that the background color changes back to white.
For more ways to monitor what your system is doing, take a look at Chapter 5, Monitoring Your System
During the boot process, your operating system should load all services that will be running in the background on your machine. This includes database servers, web servers, tools such as Webmin, and other system processes. Server distributions are very lean by default, so they will only start a handful of essential services. Webmin allows you to control which of these scripts is executed through the Bootup and Shutdown module.
Perform the following steps to check which system services are started at boot:
Navigate to System | Bootup and Shutdown.
Select a service to disable temporarily. If your system has the
avahidaemon or thersyncservice, these can probably be disabled for a minute without causing trouble. Consider the following screenshot:
Mark the checkbox next to one of these services and click the Disable Now and On Boot button. You will see a screen notifying you that the service was stopped and disabled from starting at the next boot.
Go back to the Bootup and Shutdown screen, select the same service again, and click the Start Now and On Boot button to revert your previous change.
When your OS starts, it first loads the system kernel and then starts a process called init (short for initialization), which executes various init scripts that start system services. Under Linux, these scripts are stored in one directory (/etc/init.d) and activated by the creation of symbolic links to them in a special directory from which all scripts are executed at boot time. Webmin allows you to control which init scripts are executed by creating or removing these symbolic links or performing other activation functions specific to your system.
The init system described earlier is often referred to as SysV-style init. It's named after the historic UNIX System V that inspired all modern Unix-like operating systems, including Linux and BSD. Many distributions are gradually switching over to more modern alternatives such as Upstart and Systemd. The details of how these systems differ from SysV-init are beyond the scope of this book, but Webmin tries to provide a common interface to all of them. Screenshots in this recipe may differ slightly depending on which init system your distribution uses.
Webmin also allows you to easily create your own init scripts and verify that a started service is actually running.
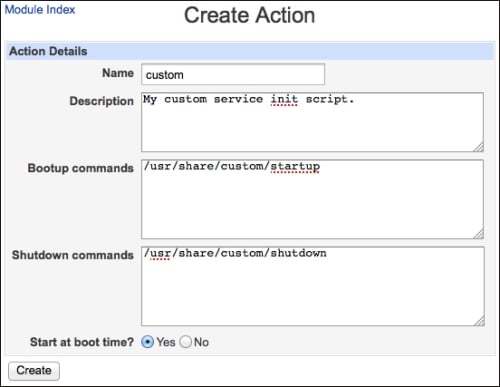
Most server packages you install will come with their own init scripts and activate them in your init system. If you install a package that doesn't, you can use Webmin to create a simple init script for you.
Navigate to System | Bootup and Shutdown and click the Create a new bootup and shutdown action link.
Note
Depending on the init system you're using, this link may also be named Create a new action, Create a new upstart service, Create a new systemd service, and so on.
You will be asked to specify the name and description of the startup item as well as two commands: one for starting the service and one for shutting it down. Once you fill these out, click Create and Webmin will automatically create a basic init script for you.
Even if a service is successfully started during boot, it could potentially crash. To inspect which services are actually running, go to System | Running Processes. There, you will see a tree of processes sorted in the order in which another process has started them. You can also sort processes by owner or the amount of CPU or RAM they are consuming. Consider the following screenshot:
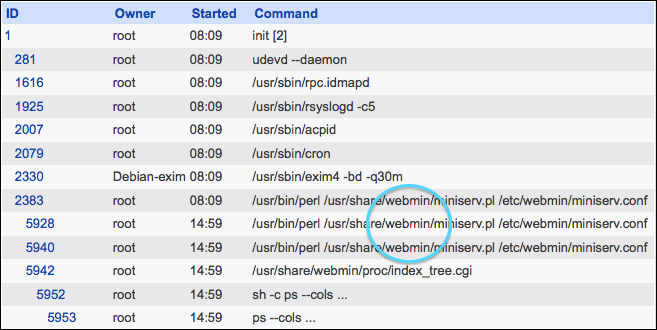
Click on a process ID for one of Webmin's processes to get more information about it, including those files or network connections the process still has open.
Webmin provides an easy-to-use interface to your system's package management system. You can use it to check what packages are installed and view the files installed by each package.
For checking what packages are installed, perform the following steps:
Go to System | Software Packages. Consider the following screenshot:

Search for the package you're interested in by typing the name or part of its description into the Search For Package form. For example, type in
webminand click Search For Package. You can also browse a listing of packages by clicking the Package Tree button.If a package is installed, it will be visible in the package list. Click the name of the package to see a Package Details screen.
Webmin is able to determine which package management system your OS is using, and provides a unified interface to common tasks such as inspecting, installing, and uninstalling packages. In the background, Webmin will execute the appropriate commands (apt-get, yum, rpm, yast, and so on) for you and display the results in the form of a web page.
Beyond simply viewing the installed packages, it's often useful to check which files were installed by a package. You may also be interested in a particular file on disk and want to check which package installed it. Webmin allows you to gather this information easily.
To view files installed from a package, perform the following steps:
Go to System | Software Packages, type in the name of the package (webmin, for example), and click Search For Package.
In the package listing, click the name of the package to see its details.
To view what files were installed by this package, click the List files button.
To identify which package has installed a file, perform the following steps:
Go to System | Software Packages.
In the Identify a file section, type in the name of a file or command or click the ellipsis (...) button to browse your disk.
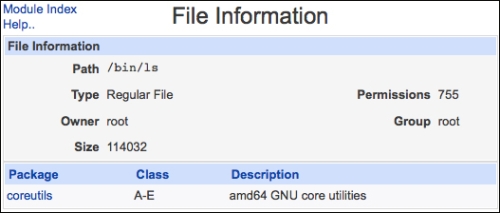
Click the Search For button.
If the file is identified by the package management system, you will see a screen with information about the file, including the name of the package which installed it:
Webmin is able to use your OS package management to install additional software. If you're using a Debian-based system, such as Ubuntu, you can install packages from .deb files or APT repositories. If you're using an RPM-based system, such as CentOS or openSUSE, you can install packages from .rpm files or yum repositories.
Many web applications depend on an image manipulation library called ImageMagick. Many programs that are used to create, edit, compose, or convert bitmap images such as PNG and JPEG use this library. In this recipe, we will install ImageMagick, but the same procedure may be applied to any other software available in your distribution's repository.
Follow these steps to install a software package using Webmin:
Navigate to System | Software Packages.
Select the Package from Repo radio button. Note that you won't actually see the word Repo, but rather the name of repository appropriate for your system (APT, YUM, Ports, and so on).
Click Search Repo, then type in the package name
imagemagick, and click Find packages matching to execute the search.You will be presented with a list of packages matching your search, including
imagemagick—the package you want to install. Select the package by clicking its name.You will be brought back to the Software Packages screen, where you can now press the Install button.
Webmin will download and install ImageMagick along with a long list of its dependencies. On the results screen, you can see the details for all the installed packages.
Tip
If the software package you're installing provides a component that may be managed by Webmin (such as Apache, MySQL, PostgreSQL, and Postfix), you should take two additional steps. Click the Refresh Modules link in Webmin's main menu and then refresh your entire browser. This will ensure that Webmin recognizes the newly installed software and updates its menu.
Webmin determines which package management system your OS uses. It executes the appropriate commands to search available repositories for packages matching your query and installs them along with their dependencies. The same task can be accomplished from the command line, but Webmin abstracts away the command syntax particular to your packaging system so that you can use the same interface regardless of the underlying OS.
Webmin also allows you to install software from a package file that you may have. In order to do that, follow this recipe, but select the From uploaded file radio button and upload your file instead of searching the repository. If your package file is too large to upload with a browser, you can install it from its URL instead.
Please note that this method will require you to install its dependencies manually before installing the package itself.
Open source communities continually release updates to the software they manage. It's very important to be up-to-date with these upgrades, because they often contain fixes for security vulnerabilities discovered in your software.
To update installed packages, perform the following steps:
Navigate to System | Software Package Updates. You will see a list of all packages for which updated versions are available in the repository. Consider the following screenshot:

Before updating, you may click the Refresh Available Packages button to make sure that you have the most current update information.
Make sure that all the checkboxes next to packages with available updates are marked, and then click Update Selected Packages.
The next screen will display a list of all packages that will be updated, along with possible new dependent packages. Click Install to perform the updates.
The next screen will display progress of the update. Make sure that the page is fully loaded before navigating to another screen.
When you return to the package update screen, you should now see the message No packages available to be updated were found, informing you that all packages are up-to-date.
Webmin determines which package management system your OS uses and queries the package repositories for information about latest available versions. You can trigger this package cache update yourself by clicking Refresh Available Packages. When you select to perform the update, Webmin executes the appropriate package management commands to install latest versions.
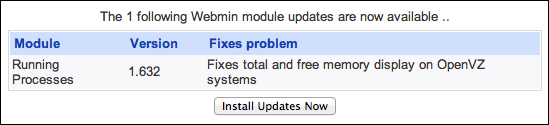
Webmin will also notify you if updates are available for any of its own modules. This notice will appear on the System Information page, which is the first page displayed when you log in. If you see it, click Install Updates Now to install the module updates as shown in the following screenshot:
Webmin is a good tool for monitoring the state of your server. You can set it up to send you an e-mail whenever an event that requires your attention occurs.
Webmin needs access to a mail server in order to send an e-mail. In Chapter 12, Setting Up an E-mail Server, we will cover setting one up. However, if you don't plan to set up your own mail server or you want to start monitoring your system before you do, you can use an external e-mail service.
Webmin can send e-mail over SMTP, but it doesn't support TLS/SSL encryption. You'll need an account with a provider who allows you to connect via SMTP without encryption.
Perform the following steps to enable Webmin to send e-mails:
If you want to send an e-mail via an external SMTP account, navigate to Webmin | Webmin Configuration | Sending Email and set the Send e-mail using option to Via SMTP to remote mail server.
Provide the address of the SMTP server, set SMTP server authentication to Login as, and provide your account's username and password.
Set the From address for email from Webmin option to an authorized e-mail address.
Click Save to save the settings.

Go back to Webmin | Webmin Configuration | Sending Email, and use the Send test message form to test your configuration.
Webmin is able to communicate with a remote server over unencrypted SMTP, so your mail will actually be sent from there. Please note that the configuration, including your password is saved in clear text on the server in the /etc/webmin/mailboxes/config file. This file is accessible to all users with administrative privileges on the server, and they will be able to read your e-mail password.
Check out Chapter 12, Setting Up an E-mail Server, for information about setting up your own mail server.
If you have multiple servers running with different sets of installed software, it may become cumbersome to regularly check for software updates manually. Webmin allows you to schedule automatic update checking and sends you an e-mail whenever new versions of software become available.
Make sure that Webmin is set up for sending e-mail. Refer to the Enabling Webmin to send an e-mail recipe of this chapter for more information.
To get an e-mail notification when new versions of software become available, perform the following steps:
Navigate to System | Software Package Updates and enable Scheduled checking options.
Set Check for updates on schedule? to check for updates every day and provide an e-mail address to which a report will be sent in case any updates are available. Consider the following screenshot:

cron
is a system utility, which runs in the background as a daemon and starts tasks that are scheduled to execute at a specific time. When Scheduled checking options is enabled, Webmin adds an entry in the system's cron table to execute its update verification script. The cron daemon will then execute the script once every day (hour or week, depending on the setting). If Webmin discovers available updates, it will send you an e-mail.
You could set up Webmin to automatically install the updates when they become available. This may not be as great idea as it seems, because every update can potentially break something on your system. This should not normally happen, but it's a good practice for a human to monitor the update process and verify that everything works as it should after updates have been applied.
Most packages that you install on your system will come with their documentation. Webmin provides a simple utility to search through these manuals.
To read the documentation of the installed software, perform the following steps:
Go to System | System documentation and type in
wgetas the search term.Set the Match option to Name and contents.
Mark checkboxes next to both Manual pages and Package documentation, and click Search.
Webmin will search through all available documentation and display a list of all manual pages and package notes that mention wget.
Documentation accompanying a package usually consists of the program's manual pages and packaging information. The man pages contain instructions on using the installed software. They are stored in a special format (usually in /usr/share/man, /usr/local/man or similar locations) and displayed using the man command. Package information, on the other hand, may include information about how this package was prepared, how it is intended to be used, and so on. Package docs are usually stored as text or HTML files in /usr/share/doc.
Webmin scans the available man pages, package documentation files, and Perl module documentation for mentions of your search term. It displays all the results in the form of web pages for easy viewing.
Webmin provides another important search form, which is located in the sidebar menu under the list of module categories. This allows you to perform a detailed search of Webmin itself, which scans both its documentation and also the elements of its user interface. For instance, if you use this form to search for the Send test message phrase, Webmin will display a result listing with a link to the Sending E-mail module that allows you to send a test e-mail.