In this chapter, you'll learn how to install VMware Workstation. The chapter is not just about executing a wizard by clicking on next, next, and finish, you'll also learn how to configure the computer that will run VMware Workstation wisely and perform an advanced installation on either Windows or Linux.
Before starting the installation of VMware Workstation, you should take care of the host computer on which you want to use VMware Workstation. Sure, any computer that meets the minimal requirements will work, but if you choose the appropriate configuration, you'll benefit more from your VMware Workstation installation. In this section, we'll spend a few words on using the most appropriate configuration for your computer.
Every virtual machine that you'll install will work as a computer by itself, and the total number of CPU cores in your computer will be available as the maximum number of CPUs that you'll allocate to a virtual machine. However, if you want to get the best performance out of your virtual machines, it is a good idea to not configure more virtual CPUs than the total number of CPUs and CPU cores in your computer. This means that if you have four cores in total, ideally you shouldn't run more than three virtual machines with one core each at the same time. As the number of virtual CPUs that are in use gets higher than the total number of CPUs in your computer, CPUs must be shared, and that is not good for performance.
There is no formal number of CPU cores, so if you're on a budget for hardware, you can run VMware Workstation on a computer that has only one core. However for best possible performance, this is not recommended.
Tip
Linux cgroups
If you are running VMware Workstation on Linux, you can use cgroups. With cgroups, you can define groups of resources that make sure that every VM always has a dedicated amount of system resources available; a nice and efficient way to use the hardware in the best and most optimal way.
If a computer runs out of physical RAM, it starts swapping to disk. Using VMware Workstation, you want to avoid your computer starting to swap at all times. To make sure this never happens, the total size of RAM in your computer must be more than the total amount of RAM in use by all the virtual machines, with an addition of 2 GB for the host operating system for smooth operation. This means that a typical computer that is going to be used for VMware Workstation will have at least 4 GB of RAM or more if possible. But if you're on a budget and want to create virtual machines that don't need much RAM, you can work with VMware Workstation on a minimal 1 GB of RAM.
A very important part of the configuration of the host system is the available disk space. Typically, each virtual machine needs a couple of gigabytes of available disk space; so a minimal configuration will need at least 10 GB of available disk space, whereas on a dedicated test machine that is going to run several virtual machines, you might need hundreds of gigabytes of free disk space.
If you're looking for good performance, just having the available disk space is not enough. This is because you don't want the virtual machine disk file to be fragmented. To avoid fragmentation, it is recommended that you use a machine where a separate disk is dedicated to the storage of VMDK files. The benefit of this that you can avoid fragmentation, and you'll have one disk that is dedicated to the operating system and another disk that is dedicated to handling virtual machine I/O requests.
To get VMware Workstation, you'll typically download it from www.vmware.com. From the VMware site, you can either download a trial version or purchase VMware Workstation. Once you've got the VMware installation file and a registration code, you can start the installation. You can also create an account at the VMware site that allows you to easily access all of your previous purchases. In this section, you'll learn how to buy your own copy of VMware Workstation and how to access purchased products from your VMware account.
The following procedure describes how to get VMware Workstation:
Tip
Support
There is a supported version of VMware Workstation, but it is only available if you buy 10 licenses or more. If you're going to use VMware Workstation in a business environment and you want easy access to help, buy the supported version. VMware offers basic support that is 12 hours a day from Monday to Friday or business support that is 24 hours a day, 7 days a week. When purchasing support, you can select a contract period of either one year or three years. If support is important for you, I recommend that you buy Production support. The price difference is small, and for this small difference you will have 24/7 support.
Start a browser and go to www.vmware.com. Click on the VMware Store button and navigate to Desktop Products | VMware Workstation 9.
Select Buy Now if you have never bought VMware Workstation before. If you have a recent version, click on Upgrade to pay the discount price.
Enter the quantity of VMware Workstation licenses that you want to buy and click on Add to Cart. Your shopping cart will now be updated.
After indicating what you want to buy, click on Secure Checkout to pay for your VMware license. This brings you to a window where you can either log in with an existing VMware account or create a new VMware account and enter your billing information.
Click on Continue to complete the transaction. You'll now have access to your own version of VMware Workstation.
After your purchase of VMware Workstation, you can access your account to download it later from the VMware website. You can always download the software from here as well as access the associated license keys.
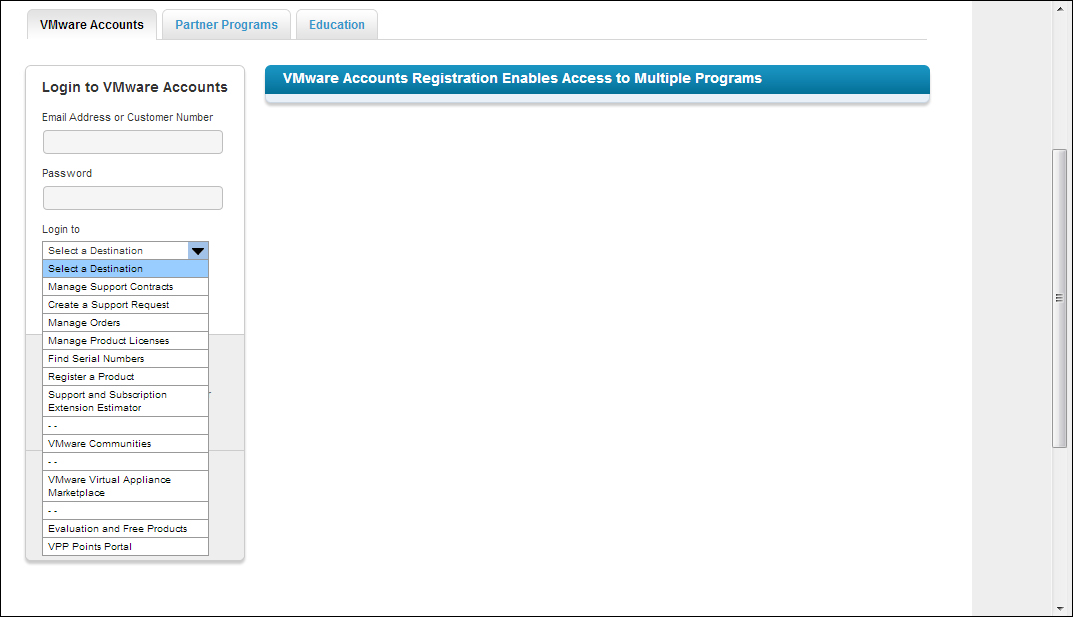
To access your account on www.vmware.com, click on My Account and log in with the e-mail address and password that you created when purchasing VMware Workstation. You'll also see a drop-down list (see the following screenshot) from which you can indicate what kind of information you're looking for. For instance, select Login to Find Serial Numbers to get your serial number from the VMware site. After logging in, you'll find a list of all the products that you've purchased as well as a link to download your version of VMware Workstation.
In this section, I'll assume that you've made all appropriate preparations to start the installation of VMware Workstation. This means that you have installed the Windows host operating system and purchased VMware Workstation and are all ready to start the installation. Perform the following steps:
Log in to the VMware website and select Products & Downloads. From there, select Download VMware Workstation for Windows and click on the Manually Download link. Accept the license agreement, which will start the download.
After downloading the installation file, double-click on it to run it. Allow the installation program to be executed when the Windows Security policy asks if you want to allow it. You will now see the first screen of the VMware Workstation Setup wizard. Click on Next to start the installation.
The installer now gives you the option to select between a typical installation and a custom installation. The typical installation doesn't need much explanation; therefore, in this book I'll explain the options that are presented by the custom installation procedure.
You'll now see a list of different program components that you can install. You should at least install the core components as they contain everything that is required to start VMware Workstation. If you want to develop your own tools to manage and monitor VMware Workstation's virtual machines, select the VIX Application Programming Interface (this typically only makes sense if you're a developer). The Enhanced Keyboard Utility is useful if you need easy access to virtual machines from computers that have a different keyboard layout.
Use the Visual Studio Plugin for the easy debugging of error messages generated by VMware Workstation.

Select the options that you want to install
With VMware Workstation, you can provide access to your virtual machines using the Workstation Server. This server provides access to shared virtual machines by default over the secure HTTP port
443. In the following screenshot, you'll indicate where virtual machines are stored and on which port the Workstation Server Component will listen. If you want to change these two settings, you can do it here.In the following window, the setup program asks if you want to check for product updates on startup. If you're using this option, you'll get notifications if a newer version is available. Following that there is an option where you will indicate if you want to send anonymous system data and usage statistics to VMware. This option is On by default, but you can deselect it here if you don't want to share your usage information with VMware. Following this window, you can indicate if you want shortcuts to launch VMware Workstation on the desktop and start menu's All Programs option.
After specifying what you want to do with these basic options, you can click on Continue to start the installation process. As about 3 gigabytes of files will be copied to your computer now, this will take some time to complete.
Once all files have been copied to your computer, you are prompted to enter a license key. You don't have to do that at this point; but you will need to enter the license key anyway before you can create your first virtual machine, so you might as well do it now.

Before creating your first VM, you'll have to enter the license key
The installation is now complete. Click on Finish to close the setup wizard.
Installing VMware Workstation on a Windows workstation isn't hard to do; just run the installation file and change a few of the default parameters and it will work. The installation of VMware on Linux is a bit more difficult because you'll have to run a few commands from a shell environment.
Tip
64 or 32 bits?
If you're using VMware on Linux, you should install a 64-bit flavour of Linux. The handling of hardware resources, especially memory, is much more efficient on a 64-bit Linux version than it is on a 32-bit version of Linux. So for the best possible performance, make sure to use the 64-bit Linux version.
Open a shell window and use su -, and enter the password of the root user.
After downloading the installation file, you can find it in the
Downloadsfolder of the user account that has downloaded the file. Typically, this is/home/<username>/Downloads. Use thecdcommand to go to this directory.The downloaded file has a name that looks like
VMware-Workstation-Full-<version>.bundle. Use the command bashVMware-Workstation-Full-<version>.bundleto start VMware Workstation Installer. This launches the graphical installation program. Select I agree to indicate that you agree to the license terms and then click on Next to continue.
On Linux as well, you'll install VMware Workstation using a graphical installation program
The installation program now opens a few windows in which it asks for generic settings. In the first window, you'll indicate if you want to check for product updates on startup and next you will express if you want to help VMware by sending anonymous usage data to VMware.
As Linux is a multiuser operating system by default, in the next window you can enter the name of a user account that has been used for connecting to VMware Workstation Server. Normally, the root user account is the only account that has sufficient permissions to do this; but if on your Linux computer you have another account with sufficient permissions, enter the name of the account here and click on Next to continue.
Now you need to enter the name of the path where the shared virtual machines are stored. Note that the path is uncommon; they will be in
/var/lib/vmware/Shared VMs. This perfectly complies with Linux standards, but it is not typically a location where you would look for these shared files.In the next window, you'll indicate on which port the VMware Workstation Server is offering its services. By default port
443is used, but if this port is already in use by a web server, you'll have to choose something else. Typically, anything goes as long as the port number is part of the unprivileged port range, which means that it needs to be above port1024.1443is fine, for instance.
If the Apache server is already using port 443, you'll need to select another port
At this point, the installation program has all the data it needs. Click on Install to start the installation procedure.
After installing it, you can start VMware Workstation for the first time. But before you can actually start creating the first virtual machine, there are a few steps that still need to be completed. First, you'll need to accept the license agreement. Once you've done that, you will see the VMware Workstation dashboard in which all of the common tasks that are performed in VMware Workstation are summarized. In the following screenshot, you can see what the dashboard looks like. In the next chapter, you'll learn how to continue and create your first virtual machine.
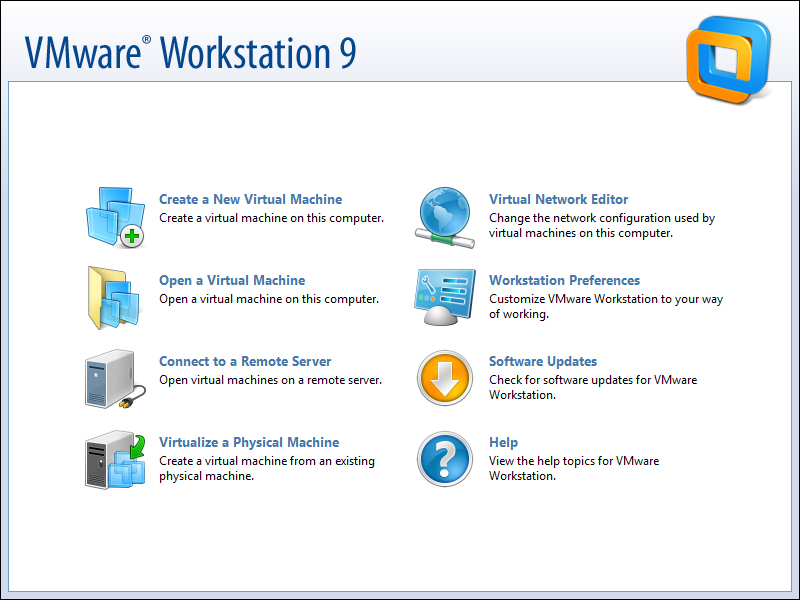
The VMware Workstation dashboard
Before you start creating your first virtual machine, there are a few VMware Workstation settings that you might want to change. To access these settings, either click on Workstation Preferences or open the Edit menu and select Preferences.
The Preferences option allows you to set preferences for different features; some of them are self-explanatory. In this section, you'll just read about the most interesting settings. An important feature that you'll find under the Workspace option is Default hardware compatibility. This option is normally set to the most recent version of VMware Workstation. If, however, you plan on exchanging virtual machines with users of previous versions frequently, you might want to change this to an earlier version. Another important option that you'll find here is ESX Server compatibility. If you plan to upload virtual machines to ESX Server, make sure that Compatible with ESX Server is selected. Without this option selected, you won't be able to upload virtual machines to an ESX environment.
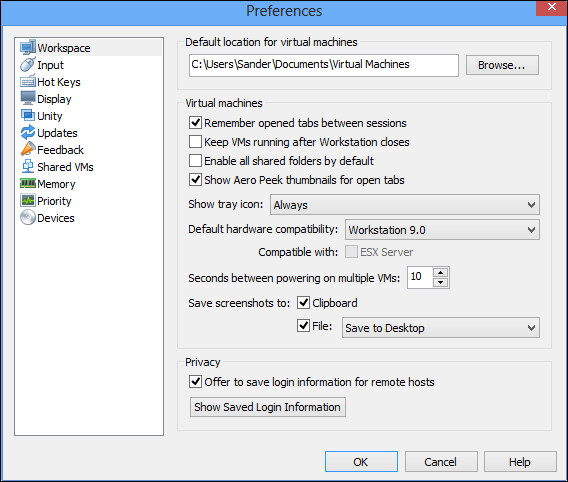
On the Workspace Preferences window, you'll define the compatibility for the VMs you create
To define special key combinations that you can use for commonly used virtual machine operations, you can use the Hot Keys tab. On this tab, for instance, you'll define which keys you'll use to release control from a virtual machine and get back to the host environment. By default, the Ctrl + Alt keys are used for this purpose. On some operating systems, this key already has a different meaning; on Linux, for instance, you use it to open different virtual consoles. If you want to keep this functionality, you can define another hotkey sequence.
An important part of the configuration of your VMware Workstation host is the amount of RAM that you'll make available for the use of the virtual machines. On one hand, you need to make sure that there is enough RAM remaining to keep the host operating system running smoothly. On the other hand, you also want to make sure that you have enough RAM to allocate the needs of all of your virtual machines. If you don't have sufficient RAM for the host operating system, it will start swapping, and if you don't have enough RAM for the virtual machines, the virtual machine memory will get swapped, neither of which is good for the performance of your computer.
Also under Memory, you can specify how the swap is going to be used. The best option for good performance is to disallow the usage of the swap completely. To do this select Fit all virtual memory into reserved host RAM, but this means that you might not be able to run all the virtual machines that you need on your host computer. The default option, which is selected, is Allow some virtual machine memory to be swapped. This offers the best compromise between performance and the amount of virtual machines that you can run. If you want to be able to run as many virtual machines as possible on the available hardware at the host computer, select Allow most virtual machine memory to be swapped; but be prepared for bad performance if you plan to run multiple virtual machines on your computer.
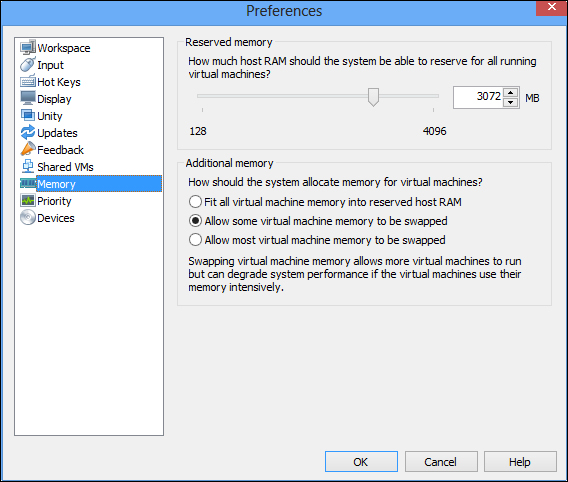
On the Memory tab, you can specify how the host operating system will manage system memory for your virtual machines
On the Priority tab, you need to specify that a virtual machine should get extra priority if it is active. By default, there is no additional priority for the virtual machine even if it is active. If you want to speed up the virtual machine a bit while working on it, make sure that High is selected on the Input grabbed option. To make sure that the host works smoothly while no virtual machines are in use, make sure that the Input ungrabbed option reads Low.
Another performance-related option specifies how to deal with snapshots. The default options will run the snapshot process in the background irrespective of whether you are taking a snapshot or restoring a snapshot. However, running snapshots in the background ensures that changes are only applied when the virtual machine is off. If you want to apply changes directly, you will need to make sure that the snapshot program runs as a foreground job. This will, however, slow down other processes on your computer as the snapshot process is both heavy in I/O as well as in CPU usage.

Under the Priority option, you can optimize virtual machine performance a bit