


Upgrades and migrations can be scary at times, and with vCenter at the heart of your Virtual environment, be sure to take time to research, plan, and review the steps for your process. It is also imperative that you fully understand and test the new product before moving it to production. This chapter will provide the following information:
Upgrading vCenter to vSphere 6
Migrating vCenter from SQL Express to SQL Server
Deploy vCenter Server Appliance with no DHCP server
Upgrading from Windows vCenter 5.1 to vCenter Server Appliance
When you migrate to vSphere 6.0, you need to perform all the steps in sequence to avoid frustration, loss of time, and, most importantly, possible data loss. Before you upgrade, you should consider a roll back plan that could include backups and/or snapshots. After you upgrade each component, there is no option to go back. Once you migrate to vCenter Server 6.0, you cannot revert to vCenter Server 5.x without performing your recovery process mentioned earlier.
Good planning and preparation includes research on the following:
The back up and restoration of vCenter components
Reading Release Notes for the targeted release
Researching the Web for others that have performed the upgrade
This will help you in preparing yourself for the update, as it could help you avoid using your recovery plan.
You want to verify that all the equipment (hardware) in your environment is going to be compatible with the new software before you perform the upgrade. You should check the VMware Compatibility Guide, found at http://www.vmware.com/resources/compatibility.
Verifying your hardware before the upgrade is better than finding out that it's not compatible after the upgrade. Remember to check that plug-ins, such as multi-path IO and any other features you are using will not cause you problems. If you're using products such as Horizon View or Sire Recovery Manager (SRM), make sure you verify the products for any possible conflicts. Also, check any third-party solutions you are using and make sure they can be used with the upgrade you are planning.
You should verify that the existing database will be supported for the version of vCenter Server you are upgrading to. Reference the VMware Product Interoperability Matrixes found at http://www.vmware.com/resources/compatibility/sim/interop_matrix.php.
Perform a full backup of your vCenter Server database, along with the Inventory Service database. Refer to the vendor documentation based on the vCenter Server database type you are using.
To perform backups on the Inventory Service database for Windows, use the information found at https://pubs.vmware.com/vsphere-50/index.jsp?topic=%2Fcom.vmware.vsphere.install.doc_50%2FGUID-518228D1-E305-457C-B552-50DAB4BDF6B1.html.
Also, make sure that permissions are set correctly (DBO) on your vCenter Server database.
You are going to want to make sure your network is working correctly and that it meets all connectivity requirements for the upgrade of vCenter:
Check the fully qualified domain name (FQDN) of the system on which you will perform the upgrade to make sure it can resolve to the other components.
Open the Command Prompt and use
nslookup, followed by the hostname of your vCenter (for example,m-vcenter-01). This should return the IP address that is assigned to that system. You should also see the name and IP address of your domain controller. If this is successful, the FQDN should be resolvable.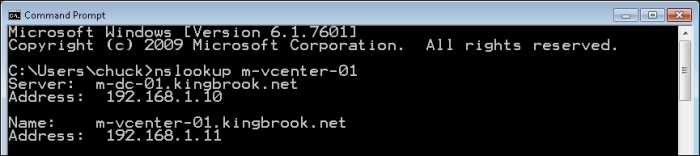
Now, let's check the DNS reverse lookup and make sure it returns your FQDN name when you use the IP address for the vCenter Server. Do not perform this from the vCenter Server, but from another workstation.
If you use DHCP instead of an assigned IP (static) address on the vCenter Server (which is not the best practice), check the name to make sure it is correct in domain name service (DNS). When pinging the name of the vCenter, you should see that the correct IP address is returned. This is shown in the following screenshot:

Let's do the same type of testing with your ESXi host. Again, make sure you can ping both the IP address and the name of the host and get the correct information back. The ping to the vCenter from the host is shown in the following screenshot:

If your identity source is going to be Active Directory (AD), you want to make sure you have everything configured correctly. Your DNS lookup along with the reverse lookup of your domain controller (DC) should have the DNS entries for the Single Sign-On (SSO) Server machines. Try to ping your domain (for example,
kingbrook.net), and you should get the IP address of your DC. This is shown in the following screenshot:
Verify the System DSN settings to make sure that the vCenter Server is configured correctly to communicate with the database.

Verify whether your hosts on the current vSphere network have their internal clocks synchronized before you begin the migration of the vCenter Server (Windows or Appliance). If the clocks are unsynchronized, there could be problems with authentication, which could cause your upgrade to fail, or possibly prevent the vpxd service used by VCSA from beginning.
vSphere 6 contains a few new features and also provides updates to some of the existing features. This section will highlight both the new and updated features found in the vSphere 6 release. The information will be on the following:
Platform Service Controller
vCenter Server Appliance
vSphere Web Client
vSphere Client
VMware will introduce a new component in version 6 named the VMware Platform Services Controller (PSC).
Single Sign On (SSO) was the first component to be converted into the PSC. SSO was released in vSphere 5.1 and contained some major issues. This forced a rebuild to SSO 2.0 for version 5.5. In the new release, vCenter, vRealize, vRealize Automation along with vCloud Director, can now use the shared PSC component.
PSC will contain the following functionalities as of now:
SSO
Certificate Store
Licensing
Certificate Authority
Service (Product) Registration
PSC uses the vPostgres database that is integrated into vCenter and the database is the same in both Windows and Appliance versions. PSC also self-replicates; it doesn't use ADAM, which means it is now possible to replicate the Windows vCenter and vCenter appliance between each other.
You can embed PSC within vCenter or use an external database instead of the vPostgres database. The guidance from VMware, if you are running less than eight vCenters, is that it is best to use the embedded PSC, so that vCenter will only connect to the internal PSC.
If you are going to have more than eight vCenters, VMware recommends you use an external PSC, rather than using the embedded one. This way, you can setup PSC in a highly available and load-balanced service sharing between all of your vCenters.
The Certificate Store and the Certificate Authority (CA) are new components that will help you with vSphere certificates management. The VMware Certificate Authority (VMCA), which is also new, performs as the root certificate authority and manages its own certificates, or it can handle certificates from an external certificate authority (CA). VMCA allows the provisioning for each ESXi host requiring the signed certificate. This will be added to the vCenter inventory as part of the upgrade. This provides the viewing and managing of the vSphere Web Client certificates, which allows the management of the entire workflow of the certificate lifecycle with the new VMCA.
The management limits of vCenter Server Appliance (VCSA) have also been expanded. With version 5.5, you could manage up to 100 hosts and up to 3,000 powered on Virtual Machines (VMs). Now, version 6 of vSphere allows you to manage 1,000 hosts and an increase of 10,000 powered on VMs. IBM DB2 continues to be the embedded database, and Oracle remains as the only supported external database. This is because Microsoft will not officially support the ODBC driver for Linux; the driver that is currently used is community supported.
The web client continues increased performance gains, along with tagging improvements and many other new functions. Flash is still used, which means there is not a native HTML5 web client for now.
VMware is keeping the VI Client (C#) for at least the next few releases. Progress continues with the web client and there are continuous improvements to the speed. So far, most customer feedback has been a preference for the older, yet familiar, clients. At this point in time, there will be no new functionality added to the old client, but the support will remain. Therefore, the old client will manage less functions than the new VCSA.
Now that we have completed the overview of the new and updated components, let's begin the steps needed to upgrade vCenter.
Remember to always check the What's New in VMware vSphere 6.0 document found on the VMware website to find the most current information about the product. The What's New in VMware vSphere 6.0 can be found at http://www.vmware.com/files/pdf/vsphere/VMware-vSphere-Whats-New.pdf.
The new vCenter installer for the Windows version has been streamlined. Now, there is a return to a single installer, with all input collected up front. There is also an improved pre-check function with more items checked. You also have a choice between the external (pre-existing) or the internal (embedded) option of PSCs during the installation process.
The procedure for upgrading has not changed since the last version of vCenter. The following are the vCenter upgrades that you can perform from a standalone installer or Update Manager:
vCenter is the first component that is upgraded. If VCSA is used, you might be required to install a new VCSA and then import the information from the previous version.
The next component to upgrade is VUM (Windows based vCenter) along with the plugins you are using. Plugins interact with your host and need to be upgraded before the hosts are upgraded.
The next step is to upgrade your hosts. Use the newly upgraded VUM and create new baselines with drivers and plugins. Then, upgrade your hosts in a rolling fashion.
The next step is to update the Virtual Machines' (VM) tools and virtual hardware.
Next, upgrade any vDSes using the following steps:
Create a backup of your dvSwitch :
Use the web client to log in to the vCenter.
Browse and select the dvSwitch to Backup.
Go to Actions | All vCenter Actions | Export Configuration.
Select Distributed Switch and Port Groups.
Enter the description for the dvSwitch export.
Click on OK.
Then upgrade the dvSwitch:
Use the web client to log in to the vCenter.
Browse and select your dvSwitch to Upgrade.
Go to Action | Upgrade Distributed Switch.
Review the upgrade version and features available as part of this version:
Click on Next.
Verify the compatibility for the dvSwitch upgrade.
Click on Next.
Some of the features need additional conversion setup (enhanced LACP support):
Select the Enhance the LACP support checkbox.
Click on Finish.
Once the dvSwitch is upgraded, it cannot be downgraded to a previous version and you cannot add older VMware ESX/ESXi servers to the upgraded dvSwitch.
Now, upgrade the datastores from VMFS3 to VFMS5 (if upgrading from 5.1 only).
Now you can complete other components in your environment such as VDP, vCO, View, vCD, and so on. Remove any snapshots created during the upgrade that are not needed.
While SQL Express is never recommended for a production environment, many times the setup of vCenter is completed with SQL Express for a Proof of Concept (POC), Pilot or a Test/Development environment. For various reasons, there might be a time you want or need to migrate from SQL Express to the full SQL Server. So, for whatever reason you might have to perform the process, here are the steps used to migrate from SQL Express to the full SQL version:
Migrate the SSO database (vCenter 5.1 only)
Migrate the vCenter Database
Change the vCenter ODBC connection
Recreate the SQL Jobs
But before you begin, here are a few items to document to make sure the migration goes as smoothly as possible:
Names of the databases
Current administration users and the correct passwords
Target SQL Server Ports
A decision on the mode of authentication you are going to use
Make sure you check the interoperability of your vCenter with the planned database version and verify that they support each other.
You will need to schedule some downtime of both SSO and your vCenter. While you are moving the database and the services between servers, vCenter and SSO services must be stopped. They will need to be stopped until the data is copied and the configurations are changed. No Virtual Machine workload is touched and it can remain running. If needed, your host can be managed using the standalone vSphere client while the migration is in progress.
Create back-ups of the items that are to be changed such as any files, registry keys, and other items that would need to be recovered if something goes wrong.
Use this process if you are migrating from a pre-5.5 version. SSO in vCenter 5.5 does not use a database.
If you are not sure of the current password for the RSA_USER/RSA_DBA, you will need to go to the SSOServer\utils folder. Open an administrative command prompt and type the following:
ssocli manage-secrets -a listallkeys
Make sure both vCenter Single Sign-On services are stopped. After verifying that the services are stopped, you can:
Backup and restore the database files to the target SQL Server
Copy the database files to the target SQL Server
Two SQL Server users are created when installing SSO:
RSA_DBARSA_USER
The RSA_DBA is the account used during an installation and is not needed for the migration. During the migration process, the RSA_USER will be used. The login/user is added to the target SQL Server and the password along with the required permissions are set.
Open an administrative elevated command prompt and move to the default directory of the SSO server directory\utils. Type in the following:
ssocli configure-riat -a configure-db –database-host newdbhost –database-port newdatabaseport –rsa-user RSA_USER –rsa-user-password password -m master_password
In the preceding code, replace the following:
Database hostname
Database port number
1433for standard SQLRSA_USER password
-mmaster password for theAdmin@System-Domainpassword
The rsa-user password will only work with the rsa-user option.
Prepare to edit two files jndi.properties and config.properties using your preferred text editor (for example, Notepad.exe) and using elevated permissions.
For the first file, SSOServer\webapps\ims\web-inf\classes\jndi.properties, check the following values:
com.rsa.db.type=MSSQL.
com.rsa.db.instance=RSA. (your RSA instance dbname is)
com.rsa.db.msserverinstance= . (Leave empty when using the default MSSQLSERVER instance on the target server)
com.rsa.db.hostname=destinationSQL server.
com.rsa.db.port=1433.
Pay special attention to com.rsa.instanceName and remember that this does not refer to the SQL Instance. This refers to the SSO instance and you should not change this.
For the second file, SSOServer\webapps\lookupservice\WEB-INF\classes\config.properties, check the following values:
db.url=jdbc:jtds:sqlserver://;serverName=;portNumber=1433;databaseName=RSA. PortNumber has to be added here.
db.user=RSA_USER
db.pass=yourpassword
db.type=mssql
db.host=destination SQL server fqdn.
Make the changes to the lines in order to match your environment. Now, save the files and start the service for your vCenter Single Sign-On.
Stop the vCenter services if they are not already stopped. Include all the services for vCenter, excluding Update Manager, SSO, and Orchestrator. After all the services are stopped:
Backup and restore the database files to the target SQL Server.
Copy the database files to the target SQL Server.
Then, create the login/user to the target SQL Server, and set the required password and permissions. The user for the vCenter database must be db_owner and also dbo on the Microsoft DB system database can be found on the target server.
Now, use the ODBC Manager (64-bit) to change the System DSN being used by your destination SQL Server.
When using the default MSSQL Server installation, the MSSQLSERVER instance does not need to be filled, a connection will use the hostname for the SQL server.
When using Windows credentials (instead of SQL Authentication), the ODBC is changed in the service account user. Modify the default database value to the default name of
VIM_VCDB. If you did not change it or if you decided to use a new name for the database, you would type it here.
After the changes are complete, check the connection to verify whether it works.
The next step is to modify the ODBC connection found in the registry:
Navigate to Start | Run, type regedit, and then click on OK. This will start the Registry Editor and the window will open. Move to HKEY_LOCAL_MACHINE | SOFTWARE | VMware, Inc. | VMware VirtualCenter and make a change to the key DbInstanceName by removing its current Value data. Do not delete this key. See the following screenshot:

Then change the key DbServerType. Edit the Value data from SQL Express value Bundled to Custom, as displayed in the following screenshot:

Now, navigate to HKEY_LOCAL_MACHINE | SOFTWARE | VMware, Inc. | VMware VirtualCenter | DB and change key 4. Do this by entering the new ODBC driver, changing the ODBC in place of the original. If this did not change, verify the value and leave it alone. You will add the user for vCenter Server SQL to key 2. You need to set the password that is kept in key 3. This is completed by opening an Administrator command prompt and typing C:\Program Files\VMware\Infrastructure\VirtualCenter Server\vpxd.exe -p.
Now, on the SQL Server, you need to recreate the SQL jobs. This is completed by using the SQL Server Management Studio and going to SQL Server Agent.
Use the following list to create the job list:
|
Rollup job |
SQL job filename |
|---|---|
|
Event Task Cleanup vCenter Database |
|
|
Past Day stats rollup vCenter Database |
|
|
Past Month stats rollup vCenter Database |
|
|
Past Week stats rollup vCenter Database |
|
|
Process Performance Data vCenter Database |
|
|
Property Bulletin Daily Update vCenter Database |
|
|
Topn past day vCenter Database |
|
|
Topn past month vCenter Database |
|
|
Topn past week vCenter Database |
|
|
Topn past year vCenter Database |
|
To add the jobs, browse to C:\Program Files\VMware\Infrastructure\VirtualCenter Server\sql and open the equivalent SQL file using Open | file and choose the vCenter database. Next, execute each Query and continue through each one. When you find the existing jobs, make sure to check that each matching SQL user in jobs is the right one. Choose a job and right–click on it; then go to properties to make sure the user and database name is right. If they are incorrect, recreate them.
Review the vcdb.properties file by going to C:\ProgramData\VMware\VMware VirtualCenter (for Windows 2008R2 and higher). Make sure to use Explorer to uncheck hidden and protected files. Then, edit the vcdb.properties file value url= ;integratedSecurity\ to:
false– For SQL authenticationtrue– For Windows authentication
The following screenshot shows the edited vcdb.properties file value url= ;integratedSecurity\ is set to true:

The remaining should match sqlserver://<your SQL server>\\SQL instance;databaseName=\dbname; dbtype=mssql.
Check to be sure the Windows user has the permissions to the SQL database. The user also needs to run VMware VirtualCenter Management Webservices and VMware VirtualCenter. Run regedit again and move to HKLM\System\CurrentControlSet\Services\ to remove the old service values from SQL Express from the DependOnService Multi string found in the vCenter services. Do not delete the value, just remove the VIM_SQLEXP from the data. The other dependencies should not be changed. Start the service for vCenter and use the logs to verify everything has started up.
When you normally deploy the vCenter Server Appliance, a DHCP server is present and the appliance will get the IP address from it. But what if, for whatever reason, there was no access to a DHCP server for the deployment?
You will need to assign an IP address (static) for your network (VLAN or port group), along with the proper subnet mask. You then need to connect to the host that contains the VCSA appliance using the C# client. Right-click on the VCSA appliance and choose open console. Then, log in to the appliance using the supplied default username of root and vmware as the default password. After logging in, you will be presented with the Linux CLI. Use the following procedure to provide an IP address for your appliance.
Use the following command to change the interface configuration file:
vi /etc/sysconfig/networking/devices/ifcfg-eth0
From here, you will be using the screen-oriented text edit vi to make changes to the file. If you are familiar with this editor, this should be easy. If not, follow the procedure closely and the changes will be completed without a problem. Inside the vi Editor, use your arrow keys to position yourself in the file. Sometimes, using the arrow keys on the keypad causes problems, so use the non-keypad arrow keys. Now, move to the line that contains BOOTPROTO and press the E key, or the right arrow key, to move to the end of the line. By pressing the I key, you are now in edit mode and can make modifications to the file. Use the Backspace key to delete dhcp and replace it with static.
Continue to use the arrow keys to move to the bottom of the file and insert the following lines:
TYPE=EthernetUSERCONTROL=noIPADDR=the IP address you obtainedNETMASK=the mask you obtainedBROADCAST=actual IP broadcast address
It should look something like this:

Now, press the Esc key, enter a colon (:), and type wq, and hit the Enter key.
You should get a message that shows the ifcfg-eth0 file was written. Now, restart the network service: service network restart.

Typing ifconfig should show the new IP address you just entered on eth0, so verify that you can ping other addresses on the same network.
If you run into problems, double check your IP address, your submask, and the VM port group. Now, with the new IP address, you can get to the VCSA appliance by opening a browser and entering https://10.10.1.50:5480.
There is a possibility that VMware will discontinue the Windows vCenter application. You can see it with every new vCenter Release that there is a push towards using the VCSA to manage the vSphere environment. Even now, some newer features in vSphere can't be used from the traditional Windows-based client.
There are several benefits to using VCSA, but there are also some limits.
Here are the benefits of using the VCSA:
There is no Windows OS license for vCenter Server
No patching or upgrading of Windows OS is required
There is no need to maintain third-party tools running on your vCenter Server
It's a fast deployment—no Windows OS or vCenter application to install
It's possibly the vCenter of the future
Here are the current limits when using the VCSA:
Oracle is the only supported external database
The VCSA is Software Und System Entwicklung (SUSE) distribution and there are no OS-level patches from VMware
You would need a certain amount of Linux experience when using the appliance
No Update Manager
Problems occur when running local scripts (alarms)
No integration of Powershell into Alarm execution
No integration of already existing Windows system monitoring tools
There are no automated tools to help with this migration from Windows vCenter to the appliance. You need to deploy a new appliance and follow the procedure mentioned next to move the host from your original Windows version to the appliance.
Here are a few things to complete before you begin:
Document the current resource pool configurations
Record all DRS rules and groups (you will create the rules after the new vCenter connects to the VMs)
Document and verify the port configurations of the physical network
Have Update Manager on the Windows version of vCenter in order to upgrade the host to 5.5 after the migration
After you feel that you have the information you need to make sure you understand your environment, you can schedule some downtime and begin the following migration process:
Install, configure, and verify the new production VCSA. Make you can login and then recreate your resource pools, folder structure, and the permissions to match the current environment.
If using vSphere Replication, disable it along with HA on the old vCenter.
Halt DRS by switching it to manual mode. Your resource pools will be removed if you disable DRS.
It is a good idea to export from the old environment and then import the vSphere Distributed Switches (vNDS). This makes the rebuilding process easier, if needed. If you are going from version vSphere 5.1 to VCSA 5.5, keep the current version of the distributed switch. You will upgrade this later after you import the host, which is still at 5.1.
Then, remove all additional components from vCenter such as vRealize and other third-party consoles from the old vCenter.
Move the VMs to standard virtual switches by using the secondary links for the standard vSwitch. When you add a host to a virtual distributed switch, there you will specify the uplink NIC for hosts and vCenter will assign that NIC to the first uplink slot.
Remove the ESXi hosts from the old vDS.
Now, disconnect (do not remove), one at a time, each ESXi host from your Windows-based vCenter and add them to the new VCSA. Try to keep the same resource pools using the documentation that was created before the process.
Verify that the resource pools are correct and then create DRS & HA rules from the information you gathered before the migration.
Add the new imported ESXi hosts to the configured VCSA vDS. Remove the standard vSwitch along with re-adding the NIC to the secondary uplink.
Shut down the old vCenter.
Re-enable HA and put DRS in fully automated mode on the new vCenter.
Move any DNS names related to services.
Use Update Manager to update your hosts to 5.5.
Migrate your virtual distributed switch to 5.5.
Check and double check along the way to make sure each step is completed to your satisfaction. As with most projects, take the time to verify and document what you have. Put together a plan and always have a procedure to go back to, if needed.
This chapter has provided an introduction to the troubleshooting solutions you will find in the remaining chapters. It is very important when installing or updating any product to be sure to take the time to fully research the information on the new release or upgrade. Then, plan your process and know the options for recovery before you review your work. Take the time to try to understand how the new product is going to function on the existing equipment before moving it to production.
The next chapter will cover the topic of the vCenter database. vCenter uses the database to keep track of all the vSphere information and cannot function without it. In the next chapter, we will review fixing server services and database issues. The chapter will also help the administrator understand how to recover from an improper shutdown pertaining to the database.