So you want to start creating cool web applications in Java? Well, you've come to the right place. Vaadin is a mature, powerful Java framework to build modern web applications leveraging your Java programming skills, and understanding of concepts such as listeners, components, and other well-known constructions acquired from the desktop APIs such as Swing and AWT.
First things first. Downloading, installing, and configuring your development environment are the first steps to get started with Vaadin. In this chapter we will cover the following topics:
Creating and running Vaadin applications in Eclipse
Creating and running Vaadin applications in NetBeans
Creating and running Vaadin applications using Maven
Generated application explained
Buttons
Labels
Text fields
Notifications
We will cover the details of configuring your development environment using Eclipse, NetBeans, and Maven. Feel free to jump straight to the section explaining your favorite IDE and skip those covering the other ones.
Let's get our hands dirty!
Steps to download and install Eclipse are as follows:
Go to http://eclipse.org/ and download the latest (or your favorite) version of Eclipse for Java EE Developers.
Extract the downloaded file to the directory you would like Eclipse to be installed in.
Execute
eclipse.exeoreclipseaccording to your operating system flavor.
Guess what? We've just downloaded and installed Eclipse. Seriously, that was the very first step; now we need to install the Vaadin plugin for Eclipse.
Steps to install the Vaadin plugin for Eclipse are as follows:
In Eclipse, go to Help | Eclipse Marketplace….
Type
Vaadinin the Find field inside the Search tab and press Enter.Click on the Install button besides the Vaadin Plugin for Eclipse heading.

Eclipse will calculate some requirements and dependencies. Once it does, make sure the Vaadin Plugin for Eclipse is checked and click on Next.
Read and accept the terms of the license agreement and click on Finish to start installing the plugin.
The installation process can take some minutes. You will be prompted to accept installing software that contains unsigned content. Click on OK when asked to and let Eclipse continue with the installation.
Finally, Eclipse will ask you if you want to restart the IDE. Do it. Once you restart Eclipse, you'll see a little reindeer logo on the toolbar, that's the Vaadin logo and means that the plugin is ready.

We've just prepared Eclipse to start hacking! Using the Vaadin Plugin for Eclipse we'll be able to create new Vaadin projects, custom components, and themes. But before that, we will have to install a web server to deploy our Vaadin applications.
Note
You might have noted that the Vaadin Plugin for Eclipse installed an additional plugin: IvyDE. Ivy is a tool for managing dependencies, usually all the JAR files that your project needs. Don't worry too much if you don't know Ivy, just go through the following steps and we will get some fun in a couple of minutes, I promise.
Steps to make Eclipse a Jetty-ready IDE are as follows:
Go to Help | Eclipse Marketplace… in Eclipse.
Type
Run Jetty Runin the Find field inside the Search tab and press Enter.Click on the Install button besides the Run Jetty Run plugin.
Make sure Run Jetty Run is checked and click on Next.
Accept the license agreement and click on Finish.
The installation process can take some minutes. You will be prompted to accept installing software that contains unsigned content. Click on OK when asked to and let Eclipse continue with the installation.
Once Eclipse finishes installing the plugin, it will ask you if you want to restart the IDE. Do it again.
We've successfully downloaded and installed our own Jetty server.
Now we are ready to create and deploy our first Vaadin-powered application.
Steps to create a Vaadin application are as follows:
Navigate to File | New | Other….
Go to the Vaadin sub tree and select Vaadin 7 Project.
Click on Next.
Type
welcomefor your project name and select the latest Vaadin version.Click on Finish to let Eclipse create the project for us.
A new project has been created and we can deploy it to our server right away, so let's do it now!
Steps to deploy and run a Vaadin application are as follows:
Click on the Debug As… button on the toolbar and go to Debug As | Run Jetty.

Alternatively, you can right click on your project and select Debug As | Run Jetty.
Using your preferred browser, go to
http://localhost:8080/welcomeand play with the just created Vaadin application.
Installing NetBeans is quite easy. Let's see how it's done.
Go to the URL http://netbeans.org/ and download the latest (or your favorite) version of NetBeans Java EE edition.
Run the just downloaded installation file.
The installation program will allow you to choose whether to install Apache Tomcat or Glassfish. Although you can use most Java servers, we will use Tomcat to deploy our applications. So, make sure you check Apache Tomcat and click on Next.
Accept the terms of the license agreement and click on Next.
Accept the terms of the JUnit license agreement and click on Next.
Select the directory you would like NetBeans to be installed to and click on Next.
Select the directory you would like Tomcat to be installed to and click on Next.
Click on Install to start the installation process.
Once the installation process is finished, you will be prompted to contribute to the NetBeans project. If you wish to, check the corresponding option and click on Finish, otherwise just click on the Finish button.
As you can guess, we have installed NetBeans and we are ready to create our first Vaadin project.
The best and the easiest way to create Vaadin 7 projects in NetBeans is by using Maven. Fortunately, NetBeans have very good support for Maven projects. If you don't know Maven, don't worry, be happy (thanks Bobby). Follow these steps and you'll get a Vaadin application willing to be hacked right away.
Steps to create a new Vaadin project are as follows:


A new project has been created and we can deploy it to our server right away, so let's do it now!
Steps for deploying and testing the Vaadin application in NetBeans are as follows:
Deploying an application in NetBeans couldn't be easier. Just select your welcome project and click on that little green arrow on the toolbar:

Alternatively, you can do the same using the menu Run | Run Project (Vaadin Web Application). Even faster: F6.
NetBeans will prompt you to select a server. You've installed Tomcat, right? Select the Apache Tomcat server and click on OK. Note that you can deploy to any server you have registered in NetBeans, we are using Tomcat just for the purposes of this example.
Once you select the server, you will see a lot of messages on the output console. This is Maven preparing your application. Be patient, this process could take a while, only the first time.
Go to
http://localhost:8084/welcomeand play with the just created Vaadin application.
You can completely skip this section if you don't want to use Maven to develop Vaadin applications. If you want to, and you are using NetBeans, please read the previous section if you haven't already.
You are still here. Chances are that you are not using Eclipse or NetBeans. Well, actually, the easier way to get Vaadin 7 is through Maven. We are not covering how to install Maven here. If you haven't already, install Maven following the instructions given in http://maven.apache.org.
Steps for creating a new Vaadin project are as follows:
Open a new terminal in your operating system and move to the directory you want your project to be created in.
Run the command line shown as follows:
mvn archetype:generate -DarchetypeGroupId=com.vaadin -DarchetypeArtifactId=vaadin-archetype-application -DarchetypeVersion=7.0.0 -Dpackaging=warEnter your preferred groupId and press Enter. For example,
com.example.welcome.Enter
welcomeas artifactId and press Enter.Press Enter to accept the default version.
Press Enter to accept the default package.
If you can see the rewarding BUILD SUCCESS message, you have successfully created your first Vaadin project using Maven. You must have a new directory with all the generated files for your project.
Steps for deploying and running Vaadin applications with Maven are as follows:
Move to the directory that Maven created for your project. If you have specified
welcomeas artifactId, then move to thewelcomedirectory.Before actually deploying the application we must compile it and package it. To do that, run the command:
mvn packageThis will take some time, so be patient.
Now we are ready. Run the command:
mvn jetty:runIf you haven't run this before, you will see a very verbose Maven downloading stuff.
Go to
http://localhost:8080/welcomeand play with the just created Vaadin application.
We have completed the first step of configuring our development environment to develop and run Vaadin applications. Now let's get started with the real cool stuff: the code.
Open the file WelcomeUI.java (or MyVaadinUI.java if you are using NetBeans or Maven). You will see something like this:
package com.example.welcome;

import com.vaadin.server.VaadinRequest;
import com.vaadin.ui.Button;
import com.vaadin.ui.Button.ClickEvent;
import com.vaadin.ui.Label;
import com.vaadin.ui.UI;
import com.vaadin.ui.VerticalLayout;

public class WelcomeUI extends UI {

  protected void init(VaadinRequest request) {
    final VerticalLayout layout = new VerticalLayout();
    layout.setMargin(true);
    setContent(layout);

    Button button = new Button("Click Me");
    button.addClickListener(new Button.ClickListener() {
      public void buttonClick(ClickEvent event) {
        layout.addComponent(new Label("Thank you for clicking"));
      }
    });
    layout.addComponent(button);
  }
}
This is going to be like a crash course on Vaadin 7. Let's pretend that we have created the previous class starting with an empty one like the following (package and import declarations will be omitted):
public class WelcomeUI {
}
This class will be the root of all our UI components. When you create a Vaadin application, and once the user browses to the URL the application has been deployed to, a web page will be automatically generated using the logic you've implemented in a certain method of this class. Which method? One overridden from the UI class, so first, we got to extend the UI class as follows:
public class WelcomeUI extends UI {
}
And the method to override is as follows:
public class WelcomeUI extends UI {

  protected void init(VaadinRequest request) {
  }

}
Note
Where is the init method called from? A Java web application is implemented using the Servlet technology. In short, a Servlet is a class that adds functionality to a web server. You can pair URLs with your own Servlet implementations and call any code you need to fulfill the requirements for your application. You do this in the web.xml file (or using annotations). Vaadin has a custom Servlet implementation which can be configured to call your own UI class implementation. Take a look at the web.xml file and find the Vaadin Servlet (com.vaadin.server.VaadinServlet).
Because this method will be called when the user browses to the application URL, you have the chance to build the user interface here. This is done by building a components tree. It's like a hierarchy where the components are arranged. We have already created the root component for the hierarchy, our WelcomeUI class. Now we can add visual components into the root component. But let's first see graphically how the component hierarchy should look when we finish our piece work:
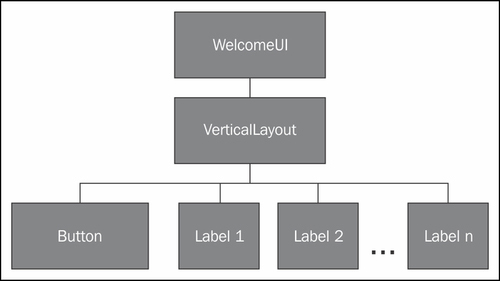
What we have here is a WelcomeUI having a VerticalLayout which has a Button and some Labels. VerticalLayout, what's that? Think of it as an invisible component that allows you to arrange its child components vertically on the page, one upon another. So the button is on the top, then goes the first label, then the second label, and so forth.
Ok, back to the code. Take a look at how we can add that VerticalLayout invisible thing:
public class WelcomeUI extends UI {

  protected void init(VaadinRequest request) {
    VerticalLayout layout = new VerticalLayout();
    setContent(layout);
  }

}
We've created an instance of VerticalLayout and then set it to be the content of the UI. By calling the setContent(layout) method we are saying that layout is a child of our WelcomeUI instance.
Now we have a layout in which we can add the button and all the n labels. Let's do it for the button:
public class WelcomeUI extends UI {

  protected void init(VaadinRequest request) {
    VerticalLayout layout = new VerticalLayout();
    setContent(layout);

    Button button = new Button("Click Me");
    layout.addComponent(button);
  }

}
No rocket science. We create an instance of Button and add it to the layout. This means the button is a child of layout, it will be displayed inside the VerticalLayout.
At this point, if we run the application, a button will be shown but it won't produce any response when clicked. Let's change that boredom:
public class WelcomeUI extends UI {

  protected void init(VaadinRequest request) {
    VerticalLayout layout = new VerticalLayout();
    setContent(layout);

    Button button = new Button("Click Me");
    button.addClickListener(new Button.ClickListener() {
      public void buttonClick(ClickEvent event) {
        // this will be called when button is clicked
      }
    });
    layout.addComponent(button);
  }

}
Don't be afraid, we've added five lines of code, but most of them are brackets or comments. Button has a method that allows you to add click listeners. A click listener is a class that listens to click events, that's it. Here, we are using an anonymous class (you know Java, right?):
new Button.ClickListener() {
  public void buttonClick(ClickEvent event) {
    // this will be called if button is clicked
  }
}
This class is an anonymous implementation of the
Button.ClickListener interface. We are passing the just created instance to the addClickListener method in order to connect our code with the click event on the button. This kind of usage of anonymous classes is very common when developing Vaadin applications, especially in places where you need this callback behavior.
We are ready to add the logic needed to dynamically add all those labels into the layout. We have a listener defining a method that will be called each time the button is clicked. So let's add the corresponding logic in that method:
public class WelcomeUI extends UI {

  protected void init(VaadinRequest request) {
    final VerticalLayout layout = new VerticalLayout();
    setContent(layout);

    Button button = new Button("Click Me");
    button.addClickListener(new Button.ClickListener() {
      public void buttonClick(ClickEvent event) {
        Label label = new Label("Thank you for clicking");
        layout.addComponent(label);
      }
    });
    layout.addComponent(button);
  }

}
This is similar to when we added a button to the layout. This time we're adding a label. A label allows you to show non-editable texts.
Label components can display text in several formats. You can display plain text (that's the default), preformatted text, and HTML text. What if you want to display the "Thank you" part of the message on the label using a bold font?
You are one line far of doing that. Try it! Use the setContentMode method of Label and the ContentMode enumeration to display HTML messages on your page.
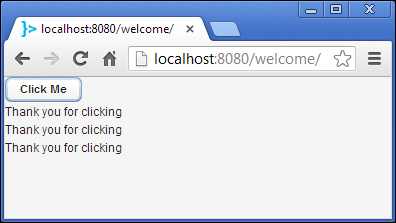
If we run the application right now, we will see a screen as shown in the following screenshot (before clicking the button several times, of course):
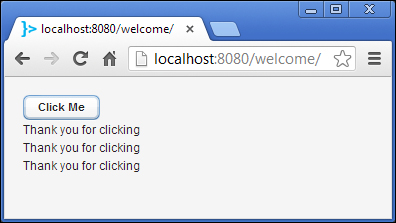
It looks a little tight on the page. We can add some space around the layout using the setMargin method as shown in the following code snippet:
public class WelcomeUI extends UI {

  protected void init(VaadinRequest request) {
    final VerticalLayout layout = new VerticalLayout();
    layout.setMargin(true);
    setContent(layout);

    Button button = new Button("Click Me");
    button.addClickListener(new Button.ClickListener() {
      public void buttonClick(ClickEvent event) {
        Label label = new Label("Thank you for clicking");
        layout.addComponent(label);
      }
    });
    layout.addComponent(button);
  }

}
Now it will appear as follows:
That's it. If you make some little refactor, you will get the original application that your IDE (or Maven) created.
Now that you understand the code of the generated application, let's try adding a couple of features to make it a little bit more interesting. First, that boring "Thank you" message is not very useful. What if we develop an application that generates some random funny phrases? The user enters the name of two friends or something, and the application will produce random phrases about them.
Follow these steps to add some fun to our application:
Change your code to add the required text fields just before the line that creates the
buttoninstance by adding the highlighted code:// ... setContent(layout); final TextField name1 = new TextField("Somebody's name"); final TextField name2 = new TextField("somebody's name"); layout.addComponent(name1); layout.addComponent(name2); Button button = new Button("Click Me"); // ...Add the business logic in a new method like this:
public String getFunnyPhrase(String name1, String name2) {
  String[] verbs = new String[] {
    "eats", "melts", "breaks", "washes", "sells"};

  String[] bodyParts = new String[] {
    "head", "hands", "waist", "eyes", "elbows"};

  return name1 + " " +verbs[(int) (Math.random() * 100 % verbs.length)] + " " +name2 + "'s " +bodyParts[(int) (Math.random() * 100 % verbs.length)];
}
Change the listener to display the message returned by the business method:
public void buttonClick(ClickEvent event) {
  String phrase = getFunnyPhrase(
      name1.getValue(), name2.getValue());
  layout.addComponent(new Label(phrase));
}
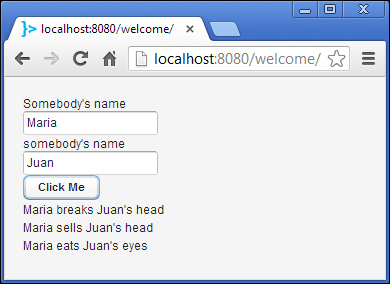
We added a couple of text fields to our layout and then implemented a method to get the message to be shown on the labels. As you may have already guessed, the TextField class defines a getValue() method which returns the value which the user has introduced in the field. In this case, it happens to be a String. All input components (that is, components that get input from a user) have a
getValue() method, which we can use to know the values introduced on the user interface. The following is a screenshot of the application (it seems that Maria doesn't like Juan too much):
Notifications are a common feature in applications. You might need to notify that some event has occurred in your system when the user performs certain action. For example, in a CRUD (create, read, update, and delete) interface, your application should notify the user whether each action has been successfully executed or not.
Vaadin makes it easy for you to show fancy notifications in your web applications. The Notification class has several static methods you can call from any part of your code to show notifications. For simple notifications you can make a call such as:
Notification.show("User created");This will display a message centered on the page shown as follows:
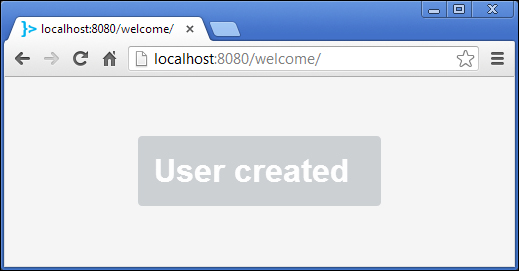
The message will disappear when the user moves the mouse or presses any key.
In the funny phrases application, it would be nice if the application alerts the user when no names are given instead of showing no-sense phrases. Would you be able to modify the application in order to make it show this alert using the Notification class? Try it!
Tip
Downloading the example code
You can download the example code files for all Packt books you have purchased from your account at http://www.packtpub.com. If you purchased this book elsewhere, you can visit http://www.packtpub.com/support and register to have the files e-mailed directly to you.
There are a couple of concepts you must keep in mind to be proficient with Vaadin. Answer the following questions and test yourself about your current Vaadin level.
Q1. Which method will be automatically called when somebody browses to your application URL?
UI.setContent(Component component).UI.init(VaadinRequest request).VerticalLayout.init(VaadinRequest request).VerticalLayout.addComponent(Component component).
Q2. Suppose you are overriding the init method of your own UI class. How would you set the root of your components tree?
By calling the
setContentmethod of theUIclass and passing the root component.By calling the
addComponentmethod of theUIclass and passing the root component.Actually, an instance of the
UIclass I'm writing will be the root of the tree.There's no such a thing as a components tree (it seems the book's author is going crazy).
We learned some cool features in this chapter:
We configured our development environment using Eclipse, NetBeans, and Maven.
We learned the details of the code IDE wizards (or Maven) generated when we create a new project.
We learned how components are internally arranged in a tree, where the root is a class extending
UI.We learned that the
initmethod of ourUIclass is like a starting point for building our user interface.We used labels and buttons and attached them to a vertical layout.
We also learned how easy it is to show notifications using the static methods of the
Notificationclass.
Now you are able to develop simple web applications using Vaadin. The next chapter will teach you how to use more complex input components.