


Recently, the Internet has shifted from being a provider of mostly textual information to a rich media platform; delivering high quality audio, video, and more. This shift was pioneered by sites such as YouTube, Flickr, Last.fm, Facebook, and others. The availability of broadband and faster connection speeds, throughout the world, has aided this shift. This change has brought new challenges to content providers, as they now need to organize and deliver to the customer not only textual content, but all other forms of media. While textual information can be easily manipulated, multimedia objects are a lot harder to work with.
Traditional Content Management Systems (CMS) have focused on organizing and manipulating textual information, but modern systems have more support for multimedia. In this book, we will discover how to manage various forms of rich media content in TYPO3 one of the world's leading open source CMSs.
In this chapter, we will cover:
Setting up a web server on Debian
Setting up a multithreaded environment
Setting up a web server on Windows
Creating a scalable architecture
Setting up an NFS share
Setting up TYPO3
Installing needed extensions
Creating a template for a site
Welcome to this book about the vast world of TYPO3 Multimedia! In this book, we will cover various topics that relate to manipulating multimedia objects in the TYPO3 content management system.
In this chapter, we will lay down some expectations for the rest of the book, and set up the environment that we will use for most of the examples used throughout the book.
In order to get the most from this book, there are some expectations of prior knowledge and experience. It is assumed that the reader has a good understanding of TYPO3, which can be achieved by reading the introductory tutorials—Inside TYPO3, TYPO3 Core API, and Modern Template Building guide—essential to understanding how TYPO3 works. Basic TypoScript knowledge is required as well.
We will write several extensions in this book; however, we will omit a lot of the details about extension writing, focusing rather on the specifics of the extension. If you're new to extension development in TYPO3, you should look for resources on the subject on www.typo3.org. TYPO3: Extension Development, Dmitry Dulepov, Packt Publishing is an excellent book that covers all of the prerequisites and much more.
There are multiple ways to achieve anything in TYPO3. The best solution depends on the situation, and generally requires some compromises. This book cannot illustrate the best solution to every problem, but attempts to show various possibilities and approaches to problem solving using practical examples.
Most examples assume you have administrator access to the installation. If you are an editor or a designer, and have a restricted access to the system, you should skip the examples that pertain to developers, or ask your system administrator to provide you appropriate access.
While all of the examples presented in this book can be completed using standard tools such as a web browser and a text editor, I highly recommend using an Integrated Development Environment (IDE) if you're serious about web development. IDE would save you time, boost your productivity, and provide insight into your application that is simply not possible with standard tools.
There are a variety of PHP IDEs available for various platforms and budgets. Popular products include Komodo IDE, Zend Studio, NetBeans, and Eclipse with PDT plugin. My weapon of choice is NuSphere PhpED, and you may see examples and screenshots throughout the book that make use of the PhpEd platform. The examples can be transposed to the IDE you're using, but this may require looking in the manual or searching online for the detailed description.
Before we start anything else, we need to set up a web server. The most common setup for TYPO3 is based on a LAMP stack (Linux, Apache, MySQL, and PHP), although other setups are supported as well. Next, we will install all the components required by TYPO3 on a Debian Linux server.
Setting up a Debian server is very easy, because all the packages you need are available through APT (Advanced Packaging Tool). Make sure that the package lists are up-to-date by running:
Shell> apt-get update
Issue the following command while logged in as root:
Shell> apt-get install apache2-mpm-prefork libapache2-mod-php5 php5-gd php5-mysql mysql-server-5.0
APT makes software maintenance easy, as all packages can be upgraded or removed through simple commands. You could install the packages from source, but it would make subsequent upgrades difficult. With APT, you can run the following to update the package cache information and upgrade your system:
Shell> apt-get update
Shell> apt-get upgrade
It's highly recommended to do this on a regular basis to apply any security patches. But be careful upgrades could break some functionality!
We can also install some other components to add additional functionality to our system.
This line will install ImageMagick on your system.
Shell> apt-get install imagemagick
This installs ImageMagick—a powerful graphic processing program. TYPO3 works with GD and ImageMagick, and you can enable the use of ImageMagick in the Install Tool. As ImageMagick is an external program (unlike GD, which is a PHP extension), it is more efficient and feature-rich when it comes to image processing. Therefore, it's highly recommended that you install and enable it.
An alternative to ImageMagick is GraphicsMagick—a fork of ImageMagick with a more stable API. GraphicsMagick is also more efficient, and performs better than ImageMagick, especially on multi-core processors. No changes to TYPO3 are required to work with GraphicsMagick, and it can be utilized as soon as it is installed by using the following command:
Shell> apt-get install graphicsmagick
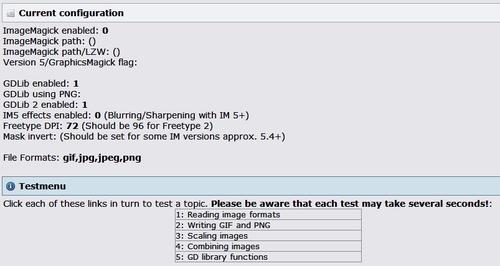
To verify that everything is functioning correctly, you can go into TYPO3 Install Tool (available when you install TYPO3 as described in recipe Setting up TYPO3), and select Image Processing to check the configuration, then run some tests, as shown on the following screenshot:
Apache provides a few tools that significantly simplify maintenance tasks. Here are some useful commands:
Shell> a2enmod module_name
Shell> a2dismod module_name
The first command line (shown above) enables a module while the second command line disables a module (example: mod_rewrite).
Shell> a2ensite site_name
Shell> a2dissite site_name
The first command line enables a website configuration file while the second command line disables a website configuration file (example: default).
Note
Always put different site configurations in separate files. This way you can be sure that disabling a site configuration will only disable that website, and will not have any adverse effects on the other sites hosted on the server.
Shell> apache2ctl start
Shell> apache2ctl stop
Shell> apache2ctl restart
The commands you just saw are used to start, stop, or restart the server respectively. Make sure to restart the server after configuration changes, as they will not take effect (alternatively, you can reload the server).
There are many other resources online to help you set up and optimize the web server. One such resource that also gives some information specific to TYPO3 is http://www.installationwiki.org/Typo3.
TYPO3 is an enterprise content management system, so it is thread safe—meaning two instances of the script can be executed simultaneously, and they will run in parallel without interfering with each other. Therefore, Apache can be set up with mod_fcgid and PHP processes will be allowed to run in parallel.
1. Install components of the server:
Shell> apt-get install libapache2-mod-fcgid apache2-mpm-worker php5-cgi Shell> a2enmod actions Shell> a2enmod fcgid2. Replace contents of
/etc/apache2/mods-available/fcgid.confwith:<IfModule mod_fcgid.c> AddHandler fcgid-script .fcgi SocketPath /var/lib/apache2/fcgid/sock IPCConnectTimeout 60 IPCCommTimeout 256 BusyTimeout 256 ProcessLifeTime 256 </IfModule>
3. Modify site configuration, by default located in
/etc/apache2/sites-available/default4. Add the following to the virtual host definition:
Alias /fcgi-bin/ /var/www/fcgi-bin.d/
Action php-fcgi /fcgi-bin/php-fcgi-wrapper
5. Add the following lines to the directory definition for
/var/www/:AddHandler fcgid-script .php FCGIWrapper /usr/bin/php-cgi .php
6. While there, modify the
Options, adding+ExecCGI. Your final site configuration should look like this:<VirtualHost *:80> ServerAdmin webmaster@localhost Alias /fcgi-bin/ /var/www/fcgi-bin.d/ Action php-fcgi /fcgi-bin/php-fcgi-wrapper DocumentRoot /var/www/ <Directory /var/www/> AddHandler fcgid-script .php FCGIWrapper /usr/bin/php-cgi .php Options Indexes FollowSymLinks MultiViews +ExecCGI AllowOverride None Order allow,deny allow from all </Directory> </VirtualHost>
Note
Refer to the Apache manual for descriptions of some of the options listed above, as well as other configuration options.
7. Create the executable link to PHP CGI module:
Shell> mkdir /var/www/fcgi-bin.d Shell> ln s /usr/bin/php5-cgi /var/www/fcgi-bin.d/php-fcgi-wrapper
apache2-mpm-worker package, downloaded in the first command line call, is designed to run several threads simultaneously. PHP CGI binary is installed in the same statement.
We then enable the fcgid Apache module, and adjust its configuration. Most installations need to increase the timeout; otherwise, you will be looking at an Internal Server Error if the page rendering takes too long. To further complicate the diagnosis, timeouts are not recorded in logs. We increase the values of IPCConnectTimeout, IPCCommTimeout, and BusyTimeout, along with the ProcessLifeTime. Depending on your configuration, you may need to increase these values further.
Now, when a request comes in to Apache, the PHP CGI process will be launched to handle it. With multiple simultaneous requests, multiple processes will be launched, and run parallel to each other, handling individual requests.
Note
If you have multiple clients using this server, they can have separate PHP processes, and not interfere with each other (for security purposes). You can find more information on configuring this set up at http://typo3.org/development/articles/using-php-with-mod-fcgid/.
TYPO3 runs on a Windows server with IIS. This setup is less common, but supported. Most examples in this book assume you're running a Linux server.
If you want a development environment on your local computer running Windows, you can set up WAMP server. It is an all-in-one installer that can set up all the necessary components in minutes. Obviously, it will not be optimized for performance, but it will be enough to start experimenting with TYPO3. Just download the installation package, and run the executable file. It will guide you through the steps needed to complete the installation.
Note
Download WAMP distribution at http://www.wampserver.com/en.
An alternative to WAMP is XAMPP—another package containing Apache, MySQL, PHP, and Perl. Unlike WAMP, XAMPP is not specific to Windows platforms, and could be installed on a Mac, Linux, or Solaris system as well.
Note
Find out more about XAMPP at http://www.apachefriends.org/en/xampp.html.
1. Go to Control Panel | Add or Remove Programs | Add/Remove Windows Components, and check the box next to Internet Information Services (IIS) as shown in the following screenshot. Have your original installation CD handy, as you will probably be asked for it to complete the installation.

2. Download the TYPO3 source and dummy package, and extract them into
C:\Intepub\wwwroot.3. Download the installer binary package from http://php.net, and run it. Select the IIS CGI or Fast CGI module, and make sure that you install the complete package (including extensions).
4. Restart the web server, and proceed with TYPO3 installation.
Windows web environment is powered by Internet Information Services (IIS). This component is available in most Windows systems, but not installed by default. In Step 1, we install this missing component. Once the installation is complete, our server is functional and capable of serving files over the Web.
At this point, if you browse to a PHP file on the server through a browser, you should see the PHP source code. The problem is it is not executing—that is because PHP is not yet installed, and IIS doesn't know how to handle PHP files. We solve this problem in Step 3.
Additional instructions for configuring PHP to run on IIS are available in the PHP manual: http://www.php.net/manual/en/install.windows.php
We've just installed the processing side of the application. We can use a DB on another server, or install MySQL.
MySQL can be installed on Windows very easily. Just download the MSI Installer file and run it. The install wizard will take you through the steps needed to install the database.
TYPO3 can be configured to use other databases besides MySQL, including PostgreSQL, MS SQL, Oracle, and others. This support is provided by DBAL (Database Abstraction Layer) extension, so install it if you intend to use one of these products instead of MySQL.
In the previous examples, we've installed the database server on the same physical machine as the web server. Although a small website will perform just fine on a single server, larger sites will hit performance bottlenecks caused by limited capacity. A common industry solution to this problem is to place the web server on a different physical server from the database. This allows accommodation of future traffic increases by adding more processing servers.
As mentioned before, TYPO3 is thread-safe, so the processes running on one server will not interfere with processes on the other servers.
Once you have moved your database to a different server, you need to point TYPO3 to the new DB host. If you haven't installed TYPO3 yet, refer to the next recipe. Otherwise, select the Admin Tools | Install module in the TYPO3 backend, or if you don't have access to the backend yet, go to http://example.com/typo3/install/ (replacing example.com with the domain name of your site).
Note
Resolving missing ENABLE_INSTALL_TOOL file error
You may get an error, stating that the Install Tool has been locked due to missing ENABLE_INSTALL_TOOL file. This file is a security precaution, preventing anyone from potentially accessing system settings. If this file is present, it is removed after one hour of inactivity for the same reason. But there are several ways to recreate it. If you're logged in to the backend, the easiest way to create the file is to go to User tools | User settings [admin], and under Admin functions tab, click the button Create Install Tool Enable File:

If you don't have access to the backend, you can create the file manually using the following command line or a file explorer:
Shell> touch /var/www/typo3conf/ENABLE_INSTALL_TOOL
Once you have gained access to the Install Tool, go to Basic configuration, and adjust the database access information.
You can now scale horizontally, by adding more processing servers accessing the same database. In this setup, storage becomes a problem. Luckily, most static files needed by TYPO3 are stored in the fileadmin folder that can be mounted from an external resource, such as Network Attached Storage (NAS). See the next recipe Setting up an NFS share to see how this can be accomplished.
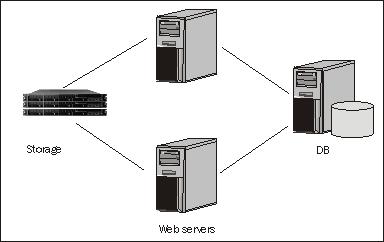
We have now arrived at a highly scalable set up. Should the traffic to the application increase, extra nodes—either web servers or database servers—can be added. This also allows for failover in case of hardware or software failure. These setups are more complex and are outside the scope of this book.
In the Creating a scalable architecture recipe, we arrived at a server architecture to support a website. That architecture required a separate storage, linked to processing servers over the network. In this recipe, we will cover how you could set up such NAS on a Debian Linux server with no special hardware.
1. Run the following command to install all the required components for Network File System (NFS) sharing:
Shell> apt-get install nfs-kernel-server nfs-common portmap2. Edit
/etc/exportsfile, and add the following line:/var/www/fileadmin 10.0.0.0/24(rw)
3. Run the following command to make the changes effective:
You can fine tune the line in /etc/exports to fit your needs. Pay particular attention to access if you want your files to be secure. You could list individual servers as a comma-separated list, and give them explicit permissions to the shared folder.
The folder fileadmin will now be shared by other computers on the network, and could be accessed by several web servers in our scalable architecture. Changes to the TYPO3 code—such as installing extensions or changing configuration values—will still need to be done independently on each server, but all media files can be stored on the NFS share.
In the following section we will see how we can mount a Network File System.
You need to install similar tools—nfs-kernel-server, nfs-common, portmap—to mount the network file system correctly. Run the following command as a root user:
Shell> apt-get install nfs-common
After that, mount the shared folder on a different server with the following command:
Shell> mount -t nfs hostname:/nfs_folder /var/www/fileadmin
We now have a web server running; so, we can install TYPO3.
1. Download the latest stable release, and a dummy package from http://typo3.org.
2. Read
INSTALL.txt.3. Extract all files to
/var/www.Note
To ease upgrades in the future, or to run several TYPO3-driven sites from the same code base, you should extract the TYPO3 source package into a separate directory from the dummy package. For example, you could create a directory
srcunder/var/www, and create a folder for each version of TYPO3 that you plan on using. Also, under/var/www, create a folder for each site you want to have on this server, and extract the dummy package into each folder. Next, create symbolic links for foldersmisc, t3lib, andtypo3in the site folders, linking to the source package.misc:ln -s /var/www/src/typo3-4.3.0/misc /var/www/mysite/misct3lib:ln -s /var/www/src/typo3-4.3.0/t3lib /var/www/mysite/t3libtypo3:ln -s /var/www/src/typo3-4.3.0/typo3 /var/www/mysite/typo3
When a new version is released, simply create a new folder for it, and change the links. If you realize that the new version is incompatible, you can quickly restore links to the old version.
4. Launch 1-2-3 installer. If you have a fresh new installation, simply go to http://example.com/typo3/index.php, and it will redirect you to the installer.
5. Enter your database information in Step 1. If you installed the database on the same host as the web server, enter
localhostunder address.
6. In Step 2, select an empty database where you would like the TYPO3 data to be stored, or create a new database. Make sure the database you choose to use is empty.

7. In the final step, TYPO3 will import the default data schema and records it needs to operate. You should now be able to log in to the TYPO3 backend.
There are several ways to download the latest version of TYPO3 source and the dummy package. The best way to access both is to go to http://typo3.org/ and click on Download. The source package contains all the TYPO3 core files needed for the system, while the dummy package helps create the needed directories and files specifically for your site.
Before you proceed with uploading the files to the web server, you must read the instructions in INSTALL.txt. Installation instructions change often and there may be components of the web server that are required in the future. Installation documentation covers all the nuances of installing the specific version you have just downloaded.
After you have finished installing, explore the Install Tool fully, as it contains a full array of options you need to configure your system. Go to http://example.com/typo3/install to launch the Install Tool (replacing example.com with the domain name of your site).
Basic Configuration runs a basic check of file permissions and server settings, and will report if there are any problems. Make sure to go through any issues, as they're likely to impact operations. You can also change database information here.
Database Analyzer will check the integrity of your database schema. Click COMPARE under Update required tables to see if the database needs to be upgraded. Make sure that you do this after every TYPO3 source or extension upgrade. You can also delete all data, or import it again.
Update Wizard should be used when you upgrade your TYPO3 source version—for example from 4.3 to 4.4.
Image Processing will run a series of tests to check the ImageMagick, GD, or GraphicsMagick configuration.
All Configuration gives an overview of all the system configuration variables available in the system. Go through all the options, and adjust the value to fit your system.
typo3temp/ gives statistics and lets you perform operations on temporary files created by TYPO3.
Clean up database lets you clear cached image sizes.
phpinfo() gives a standard PHP status report.
Edit files in typo3conf/ allows some basic edit operations on files in the
typo3confdirectory.About gives some general information about the use of the script, in greater detail than just described.
There is an excellent installation guide available from http://dmitry-dulepov.com/e-books/typo3-installation-and-upgrade.html. It covers setup instructions, as well as steps that need to be taken to optimize and secure the new installation.
Most of the power of TYPO3 comes from extensions. In fact, much of the system you have just installed is powered by extensions—these come packaged with the source, and are called system extensions, or simply sysext. You can find them under the typo3/sysext folder. These extensions have been deemed necessary for most installations, and many come preloaded by default. There are more extensions available through the TYPO3 Extension Repository (TER), and they can be installed as local extensions, and will reside under the typo3conf/ext folder. You can get a complete list at http://typo3.org/extensions.
As we will be dealing a lot with multimedia, we should install the Digital Asset Manager (DAM) extension. Its extension key is dam. While you can run a website without it perfectly well, a lot of the information provided in subsequent chapters will assume that you have a lot of media objects, and need an efficient way of organizing them. DAM is designed to do just that.
There are several ways to install extensions in TYPO3. Next, we will cover how you can install extensions using the Extension Manager—which is the simplest way to install extensions. For other possibilities, refer to the There's more... section further ahead. You may choose different options depending on the situation, so you should be familiar with all methods.
1. Go to Admin Tools | Extension Manager.
2. In the top-most selection box, choose Settings to go to the settings submodule.
Note
Terminology
A quick note about terminology: All options in the left frame of the backend menu are called modules. Some modules may have submodules—those are usually available in selection boxes at the top of the content frame. Refer to TYPO3 official documentation for an overview of the structure of the backend.
3. Under Security Settings, check the box if you want access to extensions that have not been reviewed. If you leave the box unchecked, and are unable to find some mentioned extensions, this would probably be the reason.
4. If you plan on uploading extensions to TER, then under User Settings, enter your TYPO3 account information. You can sign up for a free account at http://typo3.org.
5. Under Mirror list, select the mirror that is closest to you, or leave the recommended setting of random.
6. Scroll to the bottom and click Update to save your changes.
7. Go back to the submodule selector and choose Import Extensions.
8. In the List or look up all extensions box, type in dam.
9. In the list that appears, choose the Media (DAM) extension, and choose the Import button.
10. You will be notified of any Dependency Error that you can ignore or resolve.

The Extension Manager will perform all the necessary database updates.

In the following section we will cover other methods of importing extensions from T3X files and code repositories.
Extensions are distributed and can be downloaded as files with T3X extension. You can download the files through the TER. Once you have the file, it can be imported through the Import Extensions submodule of the extension manager. The rest of the steps are the same as above.
In between stable releases, unstable versions can be exported from repositories. These versions contain bug fixes and new features, but may not be fully tested, and therefore contain some problems. Here is how the latest revision of DAM can be checked out from the repository. Create a new folder under typo3conf/ext/dam, and in it, run the following command:
Shell > svn co https://svn.typo3.org/TYPO3v4/Extensions/dam/dam/trunk
Note
This command assumes you have Subversion installed. If you don't, you will get an error. Subversion client can be installed through APT:
Shell> apt-get install subversion
If you're using Windows, you can use Tortoise SVN that is a graphical interface to the Subversion client. It integrates seamlessly into Windows Explorer and most commands can be accessed through right-click context menu. Go to http://tortoisesvn.net/ to find out more about Tortoise SVN.
The rest of the steps for installation are the same as above.
Our goal is to have a website for people to visit, and as such that website needs a frontend template where content will be displayed (TYPO3 can be used for other applications as well).
We will create a very basic template, which will allow us to see the results of the work in TYPO3 on the page. On a real project, you will probably be given a template by a designer.
Make sure to create a template directory under fileadmin, and create a file mainTemplate.html with the following contents:
<!DOCTYPE html PUBLIC "-//W3C//DTD XHTML 1.0 Transitional//EN" "http://www.w3.org/TR/xhtml1/DTD/xhtml1-transitional.dtd">
<html xmlns="http://www.w3.org/1999/xhtml">
<head>
<title>Site template</title>
</head>
<body>
<!-- ###DOCUMENT_BODY### begin -->
<div id="container">
<div id="leftContent">
<!-- ###LEFT_COLUMN### -->
Left Column Content
<!-- ###LEFT_COLUMN### -->
</div>
<div id="centerContent">
<!-- ###CENTER_COLUMN### -->
Center Column Content
<!-- ###CENTER_COLUMN### -->
</div>
<div id="rightContent">
<!-- ###RIGHT_COLUMN### -->
Right Column Content
<!-- ###RIGHT_COLUMN### -->
</div>
<div id="borderContent">
<!-- ###BORDER_COLUMN### -->
Border Column Content
<!-- ###BORDER_COLUMN### -->
</div>
</div>
<!-- ###DOCUMENT_BODY### end -->
</body>
</html>
Also, create a new CSS file in the same directory, called mainStyle.css with the following content:
#container {
width: 100%;
height: 100%;
}
#leftContent {
float: left;
width: 200px;
display: inline;
}
#centerContent {
float: left;
width: 500px;
display: inline;
}
#rightContent {
float: right;
width: 200px;
}
#borderContent {
float: right;
width: 200px;
}
Note
Case Sensitivity
Make sure you follow case sensitivity, as TypoScript code is case sensitive, and it doesn't see mainStyle.css as the same as mainstyle.css.
Come up with a convention for yourself. If you know all your names, follow camelCase, you will save yourself a lot of double checking and headaches when something doesn't work.
1. In the Template module, browse to the page you would like to be the root of the site. Create a new root template.
2. In the Includes tab, include the
styles.content(default) static template.3. In the
setupfield, add the following code:page = PAGE page.typeNum = 0 page.10 = TEMPLATE page.10 { template = FILE template.file = fileadmin/templates/mainTemplate.html workOnSubpart = DOCUMENT_BODY subparts.LEFT_COLUMN < styles.content.getLeft subparts.RIGHT_COLUMN < styles.content.getRight subparts.BORDER_COLUMN < styles.content.getBorder subparts.CENTER_COLUMN < styles.content.get } page.includeCSS.mainStyle = fileadmin/templates/mainStyle.css

There is a lot that happens in just a few lines. Let's refresh your TypoScript knowledge.
page=PAGE creates a new top-level page object, and page.typeNum=0 assigns a page type of 0 that is the default. So, when you go to the page with no type argument, this page object will be used.
Note
Other type numbers can be used to display content in a different form. For example, different type value can render a page for mobile device, for print, or even as XML for external applications, such as RSS feeds.
In the earlier code, page.10=TEMPLATE defines a content object at position 10 in the content object array. When the page is rendered, the content objects are each rendered in numerical order. Page.10 is defined as a TEMPLATE content object, so it will take an HTML template file, and process it. Lines template=FILE and template.file=fileadmin/templates/mainTemplate.html define the location of the template file that will be loaded. workOnSubpart=DOCUMENT_BODY tells the page object to use the DOCUMENT_BODY subpart section of the template.
At this time, the template file will be loaded and output as it is. However, the following lines replace the respective subparts with output from each column:
page.10 { subparts.LEFT_COLUMN < styles.content.getLeft subparts.RIGHT_COLUMN < styles.content.getRight subparts.BORDER_COLUMN < styles.content.getBorder subparts.CENTER_COLUMN < styles.content.get }
This is possible because we included the styles.content static template.
What will happen now is TYPO3 will get a list of all content elements in each column, and render them, that is, it will convert content into HTML. It will then place the resulting HTML code in place of the subparts.
The design in mainTemplate.html is very simple—just HTML. We want to apply some styling to that structure. Line page.includeCSS.mainStyle=fileadmin/templates/mainStyle.css includes our CSS file, which does just that.
For more information about templates, you should read a detailed guide to templating in TYPO3: http://typo3.org/documentation/document-library/tutorials/doc_tut_templselect/current/ (Modern Template Building). We will briefly go through a few more features.
In the mainTemplate.html file, we have used four subparts. This lets us preview the file, and see exactly where the content will go once it is rendered. Subparts are defined by a unique marker, enclosed in HTML comment tags, and surrounding some text, as in:
<div><!-- ###TEMPLATE_SUBPART### --> Code that will be replaced <!-- ###TEMPLATE_SUBPART### --></div>
Sometimes, you just want content to be inserted into a specific point, in such a case, you can use a marker. A marker is similar to a subpart, but exists by itself and doesn't reside in an HTML comment:
<div>###TEMPLATE_MARKER###</div>
Subparts are also used by extensions, where the subparts contain markers. This may not be clear at this point, but after working with a few templates you will grasp the difference.
To include JavaScript files, add the following lines to TypoScript:
page.includeJS.someCode = fileadmin/templates/someCode.js
See TypoScript Reference (TSref) for more options: http://typo3.org/documentation/document-library/references/doc_core_tsref/current/
