In this chapter, we'll cover the following recipes:
Getting started with the WebGL renderer
Getting started with the Canvas renderer
Getting started with the CSS 3D renderer
Detecting WebGL support
Setting up an animation loop
Determining the frame rate for your scene
Controlling the variables used in the scene
Setting up a local web server with Python
Setting up a local web server with Node.js
Setting up a local web server using Mongoose
Solving cross-origin-domain error messages in Chrome
Solving cross-origin-domain error messages in Firefox
Adding keyboard controls
Loading textures asynchronously
Loading models asynchronously
Loading models asynchronously with progress
Loading other resources asynchronously with progress
Waiting until resources are loaded
Dragging a file from the desktop to the scene
In this chapter we'll show you a number of recipes that introduce the basic usage of Three.js. We'll start with a number of simple recipes that you can use as a starting point for your Three.js projects. Next, we'll show you a couple of features that you can add to your project, such as WebGL detection and defining an animation loop. We'll end with a number of more advanced features such as adding drag and drop support, and loading resources synchronously and asynchronously.
When you want to create an initial Three.js project that uses WebGL for rendering, you always have to set up the same couple of variables. You need a THREE.WebGLRenderer object, a THREE.Scene object, a camera, and some way to render the scene. In this recipe, we'll provide you with a standard template that you can use in your own projects to quickly get started with the WebGL renderer.
Make sure that you download the sources for this book. You can either do this in the following two ways:
Firstly, you can do this by cloning the Git repo that you can find at https://github.com/josdirksen/threejs-cookbook.
Alternatively, you can download the sources from Packt Publishing website. When you extract the ZIP file or clone the repository you'll find a set of directories; one for each chapter of this book. For this recipe, you can use
0as a reference.
You can directly view the end result of this recipe by opening the previously mentioned file in your browser. When you open this example in the browser, you'll see the following screenshot:

This is a minimal scene, rendered with the THREE.WebGLRenderer object.
Creating a skeleton that you can use as a base for your projects is easy. With a couple of simple steps, you'll get your first WebGLRenderer-based Three.js scene up and running:
Let's first define the basic HTML that we'll use:
<!DOCTYPE html>
<html>
  <head>
    <title>01.01 - WebGLRenderer - Skeleton</title>
    <script src="../libs/three.js"></script>
    <style>
      body {
      margin: 0;
      overflow: hidden;
      }
    </style>
  </head>
  <body>
    <script>
      ...
    </script>
  </body>
</html>
Tip
Downloading the example code
You can download the example code files from your account at http://www.packtpub.com for all the Packt Publishing books you have purchased. If you purchased this book elsewhere, you can visit http://www.packtpub.com/support and register to have the files e-mailed directly to you.
As you can see this is use a simple page, with a
scripttag in the body that'll contain our Three.js code. The only interesting part is the CSS style.We will add this style to the body element to make sure that our Three.js scene will run in fullscreen mode and won't show any scrollbars.
Next, let's start by filling in the script tag. The first thing that we will do is create a number of global variables that are used throughout this recipe:
      // global variables
      var renderer;
      var scene;
      var camera;
The
renderervariable will hold a reference to theTHREE.WebGLRendererobject that we're going to create in the next step. Thescenevariable is the container for all the objects that we want to render, and thecameravariable determines what we will see when we render the scene.Usually, you'd want to wait for all the HTML elements to finish loading, before you start running your JavaScript. For this, we use the following JavaScript:
      // calls the init function when the window is done loading.
      window.onload = init;
With this code, we tell the browser to call the
initfunction, once the complete page has loaded. In the next step, we'll show the content of thisinitfunction.For your skeleton to work, you need to add the
initfunction, which looks as follows:function init() { // create a scene, that will hold all our elements // such as objects, cameras and lights. scene = new THREE.Scene(); // create a camera, which defines where we looking at. camera = new THREE.PerspectiveCamera(45, window.innerWidth / window.innerHeight, 0.1, 1000); // position and point the camera to the center camera.position.x = 15; camera.position.y = 16; camera.position.z = 13; camera.lookAt(scene.position); // create a renderer, set the background color and size renderer = new THREE.WebGLRenderer(); renderer.setClearColor(0x000000, 1.0); renderer.setSize(window.innerWidth, window.innerHeight); // create a cube and add to scene var cubeGeometry = new THREE.BoxGeometry(10 * Math.random(), 10 * Math.random(), 10 * Math.random()); var cubeMaterial = new THREE.MeshNormalMaterial(); var cube = new THREE.Mesh(cubeGeometry, cubeMaterial); scene.add(cube); // add the output of the renderer to the html element document.body.appendChild(renderer.domElement); // call the render function renderer.render(scene, camera); }In this
initfunction, we first created aTHREE.Sceneobject with the container for all the objects that we want to render. Next, we created a camera, which determines the field of the view that will be rendered. Next, we created theTHREE.WebGLRendererobject, which is used to render the scene using WebGL. TheTHREE.WebGLRendererobject has many properties. In this recipe, we used thesetClearColorproperty to set the background of our scene to black, and we told the renderer to use the complete window for its output, using thewindow.innerWidthandwindow.innerHeightproperties. To see whether our skeleton page is working, we then added a simpleTHREE.Meshobject with aTHREE.BoxGeometryobject to the scene. At this point, we can add the output of the WebGL, as a child of the HTML body element. We do this by appending the renderer's DOM element to the document body. Now, all that is left to do is render the scene by callingrenderer.render().
With these steps, you've created a basic WebGLRenderer based Three.js scene, which you can use as a basic starting point for all your Three.js experiments.
The
THREE.WebGLRendererobject only works when your browser supports WebGL. Even though most modern desktop browsers (and even a large number of mobile browsers) support WebGL, in some cases, you might need to look for an alternative. Three.js provides a couple of other renderers, which you can use. To get an up-to-date overview of which browsers support WebGL, you can check out the information on this topic at http://caniuse.com/webgl.Besides using the
THREE.WebGLRendererobject to render your scene, you can use theTHREE.CanvasRendererobject, which is explained in Getting started with the Canvas renderer recipe or theTHREE.CSS3DRendererobject, which is explained in the Getting started with the CSS 3D renderer recipe.
If your system doesn't support WebGL, there is an alternative renderer that you can use to render your scenes: the CanvasRenderer object. This renderer doesn't use WebGL to render the output, but directly uses JavaScript to draw the HTML5 canvas element.
In the r69 Version of Three.js, the canvas renderer has been removed from the default distribution. To use this renderer, we have to first import the following two files:
    <script src="../libs/CanvasRenderer.js"></script>
    <script src="../libs/Projector.js"></script>
For this recipe, you can take a look at the 01.02-canvasrenderer-skeleton.html example from the sources in this chapter. If you open this example in your browser, you'll see a cube, pretty much like the one in the previous recipe:
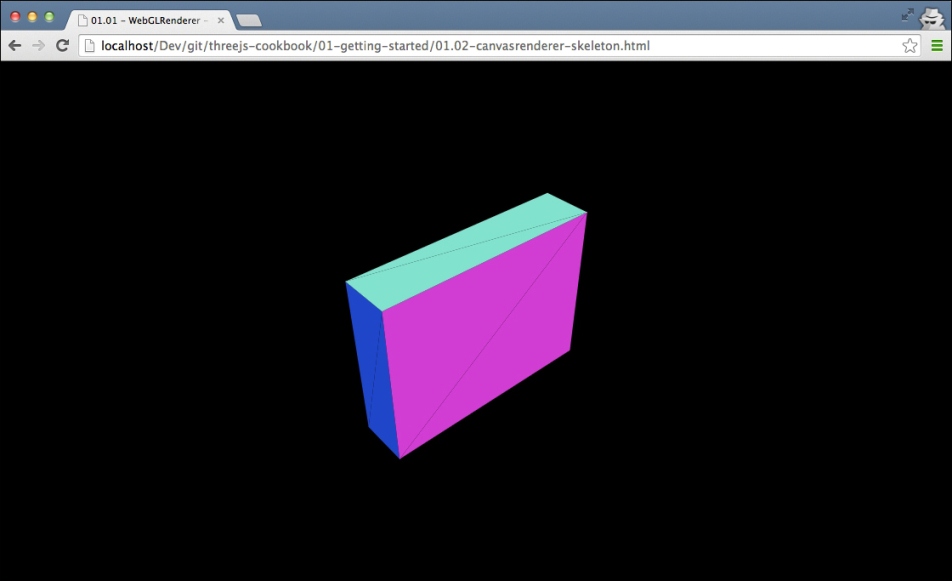
This time, however, this cube is rendered with the HTML5 canvas element. HTML5 canvas is supported on many devices, but provides less performance than the WebGL- based solution.
To set up the WebGL renderer, you will follow exactly the same steps as we showed in the previous recipe, Getting started with the WebGL renderer, so we won't go into the details in this section but we'll just list down the differences:
To get started with the
THREE.CanvasRendererobject, the only thing we need to change is the following:Replace the
THREE.WebGLRendererobject in the following piece of code:renderer = new THREE.WebGLRenderer(); renderer.setClearColor(0x000000, 1.0); renderer.setSize(window.innerWidth, window.innerHeight);Replace the THREE.WebGLRenderer object with the
THREE.CanvasRendererobject as follows:renderer = new THREE.CanvasRenderer(); renderer.setClearColor(0x000000, 1.0); renderer.setSize(window.innerWidth, window.innerHeight);
And that's it. With this change, we move from rendering using WebGL to rendering on the HTML5 canvas.
The main difference between the HTML5 canvas renderer and the WebGL renderer is that this approach uses JavaScript to directly draw to the HTML5 canvas for rendering your 3D scene. The main issue with this approach is the lousy performance. When you use the THREE.WebGLRenderer object, you can use hardware-accelerated rendering. However, with the THREE.CanvasRenderer object, you have to completely rely on software-based rendering, which will result in lower performance. An added disadvantage of THREE.CanvasRenderer is that you can't use the advanced materials and features of Three.js, as that relies on WebGL specific functionality.
If you can use the WebGL approach given in the Getting started with the WebGL renderer recipe, you should really use it. It provides more features than those that are available with the canvas-based approach, and has much better performance.
In the following recipe, Getting started with the CSS 3D renderer, this will also show a different approach where we use the CSS 3D-based renderer to animate the HTML elements. CSS 3D also provides hardware accelerated rendering, but only has support for a limited set of Three.js features.
HTML and CSS are getting more and more powerful each day. Modern browsers, both mobile and desktop variants, have great support for these two standards. The latest versions of CSS also support 3D transformations. With the THREE.CSS3DRenderer object, we can directly access these CSS 3D features and transform an arbitrary HTML element in 3D space.
To use the CSS 3D renderer, we first have to download the specific JavaScript file from the Three.js site, as it hasn't been included in the standard Three.js distribution. You can download this file directly from GitHub at https://raw.githubusercontent.com/mrdoob/three.js/master/examples/js/renderers/CSS3DRenderer.js or look in the lib directory of the sources provided with this book.
To see the CSS3DRenderer scene in action, you can open the example 01.03-cssrenderer-skeleton.html in your browser:

What you see here is a standard HTML div element, rendered in 3D with the THREE.CSS3DRenderer object.
To set up a THREE.CSS3DRenderer based scene, we need to perform a couple of simple steps:
Before we get started with the
THREE.CSS3DRendererspecific information, first, you have to set up a simple basic HTML page as we did in the Getting started with the WebGL renderer recipe. So walk through the first three steps of that recipe, and then continue with the next step.After the initial setup, the first thing that we need to do is to add the correct JavaScript to our head element:
<script src="../libs/CSS3DRenderer.js"></script>
Next, we'll start with the definition of the global variables that we need:
    var content = '<div>' +
      '<h1>This is an H1 Element.</h1>' +
      '<span class="large">Hello Three.js cookbook</span>' +
      '<textarea> And this is a textarea</textarea>' +
    '</div>';

    // global variables, referenced from render loop
    var renderer;
    var scene;
    var camera;
What we define here is a string representation of the element that we want to render. As the
THREE.CSS3DRendererobject works with the HTML elements, we won't use any of the standard Three.js geometries here, but just plain HTML. The renderer, scene, and camera are simple variables for the corresponding Three.js elements, so that we can easily access them from therender()function, which we'll see later on.Similar to the other skeletons we will initialize the scene in the
init()function. The function that you need to add to theTHREE.CSS3DRendererobject is shown as follows:function init() { scene = new THREE.Scene(); camera = new THREE.PerspectiveCamera(45, window.innerWidth / window.innerHeight, 0.1, 1000); // create a CSS3DRenderer renderer = new THREE.CSS3DRenderer(); renderer.setSize(window.innerWidth, window.innerHeight); document.body.appendChild(renderer.domElement); // position and point the camera to the center of the scene camera.position.x = 500; camera.position.y = 500; camera.position.z = 500; camera.lookAt(scene.position); var cssElement = createCSS3DObject(content); cssElement.position.set(100, 100, 100); scene.add(cssElement); render(); }We'll focus on the highlighted parts in this code fragment. For an explanation of the other parts of this function, we will take a look at the Getting started with the WebGL renderer recipe. As you can see in this fragment, this time we will create a
THREE.CSS3DRendererobject. Just as we did with the other renderers, we also need to set the size. Since we want to fill the screen, we will use thewindow.innerwidthandwindow.innerheightproperties. The rest of the code stays the same.Now, all we need to do to finish this skeleton is add an element. With the CSS 3D renderer, we can only add
THREE.CSS3DObjectelements. For this step, just add the following function:function createCSS3DObject(content){ // convert the string to dome elements var wrapper = document.createElement('div'); wrapper.innerHTML = content; var div = wrapper.firstChild; // set some values on the div to style it. // normally you do this directly in HTML and // CSS files. div.style.width = '370px'; div.style.height = '370px'; div.style.opacity = 0.7; div.style.background = new THREE.Color(Math.random() * 0xffffff).getStyle(); // create a CSS3Dobject and return it. var object = new THREE.CSS3DObject(div); return object; }This function takes an HTML string as the input, converts it to an HTML element, sets some CSS styles, and uses this as the input to create a
THREE.CSS3DObjectobject, which is added to the scene.
If you open this file in your browser, you'll see something that resembles the example we showed in the Getting ready section of this recipe. You can use the HTML page and JavaScript as a template for the entirety of your CSS 3D renderer project.
With CSS 3D, you can apply all kinds of transformations to the HTML elements. For instance, you can apply a specific rotation around an axis using the transform property. The interesting thing is that you can also apply matrix transformations. Three.js uses matrix transformations internally to position and rotate the elements. With the THREE.CSS3DRenderer object, Three.js hides the internal CSS 3D specific transformations and styles and provides a nice abstraction level, which you can use to work with the HTML elements in 3D.
If you can use the WebGL approach from the Getting started with the WebGL renderer recipe, you should really use it. It provides more features than those that are available with the CSS-based approach, but has less support for mobile devices. If, on the other hand, you're looking to manipulate the HTML elements on screen, the
THREE.CSS3DRendererobject is a great solution.
Not all browsers currently support WebGL. When you create a page that uses the THREE.WebGLRenderer object, it is a good idea to make sure that the browser supports WebGL. If a browser doesn't support it, this will result in all kinds of strange JavaScript errors in the JavaScript console and an empty screen for the end user. To make sure that your WebGL projects work as expected, we'll explain how to detect WebGL support in a browser in this recipe.
In this recipe, as an example, we will use the 01.04-detect-webgl-support.html file, which you can find in the sources provided with this book. If you open this file, you'll see the following result if your browser doesn't support WebGL:

Let's take a look at the recipe to create the preceding example.
To detect WebGL and create the message WebGL is not-supported, we need to perform the following steps:
First, we'll create the CSS for the pop up to show when WebGL isn't supported.
Then, we need to detect whether the browser WebGL is supported. For this, we'll write a method that returns the values true or false.
Finally, we'll use the result from the previous step to either show the pop up or just continue.
In the following section, we'll look at these steps in detail:
The first thing you need to do is set up the CSS that we'll use:
<!DOCTYPE html>
<html>
  <head>
    <style>
      .black_overlay {
        display: none;
        position: absolute;
        top: 0;
        left: 0%;
        width: 100%;
        height: 100%;
        background-color: black;
        z-index: 1001;
        opacity: .80;
      }

      .white-content {
        display: none;
        position: absolute;
        top: 25%;
        left: 25%;
        width: 50%;
        height: 70px;
        padding: 16px;
        border: 2px solid grey;
        background-color: black;
        z-index: 1002;
      }

      .big-message {
        width: 80%;
        height: auto;
        margin: 0 auto;
        padding: 5px;
        text-align: center;
        color: white;

        font-family: serif;
        font-size: 20px;
      }

    </style>
    <title></title>
  </head>
  <body>
As you can see, there is nothing special in this CSS. The only thing that we will do here is create a number of classes that we'll use to create a pop-up message and hide the background. Next, we will define the HTML that is used to create the pop ups.
The following snippet shows you the HTML code, which will contain the message. Using the CSS that we previously defined we can show or hide this element:
    <!-- Lightbox to show when WebGL is supported or not-->
    <div id="lightbox" class="white-content">
    <div class="big-message" id="message">

    </div>
    <a href="javascript:void(0)" onclick="hideLightbox()">Close</a>
    </div>
    <div id="fade" class="black_overlay"></div>
As you can see, we just create a number of
divelements that are currently hidden. When we detect that WebGL isn't supported this will be shown by the twodivelements by changing their visibility.Next, let's take a look at the JavaScript you need to add to detect WebGL. We'll create the following function for it:
    // loosely based on the http://get.webgl.org function detectWebGL() {

      // first create a canvas element
      var testCanvas = document.createElement("canvas");
      // and from that canvas get the webgl context
      var gl = null;

      // if exceptions are thrown, indicates webgl is null
      try {
        gl = testCanvas.getContext("webgl");
      } catch (x) {
        gl = null;
      }

      // if still null try experimental
      if (gl == null) {
        try {
        gl = testCanvas.getContext("experimental-webgl");
        } catch (x) {
        gl = null;
        }

    }
    // if webgl is all good return true;
    if (gl) {
      return true;
    } else {
      return false;
    }
}
As you can see, we create an HTML
canvaselement and then try to create a WebGL context with thegetContextfunction. If this fails, theglvariable is set to null but if it succeeds, theglvariable will contain the WebGL context. If theglvariable isn't null, it will return true. On the hand, if it is, it will return false.Now that we're able to detect whether a browser supports WebGL or not, we'll use this function to show a pop up. For this recipe, we'll also show you a pop up when WebGL is supported:
    var hasGl = detectWebGL();
    if (hasGl) {
      showLightbox("WebGL is supported");
    } else {
    showLightbox("WebGL is not-supported");
    }

    function showLightbox(message) {
      var lightBox = document.getElementById('light');
      lightBox.style.display = 'block';

      var fadeBox = document.getElementById('fade');
      fadeBox.style.display = 'block'

      var msg = document.getElementById('message');
      msg.textContent = message;
    }

    function hideLightbox() {
      var lightBox = document.getElementById('light');
      lightBox.style.display = 'none';

      var fadeBox = document.getElementById('fade');
      fadeBox.style.display = 'none'
    }
And that is it for this recipe. If we add this to a web page, a browser that supports WebGL shows a pop up with WebGL is supported, if no WebGL is available, a pop up is shown with the text WebGL isn't supported. Besides this approach, you can also use the detector object provided by Three.js at https://github.com/mrdoob/three.js/blob/master/examples/js/Detector.js. If you include this file in your JavaScript, you can detect WebGL by checking the webgl attribute of the Detector object.
In the recipes at the beginning of this chapter, we showed you how to set up a basic Three.js scene, using one of the available renderers. If you want to add animations to your Three.js scene, for instance, to move the camera around or rotate an object, you'll need to call the render function multiple times. In the old days of JavaScript, you had to control this yourself using the setTimeout or setInterval JavaScript functions. The problem with these functions is that they don't take into account what is happening in your browser. For instance, your page will be hidden or the Three.js scene might be scrolled out of view. A better solution for animations, and the one that we'll use in this recipe, is requestAnimationFrame. With this function, your browser determines when it is the best time to call the animation code.
For this recipe, we will use the 01.05-setup-animation-loop.html example HTML file. To see the animation in action, just open this file in your browser:

This example uses the WebGL renderer. You can of course apply this same recipe to the other renderers we've discussed in this chapter.
Let's take a look at the steps we need to take to set up such an animation loop.
To create an animation loop you don't have to change much in your existing code:
Let's first look at how to use
requestAnimationFramefor rendering. For this, we've created a render function:function render() { renderer.render(scene, camera); scene.getObjectByName('cube').rotation.x += 0.05; requestAnimationFrame(render); }As you can see, we pass the render function as an argument to request a frame for animation. This will cause the
renderfunction to be called at a regular interval. In therenderfunction, we will also update the rotation of the x axis of the cube to show you that the scene is re-rendered.To use this function in the recipes, which we saw at the beginning of this chapter, we just have to replace this call:
    function init() {
      ...
      // call the render function
      renderer.render(scene, camera);
    }
With the following:
    function init() {
      ...
      // call the render function
      render();
    }
You will now have your own animation loop, so any changes made to your model, camera, or other objects in the scene can now be done from within the
render()function.
We mentioned that in this recipe, we've used the
THREE.WebGLRendererobject as an example. You can of course also apply this to the skeletons from the Getting started with the Canvas renderer recipe or Getting started with the CSS 3D renderer recipe.What will be of interest to you also is the Determining the frame rate of your scene recipe, where we'll add additional functionality to the skeletons so you can easily see how often the render function is called by
requestAnimationFrame.
When you create large Three.js applications with many objects and animations, it is good to keep an eye on the frame rate at which the browser can render your scene. You can do this yourself using log statements from your animation loop, but luckily, there is already a good solution available that integrates great with Three.js (which isn't that strange since it was originally written for Three.js).
For this recipe, we'll use the stats.js JavaScript library that you can download from its GitHub repository at https://github.com/mrdoob/stats.js/. To use this library, you have to include it at the top of your HTML file such as this:
<script src="../libs/stats.min.js"></script>
We've also provided a ready to use example for this recipe. If you open the 01.06-determine-framerate.html file in your browser, you can directly see how this library shows the current framerate, which you can see at the top-left of the browser, as shown in the following screenshot:

Let's take a look at the steps you need to take to add this to your Three.js application.
Adding this functionality to your scene only takes a couple of small steps, which are as follows:
Firstly, we have to create the
statsobject and position it. For this, we create a simple function:function createStats() { var stats = new Stats(); stats.setMode(0); stats.domElement.style.position = 'absolute'; stats.domElement.style.left = '0'; stats.domElement.style.top = '0'; return stats; }We create the statistics object by calling
new Stats(). TheStats.jslibrary supports two different modes that we can set with thesetModefunction. If we pass0as an argument, you see the frames rendered in the last second, and if we set the mode to1, we see the milliseconds that were needed to render the last frame. For this recipe, we want to see the framerate, so we set the mode to0.Now that we can create the statistics object, we need to append the
initmethod we've seen in the skeleton recipes:// global variables var renderer; var scene; var camera; var stats; function init() { ... stats = createStats(); document.body.appendChild( stats.domElement ); // call the render function render(); }As you can see we created a new global variable called
stats, which we'll use to access our statistics object. In theinitmethod, we use the function we just created, and add thestatsobject to our HTML body.We're almost there. The only thing we need to do now is make sure that we update the
statsobject whenever the render function is called. This way, thestatsobject can calculate either the framerate or the time it took to run the render function:function render() { requestAnimationFrame(render); scene.getObjectByName('cube').rotation.x+=0.05; renderer.render(scene, camera); stats.update(); }
We mentioned that Stats.js provides two modes. It either shows the framerate or the time it took to render the last frame. The Stats.js library works by simply keeping track of the time passed between calls and its update function. If you're monitoring the framerate, it counts how often the update was called within the last second, and shows that value. If you're monitoring the render time, it just shows the time between calls and the update function.
When you're developing and writing JavaScript, you often need to tune some variables for the best visualization. You might need to change the color of a sphere, change the speed of an animation, or experiment with more complex material properties. You can just change the source code, and reload the HTML, but that becomes tedious and time consuming. In this recipe, we'll show you an alternative way to quickly and easily control the variables in your Three.js scene.
For this recipe, we also need an external JavaScript library called dat.gui. You can download the latest version from https://code.google.com/p/dat-gui/, or look into the libs directory of the sources provided with this book. To use this library, you first have to include it in the top of your HTML file:
<script src="../libs/dat.gui.min.js"></script>
In the source folder of this chapter, there is also a ready-to-use example, which we'll explain in the following sections. When you open the 01.07-control-variables.html file, you'll see the following:

As you can see in the preceding screenshot, a menu is available in the top-right corner that you can use to control the rotation speed and the scaling of the cube.
To use this library for yourself, you only need to do a couple of small things:
The first thing you need to do is define a JavaScript object that contains the properties you want to control. In this case, you need to add it to the
initfunction and create a new global JavaScript variable with the name,control:... var control; function init() { ... control = new function() { this.rotationSpeed = 0.005; this.scale = 1; }; addControls(control); // call the render function render(); }The control object in the preceding code contains two properties:
rotationSpeedandscale. In theaddControlsfunction, we'll create the UI component that is shown in the preceding screenshot:function addControls(controlObject) { var gui = new dat.GUI(); gui.add(controlObject, 'rotationSpeed', -0.1, 0.1); gui.add(controlObject, 'scale', 0.01, 2); }In this
addControlsfunction, we use the provided argument that contains therotationSpeedandscaleproperties in order to create the control GUI. For each variable, we specify four arguments:Object: The first argument is the JavaScript object that contains the variables. In our case, it's the object passed to the
addControlsfunction.Name: The second argument is the name of the variable we want to add. This should point to one of the variables (or functions) available in the object that is provided in the first argument.
Minimum value: The third argument is the minimum value that should be shown in the GUI.
Maximum value: The last argument specifies the maximum value that should be shown.
At this point, we've got a GUI that can be used to control the variables, as you can see in the following screenshot:

The only thing we now need to do is make sure that we update our object in the render loop, which is based on the variables from the GUI. We can do this easily in the
renderfunction, which is as follows:function render() { renderer.render(scene, camera); scene.getObjectByName('cube').rotation.x+= control.rotationSpeed; scene.getObjectByName('cube').scale.set (control.scale, control.scale, control.scale); requestAnimationFrame(render); }
In this recipe, we've just used dat.gui to change the numeric values. The dat.gui library also allows you to add controls for other types of values as follows:
If the variable you add is a Boolean, a checkbox will be shown
If the variable is a string, you can add an array of valid values
If the variable is a color, you can use add color to create a color picker
If the variable is a function, you get a button that fires the selected function
Besides this, you can add different kinds of event listeners to fire custom callbacks when a value managed by dat.gui changes. For more information, see the dat.gui library documentation which you can find at http://workshop.chromeexperiments.com/examples/gui/#1--Basic-Usage.
The best way to test your Three.js applications, or any JavaScript application for that matter, is to run it on a local web server. This way, you have the best representation of how your users will eventually see your Three.js visualization. In this chapter, we will show you three different ways in which you can run a web server locally. The three different ways to set up a local web server are:
One way to do this is via a Python-based approach that you can use if you've got Python installed
Another way is to do if you use Node.js or have already played around with Node.js, you can use the
npmcommand to install a simple web serverA third option is if you don't want to use the
npmcommand or Python, you can also use Mongoose, which is a simple portable web server, that runs on OS X and Windows
This recipe will focus on the Python-based approach (the first bullet point).
If you've got Python installed, you can very easily run a simple web server. You will first need to check whether you've got Python installed. The easiest way to do this is just type in python on a console and hit enter. If you see an output as follows, you are ready to begin:
> python
Python 2.7.3 (default, Apr 10 2013, 05:09:49)
[GCC 4.7.2] on linux2
Type "help", "copyright", "credits" or "license" for more information.
>>>
Once Python (http://python.org) has been installed, you can run a simple web server by just executing the following Python command. You will need to do this in the directory from where you want to host the files:
> python -m SimpleHTTPServerThe following output shows the web server running on port 8000:
Serving HTTP on 0.0.0.0 port 8000...
If you don't have Python installed, take a look at one of the following two recipes for alternative options.
If you would like to test your Three.js applications, then as described in the How to set up a local web server with Python recipe, you can run it in three different ways. This recipe will focus on the Node.js approach.
To run a local web server with Node.js (https://nodejs.org), we first have to check whether we've got npm (the node package manager, which is installed together with Node.js) installed. You can check this by running the npm command from the command line:
> npm
If the output is similar to the following code snippet, you've got npm installed and you are ready to begin the recipe:
Usage: npm <command>
where ...
You can use it to run a simple web server using:
Usage: npm <command>...Now, you are ready to install a web server by running:
> npm install -g http-serverFinally, you are ready to start the web server by running
http-serverfrom the command line:> http-server Starting up http-server, serving ./ on port: 8080 Hit CTRL-C to stop the server
A final recipe for running your own web server is presented in the next section. In that recipe you don't need Python or Node.js installed, but we will show you how to download a portable web server that you can run without requiring any installation.
If you would like to test your Three.js applications, then as described in the How to set up a local web server with Python recipe, you can run it in three different ways. If the first two approaches fail, you can always use a simple portable web server using Mongoose. This recipe will focus on the Mongoose approach.
Before you run Mongoose, you first have to download it. You can download Mongoose from https://code.google.com/p/mongoose/downloads/list.
The platform you are using will affect how you run Mongoose. If you're running Windows, you can just copy the downloaded file (an executable) to the folder from where you want to host your files from (for example, the directory where you extracted the sources for this book), and double-click on the executable to start the web server on port 8080.
For Linux or OS X platforms, you will also need to have a copy of the downloaded file in the directory where your files are located, but you have to start Mongoose from the command line.
When you are developing Three.js applications, the simplest way of testing your application is to just open the file in your browser. For a lot of scenarios, this will work, until you start loading textures and models. If you try to do this, you'll be presented with an error that looks something like this:

This error, which you can easily reproduce yourself by just dragging 01.09-solve-cross-origin-issues.html to your browser, will have the terms cross-origin or SecurityError in its message. What this error means is that the browsers prevents the current page loading a resource from a different domain. This is a necessary feature to avoid maleficent websites access to personal information. During development, however, this can be a bit incovenient. In this recipe, we'll show you how you can circumvent these kinds of errors by tweaking the security settings of your browser.
We'll take a look at how to disable the security checks for the two browsers that have the best support for WebGL: Chrome and Firefox. In this recipe, we'll look at how to do this in Chrome, and in the next recipe, we'll show you how to do this in Firefox. An important note, though, before we go on with the recipe. If you can, run a local web server. It's much more secure and doesn't result in low security settings in your browser.
After the installation of Chrome is complete, we will then need to disable the security settings in Chrome, for which we have to pass a command line parameter. Each operating system, however, does this slightly differently:
For Windows, you call the following (from the command line):
chrome.exe --disable-web-security
On Linux, do the following:
google-chrome --disable-web-security
And on Mac OS, you disable the settings by starting Chrome using:
open -a Google\ Chrome --args --disable-web-security
When you start Chrome this way, even running it directly from the filesystem will load the resources correctly to give you the following result:

Do remember to restart the browser normally after you're done experimenting or developing with Three.js, since you've lowered the security settings of your browser.
For Firefox users, we explain how to solve these cross-origin issues for this browser in the following recipe.
In the previous recipe, we explained that cross-origin error messages can occur when you run Three.js applications from the filesystem. In this recipe, we showed you how to solve these kind of issues on Chrome. In this recipe, we look at how to solve these issues in another popular browser: Firefox.
For Firefox, we will then need to disable the security settings directly from the browser. If you type
about:configin the URL bar, you will see the following:
On this screen, just click on the I'll be careful, I promise! button. This will bring you to an overview page that shows you all the internal properties available in Firefox.
Following this, in the search box on this screen type
security.fileuri.strict_origin_policyand change its value, as shown in the following screenshot:
Now, when you open a file directly in the browser, even the resources loaded through one of the asynchronous loaders will work.
Do remember to change these settings back after you're done experimenting or developing with Three.js, since you've lowered the security settings of your browser.
The reason we have to set these properties is that, by default, the modern browser checks whether you're allowed to request a resource from a different domain than the one you're running on. When you use Three.js to load a model or a texture, it uses an XMLHTTPRequest object to access that resource. Your browser will check for the availability of the correct headers, and since you're requesting a resource from your local system, which doesn't provide the correct headers, an error will occur. Even, though with this recipe, you can circumvent this restriction, it is better to always test with a local web server, since that will most closely resemble how your users will access it online.
For more information on CORS, refer to http://www.w3.org/TR/cors/.
If you want to create games or more advanced 3D scenes, you often need a way to control elements in your scene using keyboard controls. For instance, you might make a platform game where the user uses the arrows on the keyboard to move through your game. Three.js in itself doesn't provide a specific functionality to handle keyboard events, since it is very easy to connect the standard HTML JavaScript event handling to Three.js.
For this recipe, we included an example where you can rotate a cube around its x and z axes using the arrows on your keyboard. If you first open an example 01.10-keyboard-controls.html in your browser, you'll see a simple cube:

With the up, down, left, and right arrows on your keyboard, you can rotate this cube. With this file open, you are now ready to begin.
Adding a key support in your browser is very easy; all you have to do is assign an event handler to document.onkeydown.
To do this we need to assign a function to the
document.onkeydownobject This function will get called whenever a key is pressed. The following code, wrapped in thesetupKeyControlsfunction, registers this listener:function setupKeyControls() { var cube = scene.getObjectByName('cube'); document.onkeydown = function(e) { switch (e.keyCode) { case 37: cube.rotation.x += 0.1; break; case 38: cube.rotation.z -= 0.1; break; case 39: cube.rotation.x -= 0.1; break; case 40: cube.rotation.z += 0.1; break; } }; }In this function, we use the
keyCodeproperty from the passed eventein order to determine what to do. In this example, if a user presses the left arrow key that corresponds to key code37, we change therotation.xproperty of the Three.js object in our scene. We apply the same principle to the up arrow key(38), the right arrow (39), and the down arrow (40).
Using event handlers is a standard HTML JavaScript mechanism, they are a part of the DOM API. This API allows you to register functions for all kinds of different events. Whenever that specific event occurs, the provided function is called. In this recipe, we chose to use the KeyDown event. This event is triggered when the user presses a key. There is also a KeyUp event available that is triggered when the user releases a key, which one to use depends on your use case. Note that there is also a KeyPress event available. This event, though, is meant to be used with characters and doesn't register any noncharacter key press.
In this recipe, we only showed the key code values for the arrows. There is, of course, a separate key code for each key on your keyboard. A good explanation of how the various keys are mapped (especially, the special ones such as the function keys) can be found at http://unixpapa.com/js/key.html. If you want to know the key value of a specific key, and you don't feel like looking up the value in a list, you can also use just the following simple handler to output the key codes to the JavaScript console:
    function setupKeyLogger() {
      document.onkeydown = function(e) {
        console.log(e);
      }
    }
This small handler logs the complete event. In the output to the console, you can then see the key code that is used, as shown in the following screenshot:

As you can see, you also see a lot of other interesting information. For instance, you can see whether the shift or Alt keys were also pressed at the same time of the event.
If you want to learn more about key events, Mozilla provides a good overview of all the events that are available at https://developer.mozilla.org/en-US/docs/Web/Events.
When you create Three.js scenes, you often need to load resources. There might be textures you want to load for your objects, you might have some external models you want to include in your scene, or maybe some CSV data that you want to use as an input for your visualization. Three.js offers a number of different ways of loading these resources asynchronously, which we'll explore in this and the following recipes.
To run these recipes and experiment with them, we included a simple sample in the source folder of this chapter that shows this loading in action. If you open an example 01.11-load-async-resources.html in your browser, and open the JavaScript console, you'll see the progress and the result of loading resources asynchronously.
Please note that since we are loading files directly from the browser, you need to have either a local web server installed (see the Setting up a local web server with Python recipe or the Setting up a local web server with Node.js recipe) or disable some security checks as explained in the Solving cross-origin-domain error messages in Chrome recipe or the Solving cross-origin-domain error messages in Firefox recipe.

In these first of the five recipes, we'll show you how you can load textures asynchronously with Three.js.
Before looking at the steps in this recipe, you will need to create a number of standard callbacks that can be used by all the different loaders. These callbacks are used to inform you when a resource is loaded, when loading fails and, if available, the progress of the current request.
So for loading resources, we need to define three different callbacks:
The
onloadcallback: Whenever a resource is loaded, this callback will be called with the loaded resource as an argument.The
onprogresscallback: Some loaders provide progress during the loading of a resource. At specific intervals, this callback will be called to inform you how much of the resource has been loaded.The
onerrorcallback: If something goes wrong during the loading of the resource, this callback is used to inform you about the error that occurred.
For all the recipes dealing with asynchronous loading, we'll use the same set of loaders. These loaders just output some information to the console, but you can of course customize these callbacks for your specific use case.
First, we define the onLoadCallback function, which is called when a resource is loaded:
    function onLoadCallback(loaded) {
      // just output the length for arrays and binary blobs
      if (loaded.length) {
        console.log("Loaded", loaded.length);
      } else {
        console.log("Loaded", loaded);
      }
    }
As you can see from the function definition, we just output the passed argument to the console. The other two callbacks, onProgressCallback and onErrorCallback, work exactly in the same manner as they are presented:
    function onProgressCallback(progress) {
      console.log("Progress", progress);
    }

    function onErrorCallback(error) {
      console.log("Error", error)
}To load a texture asynchronously, we use the
loadTexturefunction fromTHREE.ImageUtils:function loadTexture(texture) { var texture = THREE.ImageUtils.loadTexture(textureURL, null, onLoadCallback, onErrorCallback); console.log("texture after loadTexture call", texture); }The
loadTexturefunction fromTHREE.ImageUtilstakes the following four arguments:The first one points to the location of the image you want to load
The second one can be used to provide a custom UV mapping (a UV mapping is used to determine which part of a texture to apply to a specific face)
The third argument is the callback to be used when the textures have been loaded
The final argument is the callback to be used in case of an error

Note that the first console output also shows a valid texture object. Three.js does this, so you can immediately assign this object as a texture to a material. The actual image inside the texture, however, is only loaded after the
onLoadCallbackfunction is called.
Three.js provides a nice wrapper to load textures. Internally, Three.js uses the standard way of loading resources from an XMLHTTPRequest web page With an XMLHTTPRequest web page, you can make an HTTP request for a specific resource and process the result. If you don't want to use the Three.js provided functionality, you can also implement an XMLHTTPRequest function yourself.
To run these examples and load resources asynchronously, we need to either run a web server locally, as explained in the Setting up a local web server using Python recipe or the Setting up a web server using Node.js recipe, or disable some security settings, as explained in the Solving cross-origin-domain error messages in Chrome recipe or the Solving cross-origin-domain error messages in Firefox recipe.
Alternatively, if you don't want to load resources asynchronously, but wait for all the resources to load, before you initialize your scene you can look at the next Waiting until resources are loaded recipe.
In the Loading textures asynchronously recipe, we explained that Three.js offers helper functions to load different types of resources asynchronously. In this recipe, we'll look at how you can use the THREE.JSONLoader object to load models asynchronously.
Before you get started with this recipe, make sure that you've walked through the steps explained in the Getting ready section of the Loading textures asynchronously recipe. In the following section, we'll reference the JavaScript callbacks defined in the Getting ready section of that recipe.
Three.js also allows you to easily load external models. The following function shows you how to do this for the JSON models' Three.js uses. The same, however, applies to any of the other model loaders:
    function loadModel(modelUrl) {
      var jsonLoader = new THREE.JSONLoader();
      jsonLoader.load(modelUrl, onLoadCallback, null);
    }
The
jsonLoader.loadfunction takes the following three arguments:The first one is the location of the model you want to load
The second is the callback to call when the model is successfully loaded
The final parameter is the one that we can specify the path from where the texture images should be loaded
When we call this function, you'll see the following output on the console:

With this approach, the JSONLoader object doesn't provide any feedback on how much it has loaded. If you want to load large models, it is nice to know something about the progress. The JSONLoader object also provides an alternative way of loading models that also provides progress. In the Load model asynchronously with progress recipe, we show you how to load a model and provide feedback on the progress. Besides the THREE.JSONLoader object, which loads Three.js' own proprietary models, Three.js is also shipped with a large number of loaders that you can use for other model formats. For an overview of what is provided by Three.js, please refer to https://github.com/mrdoob/three.js/tree/master/examples/js/loaders.
In the previous section, the Loading models asynchronously recipe, we loaded a model asynchronously without providing feedback about the progress. In this recipe, we'll explain how you can add progress feedback to that scenario.
Before you get started with this recipe, make sure that you've walked through the steps explained in the Getting ready section of the Loading textures asynchronously recipe. In the following section, we'll reference the JavaScript callbacks defined in the Getting ready section of that recipe.
To load models and to also show progress, we have to use a different method apart from
THREE.JSONLoader. If we use theloadAjaxJSONfunction, we can also specify a progress callback instead of just the load callback:function loadModelWithProgress(model) { var jsonLoader = new THREE.JSONLoader(); jsonLoader.loadAjaxJSON(jsonLoader, model, onLoadCallback, null, onProgressCallback); }If we now load the same model as the previous one, we see the loading progress as follows:

Besides loading specific resources, Three.js also provides a simple helper object to load any type of resource asynchronously. In this recipe, we'll explain how you can use the THREE.XHRLoader object to load any type of resource asynchronously.
Before you get started with this recipe, make sure that you've walked through the steps explained in the Getting ready section of the Loading textures asynchronously recipe. In the following section, we'll reference the JavaScript callbacks defined in the Getting ready section of that recipe.
The final resource loader we want to show in this recipe is the
THREE.XHRLoaderobject. This loader allows you to load any resource that you might need in your Three.js scene:function loadOthers(res) { var xhrLoader = new THREE.XHRLoader(); xhrLoader.load(res, onLoadCallback, onProgressCallback, onErrorCallback); }The arguments for the
XHRLoader.loadfunction should look pretty familiar by now, as it's pretty much the same as for the other loaders. First, we pass the location of the resource we want to load, and then we specify the various callbacks. The output from this function looks like this:
In the preceding screenshot, you can also see the progress while the resource is being loaded.
In the Load resources asynchronously recipe, we showed how you can load external Three.js resources asynchronously. For many sites and visualization, loading resources asynchronously is a good approach. Sometimes, however, you want to make sure that all the resources you require in your scene have been loaded beforehand. For instance, when you're creating a game, you might want to load all the data for a specific level beforehand. A common method of loading resources synchronously is nesting the asynchronous callbacks we've seen in the previous recipe. This, however, quickly becomes unreadable and very hard to manage. In this recipe, we'll use a different approach and work with a JavaScript library called Q.
As for all the external libraries that we use, we need to include the Q library in our HTML. You can download the latest version of this library from its GitHub repository at https://github.com/kriskowal/q, or use the version provided in the libs folder in the sources for this book. To include this library in your HTML page, add the following in the head element of your HTML page:
<script src="../libs/q.js"></script>
In the sources for this chapter, you can also find an example where we load resources synchronously. Open 01.12-wait-for-resources.html in your browser and open the JavaScript console:

On the console output, you'll see that the required resources and models are loaded one after another.
Let's first take a look at what we're aiming for in this recipe. We want to load resources synchronously, using the Q library, in the following manner:
    loadModel(model)
      .then(function(result) {return loadTexture(texture)})
      .then(function(result) {return loadModel(m)})
      .then(function(result) {return loadTexture(texture)})
      .then(function(result) {return loadOthers(resource)})
      .then(function(result) {return loadModelWithProgress(m)})
      .then(function(result) {return loadModel(model)})
      .then(function(result) {return loadOthers(resource)})
      .then(function(result) {return loadModel(model)})
      .then(function() {console.log("All done with sequence")})
      .catch(function(error) {
        console.log("Error occurred in sequence:",error);
      })
      .progress(function(e){
        console.log("Progress event received:", e);
       });
What this code fragment means is that:
Firstly, we want to call
loadModel(model).Once the model is loaded, we load, using the
thenfunction, a texture using theloadTexture(texture)function. Once this texture is loaded, we will then load the next resource and so on. In this code fragment, you can also see that we also call acatchand aprogressfunction. If an error occurs during loading, the function provided tocatch()will be called. The same goes forprogress(). If one of the methods wants to provide information about its progress, the function passed intoprogress()will be called.However, you will then find out that this won't work with the functions from our previous recipe. To get this to work, we have to replace the callbacks from these functions with a special Q construct that is called a deferred function:
    function loadTexture(texture) {

      var deferred = Q.defer();
      var text = THREE.ImageUtils.loadTexture
      (texture, null, function(loaded) {
        console.log("Loaded texture: ", texture);
        deferred.resolve(loaded);
      }, function(error) {
        deferred.reject(error);
      });

      return deferred.promise;
    }
In this code snippet, we create a new JavaScript object with the name
deferred. Thedeferredobject will make sure that the results of the callbacks, this time defined as anonymous functions, are returned in such a way that we can use thethenfunction we saw at the beginning of this chapter. If the resource is loaded successfully, we use thedeferred.resolvefunction to store the result; if the resource was loaded unsuccessfully, we store the error using thedeferred.rejectfunction.We use the same approach for the
loadModel,loadOthers, andloadModelWithProgressfunctions:function loadModel(model) { var deferred = Q.defer(); var jsonLoader = new THREE.JSONLoader(); jsonLoader.load(model, function(loaded) { console.log("Loaded model: ", model); deferred.resolve(loaded); }, null); return deferred.promise; } function loadOthers(res) { var deferred = Q.defer(); var xhrLoader = new THREE.XHRLoader(); xhrLoader.load(res, function(loaded) { console.log("Loaded other: ", res); deferred.resolve(loaded); }, function(progress) { deferred.notify(progress); }, function(error) { deferred.reject(error); }); return deferred.promise; }In the
loadOthersfunction, we are also provided with the progress information. To make sure that the progress callback is handled correctly, we use thedeferred.notify()function and pass in theprogressobject:function loadModelWithProgress(model) { var deferred = Q.defer(); var jsonLoader = new THREE.JSONLoader(); jsonLoader.loadAjaxJSON(jsonLoader, model, function(model) { console.log("Loaded model with progress: ", model); deferred.resolve(model) }, null, function(progress) { deferred.notify(progress) }); return deferred.promise; }With these changes, we can now load the resources synchronously.
To understand how this works, you have to understand what Q does. Q is a promises library. With promises, you can replace the nested callbacks (also called the Pyramid of doom at http://calculist.org/blog/2011/12/14/why-coroutines-wont-work-on-the-web/) with simple steps. The following example for the Q site nicely shows what this accomplishes:
step1(function (value1) {
  step2(value1, function(value2) {
    step3(value2, function(value3) {
      step4(value3, function(value4) {
        // Do something with value4
      });
    });
  });
});
Using promises, we can flatten this to the following (just like we did in this recipe):
Q.fcall(promisedStep1)
then(promisedStep2)
then(promisedStep3)
then(promisedStep4)
then(function (value4) {
  // Do something with value4
})
catch(function (error) {
  // Handle any error from all above steps
})
done();
If we were to rewrite the Three.js library, we could have used promises in Three.js internally, but since Three.js already uses callbacks, we had to use the Q.defer() function provided by Q to convert these callbacks to promises.
We only touched a small part of what is possible with the Q promises library. We used it for synchronous loading, but Q has many other useful features. A very good starting point is the Q wiki available at https://github.com/kriskowal/q/wiki.
Just like every recipe that loads resources you have to make sure that you run it either with a local web server, see the Setting up a local web server using Python recipe or the Setting up a web server using Node.js recipe, or disable some security settings (see the Solving cross-origin-domain error messages in Chrome recipe or the Solving cross-origin-domain error messages in Firefox recipe). If you want to load resources asynchronously, you can take a look at the Load any resource asynchronously recipe.
When you create visualizations, it is a nice feature to let your users provide their own resources. For instance, you might want to let the user specify their own textures or models. You can implement this with a traditional upload form, but with HTML5, you also have the option to let the user drag and drop a resource directly from the desktop. In this recipe, we'll explain how to provide this drag and drop functionality to your users.
The easiest way to prepare for this recipe is by first looking at the example we created for you. Open an example 01.14-drag-file-to-scene.html in your browser.
Note
Please note that this only works when running your own web server, or with security exceptions disabled.

When you drag and drop an image file onto the drop area (the dashed square), you'll immediately see that the texture of the rotating box is changed and the image that you provide is used.
In the following section, we'll explain how you can create this functionality.
To do this, please carry out the following steps:
First, we have to set up the correct CSS and define the drop area. To create the dashed drop area, we add the following CSS to the
styleelement in theheadelement of our page:#holder { border: 10px dashed #ccc; width: 150px; height: 150px; margin: 20px auto;} #holder.hover { border: 10px dashed #333; #333}As you can see in this CSS, we style the HTML element with ID
holderto have a dashed border. The HTML for theholder divelement is shown next:<body> <div id="holder"></div> </body>The drop area has been defined, so the next step is to add drag and drop the functionality to it.
Then, we have to assign the correct event handlers so that we can respond to the various drag and drop related events.
Just as in our previous recipes, we defined a function that contains all the required logic:
    function setupDragDrop() {
      var holder = document.getElementById('holder');

      holder.ondragover = function() {
        this.className = 'hover';
        return false;
      };

      holder.ondragend = function() {
        this.className = '';
        return false;
      };

      holder.ondrop = function(e) {
        ...
      }
    }
In this code fragment, we defined three event handlers. The
holder.ondragoverevent handler sets the class on the div element to'hover'. This way, the user can see that they are allowed to drop the file there. Theholder.ondragendevent handler is called when the user moves away from the drop area. In the event handler, we remove the class of thedivelement. Finally, if the user drops a file in the designated area, theholder.ondropfunction is called, which we use to process the dropped image.The final step is to process the dropped resource and update the material of our box. When a user drops a file, the following piece of code is executed:
      this.className = '';
      e.preventDefault();

      var file = e.dataTransfer.files[0],
      var reader = new FileReader();
      reader.onload = function(event) {
        holder.style.background =
        'url(' + event.target.result + ') no-repeat center';

        var image = document.createElement('img');
        image.src = event.target.result;
        var texture = new THREE.Texture(image);
        texture.needsUpdate = true;

        scene.getObjectByName('cube').material.map = texture;
      };
      reader.readAsDataURL(file);
      return false;
The first thing that happens is that we call
e.preventDefault(). We need to do this to make sure that the browser doesn't just show the file, since that is its normal behavior. Next, we look at the event and retrieve the dropped file usinge.dataTransfer.files[0]. We can't really do much with the file itself, since Three.js can't work directly with those, so we have to convert it to animgelement. For this, we use aFileReaderobject. When the reader is done loading, we use the content to create thisimgelement. This element is then used to create theTHREE.Textureobject, which we set as material for our box.
Drag and drop functionality isn't something that is supported by Three.js out of the box. As we saw in the previous section, we use the standard HTML5 drag and drop related events. A good overview of what events are available can be found in the official HTML5 documentation at http://www.w3.org/TR/html5/editing.html#drag-and-drop-processing-model.
One interesting thing to note is the addition of texture.needsUpdate = true to the ondrop event handler. The reason we need to set this property of the texture is to inform Three.js that our texture has changed. This is needed because WebGL and also Three.js caches textures for performance reasons. If we change a texture, we have to set this property to true to make sure that WebGL knows what to render.