


Installing, configuring, and updating macOS are perhaps some of the most common and essential tasks you will encounter in your job as a support professional or an administrator. It all starts with installing the macOS system or updating it if you already have it installed. Following installation, the configuration of macOS is the next important task required to personalize the user's experience.
In this chapter, you will learn how to install, update, upgrade, and reinstall macOS, as well as how to perform the necessary checks, and the requirements to do so. Next, you will see how to configure the macOS installation and adjust the settings post-installation. You will also learn how to do other practical tasks, including creating an installer for specific cases such as clean installations. As mentioned earlier, the tasks related to installation you will see in this chapter are probably what you will encounter more frequently when supporting users. Therefore, the information and examples provided here will help you master all the possible installation scenarios.
More specifically, this chapter will cover the following topics:
- Installing macOS
- Upgrading macOS
- Reinstalling macOS
- Updating macOS
- Configuring macOS
Before we start, let's see the technical requirements for this chapter.
Technical requirements
For this chapter, you will require the following:
- Basic knowledge of the macOS environment
- A Mac computer with administrator privileges
- An Apple ID (optional for enabling iCloud services)
- A USB flash drive or external volume
Before performing the tasks assigned in this chapter, it is essential to be aware of the system and hardware requirements regarding the installation of macOS. Here, we detail the requirements for the most recent versions of macOS.
Requirements for macOS Big Sur
The current requirements for installing the latest version of macOS 11.0.x (Big Sur) are as follows:
System requirements:
- OS X 10.9 (Mavericks) or later.
- 4 GB of memory.
- 35.5 GB of available storage space on macOS Sierra or later. If upgrading from an earlier version, macOS Big Sur requires around 44.5 GB of available storage space.
- Apple ID (recommended).
- An internet connection to download the installer.
Hardware requirements:
- MacBook 2015 or later
- MacBook Pro Late 2013 or later
- MacBook Air 2013 or later
- iMac 2014 or later
- iMac Pro 2017 or later
- Mac Pro 2013 or later
- Mac mini 2014 or later
Requirements for macOS Catalina
The requirements for macOS 15.6.x (Catalina) are the following:
System requirements:
- OS X 10.9 (Mavericks) or later for a direct upgrade*.
- 4 GB of memory.
- 12.5 GB of available storage space for OS X El Capitan 10.11.5 or later. Allow for the fact that in order to upgrade from earlier releases (OS X Yosemite 10.10 and earlier), you will require up to 18.5 GB of available storage space.
Hardware requirements:
- MacBook (2015 or later)
- MacBook Pro (2012 or later)
- MacBook Air (2012 or later)
- iMac (2012 or later)
- iMac Pro (all models)
- Mac mini (2012 or later)
- Mac Pro (late 2013, mid-2010, and mid-2012 models will require a graphics card capable of supporting Metal)
Next, we'll explain how you can check your Mac model and other important details to verify whether your machine meets the aforementioned requirements.
How to find out your Mac model and specs
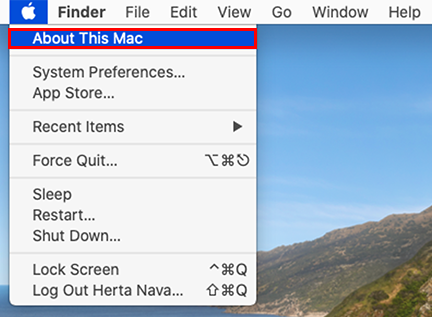
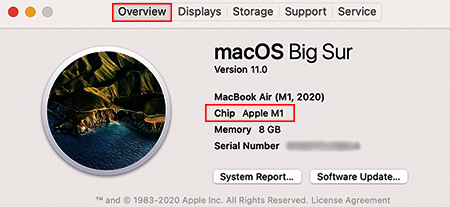
You can find out which Mac you have by going to the Apple menu ( ) at the top left of your screen and then to About This Mac, as shown in the following screenshot:
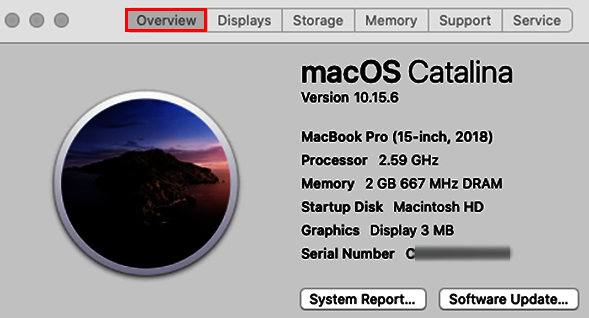
Once in the About This Mac window, make sure the Overview tab is selected. As you can see in Figure 2.2, this is a MacBook Pro (15-inch, 2018); hence, it is compatible with the current system requirements for installing macOS Big Sur. However, the memory is insufficient, so we will have to fix that before proceeding:
Another useful way to verify exactly which Mac model you have is by going to https://support.apple.com/specs and entering your Mac serial number in the search box (Figure 2.3):
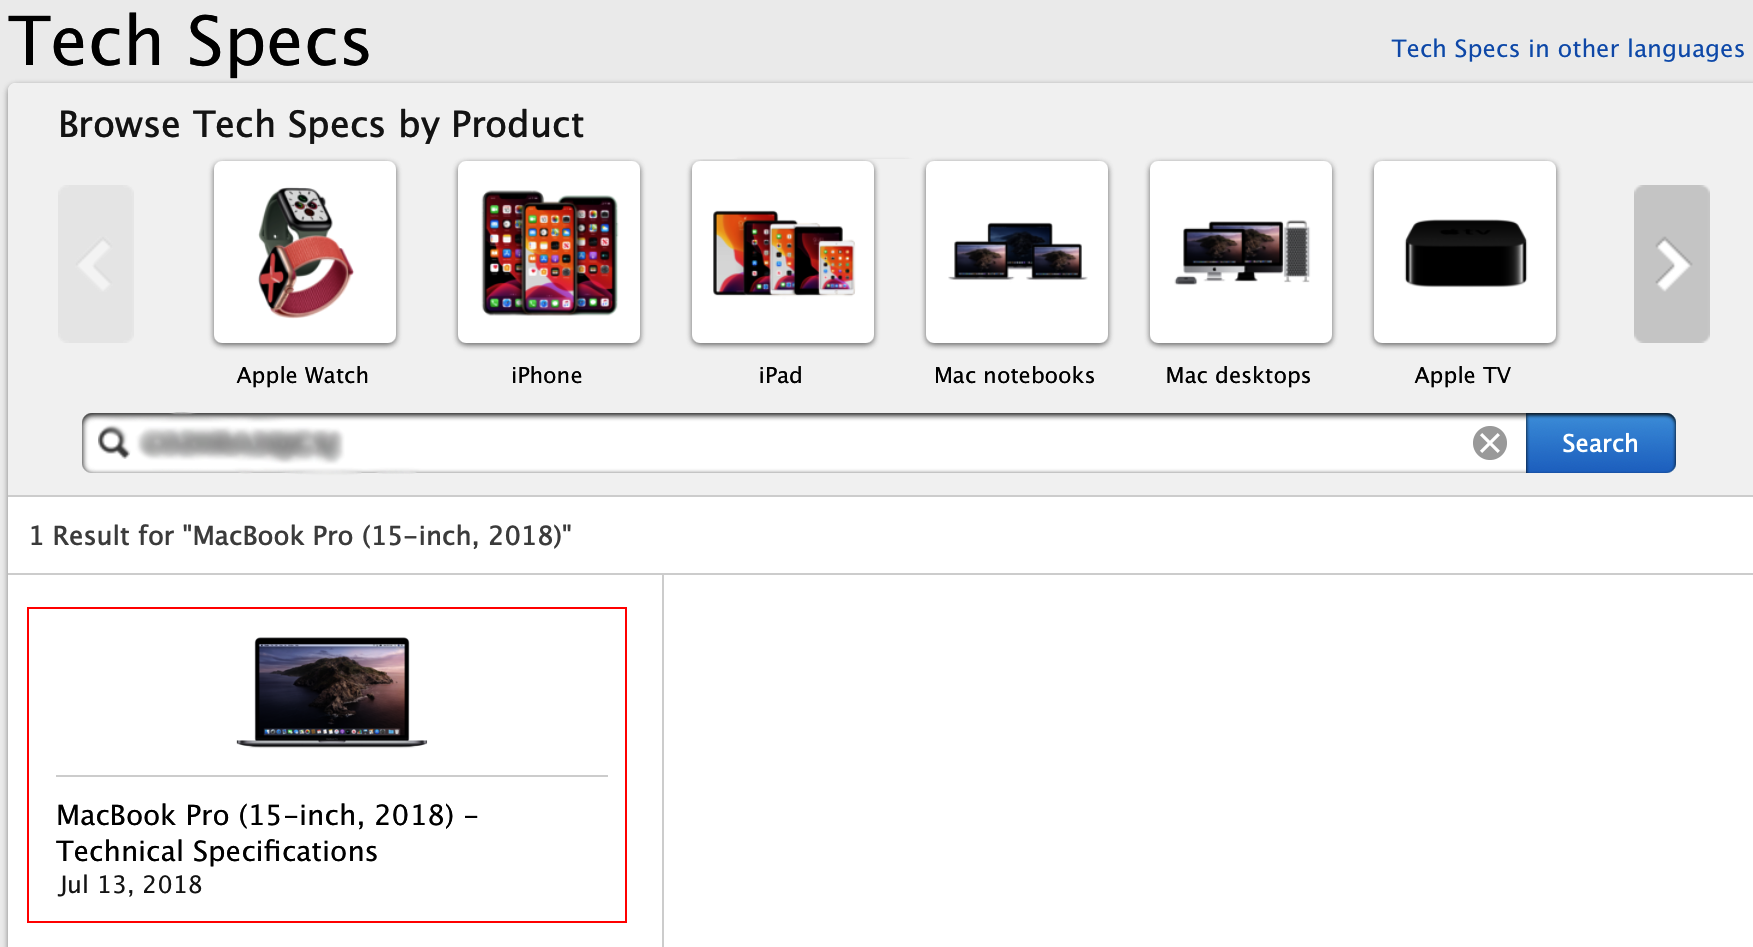
After entering the serial number in the search box, click on the Search button, and you will obtain a result (marked in red in Figure 2.3), which already shows you some very useful information. However, if you click anywhere on that result, you will see even more detailed specifications relating to your Mac model (Figure 2.4):

As you can see, you will not only find out when your Mac was brought to the market, but also its storage capacity, the type of graphics card, and much more.
Now that we know whether our machine meets the requirements for installing macOS Big Sur, and after fixing any requirements that were not met, we can do so. We will explain the steps in the next section.
Installing macOS
In this section, we will discuss the process of installing the operating system, which is normally done through an upgrade or a reinstallation. Typically, installing the latest macOS version will be an upgrade process, with no loss of data or user settings. On the other hand, a reinstallation can be performed both with or without data loss.
However, there are important details to take into account before performing any of those procedures.
Before installing, upgrading, or reinstalling macOS, you should verify the following:
- The installation requirements (system and hardware): These were described earlier in the chapter.
- Compatibility with the apps you want to use: It is essential to verify that the apps you will use are compatible with the macOS version you wish to install, as not all of them may be compatible.
- Back up your data: A best practice is to use multiple backup options, such as local, external, cloud storage, or a Time Machine backup, to make sure you can always recover your data if something goes wrong.
- Make a note of your network settings: This is important for ensuring that you can connect to the internet following installation. Chances are you won't need this information, but it is safer to have it.
- If using a notebook, such as a MacBook, make sure you plug it into an electrical outlet.
- Make sure you are connected to the internet.
Once you have taken the above recommendations into account, you will be ready to upgrade or reinstall. We will see how to upgrade in the next section.
Upgrading macOS
An upgrade will install the next major version of the OS. For example, if you are running OS X Mavericks, an upgrade will install the latest major release, such as Mojave or Catalina, and there will be no loss of data or user settings.
You can use three methods to upgrade macOS:
- Through an automatic download
- Through a manual download
- Through the internet
Let's now see how to configure automatic downloads.
Automatic upgrades
You can configure upgrades to download automatically in the background through System Preferences for the OS or the App Store preferences (available from macOS X El Capitan and later) for apps.
Perform the following steps to configure this behavior:
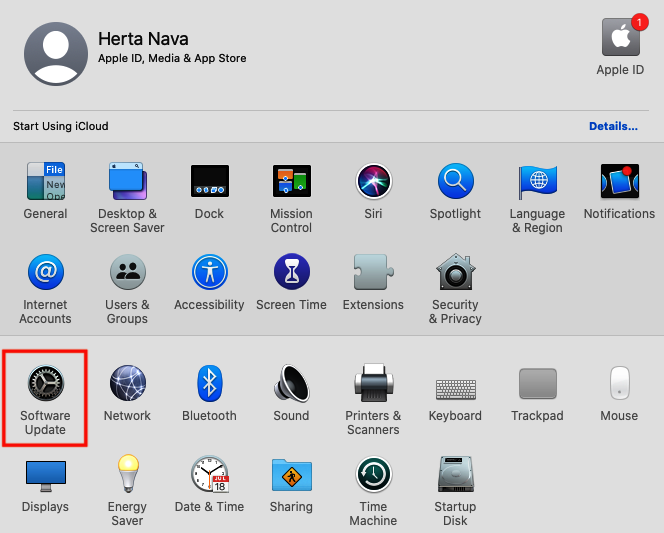
- Open the System Preferences screen. You can access System Preferences from the Apple menu (
 ) at the top left of your screen or through the gear icon,
  , in the Dock.
 - In System Preferences, click on the Software Update icon, as shown in Figure 2.5:
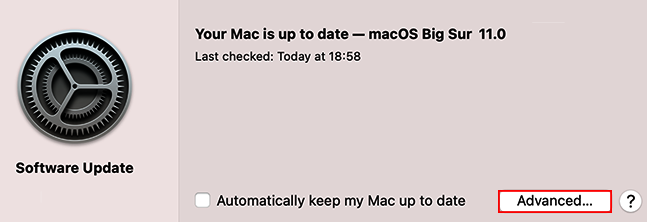
- Click the Advanced button, as shown in the following screenshot:
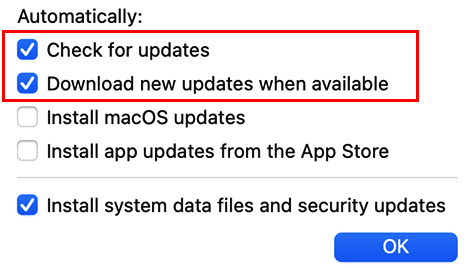
- Make sure the Check for updates and Download new updates when available options are selected, as shown in the following screenshot:
- With this configuration, you will see a notification indicating that a macOS upgrade is ready to be installed. This is because you need to check compatibility and other requirements prior to upgrading to a major version. Therefore, the upgrade won't be done until you click the Install button (Figure 2.8). On the other hand, you can program updates to the currently installed version at a later time by clicking Later or immediately by clicking on the Install button:

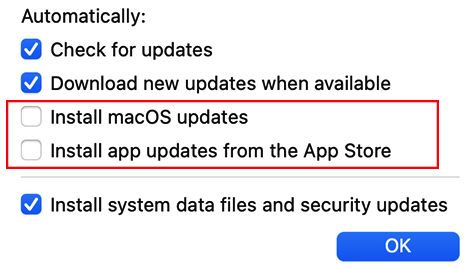
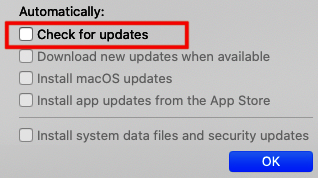
- If you want the system to verify the requirements on its own and attempt to install macOS updates/upgrades, then you should check the other two boxes (Figure 2.9). However, this is not recommended since this prevents you from checking whether all your software is ready for the update, and it can render certain apps incompatible with the new update/upgrade:
We have seen how to download and install automatic updates/upgrades. However, you can also do this manually, as we will see in the next section.
Manual upgrades
You can always verify whether upgrades are available through the App Store and install them manually. We will see how that works in macOS Catalina and macOS Big Sur next.
Manual upgrades to macOS Big Sur
Perform the following steps to download and install the latest version of macOS:
- Check the system and hardware requirements as well as the pre-verification steps, as explained in the Technical requirements and Installing macOS sections earlier in this chapter.
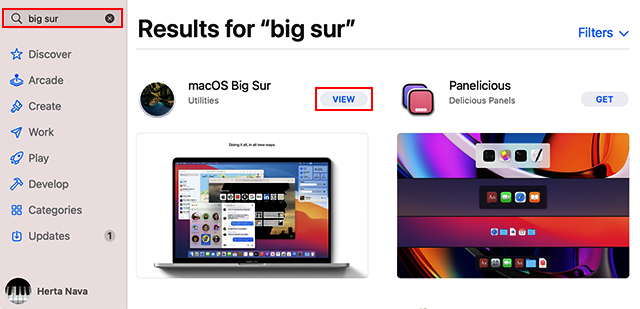
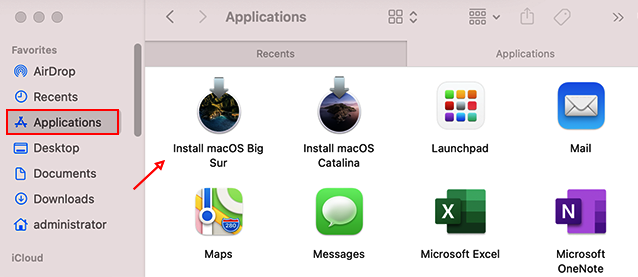
- Open the App Store. You will probably see the latest macOS available at the top of the list, or you can use the search box in the left-hand section to locate it.
- In Figure 2.10, we used the search box to locate the macOS Big Sur installer. Click on the installer name or the VIEW button to enter the details page:
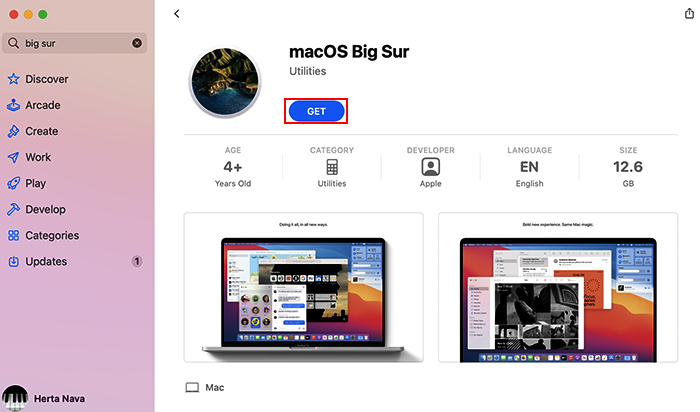
- Once on the details page, click the GET button to download the installer, as shown in the following screenshot:
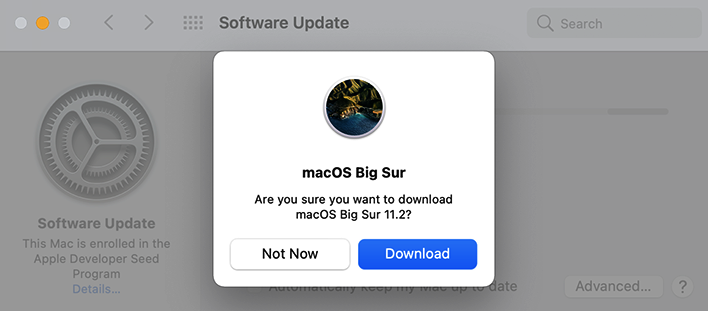
- This action will open the Software Update tool and ask you whether you want to download the upgrade. As soon as you click on the Download button (Figure 2.12), the download will start, and you can monitor its progress:
- Once the download is complete, you will see an Upgrade Now button. Click on it to start the process.
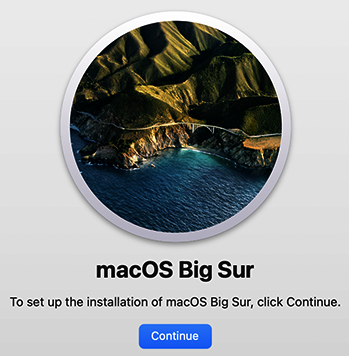
- Then, the installer will open automatically, as can be seen in the following screenshot:
Note: If you expect to do more installations, it's a good idea to save a copy of the installer in another location. The installer will be downloaded by default into the Applications folder, but it will be removed as soon as your installation is complete. If you don't save a copy elsewhere and later need to reinstall or create a bootable disk, you will have to download it again. To save a copy, just go to the Applications folder before initiating the installation (Figure 2.14), and then copy the installer into another location. Also, take into account that installers have an expiration date, so if using an old installer you saved doesn't work, chances are it has probably expired, and you will need to acquire a new copy.
- Navigate back to the installer and then click Continue (Figure 2.13) to initiate the installation.
- Accept the Software License Agreement.
- You will see the window to select the destination volume for the installation. If you only have the default volume available (usually named Macintosh HD), only that volume will appear, which is the case for this example (Figure 2.15), or you can click Show All Disks... to see more available disk options. Select the volume and then click Install or Continue:

- You may see a warning about 32-bit apps not supported by macOS (most likely to appear if you are upgrading to macOS Catalina). If that is the case, take note of the incompatible software, if any, and then click Continue.
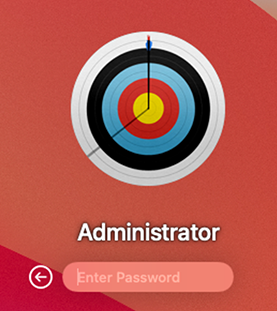
- Administrator privileges are required. Therefore, enter your admin password to continue.
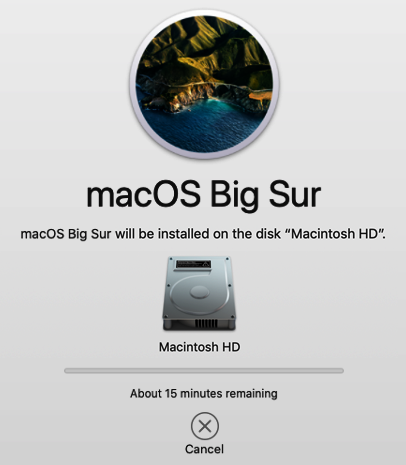
- The installation will start, and the time remaining will be shown in the progress bar, as seen in the following screenshot:
- Once the installation is complete, you will see a login screen. Since we are upgrading to macOS Big Sur in this example, you will see a screen similar to the one shown in Figure 2.17:
- Once you log in, you will be taken through a quick setup process. Take into account the fact that the screens you see will depend on your current configuration; for example, whether you have an Apple ID linked to your account. We will see a complete setup process in the The Setup Assistant process section at the end of the chapter.
And that's it! You now have the latest version of macOS. Let's now check the third way to upgrade: through the internet.
Through the internet
The final method that can be used to upgrade your macOS is through the internet. However, since this is also a reinstall method, this procedure will be covered in full in the Reinstalling macOS via internet recovery section, included in the next part of this chapter.
Reinstalling macOS
The difference between an upgrade and a reinstallation is important. During an upgrade of a Mac that already has a system installed, the next major version of the OS will be installed. During a reinstallation, we are not limited to installing the next major version, but any supported version can be installed really. Reinstallations can be done with or without data loss, except in the case of a clean installation, which requires the system volume to be erased.
You would perform this task in these example cases:
- When you have a Mac computer with an old OS installation or when the OS is corrupted.
- When you have just purchased a Mac and want to start with a new, fresh installation that will erase everything on the disk. This is also known as a clean installation.
- You are selling your Mac and want to erase all your data for security and privacy purposes.
You can approach reinstallation through three methods:
- The internet
- The macOS Recovery system
- An external installer
It is important to note the following:
- In all the preceding cases, if you don't erase the disk, you can keep your files and user settings intact.
- The first option not only reinstalls macOS but also upgrades it to the latest version compatible with your Mac.
- Through the second and third options, you can also choose to erase the disk and make a clean installation (erasing all volumes on your disk).
Let's explore the three options in more detail.
Reinstalling macOS via internet recovery
The internet recovery tool can be used both for upgrading and reinstalling. There are several options:
- Pressing Option + Command + R at startup will upgrade to the latest macOS compatible with your Mac with no loss of data or user settings.
- Pressing Shift + Option + Command + R at startup will reinstall the macOS version that came with your Mac originally, or the closest version still available and supported. In fact, if you completely erased the Mac's internal disk, this may be the only option available to reinstall macOS unless you have a bootable installer and you have permission to boot externally.
- When pressing Command + R at startup, you can access the Recovery interface and reinstall the current macOS version with no loss of data, or you can first erase the disk and perform a clean installation.
Using the first two methods is very easy and requires almost no intervention on your part:
- Turn off the Mac if it's on, or restart it.
- As soon as your Mac is restarting, and depending on what you wish to accomplish, press either of the first two key combinations described earlier for a little while, or until a spinning globe or a progress bar appears, and then release the keys. This process will start automatically.
Heads up! This can take a while (depending on your internet connection), so be patient.
Take into account that the commands described are not available for Macs with the Apple M1 silicon chip. The procedure to use the Recovery for reinstallation with M1 Macs is described later in this chapter.
The third option requires more steps. We will explore this in detail in the next section.
Reinstalling through the macOS Recovery system
The third option, reinstalling through the macOS Recovery system, requires more explanation. This method is important because it is the one that allows you to reinstall the version currently installed on your computer without losing any of your data. You will need this method, for example, if your system is corrupted and requires a reinstallation, but you don't really want to change anything; you just want everything as it was. But you can also use this method to erase the disk first and perform a clean installation.
In this section, we will explore the following:
- What is the macOS Recovery system?
- Accessing macOS Recovery with Catalina and earlier (Intel Mac)
- Accessing macOS Recovery with Big Sur (Intel Mac)
- Accessing macOS Recovery in Macs with the M1 silicon chip
- How to perform a reinstallation with macOS Catalina Recovery
- How to perform a reinstallation with macOS Big Sur Recovery
- How to perform a clean installation
Before we go through the steps of an actual reinstallation, let's take a look at the Recovery system in more detail.
What is the macOS Recovery system?
The macOS Recovery system is a volume in the Mac boot volume that includes a set of utilities to help you perform the following tasks:
- Install/Reinstall macOS.
- Restore your system from a Time Machine backup.
- Access the Disk Utility to repair or erase your volumes, and more.
- Access the Online Help.
- Perform additional advanced tasks.
Next, we will see the process of using the macOS Recovery system on a Mac with macOS Catalina, and we will review the other options available as well.
Accessing the macOS Recovery system with macOS Catalina and earlier (Intel Mac)
To access the macOS Recovery utilities, you will need to start up from the macOS Recovery system. Perform the following steps to do this:
- Turn off your Mac if it's on.
- Turn on your Mac and, at the same time, press Command + R for a few seconds, or until a spinning globe or a progress bar appears.
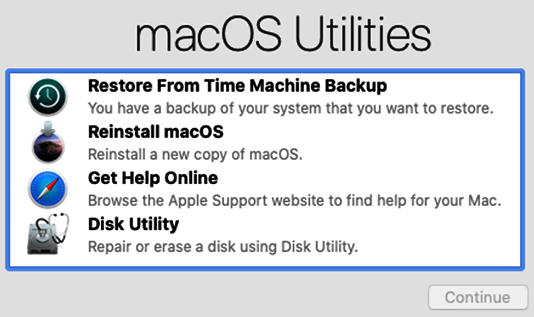
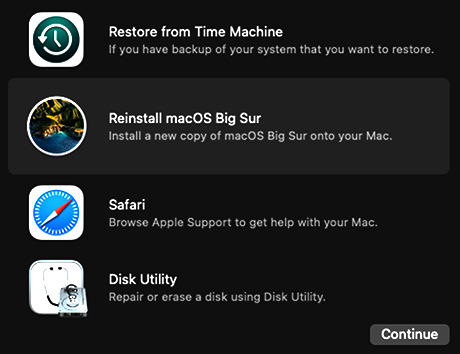
- In Figure 2.18, we see what the recovery interface looks like in macOS Catalina. You will see the following options:
- Restore From Time Machine Backup
- Reinstall macOS
- Get Help Online
- Disk Utility
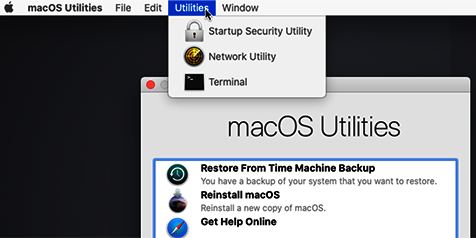
These additional options are available through the top menus:
- Startup Disk
- Startup Security Utility
- Network Utility (macOS Catalina and earlier)
- Terminal and Reset Password
Let's take a look at each of these options in a bit more detail.
Startup Disk
Startup Disk is accessed from the Apple menu ( ) in the macOS Recovery interface, as shown in the following screenshot:
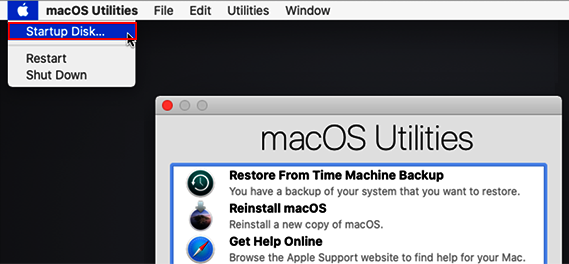
By choosing Startup Disk, you can specify which volume the computer will use to boot from on the next restart (Figure 2.20):
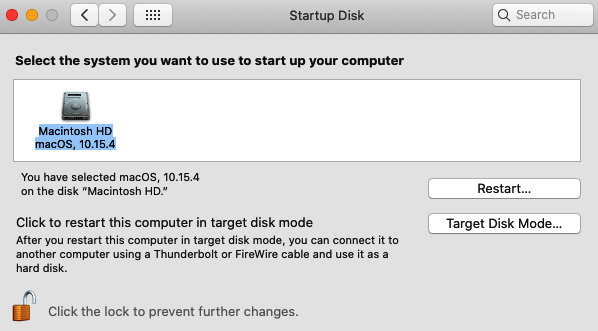
You also have the option to restart the computer in Target Disk Mode... as seen in Figure 2.20.
Startup Security Utility
Startup Security Utility lets you set up a firmware password. This tool is accessed from the Utilities menu, as shown in Fig. 2.21:
We explain the steps to set up a firmware password in detail in Chapter 5, Managing User Security and Privacy.
Network Utility
The Network Utility tool lets you use advanced network troubleshooting tools, such as ping and traceroute. You can access this tool from the Utilities menu as well (Figure 2.21). We will see the options available in this tool in detail in Troubleshooting Tips. Take into account the fact that this utility has been deprecated in macOS Big Sur.
Terminal and Reset Password
Terminal is macOS's command-line interface for advanced management tasks. The use of Terminal is covered in Chapter 16, Using the Command Line.
This tool also includes an important feature that can only be used through Terminal: the resetpassword command. When you use this command, you can reset any user password, including the admin password. We will see more on the resetpassword command in Chapter 5, Managing User Security and Privacy.
Now that we have seen what you can do with macOS Recovery, let's see how to access it from macOS Big Sur.
Accessing the macOS Recovery interface with macOS Big Sur (Intel Mac)
Take into account that with macOS Big Sur, we access the Recovery system in the same way as with macOS Catalina (explained in the previous section). It has pretty much the same options and functionalities described, but there are some changes that we discuss here:
- The interface has been significantly redesigned, as you can see in Figure 2.22:
- Security has also been tightened for this tool: you will need to authenticate with a known admin account to access it.
- The top menu now has the first menu option called Recovery instead of macOS Utilities.
- You won't find Network Utility anymore in the Utilities menu option since it has been deprecated.
- Macs with the T2 chip have extra security options in Startup Security Utility in the Utilities menu. We will explore that in Chapter 15, Managing Security in macOS.
Also, if you have a Mac with the M1 Apple Silicon chip, accessing the Recovery is a bit different, and there are a few extra options in the menu. We'll explore that next.
Accessing the macOS Recovery interface in Macs with the M1 chip
If you have a Mac with the Apple M1 Silicon chip, the process is a bit different. If you are not sure if you have it, you can easily check by going to the Apple menu ( ) and selecting About This Mac (make sure you are in the Overview tab), as shown in Fig. 2.23:
Follow these steps to access macOS Recovery when using a Mac with the M1 chip:
- Turn off your Mac and restart it while pressing and holding the Power button until you see the startup options.
- Select the icon with the name Options, and click Continue, as seen in Figure 2.24:
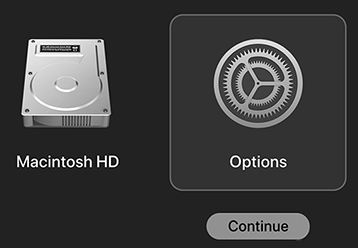
- If prompted, select an administrator for whom you know the password, and press Next.
- You should then see the Recovery interface (Figure 2.22).
The Recovery options are similar to those found in Catalina and Big Sur (Figure 2.22); however, there are some differences:
- There is an additional option present in the Utilities menu, Share Disk..., which helps to transfer files between two Mac computers; something that was accomplished in Intel Mac models through a mode known as target disk. The shortcut to engage target disk mode is no longer available on these Macs.
- Also, Startup Security Utilities is different. A significant change is that setting a firmware password is no longer possible. We will explore this in more detail in Chapter 15, Managing Security in macOS.
The reinstall process is explained next, and it's very similar for all the latest versions of macOS.
How to perform a reinstallation with macOS Catalina Recovery
Perform the following steps for a reinstallation with no loss of data through Recovery in macOS Catalina:
- Ensure that you have checked the system and hardware requirements, as well as the pre-verification steps, as explained in the Technical requirements and Installing macOS sections earlier in this chapter.
- Access the macOS Catalina Recovery interface as explained earlier.
- At this point, if a firmware password has been set, you will be asked to enter that password. If no firmware password is set, you will proceed to the macOS Recovery interface (Figure 2.21).
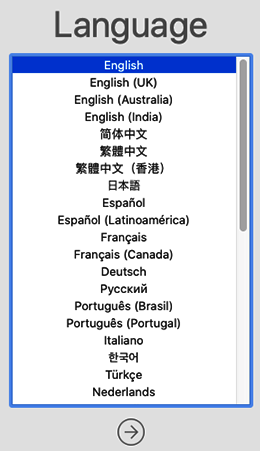
- In this example, macOS Recovery will reinstall the current version already installed on this machine, which in this example is macOS Catalina. Select the Reinstall macOS option and click Continue.
- You will see the window to choose a language for the installation (Figure 2.25). Don't worry about the display language. You can easily change it in System Preferences post-installation:
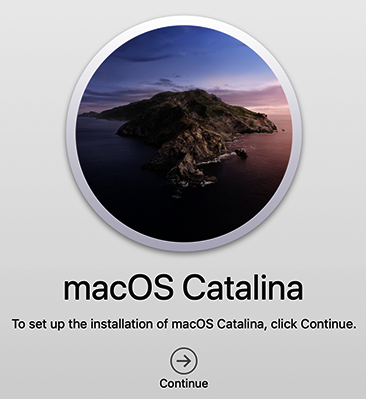
- The installer will open (Figure 2.26). Click Continue to proceed with the installation:
- Accept the Software License Agreement.
- Next, you will see the window to select the disk where you wish to install macOS. Choose the desired disk. Typically, the default option will be Macintosh HD (as seen in Figure 2.16).
- The installation will proceed at this point, and you will be able to monitor through the progress bar.
- As soon as the reinstallation is complete, you will see the login window.
- That's it! The next steps are the setup process, which we explore in the The Set Up Assistant process section at the end of the chapter.
In the next section, we will see a reinstallation with macOS Big Sur Recovery.
How to perform a reinstallation with macOS Big Sur Recovery
Perform the following steps for a reinstallation with no loss of data through Recovery in macOS Big Sur:
- Follow steps 1-3 outlined in the previous procedure.
- macOS Big Sur requires entering an administrator password to access the Recovery interface. Select a known administrator, and click Next. Then, enter the password and click Continue.
- You should now see the macOS Big Sur Recovery interface (Figure 2.22). Select the Reinstall macOS option and click Continue. In this example, macOS Recovery will reinstall macOS Big Sur, the current version already installed on this machine.
- When you see the macOS Big Sur installer appear, as seen in Figure 2.27, click Continue:
- Read and accept the terms of the software license agreement. Click Agree at the prompt to continue.
- Select the volume you want to reinstall and click Continue. The default will be Macintosh HD.
- The installation will start, and you will see a progress bar that will allow you to monitor the process. Beware that this can take a long time.
- Your Mac will probably reboot several times, and you will see the Apple logo with a progress bar. This is normal. Don't turn off the machine or stop the process.
- When finished, you will see the login window appear. Log in as usual.
- That's it! The next steps relate to the setup process, which we explore in the section on The Setup Assistant process, at the end of the chapter.
We have just covered the steps required to perform a reinstallation without data loss. In the next section, we will look at the steps associated with a clean installation.
How to perform a clean installation
A clean installation means you want to start fresh with a new installation without any prior data. Performing a clean installation requires that you erase the disk first; therefore, follow these steps to do that:
- Make sure you have checked the system and hardware requirements, as well as the pre-verification steps, as explained in the Technical requirements and Installing macOS sections earlier in this chapter.
- Access macOS Recovery, as indicated previously for your corresponding macOS version.
- In the Recovery interface (Figure 2.22), select the Disk Utility option.
- In Disk Utility, select View | Show All Devices from the top-left menu, as shown in the following screenshot, to see not only the volumes but all the devices:
- From the sidebar in Disk Utility, select the disk or volume to erase. This is the volume where you will install macOS, usually with the name of Macintosh HD. For example, in Figure 2.28, Apple SSD macOS... is the disk, Container disk4 is a container on that disk, and Macintosh HD is a volume in that container. In most cases, selecting the system volume (Macintosh HD) would be enough. But in some cases, you might want to select the whole disk if you want to make sure that everything is fully wiped out from the disk so that the installer recreates a clean boot disk structure and volume group. However, bear in mind that this action will also erase the Recovery volume, and the only methods you will have left to reinstall your machine are through the internet recovery procedure described earlier or through an external installer, provided that your machine is configured to accept booting from external devices (a setting configured in advance in Startup Security Utility).
- Be sure to select the proper volumes, containers, or disk, as erasing will wipe out all the information, and this cannot be reversed. In some cases, you might be able to recover lost data with third-party tools, but it's not an easy process, and there is no guarantee that you will be able to recover any data. With that in mind, when you are certain, click Erase at the top (Figure 2.28). In the following example, we selected Macintosh HD (the system volume) to be erased, as we will be reinstalling using the Recovery system, and we don't want to wipe that out. Because this is a clean installation, it is OK to choose that volume since we want to erase the system and start fresh with a new copy. However, take into account that this will leave not only the Recovery volume but all the other volumes in the boot disk, as well as any other volumes that might have been created by the previous owner.
- After clicking Erase, you will see a pop-up window where you need to enter the following information:
- Name: I would keep Macintosh HD, the default name for the system volume, for simplicity, but you can name it anything you want. If you decide to change it, be sure to use an adequate name to identify the system volume easily.
- Format: Choose APFS (default) or Mac OS Extended (Journaled) if you require compatibility with Mac computers using macOS 10.12 or earlier. Disk Utility will show a compatible format by default.
- Scheme: If it shows as an option, choose GUID Partition Map.
- Once that information is configured, you can go ahead and click the Erase Volume Group button. This will also erase the user data volume. If you don't see this button, click Erase.
- If you didn't erase the volume group, you should also erase the Macintosh HD - Data volume, which is where the user information is stored. Ensure you have a backup of that volume if you want to keep the data stored in that volume. Repeat steps 7 and 8 for this volume.
- Quit Disk Utility when done to go back to the macOS Recovery menu.
- You can now install macOS on the disk or volume. Once in the Recovery menu, follow the steps under How to perform a reinstallation for your appropriate macOS version.
Once reinstallation has completed successfully, what comes next is the Setup Assistant process. We will cover that process in detail later in this chapter, but before that, we will see one last method of installation through the use of an external installer.
Using an external installer
Another method for installing macOS is through a bootable installer, such as an external drive or an additional volume on your computer. This installation media will contain not only the macOS recovery environment and tools but also a full set of installation assets to start up and install the operating system.
This installation media can be useful in these scenarios:
- When you need to install a specific version of macOS
- When you have to install many computers, so you don't have to download the installer every time
- When you are not able to reinstall from the local recovery partition because it is not present or it is damaged
- When you have completely erased the disk, including the Recovery volume
The creation of a bootable installer, also known as installation media, has a number of requirements that you should consider first:
- You need an external volume or a USB with at least 12 GB of available space for macOS Catalina and earlier, and 14 GB for Big Sur; new or able to be erased, since it will be formatted.
- The volume or USB should be formatted as Mac OS Extended.
- A copy of the macOS installer on a working Mac machine.
- Administrator privileges.
It is also important to know that in order to use a bootable installer, you need permission to boot from an external media in the machine you want to reinstall. On newer Mac systems, the default setting in Startup Security Utility is to disallow booting from external or removable media. Therefore, this setting must be changed in advance. You can learn more about Startup Security Utility in Chapter 15, Managing Security in macOS.
There are several steps involved in creating a bootable installer:
- You should first format the external volume you will be using.
- Next, you will need to download a macOS installer; typically, from the App Store.
- Then, you will have to use the createinstallmedia command in Terminal.
- Finally, it's always a good idea to test the installer before using it.
The steps involved in each of these mandatory tasks are detailed here.
Formatting the external volume or USB
To create a bootable installer, you should first format the volume or USB you will be using with the GUID partition scheme. Don't forget that this will erase all the data in that volume or disk. Perform the following steps to do this:
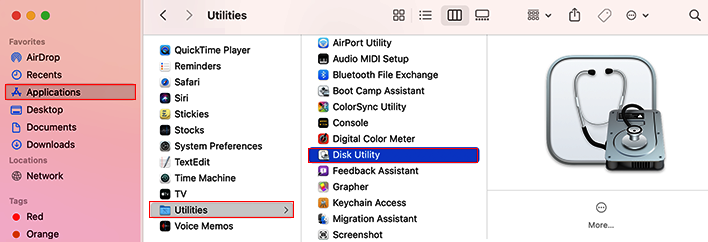
- Open Disk Utility located under Utilities in the Applications menu, as seen in the following screenshot:
- Plug the external disk/USB into your computer if this has not been done already.
- In the sidebar, look for the disk you inserted, and be sure to select the device entry and not the volume below it. In the following example, we have an old USB with a macOS Mojave installer, and we want to create a new installer with a newer version of macOS, for example, macOS Big Sur. Therefore, we will erase the current installer so as to create a new one. Select the USB in the left-hand panel (Figure 2.30):
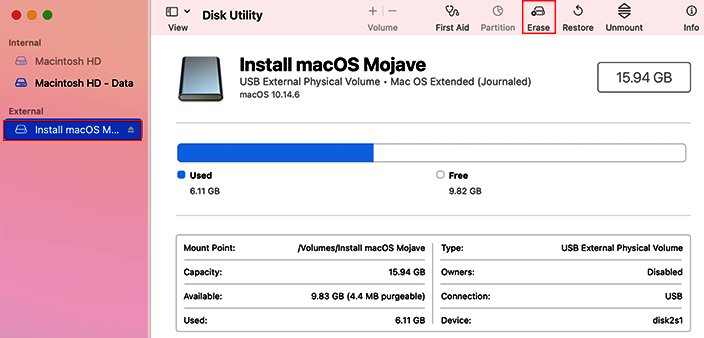
- Click the Erase button in the toolbar at the top (Figure 2.30).
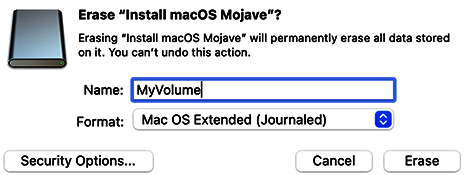
- You will then see a prompt to enter a name, a format, and, if available, a scheme, as shown in the following screenshot. Give the disk a descriptive name (for this example, we will call it MyVolume), and choose Mac OS Extended (Journaled) as the format. Next, select GUID Partition Map as the scheme, if it's shown as an option. When ready, click the Erase button (Figure 2.31):
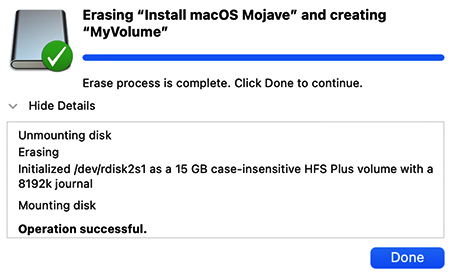
- The process will start, and you will be able to monitor its progress. You can also see more details by expanding Show Details, as seen in Figure 2.32.
- When the erase process is complete, you will see a green checkmark (refer to the following screenshot). At that point, you can click on Done and quit Disk Utility to proceed with the next steps:
Now that the volume is prepared, let's move on to the next step for creating our bootable installer: downloading the installer.
Downloading a macOS installer from the App Store
The next step is to download a macOS installer from the App Store on your Mac computer or check to see whether you already have one from the previous steps. In the Manual upgrades section of this chapter, we explain in detail how to download the current macOS installer and also installers for previous versions. For our current example, we will use the macOS Big Sur installer that we downloaded earlier. Also, take into account the following:
- If you download the installer from the App Store, it will open as soon as it finishes downloading. When that happens, just quit the installer.
- An installer downloaded from the App Store would normally be saved in the Applications folder with a name such as Install macOS Big Sur. If you have already used the installer, it will probably be gone unless you saved it to another location before using it. In this case, you will need to download it again.
- Also, you should know that installers have an expiration date. So if you cannot install with an old installer you saved, chances are it has probably expired, and you will need to download a new copy.
Now that we have the installer we will use for this install media, let's move on to the next step.
Using the createinstallmedia command
The next step is to use the createinstallmedia command. For this step, you will need to know the following:
- The exact name and location of the media you will be using as a bootable installer
- The exact location of the macOS installer
To use the createinstallmedia command, perform the following steps:
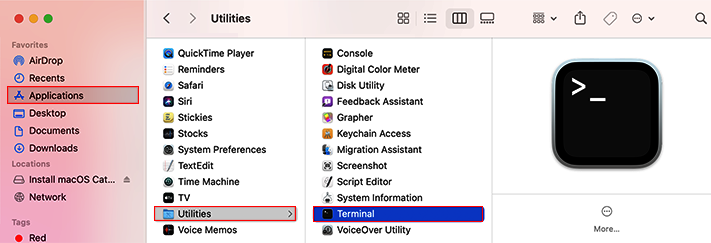
- Open Terminal located under Utilities in the Applications menu, as seen in the following screenshot:
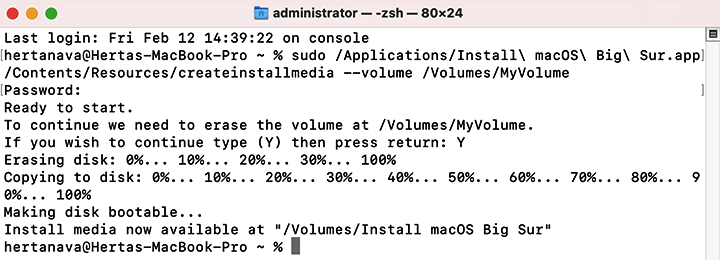
- Type or paste the following command in Terminal. Note that this example assumes that the installer is in the Applications folder and that MyVolume is the name of the USB or volume we're using to create this bootable installer. Replace those variables, if necessary:
sudo /Applications/Install\ macOS\ Big\ Sur.app/Contents/Resources/createinstallmedia --volume /Volumes/MyVolume
- Press Return.
- When asked, type your administrator password and press Return. Bear in mind that Terminal won't show anything while you type your password, which is expected (Figure 2.34):

- When prompted, type Y to confirm that you want to erase the volume and press Return. The process will start, and you will be able to see the progress in the Terminal output.
- In macOS Big Sur, you might be asked for permission to access files on a removable volume. Just click OK. This process can take several minutes. Please be patient and don't close the Terminal window.
- When completed, you will see an output similar to that shown in Figure 2.35:
- The created installation media will have the same name as the installer you downloaded (for example, Install macOS Big Sur).
- You can now quit the terminal by pressing Control + Q or going to the Terminal menu and selecting Quit Terminal.
Now that we have created our bootable installer, it's time to test it and use it.
Testing and using the bootable installer
It is time to test and use the bootable installer. Follow these steps for Intel-based Macs:
- Eject the disk you created if you will be testing it on another computer.
- Turn off the computer you will be using to test and insert the bootable disk.
- Restart the computer and hold down the Option key as soon as it starts up.
- You will see the available startup volumes, including the USB install media icon, which should show the name of the installer you used; for example, Install macOS BigSur.
- At this point, if you're not ready to reinstall, just quit or restart the computer. If you'd like to proceed with the installation of the operating system, you may do so by selecting the bootable disk and continuing with the installation process, which is similar to what we have seen already in the reinstallation process.
Follow these steps for M1 silicon Macs:
- Make sure that you have verified the system and hardware requirements, as well as completing pre-verification steps.
- Insert the bootable disk into a Mac that is connected to the internet.
- Turn on your Mac and keep the Power button pressed until you see the startup options window (Figure 2.24). This will show any bootable volumes and an Options icon.
- At this point, if you're not ready to reinstall, just quit or restart the computer. If you'd like to proceed with the installation of the Operating System, select the bootable disk and continue with the installation process, which is similar to what we have seen already in the reinstallation process.
Once macOS is installed on your Mac, you will see the Setup Assistant, which will guide you through the initial configuration process. We will detail this process later in this chapter.
Updating macOS
An update performs an incremental installation on macOS. In this case, the version of the OS will not change; only updates to the current version will be applied (for instance, an update of macOS Catalina 10.15.3 to macOS Catalina 10.15.4). These are usually system/security and software updates.
There are three types of updates:
- Software updates
- System updates
- Firmware updates
Let's take a look at each of these types of updates next.
Software updates
Software updates will normally refer to updates of macOS (minor versions) and software included with macOS. By default, an Updates Available notification, like the one in Figure 2.36, will show when software updates are ready to be installed. You will also know whether an app update is available through a red badge with a number in the App Store icon in the Dock:

You can simply click on Restart to apply the updates or choose a Later time.
If these notifications are annoying to you, you can disable them. We will explain how in the next section.
Disabling update notifications
If you no longer wish to see notifications regarding updates on the desktop, they can be disabled in the following way:
- Go to System Preferences, click Software Update, and then the Advanced button, as we saw earlier, in Figure 2.6.
- Uncheck the Check for updates box, as shown in the following screenshot:
These settings are configured in System Preferences, but there are other related settings in the App Store preferences. We will see these next.
Automatic App Store updates
You have additional settings in the App Store preferences that you can change to customize the behavior regarding app updates.
To change the App Store preferences, perform the following steps:
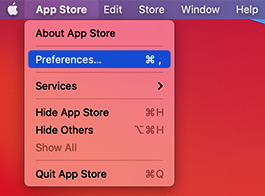
- Go to the App Store menu by clicking its icon,
 , in the Dock or from the Applications folder.
 - Select Preferences from the App Store menu, as shown in Figure 2.38:
- In the preferences, enable Automatic Updates (Figure 2.39):

Bear in mind that if the Automatic Updates option is activated, the system attempts to update the following software:
- Updates and upgrades to macOS and software bundled with macOS
- Updates to software bought from the App Store
You can also verify whether updates are available and apply them manually, as we will see in the next section.
Manual App Store updates
You can verify manually whether updates are available by going to the App Store and clicking on Updates.
Follow these instructions to apply App Store updates manually:
- Open the App Store and click on the Updates tab. In macOS Mojave and later, you can access Updates from the side menu in the redesigned App Store, as seen in Figure 2.40:
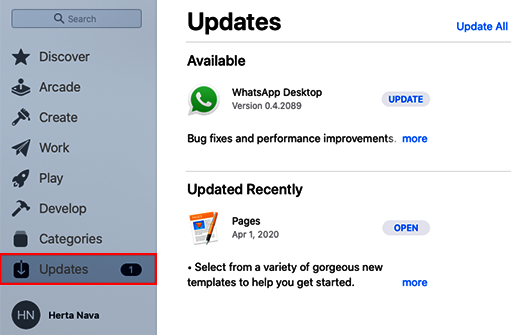
- Next, click the Update All button (Figure 2.40) to install all available updates or click the individual UPDATE buttons to update just the elements you want to. Take into account that in order to update a purchased app, you need to be signed in with the Apple ID used to acquire the app initially in order to apply any available updates.
In this section, we have seen how to do software updates. The second type of update is the system type, and we will look at it next.
System updates
System updates are system data files and security updates. These updates include the following:
- Security configuration updates, which help identify malicious software and removes it upon restart after the update is applied. Other security configuration updates include the Core Services application, Gatekeeper, and Incompatible Kernel Extension Configuration Data.
- System data files, which add new assets to features, such as new speech-recognition assets, updated fonts, improved language models, and more.
The same type of notification as shown earlier, in Figure 2.36 will appear for system updates, but with the System Preferences icon instead of the App Store icon. Clicking on Install will take you to the Software Update window.
Because of the importance of these updates, you should make sure that your system is updated at all times and that system background updates are done automatically.
To verify directly whether your software is up to date, go to the Software Update preferences:
- Open System Preferences.
- Click on Software Update. At this point, the system will check whether your software is up to date and show you any available updates. In Figure 2.45, Software Update indicates that this Mac is up to date.
- If Automatically keep my Mac up to date is selected, as seen in Figure 2.41, system files and security updates are installed automatically when they are available:
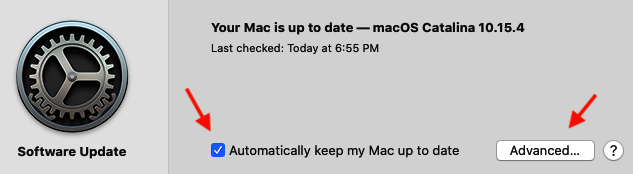
- When Automatically keep my Mac up to date is enabled, all the options shown in Figure 2.42 are enabled. These options can be seen if you click on the Advanced button shown in Figure 2.41:
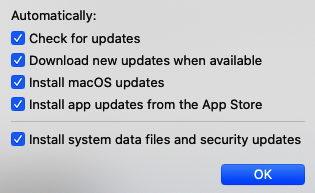
If Automatically keep my Mac up to date is deselected, Install macOS updates and Install app updates from the App Store are deselected. Therefore, you will receive notifications, but they won't be installed automatically; you will have to do it manually.
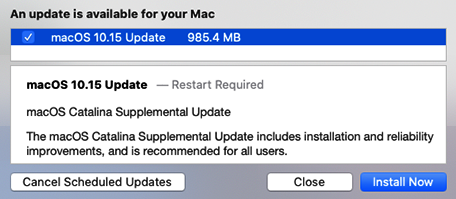
- Back in the Software Update window (Figure 2.41), if there are any updates available, you will be able to click Update Now or close the window to do it later. If you click on More Info..., you will see a window like the one in Figure 2.43 with more details on the available update. You can also choose Install Now from this window or Cancel Scheduled Updates:
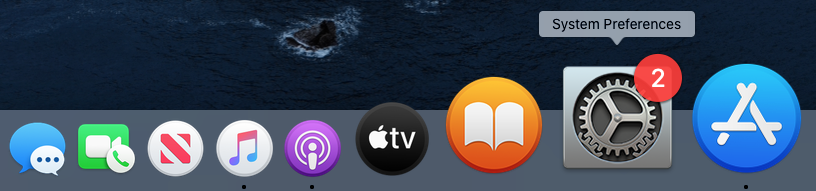
Another way to know whether you have updates ready to install is through the Dock. You will see a red badge with a number on the System Preferences icon (Figure 2.44) in the Dock to indicate the number of system updates available:
The third type of update is the firmware type. Let's explore this next.
Firmware updates
Firmware refers to computer chips with data and programs on them. These are included when the computer is manufactured. They tell the computer how to perform tasks. Therefore, keeping the firmware up to date is a best practice for optimized performance, compatibility, and security. Otherwise, you could encounter problems when installing, upgrading, or updating the operating system. In particular, you should update your firmware after updating or before reinstalling macOS.
In most systems, firmware updates will be performed automatically. The installer uses your Mac model information to install the appropriate firmware update for your Mac. There are rare cases with old Mac Pro models that might require administrator intervention.
Also, bear in mind that on a Mac with the Apple M1 silicon chip, the firmware update may fail. We will see what we can do in that case in Troubleshooting Tips.
With this information, we have reached the end of this section on updating macOS, including software, system, and firmware updates. In the next section, we will see the process that takes place after installing/reinstalling a Mac: configuring the installation.
Configuring the macOS installation
After you have installed, upgraded, or reinstalled macOS, you are taken through a setup process as soon as you log in with the existing or created admin user. In this section, we will see the common tasks related to the post-installation configuration, including the following:
- The Setup Assistant process
- Adjusting the system settings
- Benefits of configuring iCloud
Let's take a look at each of these tasks in detail.
The Setup Assistant process
The Setup Assistant, also called the "initial" configuration, is a tool that has the sole purpose of guiding you through the macOS configuration as soon as the installation/reinstallation process completes. Bear in mind that all the settings that will be configured through this process can be changed later. The Setup Assistant can also be seen in other installation/update-related processes, but the options you will see will vary accordingly.
Right after the installation is complete, the Setup Assistant process will initiate. These are the screens you will see in the case of a clean installation of macOS Big Sur through the Recovery system (the screens you see may vary depending on the OS version installed):
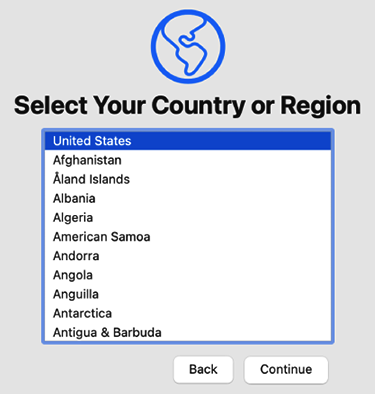
- You will be asked to choose your country (Figure 2.45):
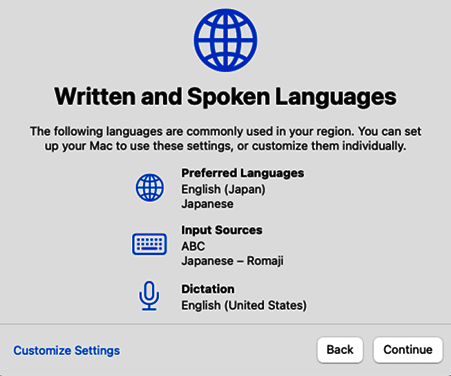
- Next, you will see the Written and Spoken Languages configuration screen. Click Customize Settings to set up your written and spoken languages, or click Continue to accept the default options (Figure 2.46). For this example, we will click Continue:
- Next, you will see the Accessibility options, which you can set up at this moment. We will click Not Now to skip to the next screen (Figure 2.47):

- You will now see a screen with important information regarding your data and privacy. You can click on Learn More... if you want to see more details about how your data and privacy are handled. When ready, click Continue.
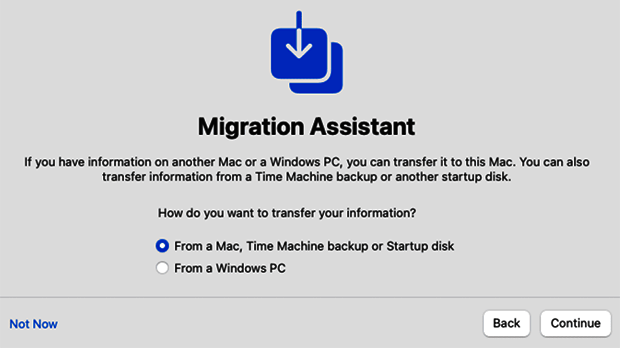
- Next, you will have the option to transfer information to the Mac from various sources, such as another Mac, a Time Machine backup, a startup disk, or a Windows PC (Figure 2.48). Alternatively, you can choose not to transfer any information at this time. For this installation, we will choose Not Now to skip the transfer of information:
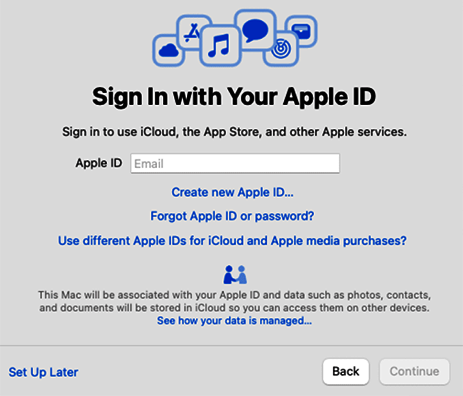
- Next, you can choose to sign in with your Apple ID (Figure 2.49) so that you can take advantage of other features, such as iCloud, iTunes, App Store, and iMessage. If you don't have an Apple ID, you can create one at this point as well. For this installation, we will choose Set Up Later. You will be asked if you are sure you want to skip this step; click Skip to continue:
- Now, you will be asked to agree to the Software License Agreement. Click on Agree.
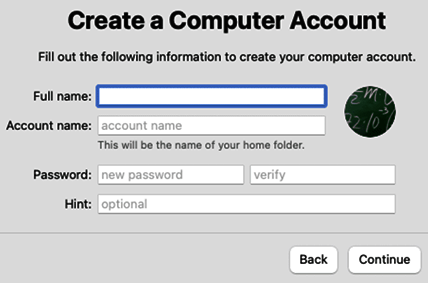
- In the next step (Figure 2.50), you will need to create a user account and password. This first account will have administration rights and will be the main account (in other words, the administrator account). When ready, click Continue:
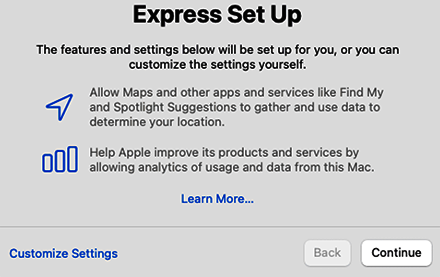
- Next, you will see the Express Set Up screen (Figure 2.51), which will configure some features for you, including apps such as Maps and services such as Find My. You can choose Customize Settings or click Continue to proceed and accept the default configuration:
- Next, you will be asked whether you want to share crash and usage data with Apple. We will leave the default option and click Continue.
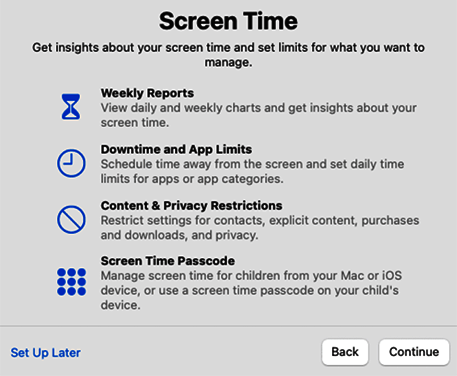
- When upgrading/installing macOS Catalina and later, you will see a window asking you to set up a new feature: Screen Time (Figure 2.52). You can either click Set Up Later or Continue:
- On the next screen, you will see the option to enable Siri, which is activated by default. Click Continue to proceed:
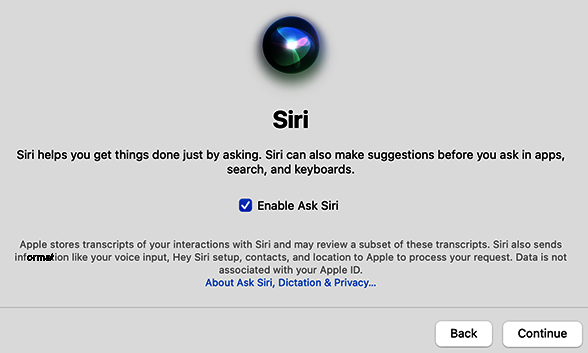
- You may be asked to select a language for Siri. When ready, click Continue.
- Next, you will be asked if you wish to share Siri data. You can select Share Audio Recordings or Not Now.
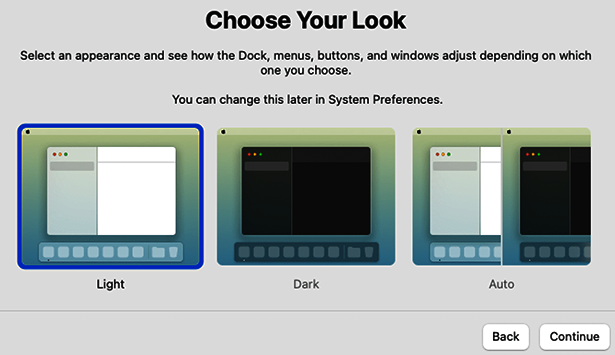
- Next, decide on a look. You can choose either the Light, Dark, or Auto mode and click Continue (Figure 2.54):
- And we are almost done. The setup will finish on the next screen.
- When the setup is finished, you will see the macOS desktop.
And that's it! The installation/reinstallation and initial configuration are now complete.
If you want to change a setting you configured during this initial configuration, you can do so later on, and that is what we'll cover next.
Adjusting the system settings
You can customize all system settings after installation through System Preferences, the interface we saw in Figure 2.5. System Preferences is an essential tool for administrators. We will go over the most important administrative options available in this tool throughout this book. Still, you can always explore all of its options at your own pace.
Besides System Preferences, macOS offers another way to configure a system, and this is through the use of configuration profiles. A configuration profile is a file with the extension .mobileconfig that contains predefined system settings. A system or network administrator most likely defines these settings.
Using this file is very straightforward. All you have to do is double-click on the configuration profile file to open it, and macOS installs the profile and its settings. These profiles are very useful when you need to configure many machines, especially in an enterprise or large environment.
After the profile has been applied, you can manage it through the Profiles preferences.
Apple has an app called Apple Configurator 2 that helps in the creation of configuration profiles, among other features. You can learn more about it here https://support.apple.com/guide/apple-configurator-2/welcome/mac.
An important part of configuring macOS is the configuration of iCloud. As you saw in the configuration process, you can skip doing that, but let's analyze why that might not be such a good idea.
Benefits of configuring iCloud
To understand why it is useful to configure iCloud, we first need to understand iCloud and the Apple ID.
iCloud is a secure cloud service where you can store files such as documents, photos, videos, and much more. When you configure iCloud, your files remain updated across your Apple devices. It also offers other key features that are only available when you set up iCloud.
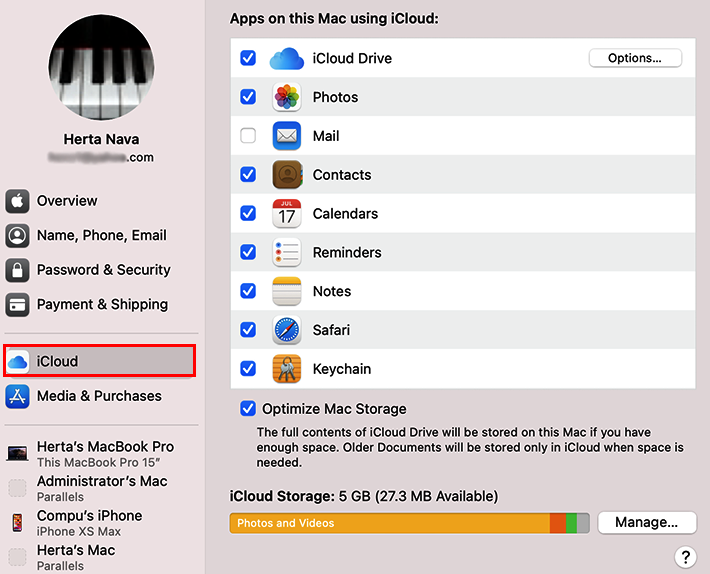
iCloud's main features are the following:
- Cloud storage and communication services for apps (iCloud Drive, Photos, Contacts, Calendars, Reminders, Safari, Siri, Notes, and Find My).
- iCloud Keychain, a security tool that we will explore in Chapter 5, Managing User Security and Privacy.
- Two-factor authentication is another feature that is used in combination with the Apple ID to increase security. We will also see how to set this up in Chapter 5, Managing User Security and Privacy.
- You can also configure mail services automatically if you use an @mac.com, @me.com, or @icloud.com domain.
- You can access iCloud from your Apple devices, but also on the web, at iCloud.com.
To use iCloud, you need an Apple ID. The Apple ID is the personal account that allows you to access Apple's products and services, such as the App Store, iTunes Store, iMessage, and FaceTime, as well as Apple's storage service called iCloud. The Apple ID is always an email address, and you need a password to use it.
When you sign in to iCloud on your Mac and other Apple devices using the same Apple ID, the changes you make to your files on one of the devices will sync with the others, as well as on the iCloud.com web portal, accessible through any standard browser on a Mac or Windows computer. For instance, a photo you add to Photos on your Mac will automatically appear in the Photos app on iCloud.com, your iOS devices, your Apple Watch, and your Apple TV.
Currently, iCloud offers 5 GB of free iCloud storage for each Apple ID account that you have, but if you need more storage, there are also paid plans that offer more storage space.
After you have set up iCloud, you can change or adjust the settings in the iCloud preferences.
Perform the following steps to access the iCloud preferences:
- Open System Preferences.
- Click on the Apple ID icon (Figure 2.55):
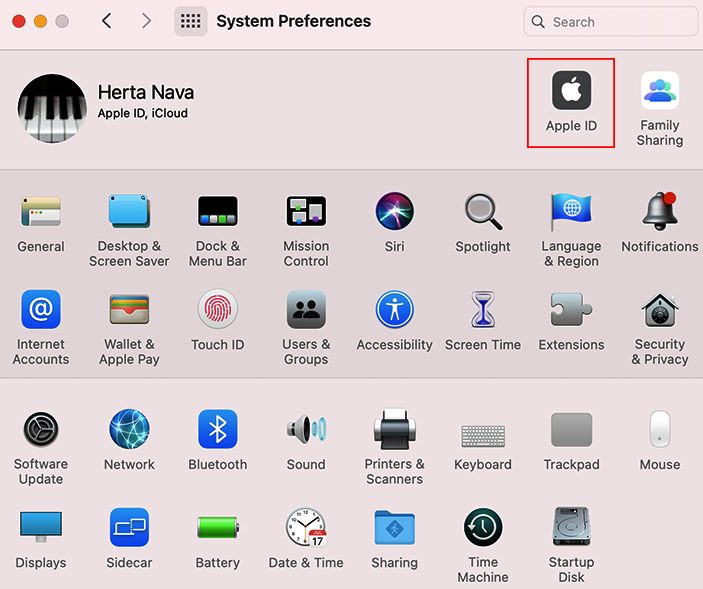
- Then, click on iCloud on the left-side menu (Figure 2.56):
We will see more details on how to configure iCloud in Chapter 4, User Accounts Management.
And with this extensive walk-through on macOS installation scenarios, we have reached the end of this chapter. Be sure to check out the Summary section for a quick recap of what has been covered.
Summary
In this chapter, we have looked at all that relates to macOS installation and configuration in great detail. You now know how to install, update, reinstall, and configure macOS. You also know how to perform other useful related procedures, such as verifying the system requirements and performing the necessary checks before installation. You can also use the Recovery system, which allows you to reinstall macOS, or use the Disk Utility feature to erase a disk or volume to prepare it for a clean installation. You know how to create a bootable installer if you need to install macOS on several machines or if you need a specific version of the OS. Finally, you know how to proceed with the Setup Assistant, as well as how to undertake post-installation configurations. You are now ready to install, upgrade, or reinstall any available version of macOS for yourself or any user that might need your support.
Now that we have our system up and running, we will go on to the next chapter, where we will discuss user management. You will learn about the types of users available in macOS, as well as how to create them, manage them, and customize their environment.


