While preparing for a real-life photo shoot, let's say a fashion shoot, a photographer will have to hire a model, pose her in front of a background, position some lights, and then take a few photos. This workflow is pretty much what we will follow to create a scene in DAZ Studio, except that we will work with 3D objects. These objects have been designed by 3D modelers and are prepared in a way that Studio can easily add them to a scene. Because these are 3D objects, instead of simple bidimensional images, we can move around them and photograph them from any point of view. Welcome to the fascinating world of 3D art!
In this chapter you will learn the following topics:
Adding a human figure to the scene
Positioning the camera
Moving objects in the scene
Rendering an image
With DAZ Studio you can create 3D scenes filled with all kinds of objects, such as people, cars, buildings, animals, and plants. As the best way to learn is by doing, we are not going to spend any time at this point discussing 3D concepts and ideas. Instead, we are going to dive into the program and start doing something interesting with it.
Let's start!
A program like Studio allows you to create a scene using 3D assets. Think of Studio as your own virtual, potentially infinite, photographer's studio. In it you can pose models, add objects, pose lights, and then take a photograph. While using Studio you pick from a library of premade 3D assets, such as people, clothing, cars, buildings, weapons, and so on. Once you select an object, you place it in the scene and change its place until you find an arrangement that works for the image that you have in mind. Throughout this book, we will see many different types of 3D assets. Some of these assets come with Studio; they are installed with the program so that you can start getting results within minutes after finishing the installation. Other assets can be added by either purchasing them or by downloading them from free repositories on the Web.
Note
Refer to Appendix, Installing DAZ Studio, for step-by-step instructions on how to install DAZ Studio on your computer.
After you install Studio, the program presents itself with a predefined scene that shows a gray human figure standing in the standard T pose.

This configuration is not optimal. Most of the time, we will end up deleting the default figure to start your scene with something that you want. In addition, the loading of that figure adds to the time that it takes to start Studio, and we all know how much fun it is to wait for a program to become ready. So, let's make a few changes that will help us work faster.
First of all we delete the figure from the scene. To do this, we double-click on the figure's pelvis and then press the Delete key.

Tip
Downloading the example code
You can download the example code files for all Packt books you have purchased from your account at http://www.packtpub.com. If you purchased this book elsewhere, you can visit http://www.packtpub.com/support and register to have the files e-mailed directly to you.
This action will get rid of the figure and give us a clear scene. Of course, repeating this operation every time we start Studio becomes very tedious very quickly. There is a much better way. We can configure Studio to start with an empty scene.

Now, every time you start Studio, it will come up with an empty scene and it will load faster.
Now if we look at the User Interface (UI) of Studio, we can see a couple of areas where we can apply some streamlining. Studio's UI comes with a default style, but that style, the way the UI elements are drawn on the screen, can be changed. This is useful, for example, to make Studio take less screen surface to draw some widgets such as buttons and tabs. The default style used by Studio is called Main Street and it uses large widgets that take a lot of screen space. Even with a very high screen resolution this style can be a bit invasive. I strongly believe that the UI of a program should stay as essential as possible, and this is even truer for programs used for artistic expression. We need a large canvas and as few distractions as possible. To change the style of Studio, navigate to Window | Style | Select Style. A window will appear where you can select the style for the UI. From the Select a Style window, click on the drop-down list at the top and select Highway.

The Highway style is similar to the default one, but it takes a lot less screen real estate to be drawn. Click on the Accept button to confirm your choice.
Let's take a break for a moment and consider what we have done up to this point. Right now the screen of Studio looks a little tidier, the UI is not as predominant, and we get a clean slate every time we start. These little steps make the experience of using Studio better and faster. A few seconds saved every time you run the program really add up at the end of the year. In addition, the customization of the environment is the first step in making the program your own. It also shows you that you are in control of the program and not the other way around.
Lastly, we need to fix the orientation of the tabs. While having the tabs arranged vertically might seem like a good way of saving screen space, the orientation makes it very hard to read the text of the tabs and it forces us to tilt our heads sideways. To fix this issue, navigate to Window | Workspace | Orient Tabs Along Top. Refer to the following screenshot to see exactly where the menu option is:

Once you perform this last change, you will see the right pane of the window collapse to almost nothing. Don't worry about it. We will do some more rearranging of the layout later on. For now, be assured that you will be able to get access to the pane by simply clicking on the disclosure arrow.
Note
Every now and then we will see elements of the UI using small triangles, usually black, that are employed to open up or close down parts of the interface. These triangles, or arrows, are visible in the menus in the edges of panels and other UI elements. While the term disclosure triangle can be a mouthful, that's how those elements are named. Having a bit of common terminology helps us understand each other while communicating via e-mail, online forums, and social media.

Now that we have configured Studio with a much more comfortable layout, we can start putting together the elements of our first scene.
If you have installed Studio as described in Appendix, Installing DAZ Studio, you should have several 3D assets ready to use. One of these assets is the Genesis figure. Genesis is a base humanoid figure that can be altered to assume all kinds of shapes. It can be a woman, a man, a giant, a monster, or a baby. It can even be altered to assume shapes that are radically different from the basic human form. For example, you can have a creature with the head of Anubis, the jackal-headed god of ancient Egypt. We'll see more of this in Chapter 4, Creating New Characters with Morphs, but for now let's locate Genesis and add it to our scene.
In the Smart Content tab, which should be at the left of your monitor, you can find a series of vertical labels that indicate the groups of 3D assets available in Studio.
Click on the People category, where there are four actors available: Basic Child, Basic Female, Basic Male, and Genesis. If this is a fresh installation, all the icons will have a New label to indicate that the asset has never been used before.
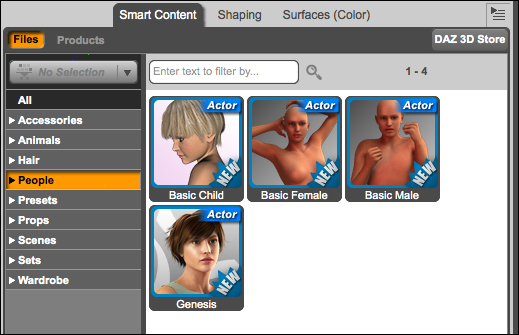
It would seem that the icon labeled Genesis would add a female figure to the scene, complete with hair. That icon actually loads the same androgynous gray figure that we deleted from the scene.
Instead, let's double-click on the Basic Female icon. This action will cause the 3D model of a woman to be added to your scene. The model will appear in the 3D Viewport. Notice that the Basic Female icon doesn't have the New label anymore.

The figure comes in the scene with the typical T pose, a neutral pose that is common to most characters. This pose is our starting point, and it can be modified to assume any pose that we want to apply to the model. The basic female character is fairly similar to the Victoria 4 model, the previous version of female characters made by DAZ. You can notice that it comes with no genitalia and no nipples. This is a feature of the skin—the texture—applied to the figure and something that can be changed easily, if the need for such features arises.
The Smart Content tab of DAZ Studio is context-sensitive to the context in which we are. This means that it changes to display different items depending on what object is selected in the scene. When the scene is empty or when there is nothing selected, the Smart Content tab shows the list of categories available, and it presents items that can be added to the scene. If we click on the Basic Female figure to select it, the Smart Content tab will change to show us what we can do with it; for example, it will show us materials or poses that we can apply to the figure. This feature will become more obvious as we progress with more complex scenes.
Click on the disclosure triangle next to the Wardrobe category. Then, click on the Outerwear subcategory; you will see two items: Jacket and Leggings.
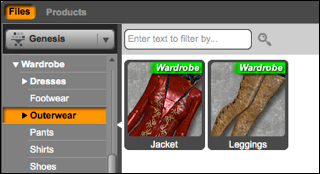
While you make sure that the figure in the Viewport is selected, double-click on the Jacket icon. This operation adds the jacket to the scene and then binds it to the character so that the two will move together.
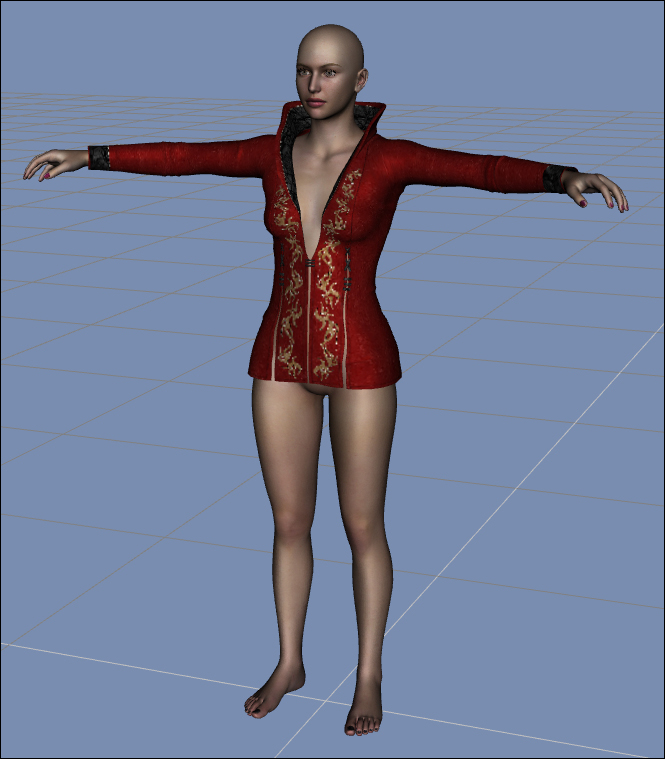
This is called conforming the clothing to the character. Without conforming the two objects, the figure and the jacket would be simply two independent items in the scene.
Now click on the Pants subcategory in the Smart Content tab. In there you will find two other items: JS Pants and Shorts. Make sure that the female figure is selected and then double-click on the JS Pants icon. That will add and conform the pants to the figure.
Now, click on the Shoes subcategory and add JS Boots to the figure as we did for the other items.
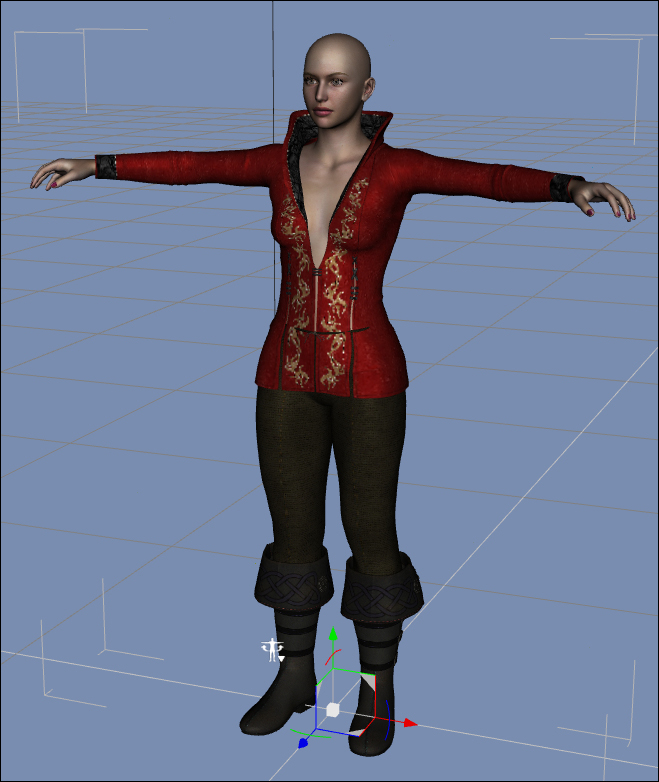
Studio can give you access to hundreds of hairdos that you can customize with colors and styles. The default installation of Studio has a few hair models available. Let's pick one and work with it. In the Smart Content pane, click on the Hair category. You will see four models of hair; let's add the one called Aldora. The procedure is the same as we saw before, but now that the figure is fully clothed, it's not easy to click on a part of the body to select it.
Tip
The fact is you can select the figure by double-clicking on any part of the body, for example, the head. I suggested to use the pelvis because sometimes small movements of the mouse, while double-clicking, can actually move the body part by mistake. I find the center of the body just less sensitive to small mistakes. Call it a good habit.
So, now we can double-click on the head to select the whole figure, and then add the hair by double-clicking on the Aldora icon.
It's now time to take a break and enjoy the fruit of this work. Studio is a 3D environment, so let's start taking advantage of this fact and see how we can take a look at our figure from a different point of view. Look at the top-right of the 3D Viewport, you should see a cube with faces painted in green, red, and blue. That cube controls the position of your camera.
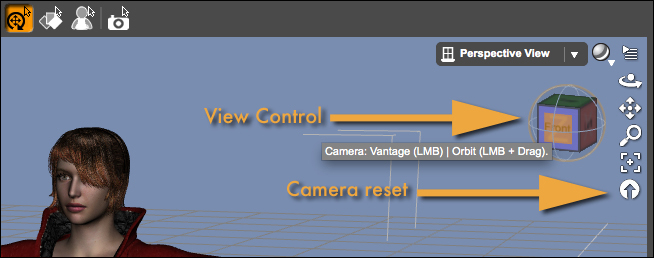
Click-and-drag on that cube to change your camera's point of view. You can now see that we are actually using 3D objects, and that we can place our camera in any place of the scene to take a snapshot in any way we want.
Restore the position of the camera to the default by clicking on the camera reset button.
To change the pose from the uninspiring "T" default, let's apply a predefined pose. This is one of the strengths of Studio, the ability to save and apply poses to our characters. Luckily for us, Studio comes with a set of predefined poses so we can change our scene with a point-and-click approach.
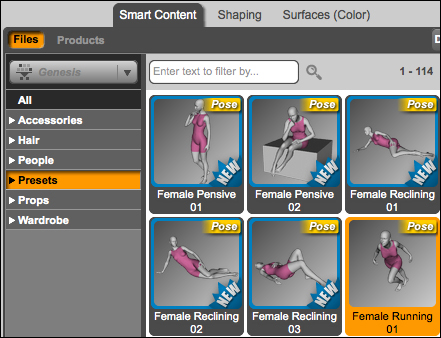
In the Smart Content pane, click on the disclosure triangle next to the Presets category. This will reveal three subcategories: Animations, Materials, and Poses. Click on the Poses subcategory. This last operation will show you a list of icons representing several poses for our character. While making sure that the Basic Female character in the 3D Viewport is selected, double-click on the pose labeled Female Running 01.
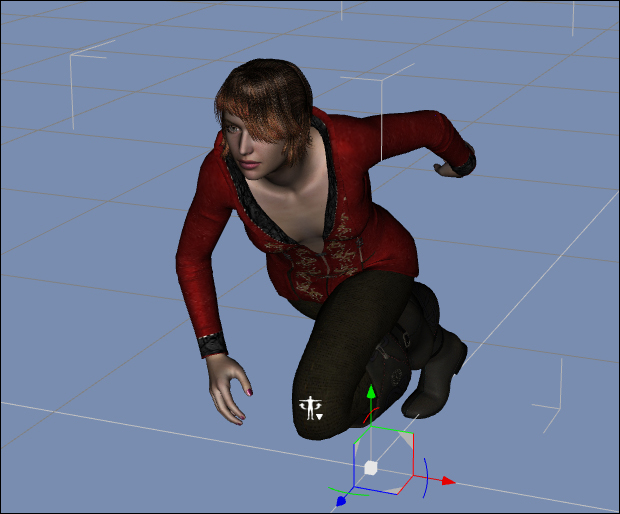
If everything went well, you should have the same result that you can see in the following image. As we can see, all the garments are following the pose of the main figure. The sleeves bend, the boots adapt to the position of the feet, and everything works perfectly. This is no small feat, as conforming and fitting clothes to a 3D figure is a very complex operation, as we will see in the chapter dedicated to creating clothing. Studio makes this operation very simple, and this is one of the advantages of using this application.
If you see something different with your scene, like clothing out of place or not following the main figure, it could be that you didn't conform the garment to the figure when the garment was added to the scene. To fix this there is an easy procedure that can be followed, but it uses a part of the UI that we haven't explored yet.
On the right-hand side of the Studio screen, there is a pane that collapsed when we arranged the tabs to be shown horizontally. You can now reveal that pane by clicking on the disclosure triangle for it. Refer to the following screenshot to see where the disclosure triangle is:
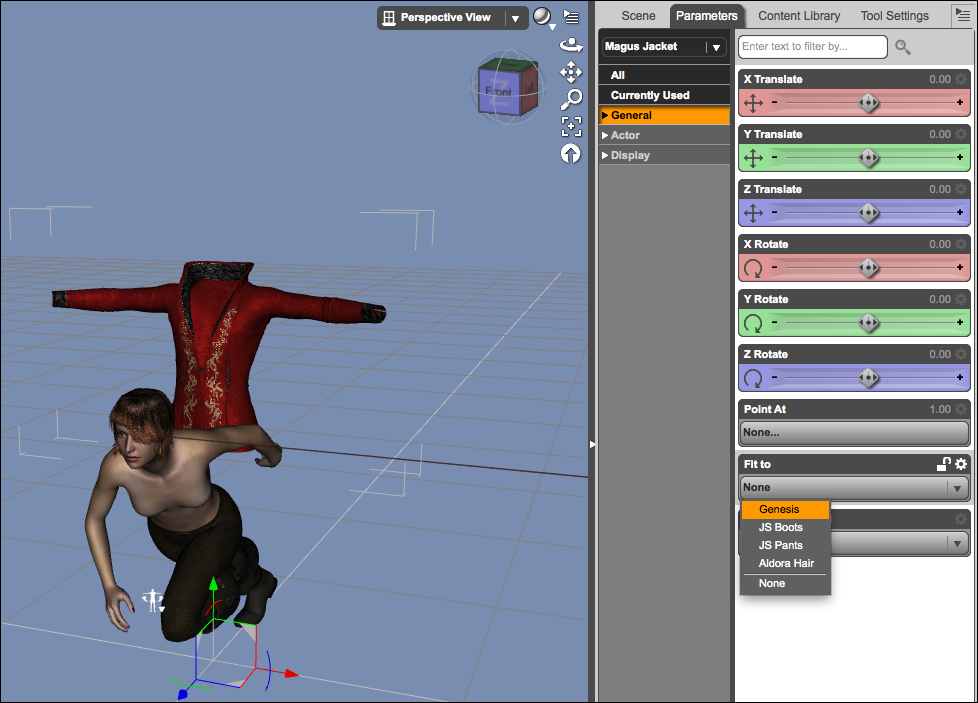
Once you do that, you will see a series of additional tabs: Scene, Parameters, Content Library, and Tool Settings. Let's not worry about those for now and just click on the Parameters tab. Let's assume that Jacket is the item that didn't conform to the figure. So, to correct the problem, follow these easy steps:
Click on the drop-down list just below the Parameters tab and select Jacket.
Click on the General category.
From the right-hand side of the pane, find the Fit to drop-down list and click on it.
Select Genesis.
That's all there is to it. The jacket should now fit the character perfectly.
Once you are done with the fix, you can click on the disclosure triangle to hide the pane again and have more screen surface available for the 3D Viewport.
With so many actions performed at this point, it would be a pity if something happened to our scene. Better save it so that we don't risk losing data. From the Studio menu click on the File menu and then select Save…. As it usually happens for this operation, you will be asked to select a folder where to save the file and a name for the file. Let's select Chapter_01_01 to indicate that this is the scene for chapter 1 and this is the first version of the file. You can use, of course, any filename of your choice. Just be sure to remember what name you used and in which folder you stored the file because Studio, strangely enough, doesn't provide an Open Recent menu option. Studio will save the scene into a file named with the name that you selected and with the extension .duf, which is the default used by the application. DUF stands for DSON User File and it's the normal format for Studio scenes since Studio 4.5.
As nice as our character is, she is standing in the middle of nothing and that is not right. We need to add an environment. To do so follow these easy steps:
Click away from the figure in an empty area of the scene to clear your selection.
With no active selection, the Smart Content pane now shows all the items installed in Studio.
Click on the Sets category.
Double-click on the !Preload icon to add that environment to the scene. Refer to the following screenshot to verify your steps:

The environment is much larger than what we can see with our camera. Use the mouse wheel to zoom out and see more of the scene. You will need to roll the wheel toward the screen to zoom out. Rolling the wheel in the opposite direction zooms in. Chapter 7, Navigating the Studio Environment, explains in detail how to move the camera in the scene.
The environment has been added to the scene with a position that places the floor at a point that is much higher than where our figure stands. We need to move the figure so that it looks like she is touching the floor. For this, follow these steps:
Select Genesis by right-clicking on the face and then choosing Select Genesis – Dbl Click from the menu.
You should see the indicator of the Universal tool at the base of the figure. The Universal tool has the ability to move, rotate, and scale any object in the scene. If the Universal Tool is not enabled, use the switch in the toolbar to enable it.
Move your mouse to the top of the green arrow, which is pointing up. This arrow allows us to move the selected object up or down. When the arrow is highlighted, click-and-drag up to move the figure until the upper half of it is beyond the camera's frame. The following image shows how the Universal tool appears in the Viewport:

Click on the Frame Object camera tool to reframe Genesis. Refer to the following screenshot to see how to find the Frame Object tool:

Now hover above the tip of the blue arrow of the Universal Tool. This part of the tool allows you to move the selected object in the depth direction. Click-and-drag until you see Genesis standing above the floor. Use the following image for reference:

Now use the green axis again to move the figure toward the floor. Keep an eye on the sole of the right boot. When you see that the boot sinks inside the floor, move the figure back up. We want to have our character rest on the floor. There should be just a bit of contact with the floor. For now don't worry too much about it. Just use your best judgment; later on, we will learn how to make precise adjustments.
Using the camera cube, adjust the camera angle to make the image a bit more dramatic. A low camera angle, with the camera below the subject's waist, looking slightly up, gives a bit more tension to the scene.
If you want to explore some rules of image composition, you can look in your public library for a good, introductory book about photography. There is also a nice article available online at the Digital Camera World website, http://www.digitalcameraworld.com/2012/04/12/10-rules-of-photo-composition-and-why-they-work/.

All that we have done up to now is great, but the target of this activity is to be able to produce an image that we can show independently from Studio; for example, this could be a frame of a graphic novel. Ideally, we would like to obtain a PNG or JPG file that we can show other people. This can be achieved through a process called rendering.
When Studio renders, it converts all the 3D elements to a 2D image and in the process, it computes the final versions of the materials. Keep in mind that when we move around the 3D scene, we can only see an approximation of the quality of the scene. This is because it takes a very long time, computer-wise, to compute the final version of all the objects in the scene and their materials. That time would prevent the smooth movement of the camera or the ability to edit the scene in real time.
When we ask Studio to render an image, the software computes all the elements in the scene and it generates an image that is the faithful representation of those elements, including all the details of the materials and lights. We haven't looked at the lights yet, but those are also computed at render time.
To render an image use these steps:
From the Studio menu, navigate to Render | Render.
A window will pop up and in it you will be able to see the gradual development of the image.
Note that the indicator for the Universal tool and the other icons visible in the 3D Viewport are not visible in the rendered image.
If you want to save the image to disk, enter a name in the designated field and select a file format. I suggest
.pngto avoid the data loss inherent in the JPEG format. The following screenshot shows the render window:
Click on the drop-down menu that says Library and select Folder. Click on the button with three dots to select the destination folder. Select your
Desktopfor now.Using your file manager (Finder on the Mac, Windows Explorer on Windows) go to your Desktop, and you will be able to see an icon with the name that you have selected.
Double-click to open the image in your default image viewer.
Congratulations, you have created an image from a 3D scene that includes a human figure, conforming clothing, conforming hair, and a fully featured environment. As a last step, use the Studio menu and navigate to File | Save as… to save your scene as Chapter_01_02.
In this chapter you have learned the following topics:
Customizing the Studio environment
Using the Smart Content pane to locate 3D assets
Adding figures, clothing, and hair
Fitting a garment to a figure via the Parameters tab
Adding an environment to the scene
Using the Universal tool to move objects in the scene
Rendering an image from the 3D scene
As we complete this quick tour of the essential elements of a Studio scene, we have gained considerable familiarity with the program. Take a few minutes to re-examine the work done so far. You should feel good about the progress. Think how complex and time consuming it would be to draw a scene like this using pencil and colors.
Now that you are more familiar with Studio, we can have a look at some of the interesting ways in which we can customize the program to be even more flexible and easier to use. This is the focus of the next chapter.