


 Download code from GitHub
When you start writing Terraform configuration, you will notice very quickly that the language provided by Terraform is very rich and allows for a lot of manipulation.
In the recipes in this chapter, you will learn how to use the Terraform language effectively in order to apply it to real-life business scenarios. We will discuss how to specify the versions of the provider to be used, as well as how to make the code more dynamic with variables and outputs. Then, we will use these concepts to provision several environments with Terraform. After that, we will consider the use of functions and conditions.
We will also learn how to retrieve data from external systems with data blocks, other Terraform state files, and external resources. Finally, we will cover the use of Terraform for local operations, such as running a local executable and manipulating local files.
In this chapter, we will cover the following recipes:
- Configuring Terraform and the provider version to use
- Manipulating variables
- Using local variables for custom functions
- Using outputs to expose Terraform provisioned data
- Provisioning infrastructure in multiple environments
- Obtaining external data with data sources
- Using external resources from other state files
- Querying external data with Terraform
- Calling Terraform built-in functions
- Writing conditional expressions
- Manipulating local files with Terraform
- Executing local programs with Terraform
- Generating passwords with Terraform
Let's get started!
Technical requirements
For this chapter, you will need to have the Terraform binary installed on your computer. The source code for this chapter is available at https://github.com/PacktPublishing/Terraform-Cookbook/tree/master/CHAP02.
Check out the following video to see the code in action: https://bit.ly/3hcZNVR
Configuring Terraform and the provider version to use
The default behavior of Terraform is that, when executing the terraform init command, the version of the Terraform binary (which we will call the Command-Line Interface (CLI), as explained here: https://www.terraform.io/docs/glossary.html#cli) used is the one installed on the local workstation. In addition, this command downloads the latest version of the providers used in the code.
However, for compatibility reasons, it is always advisable to avoid surprises so that you can specify which version of the Terraform binary is going to be used in the Terraform configuration. The following are some examples:
- A Terraform configuration written with HCL 2 must indicate that it has to be executed with a Terraform version greater than or equal to 0.12.
- A Terraform configuration that contains new features such as count and for_each in modules must indicate that it has to be executed with a Terraform version greater than or equal to 0.13.
In the same vein and for the same reasons of compatibility, we may want to specify the provider version to be used.
In this recipe, we will learn how to specify the Terraform version, as well as the provider version.
Getting ready
To start this recipe, we will write a basic Terraform configuration file that contains the following code:
variable "resource_group_name" {
  default = "rg_test"
}
resource "azurerm_resource_group" "rg" {
  name     = var.resource_group_name
  location = "West Europe"
}
resource "azurerm_public_ip" "pip" {
  name                         = "bookip"
  location                     = "West Europe"
  resource_group_name          = azurerm_resource_group.rg.name
  public_ip_address_allocation = "Dynamic"
  domain_name_label            = "bookdevops"
}
This example code provides resources in Azure (a Resource Group and a public IP address). For more details, read the following documentation about the Terraform AzureRM provider: https://www.terraform.io/docs/providers/azurerm/index.html
Finally, when executing the terraform plan command inside this code, we get the following warning message:

This means that, currently, this Terraform configuration is still compatible with the latest version of the provider but that in a future version of the provider, this property will be changed and therefore this code will no longer work.
Now, let's discuss the steps we need to follow to make the following compliances:
- This configuration can only be executed if Terraform 0.13 (at least) is installed on the local computer.
- Our current configuration can be executed even if the azurerm provider evolves with breaking changes.
We'll take a look at this next.
How to do it…
To specify the Terraform version to be installed on the local workstation, do the following:
- In the Terraform configuration, add the following block:
terraform {
  required_version = ">= 0.13"
}
- To specify the provider source and version to use, we need to add the required_provider block inside the same terraform configuration block:
terraform {
  ...
  required_providers {
    azurerm = {
      source = "hashicorp/azurerm"
      version = "2.10.0"
    }
  }
}
How it works…
When executing the terraform init command, Terraform will check that the version of the installed Terraform binary that executes the Terraform configuration file corresponds to the version specified in the required_version property of the terraform block.
If it matches, it won't throw an error as it is greater than version 0.13. Otherwise, it will throw an error:

With regard to the specification of the provider version, when executing the terraform init command, if no version is specified, Terraform downloads the latest version of the provider, otherwise it downloads the specified version, as shown in the following two screenshots.
The following screenshot shows the provider plugin being downloaded from the specified source without us specifying the required version (at the time of writing, the latest version of the provider is 2.20.0):

As we can see, the latest version of the azurerm provider (2.20.0) has been downloaded.
In addition, the following screenshot shows the azurerm provider plugin being downloaded when we specify the required version (2.10.0):

As we can see, the specified version of the azurerm provider (2.10.0) has been downloaded.
In this required_version block, we also add the source property, which was introduced in version 0.13 of Terraform and is documented here: https://github.com/hashicorp/terraform/blob/master/website/upgrade-guides/0-13.html.markdown#explicit-provider-source-locations
There's more…
In this recipe, we learned how to download the azurerm provider in various ways. What we did here applies to all providers you may wish to download.
It is also important to mention that the version of the Terraform binary that's used is specified in the Terraform state file. This is to ensure that nobody applies this Terraform configuration with a lower version of the Terraform binary, thus ensuring that the format of the Terraform state file conforms with the correct version of the Terraform binary.
See also
- For more information about the properties of the Terraform block, go to https://www.terraform.io/docs/configuration/terraform.html.
- For more information about the properties of the providers, go to https://www.terraform.io/docs/configuration/providers.html.
- More information about Terraform binary versioning is documented at https://www.terraform.io/docs/extend/best-practices/versioning.html.
- The upgrade guide for the azurerm provider (to version 2.0) is available at https://www.terraform.io/docs/providers/azurerm/guides/2.0-upgrade-guide.html.
Manipulating variables
When you write a Terraform configuration file where all the properties are hardcoded in the code, you often find yourself faced with the problem of having to duplicate it in order to reuse it.
In this recipe, we'll learn how to make the Terraform configuration more dynamic by using variables.
Getting ready
To begin, we are going to work on the main.tf file, which contains a basic Terraform configuration:
resource "azurerm_resource_group" "rg" {
  name     = "My-RG"
  location = "West Europe"
}
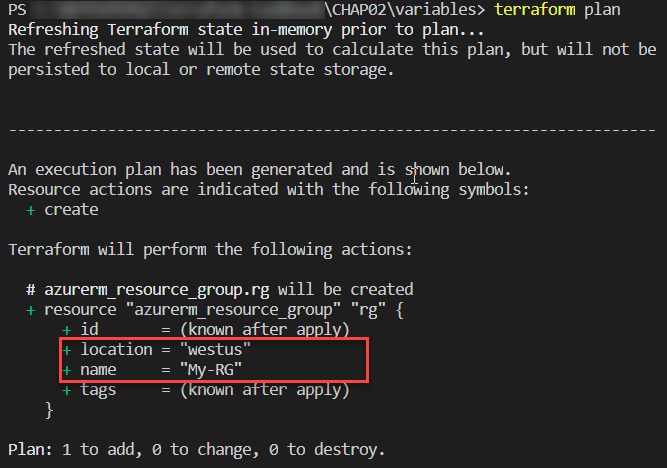
As we can see, the name and location properties have values written in the code in a static way.
Let's learn how to make them dynamic using variables.
How to do it…
Perform the following steps:
- In the same main.tf file, add the following variable declarations:
variable "resource_group_name" {
  description ="The name of the resource group"
}
variable "location" {
  description ="The name of the Azure location"
  default ="West Europe"
}
- Then, modify the Terraform configuration we had at the beginning of this recipe so that it refers to our new variables, as follows:
resource "azurerm_resource_group" "rg" {
  name     = var.resource_group_name
  location = var.location
}
- Finally, in the same folder that contains the main.tf file, create a new file called terraform.tfvars and add the following content:
resource_group_name = "My-RG"
location            = "westeurope"
How it works…
In step 1, we wrote the declaration of the two variables, which consists of the following elements:
- A variable name: This must be unique to this Terraform configuration and must be explicit enough to be understood by all the contributors of the code.
- A description of what this variable represents: This description is optional, but is recommended because it can be displayed by the CLI and can also be integrated into the documentation, which is automatically generated.
- A default value: This is optional. Not setting a default value makes it mandatory to enter a default value.
Then, in step 2, we modified the Terraform configuration to use these two variables. We did this using the var.<name of the variable> syntax.
Finally, in step 3, we gave values to these variables in the terraform.tfvars file, which is used natively by Terraform.
The result of executing this Terraform configuration is shown in the following screenshot:
There's more…
Setting a value in the variable is optional in the terraform.tfvars file since we have set a default value for the variable.
Apart from this terraform.tfvars file, it is possible to give a variable a value using the -var option of the terraform plan and terraform apply commands, as shown in the following command:
terraform plan -var "location=westus"
So, with this command, the location variable declared in our code will have a value of westus instead of westeurope.
In addition, with the 0.13 version of Terraform released in August 2020, we can now create custom validation rules for variables which makes it possible for us to verify a value during the terraform plan execution.
In our recipe, we can complete the location variable with a validation rule in the validation block as shown in the following code:
variable "location" {
  description ="The name of the Azure location"
  default ="West Europe"
  validation { # TF 0.13
    condition = can(index(["westeurope","westus"], var.location) >= 0)
    error_message = "The location must be westeurope or westus."
  }
}
In the preceding configuration, the rule checks that if the value of the location variable is westeurope or westus.
The following screenshot shows the terraform plan command in execution if we put another value in the location variable, such as westus2:
For more information about variable custom rules validation read the documentation at https://www.terraform.io/docs/configuration/variables.html#custom-validation-rules.
Finally, there is another alternative to setting a value to a variable, which consists of setting an environment variable called TF_VAR_<variable name>. As in our case, we can create an environment variable called TF_VAR_location with a value of westus and then execute the terraform plan command in a classical way.
See also
In this recipe, we looked at the basic use of variables. We will look at more advanced uses of these when we learn how to manage environments in the Managing infrastructure in multiple environments recipe, later in this chapter.
For more information on variables, refer to the documentation here: https://www.terraform.io/docs/configuration/variables.html
Using local variables for custom functions
In the previous recipe, we learned how to use variables to dynamize our Terraform configuration. Sometimes, this use can be a bit more tedious when it comes to using combinations of variables.
In this recipe, we will learn how to implement local variables and use them as custom functions.
Getting ready
To start with, we will use the following Terraform configuration:
variable "application_name" {
  description = "The name of application"
}
variable "environment_name" {
  description = "The name of environment"
}
variable "country_code" {
  description = "The country code (FR-US-...)"
}
resource "azurerm_resource_group" "rg" {
  name = "XXXX" # VARIABLE TO USE
  location = "West Europe"
}
resource "azurerm_public_ip" "pip" {
  name = "XXXX" # VARIABLE TO USE
  location = "West Europe"
  resource_group_name = azurerm_resource_group.rg.name
  allocation_method = "Dynamic"
  domain_name_label = "mydomain"
}
The goal of this recipe is to consistently render the names of the Azure resources. We must provide them with the following nomenclature rule:
CodeAzureResource - Name Application - Environment name - Country Code
How to do it…
Perform the following steps:
- In the main.tf file, which contains our Terraform configuration, we will add a local variable called resource_name, along with the following code:
locals {
  resource_name = "${var.application_name}-${var.environment_name}-${var.country_code}"
}
- We then use this local variable in the resources with the following code:
resource "azurerm_resource_group" "rg" {
 name = "RG-${local.resource_name}"
 location = "West Europe"
}
resource "azurerm_public_ip" "pip" {
 name = "IP-${local.resource_name}"
 location = "West Europe"
 resource_group_name = azurerm_resource_group.rg.name
 public_ip_address_allocation = "Dynamic"
 domain_name_label = "mydomain"
}
How it works…
In step 1, we created a variable called resource_name that is local to our Terraform configuration. This allows us to create a combination of several Terraform variables (which we will see the result of in the Using outputs to expose Terraform provisioned data recipe of this chapter).
Then, in step 2, we used this local variable with the local.<name of the local variable> expression. Moreover, in the name property, we used it as a concatenation of a variable and static text, which is why we used the "${}" syntax.
The result of executing this Terraform configuration is as follows:

In the previous screenshot, we can see the output of executing the terraform plan command with the name of the Resource Group that we calculated with the locals variable.
See also
For more information on local variables, take a look at the following documentation: https://www.terraform.io/docs/configuration/locals.html
Using outputs to expose Terraform provisioned data
When using Infrastructure as Code tools such as Terraform, it is often necessary to retrieve output values from the provisioned resources after code execution.
One of the uses of these output values is that they can be used after execution by other programs. This is often the case when the execution of the Terraform configuration is integrated into a CI/CD pipeline.
For example, we can use these output values in a CI/CD pipeline that creates an Azure App Service with Terraform and also deploys the application to this Azure App Service. In this example, we can have the name of the App Service (web app type) as the output of the Terraform configuration. These output values are also very useful for transmitting information through modules, which we will see in detail in Chapter 5, Sharing Terraform Configuration with Modules.
In this recipe, we will learn how to implement output values in Terraform's configuration.
Getting ready
To proceed, we are going to add some Terraform configuration that we already have in the existing main.tf file.
The following is an extract of this existing code, which provides an App Service in Azure:
...
resource "azurerm_app_service" "app" {
  name                = "${var.app_name}-${var.environment}"
  location            = azurerm_resource_group.rg-app.location
  resource_group_name = azurerm_resource_group.rg-app.name
  app_service_plan_id = azurerm_app_service_plan.plan-app.id
}
...
How to do it…
To ensure we have an output value, we will just add the following code to this main.tf file:
output "webapp_name" {
  description = "output Name of the webapp"
  value = azurerm_app_service.app.name
}
How it works…
The output block of Terraform is defined by a name, webapp_name, and a value, azurerm_app_service.app.name. These refer to the name of the Azure App Service that is provided in the same Terraform configuration. Optionally, we can add a description that describes what the output returns, which can also be very useful for autogenerated documentation or in the use of modules.
It is, of course, possible to define more than one output in the same Terraform configuration.
The outputs are stored in the Terraform state file and are displayed when the terraform apply command is executed, as shown in the following screenshot:

Here, we see two output values that are displayed at the end of the execution.
There's more…
There are two ways to retrieve the values of the output in order to exploit them, as follows:
- By using the terraform output command in the Terraform CLI, which we will see in the Exporting the output in JSON recipe in Chapter 4, Using the Terraform CLI
- By using the terraform_remote_state data source object, which we will discuss in the Using external resources from other state files recipe, later in this chapter
See also
Documentation on Terraform outputs is available at https://www.terraform.io/docs/configuration/outputs.html.
Provisioning infrastructure in multiple environments
In the same way that we deploy an application to several environments (dev, test, QA, and production), we also need to provision infrastructure on these different environments.
The question that often arises is how to write a maintainable and scalable Terraform configuration that would allow us to provision infrastructure for multiple environments.
To answer this question, it is important to know that there are several solutions for organizing Terraform configuration topologies that will allow for this provisioning.
In this recipe, we will look at two Terraform configuration structure topologies that will allow us to deploy an Azure infrastructure to multiple environments.
Getting ready
To fully understand this recipe, you will need to have a good understanding of the notion of variables, as discussed in the Manipulating variables recipe of this chapter.
The goal of the Terraform configuration that we are going to write is to deploy an Azure App Service for a single environment. Its code is distributed in the following files:

In the preceding diagram, we can see the following:
- The main.tf file contains the Terraform configuration of the resources to be provisioned.
- The variables.tf file contains the declaration of the variables.
- The terraform.tfvars file contains the values of the variables.
The Terraform source code for this basic example is available at https://github.com/PacktPublishing/Terraform-Cookbook/tree/master/CHAP02/myApp/simple-env.
What is important in this recipe is not the content of the code, but the folder structure and the Terraform commands to be executed.
How to do it…
Follow these steps to implement the first Terraform configuration folder topology:
- In an empty folder, create a separate directory per environment: one for dev, one for test, one for QA, and one for production.
- Copy the Terraform base configuration into each of these directories identically.
- Then, in each of these directories, modify the values of the terraform.tfvars file with the information that is specific to the environment. Here is an extract of each of these terraform.tfvars files:
resource_group_name = "RG-App"
service_plan_name = "Plan-App"
environment = "DEV" #name of the environment to change
- Finally, to provision each of these environments, inside each of these directories, execute the classical Terraform execution workflow by running the terraform init, terraform plan, and terraform apply commands.
Follow these steps to implement the second topology of the Terraform configuration folder:
- In the folder that contains our basic Terraform configuration, create three subdirectories: dev, test, and production.
- Then, in each of these subdirectories, copy only the terraform.tfvars base file, in which we modify the variables with the correct values of the target environments. The following is an extract from each terraform.tfvars file:
resource_group_name = "RG-App"
service_plan_name = "Plan-App"
environment = "DEV" #name of the environment to change
- Finally, to provision each of these environments, go to the root folder of the Terraform configuration and execute the following commands:
terraform init
terraform plan -var-file="<environment folder>/terraform.tfvars"
terraform apply -var-file="<environment folder>/terraform.tfvars"
How it works…
In the first topology, we duplicate the same Terraform configuration for each environment and just change the values of the variables in the terraform.tfvars file of each folder.
By doing this, we get the following folder structure:

Terraform is then executed with the basic Terraform commands. This structure can be used if the infrastructure does not contain the same resources for each environment. This is because duplicating all the Terraform configuration in each environment folder offers us the advantage of being able to easily add or remove resources for one environment without affecting the other environments.
However, this is duplicate code, which implies that this code must be maintained several times (we must modify the infrastructure for all environments, make changes to the Terraform configuration, and so on).
In the second topology, we kept the Terraform configuration in the common base for all environments and have just one terraform.tfvars file per environment. By doing this, we get the following folder structure:

As for the execution of the Terraform configuration, we have added the -var-file option to the plan and apply commands. This structure can be used if the infrastructure is the same for all environments but only the configuration changes.
The advantage of this topology is that we have only one common piece of Terraform resource code (in the main.tf and variables.tf files), and just one terraform.tfvars file to fill in, so we will have to make a few changes in case of code evolution or a new environment.
On the other hand, the changes that were made to the Terraform main.tf code will apply to all the environments, which in this case requires more testing and verification.
See also
- There are other solutions to Terraform configuration folder structure topologies, as we will discuss in Chapter 5, Sharing Terraform Configuration with Modules.
- Documentation regarding the -var-file option of the plan and apply commands is available at https://www.terraform.io/docs/commands/plan.html.
- An article explaining the best practices surrounding Terraform configuration can be found at https://www.terraform-best-practices.com/code-structure.
- The following blog post explains the folder structure for production Terraform configuration: https://www.hashicorp.com/blog/structuring-hashicorp-terraform-configuration-for-production
Obtaining external data with data sources
When infrastructure is provisioned with Terraform, it is sometimes necessary to retrieve information about the already existing resources. Indeed, when deploying resources to a certain infrastructure, there is often a need to place ourselves in an existing infrastructure or link it to other resources that have already been provisioned.
In this recipe, we will learn how, in our Terraform configuration, to retrieve information about resources already present in an infrastructure.
Getting ready
For this recipe, we will use an existing Terraform configuration that provides an Azure App Service in the Azure cloud. This source code is available at https://github.com/PacktPublishing/Terraform-Cookbook/tree/master/CHAP02/data.
This code is incomplete because, for this project, we need to store the App Service in an existing Service Plan. This Service Plan is the one we will use for the entire App Service.
How to do it…
Perform the following steps:
- In our file that contains our Terraform configuration, add the following data block:
data "azurerm_app_service_plan" "myplan" {
  name                = "app-service-plan"
  resource_group_name = "rg-service_plan"
}
In the properties sections, specify the name and the Resource Group of the Service Plan to be used.
- Then, complete the existing App Service configuration, as follows:
resource "azurerm_app_service" "app" {
  name                = "${var.app_name}-${var.environement}"
  location            = azurerm_resource_group.rg-app.location
  resource_group_name = azurerm_resource_group.rg-app.name
  app_service_plan_id = data.azurerm_app_service_plan.myplan.id
}
How it works…
In step 1, a data block is added to query existing resources. In this data block, we specify the Resource Group and the name of the existing Service Plan.
In step 2, we use the ID of the Service Plan that was retrieved by the data block we added in step 1.
The result of executing this Terraform configuration can be seen in the following screenshot:

As we can see, we have the ID of the Service Plan that was retrieved by the data block.
There's more…
What's interesting about the use of data blocks is that when executing the terraform destroy command on our Terraform configuration, Terraform does not perform a destroy action on the resource called by the data block.
Moreover, the use of data blocks is to be preferred to the use of IDs written in clear text in the code, which can change because the data block recovers the information dynamically.
Finally, the data block is also called when executing the terraform plan command, so your external resource must be present before you execute the terraform plan and terraform apply commands.
If this external resource is not already present, we get the following error in the terraform plan command:

See also
For more information about data blocks, take a look at the following documentation: https://www.terraform.io/docs/configuration/data-sources.html
Using external resources from other state files
In the previous recipe, we saw that it's possible to retrieve information about resources already present in the infrastructure using data blocks.
In this recipe, we will learn that it is also possible to retrieve external information that is present in other Terraform state files.
Getting ready
For this recipe, we will, similar to the previous recipe, use a Terraform configuration that provisions an Azure App Service that must be part of an already provisioned Service Plan.
Unlike the previous recipe, we will not use individual data sources; instead, we will read outputs from an existing Terraform state file that was used to provision the Service Plan.
As a prerequisite, in the Terraform configuration that was used to provision the Service Plan, we must have an output value (see the Using outputs to expose Terraform provisioned data recipe in this chapter) that returns the identifier of the Service Plan, as shown in the following code:
resource "azurerm_app_service_plan" "plan-app" {
  name = "MyServicePlan"
  location = "westeurope"
  resource_group_name = "myrg"
    sku {
     tier = "Standard"
     size = "S1"
     }
}

output "service_plan_id" {
  description = "output Id of the service plan"
  value = azurerm_app_service_plan.plan-app.id
}
In addition, we used a remote backend version of Azure Storage (see the Protecting state files in an Azure remote backend recipe in Chapter 6, Provisioning Azure Infrastructure with Terraform, for more information) to store the Terraform state file of the Service Plan.
How to do it…
Perform the following steps:
- In the Terraform configuration that provides the Azure App Service, add and configure the terraform_remote_state block, as follows:
data "terraform_remote_state" "service_plan_tfstate" {
  backend = "azurerm"
  config = {
     resource_group_name = "rg_tfstate"
     storage_account_name = "storstate"
     container_name = "tfbackends"
     key = "serviceplan.tfstate"
  }
}
- Then, in the Terraform configuration of the Azure App Service, use the created output of the Service Plan, as follows:
resource "azurerm_app_service" "app" {
  name = "${var.app_name}-${var.environement}"
  location = azurerm_resource_group.rg-app.location
  resource_group_name = azurerm_resource_group.rg-app.name
  app_service_plan_id = data.terraform_remote_state.service_plan_tfstate.service_plan_id
}
How it works…
In step 1, we added the terraform_remote_state block, which allows us to retrieve outputs present in another Terraform state file. In its block, we specified the remote backend information, which is where the given Terraform state is stored (in this recipe, we used Azure Storage).
In step 2, we used the ID returned by the output present in the Terraform state file.
The result of executing this code is exactly the same as what we saw in the Using external resources with data blocks recipe.
There's more…
This technique is very practical when separating the Terraform configuration that deploys a complex infrastructure.
Separating the Terraform configuration is a good practice because it allows better control and maintainability of the Terraform configuration. It also allows us to provision each part separately, without it impacting the rest of the infrastructure.
To know when to use a data block or a terraform_remote_state block, the following recommendations must be kept in mind:
- The data block is used in the following cases:
- When external resources have not been provisioned with Terraform configuration (it has been built manually or with a script)
- When the user providing the resources of our Terraform configuration does not have access to another remote backend
- The terraform_remote_state block is used in the following cases:
- External resources have not been provisioned with Terraform configuration
- When the user providing the resources of our Terraform configuration has read access to the other remote backend
- When the external Terraform state file contains the output of the property we need in our Terraform configuration
See also
The documentation for the terraform_remote_state block is available at https://www.terraform.io/docs/providers/terraform/d/remote_state.html.
Querying external data with Terraform
In the previous two recipes, we learned that it is possible to use either the data block or the terraform_remote_state block to retrieve external data. However, there are scenarios where the data block does not exist in the provider or terraform_remote_state cannot be used, such as when we need to process with an external API or need to use a local tool and process its output.
To meet this need, there is an external resource in Terraform that allows you to call an external program and retrieve its output data so that it can be used in the Terraform configuration.
In this recipe, we will learn how to call an external program and retrieve its output so that we can reuse it.
Getting ready
For this recipe, we will use an existing Terraform configuration that allows us to provision a Resource Group in Azure.
Here, we want a Resource Group to be in a different Azure region (location), depending on the environment (dev or production).
The source code for this recipe is available at https://github.com/PacktPublishing/Terraform-Cookbook/tree/master/CHAP02/external.
How to do it…
Perform the following steps:
- In the directory that contains our main.tf file, create a PowerShell GetLocation.ps1 script that contains the following content:
# Read the JSON payload from stdin
$jsonpayload = [Console]::In.ReadLine()

# Convert JSON to a string
$json = ConvertFrom-Json $jsonpayload
$environment = $json.environment

if($environment -eq "Production"){
 $location="westeurope"
}else{
 $location="westus"
}

# Write output to stdout
Write-Output "{ ""location"" : ""$location""}"
- In the main.tf file, add the external block, as follows:
data "external" "getlocation" {
  program = ["Powershell.exe", "./GetLocation.ps1"]
  query = {
      environment = "${var.environment_name}"
  }
}
- Then, modify the code of the Resource Group to make its location more dynamic, as follows:
resource "azurerm_resource_group" "rg" {
  name = "RG-${local.resource_name}"
  location = data.external.getlocation.result.location
}
- Optionally, you can add an output value that has the following configuration:
output "locationname" {
  value = data.external.getlocation.result.location
}
How it works…
In step 1, we wrote the PowerShell GetLocation.ps1 script, which will be called by Terraform locally. This script takes in environment as an input parameter in JSON format. Then, this PowerShell script makes a condition on this input environment and returns the right Azure region as output so that we can use it in our Terraform configuration.
Then, in step 2, we used the Terraform external resource, which calls this PowerShell script and provides it with the contents of the environment_name variable as a parameter.
Finally, in step 3, we used the return value of this external block in the location property of the Resource Group.
The following screenshot shows the output of executing terraform plan with the environment_name variable, which is set to Dev:
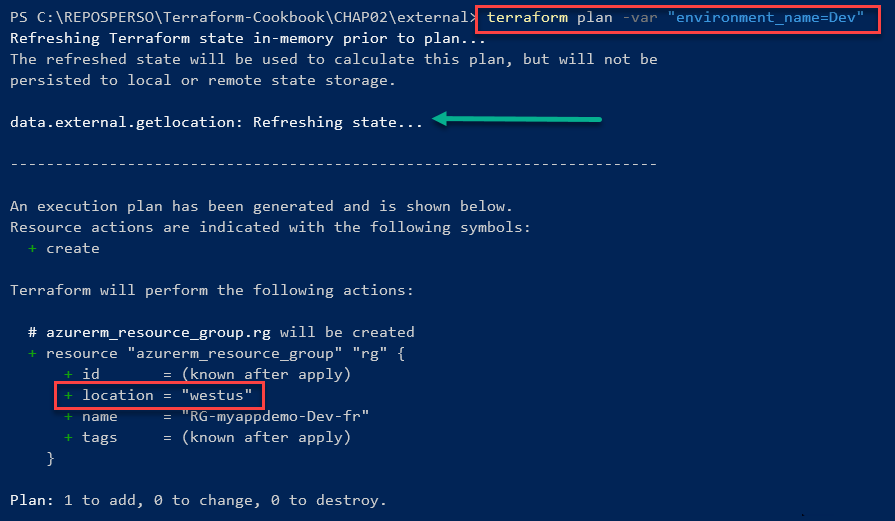
As you can see, the regional location of the Resource Group is westus.
The following screenshot shows the output executing terraform plan with the environment_name variable, which is set to Production:

As you can see, the location of the Resource Group is westeurope.
Optionally, we can also add a Terraform output that exposes this value. This can be displayed upon executing Terraform. This can also be exploited at other places in the Terraform configuration.
The following screenshot shows the output after running the terraform apply command:

As we can see, the terraform output command displays the right locationname value.
There's more…
In this recipe, we used a PowerShell script, but this script also works with all the other scripting languages and tools that are installed on your local machine.
This external resource contains specifics about the protocol, the format of the parameters, and its output. I advise that you read its documentation to learn more: https://www.terraform.io/docs/providers/external/data_source.html
See also
The following are some example articles regarding how to use the external Terraform resource:
Calling Terraform built-in functions
When provisioning infrastructure or handling resources with Terraform, it is sometimes necessary to use transformations or combinations of elements provided in the Terraform configuration.
For this purpose, the language supplied with Terraform (HCL2) includes functions that are built-in and can be used in any Terraform configuration.
In this recipe, we will discuss how to use built-in functions to apply transformations to code.
Getting ready
To complete this recipe, we will start from scratch regarding the Terraform configuration, which will be used to provision a Resource Group in Azure. This Resource Group will be named according to the following naming convention:
RG-<APP NAME>-<ENVIRONMENT>
This name should be entirely in uppercase.
The source code for this recipe is available at https://github.com/PacktPublishing/Terraform-Cookbook/tree/master/CHAP02/fct.
How to do it…
Perform the following steps:
- In a new local folder, create a file called main.tf.
- In this main.tf file, write the following code:
variable "app_name" {
  description = "Name of application"
}
variable "environement" {
  description = "Environement Name"
}
- Finally, in this main.tf file, write the following Terraform configuration:
resource "azurerm_resource_group" "rg-app" {
  name     = upper(format("RG-%s-%s",var.app-name,var.environement))
  location = "westeurope"
}
How it works…
In step 3, we defined the property name of the resource with a Terraform format function, which allows us to format text. In this function, we used the %s verb to indicate that it is a character string that will be replaced, in order, by the name of the application and the name of the environment.
Furthermore, to capitalize everything inside, we encapsulate the format function in the upper function, which capitalizes all its contents.
The result of executing these Terraform commands on this code can be seen in the following screenshot:
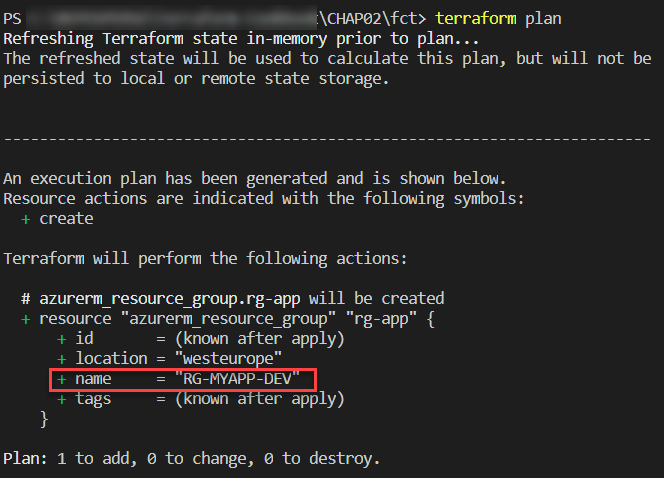
Thus, thanks to these functions, it is possible to control the properties that will be used in the Terraform configuration. This also allows us to apply transformations automatically, without having to impose constraints on the user using the Terraform configuration.
See also
There are a multitude of predefined functions in Terraform. The full list can be found at https://www.terraform.io/docs/configuration/functions.html (see the left menu).
Writing conditional expressions
When writing the Terraform configuration, we may need to make the code more dynamic by integrating various conditions. In this recipe, we will discuss an example of an equal condition operation.
Getting ready
For this recipe, we will use the Terraform configuration we wrote in the previous recipe, whose code is available at https://github.com/PacktPublishing/Terraform-Cookbook/tree/master/CHAP02/fct.
We will complete this code by adding a condition to the name of the Resource Group. This condition is as follows: if the name of the environment is equal to Production, then the name of the Resource Group will be in the form RG-<APP NAME>; otherwise, the name of the Resource Group will be in the form RG-<APP NAME>-<ENVIRONMENT NAME>.
How to do it…
In the Terraform configuration of the main.tf file, modify the code of the Resource Group, as follows:
resource "azurerm_resource_group" "rg-app" {
    name = var.environment == "Production" ? upper(format("RG-%s",var.app-name)) : upper(format("RG-%s-%s",var.app-name,var.environment))
    location = "westeurope"
}
How it works…
Here, we added the following condition:
condition ? true assert : false assert
The result of executing Terraform commands on this code if the environment variable is equal to production can be seen in the following screenshot:

If the environment variable is not equal to production, we'll get the following output:

See also
Documentation on the various conditions of Terraform can be found at https://www.terraform.io/docs/configuration/expressions.html#conditional-expressions.
Manipulating local files with Terraform
Terraform is very popular due to its Infrastructure as Code functionality for cloud providers. But it also has many providers that allow us to manipulate the local system.
In the Querying external data with Terraform recipe, we discussed local script executions that are performed by Terraform to get data for external data sources.
In this recipe, we will study another type of local operation that involves creating and archiving local files with Terraform.
Getting ready
For this recipe, we don't need any prerequisites or base code – we will write the code from scratch.
The source code for this recipe is available at https://github.com/PacktPublishing/Terraform-Cookbook/tree/master/CHAP02/files.
How to do it…
Perform the following steps:
- In a new folder called files, create a main.tf file. Write the following code inside it:
resource "local_file" "myfile" {
  content = "This is my text"
  filename = "../mytextfile.txt"
}
- In a command-line terminal, navigate to the files directory and execute Terraform's workflow commands, which are as follows:
terraform init
terraform plan -out="app.tfplan"
terraform apply "app.tfplan"
- In a new archive folder, create a main.tf file and write the following Terraform configuration inside it:
data "archive_file" "backup" {
  type = "zip"
  source_file = "../mytextfile.txt"
  output_path = "${path.module}/archives/backup.zip"
}
- Then, using the command-line terminal, navigate to the archive directory and execute the following Terraform commands:
terraform init
terraform plan
How it works…
In step 1, we wrote a piece of Terraform configuration that uses the local provider and the local_file resource. This resource creates a file called mytextfile.txt and adds This is my text to it.
Then, in step 2, we executed Terraform on this code. By doing this, we obtained the mytextfile.txt file on our local disk.
The result of executing the terraform plan command on this code can be seen in the following screenshot:

After we executed terraform apply, the mytextfile.txt file became available on our local filesystem.
In the second part of this recipe, in step 3, we wrote a piece of Terraform configuration that uses the archive provider and the archive_file resource to create a ZIP file that contains the file we created in steps 1 and 2.
After we executed terraform apply, the ZIP archive backup.zip file became available on our local filesystem, in the archives folder.
There's more…
As we can see, the archive_file resource we used in the second part of this recipe is of the data block type (which we learned about in the Obtaining external data with data sources recipe of this chapter) and is therefore based on an element that already exists before we execute the terraform plan command.
In our case, the file to be included in the archive must already be present on the local disk.
See also
- Documentation on the local_file resource is available at https://www.terraform.io/docs/providers/local/r/file.html.
- Documentation on the archive_file resource is available at https://www.terraform.io/docs/providers/archive/d/archive_file.html.
Executing local programs with Terraform
As we saw in the previous recipe regarding file manipulation, apart from infrastructure provisioning, Terraform also allows you to run programs or scripts that are located on the local workstation where Terraform has been installed.
In this recipe, we will learn how to execute a local program inside the Terraform configuration.
Getting ready
For this recipe, we will complete the Terraform configuration that we used in the previous recipe to write a file on the local machine. Our goal will be to execute a PowerShell command with Terraform that will read and display the contents of the file that we have written using Terraform.
Of course, we will have to run this Terraform script on a Windows operating system.
The source code for this recipe is available at https://github.com/PacktPublishing/Terraform-Cookbook/tree/master/CHAP02/files_local_exec.
How to do it…
Perform the following steps:
- In the main.tf file, which is in the files directory of the source code from the previous recipe, complete the Terraform configuration with the following code:
resource "null_resource" "readcontentfile" {
  provisioner "local-exec" {
   command = "Get-Content -Path ../mytextfile.txt"
   interpreter = ["PowerShell", "-Command"]
  }
}
- Then, in a command-line terminal, execute the Terraform workflow commands, as follows:
terraform init
terraform plan -out="app.tfplan"
terraform apply "app.tfplan"
How it works…
In this recipe, we used null_resource, which is a null provider resource. This resource doesn't allow us to create resources, but rather run programs locally.
In this resource, we have the provisioner block, which is of the local-exec type, which operates on our local machine. Then, in this block, we indicate the command to execute, which is the -Content command of PowerShell. With this, we are telling Terraform to use the PowerShell interpreter to execute this command.
When executing the respective Terraform commands, we get the following result:

As you can see, the text This is my text, which we had written in the file (in the local_file resource), is displayed in the Terraform runtime output.
There's more…
In this recipe, we looked at a simple local-exec command being executed with Terraform. It is also possible to execute several commands that are stored in a script file (Bash, PowerShell, and so on) with a sample Terraform configuration, as shown here:
resource "null_resource" "readcontentfile" {
  provisioner "local-exec" {
    command = "myscript.ps1"
    interpreter = ["PowerShell", "-Command"]
  }
}
In addition, it is important to know that the local-exec provisioner, once executed, ensures that the Terraform state file cannot be executed a second time by the terraform apply command.
To be able to execute the local-exec command based on a trigger element, such as a resource that has been modified, it is necessary to add a trigger object inside null_resource that will act as the trigger element of the local-exec resource.
The following example code uses a trigger, based on timestamp, to execute the local-exec code at each execution step of Terraform:
resource "null_resource" "readcontentfile" {
  triggers = {
   trigger = timestamp()
  }
  provisioner "local-exec" {
   command = "Get-Content -Path ../mytextfile.txt"
   interpreter = ["PowerShell", "-Command"]
  }
}
In this example, the trigger is a timestamp that will have a different value each time Terraform is run.
We will look at another concrete use case of local-exec in the Executing Azure CLI commands in Terraform recipe in Chapter 6, Provisioning Azure Infrastructure with Terraform.
See also
The local-exec provisioner documentation is available at https://www.terraform.io/docs/provisioners/local-exec.html.
Generating passwords with Terraform
When provisioning infrastructure with Terraform, there are some resources that require passwords in their properties, such as VMs and databases.
To ensure better security by not writing passwords in clear text, you can use a Terraform provider, which allows you to generate passwords.
In this recipe, we will discuss how to generate a password with Terraform and assign it to a resource.
Getting ready
In this recipe, we need to provision a VM in Azure that will be provisioned with an administrator password generated dynamically by Terraform.
To do this, we will base ourselves on an already existing Terraform configuration that provisions a VM in Azure.
The source code for this recipe is available at https://github.com/PacktPublishing/Terraform-Cookbook/tree/master/CHAP02/password.
How to do it…
Perform the following steps:
- In the Terraform configuration file for the VM, add the following code:
resource "random_password" "password" {
  length = 16
  special = true
  override_special = "_%@"
}
- Then, in the code of the resource itself, modify the password property with the following code:
resource "azurerm_virtual_machine" "myterraformvm" {
  name = "myVM"
  location = "westeurope"
  resource_group_name = azurerm_resource_group.myterraformgroup.name
  network_interface_ids = [azurerm_network_interface.myterraformnic.id]
  vm_size = "Standard_DS1_v2"
....
  os_profile {
     computer_name = "vmdemo"
     admin_username = "admin"
     admin_password = random_password.password.result
  }
....
}
How it works…
In step 1, we added the Terraform random_password resource from the random provider, which allows us to generate strings according to the properties provided. These will be sensitive, meaning that they're protected by Terraform.
Then, in step 2, we used its result (with the result property) in the password property of the VM.
The result of executing the terraform plan command on this code can be seen in the following screenshot:
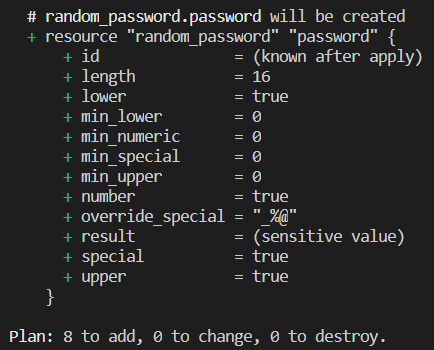
As we can see, the result is sensitive value.
On the other hand, it will be present in clear text in the Terraform state file.
See also
- To find out more about the random_password resource, read the following documentation: https://www.terraform.io/docs/providers/random/r/password.html.
- Documentation regarding sensitive data in Terraform state files is available at https://www.terraform.io/docs/state/sensitive-data.html.


