


 Download code from GitHub
Chapter 2: SwiftUI Watch Tour
We've looked at things SwiftUI can do; now, we will examine how they look on each device. In this chapter and the next, we will work exclusively with watchOS and SwiftUI. Even if you are not doing watchOS development, everything can be applied to the iPhone, iPad, and macOS. There are some subtle differences, but overall everything is the same.
Since there is no specific design for this chapter, we'll look at the default behaviors that we get out of the box. WatchOS has many default looks that are harder to customize than on the other devices. We'll use this chapter to focus on execution, and in the next chapter, we'll work with a specific design. Let's get started working with SwiftUI.
In this chapter, we'll cover the following:
- Creating a SwiftUI PageView in watchOS
- Creating a Bar Chart, Wedge Chart, and Activity Ring
- Creating a list in watchOS
This chapter has a starter file called SwiftUIWatchTour...
Technical requirements
The code for this chapter can be found at https://github.com/PacktPublishing/SwiftUI-Projects/tree/master/Chapter02.
Getting started
We are going to build a small app that will just get your feet wet. We will create a List which we will use to navigate us through our small app. Charts will link to charts and Colors will link to another colors list. One will show you Charts, and the other will show you a List from an Array. You will create three charts in this chapter – Bar, Activity Ring, and Wedge. We will build out a PageView, which will allow us to swipe from left to right to see each one. For the List, you will create a list and display it using an array. Here are what the screens will look like when we are finished:
Building out our navigation
SwiftUI is now fully supported in watchOS 7, which means we do not have to work with some of the older controllers pre watchOS 6. We will first create our entire navigation, and then we will go back and build out each view. Let's get started by opening ContentView first.
Creating a static list
Our List, in this view, is going to be a static list with just two links. One will present a modal, and the other will do the standard push to detail view. Add the following after the struct declaration:
@State private var isPresented = false
In the last chapter, we skipped @State because it was not in scope, and I will do it again as I cover this in greater detail in Сhapter 5, Car Order Form – Data. But I will, for now, just say we are creating a Boolean that keeps track of the modal presentation. Next, inside the body variable, replace Text ('Content View') with the following:
List {
    Button(&apos...
Creating a chart Page-View navigation
Next, we are going to create a Page View navigation controller. Just as you would expect on a phone, you will be able to swipe from the right to left and see different content on each page. You will also see some dots at the bottom of the page, which shows which page is being displayed currently.
Open ChartsView and let's get started. Inside the body variable, replace Text('Charts View') with the following:
TabView { // Step 1
    BarChartView() // Step 2
    WedgeChartView()
    RingView()
}.tabViewStyle(PageTabViewStyle(indexDisplayMode: .automatic))     // Step 3
We just added all of the code for ChartsView, so let's look at what we did:
- We wrap all of our views inside a
TabView. - Next, we set up each page by just listing them inside the
TabView. - We set the
.tabViewStyle()modifier toPageTabViewStyle(indexDisplayMode...
Creating a SwiftUI watch list
We are going to display a SwiftUI List view. Our List is going to display a list of colors. First, we need to create a color model.
Open the ColorModel file inside the Model folder and add the following:
struct ColorModel: Identifiable {
    var id = UUID()
   	var name: String
}
This struct has two properties: id and name. We have also set our model so that it conforms to Identifiable. When using a List in SwiftUI, our List is required to be unique, and there are two ways to handle this. We can either pass data, for example, the name as our unique ID, or we can use UUID and use this as our ID. The more you work with SwiftUI, the more ways you will encounter to handle Identifiable. If your data was coming from a feed, then you could use id if it were unique.
Open ColorsView.swift and add the following code inside the ColorsView struct, before the body:
@State var colors: [ColorModel] = [ ColorModel(name...
Using Swift previews
We covered this in the last chapter, but before we write any SwiftUI code, we will look at a SwiftUI file. Open BarChartView and you'll see our struct view, which we looked at in the previous chapter. If you scroll to the bottom, you will see static var previews. Previews are used to preview our design without having to launch the simulator. You should see a blank space to the right of your code, and at the top of this, you will see a button named Resume:

Figure 2.5
Click Resume, and you will see the preview appear:

Figure 2.6
Let's move on to building some charts.
Charts
Building charts is pretty fun in SwiftUI because it requires very little code. Here is an example of the three screens that we are looking to create in this section:
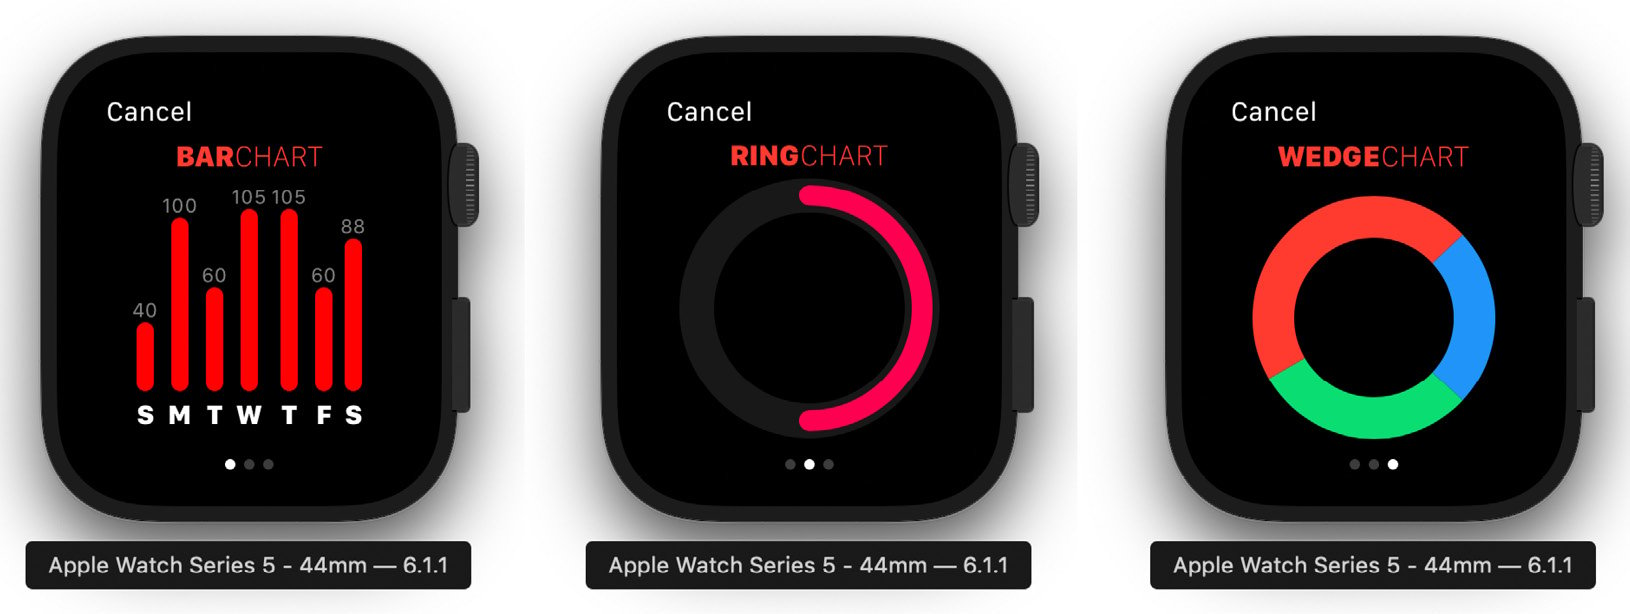
Figure 2.7
We will start on the Bar Chart first using the Capsule shape.
Bar charts
Bar charts are a great way to display information to users. In this example, we will create a static Bar Chart that you can use to display data on the watch. We can also take all of these examples and show them on the larger screens of other devices. Whenever we work in SwiftUI, we will use Swift Previews to review our work, making our workflow go much faster than having to wait for the simulator to launch and display. Please note that to use Swift Previews, you must be on macOS Catalina. If you are not, then just run the simulator.
Creating a header
First, we will start by creating our header for our view. This view is just two text views stacked horizontally next to each other. Open BarChartView...
Summary
In this chapter, we got to work on some basic SwiftUI views. This chapter was a primer to help you get a bit more comfortable using SwiftUI. From here on out, our UIs will become more complex. In the next chapter, we will build an NBA Draft app for the Apple Watch. We will work with animations as well as loading data from a plist. I hope you're excited as I am because this is the kind of stuff that made me want to write this book.