So, you've decided to learn how to use SketchUp for architectural visualization? Maybe a friend told you how easy it is, and you decided to give it a go yourself? Or you heard all the hype about it on the Internet? Well, whatever your reason for picking up this book, you've come to the right place! SketchUp is the easiest, most powerful, effective, and fun-to-use application you will ever come across for 3D work. This book shows you how to use SketchUp and other software to achieve great architectural visuals in no time.
This chapter shows you all you need to get up and running immediately, and it will give you a flavor of what is in the rest of the book. In this chapter, you will learn how to produce the following:
A photorealistic rendering of a scene modeled in SketchUp
Real-world shadows and lighting using a physically accurate light simulator
Materials that reflect or absorb light
When you have followed the tutorial and seen how easy it is to produce great results with SketchUp, you will be able to go on and refine your skills and techniques in the subsequent chapters. The rendering software you'll be using is Thea Render, which is a professional visualization software. Rendering is the process that generates an image from the 3D-scene geometry you prepare in SketchUp. To find out more about Thea and how to install it, jump to Chapter 2, Collecting a Toolset, but come back again!
Here's what you can expect from just 20 minutes of modeling and rendering:
Reflection, highlights, and surface texture even with simple materials
Soft shadows and indirectly lit surfaces
Physically accurate lighting from the Sun and sky
If all that's achieved with just a few minutes in SketchUp and a bit of rendering, what do you think you could do after reading the whole book? Have you ever achieved such great results as quickly in any other software package?
This chapter is as much about expelling the myths about SketchUp as it is an introduction to photorealistic architectural visualization. I hope you will be enthused by it when you see the quality of your own results.
Note
If you don't have SketchUp installed already, you should now skip ahead to Chapter 2, Collecting a Toolset, where you will find the download and installation instructions for SketchUp and Thea Render.
To make sure that you know at least a bit about SketchUp, we will give you an ultra-short overview of the main interface elements and drawing tools. If you already know how to use it, you can skip this section and start with the Modeling the room section.
The SketchUp user interface consists of the main 3D window with tool bars and a number of pallets that can be switched on and off as required.
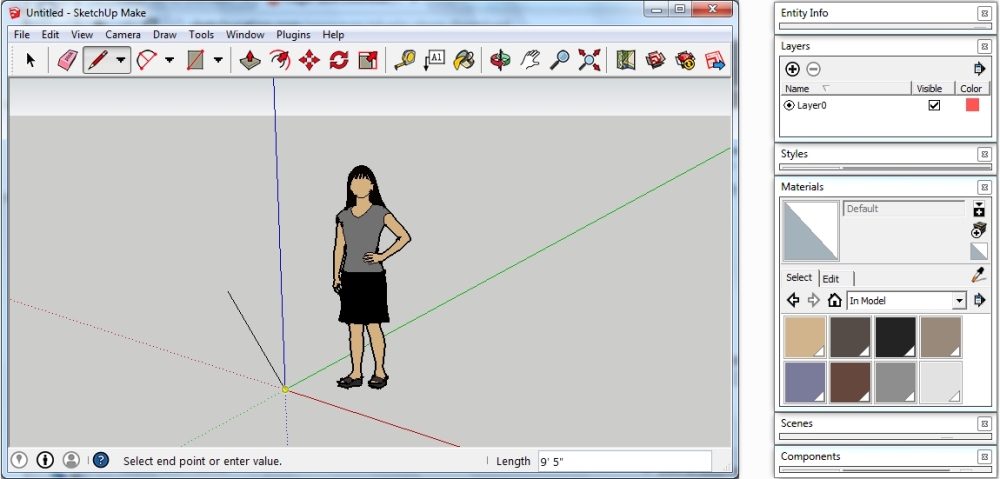
The main window along the top edge has a menu bar with several entries (on Mac, this will appear at the top of the screen) and a number of toolbars. When you start SketchUp with a new empty scene, you will find a stylized person near the coordinate origin. This person can give you a bit of reference about the size of your scene until you have added your own geometry.
Toolbars behave differently on Windows and Macs: In Windows, you can enable and disable individual toolbars by navigating to View | Toolbars. For a start, you should have at least the Getting Started toolbar enabled. As in other Windows applications, toolbars can be disconnected from the main window and left floating on the screen or aligned along the vertical edge of the main window. Just click on the small grey dots at the left edge of a toolbar and drag it around.
On Mac, you only get one toolbar, but it is easy to customize its content. Just right-click and select Customize Toolbar from the context menu. You can enable additional floating toolbars by navigating to View | Tool Pallets. These tool pallets can't be docked to the main window, though.
Some plugins also add new toolbars to your screen when they are installed. You can enable and disable these like any other toolbar.
Along the bottom of the main window, you can see the status bar. You should always keep an eye on the text displayed here, because it gives you a clue about the options that are possible with your currently selected tool. For example, in the previous screenshot, the line tool is active, and SketchUp expects the input of the endpoint or a numeric length for the line.
Anytime SketchUp allows you to enter a value such as the dimensions of a rectangle, you can just type the values. There is no input box that you have to click first. Whatever you type will be displayed in the Value Control Box (VCB). This is the small text area at the right end of the status bar.
SketchUp is very accommodating in what it allows for input. Although SketchUp uses inches as its internal unit, the default unit size for numeric values is set via the file-specific template. If you use a template based on millimeters and enter 500, SketchUp will create a line or rectangle of 500 mm length. If you use a template based on inches, it will instead create a 500 inch long element. However, you can add a common unit indicator such as 500mm (for 500 millimeter) or 5'6" (for 5 feet and 6 inches) to enter a dimension regardless of the current template.
Other possible inputs are the number of elements for an array or the number of sides for a circle or polygon. Just remember to look at the status bar for a hint.
The dialog boxes or pallet windows are not integrated in the main window. These are individual windows that float on top of the main SketchUp window and usually contain lists of materials or styles to choose from. You can enable and disable the dialog boxes via the Window menu. Some tools (such as the Paint Bucket tool) also show the associated dialog box when they are selected. Some dialogs are universally useful, and you should keep them around any time. These are as follows:
Entity Info
Layers
Materials
Outliner
Other dialog boxes are only useful for specific models (such as Component Attributes) or at a later stage in the modeling process. We will introduce each window later when we need its functionality.
You can organize your dialog windows in a stack and move them around the screen as one unit. The stack also snaps to the top or side of your screen and the side of the main SketchUp window. In the stack, all windows will take the same width, but you can still change the height. You can also double-click on the title bar of a window to collapse or expand its main content. You can keep many dialogs in the stack if you keep the windows that you are not using at that moment collapsed.
In the rest of the book, we usually refer to the dialog windows as pallets to avoid confusion with other dialogs that occasionally pop up in SketchUp. This is also consistent with other applications such as GIMP.
Without any modifications, SketchUp's default toolbar contains a selection of tools that are frequently used and are important to know. This selection is called the Getting Started toolbar. The following screenshot shows the Getting Started toolbar:

To move around in the 3D scene, you use the navigation tools. You can also find these in the Camera toolbar and the Camera drop-down menu. The following screenshot shows the navigation tools:

The Orbit tool (the icon with the red and green arrows) is what you will mostly use to move your viewpoint. When you click on the tool button, your cursor changes to the tool icon, and you can change your perspective viewpoint up, down, left, or right by left-clicking on the scene and moving the mouse while you keep the button pressed. Note that your view also rotates so that you are still looking at the same object, only from another direction.
You can quickly activate the Orbit tool via the O key on your keyboard, but the best way to switch to Orbit is via the middle mouse button or scroll wheel. Just pressing and holding the button will activate the Orbit tool without interrupting any other tool that you are using.
Next in line is the Pan tool (hand icon); it is also accessible via the H key. This tool translates your viewpoint relative to the scene. Again, select the tool and keep the left-mouse button pressed while you move your mouse over the screen. You can see how the scene "moves" in the 3D window according to your mouse movements. In reality, it's not the scene that moves, but it is your viewpoint (or camera if you like) that moves in the opposite direction.
Finally, there are the Zoom and Zoom Extents tools that will move your viewpoint in and out of the scene, thus showing you a smaller or larger part of the model. The Zoom tool works again via the left-mouse button, but it is far easier to zoom in and out with a scroll wheel on your mouse. The Zoom Extents tool moves and centers the camera to show the whole model. This is very useful whenever you get lost in your scene or something obstructs your view of the part that you want to work on.
Tip
Keyboard shortcuts
Frequently used tools are accessible via keyboard shortcuts. Mastering these can speed up your SketchUp work significantly. Check the SketchUp quick reference cards available at www.sketchup.com/content/quick-reference-cards-0 for details.
The Select tool (arrow) and Eraser tool are not actually drawing tools, but you should know how to remove elements when you have created them. The following screenshot shows the Select and Erase tools:

The Select tool works as expected. Just select the tool (the keyboard shortcut is Space bar) and click on any element in the scene. If you hold down the Shift key, you can add and remove elements from the selection. If you double-click on an element, the elements that are immediately connected are also selected and triple-clicking will select all the elements that are in contact with it. For example, if you click on one side of a cube, only the polygon will be selected. Double-click on the cube, and you select the polygon and the four surrounding edges. Triple-click and the entire cube will be selected.
To use the Eraser tool, you don't need to select an element; you just use the tool and click on the element you want to delete. Intuitively, the Delete key on your keyboard works as well when the item is selected.
To create new elements, you use the drawing tools. You can also find them in the Drawing toolbar or via the Draw drop-down menu. In SketchUp 2014, the Getting Started toolbar shows a collapsed view of the main drawing tools. To access the hidden functions, click on the arrow next to each icon and select the specific feature from the drop-down list. In the following image, you can see the default tool icons and the functions that they access:
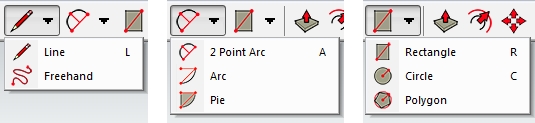
The Line tool draws a straight line between two points. A line in SketchUp is also called an edge. Three or more lines can form the boundary of a polygon. When you create a closed line loop out of coplanar lines, a 3D surface is created between them.
The Rectangle tool creates a rectangular polygon and the four edges surrounding it. If you delete the polygon afterwards, the edges will still remain. You can use the numeric input option to specify an exact width and height after you have placed the first point of the rectangle.
For the Circle and Polygon tools, you first place the center point and specify a second point on the circumference. Alternatively, you can specify the radius numerically. If you type a number before you place the center point, you set the number of sides (in SketchUp, even a circle is made out of short straight segments, but you usually don't see them).
You can also specify the sides of a circle segment created with the 2 Point Arc tool, but to place it, you pick the start and end points and then indicate the bulge of the arc (numerically or by picking a third point). SketchUp 2014 also introduced two new arc tools: Arc and Pie. You use these by picking the center of the arc first and then the start and end of the segment.
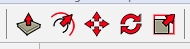
In SketchUp, the drawing elements only create flat surfaces. To create volumetric 3D objects, you have to extrude one of these polygons using the Push/Pull tool. You can see the icon in the following screenshot (first icon from the left):
The Push/Pull tool is probably the quintessential SketchUp tool. To use it, select the tool and then move the cursor over an existing surface. Surfaces that can be extruded will be shown in a darker shade while the cursor is above them. Click anywhere inside the surface and move the mouse up or down along the surface normal. You will see that the polygon will be extruded to a box or prism shape along its surface normal. To set the endpoint for the extrusion, type the desired height of the object or click somewhere in the scene to set the height via reference.
The next modification tool is the Offset tool. The workflow of this tool is similar to that of the Push/Pull tool, but the edges of the surface will be offset in the plane of the surface, not orthogonal to it. Again, you can specify the offset distance via keyboard inputs or reference points.
The Move tool (four-way arrow) is a universal tool in SketchUp. You can use it to move an object as well as rotate or copy it or create a linear array. To simply move something, select the object (or objects) and then activate the Move tool. Click somewhere in the scene to set a reference point and move the cursor in the direction that you want the object to move. You can set the distance via keyboard inputs or by clicking again to set the end point for the move.
To create a copy, you follow the same steps mentioned earlier, but you have to hold down the Ctrl key (or the Option key on Mac) before you click to set the start point. A useful variation of this is the creation of an array instead of a single copy: After you have placed your first copy, you can type an asterisk (*) followed by the number of copies you want to create. For example, type *5 if you want to create five copies of the object, each with the same distance from the previous copy. You can also move the first copy to the end of the array and then type /5 to create four further copies, which are evenly spaced between the first and the last ones.
The Rotate tool (two round arrows) works like the Move tool but rotates the object around a center. It can also be used to create polar arrays of objects.
The Scale tool is the last of the standard modification tools. When you select it, you will see green boxes around the object that you want to scale. Select one of the corner boxes to scale the object in two (or three) dimensions, or select a box in the middle to scale in one dimension only. You can also type in a number such as 2.0 for a fixed scaling factor to double the size of the object.
The tools we have introduced so far should be familiar to you if you have used 3D or CAD software before. The following sections highlight a few of the drawing concepts that make SketchUp such a unique tool. It is essential to understand these ideas to achieve a productive workflow and get the most out of the SketchUp tool set.
Lines and other edges that are part of a new element do interact with existing geometry: a line crossing another line or 3D surface will split this other element in two (two independent lines or two surfaces). On the other hand, if you remove a line between coplanar surfaces, the surfaces will merge into one. This is sometimes called "healing" of an edge or face. The endpoints of lines will also merge with the existing geometry. If you draw a line from one corner of a rectangle and then try to move the line, it will take the corner point along and distort the rectangle.
To avoid the interaction of geometry with each other, you can place elements into groups. Elements in a group will only interact with elements in the same group but not with anything outside. You will use groups a lot when you build complex models. Components are a special type of group; they all share one common definition, and so any change applied to one instance of a component is visible in all the other copies. You may know this concept from blocks in AutoCAD.
To create a component, select all the edges and faces you want to have in the group and then right-click on it and select Make Group from the context menu. A group also provides a bit of protection for its elements. You have to double-click on the group first before you can modify any of the geometric elements in it. You can still snap to the edges and corners, though.
If you find that you left out some elements after you created the group, you can select them and navigate to Edit | Cut to move them to the clipboard. Then, double-click on the group to allow changes and navigate to Edit | Paste in Place. The elements will be inserted in the same location, but now, they are part of the group.
For precise drawing, you can snap to the end and midpoints of a line or an edge. You will also see the appearance of colored guidelines while you are drawing, and your cursor will have a tendency to follow these guides. This is known as inferencing, and it allows you to draw elements that are precisely aligned with the current coordinate system or other existing geometry.
The simplest inferencing takes place when you draw a line close to the cardinal axes of the scene. If you try to draw a line that is roughly parallel to the y axis (green axis), you will see that the unfinished line segment will suddenly align itself with the y axis and turn green. If you move the cursor a bit, this will only change the length of the line but not the direction. Only when you move the cursor far away enough from the y axis, the unfinished line will snap back to the pencil tool. This works for all three axes and with any tool in SketchUp. Sometimes, you may want to switch it off, but unfortunately, there is no way to do this. You can only zoom in closer to your scene to make the inferencing less sensitive.
One last feature you should know about before we model a room is layers. Like in a CAD application, you can assign elements to a specific layer and turn the visibility of layers on and off. Note that the geometry will still interact with each other even if it's on a hidden layer. It is a good practice to create all geometric elements on the default layer (Layer0) and only assign a group or component to a different layer. We will discuss the use of layers in more detail later in the book.
You can also temporarily hide specific objects if they are getting in the way. For example, if you want to see the inside of a room, just select all the elements and then right-click and select Hide from the context menu. To make them visible again, navigate to Edit | Unhide | All.
There are many useful resources available online to help you improve your SketchUp skills. They are as follows:
The SketchUp Concepts Guide page (help.sketchup.com/en/article/115426) for a quick overview
The SketchUp User's Guide page (help.sketchup.com/en/article/116174) for a detailed description of the tools and their use
YouTube channels,
harwoodpodcastand4sketchupgo2school, for many detailed video tutorials to introduce various modeling techniques
After this quick introduction, we can now continue with a hands-on tutorial. We will create a simple interior scene and use the Thea Render plugin to create a photorealistic rendering.
Tip
Downloading the example code
You can download the example code files for this book from your account at http://www.packtpub.com. If you purchased this book elsewhere, you can visit http://www.packtpub.com/support and register to have the files e-mailed directly to you.
One of the common misconceptions about photorealistic modeling and rendering is that it requires very detailed models before the rendering is effective. This simply is not true with today's software sophistication. The gallery scene you'll be modeling here is simple and easy to produce in SketchUp, just like the majority of rooms in the real world:
Start by firing up SketchUp; then select Model Info from the Window menu.
Select Units from the list on the left.
Set the units to the values shown in the following screenshot. You can use inches if you like, but you may find it easier to follow if you use millimeters:

Close the Model Info dialog window by clicking on the red X button.
Start modeling by selecting the Rectangle function from the Draw menu.
Click on the origin and draw a rectangle of any size. Click on the left-mouse button to place the opposite corner and create the rectangle.
Now, type in
4000,10000. This appears in the little text box at the bottom-right corner of the screen (VCB). Hit Enter, and your rectangle will resize to 4,000 mm by 10,000 mm (4 x 10 meters).
Rotate the view by pressing the middle-mouse button (MMB or scroll wheel) and moving the mouse. Now, select the Push/Pull tool and click on the rectangle, moving the mouse to extrude the rectangle into a box, as seen in the following screenshot:


Draw a rectangle on the end face, as shown in the previous screenshot.
Now, select and delete the face (hit the Delete key or right-click and select Erase from the context menu).
Triple-click on the geometry. Notice how all the connected faces are now selected.
Right-click and select Reverse Faces. The outside faces will now be drawn in a darker shade. We need to do this because we're going to place the camera inside the room you've just created.

You're now going to set up the camera view and sun lighting. You might have noticed that there are very few actual camera buttons in SketchUp. This is because SketchUp is all about "what you see is what you get". If you see it on the screen, this is what you'll see in your render. All the complex camera stuff is taken care of in the background, and the right settings will be exported to the renderer without you or me having to worry about it. We will look at how to set up scenes for maximum impact in Chapter 3, Composing the Scene.
The following are the steps to set up a view interactively:
Rotate and zoom in on the view so that you're more or less looking at the scene, as shown in the following screenshot.
Navigate to Camera | Walk.

Type in your eye height in mm (say,
1200). The camera changes to a view from this eye level. A lower viewpoint will make the room look a bit bigger.Navigate to Camera | Look Around to move your head around and compose the view you want, and use Walk to move in or out of the scene by holding the left-mouse button and moving the mouse up or down.
Now that you're happy with the view you have created, you need to save it so that it can't be changed by accident or while doing further modeling tasks. You do this by creating a scene that will be imported into the rendering software as a camera view:
Navigate to Window | Scenes.
Press the "Plus" icon in the pop-up window. A new scene is created, and a tab called Scene 1 will appear at the top of the main viewing window.
Rotate your view now with the middle-mouse button, then click on the tab. You are taken back to the view that was used when you created the scene. Scenes retain their view settings as part of their options.
We want to get some direct sunlight in through the window to bounce off the wall and floor. Within SketchUp, the "sun" only lights up areas that are not obstructed, and there is a sharp contrast between light and dark. In the renderer, the sunlight will bounce into the whole room. There is more on lighting in Chapter 8, Photorealistic Rendering. You can change the lighting and shadows in a scene by changing the Sun's position via date and time as explained in the following steps:
Navigate to Window | Shadows to activate the Shadow Settings panel, as shown in the following screenshot:

Click the icon in the top-left corner of the panel to switch on the display of shadows.
Move the sliders around for Time and Date until you get the effect that is similar to the previous screenshot.
When you have found a nice setting, click on the Update icon from the Scenes panel and confirm to update all the settings in the popup window. Shadow settings are part of the scene information, and by updating the scene now, you can return to your settings later just by clicking on the scene tab.
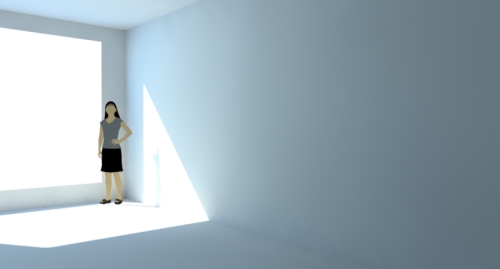
You now have all the lighting you need for a daytime indoor scene. The following screenshot is what you would get if you did a quick test render in Thea Render. As you can see, the whole room is lit by the sun, just as it would be in real life:
You will now add some flooring materials straight from the ones included in SketchUp. In Chapter 5, Applying Textures and Materials for Photorealistic Rendering, we will look at creating and obtaining many more materials from photos and online texture banks. For now, let's stick to what's already there, so you can see how good a render you can get straight out of a basic, no frills, SketchUp model.
In SketchUp, materials are applied with the paint bucket tool. You only need to select the right material or color and "pour" it onto a surface:
If the Materials pallet is not visible, navigate to Window | Materials to enable it.

Select Wood from the drop-down box.
Select a wood material by clicking on one of the thumbnail images. Your cursor will change to a Paint Bucket symbol.
Click on the floor to apply the material. Try a few different wood patterns until you find the one that you like best.
Now, draw a rectangle on the floor for a carpet, as shown in the following screenshot:

Select a carpet texture and paint it onto the raised surface, as shown in the following screenshot:

You've now got two textures in the scene that you'll be able to modify in Thea to add shininess, highlights, or reflections. The matt will stay as it is. You will learn how to add surface details such as the ones in Chapter 8, Photorealistic Rendering. We will look at creating and applying SketchUp materials in more detail in Chapter 5, Applying Textures and Materials for Photorealistic Rendering.
The scene doesn't look realistic with just a hole in the wall. Let's make a window using SketchUp's Push/Pull tool. It will help if you hide the wall and ceiling now. This will allow you to view the room more easily as you progress with the tutorial. You will reinstate them later when they are needed again.
Zoom and rotate out to a bird's eye view of the room.
Select the wall face to the left of the window and the ceiling.
Right-click on one of them and select Hide from the context menu, as shown in the following screenshot:

To create a window reveal efficiently, we have to be a bit creative with the tools that SketchUp offers:
First, use the Line tool (Draw | Line) to draw along the edge of the existing window opening. Make sure that you snap to the endpoints (corners) at the beginning and end of the line.
As soon as the line is completed, SketchUp will close the opening with a new rectangle. Use the Push/Pull tool to push the new rectangle outwards by about 200 mm. This will create a reveal for the window.
Delete the window rectangle again. As you see, the fastest way to create the four sides for the reveal is to create and extrude an extra rectangle that we do not need.
With the Line tool, draw a line out from the edge of the bottom window along the green axis, then down along the blue axis, back to the wall, and back to the start, as shown at the left in the following image.
Select the Arc tool from the Draw menu. Draw an arc as shown in the following image; then, delete the corners with the Erase tool (middle of the following image).
Use the Push/Pull tool to extrude the shape along the bottom of the window in the first part of the image and then from the other direction to form a windowsill, as shown in the following image:

Select the Rectangle tool and move the cursor along the top corner of the window. When you see a Tooltip saying Midpoint, click and draw a rectangle across the lintel.
Use the Arc tool to round off the front and delete the corners as you did earlier.
Use the Push/Pull tool again to extrude the shape down to span the whole window frame.
Create the glass pane by selecting the midpoint of one corner and then the opposite corner with the Rectangle tool, as shown at the right of the following image:

Select this rectangle and apply the Translucent_Glass_Blue material from the Translucent collection with the Paint Bucket tool on both sides of the rectangle (inside and outside). Your scene should now look similar to the following screenshot:

If any wall faces have turned blue, select them now. Right-click on them and select Reverse Faces from the context menu.
Reinstate the hidden faces by navigating to Edit | Unhide | All.
Check if these faces also need reversing.
Double-click on the Scene 1 tab to reset the view to the interior of the room.
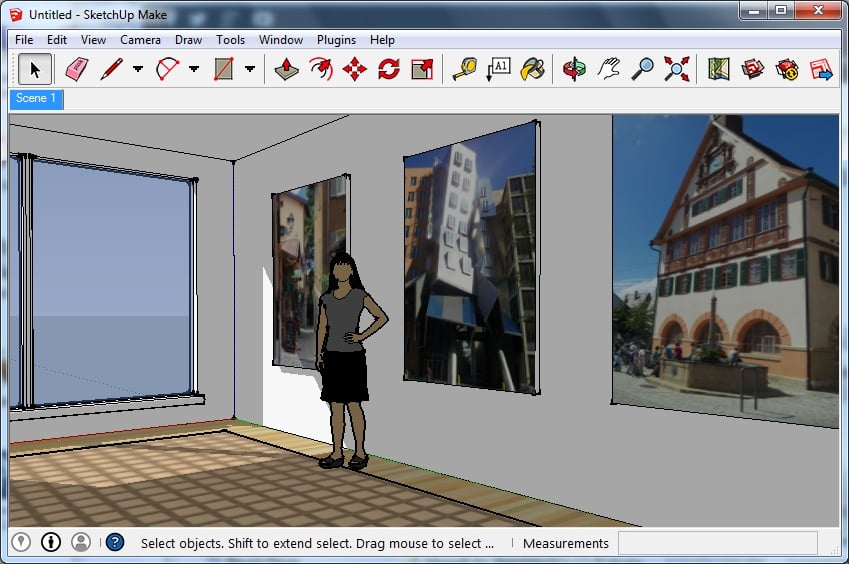
For the artwork on the wall, you can simply grab some images of your own or browse the Web. For this tutorial, it doesn't matter where you get them from. However, if you have some art of your own, why not scan or photograph it and use it here? It can be your own 3D portfolio!
Select Import from the File menu.
Change the Files of type: option to All Supported Image Types.
Choose an image you want to use for your artwork.
Now, move the cursor to the wall and click on it to set the bottom-left corner of the image. Stretch the image to the size you want and click on the wall again, as shown in the following screenshot:

Repeat this for more images. Remember to click on the Scene 1 tab from time to time so that you can see what will or will not be in the frame when you render.
Trace a rectangle around each image. You can snap to the corners of the images to draw accurately.
Finally use the Push/Pull tool to give each canvas some depth. You can see the canvas edge in the following image:

Click on the Scene 1 tab to check your scene from the camera's position. You should have something similar to the following screenshot. Move the person around a bit to give her a better view or remove her altogether if you prefer:
We are already in good shape with our scene. So, the first thing we should do is a test rendering:
Navigate to Plugins | Thea Render | Thea Rendering Window to open the main rendering window within SketchUp.
Below the main window area, you will find the rendering controls. Check if the Mode is set to Unbiased (TR1) on the Rendering tab.
Now, just click on the Start button in the middle (the triangle pointing to the right) to export the scene and get the rendering started.
After a short time, the rendering will appear and will improve gradually. Most likely, it is going to be too dark to see anything, though. While the rendering is still continuing, you can adjust the brightness of the image:
Switch to the Display tab.
Adjust the setting for ISO to 800 or 1600.

Give it a bit of time to render until you have a good idea of the light and reflections; then hit the Stop button at the far right. You should notice the following:
The image aspect ratio is different from the SketchUp view
The floor is not as reflective as we would expect from a polished laminate
The light is diffused near the window, and the shadows are not sharp as we see in SketchUp
This is not too surprising since at the moment, all materials have the same properties (except for the window that is translucent). To improve the image, we have to define some additional properties for the materials.
In order to produce photorealistic images, we need to improve the optical characteristics of the SketchUp materials. Without any special assignment, SketchUp materials get translated into a default material that only maintains the color and texture from SketchUp. To define advanced properties, we can use the Thea Tool window:
Open the Thea Tool window by navigating to the Plugins | Thea Render menu.
On the Camera tab, change the Aspect ratio to SU Window.
Click on the Materials tab. You will see the materials dialog shown in the following screenshot:

In the drop-down menu at the top, select the Translucent_Glass_Blue material. This is the material we used for the window.
In the drop-down menu below the preview area, select Thin Glass.
Click on the SU button to the right of the Color label. A new (blue) button will appear next to it.
Click on it to open a color selector.
Pick a white color from the palette and click on OK to close the selector.
You can leave the remaining options for the glass material as they are.
Next, select the material you used for the floor (Wood_Floor_Light in our case).
In the second drop-down, pick Thea Material (Mat-Lab).
The Thea Material Lab window will open and show a preview of the material as it is. You can see this in the following screenshot:
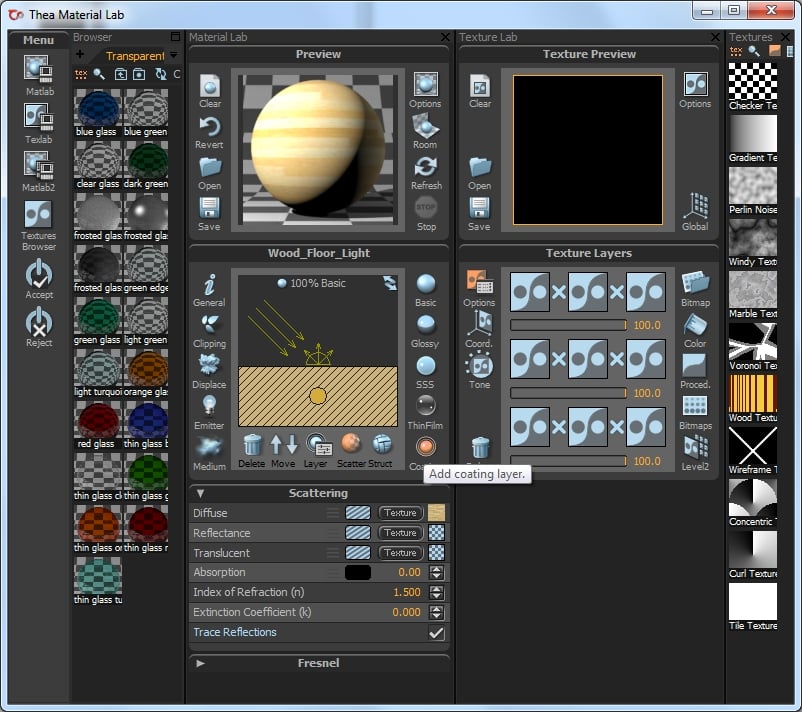
Below the Preview panel, you will find the material properties panel. Find the Coating button in the bottom-right corner of the window and click on it (only once!).
A new layer will be added to the material built up, and the preview window should update in a short time. You can see the change in specular highlights in the preview.
Click on the Accept button to the left of the Material Lab window to apply your changes and close the window.
Finally select the carpet material (Carpet_Pattern_LeafSpares_Tan).
Select Matte as Thea material type.
Increase the Bump value to 50%.
With these changes, we have addressed the issues we noticed in our first test render. We are ready to give it another go!
Open the Thea Rendering Window again.
Check if the rendering mode is still set to Unbiased (TR1).
Press the Start button. The scene will be exported again, and a new rendering process starts.
Let the rendering continue for a while until you can make out a few more details.
If you find that the rendering is too bright or too dark, switch to the Display tab.
Adjust the ISO, Shutter, and f-number settings until the image is reasonably lit. You can see a possible combination in the following screenshot:

When the image quality has progressed sufficiently, you can check the issues we noted earlier. You see that the sunlight through the window is now clearly defined; there is a bit of specular reflection visible on the floor, and the carpet does not seem to reflect the light anymore.
The rendered image will progress in the render window. With each new pass, the image will look a bit better. The unbiased rendering process will continue like this but it will never finish. You can set Limits for Time or Samples on the Rendering tab to terminate the rendering after a specific time, but you can also just stop the calculations when you think that the quality of the image is sufficient:
Either wait for your Limit to be reached, or click on the Stop button to interrupt the rendering.
Click on the Save Image button at the far left of the screen, and choose a name and file type for the rendered image. PNG is usually ok.
This chapter was designed to give you a taste of how easily and quickly you can get great photorealistic results with the SketchUp and Thea Render combination.
In particular, you have learned the basic steps towards modeling a simple indoor studio scene and setting up a daylight environment in SketchUp. You have also used the Thea Render plugin to assign advanced optical properties to SketchUp materials and created a photorealistic rendering without leaving the SketchUp interface.
This is the basic framework for achieving successful renderings of most interior and outdoor scenes. You're now able to immediately apply what you've learned in your own projects. The remaining chapters in this book provide additional information when you want to take your skills a step or two further. You can dip in whenever you need some specific guidance or follow the chapters in a course format.
In the next chapter, you'll find out how to create your own visualization and animation studio setup to create even better architectural visuals!