


 Download code from GitHub
Chapter 1: Getting Started with Shopify
From the very dawn of the internet, people saw the convenience of having information available at their fingertips. Ever since, people have been working hard on creating various internet applications and comprehensive services that will make our lives easier, and with these came e-commerce stores. Consequently, Shopify was born.
The first chapter sets a solid foundation for understanding what Shopify is and how it all works which, as practice shows, we often skip. The approach of cutting the theory and jumping straight into the syntax might sound tempting. However, even the tiniest ripples can cause considerable problems in the long run. While we will not go much into how Toby Lutke created Shopify, in this chapter, we are going to cover the following main topics:
- What is Shopify?
- How to start?
- Navigating the admin panel
- Managing a theme
- Understanding theme structure
By the end of this chapter, we will not only have learned what Shopify is, but we will also learn how to create an account under the Shopify Partners Program, create a development store to practice on, learn to navigate Shopify admin, and create a child theme and understand its structure. With this knowledge, we will have a solid foundation of how all these essentials will allow us to embark further on our learning journey to customize a theme on Shopify.
What is Shopify?
Whether a developer or through general use of the internet, chances are that the name Shopify has come up at least once, but what is Shopify? Shopify is a multinational e-commerce company based in Ottawa, Canada, that offers various comprehensive services to its clients. This subscription-based service provides everything from buying the domain to building and managing a future dream store with ease.
Over the years of its existence, Shopify has proven that it is not just another store builder or a tool to sell products. Instead, it has established itself as an e-commerce powerhouse that allows anyone to build the store and create a unique experience for their shoppers. Being a template-based store builder, Shopify offers various free or paid themes to enable store customization, enabling you to use the intuitive and straightforward theme editor without any development knowledge. However, if the end goal is to create an utterly unique store with various customization options at our fingertips, then we will require a developer with Liquid knowledge to customize the theme and create additional options inside the code editor.
How to start?
The first step toward learning and working on Shopify requires us to learn about the Shopify Partners Program. The Partners Program is a platform created by Shopify that assembles people from all over the world and offers them the ability to build new e-commerce stores for store owners, design themes, develop apps, and refer new clients to Shopify. One of the most enticing extensions of the platform is that it will allow us to create a development store to practice our Liquid knowledge.
Before creating our Development store and familiarizing ourselves with Shopify, we will first need to create an account within the Shopify Partners Program. Creating the account is a relatively straightforward process, which we can start on the following page: https://www.shopify.com/partners:
- We can begin the process by clicking on the Join now button in the top-right corner of the header or by clicking on the Log in button to access an existing account. After filling in the basic information on the create account page and the subsequent Account Information page, we will get our first view of the Partners dashboard:

Figure 1.1 – Example of a Shopify partner dashboard
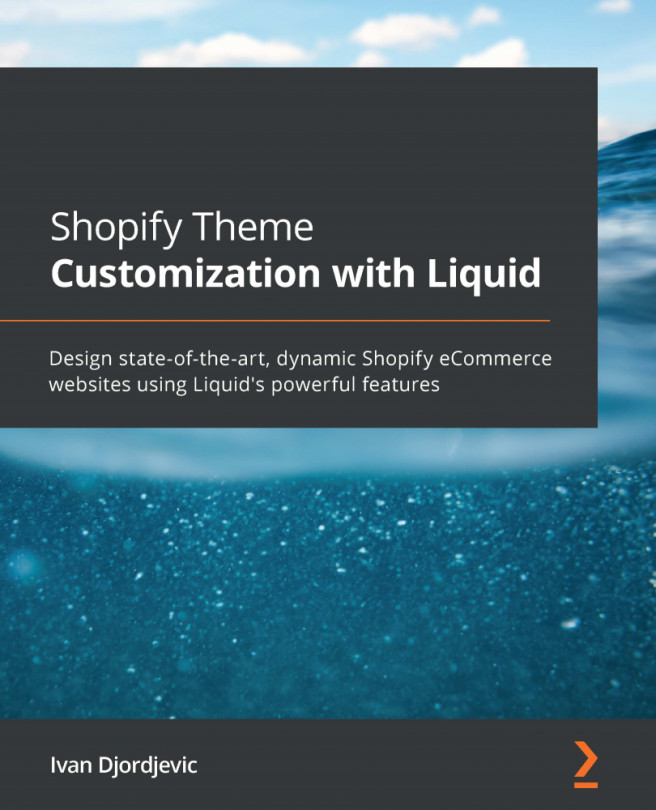
- After creating an account, the next step will be to create our Development store. We can do this by visiting the Store link in the upper-left sidebar and pressing the Add store button, which will prompt a store registration form that we will need to fill in:
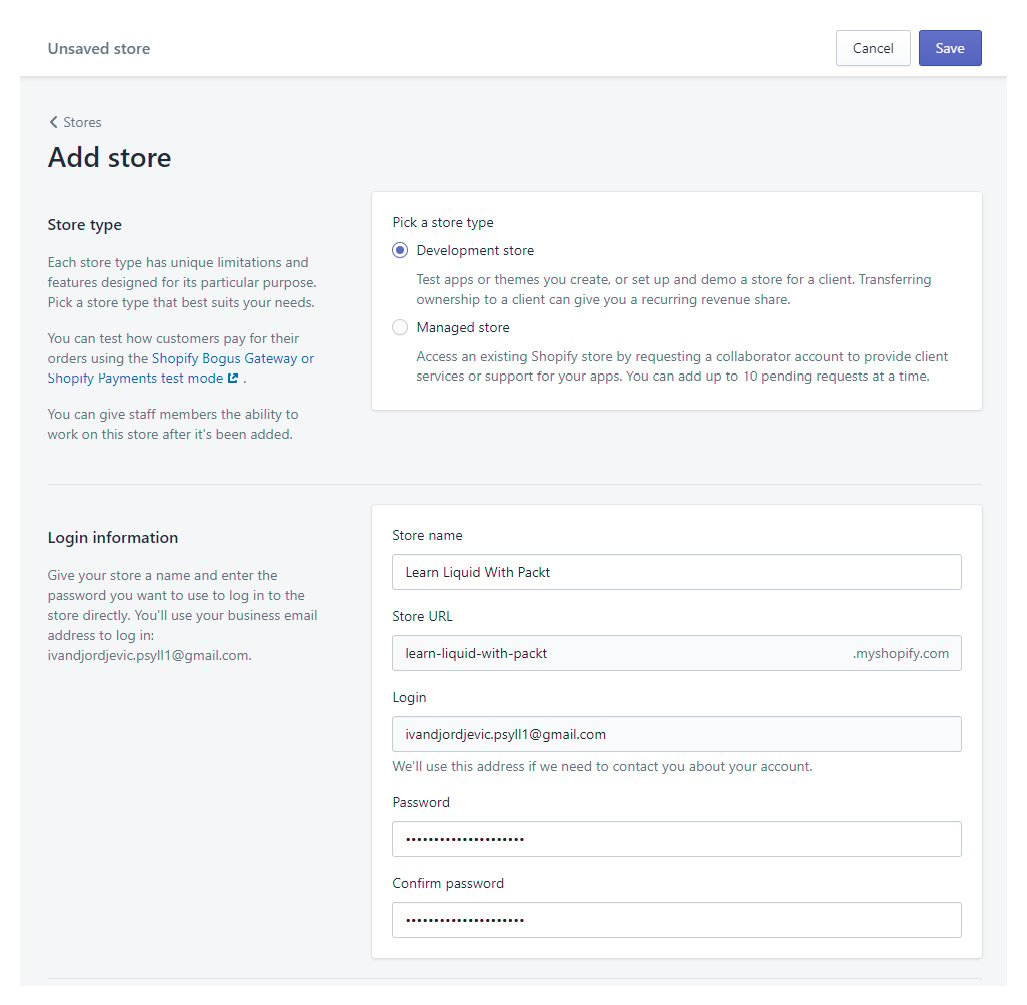
Figure 1.2 – Example of creating the Development store
Most of the options require no simplification as they are self-explanatory, but we will need to analyze the most important one, Store type, which consists of two options:
- Development store
- Managed store
For our learning purposes, we will be using Development store. However, we will also provide a short explanation of what the Managed store option means and when we can use it.
The Managed store option will enable us to request collaborator access to an existing store. Selecting this option will prompt another section named Permission, where we will need to choose the type of access that we are requesting. Generally, we can choose to request access to all areas of the client store. However, to perform theme customization on a client store, we will need access to the Themes option under Online store.
Once we have selected the permission level that we require to perform the work and have entered the URL of the store that we are requesting access for, all that is left is to send the request by pressing the Save button. The store owner will receive a notification of the store access request and then choose to grant or deny access.
The Development store options will allow us to create an entirely new store where we can practice our Liquid skills, test out new features before they are rolled out to the Shopify live storefront, or create a new store that we can later transfer to our client.
Important note:
While creating the Development store is completely free of charge, in transferring the store to the client, the theme will automatically lose development status. The person to whom we have transferred the ownership will need to select a recurring plan for which the developer who initially created the theme will receive a recurring commission for as long as they are paying for their subscription plan.
Let's create our development store by selecting Development store as the store type and filling in the store information.
Tip:
The developer preview is a new feature that Shopify has rolled out recently and will allow us to preview the innovations they are rolling out before they hit the live storefront. However, we will abstain from using this option.
Once you have filled in the login information, store address, and have selected the purpose of the store, press the Save button to create your store.
Success! Our store is ready to go, and with it, we are ready to proceed to familiarizing ourselves with the Shopify admin panel.
Navigating the admin panel
With the creation of a new development store, we will get the first glimpse of our store home page. The home page consists of the middle screen, which will contain some general advice for store owners to start their business, daily tasks, recent activity, and, on the left side of the screen, we will see the sidebar, which will be our primary focus.
Figure 1.3 – Example Shopify admin home page
While we will not go into much detail straight away, it is imperative to have a basic understanding of each area of the store that we will be referencing later through different chapters of the book. We will split the sidebar into three sections for ease of reference, and we can list them as follows:
- Core aspects
- Sales channel
- Settings
Core aspects
The first section, Core aspects, contains the store-related options that the store owner generally uses, and this includes the following information:
- The Orders section contains all the information regarding the orders that the store owner has received. It is here that the store owner can preview each order individually and decide whether they would like to proceed with it. The owner may also manually create orders using the draft method and preview the abandoned checkout.
- The Products section consists of four separate areas that allow us to create and manage products, handle incoming inventory for the existing products, create and manage collections or product categories if you prefer, and create gift cards.
- The Customers section, as the name suggests, allows us to create and manage our customer database. This section, along with the previous Products section, will be of particular interest to us. We will return to them later with a detailed explanation of some of their functionalities that will be of interest to us.
- The following section, named Analytics, will primarily be used by the store owner. It offers a great deal of information regarding the store's performance, such as a detailed report on sales, along with a live view of the customers visiting the store and their behavior.
- The Marketing section, as its name suggests, allows us to view the store market strategy overview. We can create and manage campaigns via emails or other social networks and create automation to increase the store retention rate.
- We can use the Discount section to create a discount coupon code that we can share with our customers to manually enter the checkout to receive a discount on their complete order or a specific product. Additionally, we can make an automatic discount that will automatically trigger once we fulfill the requirements set by the store owner.
- The last section, named Apps, grants us a quick preview of all the apps installed on our store where we can manage or remove the apps if we choose to.
Important note:
Due to the Shopify platform's limitations, it is impossible to combine the discounts. If we have qualified for the automatic discount of 10%, we will not be able to enter the manual discount coupon code for free shipping that we have previously received from the store owner.
Tip:
While it is possible, you should never install an app on your own when working under a collaborator account on the managed type of store. Suppose you require a particular app to perform a task entrusted to you. In that case, you should reach out to the store owner, explain the need for it, and ask them to install it for you before proceeding, as they will need to grant specific permissions and share the store data with the app that should be reviewed and accepted by the store owner.
Sales channel
The second section of our sidebar, Sales channel, represents the various platforms we can use to sell our store products. By default, the only visible channel is Online store, which will be our primary objective; however, we can easily add more by clicking on the plus button next to the sales channel.
The Online store channel is the heart of the store as it provides us with the ability to output a visible storefront for our customers, and we can break it down into six individual sections:
- The Themes section allows us to manage our store look by customizing our store theme to our unique brand. The first thing that we can sometimes see once we open the Themes section is the note from Shopify that our online store is password-protected, meaning that the store is not yet visible to our customers. While password protection is in place, every visitor who tries to view our store will only see a notification that the store is password-protected and is currently inaccessible.
Important note:
We can easily disable password protection by clicking the See store password button on the password protection note in the Themes section or by visiting the Preferences section in the Online Store section. However, considering that we have selected the development option as our store, disabling password protection is unavailable. We can only remove password protection after transferring the store to our client or purchasing a subscription plan of our own.
After the password protection note, the next area that we can see under our Themes section is named Current theme. This section shows us the name and a small preview of the current theme, followed by the Online store speed section, which provides us with our store's speed report. The Online store speed section is currently disabled for password-protected stores.
Following the previous section, near the bottom of the screen, we can find the last section named Theme library. We can easily explore free and paid themes within this area by selecting their respective links or uploading our custom-made theme by choosing the Upload theme button.
- The Blog posts section allows us to manage and create blog posts that we would like to show on our store and categorize them under different blogs.
- The Pages section allows us to create multiple pages that our customers will be visiting frequently, such as the About us or Contact us pages, or the pages supporting our products by offering in-depth information. For more information on managing pages, refer to https://help.shopify.com/en/manual/online-store/pages.
- Inside the Navigation section, we can find the necessary tools that will allow us to create navigation with up to two-level nested menus that our customers can use to navigate our online store. For information on creating the navigation menu and managing the link list, refer to https://help.shopify.com/en/manual/online-store/menus-and-links.
- The Domains section shows us our current primary domain, which uses the format
my-store-name.myshopify.com. Additionally, we can purchase a custom domain by using the Buy new domain button, or if we have obtained a domain through a third party, we can then set that as our primary domain. For more information on domains, refer to https://help.shopify.com/en/manual/online-store/domains. - The last and final section under our Online store channel is named Preferences. As most of the options under this section are self-explanatory, we will not be going into too many details to keep the book to the point. However, if you would like to read more about each of them, you can visit their respective pages, which we will list, to get additional information. The Preferences section allows us to regulate some important settings that will help the store owners with their future store, and we can list them in the following way:
- Title and meta description: For detailed information on the title and meta description, refer to https://help.shopify.com/en/manual/online-store/setting-up/preferences#edit-the-title-and-meta-description.
- Social sharing image: For detailed information on social sharing images, refer to https://help.shopify.com/manual/using-themes/change-the-layout/theme-settings/showing-social-media-thumbnail-images.
- Google Analytics: For detailed information on Google Analytics, refer to https://help.shopify.com/manual/reports-and-analytics/google-analytics.
- Facebook Pixel: For detailed information on Facebook Pixel, refer to https://help.shopify.com/manual/promoting-marketing/facebook-pixel.
- Customer privacy: For detailed information on customer privacy, refer to https://help.shopify.com/en/manual/your-account/privacy/cookies.
- Password protection: For detailed information on password protection, refer to https://help.shopify.com/manual/using-themes/password-page.
- Spam protection: For detailed information on spam protection and usage of Google reCaptcha, refer to https://help.shopify.com/en/manual/online-store/setting-up/preferences#protect-your-store-with-google-recaptcha.
Settings
The third and final section of our sidebar, named Settings, contains many options to help store owners set up and run their store. Due to the significant number of sections and subsequent options inside Settings, we will not be covering all of them, but we will mention some of the options that will be of interest to us in some of the following chapters of the book.
Managing a theme
We have already mentioned this topic under the Themes section, but what is a theme? The theme is a master template file that controls your store layout, which allows us to change the storefront layout by editing the code or editing the theme editor settings through this template.
By default, a debut theme is automatically added as a starting theme when creating a new store. However, for our learning purposes, we will try and install a theme of our own:
- The first thing that we need to do is to position ourselves in the Themes section inside the Online store sales channel. Once inside, scroll down until you reach the area named Theme Library and search for and click on the button called Explore free themes:

Figure 1.4 – Exploring the free Shopify theme
- By pressing the Explore free themes button, we will see a popup containing the eight free Shopify themes to add to our store and the Debut theme, which we already have installed and is marked with the label Current:

Figure 1.5 – Selecting the free Shopify theme named Minimal
- While we can choose any of these themes, let's select the second column theme inside the third row called Minimal by clicking on it.
As with most themes, the Minimal theme contains multiple styles, such as Modern, Vintage, and Fashion. While all of these are great choices, we will select the Modern option for our learning purposes. Once you have chosen the Modern option, click on the Add to theme library button to finalize the process and add the newly selected theme to our store's theme library:

Figure 1.6 – Selecting the style for the selected theme and adding it to the theme library
Depending on your internet connection, it might take a few seconds while Shopify loads in your new theme, after which you will receive a notification that the Minimal theme was successfully added to your store. Even though we have added a new theme to our store, the Debut theme is still our live theme, whereas if we look under the theme library, we will see our newly added Minimal theme. To change that, we will need to set our new theme as the current theme.
- We can publish a new theme live by scrolling down to the theme we are looking to publish live. In our case, that theme is Minimal. Click on the Actions button and then click on the Publish button, after which a popup will appear asking for confirmation to publish the Minimal theme live. Press the Publish button for the second time to confirm our choice, which will automatically publish and set the Minimal theme as our store's current theme:

Figure 1.7 – Publishing a new Shopify theme live
- Now that we have installed the new theme, it is time to preview how our new theme looks in our store. We can do this by clicking on the Actions button:

Figure 1.8 – Previewing the theme storefront
However, this time, the Actions button we should click on will be on our current theme, not our theme library, and then select the Preview button, which will open our store preview in a new tab.
As we can see from the preview page that has opened for us, the storefront does not look appealing, as it lacks content. We can only see some default sections with placeholder images.
- Before we make any changes to our storefront, we should first create a duplicate theme to test our changes without the fear of it crashing our live storefront and causing us harm. However, before we start the duplication process, let's return the Debut theme as our current theme by publishing it live again. We like the Debut theme more in any case, plus it will help us practice what we just learned.
Tip:
Creating a new duplicate theme should be our number one thought before making any major modifications to our theme. Having multiple theme duplicates will help us pinpoint any potential issue caused by an app or a simple oversight that will break our live storefront, which will inevitably happen at some point.
- After setting the Debut theme as our current store theme, click the Actions button on our current live theme and then click on the Duplicate button to start the theme duplication process:

Figure 1.9 – Starting the theme duplication process
Considering that this is a newly installed theme without any content, the duplication process should not take too much time. After the process is complete, you will notice that we added a new theme to our Theme library, named
Copy of Debut.Important note:
Creating a duplicate theme each time you decide to make a significant modification is encouraged. However, we should keep in mind that Shopify only allows up to 20 duplicate themes per store. After we reach that limit, we will receive a notification that we have reached a limit of 20 duplicate themes per store. This limitation will also prevent us from creating a new theme duplicate, and if we want to make another one, we will need to delete some of the older theme duplicates that we no longer use.
- By default, Shopify will automatically take the name of the theme we are duplicating and add the words
Copy ofin front of it. In view of the fact that having multiple similarly named themes can quickly get out of hand, we should immediately rename our new theme to avoid potential future confusion. - Click on the Actions button on our newly created Copy of Debut theme, and select the Rename option:

Figure 1.10 – Example of renaming the theme and its confirmation
This action will automatically prompt you with a popup where you can enter a new name. Shopify provides us with up to 50 characters to name our new theme, which gives us plenty of space to select a proper name. You should include supplementary information such as the date and what customization it contains. In our case, we will name the theme Debut - Learning Shopify - 19 Apr '21, and after, we will click on the Rename button to confirm our choice.
Now that we have learned how to create and rename a duplicate theme, it is time to dive into our newly created theme and learn more about how it works.
Understanding theme structure
To start familiarizing ourselves with the theme structure, we will first need to open the code editor. We can open the code editor by clicking on the Actions button on the Debut - Learning Shopify - 19 Apr '21 theme and then clicking on the Edit Code button, where we will have the first view of our code editor.
We can divide the code editor into the following two sections:
- Header
- Sidebar
Header
We can find the Header section at the top of the page, and it contains the name of the theme with the arrow button to exit the editor on the left side and three buttons on its right side, named as follows:
- Preview
- Customize theme
- Expert theme help
Preview
The first button on our list, the Preview button, will allow us to quickly preview the duplicate theme that we are working on and any changes that we have made. While the current preview of our theme contains only placeholder content, it does contain one element that will be of great use to us, the preview bar:
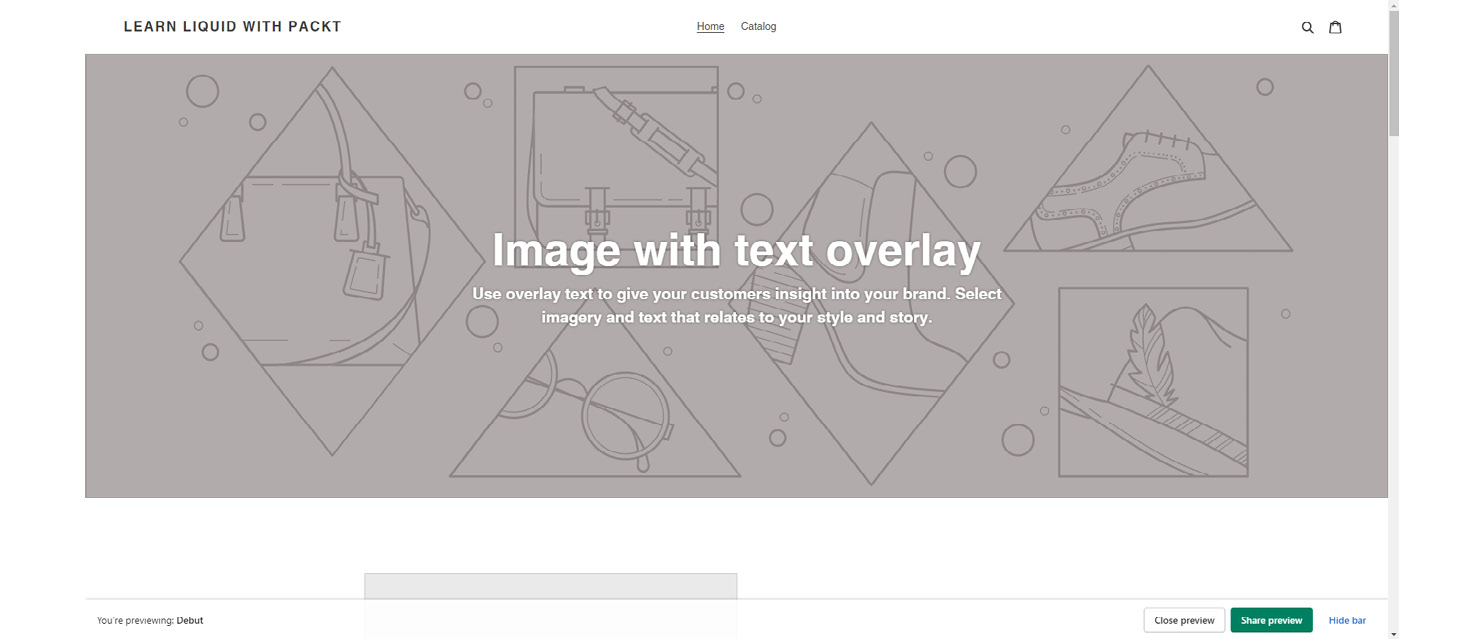
Figure 1.11 – Example of the preview screen and preview bar
We can find the preview bar at the bottom part of our preview screen, and it contains the name of the theme that we are previewing on the left side, and on the right side, it includes three buttons:
- The close preview button will automatically close our duplicate theme preview and redirect us to our live theme's home page.
- Clicking the Share preview button will trigger a popup that we can share with anyone to provide them with a glimpse of the changes we make on our same theme. While anyone who possesses this link will be able to view all aspects of your new theme, they will be unable to complete any purchases or reach the checkout page. In addition, the autogenerated preview link will only last for 14 days, meaning that after 14 days, you will need to generate a new preview link by repeating the preview steps and share it again with whomever you choose to.
- The last button in our preview bar is called Hide bar, and, as its name suggests, it allows us to hide the preview bar so that we can preview our changes without any visual obstacles. Note that the preview bar will automatically show itself when refreshing the page.
Customize theme
Under our editor's Header area, the next item is the Customize theme button, which will open another different kind of editor, a theme editor. Inside this editor, we can update some of the theme settings, such as typography, colors, and media links, and even manage the storefront sections.
Expert theme help
Finally, the Expert theme help button is something that the store owners will be using to post a job request using the Shopify Partners Program, whereby, at the end of this book, you will be in waiting as a Shopify expert.
Sidebar
The second section inside the code editor, Sidebar, lists all the files and directories we will be referencing; however, at the moment, we are unable to see all the directories. We can resolve this by clicking on the Layout and Templates directories to collapse them:

Figure 1.12 – Collapsing the directories inside the code editor
After collapsing the two directories, we will notice that the two arrows inside the directory icon are now gone and that we can now see the additional four directories that our theme contains. The Shopify theme contains the following directories:
LayoutTemplatesSectionsSnippetsAssetsConfigLocales
Layout
The Layout directory is the main directory of our theme as it contains the essential files that our store requires to work. This directory usually contains up to four files, which we can call theme layout templates, described as follows.
gift_card.liquid
gift_card.liquid is a template file containing the code that renders the gift card page and is later sent to our clients via email notifications when they purchase a gift card.
password.liquid
The password.liquid file template renders the online store password page that any of our customers will see if they visit our store while the store is in development mode. We mentioned what password protection is and how to disable it back in the Navigating the admin panel section when discussing Sales channel and its Online store area.
To better understand the password protection page, let's try and preview it to see how it works. You can preview your store password page by combining the URL of your store, https://my-store-name.myshopify.com, and adding the word /password at the end.
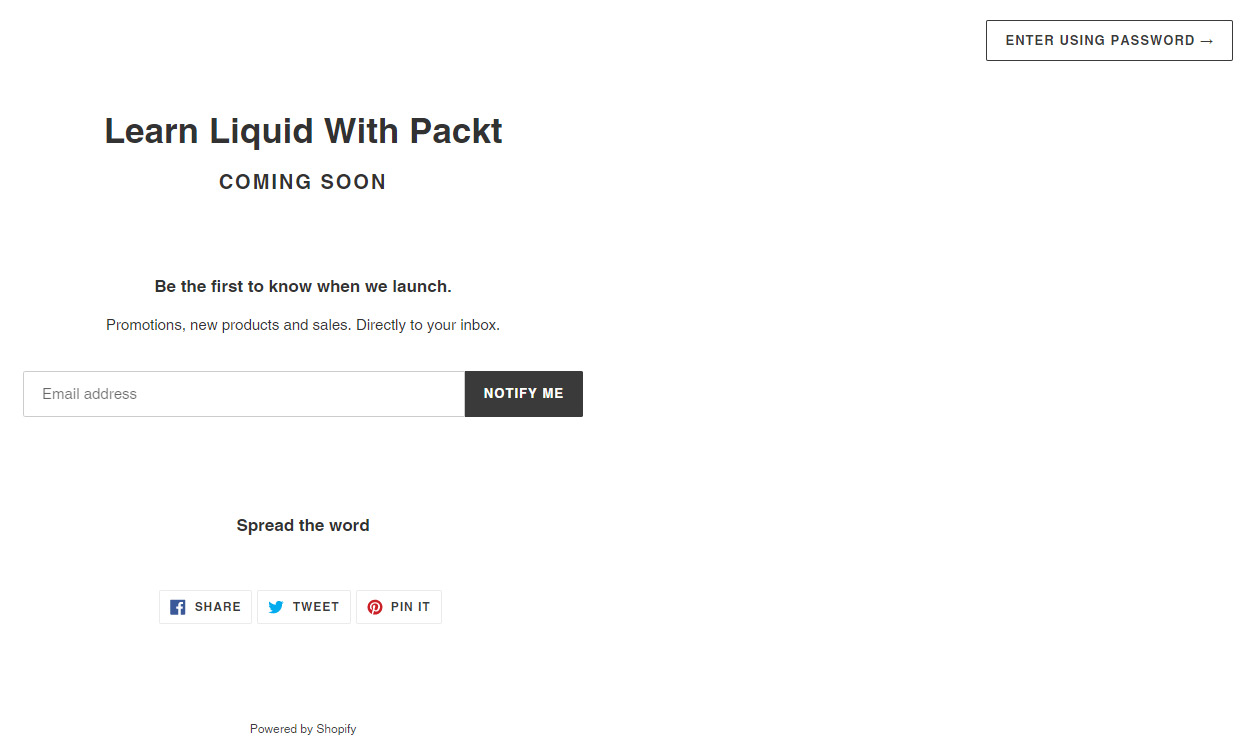
Figure 1.13 – Example of a Shopify password protection page
As we can see, password protection contains only the most basic information. However, it is successfully doing the work that we designed it for by preventing people from viewing our password, still in the Development store.
In the top-right corner of our password protection page, we will notice a button, ENTER USING PASSWORD, that will launch a popup where we can log in to our store using our store owner credentials and then click on the Log in here link, which will redirect us to our admin panel:
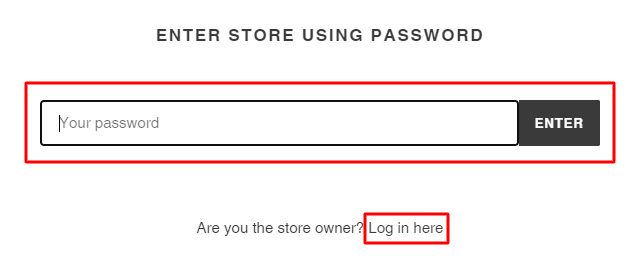
Figure 1.14 – Password page login form
However, what if we wanted to preview our theme storefront by entering the password? The password that this form is requesting is the same password that we have set to enable our password protection page. In our case, it was automatically generated by the system when we selected the development option as our store type.
To ascertain our password protection page's password, we need to return to our admin panel by typing https://my-store-name.myshopify.com/admin in the URL of our new browser tab. Once inside, in the left sidebar, under Sales Channel, expand the Online store field by clicking on it and then click on the Preferences option. Under the area named Password protection, you will find the password needed for our password page form to gain access to our storefront:
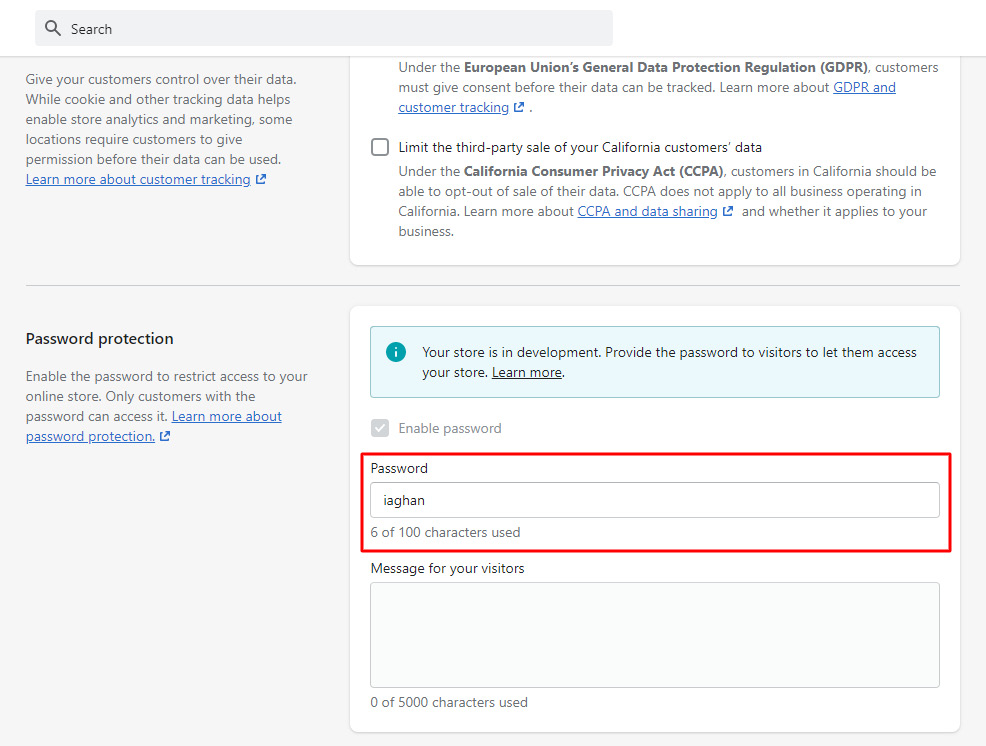
Figure 1.15 – Password protection page settings
Suppose we were to return to our password protection page and enter the password that we have found. In that case, the password protection page will be temporarily suspended for us, and the store will redirect us to the preview or live theme storefront, depending on the type of link we have initially opened.
theme.liquid
Back inside our code editor, we can consider our next item on the list, named theme.liquid, as the master layout file in which all other template files and any other element that we will learn of later will be rendered.
checkout.liquid
The last layout file on our list, named checkout.liquid, is not currently visible on our Development store. This layout file is only visible to the Shopify store owners who have purchased the Shopify Plus subscription.
Usually, each theme contains a set of predefined options that will allow us to make some basic styling changes to our checkout page. However, with the checkout.liquid layout file in our possession, we will have access to our checkout file, where we can create some more complex modifications that we would otherwise not be able to do.
Note that even with the checkout.liquid file in our hands, we will not be able to modify the flow of the checkout page process due to security reasons. We will only be able to make some basic modifications that will not interrupt the checkout flow.
We can only activate the Shopify plan by submitting a request to Shopify support. After reviewing our application, they will generate a custom price for enabling this unique plan in our store.
Important note:
Even though you have activated the Shopify Plus plan on your store, the checkout.liquid file will not be visible immediately. Instead, you will need to submit a request to Shopify support and ask them to include this unique file in your store.
For these reasons, we will not be going into too much detail regarding the checkout.liquid file. However, we will cover the how-to and most essential elements that the layout files contain, which should set us on a proper path of understanding layout files. For more information on editing the checkout file, refer to: https://shopify.dev/themes/architecture/layouts/checkout-liquid
Templates
The next point on our theme directories list is Templates, a group of files that allows us to create and manage the look of multiple pages all at once. Templates files consist of two types of files:
- The first type of
Templatesfile is a.jsontype of file, which is a new addition to Shopify. Using the.jsontype of template, we can easily control the layout of any page through the theme editor. However, for better understanding, we will not go into too many details right now. It will be far more productive to cover the.jsontemplate and its possibilities in some of the following chapters. - The second type is a
.liquidtype of file, which is a simple markup type of file with which we will familiarize ourselves right now.
Practice dictates that each theme comes with one template file for each page type, for example, product.liquid, which the system will automatically assign to any current or future product page that we may create. Considering that Shopify is a template-based file, any change made to a specific template will affect any page to which we have previously assigned this template. However, Shopify also allows us to create additional template files for each page type and customize them further without changing our original template file layout.
We can create a new template file by clicking on the Add a new template button located just below the template's directory, after which a popup will appear, asking us to choose a type and name for our new template file:
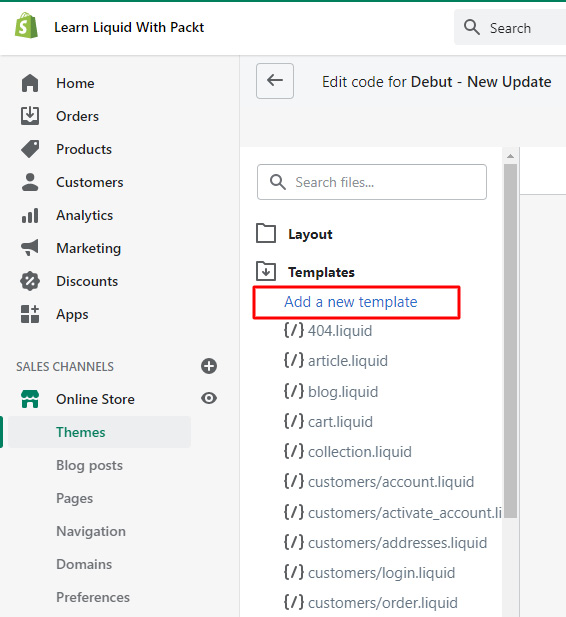
Figure 1.16 – Creating a new template file
After successfully creating a new template file, we can now assign the new template to the page for which we have created the new template. We can do this by opening any page inside our admin panel, depending on the type of page template we have created, and selecting the new template name inside the Template suffix drop-down menu located under the Theme templates area.
Important note:
The Template suffix drop-down menu can only read values from the current live theme. What this means is that the newly created template file will not be visible in our admin until we either publish our duplicate theme live or create the same template file within our current live team. If we opt for the second choice, note that we need to create the file with the same name; we do not have to make any changes to the file's content.
If we do not see the Theme templates area in our admin, we should confirm that we are on the right page by checking which template type we have created, as the Template suffix drop-down menu will only be visible on the pages that have more than one template created.
Sections and snippets
The next point of interest within our list of directories is called Sections, a different type of template file that, when combined with template files, allows us to create the genuinely customizable features for which Shopify has become famous. Note that any variable created inside the section will not be accessible outside the section, and vice versa. The only exception to this rule is that it offers a one-way communication if a section includes snippets.
The Snippets files allow us to re-use repetitive pieces of code over Templates/Sections by referencing their names. Besides allowing us to re-use parts of code, Snippets will enable us to access the variables inside the parent element as long as we pass those variables to the snippet as a parameter.
Assets
As the name suggests, the Assets directory allows us to store any theme-related assets, including images, font files, JavaScript, CSS files, and references them easily throughout the theme files.
Config
The Config directory is vital within our theme. Within this directory, we can define and manage the global JSON values for our theme. The directory consists of two key files:
- The
settings_schema.jsonfile allows us to create and manage the content inside the theme editor on our theme, which we can reference throughout the entire theme file. - The
settings_data.jsonfile, on the other hand, records all the options defined in our schema file and saves their values. You can consider this file as your theme database, which will allow us to preview the current JSON values or modify them by updating the theme settings under the theme editor, or by directly editing the values inside thesettings_data.jsonfile.
Locales
The last directory on our list, named Locales, contains the theme locale file, which we can use to translate the content of our theme. The number of files that this directory may contain can vary. It can have one default file, en.default.json, or it can include multiple files depending on how many languages you would like to offer on your store.
Summary
In this first chapter, we have covered the essential aspects of Shopify by learning what Shopify is and how to create an account on the Shopify Partners Program, which we will use through our learning process, as well as for any future work on the Shopify platform.
We have created a development store and have also understood how and why it is crucial to create a duplicate theme before making any significant changes. While some of the things we have covered might sound irrelevant, each of these will help us to better understand the workflow that we will be doing regularly as a Shopify developer.
Lastly, we have acquired some knowledge of the internal structure of our theme files, which will be of great use to us in the following chapter, where we will be familiarizing ourselves with the fundamentals of Liquid and further developing our knowledge on theme customization.
Questions
- What is the Partners Program?
- How can we disable the password protection of the Development type store?
- What is the difference between the
LayoutandTemplatesdirectory files? - Under what circumstances will the new template file be visible inside the admin section of your page?
- What types of files and what conditions will allow us to access the variables within the parent file scope?
Further reading
- For additional information and an overview of Shopify admin, refer to https://help.shopify.com/en/manual/shopify-admin.
- For detailed information on managing your store account, refer to https://help.shopify.com/en/manual/your-account.
- For additional information on the online store, refer to https://help.shopify.com/en/manual/online-store.