


 Download code from GitHub
Simple DirectMedia Layer (SDL) is a cross-platform multimedia library created by Sam Oscar Latinga. It provides low-level access to input (via mouse, keyboard, and gamepads/joysticks), 3D hardware, and the 2D video frame buffer. SDL is written in the C programming language, yet has native support for C++. The library also has bindings for several other languages such as Pascal, Objective-C, Python, Ruby, and Java; a full list of supported languages is available at http://www.libsdl.org/languages.php.
SDL has been used in many commercial games including World of Goo, Neverwinter Nights, and Second Life. It is also used in emulators such as ZSNES, Mupen64, and VisualBoyAdvance. Some popular games ported to Linux platforms such as Quake 4, Soldier of Fortune, and Civilization: Call to Power utilize SDL in some form.
SDL is not just used for games. It is useful for all manner of applications. If your software needs access to graphics and input, chances are that SDL will be a great help. The SDL official website has a list of applications that have been created using the library (http://www.libsdl.org/applications.php).
In this chapter we will cover the following:
Getting the latest SDL build from the Mercurial repository
Building and setting up SDL in Visual C++ 2010 Express
Creating a window with SDL
Implementing a basic game class
Each platform has its own way of creating and displaying windows and graphics, handling user input, and accessing any low-level hardware; each one with its own intricacies and syntax. SDL provides a uniform way of accessing these platform-specific features. This uniformity leads to more time spent tweaking your game rather than worrying about how a specific platform allows you to render or get user input, and so on. Game programming can be quite difficult, and having a library such as SDL can get your game up and running relatively quickly.
The ability to write a game on Windows and then go on to compile it on OSX or Linux with little to no changes in the code is extremely powerful and perfect for developers who want to target as many platforms as possible; SDL makes this kind of cross-platform development a breeze. While SDL is extremely effective for cross-platform development, it is also an excellent choice for creating a game with just one platform in mind, due to its ease of use and abundance of features.
SDL has a large user base and is being actively updated and maintained. There is also a responsive community along with a helpful mailing list. Documentation for SDL 2.0 is up-to-date and constantly maintained. Visiting the SDL website, libsdl.org, offers up lots of articles and information with links to the documentation, mailing list, and forums.
Overall, SDL offers a great place to start with game development, allowing you to focus on the game itself and ignore which platform you are developing for, until it is completely necessary. Now, with SDL 2.0 and the new features it brings to the table, SDL has become an even more capable library for game development using C++.
Note
The best way to find out what you can do with SDL and its various functions is to use the documentation found at http://wiki.libsdl.org/moin.cgi/CategoryAPI. There you can see a list of all of SDL 2.0's functions along with various code examples.
The latest version of SDL and SDL 2.0, which we will be covering in this book, is still in development. It adds many new features to the existing SDL 1.2 framework. The SDL 2.0 Roadmap (wiki.libsdl.org/moin.cgi/Roadmap) lists these features as:
A 3D accelerated, texture-based rendering API
Hardware-accelerated 2D graphics
Support for render targets
Multiple window support
API support for clipboard access
Multiple input device support
Support for 7.1 audio
Multiple audio device support
Force-feedback API for joysticks
Horizontal mouse wheel support
Multitouch input API support
Audio capture support
Improvements to multithreading
While not all of these will be used in our game-programming adventures, some of them are invaluable and make SDL an even better framework to use to develop games. We will be taking advantage of the new hardware-accelerated 2D graphics to make sure our games have excellent performance.
SDL has separate extensions that can be used to add new capabilities to the library. The reason these extensions are not included in the first place is to keep SDL as lightweight as possible, with the extensions serving to add functionality only when necessary. The next table shows some useful extensions along with their purpose. These extensions have been updated from their SDL1.2/3 Versions to support SDL 2.0, and this book will cover cloning and building them from their respective repositories as and when they are needed.
This book will cover setting up SDL 2.0 in Microsoft's Visual C++ Express 2010 IDE. This IDE was chosen as it is available for free online, and is a widely used development environment within the games industry. The application is available at https://www.microsoft.com/visualstudio/en-gb/express. Once the IDE has been installed we can go ahead and download SDL 2.0. If you are not using Windows to develop games, then these instructions can be altered to suit your IDE of choice using its specific steps to link libraries and include files.
SDL 2.0 is still in development so there are no official releases as yet. The library can be retrieved in two different ways:
One is to download the under-construction snapshot; you can then link against this to build your games (the quickest option)
The second option is to clone the latest source using mercurial-distributed source control and build it from scratch (a good option to keep up with the latest developments of the library)
Both of these options are available at http://www.libsdl.org/hg.php.
Building SDL 2.0 on Windows also requires the latest DirectX SDK, which is available at http://www.microsoft.com/en-gb/download/details.aspx?id=6812, so make sure this is installed first.
Getting SDL 2.0 directly from the constantly updated repository is the best way of making sure you have the latest build of SDL 2.0 and that you are taking advantage of any current bug fixes. To download and build the latest version of SDL 2.0 on Windows, we must first install a mercurial source control client so that we can mirror the latest source code and build from it. There are various command-line tools and GUIs available for use with mercurial. We will use TortoiseHg, a free and user-friendly mercurial application; it is available at tortoisehg.bitbucket.org. Once the application is installed, we can go ahead and grab the latest build.
Cloning and building the latest version of SDL directly from the repository is relatively straightforward when following these steps:
Open up the TortoiseHg Workbench window.

Pressing Ctrl + Shift + N will open the clone dialog box.
Input the source of the repository; in this case it is listed on the SDL 2.0 website as http://hg.libsdl.org/SDL.
Input or browse to choose a destination for the cloned repository—this book will assume that
C:\SDL2is set as the location.Click on Clone and allow the repository to copy to the chosen destination.

Within the
C:\SDL2directory there will be aVisualCfolder; inside the folder there is a Visual C++ 2010 solution, which we have to open with Visual C++ Express 2010.Visual C++ Express will throw up a few errors about solution folders not being supported in the express version, but they can be safely ignored without affecting our ability to build the library.
Change the current build configuration to release and also choose 32 or 64 bit depending on your operating system.

Right-click on the project named SDL listed in the Solution Explorer list and choose Build.
We now have a build of the SDL 2.0 library to use. It will be located at
C:\SDL2\VisualC\SDL\Win32(or x64)\Release\SDL.lib.We also need to build the SDL main library file, so choose it within the Solution Explorer list and build it. This file will build to
C:\SDL2\VisualC\SDLmain\Win32(or x64)\Release\SDLmain.lib.Create a folder named
libinC:\SDL2and copySDL.libandSDLmain.libinto this newly created folder.
Now a Visual C++ 2010 project can be created and linked with the SDL library. Here are the steps involved:
Create a new empty project in Visual C++ express and give it a name, such as
SDL-game.Once created, right-click on the project in the Solution Explorer list and choose Properties.
Change the configuration drop-down list to All Configurations.
Under VC++ Directories, click on Include Directories. A small arrow will allow a drop-down menu; click on <Edit…>.

Double-click inside the box to create a new location. You can type or browse to
C:\SDL2.0\includeand click on OK.Next, do the same thing under library directories, this time passing in your created
libfolder (C:\SDL2\lib).Next, navigate to the Linker heading; inside the heading there will be an Input choice. Inside Additional Dependencies type
SDL.lib SDLmain.lib:
Navigate to the System heading and set the SubSystem heading to Windows(/SUBSYSTEM:WINDOWS).

We now have an empty project, which links to the SDL library, so it is time to start our SDL development. Click on Source Files
and use the keyboard shortcut Ctrl + Shift + A to add a new item. Create a C++ file called main.cpp. After creating this file, copy the following code into the source file:
#include<SDL.h>

SDL_Window* g_pWindow = 0;
SDL_Renderer* g_pRenderer = 0;

int main(int argc, char* args[])
{
  // initialize SDL
  if(SDL_Init(SDL_INIT_EVERYTHING) >= 0)
  {
    // if succeeded create our window
    g_pWindow = SDL_CreateWindow("Chapter 1: Setting up SDL",
    SDL_WINDOWPOS_CENTERED, SDL_WINDOWPOS_CENTERED,
    640, 480,
    SDL_WINDOW_SHOWN);

    // if the window creation succeeded create our renderer
    if(g_pWindow != 0)
    {
      g_pRenderer = SDL_CreateRenderer(g_pWindow, -1, 0);
    }
  }
  else
  {
    return 1; // sdl could not initialize
  }

  // everything succeeded lets draw the window

  // set to black // This function expects Red, Green, Blue and
  //  Alpha as color values
  SDL_SetRenderDrawColor(g_pRenderer, 0, 0, 0, 255);

  // clear the window to black
  SDL_RenderClear(g_pRenderer);

  // show the window
  SDL_RenderPresent(g_pRenderer);

  // set a delay before quitting
  SDL_Delay(5000);

  // clean up SDL
  SDL_Quit();

  return 0;
}
We can now attempt to build our first SDL application. Right-click on the project and choose Build. There will be an error about the SDL.dll file not being found:
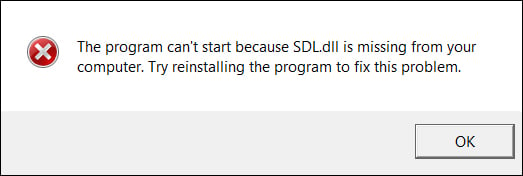
The attempted build should have created a Debug or Release folder within the project directory (usually located in your Documents folder under visual studio and projects). This folder contains the .exe file from our attempted build; we need to add the SDL.dll file to this folder. The SDL.dll file is located at C:\SDL2\VisualC\SDL\Win32 (or x64)\Release\SDL.dll l). When you want to distribute your game to another computer, you will have to share this file as well as the executable. After you have added the SDL.dll file to the executable folder, the project will now compile and show an SDL window; wait for 5 seconds and then close.
Let's go through the Hello SDL code:
First, we included the
SDL.hheader file so that we have access to all of SDL's functions:#include<SDL.h>
The next step is to create some global variables. One is a pointer to an
SDL_Windowfunction, which will be set using theSDL_CreateWindowfunction. The second is a pointer to anSDL_Rendererobject; set using theSDL_CreateRendererfunction:SDL_Window* g_pWindow = 0; SDL_Renderer* g_pRenderer = 0;
We can now initialize SDL. This example initializes all of SDL's subsystems using the
SDL_INIT_EVERYTHINGflag, but this does not always have to be the case (see SDL initialization flags):int main(int argc, char* argv[]) { // initialize SDL if(SDL_Init(SDL_INIT_EVERYTHING) >= 0) {If the SDL initialization was successful, we can create the pointer to our window.
SDL_CreateWindowreturns a pointer to a window matching the passed parameters. The parameters are the window title, x position of the window, y position of the window, width, height, and any requiredSDL_flags(we will cover these later in the chapter).SDL_WINDOWPOS_CENTEREDwill center our window relative to the screen:// if succeeded create our window g_pWindow = SDL_CreateWindow("Chapter 1: Setting up SDL", SDL_WINDOWPOS_CENTERED, SDL_WINDOWPOS_CENTERED, 640, 480, SDL_WINDOW_SHOWN);We can now check whether the window creation was successful, and if so, move on to set the pointer to our renderer, passing the window we want the renderer to use as a parameter; in our case, it is the newly created
g_pWindowpointer. The second parameter passed is the index of the rendering driver to initialize; in this case, we use-1to use the first capable driver. The final parameter isSDL_RendererFlag(see SDL renderer flags):// if the window creation succeeded create our renderer if(g_pWindow != 0) { g_pRenderer = SDL_CreateRenderer(g_pWindow, -1, 0); } else { return 1; // sdl could not initialize }If everything was successful, we can now create and show our window:
// everything succeeded lets draw the window

  // set to black
SDL_SetRenderDrawColor(g_pRenderer, 0, 0, 0, 255);

   // clear the window to black
SDL_RenderClear(g_pRenderer);

   // show the window
SDL_RenderPresent(g_pRenderer);

   // set a delay before quitting
SDL_Delay(5000);

   // clean up SDL
SDL_Quit();
Event handling, file I/O, and threading subsystems are all initialized by default in SDL. Other subsystems can be initialized using the following flags:
|
Flag |
Initialized subsystem(s) |
|---|---|
We can also use bitwise (|) to initialize more than one subsystem. To initialize only the audio and video subsystems, we can use a call to SDL_Init, for example:
SDL_Init(SDL_INIT_AUDIO | SDL_INIT_VIDEO);
Checking whether a subsystem has been initialized or not can be done with a call to the SDL_WasInit() function:
if(SDL_WasInit(SDL_INIT_VIDEO) != 0)
{
  cout << "video was initialized";
}Outside the design and gameplay of a game, the underlying mechanics are essentially the interaction of various subsystems such as graphics, game logic, and user input. The graphics subsystem should not know how the game logic is implemented or vice versa. We can think of the structure of a game as follows:

Once the game is initialized, it then goes into a loop of checking for user input, updating any values based on the game physics, before rendering to the screen. Once the user chooses to exit, the loop is broken and the game moves onto cleaning everything up and exiting. This is the basic scaffold for a game and it is what will be used in this book.
We will be building a reusable framework that will take all of the legwork out of creating a game in SDL 2.0. When it comes to boilerplate code and setup code, we really only want to write it once and then reuse it within new projects. The same can be done with drawing code, event handling, map loading, game states, and anything else that all games may require. We will start by breaking up the Hello SDL 2.0 example into separate parts. This will help us to start thinking about how code can be broken into reusable standalone chunks rather than packing everything into one large file.
We can break up the Hello SDL into separate functions:
bool g_bRunning = false; // this will create a loop
Follow these steps to break the Hello SDL code:
Create an
initfunction after the two global variables that takes any necessary values as parameters and passes them to theSDL_CreateWindowfunction:bool init(const char* title, int xpos, int ypos, int height, int width, int flags) { // initialize SDL if(SDL_Init(SDL_INIT_EVERYTHING) >= 0) { // if succeeded create our window g_pWindow = SDL_CreateWindow(title, xpos, ypos, height, width, flags); // if the window creation succeeded create our renderer if(g_pWindow != 0) { g_pRenderer = SDL_CreateRenderer(g_pWindow, -1, 0); } } else { return false; // sdl could not initialize } return true; } void render() { // set to black SDL_SetRenderDrawColor(g_pRenderer, 0, 0, 0, 255); // clear the window to black SDL_RenderClear(g_pRenderer); // show the window SDL_RenderPresent(g_pRenderer); }Our main function can now use these functions to initialize SDL:
int main(int argc, char* argv[])
{
  if(init("Chapter 1: Setting up SDL",
  SDL_WINDOWPOS_CENTERED, SDL_WINDOWPOS_CENTERED, 640,
  480, SDL_WINDOW_SHOWN))
  {
    g_bRunning = true;
  }
  else
  {
    return 1; // something's wrong
  }

  while(g_bRunning)
  {
    render();
  }

  // clean up SDL
  SDL_Quit();

  return 0;
}
As you can see, we have broken the code up into separate parts: one function does the initialization for us and the other does the rendering code. We've added a way to keep the program running in the form of a while loop that runs continuously, rendering our window.
Let's take it a step further and try to identify which separate parts a full game might have and how our main loop might look. Referring to the first screenshot, we can see that the functions we will need are initialize, get input, do physics, render, and exit. We will generalize these functions slightly and rename them to init(), handleEvents(), update(), render(), and clean(). Let's put these functions into main.cpp:
void init(){}
void render(){}
void update(){}
void handleEvents(){}
void clean(){}

bool g_bRunning = true;

int main()
{
  init();

  while(g_bRunning)
  {
    handleEvents();
    update();
    render();
  }

  clean();
}This code does not do much at the moment, but it shows the bare bones of a game and how a main loop might be broken apart. We declare some functions that can be used to run our game: first, the init() function, which will initialize SDL and create our window, and second, we declare the core loop functions of render, update, and handle events. We also declare a clean function, which will clean up code at the end of our game. We want this loop to continue running so we have a Boolean value that is set to true, so that we can continuously call our core loop functions.
So, now that we have an idea of what makes up a game, we can separate the functions into their own class by following these steps:
Go ahead and create a new file in the project called
Game.h:#ifndef __Game__ #define __Game__ class Game { }; #endif /* defined(__Game__) */Next, we can move our functions from the
main.cppfile into theGame.hheader file:class Game { public: Game() {} ~Game() {} // simply set the running variable to true void init() { m_bRunning = true; } void render(){} void update(){} void handleEvents(){} void clean(){} // a function to access the private running variable bool running() { return m_bRunning; } private: bool m_bRunning; };Now, we can alter the
main.cppfile to use this newGameclass:#include "Game.h" // our Game object Game* g_game = 0; int main(int argc, char* argv[]) { g_game = new Game(); g_game->init("Chapter 1", 100, 100, 640, 480, 0); while(g_game->running()) { g_game->handleEvents(); g_game->update(); g_game->render(); } g_game->clean(); return 0; }Our
main.cppfile now does not declare or define any of these functions; it simply creates an instance ofGameand calls the needed methods.Now that we have this skeleton code, we can go ahead and tie SDL into it to create a window; we will also add a small event handler so that we can exit the application rather than having to force it to quit. We will slightly alter our
Game.hfile to allow us to add some SDL specifics and to also allow us to use an implementation file instead of defining functions in the header:#include "SDL.h" class Game { public: Game(); ~Game(); void init(); void render(); void update(); void handleEvents(); void clean(); bool running() { return m_bRunning; } private: SDL_Window* m_pWindow; SDL_Renderer* m_pRenderer; bool m_bRunning; };
Looking back at the first part of this chapter (where we created an SDL window), we know that we need a pointer to an SDL_Window object that is set when calling SDL_CreateWindow, and a pointer to an SDL_Renderer object that is created by passing our window into SDL_CreateRenderer. The init function can be extended to use the same parameters as in the initial sample as well. This function will now return a Boolean value so that we can check whether SDL is initialized correctly:
bool init(const char* title, int xpos, int ypos, int width, int height, int flags);
We can now create a new implementation Game.cpp file in the project so that we can create the definitions for these functions. We can take the code from the Hello SDL section and add it to the functions in our new Game class.
Open up Game.cpp and we can begin adding some functionality:
First, we must include our
Game.hheader file:#include "Game.h"
Next, we can define our
initfunction; it is essentially the same as theinitfunction we have previously written in ourmain.cppfile:bool Game::init(const char* title, int xpos, int ypos, int width, int height, int flags) { // attempt to initialize SDL if(SDL_Init(SDL_INIT_EVERYTHING) == 0) { std::cout << "SDL init success\n"; // init the window m_pWindow = SDL_CreateWindow(title, xpos, ypos, width, height, flags); if(m_pWindow != 0) // window init success { std::cout << "window creation success\n"; m_pRenderer = SDL_CreateRenderer(m_pWindow, -1, 0); if(m_pRenderer != 0) // renderer init success { std::cout << "renderer creation success\n"; SDL_SetRenderDrawColor(m_pRenderer, 255,255,255,255); } else { std::cout << "renderer init fail\n"; return false; // renderer init fail } } else { std::cout << "window init fail\n"; return false; // window init fail } } else { std::cout << "SDL init fail\n"; return false; // SDL init fail } std::cout << "init success\n"; m_bRunning = true; // everything inited successfully, start the main loop return true; }We will also define the
renderfunction. It clears the renderer and then renders again with the clear color:void Game::render() { SDL_RenderClear(m_pRenderer); // clear the renderer to the draw color SDL_RenderPresent(m_pRenderer); // draw to the screen }Finally, we can clean up. We destroy both the window and the renderer and also call the
SDL_Quitfunction to close all the subsystems:{ std::cout << "cleaning game\n"; SDL_DestroyWindow(m_pWindow); SDL_DestroyRenderer(m_pRenderer); SDL_Quit(); }
So we have moved the Hello SDL 2.0 code from the main.cpp file into a class called Game. We have freed up the main.cpp file to handle only the Game class; it knows nothing about SDL or how the Game class is implemented. Let's add one more thing to the class to allow us to close the application the regular way:
void Game::handleEvents()
{
SDL_Event event;
if(SDL_PollEvent(&event))
{
switch (event.type)
{
case SDL_QUIT:
m_bRunning = false;
break;
default:
break;
}
}
}We will cover event handling in more detail in a forthcoming chapter. What this function now does is check if there is an event to handle, and if so, check if it is an SDL_QUIT event (by clicking on the cross to close a window). If the event is SDL_QUIT, we set the Game class' m_bRunning member variable to false. The act of setting this variable to false makes the main loop stop and the application move onto cleaning up and then exiting:
void Game::clean()
{
  std::cout << "cleaning game\n";
  SDL_DestroyWindow(m_pWindow);
  SDL_DestroyRenderer(m_pRenderer);
  SDL_Quit();
}The clean() function destroys the window and renderer and then calls the SDL_Quit() function, closing all the initialized SDL subsystems.
Note
To enable us to view our std::cout messages, we must first include Windows.h and then call AllocConsole(); andfreopen("CON", "w", stdout);. You can do this in the main.cpp file. Just remember to remove it when sharing your game.
SDL_CreateWindow takes an enumeration value of type SDL_WindowFlags. These values set how the window will behave. We created an init function in our Game class:
bool init(const char* title, int xpos, int ypos, int width, int height, int flags);
The final parameter is an SDL_WindowFlags value, which is then passed into the SDL_CreateWindow function when initializing:
// init the window
m_pWindow = SDL_CreateWindow(title, xpos, ypos, width, height, flags);
Here is a table of the
SDL_WindowFlags function:
|
Flag |
Purpose |
|---|---|
Let's pass in SDL_WINDOW_FULLSCREEN to the init function and test out some fullscreen SDL. Open up the main.cpp file and add this flag:
g_game->init("Chapter 1", 100, 100, 640, 580, SDL_WINDOW_FULLSCREEN))Build the application again and you should see that the window is fullscreen. To exit the application, it will have to be forced to quit (Alt + F4 on Windows); we will be able to use the keyboard to quit the application in forthcoming chapters, but for now, we won't need fullscreen. One problem we have here is that we have now added something SDL specific to the main.cpp file. While we will not use any other frameworks in this book, in future we may want to use another. We can remove this SDL-specific flag and replace it with a Boolean value for whether we want fullscreen or not.
Replace the
int flags parameter in our Game init function with a boolfullscreen parameter:
The code snippet for
Game.h:bool init(const char* title, int xpos, int ypos, int width, int height, bool fullscreen);
The code snippet for
Game.cpp:bool Game::init(const char* title, int xpos, int ypos, int width, int height, bool fullscreen) { int flags = 0; if(fullscreen) { flags = SDL_WINDOW_FULLSCREEN; } }
We create an int flags variable to pass into the
SDL_CreateWindow function; if we have set fullscreen to true, then this value will be set to the
SDL_WINDOW_FULLSCREEN flag, otherwise it will remain as 0 to signify that no flags are being used. Let's test this now in our main.cpp file:
if(g_game->init("Chapter 1", 100, 100, 640, 480, true))This will again set our window to fullscreen, but we aren't using the SDL-specific flag to do it. Set it to false again as we will not need fullscreen for a while. Feel free to try out a few of the other flags to see what effects they have.
A lot of ground has been covered in this chapter. We learned what SDL is and why it is a great tool for game development. We looked at the overall structure of a game and how it can be broken into individual parts, and we started to develop the skeleton of our framework by creating a Game class that can be used to initialize SDL and render things to the screen. We also had a small look at how SDL handles events by listening for a quit event to close our application. In the next chapter we will look at drawing in SDL and building the SDL_image extension.


