


 Download code from GitHub
Robotics is one of the upcoming technologies that can change the world. Robots can replace people in many ways, and we are all afraid of them stealing our jobs. One thing is for sure: robotics will be one of the influential technologies in the future. When a new technology gains momentum, the opportunities in that field also increase. This means that robotics and automation can generate lot of job opportunities in the future.
One of the main areas in robotics that can provide mass job opportunities is robotics software development. As we all know, software gives life to a robot or any machine. We can expand a robot's capabilities through software. If a robot exists, its capabilities such as control, sensing, and intelligence are realized using software.
Robotics software involves a combination of related technologies, such as computer vision, artificial intelligence, and control theory. In short, developing software for a robot is not a simple task; it may require expertise in many fields.
If you're looking for mobile application development in iOS or Android, there is a software development kit (SDK) available to build applications in it, but what about robots? Is there any generic software framework available? Yes. One of the more popular robotics software frameworks is called Robot Operating System (ROS).
In this chapter, we will take a look at an abstract concept of ROS and how to install it. The entire book is dedicated to ROS projects, so this chapter will be a kick-start guide for those projects.
The following topics are going to be covered in this chapter:
Getting started with ROS
Why we use ROS
Basic concepts of ROS
Robot, sensors, and actuators supporting ROS
Installing ROS
ROS in industries and research
So let's get started discussing ROS.
ROS is an open source, flexible software framework for programming robots. ROS provides a hardware abstraction layer, in which developers can build robotics applications without worrying about the underlying hardware. ROS also provides different software tools to visualize and debug robot data. The core of the ROS framework is a message-passing middleware in which processes can communicate and exchange data with each other even when running from different machines. ROS message passing can be synchronous or asynchronous.
Software in ROS is organized as packages, and it offers good modularity and reusability. Using the ROS message-passing middleware and hardware abstraction layer, developers can create tons of robotic capabilities, such as mapping and navigation (in mobile robots). Almost all capabilities in ROS will be robot agnostic so that all kinds of robots can use it. New robots can directly use this capability package without modifying any code inside the package.
ROS has widespread collaborations in universities, and lots of developers contribute to it. We can say that ROS is a community-driven project supported by developers worldwide. The active developer ecosystem distinguishes ROS from other robotic frameworks.
In short, ROS is the combination of Plumbing (or communication), Tools, Capabilities and Ecosystem. These capabilities are demonstrated in the following figure:

Figure 1: The ROS equation
The ROS project was started in 2007 in Stanford University under the name Switchyard. Later on, in 2008, the development was undertaken by a robotic research start-up called Willow Garage. The major development in ROS happened in Willow Garage. In 2013, the Willow Garage researchers formed the Open Source Robotics Foundation (OSRF). ROS is actively maintained by OSRF now.
Here are links to their websites:
Willow Garage: http://www.willowgarage.com/
The ROS distributions are very similar to Linux distributions, that is, a versioned set of ROS packages. Each distribution maintains a stable set of core packages up to the end of life (EOL) of the distribution.
The ROS distributions are fully compatible with Ubuntu, and most of the ROS distributions are planned according to the respective Ubuntu versions.
Given here are some of latest ROS distributions recommended for use from the ROS website (http://wiki.ros.org/Distributions):

Figure 2: Latest ROS distributions
The latest ROS distribution is Kinect Kame. We will get support for this distribution up to May 2021. One of the problems with this latest ROS distribution is that most of the packages will not be available on it because it will take time to migrate them from the previous distribution. If you are looking for a stable distribution, you can go for ROS Indigo Igloo, because the distribution started in 2015, and most of the packages are available on this distribution. The ROS Jade Turtle distribution will stop being supported on May 2017, so I do not recommend you use it.
The main operating system ROS is tuned for is Ubuntu. ROS distributions are planned according to Ubuntu releases. Other than Ubuntu, it is partially supported by Ubuntu ARM, Debian, Gentoo, Mac OS X, Arch Linux, Android, Windows, and Open Embedded:

Figure 3: OSes supporting ROS
This table shows new ROS distributions and the specific versions of the supporting OSes:
|
ROS distribution |
Supporting OSes |
|
Kinetic Kame (LTS) |
Ubuntu 16.04 (LTS) and 15.10, Debian 8, OS X (Homebrew), Gentoo, and Ubuntu ARM |
|
Jade Turtle |
Ubuntu 15.04, 14.10, and 14.04, Ubuntu ARM, OS X (Homebrew), Gentoo, Arch Linux, Android NDK, and Debian 8 |
|
Indigo Igloo (LTS) |
Ubuntu 14.04 (LTS) and 13.10, Ubuntu ARM, OS X (Homebrew), Gentoo, Arch Linux, Android NDK, and Debian 7 |
ROS Indigo and Kinetic are long-term support (LTS) distributions, coming with the LTS version of Ubuntu. The advantage of using LTS distribution is that we will get maximum lifespan and support.
The ROS framework is one of the successful robotics frameworks, and universities around the globe contribute to it. Because of the active ecosystem and open source nature, ROS is being used in a majority of robots and is compatible with major robotic hardware and software. Here are some of the famous robots completely running on ROS:

Figure 4: Popular robots supported by ROS
The names of the robots listed in the images are Pepper (a), REEM-C (b), TurtleBot (c), Robonaut (d), Universal Robots (e).
The robots supported by ROS are listed at the following link:
The following are links to get ROS packages of robots from:
TurtleBot 2: http://wiki.ros.org/Robots/TurtleBot
Robonaut: http://wiki.ros.org/Robots/Robonaut2
Universal Robotic arms: http://wiki.ros.org/universal_robot
Some popular sensors supporting ROS are as follows:

Figure 5: Popular robot sensors supported in ROS
The names of the sensors listed in the image are Velodyne (a), ZED Camera (b), Teraranger (c), Xsens (d), Hokuyo Laser range finder (e), and Intel RealSense (f).
The list of sensors supported by ROS is available at the following link:
These are the links to the ROS wiki pages of these sensors:
Velodyne(a): http://wiki.ros.org/Velodyne
ZED Camera(b):http://wiki.ros.org/zed-ros-wrapper
Teraranger(c): http://wiki.ros.org/terarangerone
Xsens(d): http://wiki.ros.org/terarangerone
Hokuyo Laser range finder(e): http://wiki.ros.org/hokuyo_node
Intel real sense(f): http://wiki.ros.org/realsense_camera
The main intention behind building the ROS framework is to become a generic software framework for robots. Even though there was robotics research happening before ROS, most of the software was exclusive to their own robots. Their software may be open source, but it is very difficult to reuse.
Compared to existing robotic frameworks, ROS is outperforming in the following aspects:
Collaborative development: As we discussed, ROS is open source and free to use for industries and research. Developers can expand the functionalities of ROS by adding packages. Almost all the packages of ROS work on a hardware abstraction layer, so it can be reused easily for other robots. So if one university is good in mobile navigation and other in robotic manipulators, they can contribute that to the ROS community and other developers can reuse their packages and build new applications.
Language support: The ROS communication framework can be easily implemented in any modern language. It already supports popular languages such as C++, Python, and Lisp, and it has experimental libraries for Java and Lua.
Library integration: ROS has an interface to many third-party robotics libraries, such as Open Source Computer Vision (Open-CV), Point Cloud Library (PCL), Open-NI, Open-Rave, and Orocos. Developers can work with any of these libraries without much hassle.
Simulator integration: ROS also has ties to open source simulators such as Gazebo and has a good interface with proprietary simulators such as Webots and V-REP.
Code testing: ROS offers an inbuilt testing framework called rostest to check code quality and bugs.
Scalability: The ROS framework is designed to be scalable. We can perform heavy computation tasks with robots using ROS, which can either be placed on the cloud or on heterogeneous clusters.
Customizability: As we have discussed, ROS is completely open source and free, so one can customize this framework as per the robot's requirement. If we only want to work with the ROS messaging platform, we can remove all the other components and use only that. One can even customize ROS for a specific robot for better performance.
Community: ROS is a community-driven project, and it is mainly led by OSRF. The large community support is a great plus for ROS, and one can easily start robotics application development.
Given here are the URLs of libraries and simulators integrated with ROS:
Open-CV: http://wiki.ros.org/vision_opencv
Open-NI: http://wiki.ros.org/openni_launch
Open-Rave: http://openrave.org/
Orocos: http://www.orocos.org/
Let's go through some of the basic concepts of ROS; they can help you get started with ROS projects.
Understanding the basic working of ROS and its terminology can help you understand existing ROS applications and build your own. This section will teach you important concepts that we are going to use in the upcoming chapters. If you find a topic missed in this chapter, it will be covered in a corresponding later chapter.
There are three different concepts in ROS. Let's take a look at them.
The filesystem level explains how ROS files are organized on the hard disk:

Figure 6: The ROS filesystem level
As you can see from the figure, the filesystem in ROS can be categorized mainly as metapackages, packages, package manifest, messages, services, codes and miscellaneous files. The following is a short description of each component:
Metapackages: Metapackages group together a list of packages for a specific application. For example, in ROS, there is a metapackage called navigation for mobile robot navigation. It can hold the information on related packages and helps install those packages during its own installation.
Packages: The software in ROS is mainly organized as ROS packages. We can say that ROS packages are the atomic build unit of ROS. A package may consist of ROS nodes/processes, datasets, and configuration files, organized in a single module.
Package manifest: Inside every package will be a manifest file called
package.xml. This file consists of information such as the name, version, author, license, and dependencies required of the package. Thepackage.xmlfile of a metapackage consists of the names of related packages.Messages (msg): ROS communicates by sending ROS messages. The type of message data can be defined inside a file with the
.msgextension. These files are called message files. We are following a convention that the message files are kept underour_package/msg/message_files.msg.Service (srv): One of the computation graph level concepts is services. Similar to ROS messages, the convention is to put service definitions under
our_package/srv/service_files.srv.
The ROS computation graph is the peer-to-peer network of the ROS process, and it processes the data together. The ROS computation graph concepts are nodes, topics, messages, master, parameter server, services, and bags:

Figure 7: The ROS computational graph concept diagram
The preceding figure shows the various concepts in the ROS computational graph. Here is a short description of each concept:
Nodes: ROS nodes are simply a process that is using ROS APIs to communicate with each other. A robot may have many nodes to perform its computations. For example, an autonomous mobile robot may have a node each for hardware interfacing, reading laser scans, and localization and mapping. We can create ROS nodes using ROS client libraries such as
roscppandrospy, which we will be discussing in the upcoming sections.Master: The ROS master works as an intermediate node that aids connections between different ROS nodes. The master has all the details about all nodes running in the ROS environment. It will exchange details of one node with another in order to establish a connection between them. After exchanging the information, communication will start between the two ROS nodes.
Parameter server: The parameter server is a pretty useful thing in ROS. A node can store a variable in the parameter server and set its privacy too. If the parameter has a global scope, it can be accessed by all other nodes. The ROS parameter runs along with the ROS master.
Messages: ROS nodes can communicate with each other in many ways. In all methods, nodes send and receive data in the form of ROS messages. The ROS message is a data structure used by ROS nodes to exchange data.
Topics: One of the methods to communicate and exchange ROS messages between two ROS nodes is called ROS topics. Topics are named buses, in which data is exchanged using ROS messages. Each topic will have a specific name, and one node will publish data to a topic and an other node can read from the topic by subscribing to it.
Services: Services are another kind of communication method, like topics. Topics use publish or subscribe interaction, but in services, a request or reply method is used. One node will act as the service provider, which has a service routine running, and a client node requests a service from the server. The server will execute the service routine and send the result to the client. The client node should wait until the server responds with the results.
Bags: Bags are a useful utility in ROS for the recording and playback of ROS topics. While working on robots, there may be some situations where we need to work without actual hardware. Using
rosbag, we can record sensor data and can copy the bag file to other computers to inspect data by playing it back.
The community level comprises the ROS resources for sharing software and knowledge:

Figure 8: ROS community level diagram
Here is a brief description of each section:
Distributions: ROS distributions are versioned collections of ROS packages, like Linux distribution.
Repositories: ROS-related packages and files depend on a version-control system (VCS) such as Git, SVN, and Mercurial, using which developers around the world can contribute to the packages.
The ROS Wiki: The ROS community wiki is the knowledge center of ROS, in which anyone can create documentation for their packages. You can find standard documentation and tutorials about ROS from the ROS wiki.
Mailing lists: Subscribing to the ROS mailing lists enables users to get new updates regarding ROS packages and gives them a place to ask questions about ROS (http://wiki.ros.org/Mailing%20Lists).
ROS Answers: The ROS Answers website is the Stack Overflow of ROS. Users can ask questions regarding ROS and related areas (http://answers.ros.org/questions/).
Blog: The ROS blog provides regular updates about the ROS community with photos and videos (http://www.ros.org/news).
Let's see how two nodes communicate with each other using ROS topics. The following diagram shows how it happens:

Figure 9: Communication between ROS nodes using topics
As you can see, there are two nodes, named talker and listener. The talker node publishes a string message called Hello World into a topic called /talker, and the listener node is subscribed to this topic. Let's see what happens at each stage, marked (1), (2), and (3):
Before running any nodes in ROS, we should start the ROS Master. After it has been started, it will wait for nodes. When the talker node (publisher) starts running, it will first connect to the ROS Master and exchange the publishing topic details with the master. This includes topic name, message type, and publishing node URI. The URI of the master is a global value, and all nodes can connect to it. The master maintains tables of the publisher connected to it. Whenever a publisher's details change, the table updates automatically.
When we start the listener node (subscriber), it will connect to the master and exchange the details of the node, such as the topic going to be subscribed to, its message type, and the node URI. The master also maintains a table of subscribers, similar to the publisher.
Whenever there is a subscriber and publisher for the same topic, the master node will exchange the publisher URI with the subscriber. This will help both nodes connect with each other and exchange data. After they've connected with each other, there is no role for the master. The data is not flowing through the master; instead, the nodes are interconnected and exchange messages.
The ROS client libraries are used to write ROS nodes. All the ROS concepts are implemented in client libraries. So we can just use it without implementing everything from scratch. We can implement ROS nodes with a publisher and subscriber, we can write service callbacks, and so on using client libraries.
The main ROS client libraries are in C++ and Python. Here is a list of popular ROS client libraries:
roscpp: This is one of the most recommended and widely used ROS client libraries for building ROS nodes. This client library has most of the ROS concepts implemented and can be used in high-performance applications.rospy: This is a pure implementation of the ROS client library in Python. The advantage of this library is the ease of prototyping, so development time is shorter. It is not recommended for high-performance applications, but it is perfect for non-critical tasks.roslisp: This is the client library for LISP and is commonly used to build robot planning libraries.
Details of all client ROS libraries are given in the following link: http://wiki.ros.org/Client%20Libraries.
ROS has a variety of GUI and command-line tools to inspect and debug messages. Let's look at some commonly used ones.
Rviz (http://wiki.ros.org/rviz) is one of the 3D visualizers available in ROS to visualize 2D and 3D values from ROS topics and parameters. Rviz helps visualize data such as robot models, robot 3D transform data (TF), point cloud, laser and image data, and a variety of different sensor data.

Figure 10: Point cloud data visualized in Rviz
The rqt_plot program (http://wiki.ros.org/rqt_plot) is a tool for plotting scalar values that are in the form of ROS topics. We can provide a topic name in the Topic box.

Figure 11: rqt_plot
The rqt_graph (http://wiki.ros.org/rqt_graph) ROS GUI tool can visualize the graph of interconnection between ROS nodes.

Figure 12: rqt_graph
Note
The complete list of ROS tools is available at the following link: http://wiki.ros.org/Tools
One of the open source robotic simulators tightly integrated with ROS is Gazebo (http://gazebosim.org). Gazebo is a dynamic robotic simulator with a wide variety the robot models and extensive sensor support The functionalities of Gazebo can be added via plugins. The sensor values can be accessed to ROS through topics, parameters and services. Gazebo can use when your simulation needs full compatibility with ROS. Most of the robotics simulators are proprietary and expensive; if you can't afford it, you can directly use Gazebo without any doubt.
Note
The ROS interface of Gazebo is available at the following link: http://wiki.ros.org/gazebo

Figure 13: Gazebo simulator
As we have discussed, there are a variety of ROS distributions available to download and install, so choosing the exact distribution for our needs may be confusing. Following are answers to some of the frequently asked questions while choosing a distribution:
Which distribution should I choose to get maximum support?
Answer: If you are interested in getting maximum support, choose an LTS release. It will be good if you choose the second most recent LTS distribution.
I need the latest features of ROS; which should I choose?
Answer: Go for the latest version then; you may not get the latest complete packages immediately after the release. You may have to wait for a few months after the release. This is because of the migration period from one distribution to other.
In this book, we are dealing with two LTS distributions: ROS Indigo, which is a stable release, and ROS Kinetic, the latest one.
Go to the ROS website (http://www.ros.org/), and navigate to Getting Started | Install.
You will get a screen listing the latest ROS distributions:

Figure 14: Latest ROS distributions on the website
You can get the complete installation instructions for each distribution if you click on the Install button.
We'll now step through the instructions to install the latest ROS distribution.
We are going to install ROS on Ubuntu from the ROS package repository. The repository will have prebuilt binaries of ROS in .deb format. To be able to use packages from the ROS repository, we have to configure the repository options of Ubuntu first.
Note
Here are the details of the different kinds of Ubuntu repositories: (https://help.ubuntu.com/community/Repositories/Ubuntu)
To configure the repository, first search for Software & Updates in the Ubuntu search bar.

Figure 15: Ubuntu Software & Updates
Click on Software and & Updates and enable all the Ubuntu repositories, as shown in the following screenshot:

Figure 16: The Ubuntu Software & Updates centre
The next step is to allow ROS packages from the ROS repository server, called packages.ros.org. The ROS repository server details have to be fed into source.list, which is in the /etc/apt/.
The following command will do this job for ROS Kinetic, Jade, and Indigo:
sudo sh -c 'echo "deb http://packages.ros.org/ros/ubuntu $(lsb_release -sc) main" > /etc/apt/sources.list.d/ros-latest.list'
When a new repository is added to Ubuntu, we should add the keys to make it trusted and to be able to validate the origin of the packages. The following key should be added to Ubuntu before starting installation:
sudo apt-key adv --keyserver hkp://ha.pool.sks-keyservers.net:80 --recv-key 0xB01FA116
Now we are sure that we are downloading from an authorized server.
Now, we are ready to install ROS packages on Ubuntu. The first step is to update the list of packages on Ubuntu. You can use the following command to update the list:
$ sudo apt-get update
This will fetch all packages from the servers that are in source.list.
After getting the package list, we have to install the entire ROS package suite using the following command:
ROS Kinect:
$ sudo apt-get install ros-kinetic-desktop-full
ROS Jade:
$ sudo apt-get install ros-jade-desktop-full
ROS Indigo:
$ sudo apt-get install ros-indigo-desktop-full
This will install most of the important packages in ROS. You will need at least 15 GB of space in your root Ubuntu partition to install and work with ROS.
The rosdep tool in ROS helps us easily install dependencies of packages that we are going to compile. This tool is also necessary for some core components of ROS.
This command launches rosdep:
$ sudo rosdep init
$ rosdep update
Congratulations! We are done with the ROS installation, but what next?
The ROS installation mainly consists of scripts and executables, which are mostly installed to /opt/ros/<ros_version>.
To get access to these commands and scripts, we should add ROS environment variables to the Ubuntu Terminal. It's easy to do this. To access ROS commands from inside the Terminal, we have to source the following bash file:
/opt/ros/<ros_version>/setup.bash
Here's the command to do so:
$ source /opt/ros/kinetic/setup.bash
But in order to get the ROS environment in multiple Terminals, we should add the command to the .bashrc script, which is in the home folder. The .bashrc script will be sourced whenever a new Terminal opens.
$ echo "source /opt/ros/kinetic/setup.bash" >> ~/.bashrc
$ source ~/.bashrc
We can install multiple ROS distributions on Ubuntu. If there are multiple distributions, we can switch to each ROS distribution by changing the distribution name in the preceding command.
Last but not least, there is the ROS command-line tool, called rosinstall, for installing source trees for particular ROS packages. The tool is based on Python, and you can install it using the following command:
$ sudo apt-get install python-rosinstall
We are done with the ROS installation. Just check whether the installation is proper, by running the following commands.
Open a Terminal window and run the roscore command:
$ roscore
Run a turtlesim node in another Terminal:
$ rosrun turtlesim turtlesim_node
If everything is proper, you will get this:

Figure 17: The turtlesim node
As you know, complete ROS support is only present on Ubuntu. So what about Windows and Mac OS X users? Can't they use ROS? Yes, they can, using a tool called VirtualBox (https://www.virtualbox.org/). VirtualBox allows us to install a guest OS without affecting the host OS. The virtual OS can work along with the host OS in a given specification of a virtual computer, such as the number of processors and RAM and hard disk size.
Note
You can download VirtualBox for popular OSes from the following link: https://www.virtualbox.org/wiki/Downloads
The complete installation procedure for Ubuntu on VirtualBox is shown in the following tutorial video on YouTube: https://www.youtube.com/watch?v=DPIPC25xzUM
The Following shows the screenshot of the VirtualBox GUI. You can see the virtual OS list on the left side and the virtual PC configuration on the right side. The buttons for creating a new virtual OS and starting the existing VirtualBox can be seen on the top panel. The optimal virtual PC configuration is shown in the following screenshot:
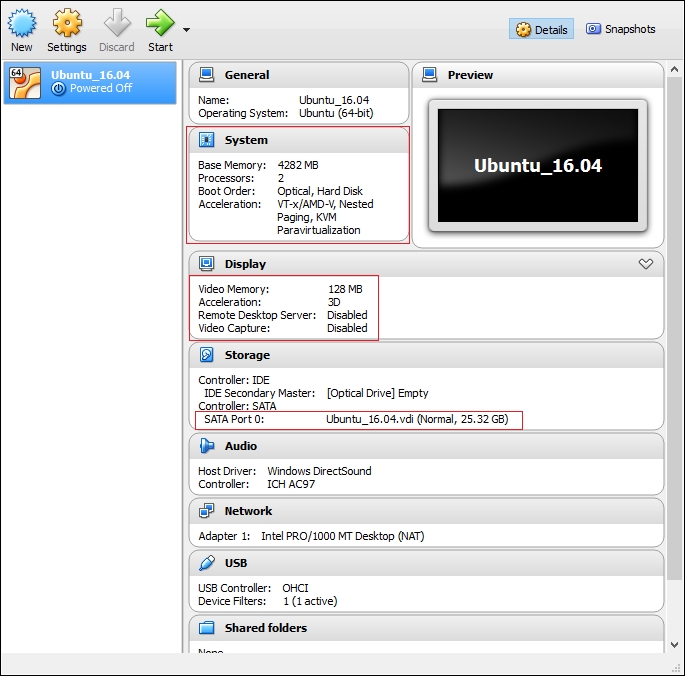
Figure 18: The VirtualBox configuration
Here are the main specifications of the virtual PC:
Number of CPUs: 1
RAM: 4 GB
Display | Video Memory: 128 MB
Acceleration: 3D
Storage: 20 GB to 30 GB
Network adapter on NAT
In order to have hardware acceleration, you should install drivers from the VirtualBox Guest add-ons disc. After booting into the Ubuntu desktop, navigate to Devices | Insert Guest Addition CD Image. This will mount the CD image in Ubuntu and ask the user to run the script to install drivers. If we allow it, it will automatically install all the drivers. After a reboot, you will get full acceleration on the Ubuntu guest.
There is no difference in ROS installation on VirtualBox .If the virtual network adapter is in NAT mode, the Internet connection of the host OS will be shared with the guest OS. So the guest can work the same as the real OS.
After setting ROS on a real PC or VirtualBox, the next step is to create a workspace in ROS. The ROS workspace is a place where we keep ROS packages. In the latest ROS distribution, we use a catkin-based workspace to build and install ROS packages. The catkin system (http://wiki.ros.org/catkin) is the official build system of ROS, which helps us build the source code into a target executable or libraries inside the ROS workspace.
Building an ROS workspace is an easy task; just open a Terminal and follow these instructions:
The first step is to create an empty workspace folder and another folder called
srcto store the ROS package in. The following command will do this job. The workspace folder name here iscatkin_ws.$ mkdir -p ~/catkin_ws/srcSwitch to the
srcfolder and execute thecatkin_init_workspacecommand. This command will initialize a catkin workspace in the currentsrcfolder. We can now start creating packages inside thesrcfolder.$ cd ~/catkin_ws/src $ catkin_init_workspace
After initializing the catkin workspace, we can build the packages inside the workspace using the following command,
catkin_make. We can build the workspace even without any packages.$ cd ~/catkin_ws/ $ catkin_make
This will create additional folders called
buildanddevelinside the ROS workspace:
Figure 19: The catkin workspace folders
Once you've built the workspace, in order to access packages inside the workspace we should add the workspace environment to our
.bashrcfile using the following command:$ echo "source ~/catkin_ws/devel/setup.bash" >> ~/.bashrc $ source ~/.bashrc
If everything is done, you can verify it by executing the following command. This command will print the entire ROS package path. If your workspace path is in the output, you are done!
$ echo $ROS_PACKAGE_PATH
Figure 20: The ROS package path
Now that we've installed ROS and set up our ROS workspace, we can discuss the advantages of using it. Why is learning ROS so important for robotics researchers? The reason is that ROS is becoming a generic framework to program all kinds of robots. So robots in universities and industries mainly use ROS.
Here are some famous robotics companies using ROS for their robots:

Figure 21: The companies using ROS
You can find them here:
Fetch Robotics: http://fetchrobotics.com/
Clearpath Robotics: https://www.clearpathrobotics.com/
PAL Robotics: http://www.pal-robotics.com/en/home/
Yujin Robot: http://en.yujinrobot.com/
DJI: http://www.dji.com/
ROBOTIS: http://www.robotis.com/html/en.php
The following is one of the job listings on Fetch Robotics for a robotics application development engineer (http://fetchrobotics.com/careers/):

Figure 22: A typical job requirement for an ROS application engineer
Knowledge of ROS will help you land a robotics application engineering job easily. If you go through the skill set of any job related to robotics, you're bound to find ROS on it.
There are independent courses and workshops in universities and industries to teach ROS development in robots. Knowing ROS will help you get an internship and MS, PhD, and postdoc opportunities from prestigious robotic institutions such as CMU's Robotics Institute (http://www.ri.cmu.edu/) and UPenn's GRAP Lab (https://www.grasp.upenn.edu/).
The following chapters will help you build a practical foundation of and core skills in ROS.
This chapter was an introductory chapter for starting with robotics application development using ROS. The main aim of this chapter was to get started with ROS by installing and understanding it. This chapter can be used as a kick-start guide for ROS application development and can help you understand the following chapters, which mainly demonstrate ROS-based applications. At the end of this chapter, we saw job and research opportunities related to ROS and also saw that lot of companies and universities are looking for ROS developers for different robotics applications. From the next chapter onward, we can discuss different ROS-based projects.