


 Download code from GitHub
In this chapter, we will introduce the Robot Operating System (ROS), which is a collection of software packages to aid researchers and developers using robotic systems. After we discuss the instructions to install ROS on your computer system using the Ubuntu operating system, the ROS architecture and many of its components are discussed. This will aid you in understanding the use of ROS to develop software for robotic applications.
ROS will be introduced in terms of its elements and their functions. An understanding of the ROS vocabulary is necessary to become proficient in using ROS to create programs for the control of real or simulated robots as well as devices, such as cameras.
To make the discussion more concrete, the turtlesim simulator will be presented with various examples of the ROS command usage. This simulator is part of ROS and it provides an excellent introduction to the capabilities of ROS.
In this chapter, we will cover the following topics:
What ROS is and which robots use ROS
How to install and launch ROS on your computer
How to navigate the ROS directories
An introduction to ROS packages, nodes, and topics
Examples of useful ROS commands
How to use ROS commands with the turtlesim simulator
ROS is sometimes called a meta operating system because it performs many functions of an operating system, but it requires a computer's operating system such as Linux. One of its main purposes is to provide communication between the user, the computer's operating system, and equipment external to the computer. This equipment can include sensors, cameras, as well as robots. As with any operating system, the benefit of ROS is the hardware abstraction and its ability to control a robot without the user having to know all of the details of the robot.
For example, to move a robot's arms, a ROS command is issued, or scripts in Python or C++ written by the robot designers cause the robot to respond as commanded. The scripts can, in turn, call various control programs that cause the actual motion of the robot's arms. It is also possible to design and simulate your own robot using ROS. These subjects and many others will be considered in this book.
In this book, you will learn a set of concepts, software, and tools that apply to an ever-increasing and diverse army of robots. For example, the navigation software of one mobile robot can be used, with a few changes, to work in another mobile robot. The flight navigation of an aerial robot is similar to that of the ground robot and so on. All across the broad spectrum of robotics, system interfaces are standardized or upgraded to support increased complexity. There are readily available libraries for commonly used robotics functions. ROS not only applies to the central processing of robotics but also to sensors and other subsystems. ROS hardware abstraction combined with low-level device control speeds the upgrade toward the latest technology.
ROS is an open source robotic software system that can be used without licensing fees by universities, government agencies, and commercial companies. The advantages of open source software is that the source code for the system is available and can be modified according to a user's needs. More importantly for some users, the software can be used in a commercial product as long as the appropriate licenses are cited. The software can be improved and modules can be added by users and companies.
ROS is used by many thousands of users worldwide and knowledge can be shared between users. The users range from hobbyists to professional developers of commercial robots. In addition to the large group of ROS researchers, there is a ROS-Industrial group dedicated to applying ROS software to robots for manufacturing.
A ROS distribution is a set of ROS software packages that can be downloaded to your computer. These packages are supported by the Open Source Robotics Foundation (OSRF), a nonprofit organization. The distributions are updated periodically and given different names by the ROS organization. More details about the ROS organization are available at:
This book is written using Ubuntu 14.04 as the operating system and ROS Indigo as the version of the ROS distribution. Always make sure that you check for any updates for the Ubuntu or ROS versions you are using.
There is a long list of robots on the ROS wiki website http://wiki.ros.org/Robots, which use ROS. For example, we are using four different robots in this book to provide you with an experience of a wide range of ROS capabilities. These robots are as follows:
TurtleBot, a mobile robot
Baxter, a friendly two-armed robot
Crazyflie and Bebop, flying robots
The images of these robots are in the following figures:

TurtleBot 2

Baxter in the authors' laboratory
Of course, not everyone has the opportunity to use real robots such as Baxter. However, there is good news! Using the ROS Gazebo software, you can simulate Baxter as well as many other robots whose models are provided for Gazebo. We will simulate TurtleBot using Gazebo and actually design our own mobile robot in the upcoming chapters of this book.

Bebop and Crazyflie
For this book, we assume the reader has a computer with Ubuntu Saucy 13.10 or Trusty 14.04 installed. The examples in this book have been developed using ROS Indigo and this version of ROS is only supported by these two versions of Ubuntu. The instructions for ROS installation provided in this section are for installing Debian (binary) packages. This method is the most efficient and preferred way to install ROS.
If you wish to install the ROS Indigo source code and build the software, refer to instructions at http://wiki.ros.org/indigo/Installation/Source. The instructions presented here to install ROS Indigo with Debian packages can also be found at http://wiki.ros.org/indigo/Installation/Ubuntu.
If you have any problems installing ROS, refer to this site and the ROS forum at http://answers.ros.org.
To begin, configure the Ubuntu repositories to allow restricted, universe, and multiverse. Click on the Ubuntu Software Center icon in the launch menu on the left side of your desktop. From the Software Center's top menu bar, navigate to Edit, then to the drop-down menu, and select Software Sources. On the Software & Updates screen, select checkboxes to match the following screenshot:
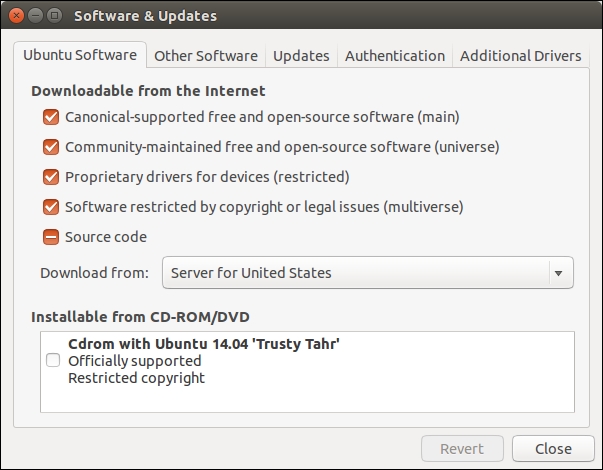
Ubuntu Software Center Screen
Open a terminal window to set up the sources.list file on your computer to accept software from the ROS software repository at http://packages.ros.org which is the authorized site for the ROS software.
At the $ command prompt, type the following command as one long command:
$ sudo sh -c 'echo "deb http://packages.ros.org/ros/ubuntu
$(lsb_release -sc) main" > /etc/apt/sources.list.d/ros-latest.list'
This step allows the operating system to know where to download programs that need to be installed on your system. When updates are made to ROS Indigo, your operating system will be made aware of these updates.
Keys confirm the origin of the code and verify that unauthorized modifications to the code have not been made without the knowledge of the owner. A repository and the keys of that repository are added the operating system's trusted software list. Type the following command:
$ sudo apt-key adv --keyserver hkp://pool.sks-keyservers.net:80 --recv-key 0xB01FA116
Before you begin with the installation, the current system software must be up to date to avoid problems with libraries and wrong versions of software. To make sure your Debian package index is up-to-date, type the following command:
$ sudo apt-get update
Note
Warning: If you are using Ubuntu Trusty14.04.2 and experience dependency issues during the ROS installation, you may have to install some additional system dependencies.
 Do not install these packages if you are using 14.04, it will destroy your X server:
$ sudo apt-get install xserver-xorg-dev-lts-utopic mesa-common-dev-lts-utopic libxatracker-dev-lts-utopic libopenvg1-mesa-dev-lts-utopic libgles2-mesa-dev-lts-utopic libgles1-mesa-dev-lts-utopic libgl1-mesa-dev-lts-utopic libgbm-dev-lts-utopic libegl1-mesa-dev-lts-utopic
Alternatively, try installing just this to fix dependency issues:
$ sudo apt-get install libgl1-mesa-dev-lts-utopic
For more information on this issue, refer to the following sites:
http://answers.ros.org/question/203610/ubuntu-14042-unmet-dependencies/
https://bugs.launchpad.net/ubuntu/+source/mesa-lts-utopic/+bug/1424059
Install the desktop-full configuration of ROS. Desktop-full includes ROS, rqt, rviz, robot-generic libraries, 2D/3D simulators, navigation, and 2D/3D perception. In this book, we will be using rqt and rviz for visualization and also the Gazebo 3D simulator, as well as the ROS navigation and perception packages. To install, type the following command:
$ sudo apt-get install ros-indigo-desktop-full
ROS Indigo is installed on your computer system when the installation is complete!
The ROS system may depend on software packages that are not loaded initially. These software packages external to ROS are provided by the operating system. The ROS environment command rosdep is used to download and install these external packages. Type the following command:
$ sudo rosdep init
$ rosdep update
Your terminal session must now be made aware of these ROS files so that it knows what to do when you attempt to execute ROS command-line commands. Running this script will set up the ROS environment variables:
$ source /opt/ros/indigo/setup.bash
Alternately, it is convenient if the ROS environment variables are automatically added to your terminal session every time a new shell is launched. If you are using bash for your terminal shell, do this by typing the following command:
$ echo "source /opt/ros/indigo/setup.bash" >> ~/.bashrc
$ source ~/.bashrc
Now when a new terminal session is launched, the bash shell is automatically aware of the ROS environment variables.
The rosinstall command is a command-line tool in ROS that allows you to download ROS packages with one command.
To install this tool on Ubuntu, type the following command:
$ sudo apt-get install python-rosinstall
The ROS environment is set up through a number of variables that tell the system where to find ROS packages. Two main variables are ROS_ROOT and ROS_PACKAGE_PATH that enable ROS to locate packages in the filesystem.
To check whether the ROS environment variables are set correctly, use the export command in the following form that lists the ROS environment variables:
$ export | grep ROS
The output of the preceding command is as follows:
declare -x ROSLISP_PACKAGE_DIRECTORIES=""

declare -x ROS_DISTRO="indigo"

declare -x ROS_ETC_DIR="/opt/ros/indigo/etc/ros"

declare -x ROS_MASTER_URI="http://localhost:11311"

declare -x ROS_PACKAGE_PATH="/opt/ros/indigo/share:/opt/ros/indigo/stacks"

declare -x ROS_ROOT="/opt/ros/indigo/share/ros"
If the variables are not set correctly, you will need to source your setup.bash file as described in the Environment setup section of this chapter. Check whether the ROS_DISTRO= "indigo" and the ROS_PACKAGE_PATH variables are correct, as shown previously.
The tutorial that discusses the ROS environment can be found at http://wiki.ros.org/ROS/Tutorials/InstallingandConfiguringROSEnvironment.
The next step is to create a catkin workspace. A catkin workspace is a directory (folder) in which you can create or modify existing catkin packages. The catkin structure simplifies the build and installation process for your ROS packages. The ROS wiki website is http://wiki.ros.org/catkin/Tutorials/create_a_workspace.
A catkin workspace can contain up to three or more different subdirectories (/build, /devel, and /src) which each serve a different role in the software development process.
We will label our catkin workspace catkin_ws. To create the catkin workspace, type the following commands:
$ mkdir –p ~/catkin_ws/src
$ cd ~/catkin_ws/src
$ catkin_init_workspace
Even though the workspace is empty (there are no packages in the src folder, just a single CMakeLists.txt link), you can still build the workspace by typing the following command:
$ cd ~/catkin_ws/
$ catkin_make
The catkin_make command creates the catkin workspaces. If you view your current directory contents, you should now have the build and devel folders. Inside the devel folder there are now several setup.*sh files. We will source the setup.bash file to overlay this workspace on top of your ROS environment:
$ source ~/catkin_ws/devel/setup.bash
Remember to add this source command to your .bashrc file by typing the following command:
$ echo "source ~/catkin_ws/devel/setup.bash" >> ~/.bashrc
To make sure your workspace is properly overlaid by the setup script, make sure the ROS_PACKAGE_PATH environment variable includes the directory you're in by typing the following command:
$ echo $ROS_PACKAGE_PATH
The output of the preceding command should be as follows:
/home/<username>/catkin_ws/src:/opt/ros/indigo/share:/opt/ros/indigo/stacks
Here, <username> is the name you chose as user when Ubuntu was installed.
The ROS software is divided into packages that can contain various types of programs, images, data, and even tutorials. The specific contents depend on the application for the package. The site http://wiki.ros.org/Packages discusses ROS packages.
A package can contain programs written in Python or C++ to control a robot or another device. For the turtlesim simulator package for example, the package contains the executable code used to change the background color or move a turtle around on the screen. This package also contains images of a turtle for display and files used to create the simulator.
There is another class of packages in ROS called
metapackages that are specialized packages that only contain a package.xml manifest. Their purpose is to reference one or more related packages, which are loosely grouped together.
Each package contains a manifest named package.xml that describes the package in the Extensible Markup Language (XML) format. In addition to providing a minimal specification describing the package, the manifest defines properties about the package such as the package name, version numbers, authors, maintainers, and dependencies on other packages.
Occasionally, we would like to find packages that we wish to use and display the files involved. This section introduces several useful ROS commands:
rospackused for information about a packageroscdused to navigate the ROS directoriesroslsused to list directories and files in a package directory
The rospack command can be used to list ROS packages, locate packages by name, and determine if a package depends on another package, among other uses. For more information use the following command with the help or -h option in the form:
$ rospack help | less
Tip
There are many options for this command, so piping with the less option shows one screen at a time. For many commands, using the power of Linux to make the output readable is necessary. Use the Q key to quit (exit) the mode.
We will use the turtlesim package for the examples here. To change directories to the location of turtlesim, use the following command:
$ roscd turtlesim
This yields the location to one of the author's laptops as follows:
harman@Laptop-M1210:/opt/ros/indigo/share/turtlesim$On your computer, the $ command prompt will be preceded by the information about your computer. Generally, that information for our computers will be deleted in our examples using ROS commands. Once you are in the turtlesim directory, the standard Linux commands can be used with the subdirectories or files, or the ROS commands can be used. To determine the directories and files in the turtlesim directory but without changing to the turtlesim directory, use the following command:
$ rosls turtlesim
Here is the result from the home directory of the author's laptop with ROS installed:
cmake images msg package.xml srvTo see the filenames of the images loaded with turtlesim, specify the images directory in the package as follows:
$ rosls turtlesim/images
The output of the preceding command is as follows:
box-turtle.png            fuerte.png       hydro.svg       palette.png          turtle.png

diamondback.png     groovy.png     indigo.png     robot-turtle.png

electric.png                 hydro.png       indigo.svg      sea-turtle.png
There are various turtle images that can be used. The rosls turtlesim command will also work to show the contents of the turtlesim subdirectories: /msg for messages and /srv for services. These files will be discussed later. To see the manifest, type the following command:
$ roscd turtlesim
$ cat package.xml
This will also show the dependencies such as roscpp for C++ programs.
The rospack find <package name> command returns the path to the package named <package name>. For example, type the following command:
$ rospack find turtlesim
The preceding command displays the path to the turtlesim directory.
Execute the following command:
$ rospack list
This lists the ROS package names and their directories on the computer. In the case of the laptop mentioned earlier, there are 225 ROS packages listed!
Tip
If you really want to see all the ROS packages and their locations, use the following command form:
$ rospack list | less
This form allows paging of the long list of names and directories for the packages. Press Q to quit.
Alternatively, this is the form of the rospack command:
$ rospack list-names
This lists only the names of the packages without the directories. After such a long list, it is a good idea to open a new terminal window or clear the window with the clear command.
This is the form of the rospack command:
$ rospack list-names | grep turtle
This lists the four packages with turtle in the name.
More information on commands that are useful to navigate the ROS filesystem is available at the ROS website http://wiki.ros.org/ROS/Tutorials/NavigatingTheFilesystem.
One of the primary purposes of ROS is to facilitate communication between the ROS modules called nodes. These nodes represent the executable code and the code can reside entirely on one computer, or nodes can be distributed between computers or between computers and robots. The advantage of this distributed structure is that each node can control one aspect of a system. One node can capture and output camera images, and another node can control a robot's manipulator in response to the camera view. We will see that the turtlesim simulator has two nodes that are created when turtlesim is executed.
The ROS site http://www.ros.org/core-components/ describes the communication and robot-specific features of ROS. Here, we will explore some of the main components of a ROS system including ROS nodes and the ROS Master. It is important for you to understand the ROS nodes and Master, so they will be defined later through discussions and examples.
Basically, nodes are processes that perform some action. The nodes themselves are really software modules but with the capability to register with the ROS Master node and communicate with other nodes in the system. The ROS design idea is that each node is an independent module that interacts with other nodes using the ROS communication capability.
The nodes can be created in various ways. From a terminal window a node can be created directly by typing a command after the command prompt, as shown in the examples to follow. Alternatively, nodes can be created as part of a program written in Python or C++. In this book, we will use both the ROS commands in a terminal window and Python programs to create nodes.
One of the strengths of ROS is that a particular task, such as controlling a wheeled mobile robot, can be separated into a series of simpler tasks. The tasks can include the perception of the environment using a camera or laser scanner, map making, planning a route, monitoring the battery level of the robot's battery, and controlling the motors driving the wheels of the robot. Each of these actions might consist of a ROS node or series of nodes to accomplish the specific tasks.
A node can independently execute code to perform its task but can communicate with other nodes by sending or receiving messages. The messages can consist of data, or commands, or other information necessary for the application.
Some nodes provide information for other nodes, as a camera feed would do, for example. Such a node is said to publish information that can be received by other nodes. The information in ROS is called a topic, which will be explained later. Continuing with the camera example, the camera node can publish the image on the camera/image_raw topic.
Image data from the camera/image_raw topic can be used by a node that shows the image on the computer screen. The node that receives the information is said to subscribe to the topic being published, in this case camera/image_raw.
In some cases, a node can both publish and subscribe to one or more topics. A number of examples later in the book will demonstrate this functionality.
The ROS nodes are typically small and independent programs that can run concurrently on several systems. Communication is established between the nodes by the ROS Master. The ROS Master provides naming and registration services to the nodes in the ROS system. It tracks publishers and subscribers to the topics. The role of the Master is to enable individual ROS nodes to locate one another. The most often used protocol for connection is the standard Transmission Control Protocol/Internet Protocol (TCP/IP) or Internet Protocol called TCPROS in ROS. Once these nodes are able to locate one another, they can communicate with each other peer-to-peer.
One responsibility of the Master is to keep track of nodes when new nodes are executed and come into the system. Thus, the Master provides a dynamic allocation of connections. The nodes cannot communicate however, until the Master notifies the nodes of each others' existence. A simple example is shown at: http://wiki.ros.org/Master.
roscore is a collection of nodes and programs that you must have running for ROS nodes to communicate. After it is launched, roscore will start the following:
A ROS Master
A ROS Parameter Server
A
rosoutlogging node
The roscore command starts ROS and creates the Master so that nodes can register with the Master. You can view the ROS tutorial for roscore at http://wiki.ros.org/roscore.
Issue the following command to start the Master in a new terminal window and observe the output:
$ roscore
The output of the preceding command is as follows:
... logging to /home/harman/.ros/log/94248b4a-3f05-11e5-b5ce-00197d37ddd2/roslaunch-Laptop-M1210-2322.log
Checking log directory for disk usage. This may take awhile.
Press Ctrl-C to interrupt
Done checking log file disk usage. Usage is <1GB.
started roslaunch server http://Laptop-M1210:46614/
ros_comm version 1.11.13
SUMMARY
========
PARAMETERS
 * /rosdistro: indigo
 * /rosversion: 1.11.13
NODES
auto-starting new master
process[master]: started with pid [2334]
ROS_MASTER_URI=http://Laptop-M1210:11311/
setting /run_id to 94248b4a-3f05-11e5-b5ce-00197d37ddd2
process[rosout-1]: started with pid [2347]
started core service [/rosout]
In the preceding screen output, you will see information about the computer, parameters that list the name (indigo) and version number of the ROS distribution, and other information. The Master is defined by its
Uniform Resource Identifier (URI). This identifies the location of the Master; in this case, it is running on the laptop and is used to execute the roscore command.
The Parameter Server is a shared dictionary of parameters that nodes store and retrieve at runtime. The Parameter Server runs inside the Master and parameters are globally viewable so that nodes can access the parameters.
In the preceding screen output from the roscore command, the parameters associated with the Master are as follows:
* /rosdistro: indigo
* /rosversion: 1.11.13
Indigo is the ROS distribution release that we are using. As Indigo is changed or packages are added, numbered versions such as 1.11.13 are released. Issuing the roscore command is a way to determine the release of ROS running on your computer.
Whenever ROS is executing, it is possible to list the nodes that are active and the topics that are used for communication. We will explore the information in the roscore output in more detail by invoking useful ROS terminal commands.
Three commands used extensively in ROS are as follows:
roscoreto start the Master and allow nodes to communicaterosnode listto list the active nodesrostopic listto list the topics associated with ROS nodes
After the roscore command is executed, the terminal window used to execute roscore must remain active, but it can be minimized. In another terminal window, the rosnode list command will cause a list of the ROS nodes that are active to be displayed on the screen. After the command for roscore is executed, only one node rosout will be listed as an active node if you type the following command:
$ rosnode list
The output of the preceding command is as follows:
/rosoutIn the second terminal window, list the active topics by typing:
$ rostopic list
The output of the preceding command is as follows:
/rosout
/rosout_agg
Notice that the /rosout node and the /rosout topic have the same designation. In ROS terms, the rosout node subscribes to the /rosout topic. All the active nodes publish their debug messages to the /rosout topic. We will not be concerned with these messages here; however, they can be useful to debug a program. For some explanation, refer to the ROS wiki at http://wiki.ros.org/rosout.
The rosout node is connected to every other active node in the system. The /rosout_agg topic receives messages also, but just from the rosout node so it does not have to connect to all of the nodes and thus saves time at system startup.
The rostopic and rosnode terminal commands have a number of options that will be demonstrated by various examples in this book.
Tip
Most of the ROS commands have help screens that are usually helpful. Type the following command for the command options:
$ rosnode -h
For more detailed usage, use the subcommand name, for example:
$ rosnode list –h
will list the subcommands and the options for the rosnode command.
There are a number of other important ROS terminal commands that you should know. They are introduced and explained using the turtlesim simulator in the upcoming section.
A simple way to learn the basics of ROS is to use the turtlesim simulator that is part of the ROS installation. The simulation consists of a graphical window that shows a turtle-shaped robot. The background color for the turtle's world can be changed using the Parameter Server. The turtle can be moved around on the screen by ROS commands or using the keyboard.
Turtlesim is a ROS package, and the basic concepts of package management were presented in the Exploring the ROS packages section, as discussed earlier. We suggest that you refer to this section before continuing.
We will illustrate a number of ROS commands that explore the nodes, topics, messages, and services used by the turtle simulator. We have already covered the roscore, rosnode, and rostopic commands. These commands will be used with turtlesim also.
Other important ROS terminal commands that will be covered in this section are as follows:
rosrunthat finds and starts a requested node in a packagerosmsgthat shows information about messagesrosservicethat displays runtime information about nodes and can pass data between nodes in a request/response moderosparamthat is used to get and set parameters (data) used by nodes
To start turtlesim with ROS commands, we need to open two separate terminal windows. First, issue the following command in the first window if the Master is not already running:
$ roscore
Wait for the Master to complete startup. You can minimize this window but do not close it because the Master must run to allow the nodes to communicate.
The result on your screen will resemble the output discussed previously in the Invoking the ROS Master using roscore section, where roscore was described.
To display the turtle on the screen, use the rosrun command. It takes the arguments [package name] [executable name] , and in this case, turtlesim as the package and turtlesim_node as the executable program.
In the second terminal window, issue the following command:
$ rosrun turtlesim turtlesim_node
You will see an output similar to this:
[ INFO] [1427212356.117628994]: Starting turtlesim with node name /turtlesim
[ INFO] [1427212356.121407419]: Spawning turtle [turtle1] at x=[5.544445], y=[5.544445], theta=[0.000000]
Wait for the display screen to appear with the image of a turtle at the center, as shown in the turtlesim screen in the following screenshot. The terminal window can be minimized, but keep the turtle display screen in view. The turtle is called turtle1 since this is the first and only turtle in our display.
After you have started turtlesim by executing the rosrun command, you will see information about the turtle's position on the screen. The /turtlesim node creates the screen image and the turtle. Here, the turtle is in the center at about x = 5.5, y = 5.5 with no rotation since angle theta is zero. The origin (0, 0) is at the lower-left corner of the screen:

Turtlesim screen
Let's study the properties of the nodes, topics, services, and messages available with the turtlesim package in another terminal window. Thus, at this point, you will have three windows active but the first two can be minimized or dragged off to the side or the bottom. They should not be closed.
In the third window, issue the rosnode command to determine information about any node. First, list the active nodes, using the following command:
$ rosnode list
The output is as follows:
/rosout
/turtlesim
We will concentrate on the /turtlesim node. Note the difference in notation between the /turtlesim node and the turtlesim package.
To see the publications, subscriptions, and services of the turtlesim node, type the following command:
$ rosnode info /turtlesim
The output of the preceding command is as follows:
---------------------------------------------------------------------
Node [/turtlesim]
Publications:
 * /turtle1/color_sensor [turtlesim/Color]
 * /rosout [rosgraph_msgs/Log]
 * /turtle1/pose [turtlesim/Pose]
Subscriptions:
 * /turtle1/cmd_vel [unknown type]
Services:
 * /turtle1/teleport_absolute
 * /turtlesim/get_loggers
 * /turtlesim/set_logger_level
 * /reset
 * /spawn
 * /clear
 * /turtle1/set_pen
 * /turtle1/teleport_relative
 * /kill
contacting node http://Laptop-M1210:38993/ ...
Pid: 2364
Connections:
 * topic: /rosout
    * to: /rosout
    * direction: outbound
    * transport: TCPROS
The following diagram represents a graphical illustration of the relationship of the turtlesim node in elliptical shapes and topics in rectangular boxes:

/turtlesim node
The graph was created using the rqt_graph command as described in the Introducing RQT tools section in Chapter 3, Driving Around with TurtleBot.
We read the output of the rosnode info command and the graph of the turtlesim node and topics in the preceding diagram as follows (ignoring the logging services and the /rosout and /rosout_agg nodes):
The
/turtlesimnode publishes to two topics. These topics control the color of the turtle's screen and the position of the turtle on the screen when messages are sent from/turtlesim:/turtle1/color_sensorwith the message type[turtlesim/Color]/turtle1/posewith the message type[turtlesim/Pose]
The
/turtlesimnode subscribes to theturtle1/cmd_veltopic of an unknown type. The type is unknown because another node that publishes on this topic has not yet been executed.There are a number of services associated with the
/turtlesimnode. The services can be used to move the turtle around (teleport), clear the screen, kill the nodes, and perform other functions. The services will be explained later in this section.
A ROS message is a strictly typed data structure. In fact, the message type is not associated with the message contents. For example, one message type is string, which is just text. Another type of message is uint8, which means that it is an unsigned 8-bit integer. These are part of the std_msg package or standard messages. The command form rosmsg list lists the type of messages on your system; it is a long list! There are packages for messages of the type control, type geometry, and type navigation, among others to control robot actions. There are sensor message types used with laser scanners, cameras, and joysticks to name just a few of the sensors or input devices possible with ROS. Turtlesim uses several of the message types to control its simulated robot—the turtle.
For these exercises, keep the roscore and /turtlesim windows active. Open other terminal windows as needed. We will concentrate on the turtle1/color_sensor topic first. You will be typing in the third window.
Tip
If the screen gets too cluttered, remember the $ clear command.
Use the $ history command to see the commands you have used.
For the /turtlesim node, the topics are listed using the following command:
$ rostopic list
The output of the preceding command is as follows:
/rosout
/rosout_agg
/turtle1/cmd_vel
/turtle1/color_sensor
/turtle1/pose
The topic type can be determined for each topic by typing the following command:
$ rostopic type /turtle1/color_sensor
turtlesim/ColorThe message type in the case of the /turtle1/color_sensor topic is turtlesim/Color. This is the format of ROS message type names:
[package name]/[message type]
If a node publishes a message, we can determine the message type and read the message.
The turtlesim package has two message types that are found with the following command:
$ rosmsg list | grep turtlesim
The output is as follows:
turtlesim/Color
turtlesim/Pose
The rosmsg list command displays all of the messages. Adding | grep turtlesim shows all messages of the turtlesim package. There are only two in the turtlesim package. From the message type, we can find the format of the message. Make sure that you note that Color in the message type starts with a capital letter.
The rosmsg show <message type> command displays the fields in a ROS message type. For the turtlesim/Color type, the fields are integers:
$ rosmsg show turtlesim/Color
Output of the preceding command is as follows:
uint8 r
uint8 g
uint8 b
The format of values designating colors red (r), green (g), and blue (b) is unsigned 8-bit integer.
To understand the message, it is necessary to find the message type. For example, turtlesim/Color is a message type for turtlesim that has three elements that define the color of the background. For example, the red color in the background is defined by uint8 r. This indicates that if we wish to modify the red value, an 8-bit unsigned integer is needed. The amount of red in the background is in the range of 0-255.
In general, the formats of numerical data include integers of 8, 16, 32, or 64 bits, floating point numbers, and other formats.
To determine the color mixture of red, green, and blue in the background of our turtle, use the rostopic echo [topic name] command in the form, as follows:
$ rostopic echo /turtle1/color_sensor
Output of the preceding command is as follows:
r: 69
g: 86
b: 255
---
Press Ctrl + C to stop the output.
The website describing the RGB Color Codes Chart and the meaning of the numerical color values can be found at http://www.rapidtables.com/web/color/RGB_Color.htm.
The chart explains how to mix the red, green, and blue (rgb) color values to achieve any desired color. An example, which is discussed later, will show you how to change the background color for the turtle. The color values are parameters that can be changed.
A simple table can clarify the relationship between the topics and the messages for the /turtlesim node:
|
Topics and Messages for /turtlesim node | |||
|---|---|---|---|
|
Topics name |
Topic type |
Message format |
Message |
|
|
|
|
|
|
|
|
|
|
|
|
|
|
|
The table of Topics and Messages shows the topics, types, message formats, and data values for the two topics of the /turtlesim node that we explored. The commands to determine the information are also shown in the table.
The Parameter Server maintains a dictionary of the parameters that are used to configure the screen of turtlesim. We will see that these parameters are used to define the color of the background for the turtle. Thus, the turtlesim node can read and write parameters held by the Parameter Server.
Use the help option to determine the form of the rosparam command:
$ rosparam help
Output of the preceding command is as follows:
rosparam is a command-line tool for getting, setting, and deleting parameters from the ROS Parameter Server.   Commands:
  rosparam set       set parameter
  rosparam get       get parameter
  rosparam list      list parameter names
<Edited>
To list the parameters for the /turtlesim node, we will use the following command:
$ rosparam list
Output of the preceding code is as follows:
/background_r
/background_g
/background_b
/rosdistro
/roslaunch/uris/host_d125_43873__51759
/rosversion
/run_id
Note that the last four parameters were created by invoking the Master with the roscore command, as discussed previously. Also, the list defines the characteristics of the parameter but not the data value.
To change the color parameters for turtlesim, let's change the turtle's background to red. To do this, make the blue and green data values equal to zero and saturate red = 255 using the rosparam set command. Note that the clear option from rosservice must be executed before the screen changes color.
The default turtle screen is blue. You can use rosparam get / to show the data contents of the entire Parameter Server:
$ rosparam get /
Output of the preceding command is as follows:
background_b: 255
background_g: 86
background_r: 69
rosdistro: 'indigo
roslaunch:
  uris: {host_d125_43873__60512: 'http://D125-43873:60512/'}
rosversion: '1.11.13
run_id: 2429b792-d23c-11e4-b9ee-3417ebbca982
You can change the colors of the turtle's screen to a full red background using the rosparam set command:
$ rosparam set background_b 0
$ rosparam set background_g 0
$ rosparam set background_r 255
$ rosservice call /clear
You will see a red background on the turtle screen. To check the numerical results, use the rosparam get / command.
Another capability of nodes is to provide what in ROS terms is called a service. This feature is used when a node requests information from another node. Thus, there is a two-way communication between the nodes.
You can check the turtle's pose using the /turtle1/pose topic and the message type, /turtlesim/Pose. Carefully note the different notations and meanings. To determine the the message type, run the following command:
$ rostopic type /turtle1/pose
The output is as follows:
turtlesim/Pose
$ rosmsg show turtlesim/Pose
The output is as follows:
float32 x
float32 y
float32 theta
float32 linear_velocity
float32 angular_velocity
We can find the turtle's position, orientation in angle (theta), and its velocity using the rostopic echo command:
$ rostopic echo /turtle1/pose
The output is as follows:
x: 5.544444561
y: 5.544444561
theta: 0.0
linear_velocity: 0.0
angular_velocity: 0.0
This command outputs the result continuously and is stopped by pressing the Ctrl +C keys. The result will show that the turtle is at the center of its screen with no rotation at angle zero and no movement since the velocities are zero.
The turtle can be moved using the rosservice teleport option. The format of the command is rosservice call <service name> <service arguments>. The arguments here will be the turtle's position and orientation as x, y, and theta. The turtle is moved to position [1,1] with theta=0 by running the following command:
$ rosservice call /turtle1/teleport_absolute 1 1 0
The result can be seen in the following screenshot:

turtle after an absolute move
The relative teleport option moves the turtle with respect to its present position. The arguments are [linear distance , angle]. Here, the rotation angle is zero. The command for relative movement is as follows:
$ rosservice call /turtle1/teleport_relative 1 0
Your turtle should now move to x=2 and y=1.
If you are communicating with ROS via the terminal window, it is possible to issue commands to ROS to explore or control nodes in a package from the command prompt, as listed in the following table:
The website (http://wiki.ros.org/ROS/CommandLineTools) describes many ROS commands. The table lists some important ones. However, these examples only cover a few of the possible variations of the commands.
In this chapter, you first learned how to install and launch ROS. We discussed the ROS architecture and ROS packages, nodes, topics, messages, and services. To apply the knowledge, the turtlesim simulator was used to illustrate many ROS commands.
In Chapter 2, Creating Your First Two-Wheeled ROS Robot (in Simulation), we will show you how to build a robot model that ROS uses to display the robot and allows you to control it in a simulation. The chapter introduces the visualization tool called rviz to display the robot and the simulation tool Gazebo that includes the physics of the robot as you move it around in a simulated environment.


