Download code from GitHub
Getting Started
There was a time when most of the web comprised pages with static content—the only graphics were embedded images. Over time, however, application requirements became more ambitious and began running into limitations. As highly interactive applications became an increasingly important part of the user experience, there was, eventually, enough demand for a fully programmable graphics Application Programming Interface (API) to address these requirements. In 2006, Vladimir Vukicevic, an American-Serbian software engineer, began working on an OpenGL prototype for a then-upcoming HTML <canvas> element that he called Canvas 3D. In March 2011, his work would lead to the Kronos Group, the nonprofit organization behind OpenGL, to create WebGL, a specification to grant internet browsers access to Graphics Processing Units (GPUs).
All of the browser engines collaborated to create WebGL, the standard for rendering 3D graphics on the web. It was based on OpenGL Embedded Systems (ES), a cross-platform API for graphics targeted at embedded systems. This was the right starting place, because it made it possible to easily implement the same API in all browsers, especially since most browser engines were running on systems that had support for OpenGL.
WebGL was originally based on OpenGL ES 2.0, the OpenGL specification version for devices such as Apple's iPhone and iPad. But, as the specification evolved, it became independent with the goal of providing portability across various operating systems and devices. The idea of web-based, real-time rendering opened a new world of possibilities for web-based 3D environments. Due to the pervasiveness of web browsers, these and other kinds of 3D applications could now be rendered on desktop and mobile devices such as smartphones and tablets. According to the Khronos Group, the ability for Web developers to directly access OpenGL-class graphics directly from JavaScript, and freely mix 3D with other HTML content, will enable a new wave of innovation in Web gaming, educational and training applications.
Even though WebGL was vastly adopted for many years after it matured into a stable release—shipping inside Firefox, Chrome, Opera, IE11, and Android's mobile web browsers—Apple still lacked official WebGL support. Neither OS X Safari nor Safari Mobile supported WebGL. In fact, it wasn't until 2014, at June's Worldwide Developers Conference (WWDC), that Apple announced that both OS X Yosemite and iOS 8 would ship with WebGL support. This became a turning point for 3D graphics on the web. With official support from all major browsers, the entire range of 3D graphics—at native speeds—could be delivered to billions of desktop and mobile devices. WebGL unleashed the power of graphics processors to developers on an open platform, allowing console-quality application to be built for the web.
In this chapter, we will do the following:
- Understand the necessary system requirements to run WebGL.
- Cover the common high-level components of a WebGL application.
- Set up a drawing area (canvas).
- Test your browser's WebGL capabilities.
- Understand that WebGL acts as a state machine.
- Modify WebGL variables that affect your scene.
- Load and examine a fully-functional scene.
System Requirements
WebGL is a web-based 3D Graphics API. As such, there is no installation needed. While WebGL 1 is based on the OpenGL ES 2.0 specification, WebGL 2 is based on OpenGL ES 3.0, which guarantees the availability of many WebGL 1 extensions along with new features.
Given this book covers WebGL 2, all WebGL and WebGL 2 terms reference the WebGL 2 (OpenGL ES 3.0) specification. Any references to WebGL 1 (OpenGL ES 2.0) will be done so explicitly.
As of January 27, 2016, WebGL 2 is available by default in Firefox and Chrome. You will automatically have access to WebGL 2, provided you have one of the following web browsers:
- Firefox 51 or above
- Google Chrome 56 or above
- Chrome for Android 64 or above
For an updated list of the web browsers that support WebGL, please visit the Khronos Group web page: http://www.khronos.org/webgl/wiki/Getting_a_WebGL_Implementation.
Or visit the well-known CanIUse.com resource: https://caniuse.com/#search=WebGL 2.
Since we will be using modern browsers to run WebGL 2, we will also leverage HTML5, CSS3, and JavaScript ES6 throughout this book. For more information on these modern standards, please refer to the following link: https://developer.mozilla.org/en-US/docs/Web.
At the time of this book's publication, WebGL 2 remains a specification that's in flux. Some parts of the specification are considered stable and have been implemented in modern browsers; other parts should be considered experimental and have been partially implemented to varying degrees. Therefore, you should be familiar with how the standardization process works and the levels of implementation for each new property. That being said, WebGL 2 is nearly 100% backward compatible with WebGL 1. All exceptions to backward compatibility are recorded in the following link: https://www.khronos.org/registry/webgl/specs/latest/2.0/#BACKWARDS_INCOMPATIBILITY.
If you have prior experience with WebGL 1 or are curious about migration strategies to WebGL 2, you can refer to Chapter 11, WebGL 2 Highlights, where key differences between WebGL 1 and WebGL 2 are highlighted.
Lastly, you will need to make sure that your computer has an approved graphics card. To quickly validate your current configuration for WebGL 2, please visit the following link: https://get.webgl.org/WebGL 2/.
WebGL Rendering
WebGL is a 3D graphics library that enables modern web browsers to render 3D scenes in a standard and efficient manner. According to Wikipedia, rendering is the process of generating an image from a model by means of computer programs. Since this is a process executed by a computer, there are different ways to produce such images. There are three main distinctions to make when discussing rendering: software-based and hardware-based rendering, server-based and client-based rendering, and retained-mode and immediate-mode rendering. As we will see, WebGL offers a unique approach to hardware and client based rendering with an immediate-mode API on the web.
Software and Hardware Based Rendering
The first distinction we should make is whether we are using any special graphics hardware. On one hand, we can talk about software-based rendering for cases where all required calculations to render 3D scenes are performed using the computer's Central Processing Unit (CPU). On the other hand, as is the case with WebGL, we use the term hardware-based rendering for scenarios where there is a GPU performing 3D graphics computations. From a technical standpoint, hardware-based rendering is much more efficient than software-based rendering, because the former involves dedicated hardware handling the necessary operations. In contrast, a software-based rendering solution can be more common due to the lack of hardware dependencies.
Server and Client Based Rendering
The second distinction to make is whether the rendering process is happening locally or remotely. When the image that needs to be rendered is too complex, the render will most likely occur remotely. This is the case for 3D animated movies where dedicated servers with lots of hardware resources render intricate scenes. We call this server-based rendering. The opposite of this approach takes place when rendering occurs locally. We call this client-based rendering. WebGL offers a client-based rendering approach: the elements that are a part of the 3D scene are usually downloaded from a server. However, the processing required to obtain an image is all performed locally using the client's graphics hardware. Although this is not a unique solution, compared to other technologies (such as Java 3D, Flash, and the Unity Web Player Plugin), WebGL presents several advantages:
- JavaScript programming: JavaScript is a language that is natural to both web developers and browsers. Working with JavaScript allows you to access all parts of the DOM and easily integrate WebGL applications with other JavaScript libraries such as jQuery, React, and Angular.
- Automatic memory management: WebGL—unlike other technologies, such as OpenGL, where memory allocation and deallocation are handled manually—follows the rules for JavaScript variable scoping and automatic memory management. This simplifies programming tremendously while reducing the code footprint. Ultimately, this simplification makes it easier to understand the application logic.
- Pervasiveness: Web browsers with JavaScript capabilities are installed in smartphones and tablet devices by default. This means you can leverage WebGL across a vast ecosystem of desktop and mobile devices.
- Performance: Performance of WebGL applications is comparable to equivalent standalone applications (with some exceptions). This is possible due to WebGL's ability to access the local graphics hardware. Until recently, many 3D web rendering technologies used software-based rendering.
- Zero compilation: WebGL is written in JavaScript; therefore, there is no need to compile your code before executing it on the web browser. This empowers you to make changes in real-time and see how those changes affect your 3D web application. Nevertheless, when we cover shader programs, we will understand that some compilation is needed. However, this occurs in your graphics hardware and not in your browser.
Retained and Immediate Mode Rendering
The third distinction to make is that WebGL is an immediate mode 3D rendering API designed for the web. Graphics APIs can be divided into retained-mode APIs and immediate-mode APIs.
Retained-Mode Rendering
A retained-mode API is declarative. The application builds a scene from primitives, such as shapes and lines, and then the graphics library maintains a scene model in memory. To change what is rendered, the application issues a command to update the scene, which could include, for example, adding or removing a shape; the library is then responsible for managing and redrawing the scene:

Immediate-Mode Rendering
An immediate-mode API is procedural. Immediate mode rendering requires the application to directly manage rendering. In this case, the graphics library does not maintain a scene model. Each time a new frame is drawn, the application issues all drawing commands required to describe the entire scene, regardless of actual changes. This method provides the maximum amount of control and flexibility to the application program:

Retained Versus Immediate Mode Rendering
Retained-mode rendering can be simpler to use, because the API does more of the work for you, such as initialization, state maintenance, and cleanup. However, it is often less flexible since the API forces its own particular scene model; it can also have higher memory prerequisites because it needs to provide a general-purpose scene model. Immediate-mode rendering, on the other hand, as offered with WebGL, is much more flexible and can implement targeted optimizations.
Elements in a WebGL Application
WebGL, like other 3D graphics libraries, comprises many common 3D elements. These fundamental elements will be covered, chapter-by-chapter, throughout this book.
Some of these common elements include the following:
- canvas: It is the placeholder where our scene is rendered. It is a standard HTML5 element and as such, can be accessed using the Document Object Model (DOM).
- Objects: These are the 3D entities that make up the scene. These entities are composed of triangles. In the following chapters, we will see how WebGL handles and renders geometries using buffers.
- Lights: Nothing in a 3D world can be seen without lights. In later chapters, we will learn that WebGL uses shaders to model lights in the scene. We will see how 3D objects reflect or absorb light according to the laws of physics. We will also discuss different light models to visualize our objects.
- Camera: canvas acts as the viewport to the 3D world. We see and explore a 3D scene through it. In the following chapters, we will understand the different matrix operations that are required to produce a view perspective. We will understand how these operations can be modeled as a camera.
This chapter will cover the first element of our list: canvas. The following sections will help us understand how to create a canvas element and how to set up a WebGL context.
Time for Action: Creating an HTML5 Canvas Element
A canvas is a rectangular element in your web page where your 3D scene will be rendered. Let's create a web page and add a HTML5 canvas element:
- Using your favorite editor, create a web page with the following code:
<html>
<head>
  <title>Real-Time 3D Graphics with WebGL2</title>
  <link rel="shortcut icon" type="image/png"
   href="/common/images/favicon.png" />

  <style type="text/css">
    canvas {
      border: 5px dotted blue;
    }
  </style>
</head>
<body>

  <canvas id="webgl-canvas" width="800" height="600">
    Your browser does not support the HTML5 canvas element.
  </canvas>

</body>
</html>
- Save the file as ch01_01_canvas.html.
- Open it with a supported browser.
- You should see something similar to the following screenshot:

What just happened?
We created a simple web page containing a canvas element. This canvas will contain our 3D application. Let's go very quickly over some relevant elements presented in this example.
Defining a CSS Style
This is the piece of code that determines the canvas style:
<style type="text/css">
  canvas {
    border: 5px dotted blue;
  }
</style>
This code is not fundamental to build a WebGL application. Given that the canvas element is initially empty, a blue-dotted border is a simple way to verify the location of the canvas.
Understanding Canvas Attributes
There are three attributes in our previous example:
- id: This is the canvas identifier in the DOM.
- width and height: These two attributes determine the size of our canvas element. When these two attributes are missing, Firefox, Chrome, and WebKit will default to using 300px by 150px.
What If Canvas Is Not Supported?
If you see the following message on your screen, Your browser does not support the HTML5 canvas element (which is the message between the <canvas> tags), you need to make sure that you're using one of the supported web browsers described earlier.
If you're using Firefox and you still see this message, you may want to check whether WebGL is enabled (it is by default). To do so, go to Firefox and type about:config in the address bar. Then, look for the webgl.disabled property. If it is set to true, change it to false. When you restart Firefox and load ch01_01_canvas.html, you should be able to see the dotted border of the canvas element.
In the remote case that you still do not see canvas, it could be because your browser has blacklisted your GPU. If this is the case, please use a system with the appropriate hardware.
Time for Action: Accessing the WebGL Context
A WebGL context is a handle (more strictly a JavaScript object) through which we can access WebGL functions and attributes. These available features constitute the WebGL API.
We are going to create a JavaScript function that will check whether a WebGL context can be obtained. Unlike other technologies that need to be downloaded into your project, WebGL is already in your browser. In other words, if you are using one of the supported browsers, you don't need to install or include any library.
Let's modify the previous example to add a JavaScript function to check the WebGL availability in your browser. This function is going to be called when the page has loaded. For this, we will use the standard DOM onload event:
- Open the ch01_01_canvas.html file in your favorite text editor.
- Add the following code right below the closing <style> tag:
<script type="text/javascript">
  'use strict';

  function init() {
    const canvas = document.getElementById('webgl-canvas');

    // Ensure we have a canvas
    if (!canvas) {
      console.error('Sorry! No HTML5 Canvas was found on
       this page');
      return;
    }

    const gl = canvas.getContext('webgl2');

    // Ensure we have a context
    const message = gl
      ? 'Hooray! You got a WebGL2 context'
      : 'Sorry! WebGL is not available';

    alert(message);
  }

  // Call init once the document has loaded
  window.onload = init;
</script>
- Save the file as ch01_02_context.html.
- Open the ch01_02_context.html file using one of the WebGL 2 supported browsers.
- If you can run WebGL 2, you will see a dialog similar to the following:

The Strict Mode, declared by 'use strict';, is a feature that allows you to place a program, or a function, in a "strict" operating context. This strict context prevents certain actions from being taken and throws more exceptions. For more information, please visit the following link: https://developer.mozilla.org/en-US/docs/Web/JavaScript/Reference/Strict_mode.
What just happened?
Assigning a JavaScript variable (gl), we obtained a reference to a WebGL context. Let's go back and check the code that allows accessing WebGL:
const gl = canvas.getContext('webgl2');
The canvas.getContext method gives us access to WebGL. getContext also provides access to the HTML5 2D graphics library when using 2D as the context name. The HTML5 2D graphics API is completely independent from WebGL and is beyond the scope of this book.
State Machine
A WebGL context can be understood as a state machine: once you modify attributes, the modifications persist until later modifications. At any point, you can query the state of these attributes to determine the current state of your WebGL context. Let's analyze this behavior with an example.
Time for Action: Setting up WebGL Context Attributes
In this example, we are going to learn to modify the color we use to clear the canvas element:
- Using your favorite text editor, open the ch01_03_attributes.html file:
<html>
<head>
<title>Real-Time 3D Graphics with WebGL2</title>
<link rel="shortcut icon" type="image/png"
href="/common/images/favicon.png" />
<style>
canvas {
border: 5px dotted blue;
}
</style>
<script type="text/javascript">
'use strict';
let gl;
function updateClearColor(...color) {
// The ES6 spread operator (...) allows for us to
// use elements of an array as arguments to a function
gl.clearColor(...color);
gl.clear(gl.COLOR_BUFFER_BIT);
gl.viewport(0, 0, 0, 0);
}
function checkKey(event) {
switch (event.keyCode) {
// number 1 => green
case 49: {
updateClearColor(0.2, 0.8, 0.2, 1.0);
break;
}
// number 2 => blue
case 50: {
updateClearColor(0.2, 0.2, 0.8, 1.0);
break;
}
// number 3 => random color
case 51: {
updateClearColor(Math.random(), Math.random(),
Math.random(), 1.0);
break;
}
// number 4 => get color
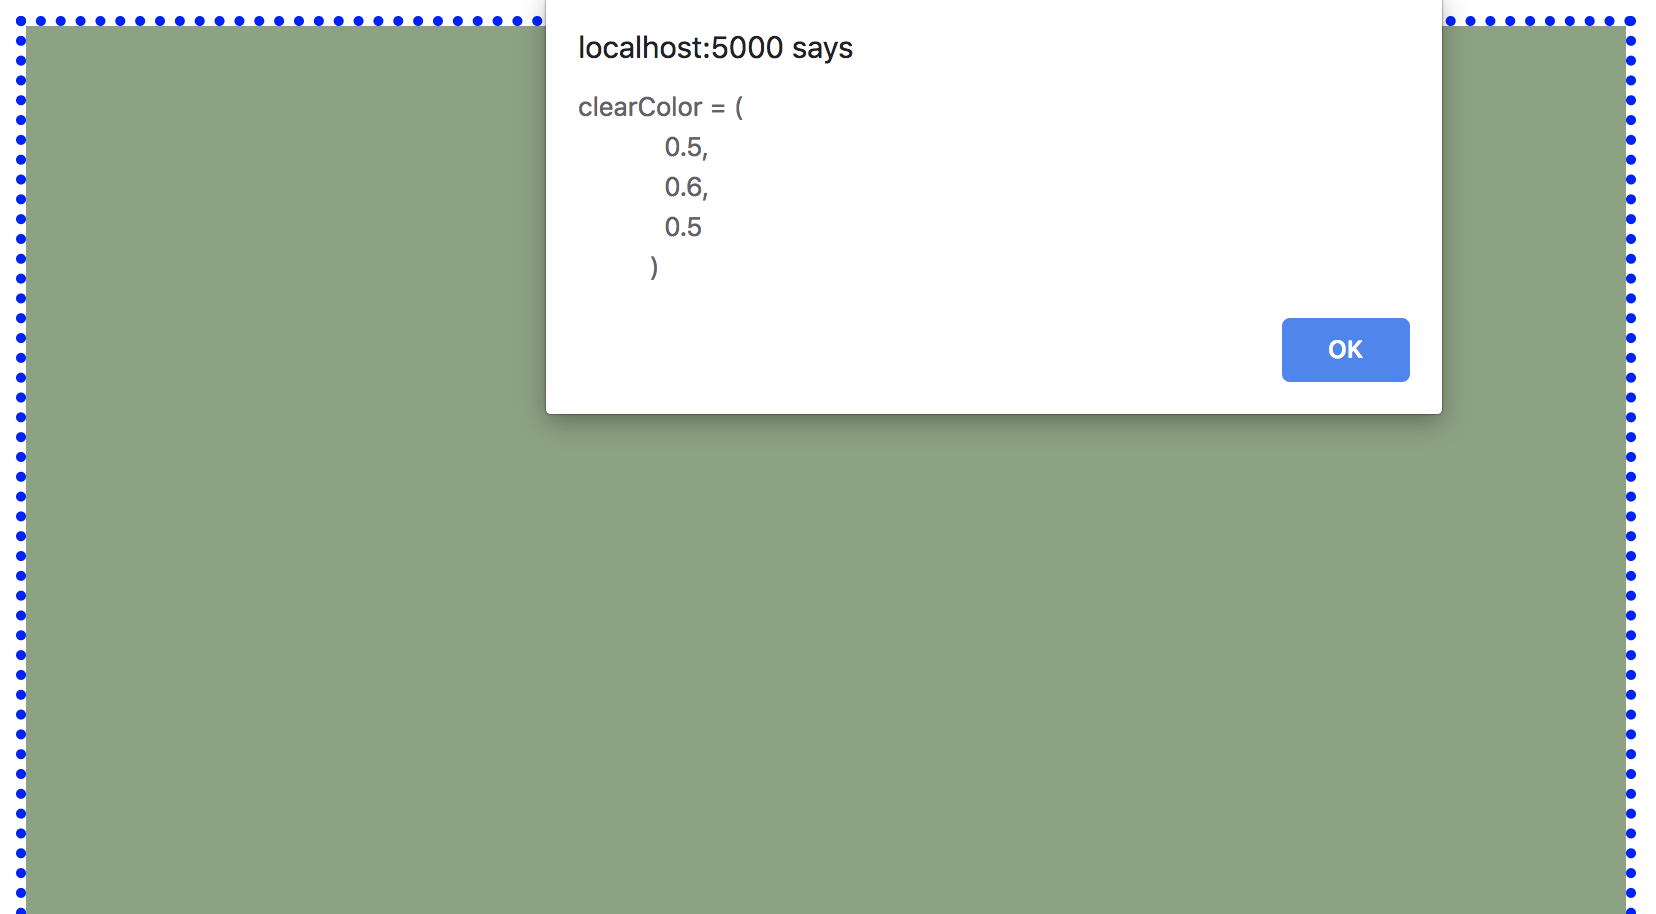
case 52: {
const color = gl.getParameter(gl.COLOR_CLEAR_VALUE);
// Don't let the following line confuse you.
// It basically rounds up the numbers to one
// decimal cipher for visualization purposes.
// TIP: Given that WebGL's color space ranges
// from 0 to 1 you can multiply these values by 255
// to display in their RGB values.
alert(`clearColor = (
${color[0].toFixed(1)},
${color[1].toFixed(1)},
${color[2].toFixed(1)}
)`);
window.focus();
break;
}
}
}
function init() {
const canvas = document.getElementById('webgl-canvas');
if (!canvas) {
console.error('Sorry! No HTML5 Canvas was found on this page');
return;
}
gl = canvas.getContext('webgl2');
const message = gl
? 'Hooray! You got a WebGL2 context'
: 'Sorry! WebGL is not available';
alert(message);
// Call checkKey whenever a key is pressed
window.onkeydown = checkKey;
}
window.onload = init;
</script>
</head>
<body>
<canvas id="webgl-canvas" width="800" height="600">
Your browser does not support the HTML5 canvas element.
</canvas>
</body>
</html>
- You will see that this file is similar to our previous example. However, there are new code constructs that we will explain briefly. This file contains three JavaScript functions:
| Function | Description |
| updateClearColor | Updates clearColor and then sets the canvas element clear color, which is one of the WebGL context attributes. As previously mentioned, WebGL works as a state machine. Therefore, it will maintain this color until it's changed using the gl.clearColor WebGL function (see the checkKey source code). |
| checkKey | This is an auxiliary function that has been attached to the window onkeydown event. It captures the keyboard input and executes code depending on the key entered. |
| init | This function gets called on the document onload event. It obtains a WebGL context and sets it to the global gl variable. |
- Open the ch01_03_attributes.html file in your browser.
- Press 1. You will see how the canvas changes its color to green. If you want to query the exact color used, press 4.
- The canvas element will maintain the green color until we change it by calling gl.clearColor. Let's change it by pressing 2. If you look at the source code, this will change the canvas clear color to blue. If you want to know the exact color, press 4.
- You can press 3 to set the clear color to a random color. As before, you can get the color by pressing 4:
What just happened?
In this example, we saw that we can change the color that WebGL uses to clear the canvas element by calling the clearColor function. Correspondingly, we used getParameter(gl.COLOR_CLEAR_VALUE) to obtain the current value of the canvas clear color.
Throughout this book, we will encounter similar constructs where specific functions establish attributes of the WebGL context while the getParameter function retrieves the current values for such attributes whenever the respective argument (in our example, COLOR_CLEAR_VALUE) is used.
Using the Context to Access the WebGL API
It is essential to note that all of the WebGL functions are accessed through the WebGL context. In our examples, the context is being held by the gl variable. Therefore, any call to the WebGL API will be performed using this variable.
Loading a 3D Scene
So far, we have seen how to set up a canvas element and how to obtain a WebGL context; the next step is to discuss objects, lights, and cameras. But why wait to see what WebGL can do? In this section, we will take a quick peek at a simplified version of the final WebGL application that we'll be building in this book.
Virtual Car Showroom
Through this book, we will develop a virtual car showroom application using WebGL. At this point, we will load one simple scene into the canvas element. This scene will contain a car, some lights, and a camera.
Time for Action: Visualizing a 3D Showroom
Once you finish reading this book, you will be able to create compelling 3D scenes such as the one we are going to play with next. This scene showcases one of the cars from this book's virtual car showroom:
- Open the ch01_04_showroom.html file in your browser.
- You will see a WebGL scene with a car in it, as shown in the following screenshot. In the following chapters, we will cover geometry rendering and will see how to load and render various 3D models:
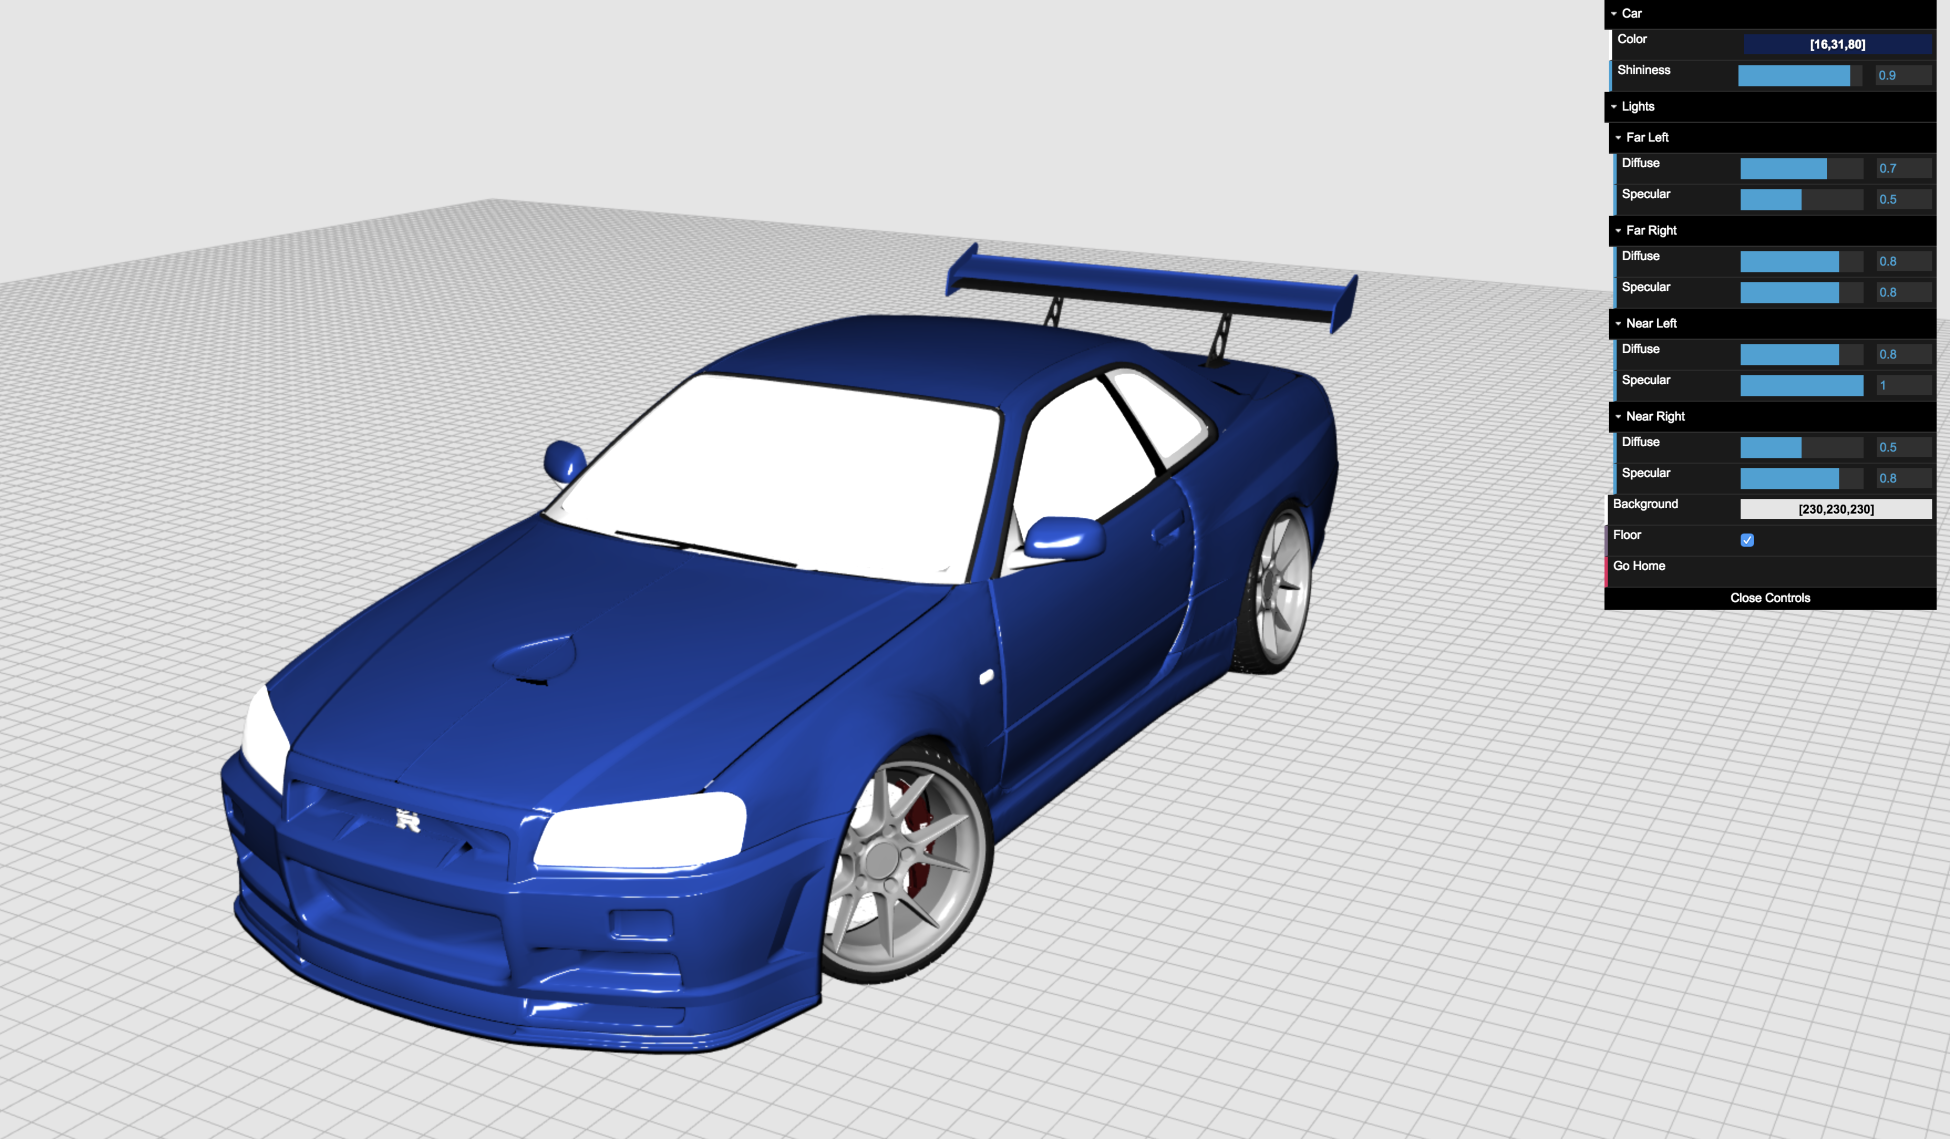
- Use the sliders to interactively update the four light sources that have been defined for this scene. Each light source has two elements: diffuse and specular elements. We have Chapter 3, Lights, dedicated entirely to lights in a 3D scene.
- Click and drag on canvas to rotate the car and visualize it from different perspectives. You can zoom by pressing the Alt key while dragging the mouse on the canvas. You can also use the arrow keys to rotate the camera around the car. Make sure that canvas is in focus by clicking on it before using the arrow keys. In Chapter 4, Cameras, we will discuss how to create and operate our own custom cameras in WebGL.
- Use the color selector widget to change the color of the car. The use of colors in the scene will be discussed in detail later in this book.
What just happened?
We have loaded a simple scene in a browser using WebGL. This scene consists of the following:
- A canvas element through which we see the scene.
- A series of polygonal meshes (objects) that constitute the car: roof, windows, headlights, fenders, doors, wheels, spoiler, bumpers, and so on.
- Light sources, otherwise everything would appear black.
- A camera that determines where our viewpoint is in the 3D world. This camera is interactive where the viewpoint can change, depending on user input. For example, we used various keys and the mouse to move the camera around the car.
There are many other elements in this scene such as textures, colors, and special light effects (specularity). Do not panic! We will explain each element throughout this book. The point here is to identify that the four basic elements we discussed previously are present in the scene. That said, feel free to examine the source code to get a sense of what's to come.
Architecture Updates
As we progress through chapters, we will encounter common functionality (for example, design patterns, utility functions, helpers, and data structures) that we can build upon. Not only this will serve us in writing DRY code, but it will also provide a useful architecture to support an advanced 3D WebGL application by the end of this book.
Don't Repeat Yourself (DRY) is a software development principle, the main aim of which is to reduce repetition of code. Write Everything Twice (WET) is a cheeky abbreviation to mean the opposite— code that doesn't adhere to the DRY principle.
Let's cover some changes that we will use in future chapters:
- Open common/js/utils.js in your editor to see the following code.
- We will use utils to include many of the utility functions to serve us in building our 3D application. The two methods, getCanvas and getGLContent, inside of utils are similar to the code we've implemented earlier in this chapter:
'use strict';

// A set of utility functions for /common operations across our
// application
const utils = {

  // Find and return a DOM element given an ID
  getCanvas(id) {
    const canvas = document.getElementById(id);

    if (!canvas) {
      console.error(`There is no canvas with id ${id} on this
       page.`);
      return null;
    }

    return canvas;
  },

  // Given a canvas element, return the WebGL2 context
  getGLContext(canvas) {
    return canvas.getContext('webgl2') || console.error('WebGL2 is
     not available in your browser.');
  }

};
- getCanvas returns the canvas element with the provided id as the argument.
- getGLContext returns a WebGL 2 context for a given canvas element.
- Open up ch01_05_attributes-final.html in your editor to see the following changes.
- We've included <link rel="stylesheet" href="/common/lib/normalize.css"> in the <head> of our document that resets many of the inconsistencies across browsers. This is an external library to help us normalize CSS styling across browsers.
- We've included <script type="text/javascript" src="/common/js/utils.js"></script>.
- Scroll to the init function where the necessary changes were made to use the utils.getCanvas and utils.getGLContext functions:
function init() {
  const canvas = utils.getCanvas('webgl-canvas');
  gl = utils.getGLContext(canvas);
  window.onkeydown = checkKey;
}
- Open up ch01_05_attributes-final.html in a browser to see these changes in action.
All example code has been structured so that common functionality is at the root of the directory ( common/), while examples for each chapter are categorized under chapter directories (for example, ch01/, ch02/, and ch03/). That being said, to view these examples in your browser, you will need to start a server at the root of the directory to load all required assets for each example. Please refer to the Preface of this book for more details.
Summary
Let's summarize what we've learned in this chapter:
- We covered the history of WebGL and how it came to fruition.
- We learned about common elements—canvas, objects, lights, and camera—that are, generally, present in WebGL applications.
- We learned how to add a HTML5 canvas element to our web page and how to set its id, width, and height.
- We implemented the code to obtain a WebGL context.
- We covered how WebGL works as a state machine and, as such, we can query any of its variables using the getParameter function.
- We got a glimpse of the interactive 3D application that we'll build by the end of this book.
In the next chapter, we will learn how to define, load, and render objects into a WebGL scene.