


It is a Hotshot custom to begin learning anything new with a Hello World example. Since we will be doing really cool things in this book, we will say "Hello World" in a unique fashion. In this project, we will use the Raspberry Pi to cause an LED light to blink. This project is directed towards those who are relatively new to the Raspberry Pi environment as a warm-up exercise. Feel free to skip ahead if you have already done this with your Pi, though we suggest you look through and make sure you haven't missed anything.
If we search for the term Raspberry Pi over the web or open the Raspberry Pi Foundation's webpage, we will find that the Raspberry Pi is a computer that is the size of a credit card.

Parts of a Raspberry Pi
The Raspberry Pi Foundation (http://www.raspberrypi.org/) initially released the Raspberry Pi model B. This was followed by the Raspberry Pi model A. In 2014, the Raspberry Pi foundation released variants B+ and A+. The Raspberry Pi models A and A+ (costing 25 USD and 20 USD respectively) do not come with an Ethernet port, a USB port and 256 MB RAM. The model A+ replaced model A while the model B+ replaced model B. The model B (price: 35 USD) came with an Ethernet port, 2 USB ports, and 512 MB RAM; model B+, which supersedes model B, comes with 40 pin GPIO header as opposed to 26 in the earlier models, and has 4 USB ports and a micro SD card slot instead of the SD slot. Per the Raspberry Pi Foundation website, model B+ (as well as model A+) consumes lower power, has better audio and a better form factor, which we certainly concur with. The model A+ also comes with a 40 pin GPIO header and a micro SD card slot. The models A+ and B+ have nine more GPIO pins than their predecessors.
Note
The Raspberry Pi 2 was released after we finished writing the book. Please refer to the book's site to find out more about getting started with model 2.
The objective of this book is to build cool projects using the Raspberry Pi. We will discuss the components of Raspberry Pi from this perspective. If you are interested in finding out more about the Raspberry Pi, the Raspberry Pi Foundation's webpage has published the technical specifications of all the components.
First, we will discuss the components available on the Raspberry Pi and the use of these components in our projects. The components of the Raspberry Pi include:
2 USB ports (1 USB port available in model A)
Ethernet port (available only in models B and B+)
RCA output
HDMI output
Audio output
Low level peripherals, which include:
GPIO (General Purpose Input Output)
UART/Serial Port (Universal Asynchronous Receiver Transmitter)
I2C (two wire interface)
SPI (Serial Peripheral Interface)
Element14 and RS Components are the most common distributors of the Raspberry Pi in the United States. The Raspberry Pi model A was roughly priced at 25 USD, while its successor model A+ was priced at 20 USD. The model B was priced at 35 USD and the model B+ is priced at 40 USD. There are also an ever increasing number of local distributors such as Adafruit and Fry's Electronics in the US that sell the Raspberry Pi for a margin. Please check the Raspberry Pi Foundation website and other sources for more vendors.
In this section, we will discuss the items required to get started with the Raspberry Pi. We will need all the same things that are required to use a computer/laptop. They are:
Display
Keyboard
Mouse
Wi-Fi Adapter / Ethernet cable
Note
It is possible to use the Raspberry Pi via remote login using a secure shell. This might seem difficult to those who are new to the Linux environment. The setup of the Raspberry Pi for remote login is explained in Project 13, Tips and Tricks.
The Raspberry Pi eLinux wiki (http://elinux.org/RPi_Hub) has listed peripherals that have been tested and confirmed to have worked on the Raspberry Pi. You have the freedom to choose peripherals according to your choice.
Display: The Raspberry Pi is provided with an HDMI output and an RCA output. It is possible to connect a monitor that has an HDMI input. It is also possible to connect monitors that have a DVI input with an HDMI to the DVI cable.
Power supply: Since the Raspberry Pi consumes 700 mA for its operation, it is recommended that the reader uses powered USB hubs to use devices such as Wi-Fi adapters as opposed to plugging in devices such as the Wi-Fi adapters directly to the USB port of the Raspberry Pi to avoid the device resetting itself.
The Raspberry Pi foundation recommends the following operating systems on the Raspberry Pi. They are:
Raspbian
Arch Linux ARM
RISC OS
You are welcome to choose any operating system of your choice. For beginners, we strongly recommend the Raspbian OS for projects. The Raspbian is equipped with tools to get started easily. The Raspberry Pi's firmware is implemented such that the operating system is loaded from an SD card.
In this section, we will download an image from the Raspberry Pi Foundation's webpage to a computer, flash an SD card with the image, and set up the operating system on the Raspberry Pi. We will also try to write and execute our first example.
The latest Raspbian image is hosted on the Raspberry Pi Foundation's webpage (http://www.raspberrypi.org/downloads/). The latest image at the time of writing this book was Raspbian wheezy. We need to download the image and extract it to the folder of our choice.

Raspbian wheezy on the Raspberry Pi Foundation's website
We will discuss flashing the SD card with the Raspbian image on both Windows and Linux machines.
Extract the files to a location of your choice. The Win32DiskImager tool is required to prepare the SD card with the Raspbian image.
Tip
A standard Raspbian image is about 1.8 GB big. It is strongly recommended that you use an SD card that is at least of 4 GB big.

The Win32DiskImager tool
We can flash the SD card in three simple steps (as shown in the preceding screenshot):


There are two identical methods to flash an SD card on a Linux machine. The two approaches include:
A GUI-based approach
A command-line interface-based approach
The SD card can be flashed in three simple steps using a command-line interface. These steps are as follows:
Identify the SD card mount point.
Unmount the SD card.
Flash the SD card.
As soon as we insert the SD card into a USB card reader or an SD card slot found on a laptop, we need to open a terminal on our Linux machine. We need to identify our device's mount point on the machine using the following command:
df –h
The devices enumerated on the machine will be listed as shown in the following screenshot:

Storage devices identified by the operating system
In the previous example, the /dev/sdb5 path is the storage device of interest. There may be more than one storage device that might be connected to a machine. We need to make sure that we have identified the right device. Once we have identified the device, it has to be unmounted using the following command:
umount /dev/sdb
Now, we will flash our SD card using the following command:
dd bs=4M if=~/2012-09-18-wheezy-raspbian.img of=/dev/sdb
The if= argument points to the location of the image and of= refers to the SD card mount point. The write operation takes a while to complete and it is ready for use on the Raspberry Pi upon completion.

Now that the image is flashed, let's get started with setting up the Raspberry Pi for the first time. We will have to insert the SD card slot found on the other side of the Raspberry Pi.

A flashed SD card in the slot
When the keyboard and the mouse are connected, we can get started by powering up the Raspberry Pi!
Once the Raspberry Pi is powered up, the operating system boots up to Raspi-config. The raspi-config is the tool used to set up desktop options, keyboard settings, storage settings, and so on. The Raspi-config screen is shown in the following screenshot:

The Raspi-config screen
In this section, we will discuss each feature of the raspi-config tool:
info: As the name suggests, this section gives the general information about the tool.expand_rootfs: While the SD card is flashed with the operating system image, the SD card is partitioned just about the size of the image. This command aids to expand the partition so that the remaining space can be used for file storage.overscan: This is an option used when the Raspberry Pi is connected to the television.configure_keyboard: This option is used to configure thechange_typeoption of the keyboard.change_pass: The default password is raspberry, and if necessary, this option lets you switch to a stronger password.change_locale: The option lets you change the language preferences.change_timezone: We can set our current time zone using this option.memory_split: This option lets us split the memory between the ARM processor's CPU and the graphics processor.overclock: The default clock speed is 700 MHz. This option lets you set the clock speed to 1 GHz. This might vary for Raspberry Pi 2.ssh: This option enables the secure shell server. This is required to remotely log in the Raspberry Pi and control devices remotely. It is enabled by default on Raspbian.boot_behaviour: This option enables you to boot directly into the desktop.update: If the Raspberry Pi is connected to the Internet using an Ethernet cable, theraspi-configtool downloads any package that might be available.
Once we complete the setup process by selecting Finish, the Raspberry Pi reboots and expands the filesystem if necessary.
In this project, we will set up the GPIO (General Purpose Input Output) peripheral on the Raspberry Pi and write our first program to cause an LED to blink. At the end, we will repeat the same steps with a Raspberry Pi add-on board called PiCrust. This will allow you to get your feet wet and ensure you have all the right tools going forward, and should you need to, troubleshoot any problems you might identify.
Think of saying "Hello World" as both a nod to programming tradition and a dry run to ensure you are well equipped!
The objectives for this mission are quite simple, and yet take us all several milestones further! Here are the objectives of the Hello World mission:
Collect all the necessary tools
Set up the GPIO peripheral
Introduce ourselves to the Raspberry Pi environment
Turn a light emitting diode (LED) on and off with a 1 second delay
Go over the previous sections, and make sure you have all the tools. Download the GPIO libraries, and ensure you can log in to the Raspberry Pi remotely, and you are all set!
Note
There are two different ways to use a Raspberry Pi. They are:
Connecting a monitor to the HDMI port or the RCA jack and a keyboard to the USB port of the Raspberry Pi.
Remotely logging into the Raspberry Pi from the reader's workstation.
If you are a beginner, it is best to use the first method while the second method can be used if you are familiar with the Linux operating system and remote login capabilities.
Once we complete the setup process by selecting Finish, the Raspberry Pi reboots and expands the file system if necessary.
As stated before, you will need to make sure you have all the tools. So, go ahead, hunt and gather away. Grab at least one of each of the following and more than one of each, if you, like us, are prone to accidents:
A laptop to download the Raspberry Pi image and set up everything
Raspberry Pi—Model B/B+ (preferred), a keyboard, and a mouse for the Raspberry Pi (optional)
SD card with 4GB memory (SD card preparation was explained earlier in this project)
USB Power Adapter (Rated 1.0 A) and Micro USB power cable
Ethernet cable
Wi-Fi adapter—(optional) refer to the eLinux wiki for Raspberry Pi for verified peripherals
Breadboard
Jumper wires
Discrete Resistor Values
A work bench (or a clean working surface—hopefully you have one)
Good thoughts and a can-do attitude
You will need all of the tools listed in the previous section to get through this project. Take your time and make sure you have everything handy!
We need to enable the GPIO peripherals in our Raspbian installation to get started. In order to download the required tools and set things in motion, the Raspberry Pi needs to be connected to the Internet.
The GPIO pin is a pin that is available from the Raspberry Pi's processor that enables interfacing input and output devices to the Raspberry Pi. In this section, we will talk about setting up the GPIO for interfacing an output device. There is a 26-pin interface (40 in Model B+) available on the Raspberry Pi and about 17 of those 26 pins are GPIO pins (26 of them in Model B+) while the others are miscellaneous pins such as power. The pins are driven by a 3.3 V rail and each GPIO pin is rated for about 17 mA and the total current draw not exceeding 50 mA.
We also need to know the GPIO peripherals available to conduct our experiment. The following figure shows the GPIO maps of the Raspberry Pi Rev 1 and Rev 2:
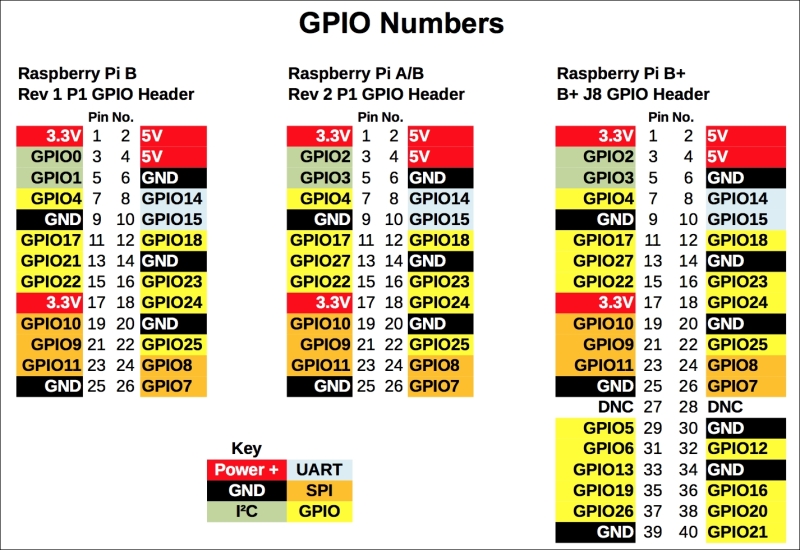
GPIO map for Models A, B, and B+. (Image published with permission from Raspi.tv)
The letter P1 shown in the following image corresponds to P1-1 of the GPIO map. P1-1 corresponds to the first pin on the left in the front row, while P1-2 corresponds to the first pin on the left in the back row.

The Raspberry Pi GPIO peripheral
In this book, we will be mostly using Python programming language. Python is a very simple and easy language to learn. We may wander off to other programming languages from time to time, but we will mostly stick to Python. With this in mind, let's get started.
There are a lot of libraries available to access the GPIO peripheral. The easiest to install and use is the quick2wire python API. The API is used to control the GPIO peripherals and I2C devices connected to the Raspberry Pi.
Note
There are different libraries such as the RPi.GPIO, Pi4J, and so on. We are using the quick2wire API in this example as a beginner might find it easy to use. You are welcome to use other libraries of your choice. The quick2wire-gpio-admin tool enables controlling the GPIO pins without root access.
One disadvantage of using the quick2wire module is that it provides access only to GPIO pins 0 through 7.
The terminal can be located in the left corner of the desktop and has been highlighted in the following screenshot:
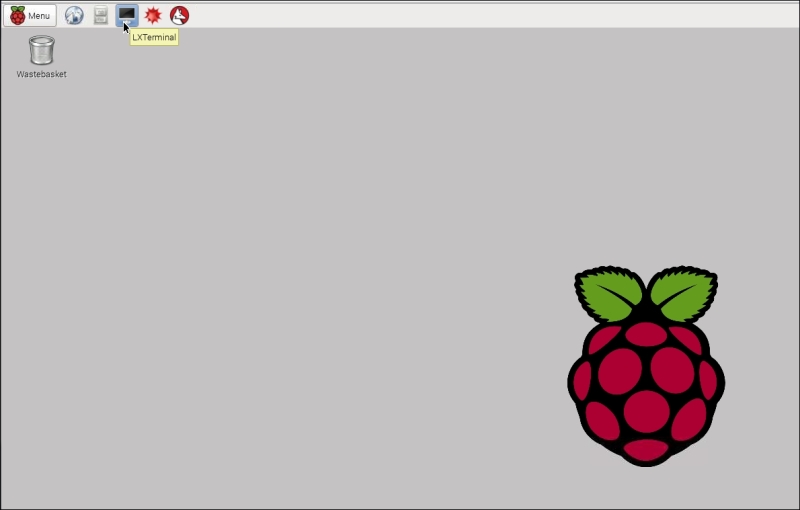
A Command-line terminal on the Raspbian desktop
The quick2wire library installation is based on a post on the quick2wire website (http://quick2wire.com/articles/how-to-add-quick2wire-as-a-raspbian-software-source/). In order to install the quick2wire-python library, the repository needs to be added to
/etc/apt/sources.list.In the command line, the repository is added by using the
nanotext editor:sudo nano /etc/apt/sources.listThe following lines need to be added to the file:
# Quick2Wire Software
deb http://dist.quick2wire.com/raspbian wheezy main
deb-src http://dist.quick2wire.com/raspbian wheezy main
The file can be saved by typing CTRL + X. The file can also be saved by pressing Y key while exiting the editor.
Alternatively, the lines can be added using a graphical text editor such as, leafpad and saving it:
sudo leafpad /etc/apt/sources.list
In order to ensure that the packages are downloaded from the quick2wire repository, we need to authenticate the packages using a key available from quick2wire:
wget https://raw.githubusercontent.com/quick2wire/quick2wire-software-users/master/software@quick2wire.com.gpg.key
sudo apt-key add
software@quick2wire.com.gpg.key
The cache is updated and the latest software packages can be downloaded as follows:
sudo apt-get update
sudo apt-get upgrade
The quick2wire tool is installed as follows:
sudo apt-get install quick2wire-gpio-admin
sudo apt-get install quick2wire-python3-api
In this section, we will ensure that the library is correctly installed and add the user to the group. This will enable the user to use the GPIO pins without having root privileges. This will be followed by the section on getting started with GPIO control programming in Python.
In order to get started with programming in the Raspberry Pi, we will launch Python IDLE3 from the desktop.

Launching IDLE3 from the desktop
Now, we have to get started with programming the LED blinking example in IDLE3.
This LED blinking sample code is as follows:
from time import sleep
from quick2wire.gpio import pins, Out

with pins.pin(7, direction=Out) as out_pin:
    while True:
        out_pin.value = 1
        sleep(1)
        out_pin.value = 0
        sleep(1)
out_pin.unexport()
We will import the
sleepclass from thetimemodule in the first line. This is required to introduce a 1-second delay between turning the LED on and off every other second:from time import sleepWe also need the pin class from the
quick2wireGPIO library:from quick2wire.gpio import Pin
We need to set the output pin that we will be using in the example:
LED_output = Pin(8, Pin.Out)
We can set the pin to the logical high (3.3 V) as follows:
LED_output=1
We will set the pin to the logical low (0 V) as follows:
LED_output=0
We will execute the same thing using an infinite
whileloop:while True: LED_output=1 sleep(1) LED_output=0 sleep(1)This will make the LED blink with a 1-second delay. We should also note the indent on the blink sequence. The blink sequence has a different indent compared to the
whileloop. Hence, the code that is at a different indent is executed infinitely.When the program is interrupted (by pressing CTRL + C on the keyboard), we need to unexport the pins at exit:
out_pin.unexport()
Another alternative is to use RPi.GPIO (https://pypi.python.org/pypi/RPi.GPIO). It comes as a standard package along with the Raspbian Wheezy OS. Let's perform a quick review of the code:
import RPi.GPIO as GPIO
from time import sleep

GPIO.setmode(GPIO.BCM)
GPIO.setup(8,GPIO.OUT)

GPIO.output(8,GPIO.LOW)

while True:
    GPIO.output(8,GPIO.HIGH)
    sleep(1)
    GPIO.output(8,GPIO.LOW)
    sleep(1)

GPIO.cleanup()
After importing the required modules, we get started with setting up the pin numbering mode. There are two types of pin numbering modes, namely:
The BCM Pin numbering mode: The pin numbers are based upon the pin numbers of the BCM chip.
The Board numbering mode: The pin numbers are based upon the pin numbers of the Raspberry Pi GPIO header.
In this example, we will set the BCM numbering mode and set pin 8 as the output:
GPIO.setmode(GPIO.BCM)
GPIO.setup(8,GPIO.OUT)
We can set the pin to logical high (3.3 V) as follows:
GPIO.output(8,GPIO.HIGH)
We can set the pin to logical low (3.3 V) as follows:
GPIO.output(8,GPIO.LOW)
Now, the LED can be made to blink with a 1 second delay:
while True:
    GPIO.output(8,GPIO.HIGH)
    sleep(1)
    GPIO.output(8,GPIO.LOW)
    sleep(1)
When the program is interrupted by typing CTRL + C, we have to clean up and release any occupied GPIO resources:
GPIO.cleanup()
In the previous section, we wrote a program to make an LED blink. Let's look at the electrical connection to observe the output of our program. We will connect a resistor between the GPIO pin and the anode of the LED. We will connect the cathode to the ground pin of the Raspberry Pi.
We will connect the LED and the resistor to the GPIO pin and the ground pin, as shown in this image:

LED blinking circuit
Note
If we are not careful with the handling of the Raspberry Pi GPIO pins, it may either temporarily reset the Raspberry Pi or sometimes even permanently damage the GPIO pin. There are several tutorials in basic electronics available over the Web. It is important that you familiarize yourself with the basics of electronics.
Once we connect the circuit as shown in the preceding image, we will be able to execute the program and conclude our experiment.
We can execute the program by running the module, as shown in the following screenshot:

Executing the Python example
That's it! We have wet our feet by saying Hello World by blinking an LED! On our way to bigger and better things, let's stop and examine the Pi Crust for a moment.
Now that our Hello World example is done, we will leave you with one more thing. Throughout this book, we will review some add-on hardware to access the GPIO peripherals on the Raspberry Pi. In this project, we will discuss the Pi Crust board for the Raspberry Pi.
The Pi Crust board was designed by Joe Walnes. It is a board that is stackable on the Raspberry Pi and eliminates the need for a breadboard to prototype circuits.

A Pi Crust board
The Pi Crust is an open source add-on hardware and costs approximately $14 to build one ourselves. The design can be downloaded free of cost from http://picru.st.
So, it is up to you to decide whether you want to simply buy one, build one, or as we are prone to encourage, improve upon it and open source it for others to benefit!
The main advantage behind Pi Crust is that it is aids prototyping. It allows easy access to the I2C interface, SPI interface, UART port, and the GPIO pins. The following figure shows BlinkM—an I2C-driven RGB LED mounted on top of the Pi Crust.

Pi Crust stacked on top of the Raspberry Pi
Now that you have traveled this far with us, how do you feel? Do you need a break, or more coffee? Before you do either, let's review.
In this project, we got started with the LED blinking example using the Raspberry Pi. We discussed the setup of GPIO peripherals and using them in an experiment. You are welcome to continue experiments with the GPIO peripherals with projects such as LED sequencing, three bit counter, and so on.
In the forthcoming projects, we will look into I2C communication, SPI communication, and UART communication (serial port).
Well done; you have taught your Pi to say "Hello World"! However, we are sure you can do more, much more. Have you watched the movie Close Encounters of the Third Kind? Well, if not, you should. However, this is not a challenge in itself. In the movie, the human beings attempt at communication with what they believe is aliens by building a pattern of lights that are set to music. Can you make a pattern of LEDs repeat that or something similar?