


Welcome, fellow pranksters and mischief-makers, to the beginning of your journey towards a stealthier lifestyle. Naturally, you're all anxious to get started with this cool stuff, so we'll only devote this first, short chapter to the basic steps you need to get your Raspberry Pi up and running.
First we'll get to know the hardware a little better, and then we'll go through the installation and configuration of the Raspbian operating system.
At the end of this chapter you should be able to connect to your Raspberry Pi over the network and be up-to-date with the latest and greatest software for your Pi.
The Raspberry Pi is a credit-card-sized computer created by the non-profit Raspberry Pi Foundation in the UK. It all started when a chap named Eben Upton (now an employee at Broadcom) got together with his colleagues at the University of Cambridge's computer laboratory, to discuss how they could bring back the kind of simple programming and experimentation that was widespread among kids in the 1980s on home computers such as the BBC Micro, ZX Spectrum, and Commodore 64.
After several years of tinkering, the Foundation came up with two designs for the Raspberry Pi. The $35 Model B was released first, around February 2012, originally with 256 MB of RAM. A second revision, with 512 MB of RAM, was announced in October 2012 and around that time the Pi hardware assembly was moved from China to Sony's facility in the UK. The $25 Model A is expected to go on sale in the first quarter of 2013.
At the heart of the Pi is the Broadcom BCM2835 System-on-a-Chip—imagine all the common hardware components of a PC baked into a small chip. The CPU is called ARM1176JZF-S, runs at 700 MHz and belongs to the ARM11 family of the ARMv6 architecture. For graphics, the Pi sports a Broadcom VideoCore IV GPU, which is quite powerful for such a tiny device and capable of full HD video playback. The following figure (taken from http://www.raspberrypi.org/faqs) shows the Raspberry Pi model:

Raspberry Pi Model B board showing key components
At the edge of the board we find the General Purpose Input/Output (GPIO) pins, which, as the name implies, can be used for any kind of general tinkering and to interface with other pieces of hardware.
This jack is for composite video output, which we can use to connect the Pi to one of those old television sets using an RCA connector cable.
To get sound out of the Pi, we can either get it through the HDMI cable connected to a monitor, or from this 3.5 mm analog audio jack using headphones or desktop speakers.
Five status LEDs are used to tell us what the Pi is up to at the moment. They are as follows:
The green light on top labeled OK (on the older Pi) or ACT (on the newer Pi) will blink when the Pi is accessing data from the SD card
The light below, labeled PWR, should stay solid red as long as the Pi has power
The three remaining LEDs will light up when a network cable is connected to the Ethernet port
The two USB 2.0 ports allow us to connect keyboards, mice, and most importantly for us, Wi-Fi dongles, microphones, video cameras, and GPS receivers. We can also expand the number of USB ports available with the help of a self-powered USB hub.
The Ethernet LAN port allows us to connect the Pi to a network at a maximum speed of 100 Mbit/s. This will most commonly be a home router or a switch, but it can also be connected directly to a PC or a laptop. A Category 5 twisted-pair cable is used for wired network connections.
The High-Definition Multimedia Interface (HDMI) connector is used to connect the Pi to a modern TV or monitor. The cable can carry high-resolution video up to 1920 x 1200 pixels and digital sound. It also supports a feature called Consumer Electronics Control (CEC), which allows us to use the Pi as a remote control for many common television sets.
The power input on the Raspberry Pi is a 5V (DC) Micro-USB Type B jack. A power supply with a standard USB to micro-USB cable, such as a common cellphone charger, is then connected to feed the Pi.
Note
The most frequently reported issues from Raspberry Pi users are without a doubt those caused by insufficient power supplies and power-hungry USB devices. Should you experience random reboots, or that your Ethernet port or attached USB device suddenly stops working, it's likely that your Pi is not getting enough stable power.

5.25V 1A power supply with USB to Micro-USB cable
Take a look at the OUTPUT printed on your power adapter. The voltage should be between 5V to 5.25V and the amperage should read between 700mA to 1200mA (1A = 1000mA).
You can help your Pi by moving your devices to a self-powered USB hub (a hub that has its own power supply).
Also note that the Pi is very sensitive to devices being inserted or removed while it's running, and powering your Pi from another computer's USB port usually doesn't work well.
The SD card is where all our data lives, and the Pi will not start without one inserted into the slot. SD cards come in a wide variety of storage sizes. A card with a minimum of 4 GB up to 32 GB of storage space is recommended for the projects in this book. The SD cards also carry a class number, which indicates the read/write speed of the card—the higher the better.
Note that there are also mini-SD and micro-SD cards of smaller physical sizes that will work with the Pi but they will need an adapter to fit into the slot.
Computers can't do anything useful without an operating system, and the Pi is no exception. There is a growing collection of operating systems available for the Pi, but we'll stick with the "officially recommended" OS—the Raspbian GNU/Linux distribution.
There are two main ways to obtain Raspbian. You can either buy it preinstalled on an SD card from your Raspberry Pi dealer, or download a Raspbian image yourself and write it to an empty SD card on a computer with an SD card slot.
Note
If you do have access to a computer but it lacks an SD card slot, it's a wise choice to invest in an external SD card reader/writer. They don't cost much and chances are you'll want to re-install or try a different operating system on your SD card sooner or later.
To download a Raspbian image, visit the site http://www.raspberrypi.org/downloads. Instead of version numbers, Raspbian uses code names (names of characters from the movie Toy Story) and the latest version at the time of writing is Wheezy. Just click on the link for the ZIP file and wait for your download to start or use the torrent link if you prefer, but we will not cover that in this book.
Two things are needed to prepare your SD card—an uncompressed image and an image writer application. Perform the following steps to prepare your SD card:
When your image has finished downloading, you'll need to unzip it, usually by right-clicking on the ZIP file and selecting Extract all or by using an application such as WinZip. Once extracted, you should end up with a disc image file named
YYYY-MM-DD-wheezy-raspbian.img.It is highly recommended that you disconnect any attached USB storage devices for now to minimize the risk of writing the Raspbian image to the wrong place.
Visit http://sourceforge.net/projects/win32diskimager/ and download the latest version of the Win32DiskImager application (
win32diskimager-v0.7-binary.zipat the time of writing).Extract that ZIP file too and run the Win32DiskImager application. On Windows 7/8 you might need to run it as an administrator by right-clicking on the application and selecting Run as administrator.
Select the IMG file you extracted earlier and choose the volume letter of your SD card slot from the Device drop-down menu. It is very important to verify that you have the correct volume of your SD card! Finally, click on Write and wait for the process to finish.
Two things are needed to prepare your SD card – an uncompressed image and an image writer script.
When your image has finished downloading, you'll need to unzip it, usually by double-clicking on the ZIP file or by right-clicking and selecting Extract here. Once extracted, you should end up with a disk image file named
YYYY-MM-DD-wheezy-raspbian.img.It is highly recommended that you disconnect any attached USB storage devices for now, to minimize the risk of writing the Raspbian image to the wrong place.
To help us write the Raspbian image file to the SD card, we will be using a Python script written by Aaron Bockover. Visit http://www.intestinate.com/imagewriter.py to download the script and save it to your
Desktopfolder.Open up a Terminal (located in
/Applications/Utilitieson the Mac).Now we need to start the
imagewriter.pyscript and tell it where to find the Raspbian IMG file. Adapt the following command to suite the paths of your files:sudo python ~/Desktop/imagewriter.py ~/Desktop/YYYY-MM-DD-wheezy-raspbian.imgIf you don't know the full path to your script or IMG file, you can just drag-and-drop the files on to the Terminal window and the full path will magically appear.
You might be asked to input your user password so that
sudois allowed to run. The script will ask which device you'd like to write the image to. It will present a list of all the currently attached storage devices. Identify your SD card slot with the help of the device description, and the size that should match your card. Finally, type the number of your device and press the Enter key.If your SD card is currently mounted, the script will prompt you to unmount it first and you'll get a final warning before the operation starts. Answer y to both questions to continue. The progress meter will tell you when the image has been successfully written to your card. You might notice a new storage volume called Untitled. That's the boot partition of Raspbian. You should right-click on this volume and Eject it to safely remove your SD card.
Tip
Downloading the example code
You can download the example code files for all Packt books you have purchased from your account at http://www.packtpub.com. If you purchased this book elsewhere, you can visit http://www.packtpub.com/support and register to have the files e-mailed directly to you.
All right, you've been patient long enough; it's time we take your Pi out for a spin! For this first voyage, it is recommended that you go easy on the peripherals until we have properly configured the Pi and verified a basic stable operation. Connect a USB keyboard, a monitor or TV, and a Wi-Fi dongle or an Ethernet cable plugged into your home router. Finally, insert your SD card and attach the power cable.
Within seconds you should see text scroll by on your display. Those are status messages from the booting Linux kernel.
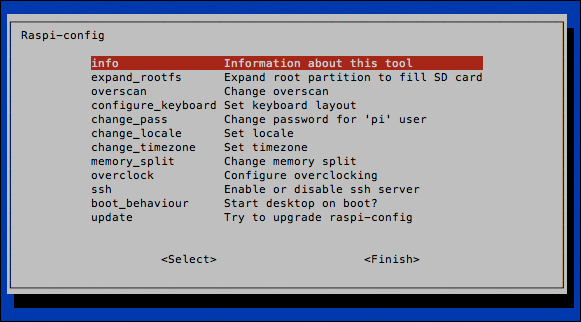
Raspi-config application running on first boot
The output will come to a halt in a minute and you'll be presented with a menu-type application called Raspi-config. Use your arrow keys to navigate and press the Enter key to select menu options.
expand_rootfs: This important option will resize the filesystem to fit the storage capacity of your SD card. You'll want to do this once, or you'll soon run out of disk space! The filesystem will be resized the next time you boot the Pi.
overscan: If you see thick black borders around the blue background on your monitor, select this option and disable to make them go away the next time you boot the Pi.
configure_keyboard: Select this option to reconfigure your keyboard. Usually there is no need to do this unless some keys on your keyboard are not working properly.
change_pass: Select this option to change the password for the default user pi. This is strongly recommended. Just in case you forget, the default password is raspberry.
change_locale: This option allows you to add non-English languages to the system. You can also select what language the applications should display by default.
change_timezone: It's important that you set the correct time zone, because any scheduling we do in the later chapters depends on this. It's also nice to have the correct time in logfiles.
memory_split: This option lets you change how much of your Pi's memory the Graphics Processing Unit (GPU) is allowed to use. To play HD movies or output fancy graphics, the GPU needs 64–128 MB of the RAM. Since we'll use the Pi mostly for recording, you can leave this at the default 64 MB of RAM.
overclock: This option allows you to add some turbo boost to the Pi. Only experiment with overclocking once you have established that your system runs stable at default speed. Also note that while overclocking will not void the warranty of the Pi, it could reduce its lifetime.
ssh: Select this option to enable or disable the Secure Shell service. SSH is a very important part of our setup and allows us to login remotely to the Pi from another computer. It is active and enabled by default, so leave this option alone for now.
boot_behaviour: This option allows you to change whether the graphical desktop environment should be started automatically each time you boot the Pi. Since we will mostly work on the command line in this book, it's recommended that you leave this option as is.
update: This option will try to upgrade the Raspi-config application itself to the latest version. You can leave this option alone for now as we will make sure all the software is up-to-date later in this chapter.
Once you're happy with the configuration, select Finish and Yes to reboot the Pi. After the Linux kernel boots again, your filesystem will be resized. This can take quite a while depending on the size of your SD card—please be patient and don't disturb the little guy.
At the raspberrypi login prompt, enter pi as the user name and the password you chose.
Now that you're logged in, let's have a look at a handful, out of the several hundred possible commands, that you can type at the command line. When a command is run prepended with sudo it'll start with the super user or root privileges. That's the equivalent of the Administrator user in the Windows world.
Pretty much all the pranks and projects in this book will be done at the command line while being remotely logged in to the Pi over the network through SSH. Before we can do that, we need to be sure our Pi is reachable and we need to know its IP address. First we'll look at wired networks, then at Wi-Fi.
So you've plugged an Ethernet patch cable into the Pi and connected it to your home router, now what? Well, there should be all kinds of blinking lights going on, both around the port of your router and the three LAN LEDs on your Pi. The next thing that needs to happen is for the router to assign an IP address to the Pi using Dynamic Host Configuration Protocol (DHCP). DHCP is a common service on network equipment that hands out unique IP addresses to all computers that want to join the network.
Let's have a look at the address assigned to the Ethernet port (eth0) on the Pi itself using the following command:
pi@raspberrypi ~ $ ip addr show eth0
If your DHCP service is working correctly, you should see a line similar to the following output:
inet 192.168.1.20/24 brd 192.168.1.255 scope global eth0
The digits between inet and the / character is your Pi's IP address, 192.168.1.20 in this case.
If your output doesn't have a line beginning with inet, it's most likely that your router lacks a DHCP service, or that the service needs to be enabled or configured. Exactly how to do this is outside the scope of this book,
but try the manual for your router and search for dhcp.
For static address network setups without DHCP, see the Setting up point-to-point networking section in Chapter 5, Taking your Pi Off-road.
The easiest way to set up the Wi-Fi networking is to use the included WiFi Config GUI application. Therefore, we will briefly enter the graphical desktop environment, configure the Wi-Fi, and save the information so that the Wi-Fi dongle will associate with your access point automatically on boot.
If you have a USB hub handy, you'll want to connect your keyboard, mouse, and Wi-Fi dongle now. While it's fully possible to perform the following actions using only the keyboard, a mouse will be very convenient:
Type
startxand press the Enter key to start the graphical desktop environment.Double-click on the WiFi Config icon located on the desktop.
From the Network drop-down menu, select Add.
Fill out the information for your access point and click on the Add button.
Your Wi-Fi adapter will associate immediately with the access point and should receive an IP address as listed under the Current Status tab.
From the File drop-down menu, select Save Configuration.
Exit the application and log out of the desktop environment.
To find out about the leased IP address of your Wi-Fi adapter (wlan0), without having to enter the graphical desktop, use the following command:
pi@raspberrypi ~ $ ip addr show wlan0
You should see a line similar to the following output:
inet 192.168.1.15/24 brd 192.168.1.255 scope global wlan0
The digits between inet and the / character is your Pi's IP address, 192.168.1.15 in this case.
To obtain information about the associated access point and signal quality, use the iwconfig command.
We will be using an application called PuTTY to connect to the SSH service on the Pi.
To download the application, visit http://www.chiark.greenend.org.uk/~sgtatham/putty/download.html.
Download the all-inclusive windows installer called
putty-0.62-installer.exe, since the file copy utilities will come in handy in later chapters.Install the application by running the installer.
Start PuTTY from the shortcut in your Start menu.
At the Host name (or IP address) field, input the IP address of your Pi that we found out previously. If your network provides a convenient local DNS service, you might be able to type
raspberrypiinstead of the IP address, try it and see if it works.Click on Open to initiate the connection to the Pi.
The first time you connect to the Pi or any foreign system over SSH, you'll be prompted with a warning and a chance to verify the remote system's RSA key fingerprint before continuing. This is a security feature designed to ensure the authenticity of the remote system. Since we know that our Pi is indeed our Pi, answer yes to continue the connection.
Login as
piand enter the password you chose earlier with Raspi-config.You're now logged in as the user
pi. When you've had enough pranking for the day, typeexitto quit your SSH session.
Both Mac OS X and Linux come with command line SSH clients.
Open up a Terminal (located in
/Applications/Utilitieson the Mac).Type in the following command, but replace
[IP address]with the particular IP address of your Pi that we found out previously:ssh pi@[IP address]If your network provides a convenient local DNS service, you might be able to type
raspberrypiinstead of the IP address, try it and see if it works.The first time you connect to the Pi or any foreign system over SSH, you'll be prompted with a warning and a chance to verify the remote system's RSA key fingerprint before continuing. This is a security feature designed to ensure the authenticity of the remote system. Since we know that our Pi is indeed our Pi, answer yes to continue the connection.
Type the password of the user
pithat you chose earlier with Raspi-config.You're now logged in as the user
pi. When you've had enough pranking for the day, typeexitto quit your SSH session.
You might be wondering why we bother with SSH and typing stuff at the command line at all when Raspbian comes with a perfectly nice graphical desktop environment and a whole repository of GUI applications? Well, the first reason is that we need all the CPU power we can get out of the Pi for our projects. With the current graphics drivers for X (the graphics system), the desktop eats up too much of the Pi's resources and the CPU is more concerned with redrawing fancy windows than with running our mischievous applications.
The second reason is that of stealth and secrecy. Usually, we want to be able to hide our Pi with as few wires running to and fro as possible. Obviously, a Pi hidden in a room becomes a lot more visible if someone trips over a connected monitor or keyboard. This is why we make sure all our pranks can be controlled and triggered from a remote location.
A community effort such as Raspbian and the Debian distribution on which it is based, is constantly being worked on and improved by hundreds of developers every day. All of them are trying hard to make the Pi run as smoothly as possible, support as many different peripherals as possible, and to squish any discovered software bugs.
All those improvements come to you in the form of package and firmware updates. To keep your Raspbian OS up-to-date, you need to know the following two commands:
The firmware updates are more related to the Raspberry Pi hardware and may contain improvements to the Linux kernel, new drivers for USB gadgets, or system stability fixes. To upgrade the firmware, we'll use a script called rpi-update written by Hexxeh. Type in the following command to install the script:
pi@raspberrypi ~ $ sudo wget http://goo.gl/1BOfJ -O /usr/bin/rpi-update && sudo chmod +x /usr/bin/rpi-update
Before we can use the script, we need to install Git, a version control system used by the Raspberry Pi firmware developers, with the following command:
pi@raspberrypi ~ $ sudo apt-get install git-core
Notice how easy it is to download and install new software packages from the Internet using apt-get.
Now, whenever you want to check for firmware updates, type sudo rpi-update and reboot once the script says it has updated your system successfully.
In this chapter, we had a look at the different parts of the Raspberry Pi board and learned a bit about how it came to be. We also learned about the importance of a good power supply and how a powered USB-hub can help alleviate some of the power drain caused by hungry USB peripherals.
We then gave our Pi an operating system to run by downloading and writing Raspbian onto an SD card. Raspbian was booted and configured with the Raspi-config utility. We also learned a few helpful Linux commands and how the Pi was set up to accept remote connections from SSH clients over the network.
Finally, we learned how to keep both software and firmware up-to-date and ready for maximum mischief.
In the upcoming chapter, we'll be connecting sound gadgets to the Pi and getting our feet wet in the big pond of spy techniques.