Welcome, fellow pranksters and mischief-makers, to the beginning of your journey toward a stealthier lifestyle. Naturally, you're anxious to get started with the cool stuff, so we'll only devote this first chapter to the basic steps you'll need to get your Raspberry Pi up and running.
In this chapter, we will look at the following topics:
- Exploring the different versions of Raspberry Pi available
- Preparing the SD card with the latest Raspbian Jessie operating system
- Learning how to remotely access the Raspberry Pi over the home network
- Updating our operating system with the latest packages
- Backing up our SD card to avert disaster
A brief history lesson on the Pi
The Raspberry Pi is a credit-card-sized computer created by the non-profit Raspberry Pi Foundation in the UK. It all started when a chap named Eben Upton got together with his colleagues at the University of Cambridge's computer laboratory to discuss how they could bring back the kind of simple programming and experimentation that was widespread among kids in the 1980s on home computers such as the BBC Micro, ZX Spectrum, and Commodore 64. Eben is now CEO of the Raspberry Pi Foundation as well as being a technical architect at Broadcom (the company that makes the main chip for the Raspberry Pi).
After several years of tinkering, the Foundation came up with two designs for the Raspberry Pi. The £25 Model B was released first, around February 2012, originally with 256 MB of RAM. A second revision, with 512 MB of RAM, was announced in October 2012, and the £15 Model A went on sale the following year, in February 2013.
In July 2014, with over 3 million Pis sold worldwide, the Foundation unveiled the Raspberry Pi Model B+, a £25 board revision incorporating numerous improvements requested by the ever-growing Pi community.
As the Pi community grows from strength-to-strength, in February 2015 the Foundation released the Raspberry Pi 2: 6 times faster than the Model B/B+ with its upgraded ARM processor, and 1 GB of RAM.
In November 2015, the Foundation rocked the community with the launch of the Raspberry Pi Zero—an amazing feat of engineering—being a fully functional PC the size of a small luggage tag (65 mm x 30 mm) that could easily be lost down the back of a sofa. What's more amazing is the price—just £4—and they were giving these things away on the front of magazines. This device is truly a secret agent's delight.
The latest part of this story is that as I write the third edition of this book, the Foundation have just released the Raspberry Pi 3—even more awesome than the Pi 2, with a faster processor and now with onboard Wi-Fi and Bluetooth—which means no more dongles for many wireless projects:

So, which Pi is good for the spy?
As you've just discovered, there have been several versions of the mini-PC board released since 2012 and most of them are still available to purchase now. I'll go through each of the versions released with their respective features; however, for our secret agent projects we will be focusing on the Raspberry Pi 2, 3, and Zero boards, as they are the most recent and most useful for spies like us.
The baby of the family is the Model A, and was released as a lower cost version of the Model B (discussed next). Its main differences from the Model B is that it features just 256 MB of memory and has no Ethernet port, so if you want to connect this board to a network, you are limited to using a USB Wi-Fi dongle or a USB-to-Ethernet adapter:

This was the first version of the Raspberry Pi to be released, with an updated revision coming later that improved the power system and USB port protection. It features 512 MB of memory and has an Ethernet port for connecting to your network. This was the most common version used at the time, as having the Ethernet port is incredibly useful, especially for getting up and running quickly in order to set up and configure your Pi without the need for a keyboard and monitor to always be available:

In 2014, the Raspberry Pi Foundation released a new version of the board, the Model B+, which had fundamental changes compared to the previous version. The most fundamental changes are the board layout, form factor and mounting points—much to the dismay of the many enclosure and accessory manufacturers out there.
The main electronic changes to this board are the addition of two more USB ports, which can deliver more power to peripherals, an expanded GPIO interface, and the removal of the composite video port, which is now consolidated into the audio jack. It also now uses a microSD card with a better card slot:

A lower cost model A+ was also subsequently released that had only 1 USB port and no Ethernet port:

In February 2015, a more powerful Raspberry Pi was released—the Raspberry Pi Model 2. It's similar to the Model B+ in terms of form-factor and interfaces, but is now reportedly 6 times faster than the Model B/B+, with its upgraded ARM processor, and 1 GB of memory.
At the same low cost of less than £30, it's a fantastic little board and is a great power-house for embedded systems:

Fortunately, the Raspberry Pi has now standardized its layout and mounting points so that add-ons will fit all of the different models:

November 2015 saw the launch of the Raspberry Pi Zero—a complete PC board that could be bought for just £4 and at the minute size of just 65mm x 30mm. The Foundation's aim was to take a Raspberry Pi Model A and make it as small and as cheap as possible. They even gave it away free on the front of The MagPi magazine when it was launched.
"We all need access to tools. Cost should never be a barrier." | ||
| --Eben Upton | ||
Up to now, the Raspberry Pi was always licensed to, and manufactured by, the likes of RS Components and Farnell element14, who have the financial might to ramp up production.
However, with the Zero, this is a go-it-alone project, with the Foundation funding and handling the manufacturing process themselves. As a result, even at the time of writing, demand has way outstripped supply, and Zeros are currently pretty difficult to get your hands on—no thanks to the many profiteers out there buying them for £4 in quantities and then trying to sell them online for a massive profit.
The Foundation are addressing this with plans to massively ramp-up production in Q2 of 2016, so hopefully by the time you read this, they will be in plentiful supply.
With its low cost and tiny form-factor, the Raspberry Pi Zero is going to be very useful in our stealthy and mischievous antics:

As I write (February 2016), the Foundation has just launched their next update of the Pi—the Raspberry Pi 3—and just in time, as not only is it more powerful, with a 64-bit ARMv8 processor, it also includes Wi-Fi and Bluetooth connectivity on the board, without requiring any additional dongles to be connected to the USB ports. They are also easier to get your hands on at this time compared to the Pi Zero.
This could be a game-changer for our sneaky activities, as it means we can build more discreet secret agent tools and devices. Incidentally, the Raspberry Pi 3 is available at the same benchmark cost of less than £30 from the main distributors, RS and Farnell element14:

As you have seen, in its short lifetime the Raspberry Pi already has several models available, each of which suits different application needs. To help us choose, the following table provides a comparison between the various models:
|
Model B+ |
Model 2 |
Model 3 |
Zero | |
|
Processor |
Broadcom BCM2835 SoC featuring ARM1176 32-bit dual-core CPU |
Broadcom BCM2836Soc featuring ARMv7 32-bit quad-core CPU |
Broadcom BCM2837 SoC featuring ARMv8 64-bit quad-core CPU |
Broadcom BCM2835 SoC featuring ARM1176 32-bit dual-core CPU |
|
GPU |
VideoCore IV | |||
|
Clock |
700MHz |
900MHz |
1.2GHz |
1GHz |
|
Memory |
512 MB |
1 GB |
1 GB |
512 MB |
|
USB Ports |
4 |
4 |
4 |
1 (Micro-USB) |
|
Ethernet |
Yes |
Yes |
Yes |
No |
|
Wi-Fi |
No |
No |
Yes |
No |
|
Bluetooth |
No |
No |
Yes |
No |
|
GPIO Pins |
40 |
40 |
40 |
40 (unpop.) |
|
Storage |
MicroSD card |
MicroSD card |
MicroSD card |
MicroSD card |
In this latest edition of this book, we're going to focus on the current Raspberry Pi version 2 and new version 3 models, as well as the Raspberry Pi Zero for those projects that might require a computer board that's somewhat more discreet. Each of these versions has different features and advantages, so we'll chose the right version for the job for each of our secret agent tools.
The Raspberry Pi Foundation site has more detailed information about each model here: https://www.raspberrypi.org/products/.
The main distributors for the Raspberry Pi 2 and 3 are RS Components and Farnell element14, but you may need a trade account to buy from them. Alternatively, there are other vendors on the Internet that sell them, including CPC and Maplin Electronics, as well as a plethora of independent sellers on Amazon and eBay.
The Raspberry Pi Zero is currently manufactured by the Raspberry Pi Foundation and is distributed through their official partners:
At the heart of the Pi is the Broadcom System on a Chip (SOC)—think of it as all the common hardware components of a PC baked into a small piece of silicon. Different versions of the Pi have different types of Broadcom chip, as outlined in the model comparison table above, but they are each based on an ARM processor, with the Pi Model 3 having the most powerful ARM processor.
For graphics, the Pi sports a Broadcom VideoCore IV GPU, which is quite powerful for such a tiny device and is capable of full HD video playback through the HDMI connector built in to every Pi.
The following figure shows the Raspberry Pi Version 3 board layout and connectors:

At the edge of the board, we find the General Purpose Input/Output (GPIO) pins, which as the name implies, can be used for any kind of general tinkering and to interface with other pieces of hardware.
The 3.5 mm four-pole jack socket is for the audio output, and on later models also contains the composite video output that was originally connected to an RCA socket. We can use that to connect the Pi to one of those old television sets using an RCA connector cable. You can also get audio out of the Pi through the HDMI connector.
Status LEDs are used to tell us what the Pi is up to at the moment. They have the following meanings:
- The green light labelled ACT will blink whenever the Pi is accessing data from the SD card
- The red light labelled PWR should stay solid as long as the Pi has sufficient power
The USB 2.0 ports allow us to connect keyboards, mice, and most importantly for us, Wi-Fi dongles, microphones, video cameras, and GPS receivers. We can also expand the number of USB ports available with the help of a self-powered USB hub.
The Ethernet port allows us to connect the Pi to a network at a maximum speed of 100 Mbit/s. This will most commonly be a home router or a switch, but it can also be connected directly to a PC or a laptop. A Category 5 twisted-pair cable is used for wired network connections.
The Camera Serial Interface (CSI) is where the official Raspberry Pi camera module connects to, using a flexible flat cable.
The Display Serial Interface (DSI) is for connecting TFT or LCD display panels using a flexible flat cable and connects to the Mobile Industry Processor Interface (MIPI) inside the Broadcom chip, which feeds graphics data directly to the display panel.
The High-Definition Multimedia Interface (HDMI) connector is used to connect the Pi to a modern TV or monitor. The cable can carry high-resolution video up to 1920 x 1200 pixels, and digital sound. It also supports a feature called Consumer Electronics Control (CEC), which allows us to use the Pi as a remote control for many common television sets.
The power input on the Raspberry Pi is a 5V (DC) Micro-USB Type B jack. A power supply with a standard USB to micro-USB cable, such as a common cell phone charger, is then connected to feed the Pi.
Take a look at the output printed on your power adapter. The voltage should be between 5V to 5.25V and the amperage provided should be at least 1A.
Tip
The most frequently reported issues from Raspberry Pi users are without a doubt those caused by insufficient power supplies and power-hungry USB devices. Should you experience random reboots, or that your Ethernet port or attached USB device suddenly stops working, it's likely that your Pi is not getting enough stable power. Another indication of the Pi not getting enough power is if you see a rainbow icon in the top right-hand of the monitor.
The official 2A power supply sold by the Foundation is highly recommended—especially for the Raspberry Pi Version 3 (1A = 1000mA).
You can help your Pi by moving your devices to a self-powered USB hub (a hub that has its own power supply).
Also note that the Pi is very sensitive to devices being inserted or removed while it's running, and powering your Pi from another computer's USB port usually doesn't work well.
The microSD card is where all our data lives, and the Pi will not start without one inserted into the slot. All models since the Model B+ use the tiny microSD cards, whereas earlier models used standard sized SD cards. The Pi 3 no longer has a push-to-release mechanism because so many people were accidentally ejecting their SD cards! You simply slide the card out now to remove it.
SD cards come with a wide variety of data storage capabilities. A card with a minimum of 4 GB of storage space is recommended for the projects in this book. The SD cards also carry a class number that indicates the read/write speed of the card—the higher the better.
The Raspberry Pi only boots from an SD card, and cannot boot from an external drive or USB stick (well that's not strictly true, but is outside the scope of this book).
It's recommended that you use a Class 10 SD card for performance, but a Class 6 card will be fine for the projects in this book. You'll need to have a minimum card size of 4 GB.
Now we have our Raspberry Pi board and SD card to hand, we need to prepare the SD card so we can start creating some mischief. We're going to use the standard Raspbian operating system, as there really is no reason to use any other distribution, and it's the de facto operating system for the Raspberry Pi.
You'll need to grab the latest Raspbian OS image from the Raspberry Pi site at https://www.raspberrypi.org/downloads/.
Download the Raspbian OS ZIP file containing the image to your PC.
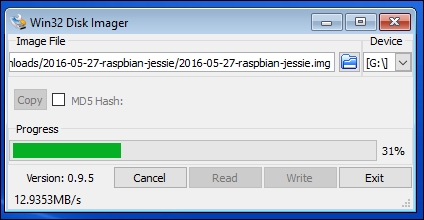
Once downloaded, unzip the file and you'll have the file 2016-05-27-raspian-jessie.img.
The next thing to do is burn this image to your SD card.
On a Windows PC, the best way to burn the image to your SD card is to use the Win32 Disk Imager utility. This can be downloaded from https://sourceforge.net/projects/win32diskimager/.
It doesn't have an installer, and launches directly from the EXE file.
Now it's time to create your SD card image:
- Insert your SD card into the PC and launch Win32 Disk Imager.
- Select SD card device drive letter (make sure it's right!).
- Choose the Raspbian image file you've just downloaded.
- Click the Write button to create the SD card image:
On a Linux PC you'll need to use the fdisk and dd utilities to burn the image to your SD card.
Carry out the following steps to create your SD card image:
- Extract the
2016-05-27-raspbian-jessie.imgto yourHomefolder. - Type the following command to check which drives you have before you insert your SD card, so that you can compare the difference in a moment to ensure you are selecting the right drive:
$ sudo fdisk -l - Now insert your SD card into the PC.
- If you're not already in a shell terminal window, open one (Ctrl + Alt + T).
- Type the following commands in the shell terminal:
$ sudo fdisk -l
In the list, check that your SD card appears as a drive device (for example, /dev/sdb). It's crucial you ensure you use the right device in the next step. We'll assume that your device is /dev/sdb.
To burn the image to the SD card, type the following command:
$ sudo dd if=2016-05-27-raspbian-jessie.img of=/dev/sdb
Hit Enter and go and make a cup of tea or coffee as this will take a while. You'll know when it's finished when the command ($) prompt re-appears.
When the command prompt does re-appear, type the following command:
$ sudo sync
Once that command has finished, you can remove the SD card from the PC.
You're now ready to boot up your Raspberry Pi. Pop in your newly burned SD card and plug the power in the Pi.
Assuming you have a monitor attached to your Pi, you should see your system booting up nicely. Although you could wait for it to boot up and connect via a terminal session (we'll look at that later), I recommend that you connect a monitor to it, at least in the first instance, just to make sure everything is working correctly.
In the new Jessie version of Raspbian you'll boot straight into a desktop GUI, which is a major change from previous versions. Previously, you'd be taken to the raspi-config utility the first time the system is run, where you'd set up your Pi, and importantly, expand the filesystem to use the entire space available on your SD card:

When you first create your Raspbian SD card you'll only be left with about 200 MB of space in the filesystem, regardless of the size of your SD card. This is not much use, so we want to expand the filesystem so it uses all of the available space on the card.
Fortunately, this is very easy now on the Raspberry Pi, as this function is available in the Raspberry Pi Configuration tool on the desktop.
To access the new configuration tool, go to Menu and select Preferences | Raspberry Pi Configuration:

Anyway, now we click the Expand Filesystem button, and in a couple of seconds you'll see a confirmation message. The filesystem will be expanded when the system next reboots.
If you have an older version of Raspbian, or you're not using the desktop GUI, then you'll need to use the raspi-config utility (which is still better than the old days when we had to do this manually in the shell). The first time you boot up you'll be taken straight to the raspi-config utility:

The first option is the Expand Filesystem option—select this and you'll see various commands scrolling up the screen. Once it's finished, you'll see the following message:
Root partition has been resized.
The filesystem will be enlarged upon the next reboot.
Click OK. Select Finish on the configuration screen and reboot your Pi when prompted.
After your Pi reboots with its fuller filesystem, you'll be taken straight to the shell prompt, where you can log in with the default user and password:
Login: pi
Password: raspberry
When you boot into the shell and you have the Ethernet connected, hopefully, the Pi will have connected to your home network and will have acquired an IP address from your router. If this is the case, then you should see the IP address that has been issued just before the login prompt:

As you can see from my screenshot, it's given me the IP address 192.168.0.118. This is good, because I can now access the Pi remotely using a secure shell (SSH) client to connect to it from the comfort of my laptop. This is particularly useful when my Pi is in the study and I want to sit on my sofa in front of the TV but still work on it, which I often do when I can't be bothered to go to my study.
To do this on Windows, download PuTTY—a utility that allows you to connect to shell terminals remotely over the network (see below if you're on Linux). You can download it from http://www.putty.org.
Install and launch PuTTY and you're ready to connect to your Pi remotely from the comfort of your sofa:

Type the IP address of the Raspberry Pi into the Host Name box and click Open, and you'll be connected to your Pi in a remote terminal window. Once you've logged in, you can now do pretty much everything on you Pi as if you were sat in front of it:

We'll assume from now on that most of the work we do will be through a remote shell session, unless otherwise highlighted.
If you want to use the command line to launch the Raspberry Pi remote shell, for example, from another Linux system, you use the following command from your terminal window (assuming your Pi has the IP address 192.168.0.120 in this case):
$ ssh pi@192.168.0.120
You'll then be prompted for the Pi's password and taken into a shell session:

You might be wondering why we bother with SSH and typing stuff in the command line at all when Raspbian comes with a perfectly nice graphical desktop environment and a whole repository of GUI applications. Well, the first reason is that we need all the CPU power we can get out of the Pi for our projects. With the current graphics drivers for X (the graphics system), the desktop eats up too much of the Pi's resources and the CPU is more concerned with redrawing fancy windows than with running our mischievous applications.
The second reason is that of stealth and secrecy. Usually, we want to be able to hide our Pi with as few wires as possible running to and from it. Obviously, a Pi hidden in a room becomes a lot more visible if someone trips over a connected monitor or keyboard. This is why we make sure all our pranks can be controlled and triggered from a remote location.
A community effort, such as Raspbian and the Debian distribution on which it is based, is constantly being worked on and improved by hundreds of developers every day. All of them are trying hard to make the Pi run as smoothly as possible, support as many different peripherals as possible, and to squish any discovered software bugs.
All those improvements come to you in the form of package and firmware updates, and something that you should get into the habit of doing is updating the operating system regularly, and even though you may have the latest image installed, it's very likely that there are updated packages that can be installed. To update your OS, enter the following command:
$ sudo apt-get update
(This fetches information about which packages have been updated.)
Then enter the following command:
$ sudo apt-get upgrade
(This proceeds to install the updated packages. Select Yes when prompted for installation. It will also upgrade the Pi to the latest firmware from the Raspberry Pi Foundation's GitHub repository—an online source code management service.)
This all may take a while depending on the number of updates required.
It happens to everyone at one point or another—you've put hours into perfecting your Raspbian installation, setting up applications, and hacking away at clever code, when out of nowhere your cat/dog/next-of-kin swoops down on your keyboard and triggers the self-destruct mechanism from the Erasing the Pi should it fall into the wrong hands section in Chapter 5, Taking Your Pi Off-Road.
Not to worry, Agent, backing up an SD card is quite simple as long as you've got the required disk space to store it.
We'll be making a complete mirror image of your SD card. The data will be stored in a single file that will be the same size as that of your SD card. To do this, we'll use the Win32 Disk Imager application we installed earlier on to create our SD card image:
- Power off your Pi safely by running the following command and wait for the green activity LED to stop flickering:
$ sudo shutdown -h now - Move the SD card to your computer's card reader.
- Start the Win32 Disk Imager application on your PC.
- Ensure that the correct volume of your SD card is shown under Device.
- Click on the folder icon and navigate to the folder where you'd like to store the image.
- Enter a good file name for your image and click on Open. The standard file extension for image files is
.img. - Finally, after verifying that the full Image File path looks good, click on Read:

Once your image backup has completed successfully, you can compress it to save quite a bit of disk space. Just right-click on the image file and select Send to, then click on Compressed (zipped) folder.
We'll be making a complete mirror image of your SD card. The data will be stored in a single compressed file, which should result in a smaller size than that of your SD card. The steps to be followed for a data backup are as follows:
- Power off your Pi safely by running the following command and wait for the green activity LED to stop flickering:
$ sudo shutdown -h now - Move the SD card to your computer's card reader.
- Open up a terminal (located in
/Applications/Utilitieson the Mac). - Type
diskutillistto obtain a readout of all connected storage devices. - To correctly identify your SD card, we're looking for a disk that has at least one Windows and one Linux entry under TYPE (there will be two of each type if we installed Raspbian through NOOBS).
- Take note of that disk's first IDENTIFIER field (disk1 in the screenshot).
- As a security precaution, we will first unmount the SD card so that no applications running in the background can change data as we make our backup. Use the following command, but replace
[disk]with the IDENTIFIER field of your SD card:$ diskutil unmountdisk [disk] - Now we'll do a complete copy of the SD card and store it in a file called
agent_sdcard.img.gzon your desktop. Type the following command, but replace[disk]with the IDENTIFIER field of your SD card (note the letter r in front of disk):$ sudo dd if=/dev/r[disk] bs=4m | gzip > ~/Desktop/agent_sdcard.img.gz - You might be asked to input your user password so that
sudois allowed to start. The backup process doesn't produce much output as it runs, but a status report can be produced by pressing Ctrl + T in theTerminalwindow: Backing up an SD card in Mac OS X
To restore your SD card from a backup image, repeat the previous steps, but use this command instead at step 7:
$ gzip -dc ~/Desktop/agent_sdcard.img.gz | sudo dd of=/dev/r[disk] bs=4m
We'll be making a complete mirror image of your SD card. The data will be stored in a single compressed file, which should result in a smaller size than that of your SD card:
- Power off your Pi safely by running the following command, and wait for the green activity LED to stop flickering:
$ sudo shutdown -h now - Move the SD card to your computer's card reader.
- Open up a terminal session (Ctrl + Alt + T).
- Type
sudo lsblk -fto obtain a readout of all connected storage devices. - To correctly identify your SD card, we're looking for a disk that has at least one
vfatand oneext4entry underFSTYPE(there will be two of each type if we installed Raspbian through NOOBS). - Take note of that disk's
NAME(sdbin the screenshot). - If any of the partitions under your disk's
NAMEhave aMOUNTPOINTlisted, you should unmount it first. Use the following command, but replace[mountpoint]with the mountpoint of your partition:$ sudo umount [mountpoint] - Now we'll do a complete copy of the SD card and store it in a file called
agent_sdcard.img.gzin yourhomedirectory. Type the following command, but replace[disk]with theNAMEof your SD card:$ sudo dd if=/dev/[disk] bs=4M | gzip > ~/agent_sdcard.img.gz - The backup process doesn't produce much output as it runs, but a status report can be produced by typing
sudopkill-USR1ddin anotherterminalconsole: Backing up an SD card in Linux
To restore your SD card from a backup image, repeat the previous steps, but use this command instead at step 7:
$ gzip -dc ~/agent_sdcard.img.gz | sudo dd of=/dev/[disk] bs=4M
In this chapter, we took a look at the versions of the Raspberry Pi that are now available, looked at their different parts, and learned a bit about how the Pi came to be.
We also learned about the importance of a good power supply and how a powered USB hub can help alleviate some of the power drain caused by hungry USB peripherals.
We then took our Raspberry Pi out of its box and gave it an operating system in order to prepare it for being the centerpiece of our secret agent toolkit, by installing Raspbian onto our SD card before popping it into the card slot.
Raspbian was booted and configured and the filesystem was expanded using the GUI-based or the raspi-config configuration utility. We also learned a few helpful Linux commands and how to set up remote connections from SSH clients over the network.
Finally, we learned how to keep Raspbian up to date and how to create a complete backup image of our precious SD card.
In the upcoming chapter, we'll be connecting sound gadgets to the Pi and getting our feet wet in the big pond of spy techniques.