Download code from GitHub
Chapter 1: Getting Familiar with the Amplify CLI and Amplify Console
In order to understand what Amazon Web Services Amplify (AWS Amplify) is and how to use it to create an app successfully, we will need to understand the fundamentals of the AWS Amplify ecosystem and how it connects to each of its own components, such as the AWS Amplify command-line interface (CLI) and the AWS Amplify Console (Amplify Console), to maximize the benefit of using it.
The AWS Amplify CLI is a toolchain that provides a robust set of features to simplify cloud-native mobile development. AWS Amplify is framework-agnostic itself because it supports all the major frameworks out there, such as React, React Native, Angular, Ionic, Vue, and pure JavaScript. Therefore, any team can easily pick it up immediately to integrate it with their existing project or create a new project with AWS Amplify. Since React is one of the most popular frameworks at the moment and TypeScript has become a common language for full-stack developments, we will be using these frameworks to create examples throughout this book.
Amplify Console is not just a cloud admin console—it also allows developers to easily deploy and host their cloud-native full-stack serverless apps. It supports a Git-based workflow, continuous deployment (CD) of the serverless backend and frontend with the DevOps pipeline, end-to-end test automation, globally available web hosting with a content delivery network (CDN), and more. All of these features are only a few clicks away with the easy-to-configure console interface. Amplify Console accelerates the development cycle by streamlining the continuous integration (CI) and CD workflow and abstracts away the complexity of setting up a fully working DevOps pipeline, which enables your development team to focus on development without wasting time fiddling around with infrastructure and pipelines. It empowers your development team with a state-of-the-art workflow and pipeline, helping them to deliver products much more quickly with better quality than ever before.
In this chapter, we're going to learn how to start an AWS Amplify project by familiarizing ourselves with the toolchain, runtime, AWS Amplify CLI, and Amplify Console on the AWS cloud. We will go through each of these in order to be able to set up and configure a new or existing project with AWS Amplify after having read this chapter. We will learn about the possibilities of integrating Amplify with existing projects, working with the most popular frameworks.
We're going to cover the following main topics:
- Understanding the AWS Amplify CLI
- Exploring Amplify Console
- Understanding AWS Amplify hosting
- Creating full-stack serverless web and native apps with AWS Amplify
Technical requirements
Development of Amplify and React apps can be done in all major operating systems (OSes), such as Windows, macOS, and Linux, so you don't need to worry about which OS you should choose. The best OS is the one that you are most familiar with. Therefore, our commands and scripts will be focused on something that could be run across all platforms. First things first—you will need to install a code editor, a JavaScript runtime, and a package manager before you can start to develop React apps. These are the technologies and installations required for creating an AWS Amplify app with React and TypeScript:
- Install an open source cross-platform code editor. We would recommend using Visual Studio Code (VS Code) because VS Code and TypeScript are created by Microsoft, so TypeScript support is out of the box. For more information, visit https://code.visualstudio.com/.
- Alternatively, you could choose Atom, which is another very popular open source and cross-platform code editor out there, but you will need to install the TypeScript plugin yourself after installation. For more information, visit https://atom.io/.
- In order to download the TypeScript plugin for Atom, you can click the Install button on the following web page after you have installed the Atom editor:
- Install the open source cross-platform Node.js JavaScript runtime environment:
- Since Linux, Windows with Windows Subsystem for Linux (WSL 2), and macOS all support Homebrew, we will use Homebrew to install all of our dependencies. For more information, visit https://brew.sh/.
- Once you have installed Homebrew, you can use the following command to install Node.js:
brew install node
- Install an open source and cross-platform package manager for development. We could install it with an installer from the following link:
- Alternatively, we could use Homebrew to install Yarn by running the following command:
brew install yarn
Once you have completed all the preceding installation steps, you will then be ready to start developing AWS Amplify apps. Prior experience with TypeScript and React is not required, but you could go through a few tutorials by yourself if you are interested in studying the fundamentals of TypeScript and React. Further details are provided here:
- TypeScript documentation: https://www.typescriptlang.org/docs/home.html
- Hello World tutorial for TypeScript: https://code.visualstudio.com/docs/typescript/typescript-tutorial
- Tutorial and documentation for React: https://reactjs.org/
All the code and instructions in this book can be found at the following Uniform Resource Locator (URL):
https://github.com/PacktPublishing/Rapid-Application-Development-with-AWS-Amplify/tree/master/ch1
We will be using both the npm and Yarn package managers to install dependencies, but npm already comes with Node.js, so there is no need to install it separately. The reason behind this is some of the tools such as the Amplify CLI would have issues on Linux if we were to use Yarn but would not have issues with npm, for some reason, so we will use what works across all OSes in this book.
Understanding the AWS Amplify CLI
Before we get started on the Amplify CLI, we might need to create an account on AWS first. To do so, go to https://aws.amazon.com/.
Please note that AWS comes with a Free Tier for beginners, therefore creating your Amplify app for development on AWS should be free at the beginning, as long as our usage is within the Free Tier. Once we have created an AWS account, we can go ahead and install the AWS Amplify CLI with the following command:
yarn global add @aws-amplify/cli
The preceding command will install the CLI globally. The AWS Amplify CLI is a toolchain that aims to simplify your workflow with the AWS ecosystem. You may wonder what is under the hood of the AWS Amplify CLI. Basically, it connects with the AWS ecosystem through the CLI. Every modern app requires features such as authentication, machine learning (ML), a NoSQL database, object storage, analytics, web hosting, a serverless application programming interface (API) gateway, notifications, and so on. AWS Amplify comes with them all. Everything you need to do is just a few commands away.
Here are a few of the most commonly used commands for us to use during development:
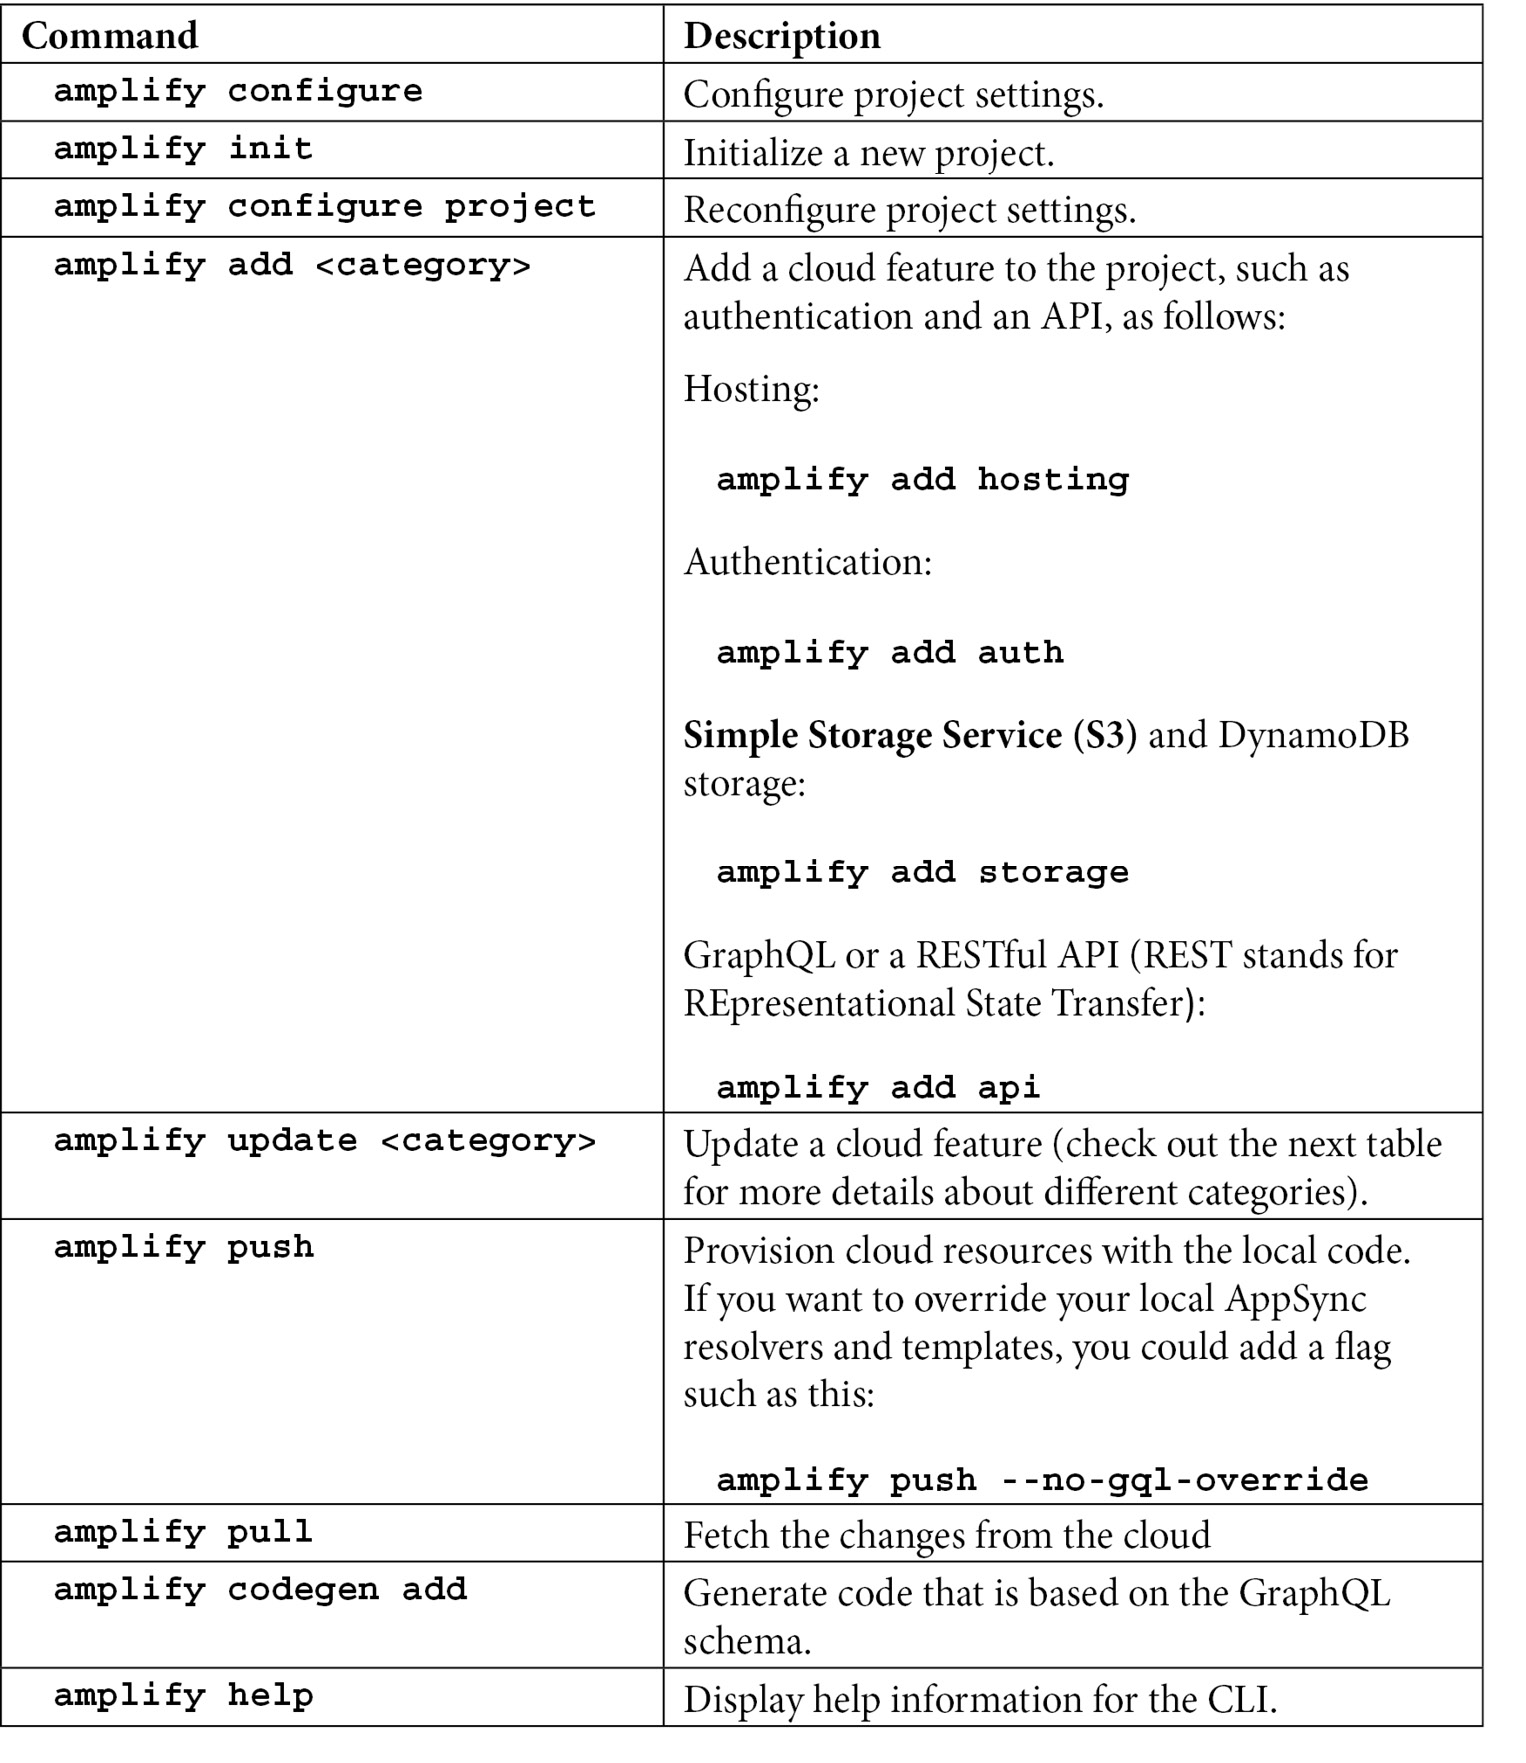
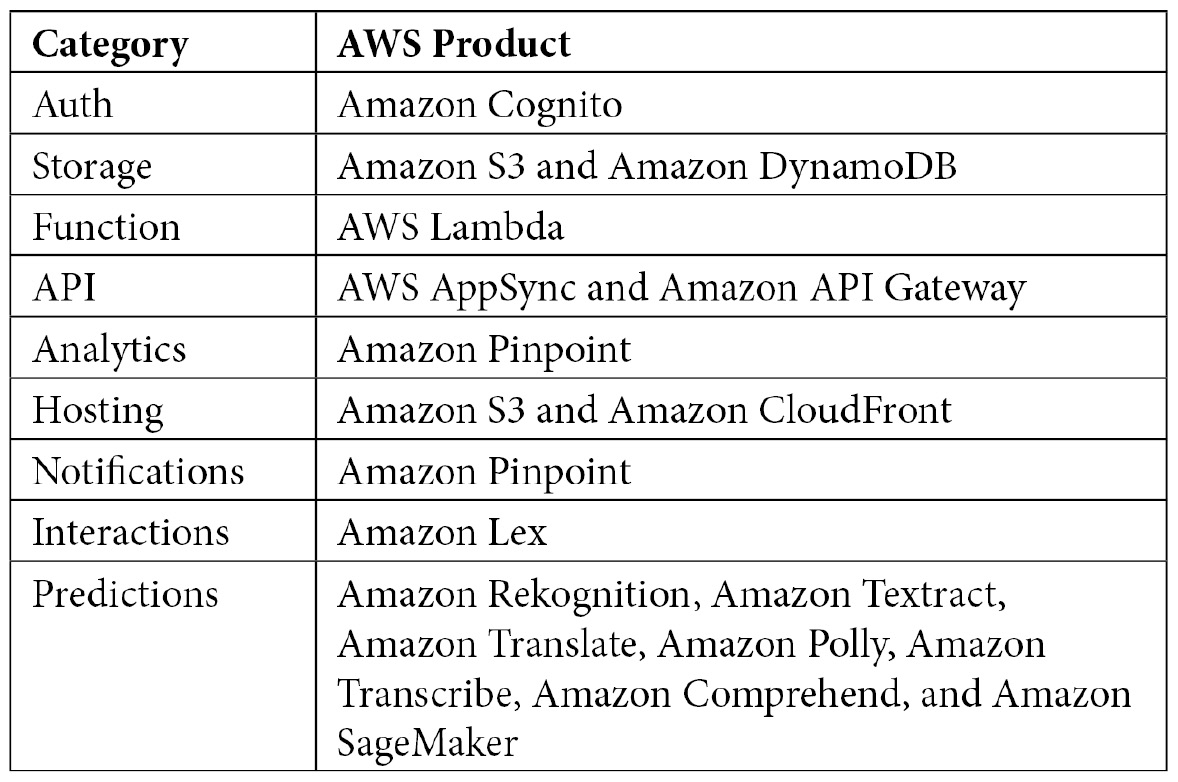
The previous table shows the commands of the AWS Amplify CLI and the mentioned categories. The following table outlines each category with its matching AWS products:
As you can see, with its cloud offerings, AWS Amplify simplifies the integration for you by abstracting away the complex setup and wiring between your app and each AWS product—such as generating necessary code behind the scenes—through the Amplify CLI.
If you have an existing project with supported frameworks (such as React, React Native, Angular, Ionic, Vue, or even native iOS and Android apps) that you would like to integrate with AWS Amplify, you could simply call amplify configure and amplify init at any time to set up the project. If you want to initialize a new project with Amplify after the project creation with the supported framework of your choice, all you need to do is call the same commands too. By calling those initiation commands through the Amplify CLI in the terminal, it will connect directly to Amplify Console through the terminal and the web browser under the hood, which will create and configure resources for the developer. Imagine the Amplify CLI as a setup wizard and Amplify Console as the user interface (UI) to create and configure an Amplify project.
We have just learned the basics of the Amplify CLI by following the steps of how to set it up. You might still need to have a better understanding of what you can do with it and how it can power up your next project. We will show you how to connect seamlessly to Amplify Console from the AWS Amplify CLI with a few simple commands next.
Important note
If you want to follow the latest changes to the Amplify CLI or report a bug that you have encountered, add the AWS Amplify CLI repository to your Favorites with the following link:
https://github.com/aws-amplify/amplify-cli/
Exploring Amplify Console
In this section, we will go through Amplify Console in order to learn how to set up an Amplify project properly. Let's enter the amplify configure command in the terminal, as illustrated in the following code snippet, and this will open up the default browser of your machine and take you to the AWS Management Console:
amplify configure
- Once you have entered the preceding command, it will open up the browser and ask you to log in to your AWS account, as shown in the following snippet. After you have logged in to your AWS account, return back to the terminal and hit Enter to continue:
Follow these steps to set up access to your AWS account:
Sign in to your AWS administrator account:
https://console.aws.amazon.com/
Press Enter to continue
- It will then ask you to select your AWS region by using the up- and down-arrow keys and then hitting Enter to select a region, as follows:
Specify the AWS Region? region: (Use arrow keys)
 us-east-1
  us-east-2
  us-west-2
  eu-west-1
  eu-west-2
  eu-central-1
  ap-northeast-1
(Move up and down to reveal more choices)
us-east-1
us-east-2
us-west-2
eu-west-1
eu-west-2
eu-central-1
ap-northeast-1
(Move up and down to reveal more choices) - Type your desired AWS Identity and Access Management (IAM) username or hit Enter with the suggested username, as shown in the following snippet. The prefix with the
amplifyusername will help you identify and remember the specific IAM user on the IAM Management Console, so call it something that's relevant to your project name, such asamplify-project-name:Specify the AWS Region ? region: us-east-1 Specify the username of the new IAM user: ? user name: (amplify-XXXXX)
- It will open up the browser and take you to the IAM Management Console. The username is pre-filled for you, and it also selects the correct access type for you, which is programmatic access. Programmatic access options allow the CLI to save an encrypted access key ID and an access secret key locally on your development machine. This allows the CLI to have access rights to configure the project for you without entering a password every time. So, leave it as is and hit Next: Permissions to continue, as illustrated in the following screenshot:

Figure 1.1 – Amplify Console: Add user
- In order to allow the Amplify CLI and your project to have access to all features of AWS, you should set the policies by attaching the
AdministratorAccesspolicy. You could customize your own policy for a specific project as well. By default, it has selected the right policy for you, so click Next: Tags to continue, as illustrated in the following screenshot:
Figure 1.2 – Amplify Console: Set permissions
- On the Add tags screen, please add some useful custom key-value pair tags for you to identify and remember who has access to this IAM user. You could add a specific developer's name as the key and an email address as the value, or a name of a project as the key and
amplifyas the value, in order to remember that this IAM user is created for your specific Amplify project. You can always come back to the IAM console through the AWS console to add or remove IAM users or edit its access policies if you make any mistakes throughout this process. After you have created several tags, you can click Next: Review to continue, as illustrated in the following screenshot:
- On the Review screen, you can double-check every detail before creating an IAM user. If you made any mistakes during the previous steps, you can click Previous to go back to the previous steps to make changes. You can simply click Create User and it will create a new IAM user for you, as well as generating an access key and a secret key, as illustrated in the following screenshot:

Figure 1.4 – Amplify Console: Review and Create user
- As you can see, the IAM Management Console has created an IAM user for you and has generated an access key and a secret key. You can download a
.csvfile that contains the access key ID and the secret key as a backup first by clicking the Download .csv button, as illustrated in the following screenshot. Then, you can copy and paste both the access key ID and secret key from here and return back to the terminal for the next step. Leave the browser open and return back to the terminal:
- Once you have completed the user creation process and returned back to the terminal, you will see the following message. Hit Enter to continue:
Complete the user creation using the AWS console
https://console.aws.amazon.com/iam/home?region=undefined#/users$new?step=final&accessKey&userNames=amplify-XXXXX&permissionType=policies&policies=arn:aws:iam::
aws:policy%2FAdministratorAccess
Press Enter to continue
- The CLI will ask you to enter the access key ID and the secret access key. You could go back to the browser or open the
.csvfile to copy and paste them in the terminal, as follows:Enter the access key of the newly created user: ? accessKeyId: (<YOUR_ACCESS_KEY_ID>) ? secretAccessKey: (<YOUR_SECRET_ACCESS_KEY>)
- The Amplify CLI will ask you to either update or create an AWS profile on your local machine. If you have set the IAM user with the default admin access rights, it makes sense to use it across all projects. You can simply hit Enter to continue with the suggested name,
default, as illustrated in the following snippet; otherwise, type your desired memorable profile name that is related to the IAM user and hit Enter to continue:This would update/create the AWS Profile in your local machine ? Profile Name: (default)
- Amplify Console will let you know once the new user has been set up successfully by showing a message like this:
This would update/create the AWS Profile in your local machine
? Profile Name:  default
Successfully set up the new user.
Important note
If you want to learn more about how AWS Amplify CLI and Amplify Console work, you can visit the Amplify Console website at the following link:
Now that you have become familiar with the AWS Amplify CLI and Amplify Console in this section, we will discover AWS Amplify hosting in the next section.
Understanding AWS Amplify hosting
Amplify hosting is a part of the Amplify Console toolchain that helps you to host the static artifact of a web app on AWS S3 with the AWS CloudFront CDN. All you need to do is to call amplify add hosting to add the capability to the app. After you have created an AWS profile through the CLI and console, you can set up AWS Amplify hosting with your repository, as follows:
- Click on the https://console.aws.amazon.com/amplify/home link and then click on the hamburger menu (triple lines) at the top-left corner to see the options, as illustrated in the following screenshot:

Figure 1.6 – Amplify Console: Home page
- Click All apps on the menu, then click Connect app, as illustrated in the following screenshot:

Figure 1.7 – Amplify Console: All apps
- In this step, you have the following three options:
- We are going to choose the From your existing code option, so you can either clone the project of this book or create a new project on your preferred Git repository and click Continue.
- Since the samples for the From fullstack samples option are written in JavaScript and not in TypeScript, we won't go through them in this book.
- If you select From scratch, it will then take you to the AWS Amplify documentation website at https://aws-amplify.github.io/docs/.
The aforementioned options can be seen in the following screenshot:

Figure 1.8 – Amplify Console: Git repository
- Now, you will need to create a new project using one of the following Git repository providers that are supported by AWS Amplify:
- GitHub
- Bitbucket (https://support.atlassian.com/bitbucket-cloud/docs/create-a-git-repository/)
- GitLab
- AWS CodeCommit
- Deploy without Git provider (upload a ZIP file that contains the artifacts manually)
Bitbucket provides unlimited free repositories for organization and personal accounts, which is ideal for beginners. Jira has become the de facto choice for enterprises and software companies to manage their software delivery in the last 10 years. Both Bitbucket and Jira are developed by Atlassian, so if you are planning to use or are already using Jira, then it makes sense to use Bitbucket for your repositories because the integration between the two is seamless.
- Let's choose Bitbucket and click Continue, and connect to the repository that you have created on Bitbucket.
Let's say you have created new Amplify projects in a repository; in that case, you can always come back here to connect your new app through Amplify Console. Now that you are familiar with AWS Amplify hosting, we will create some full-stack serverless web and native apps with AWS Amplify in the next section.
Creating full-stack serverless web and native apps with AWS Amplify
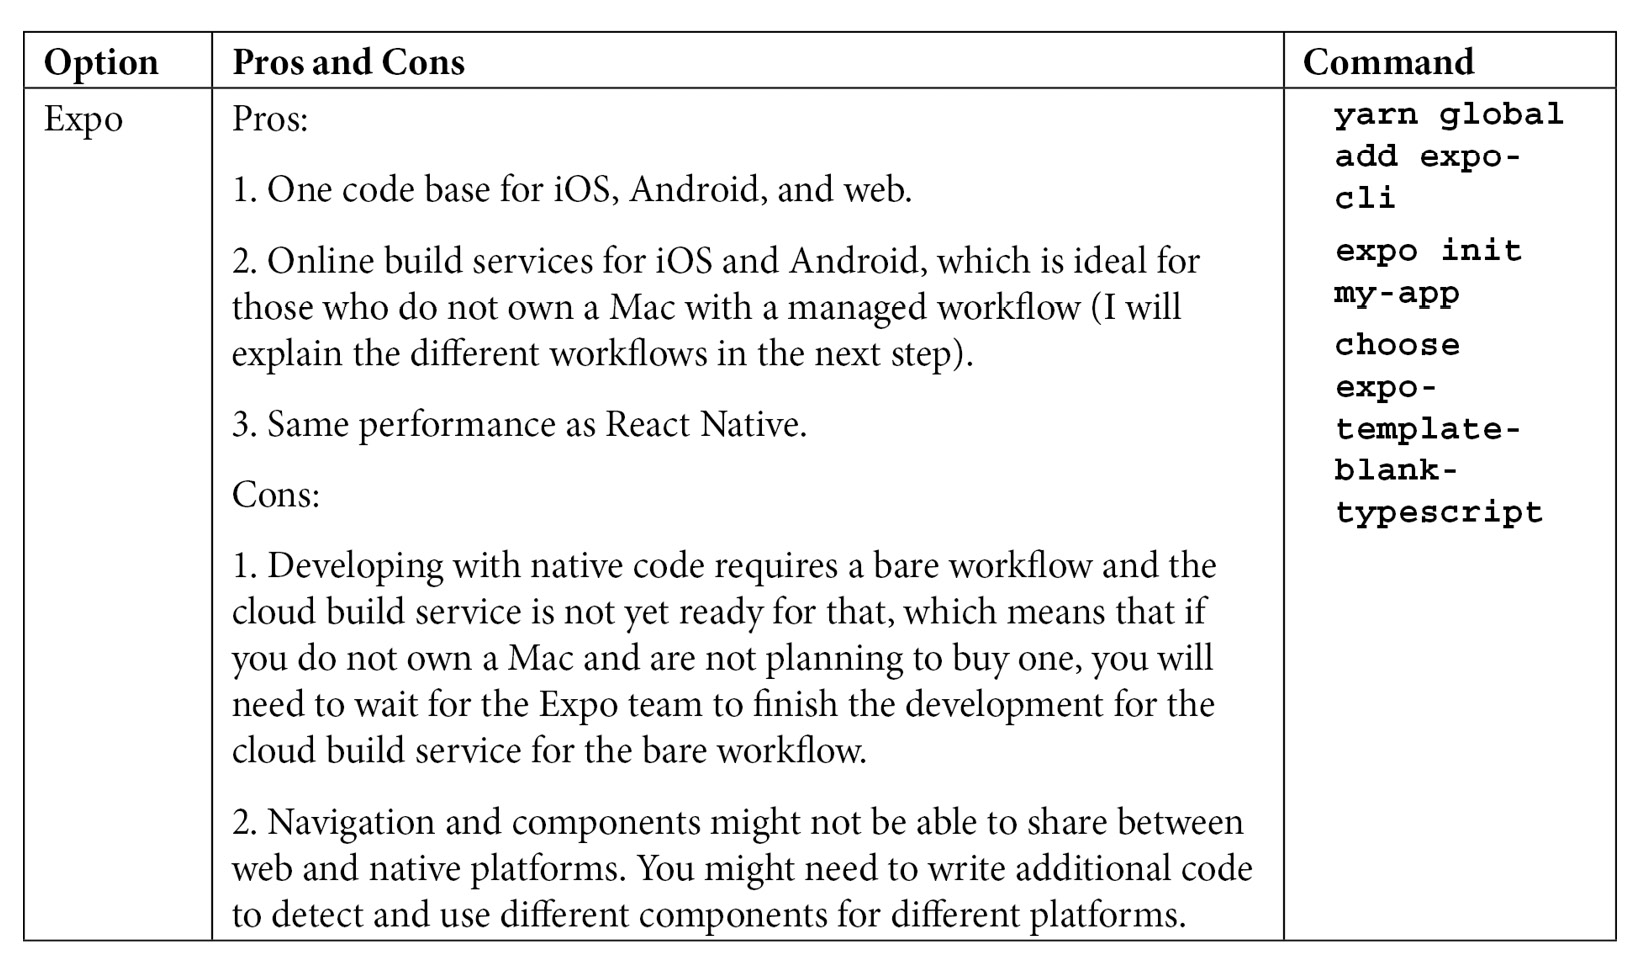
In order to connect AWS Console with a Git repository provider, we will need to create our Git repository first. Let's assume you have created a new blank project in one of the Git repositories we mentioned earlier. Open the terminal and choose your path, as outlined next, to create your first AWS Amplify app with either React, React Native, or React Native with Expo. I have put together the following table for you to decide which options to choose from, and they can be all written in TypeScript:
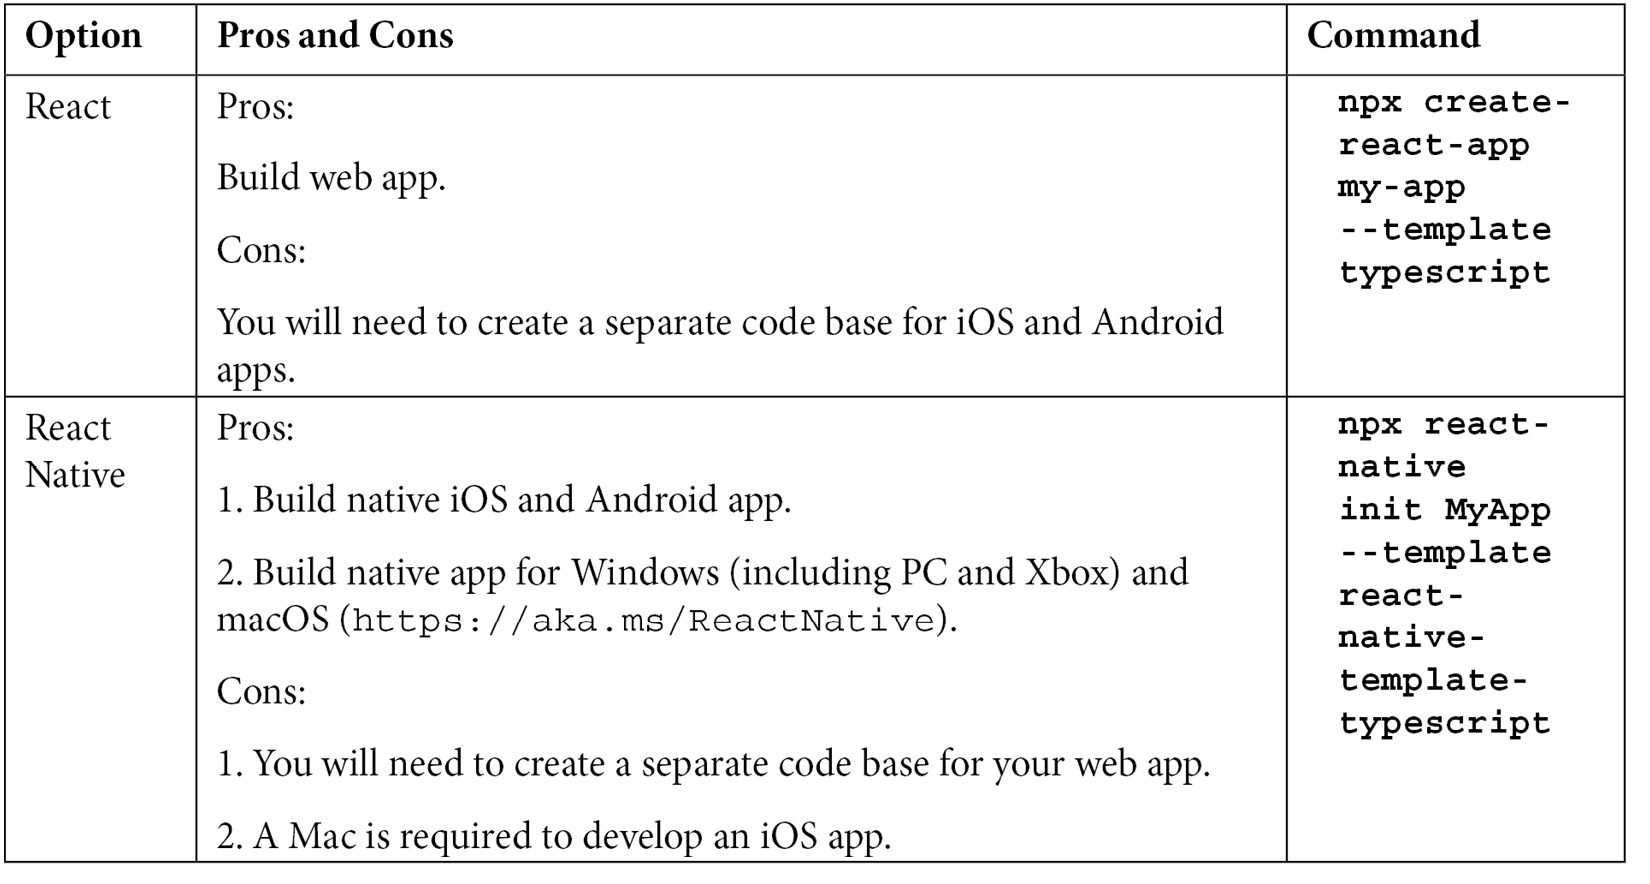
Creating an Expo app
I personally consider Expo the go-to option for most new projects, especially for proofs of concept (POCs), because it supports both mobile devices (iOS and Android) and web devices but at the same time gives you the native performance of React Native. If later in your project you need to write custom native scripts for iOS and Android platforms, then you have two options—either eject the Expo app altogether with the expo eject command or select a new bare workflow from the start.
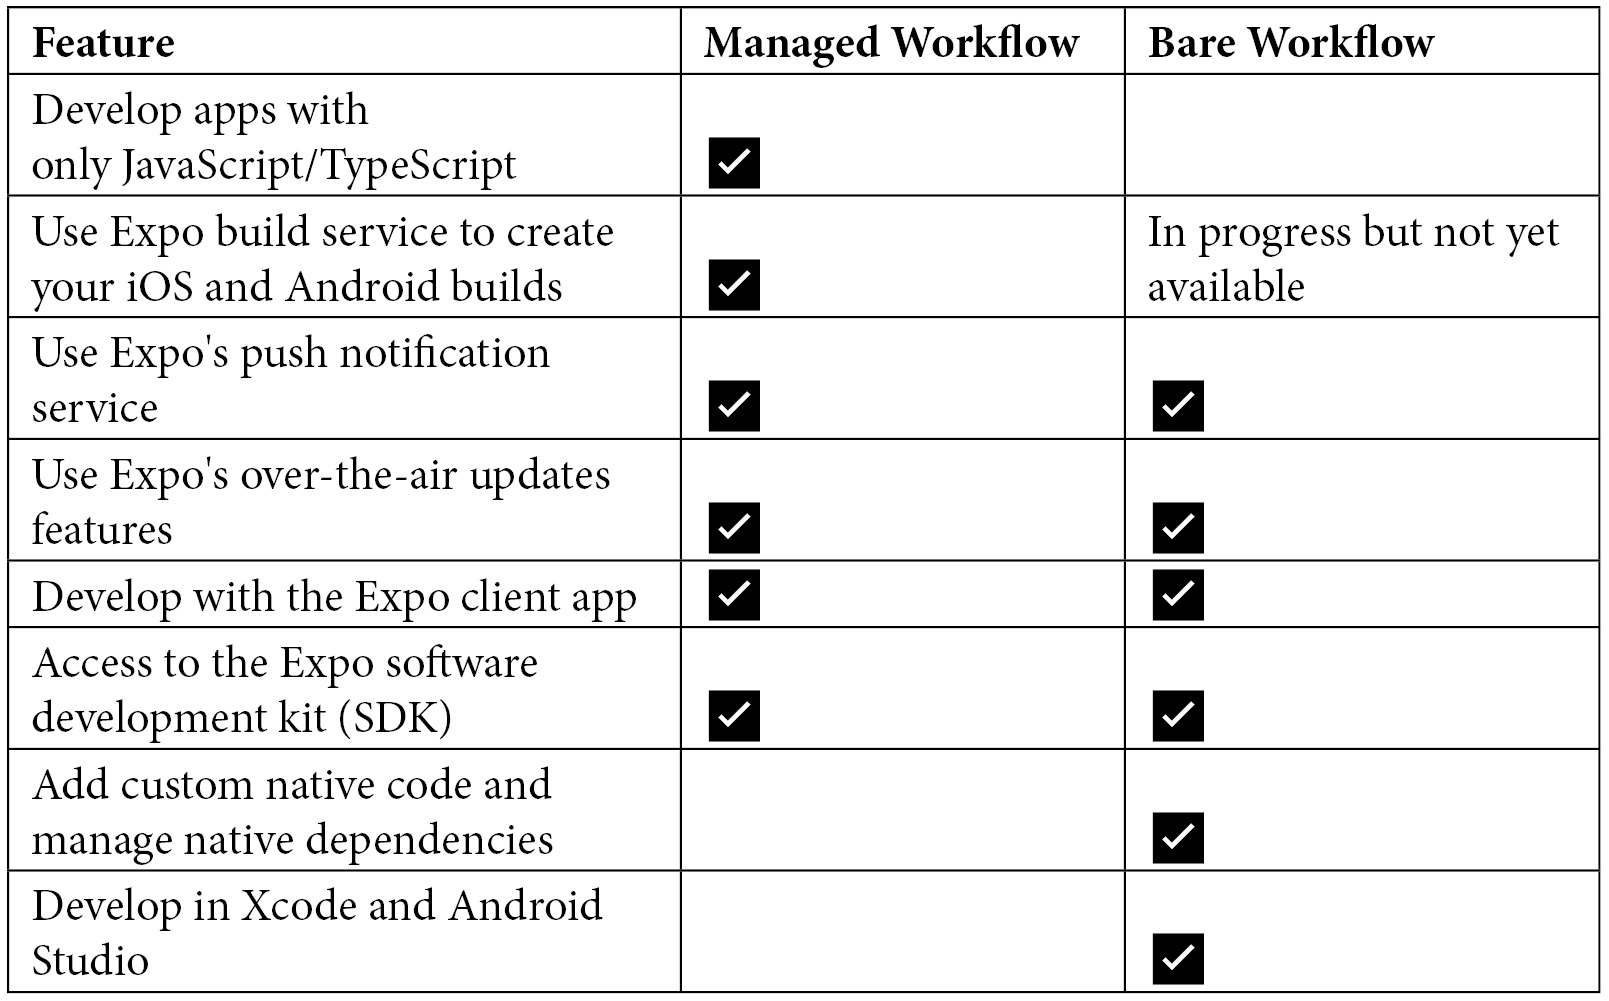
There are two workflows that you can choose from when you are developing a React Native app with Expo: a managed workflow and a bare workflow. With a managed workflow, you only write JavaScript/TypeScript, and Expo tools and services take care of everything else for you. With a bare workflow, you have full control over every aspect of a native project, but Expo tools and services are a little more limited. I have put together the following table for you to decide which workflow to choose:
Let's go ahead and create a React Native app with Expo by entering a few commands in the terminal:
- Run the following command in the terminal in order to create a React Expo app:
expo init my-app
- Since we want to write our code once and run it on iOS, Android, and the web with TypeScript, we will choose
blank (TypeScript)in the terminal, as follows:? Choose a template: ----- Managed workflow ----- Blank: a minimal app as clean as an empty canvas
 blank (TypeScript) same as blank but with TypeScript
configuration
Tabs: several example screens and tabs using react-
navigation
----- Bare workflow -----
minimal bare and minimal, just the essentials to get
you started
minimal (TypeScript) same as minimal but with
TypeScript
configuration
blank (TypeScript) same as blank but with TypeScript
configuration
Tabs: several example screens and tabs using react-
navigation
----- Bare workflow -----
minimal bare and minimal, just the essentials to get
you started
minimal (TypeScript) same as minimal but with
TypeScript
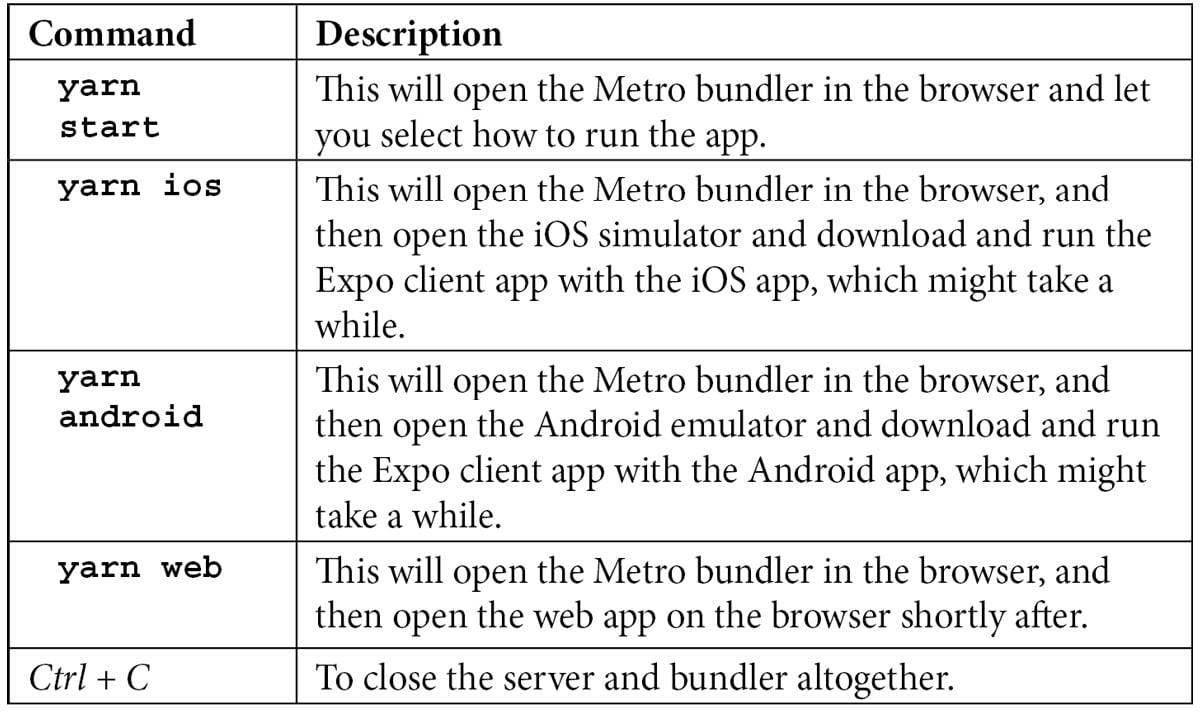
configuration - Once it's done, you can use the following commands to start running and developing the Expo app:
Alternatively, you can run the create-react-native-app command, as shown in the following code snippet, to create an Expo app. This has done all the hardwiring for you, such as configuration with iOS and Android projects:
npx create-react-native-app -t with-typescript
For iOS apps only, you will need one extra step, which requires a macOS computer. Change the directory to the ios folder under the project folder and run this command in order to install the CocoaPods dependencies:
cd ios && pod install
As you might have realized, the create-react-native-app command supports both web and native apps. You could actually focus on this path to create both React web and native apps instead of creating two projects. You can learn more about the differences between Expo and React Native at this link: https://reactnative.dev/docs/environment-setup.
Let's create an app with Expo first so that we can actually experience what Expo is like compared to pure React Native afterward, with firsthand experience. If you are not targeting iOS, you can skip the iOS exercise; the same goes for Android and the web. Feel free to jump to the one you're most interested in starting with.
Developing for iOS
If your Mac did not have Xcode installed, please go to the Mac App Store to download the Xcode app first. You can install Xcode from the Mac App Store with this link: https://apps.apple.com/us/app/xcode/id497799835?mt=12. You will then be taken to the following page:
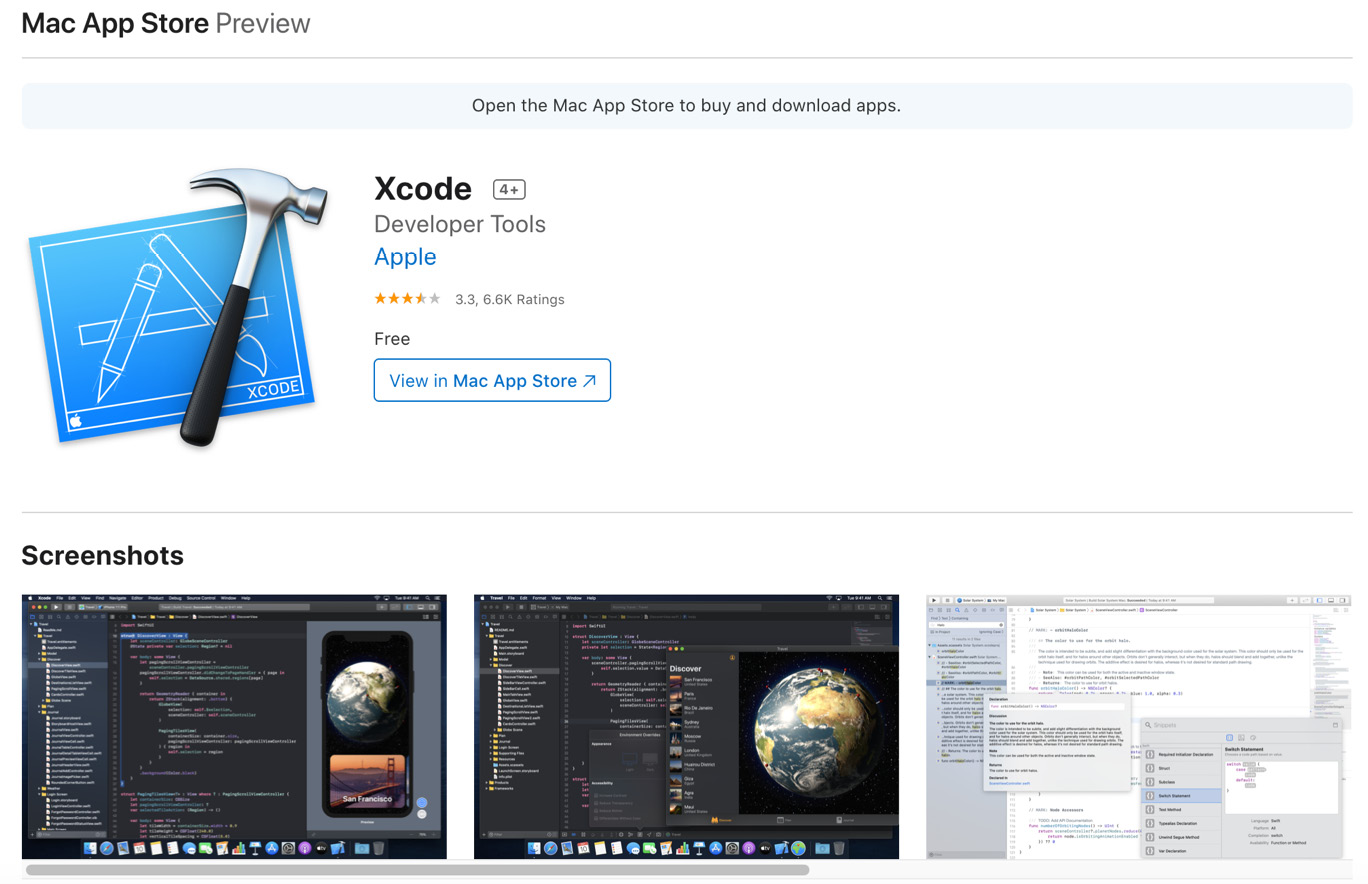
Figure 1.9 – Xcode
Once you have installed Xcode on your Mac, go to the terminal and enter the following command in order to build and launch the Expo iOS app:
yarn ios
You will see the following screen as the app is built, installed, and launched on the iOS simulator (which is part of Xcode):

Figure 1.10 – iPhone simulator
Since the screen is asking you to open up the App.tsx file on your project to start working on your app, go to the code editor and edit the App.tsx file, change the text on the screen to something that you like, and save it (Command + S on a Mac or Ctrl + S on a PC/Linux). You should then be able to see that the app has changed accordingly in real time on the iOS simulator, and that's how we can confirm that the setup and workflow is working, as illustrated in the following screenshot:
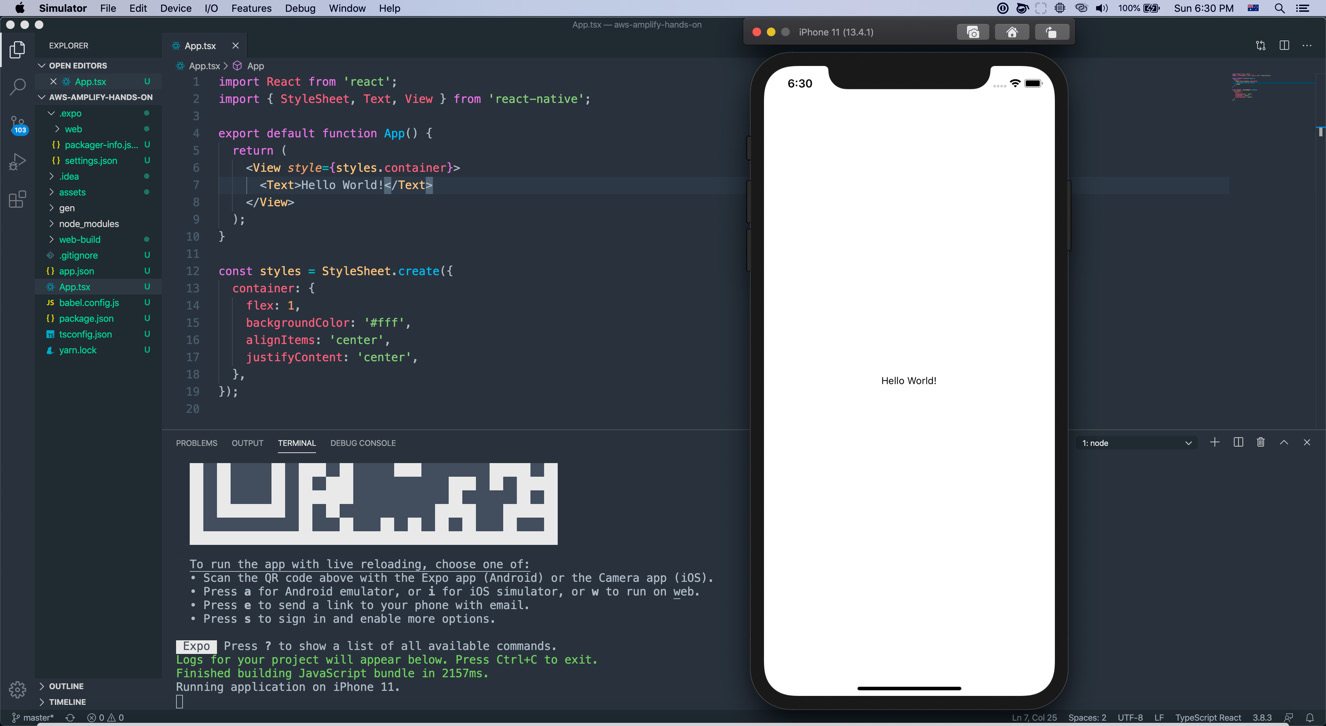
Figure 1.11 – iPhone simulator with the Expo CLI
You should now have a good understanding of how Expo works with iOS. We will be using Expo to develop an app for Android next.
Developing for Android
If you want to develop and test an Expo app on Android, you will need to either connect your Android device to your computer (with Developer and Debugging modes enabled) or set up a virtual device with Android Studio first. If you don't have an Android device, you will need to first install Android Studio with this link: https://developer.android.com/studio. After the installation, open Android Studio, go to Tools | AVD Manager, and select Create Virtual Device.
Choose an emulator device on the following screen, based on either the device you own or the desirable resolution that you would want to use to build your app:
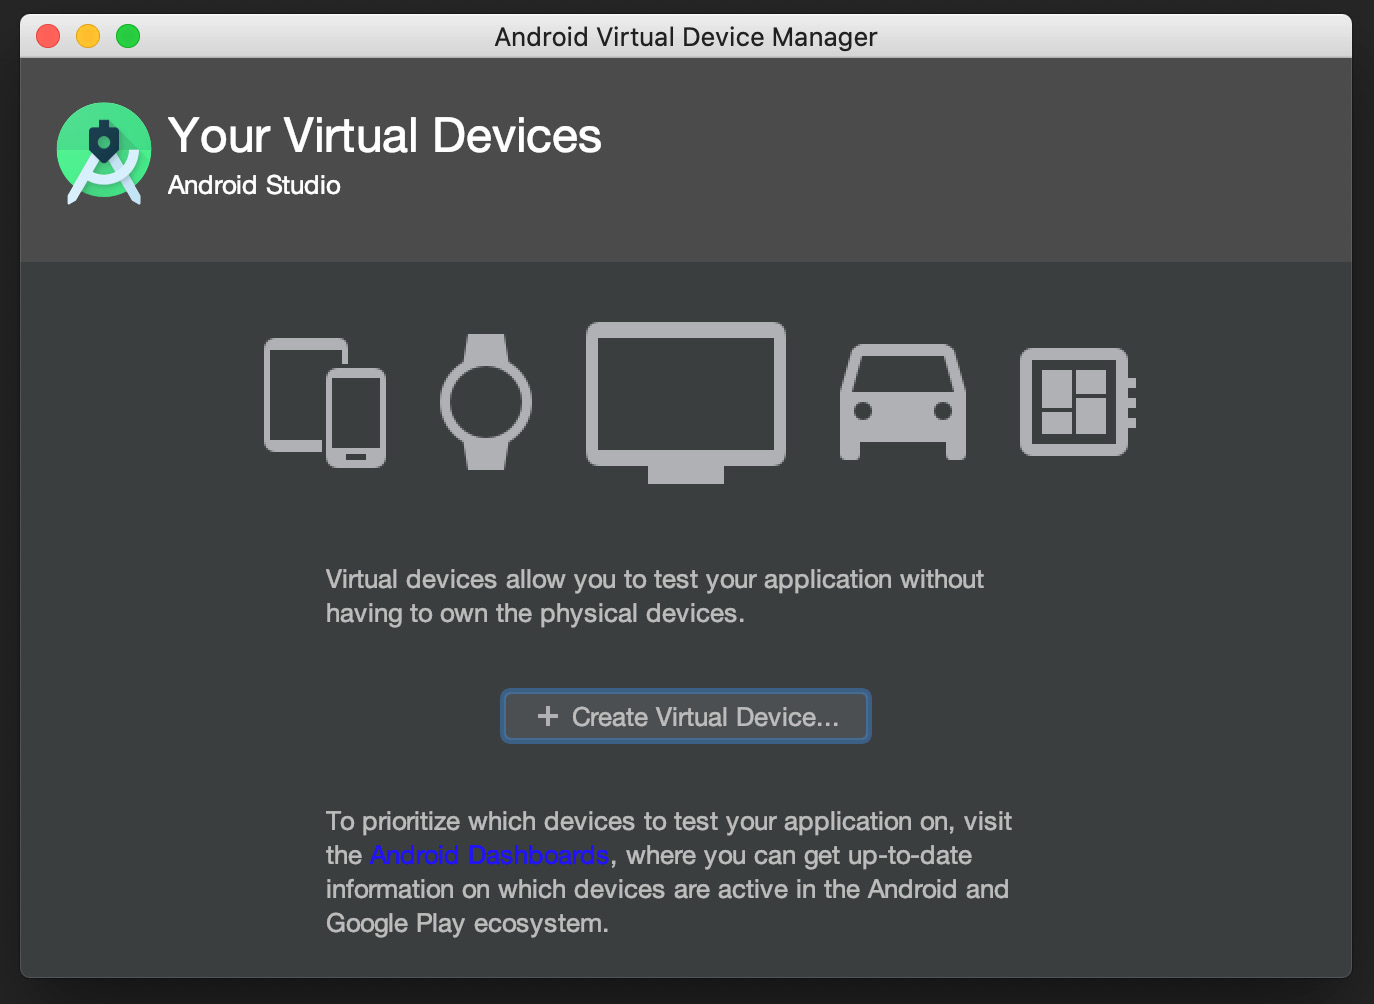
Figure 1.12 – Android Studio: Virtual Device Manager
I would recommend choosing a device with the highest resolution and density to ensure your graphical elements are prepared for these devices. Since I actually own a Nexus 6 and it has the highest resolution (screen resolution 1,440x2,960) and density (pixel density 560 dots per inch (dpi)), I selected Nexus 6 as the emulator for development. Nexus 6 is still capable of running an Android 10 OS, which is why I do not yet need to buy any new Android devices for development. For those who do not own an Android device and aren't planning to buy one for development, you could choose the Pixel 3 XL option for now, as illustrated in the following screenshot. If you need to test the Google Play API services, then you could always install an additional device such as Pixel:
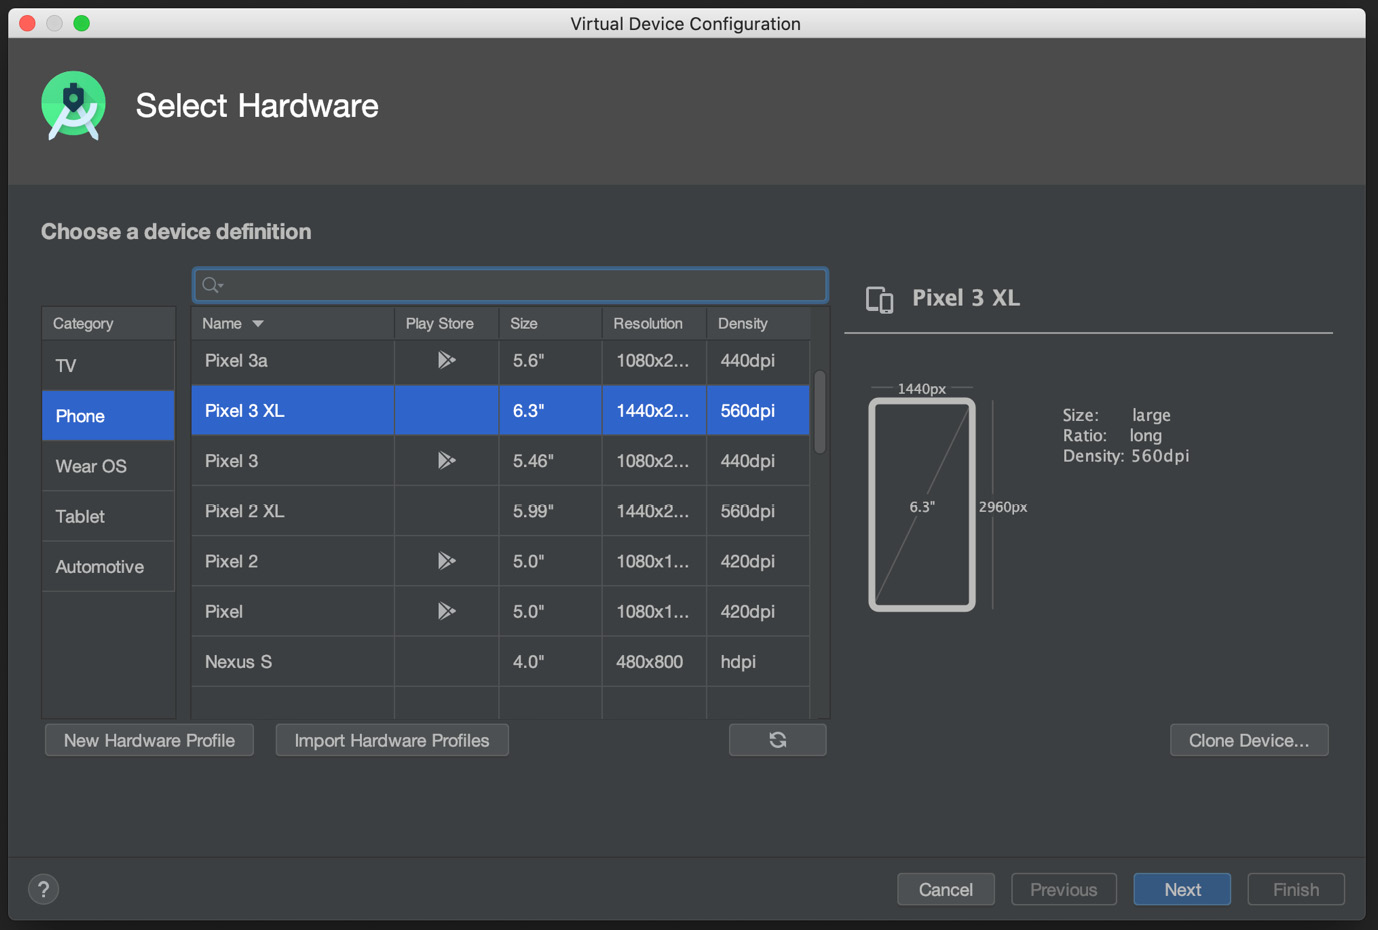
Figure 1.13 – Virtual Device Configuration – Selecting a device
Once you hit Next, you will be asked to choose a system image, as follows:
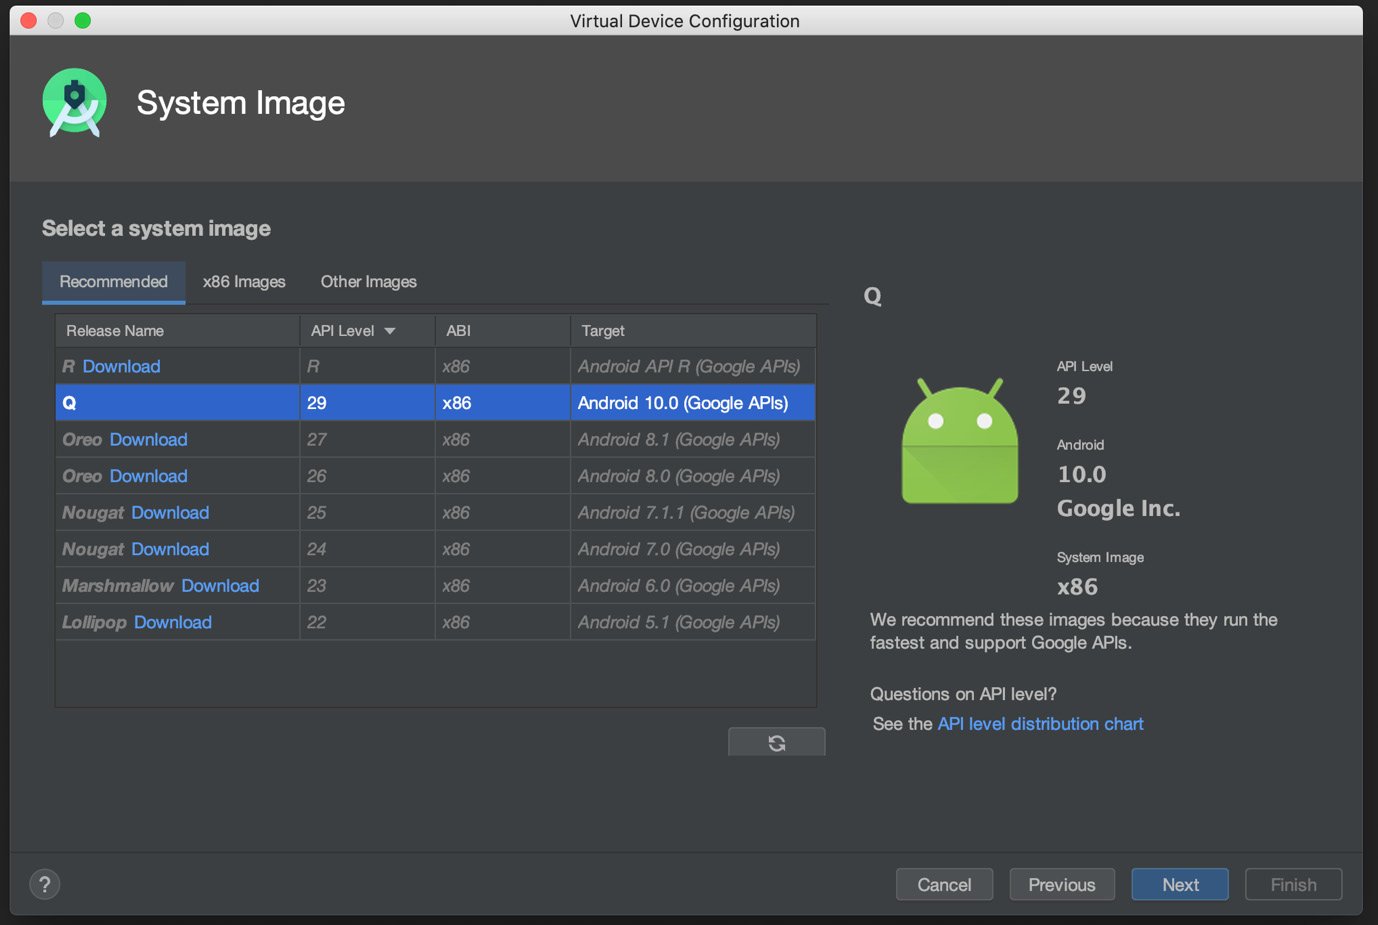
Figure 1.14 – Virtual Device Configuration: Selecting a system image
By default, Android Studio pre-selects the x86 Android Q image with Google APIs support. If you want to change that for whatever reason, such as developing for the next-gen Android R OS, click on the x86 Images tab and then choose the x86_64 image with Android API R (Google APIs) as the target, as illustrated in the following screenshot. Since Android R might not be installed by default, you have to click the Download button to download the Android R image before you can click Next to go on to the next step:
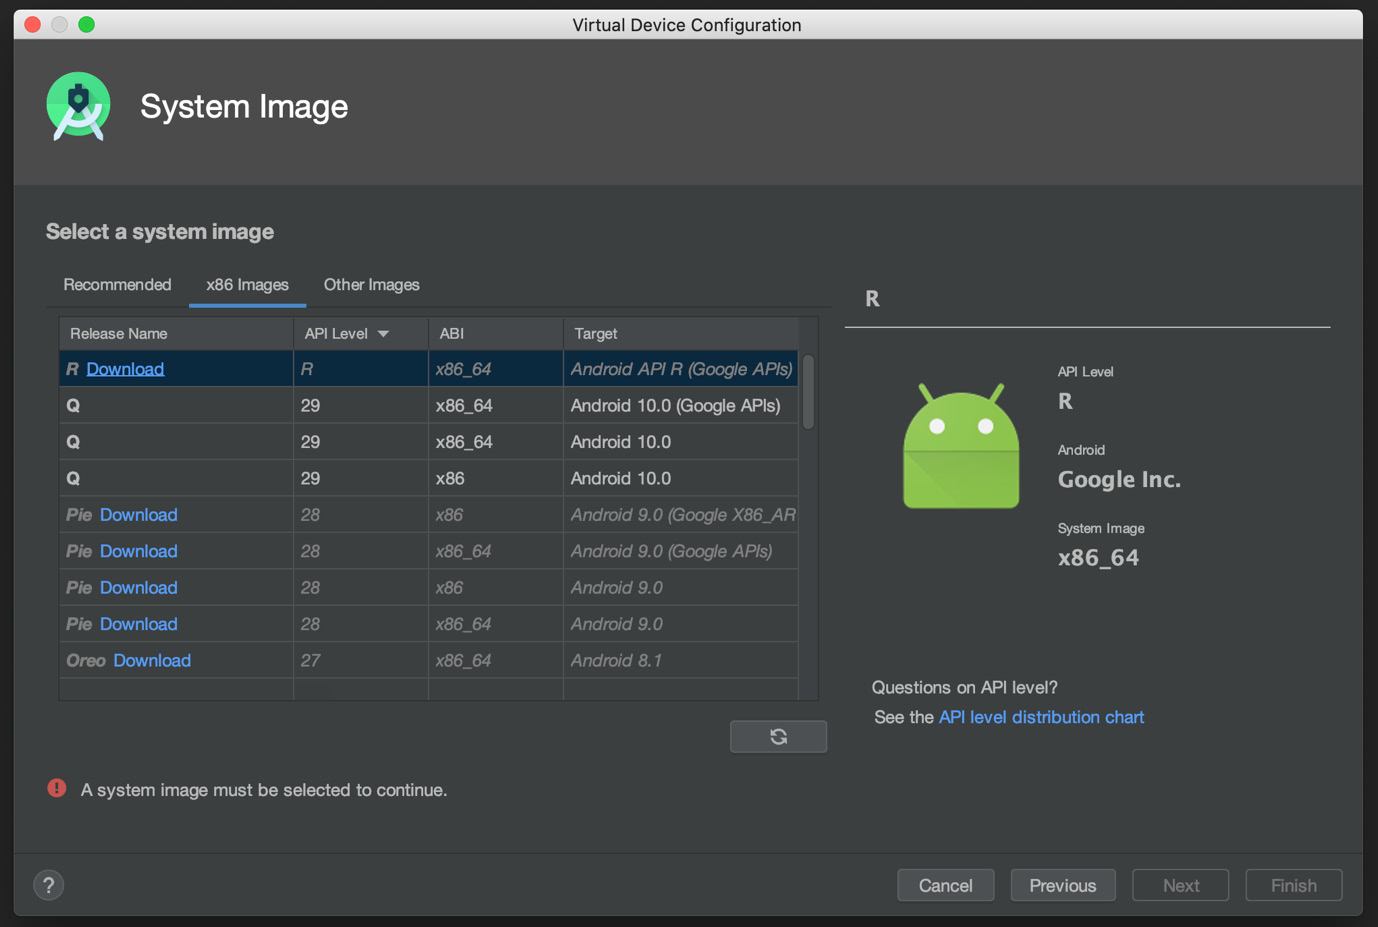
Figure 1.15 – Virtual Device Configuration: Selecting an x86_64 system image
Once you have decided on your emulator and system image (in my case, I've selected Nexus 6 with Android 10.0 x86), you will see the following screen, which lets you rename the Android Virtual Device (AVD). Let's click on the Show Advanced Settings button:
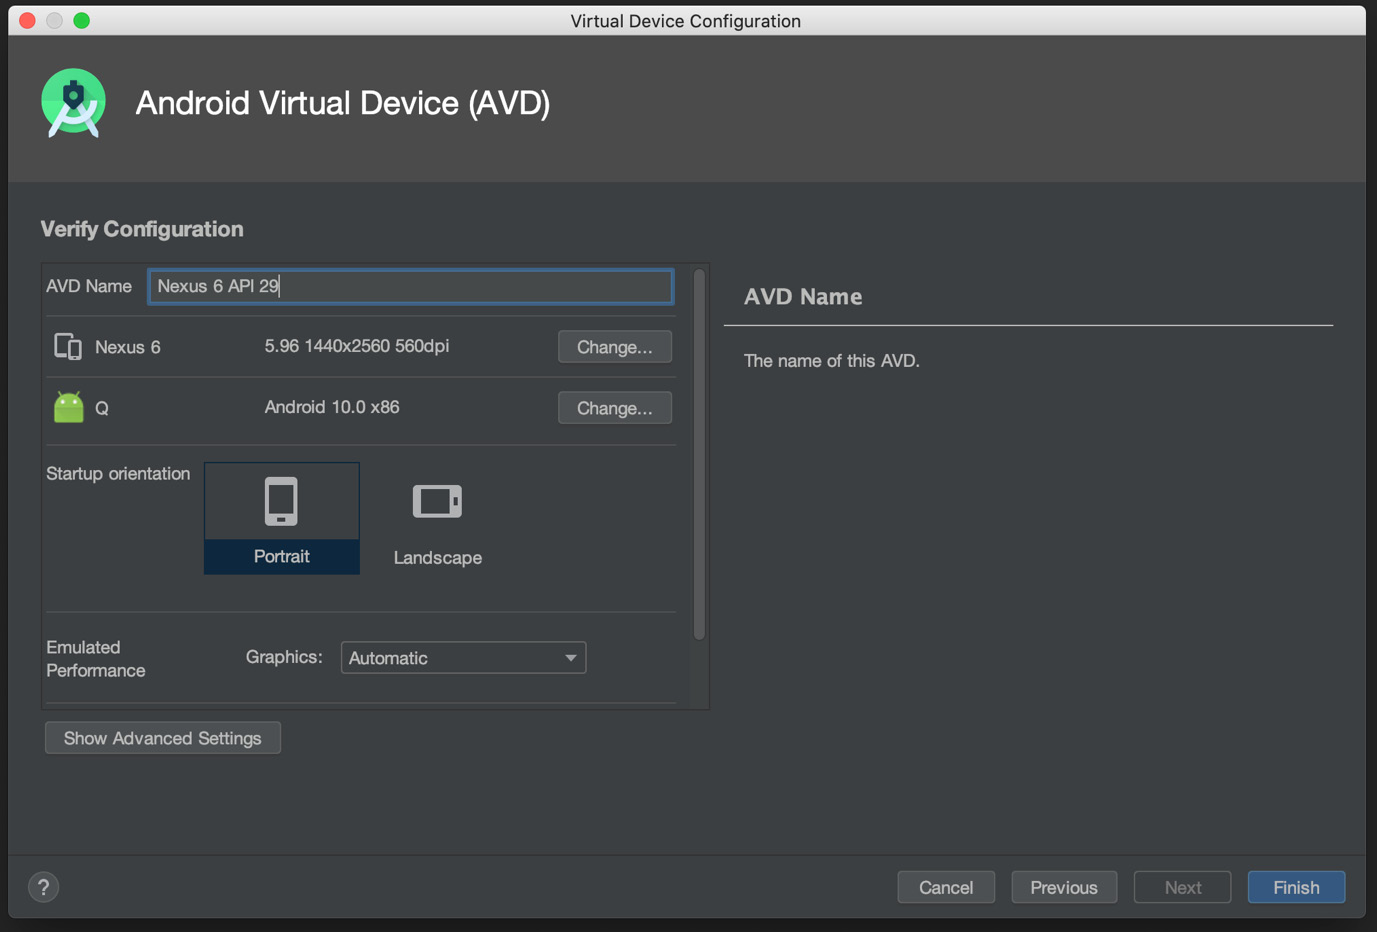
Figure 1.16 – Virtual Device Configuration: Verify the Configuration
As you can see on the following screen, the front camera is set to Emulated by default and the back camera is disabled, which is not what we want during development if our app needs to use the cameras on the phone:
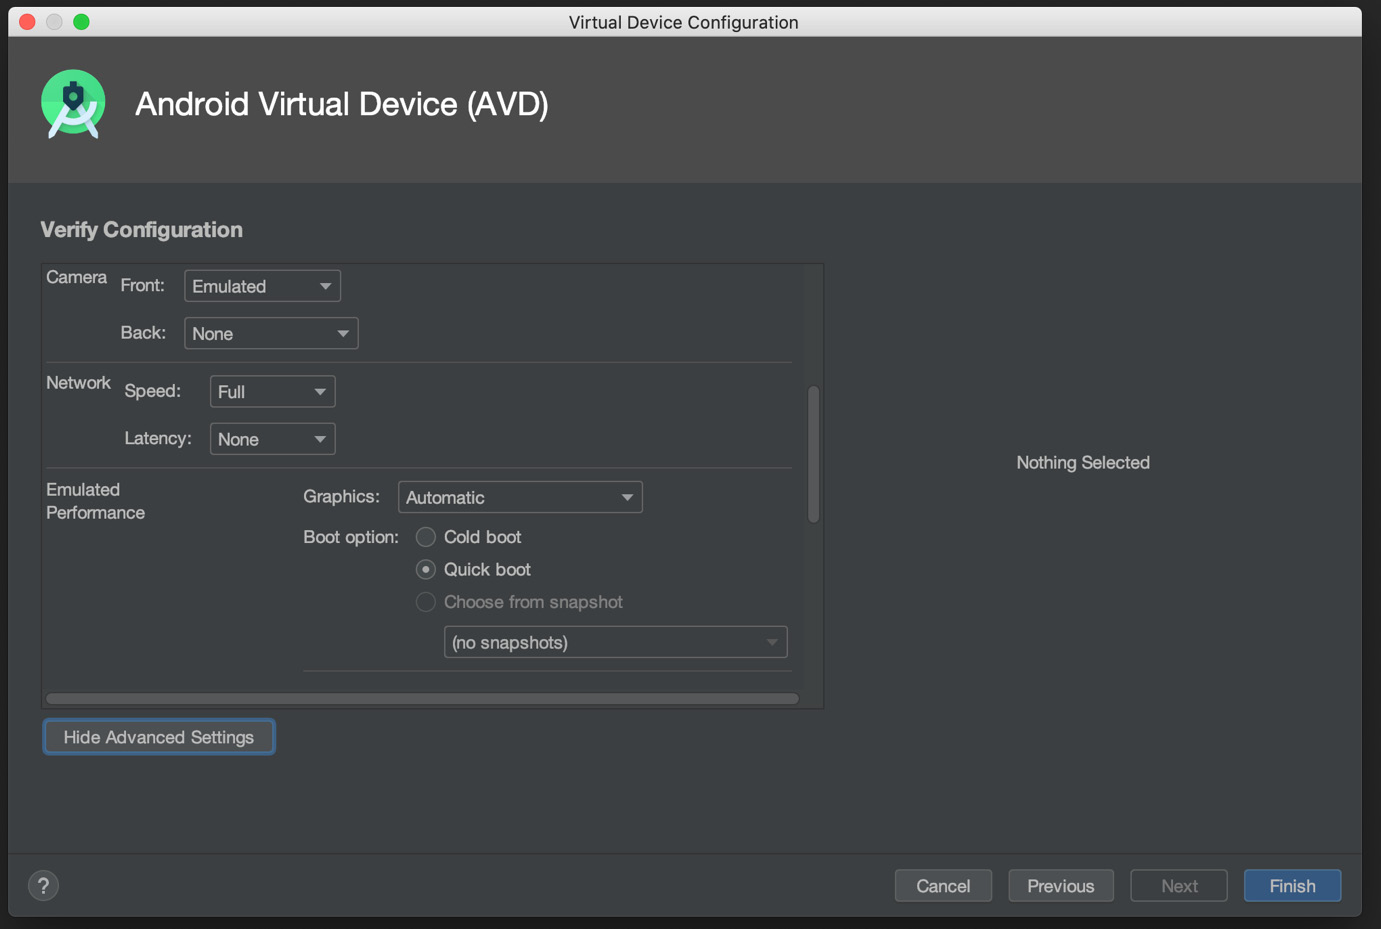
Figure 1.17 – Virtual Device Configuration: Advanced Settings
Since you might want to actually test the camera quickly during development, you can choose Webcam0 for both front and back camera if your development machine has a webcam installed (otherwise, you can choose Emulated for both the front and back cameras). If you don't need to use the camera for your app, you can just leave the setting as is.
In the Emulated Performance section, leave the Graphics setting as Automatic to let the emulator allocate resources automatically. But on the Boot option part, we have to choose the Cold boot option in Advanced Settings to avoid running into the well-known Can't find service: package error in Expo (there is a link to the issue on GitHub, at https://github.com/facebook/react-native/issues/24725). You can leave the rest of Advanced Settings at their default settings because they are based on the actual device settings, unless you want to squeeze more performance out of your development machine, in which case you are free to select more central processing unit (CPU) core and memory allocation, which should be very straightforward so we won't cover it here. Just click Finish on the following screen:
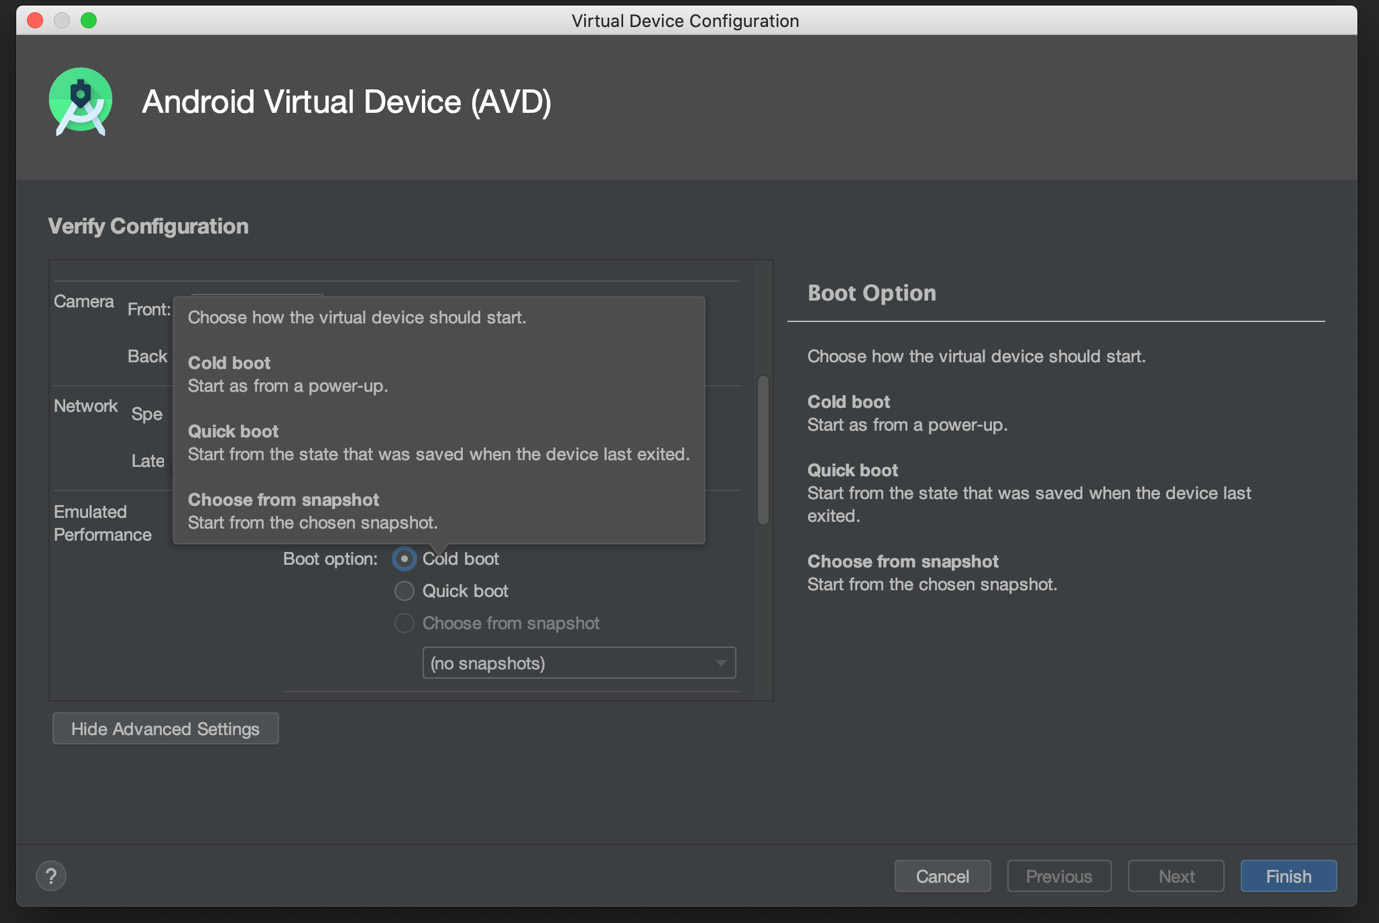
Figure 1.18 – Virtual Device Configuration: Boot option
You should now be able to see the new emulator device being created in the Your Virtual Devices list and the device selection on the emulator dropdown at the top. You can always install more emulators by yourself later if you want to cover more devices for testing. Since Android has a huge fragmentation on screen resolution and pixel density as well as running OSes on the market, it makes sense to test on different emulators and OSes during development. If you want to change the settings for whatever reason, you can always click the little pen icon to edit the settings, as illustrated in the following screenshot:
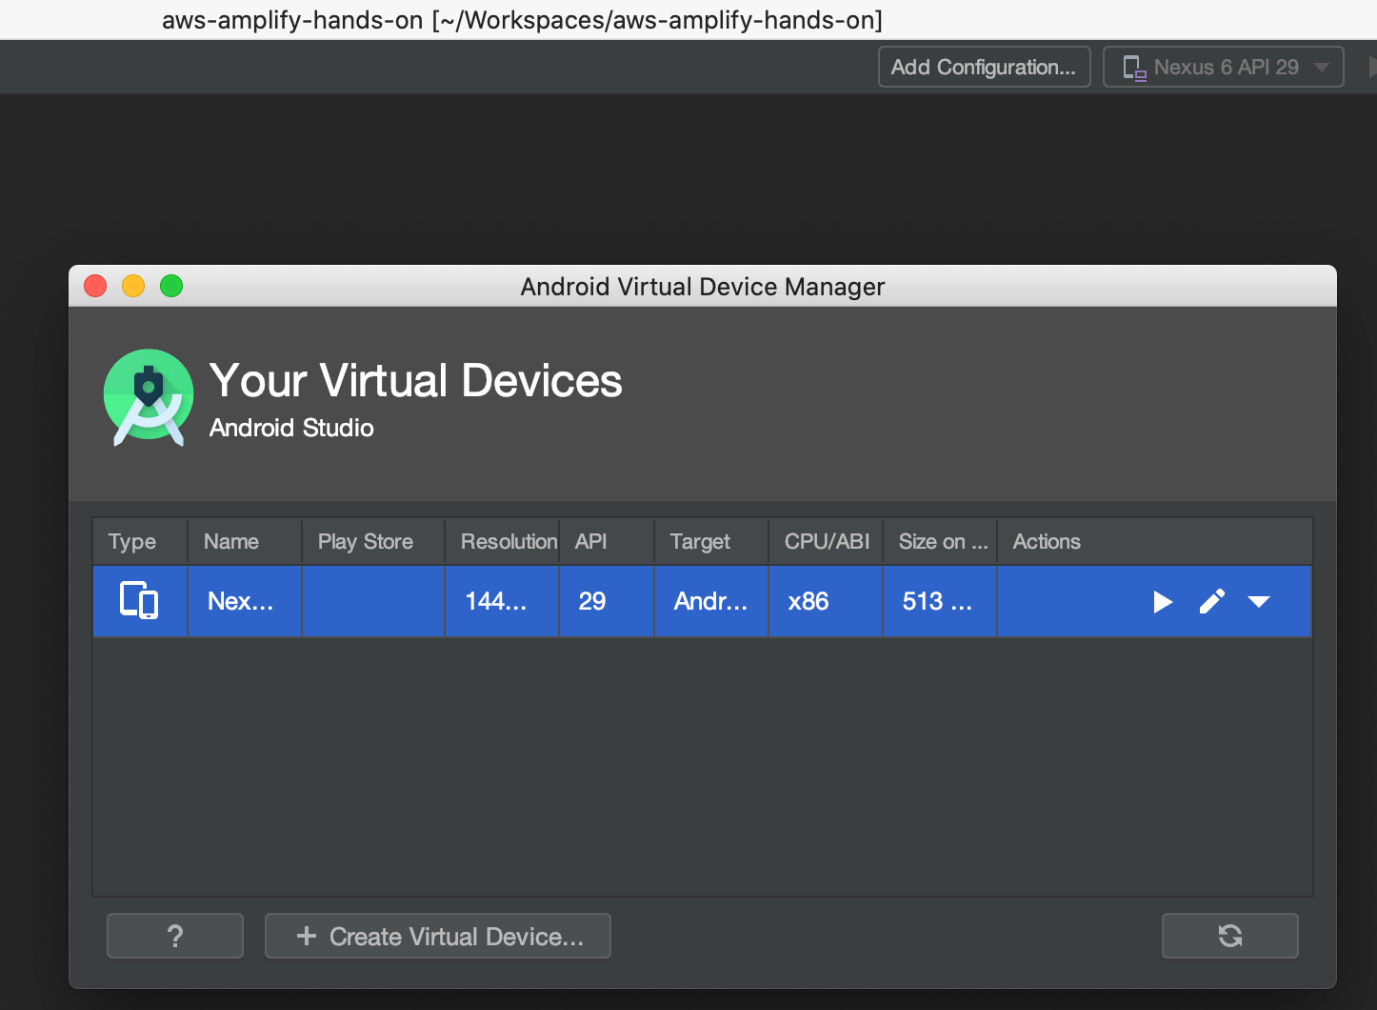
Figure 1.19 – Virtual Device Configuration: Camera settings
Now, go back to Terminal or the terminal of your code editor and run the following command:
yarn android
You should be able to see the following screen if everything worked as expected:
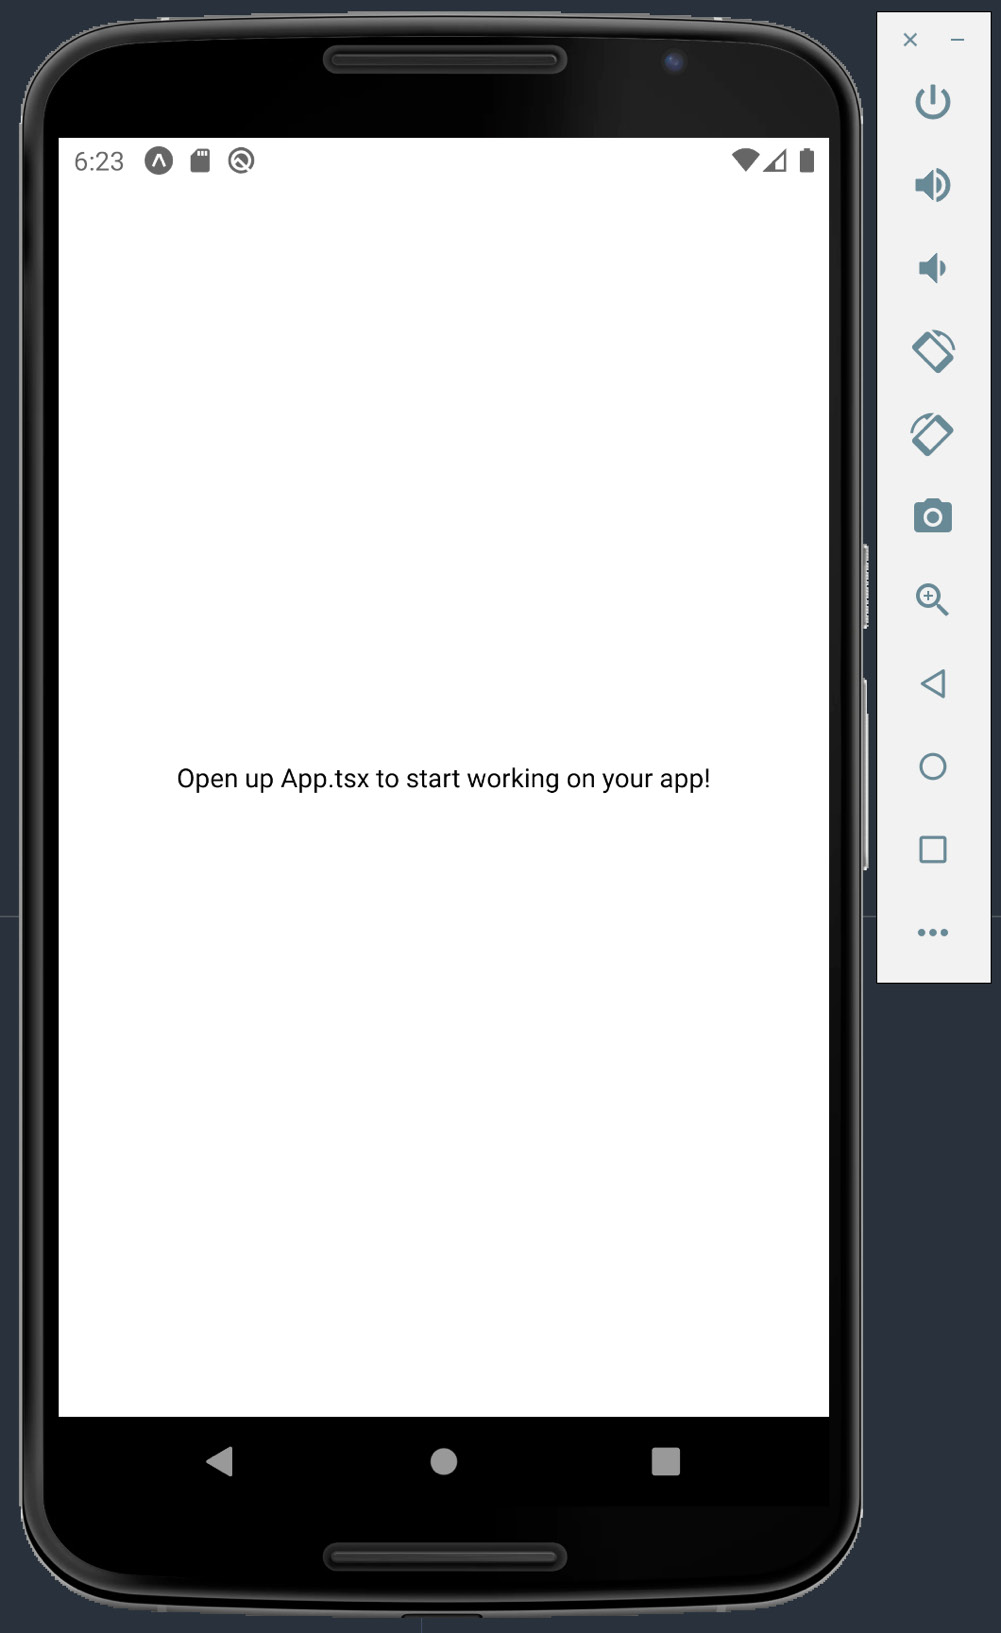
Figure 1.20 – Android emulator
Since the screen is asking you to open up the App.tsx file on your project to start working on your app, you can go ahead and edit the App.tsx file and save it (Command + S on a Mac or Ctrl + S on a PC/Linux). You should then be able to see that the app has changed accordingly in real time on the Android emulator to confirm it is working, as illustrated in the following screenshot:
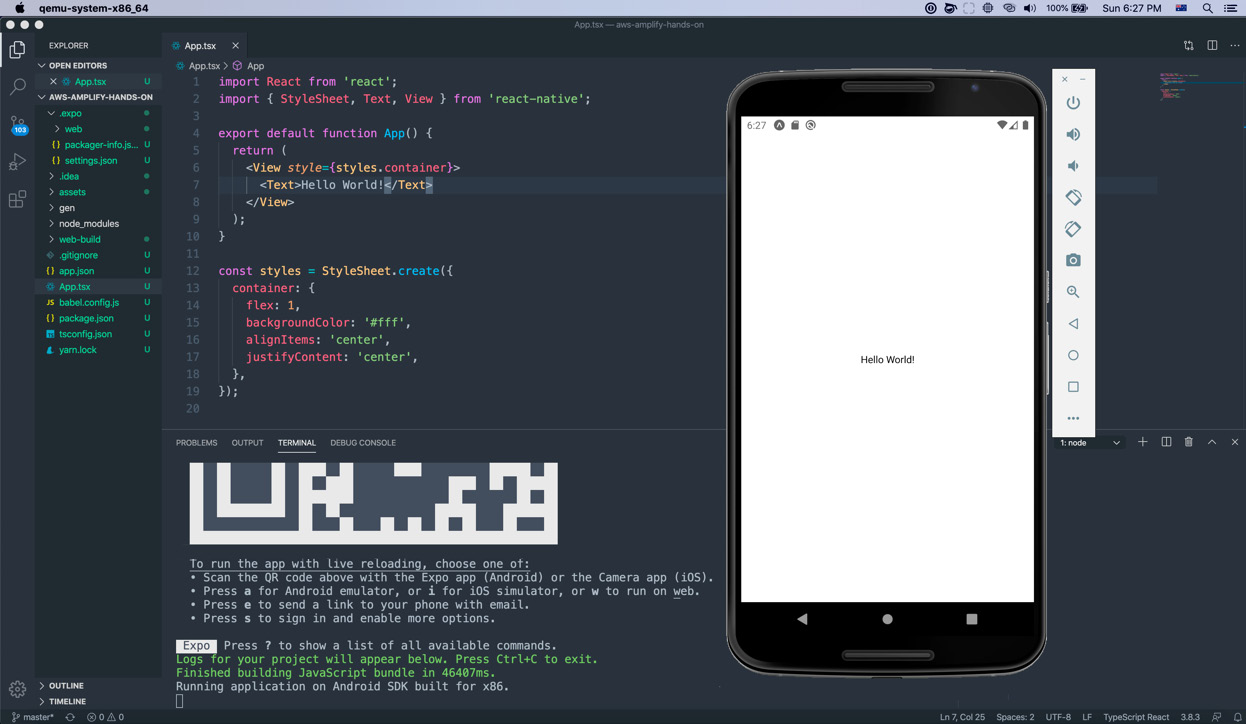
Figure 1.21 – Running the Expo app in the Android emulator
Important note
If you still encounter the Can't find service: package error even with the Cold boot option of Advanced Settings, as in the Expo CLI not being able to install and run the new build package on the Android emulator, the reason could be that the Expo client has not been installed properly on the Android emulator. If that happens, you can shut down the emulator with the Power button and press A on the keyboard to rerun the Android emulator in the terminal, which will trigger the Expo client installation for the Android emulator. Once the Expo client is being installed locally, turn on the emulator again and see if the Expo app is installed or not. Now, you can rerun the yarn android command to run the app on the Android emulator with the Expo client.
Developing for the web
Run the following command to run the Expo app as a web app in the browser:
yarn web
You should be able to see the following screen if everything worked as expected:
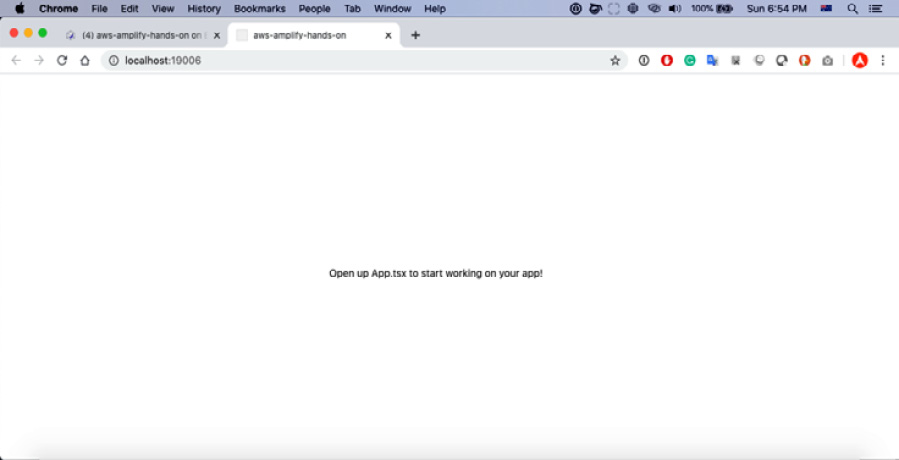
Figure 1.22 – Running the Expo app on a browser
Since the screen is asking you to open up the App.tsx file in your project to start working on your app, you can go ahead and edit the App.tsx file and save it (Command + S on a Mac or Ctrl + S on a PC/Linux). You should then be able to see that the app has changed accordingly in real time in the browser to confirm it is working, as illustrated in the following screenshot:
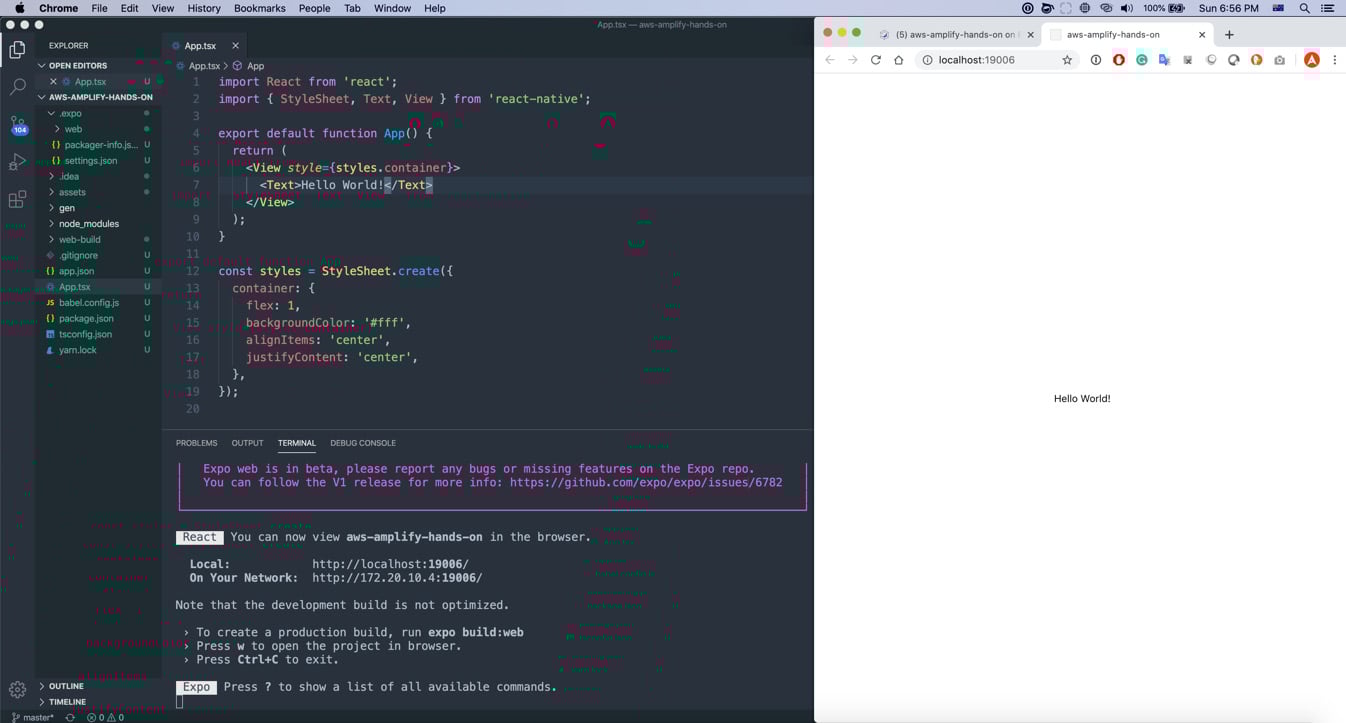
Figure 1.23 – Refreshing the Expo app in the browser
Important note
At the time of writing this book, web support is out of the box but it is still in beta, which means some of the components are not fully supported for the web yet.
Now that you are familiar with how to create a new app with the Expo CLI, we will discover how to create a Progressive Web App (PWA) with React in the next section.
Creating a new PWA
If you are planning on developing your Amplify app with React for the web only or you are planning to write the React Native code separately, creating a pure React app makes much more sense. You can run the following command to create a React app with TypeScript:
yarn create react-app my-app-name --template typescript
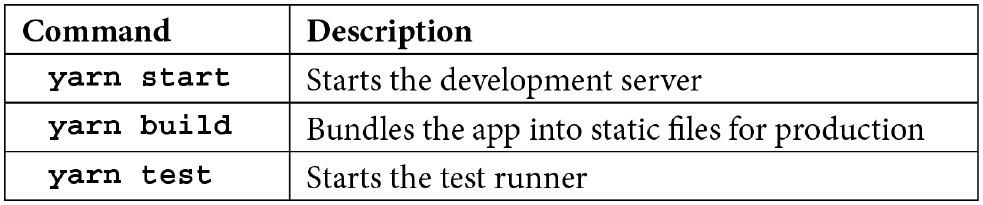
Once you have created your React PWA with TypeScript, here are a few commands to remember:
You should be able to see the following screen when you run the yarn start command:
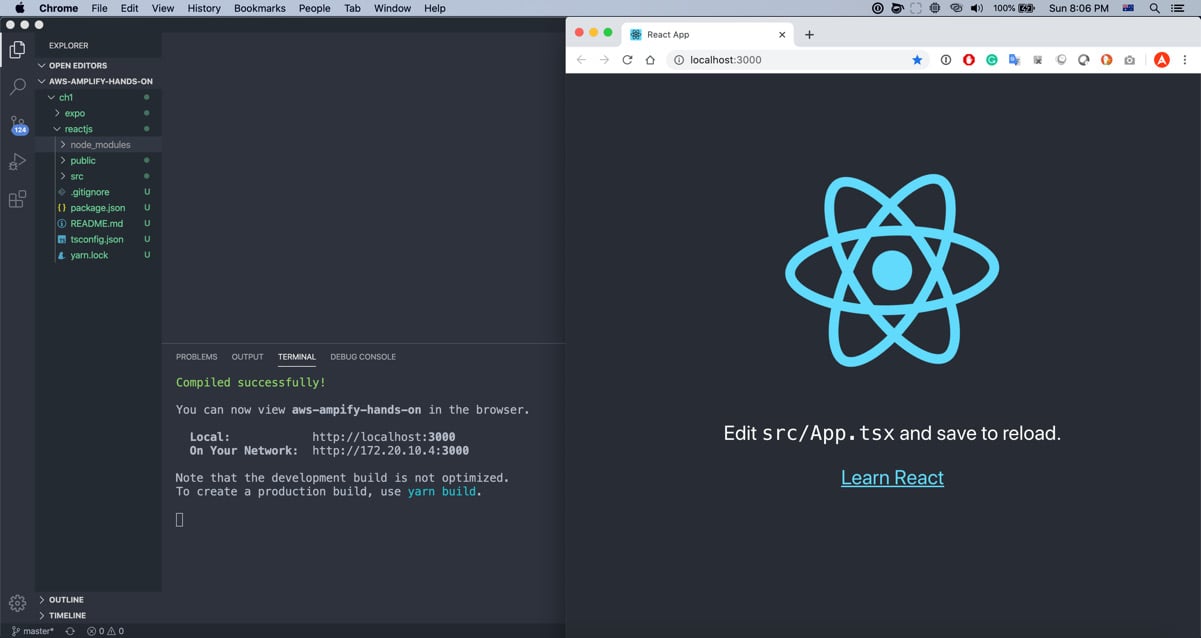
Figure 1.24 – Running the ReactJS app in a browser
Change something in the App.tsx file and save it (Command + S on a Mac or Ctrl + S on a PC/Linux). You should then be able to see that the app has changed accordingly in real time in the browser to confirm it is working, as illustrated in the following screenshot:
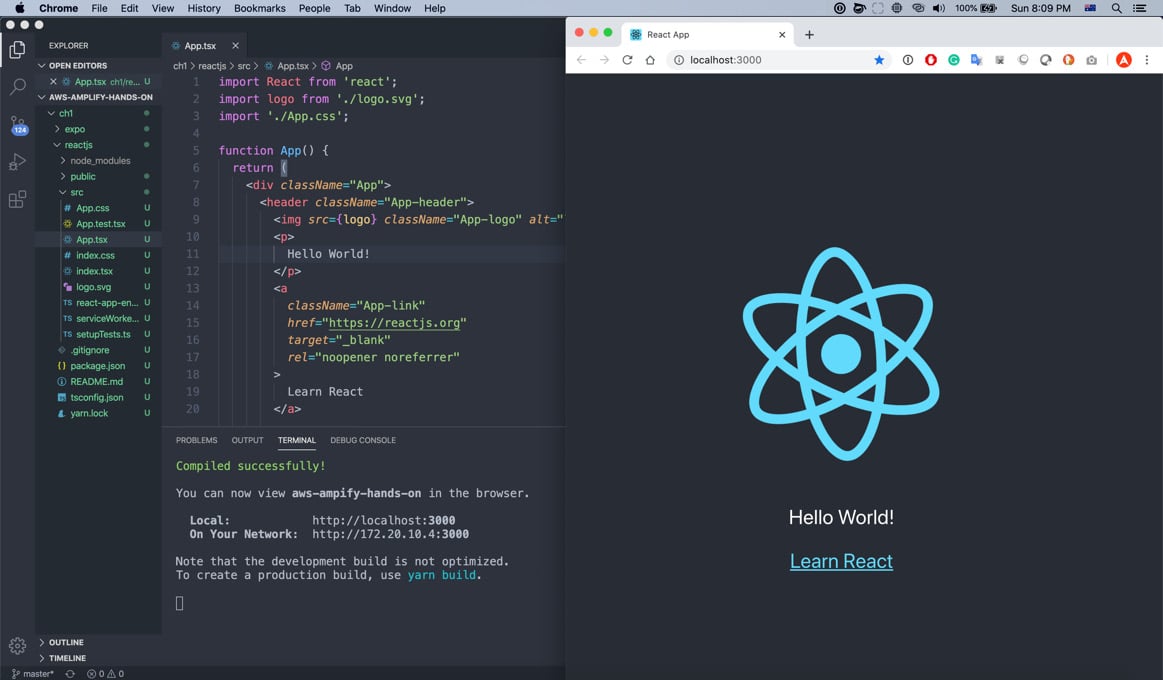
Figure 1.25 – Updating the ReactJS app in the browser
If you run the yarn build command, you will see a build folder being created, as illustrated in the following screenshot. You can upload the build folder to your web server or AWS S3 bucket as static web hosting to see it working in production, which we will cover later in this book:
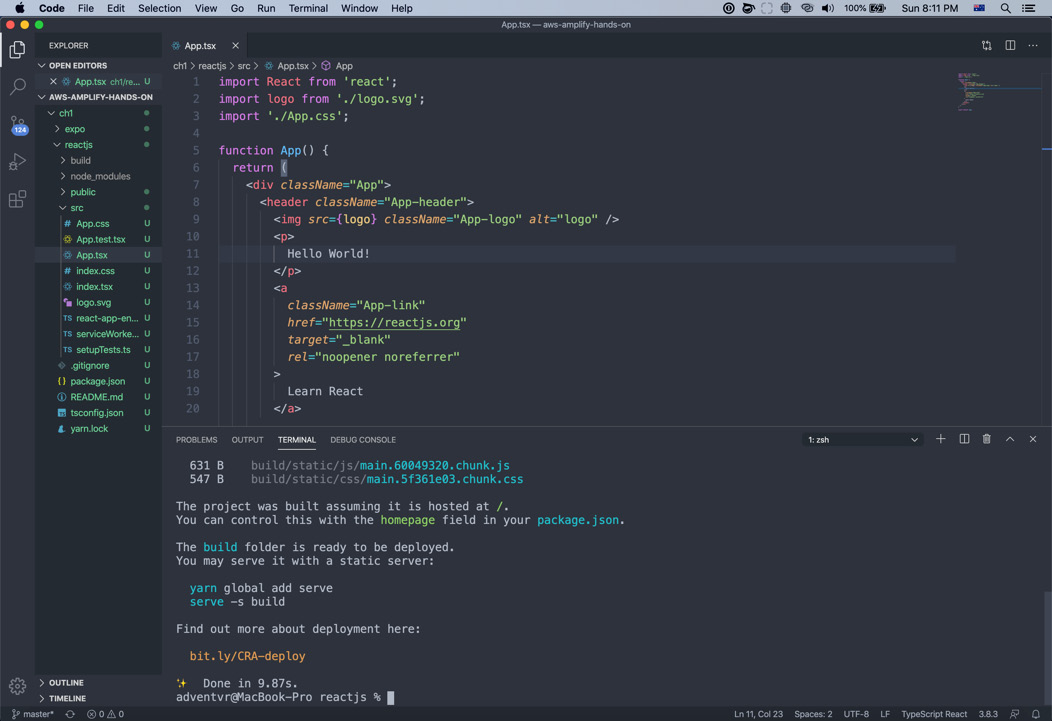
Figure 1.26 – Creating the ReactJS app folder
If you run the yarn test command, you will see the App.test.tsx script being executed to test against the App.tsx file. The console will tell you how many tests have been run and how many have passed, as illustrated in the following screenshot:
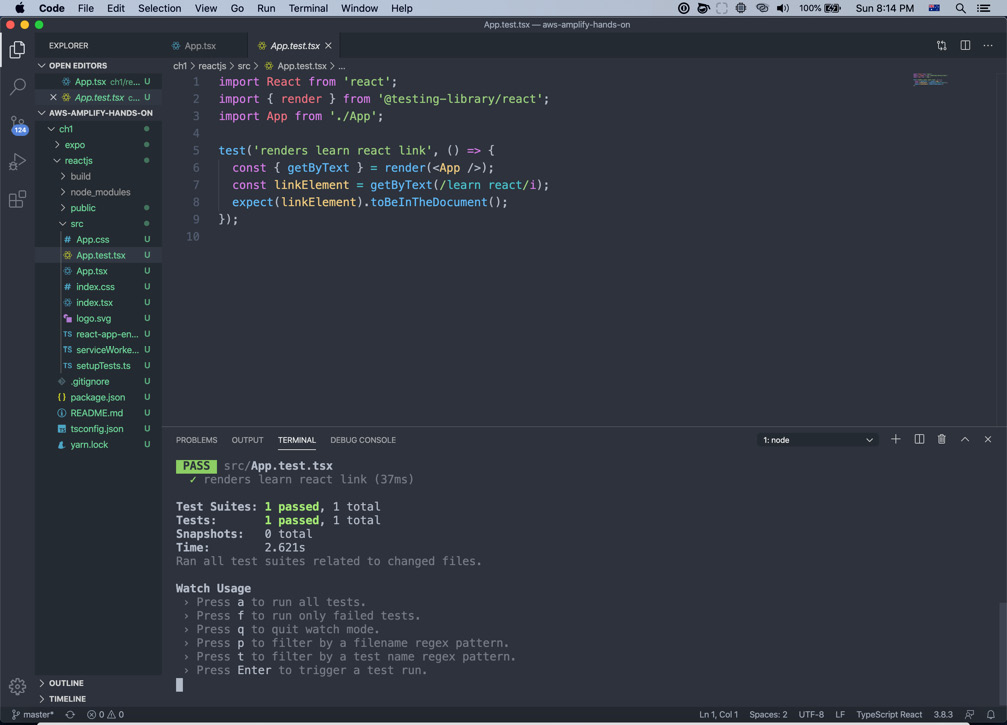
Figure 1.27 – Passing the unit test of the ReactJS app
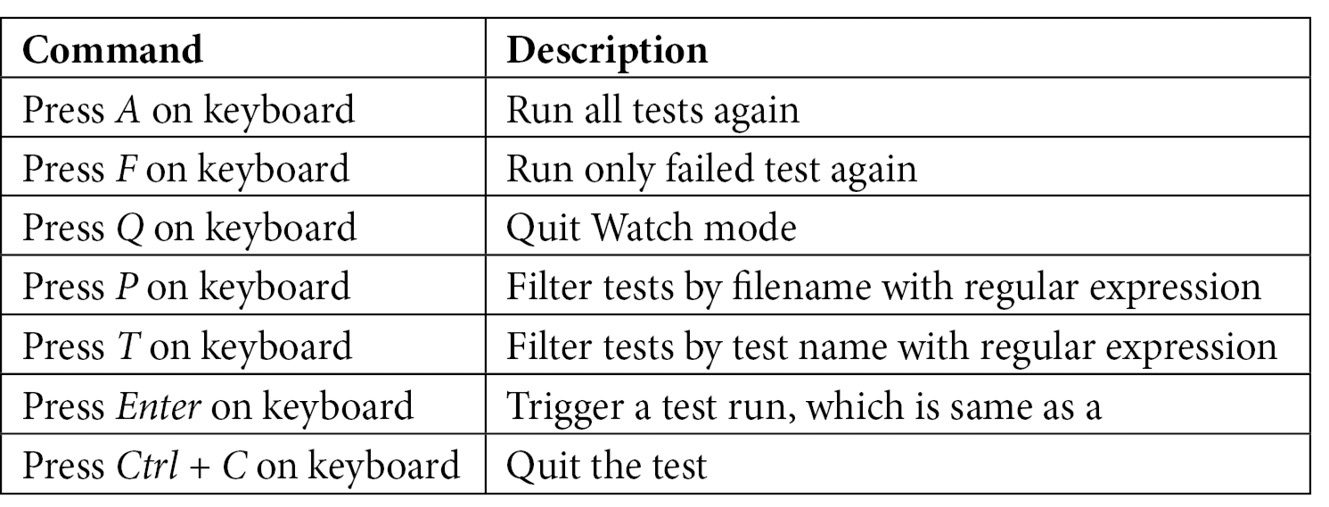
It is important to know that the test command will watch the changes of the directory as well as the start command, so any changes to the repository will trigger the test again. You can always use the command the terminal suggested to run the test in different ways, as follows:
Now that you are familiar with how to build a React app with TypeScript, we will go through how to create a React Native app with the React Native CLI in the next section.
Creating a new React Native app
If you have a Mac and you want to create a React Native app without Expo or you want to support a platform such as macOS or Windows in the future, you can use the React Native CLI to create one. In order to build a React Native app, we need to install a few dependencies, such as Node.js, Watchman (Watchman is a tool by Facebook for watching changes in the filesystem), Xcode command-line tools, and CocoaPods (CocoaPods is a dependency manager for Swift and Objective-C Cocoa projects). You can use the following commands to install the dependencies and create a React Native app with TypeScript:
brew install node
brew install watchman
xcode-select --install
sudo gem install cocoapods
npx react-native init MyApp --template react-native-template-typescript
Once you have created your React Native app with the React Native CLI, here are a few commands to remember:
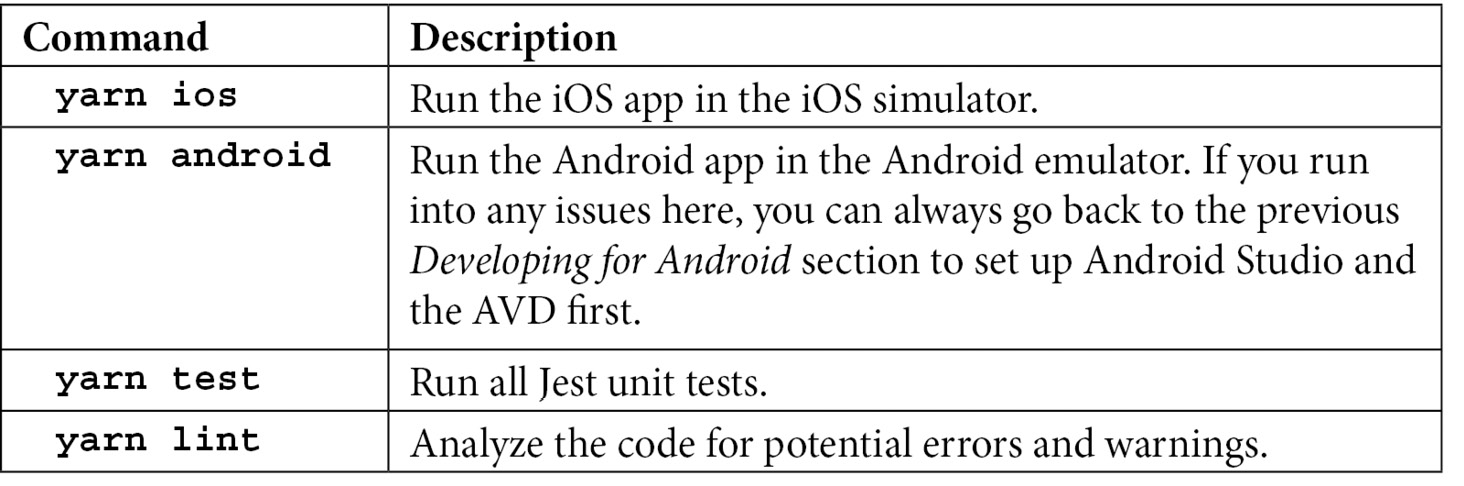
When you run the yarn ios command, the React Native CLI will build the iOS app and then launch the iOS simulator. Once the build is done, the React Native CLI will launch the Metro builder in the terminal and then launch the React Native app, as shown in the following screenshot:
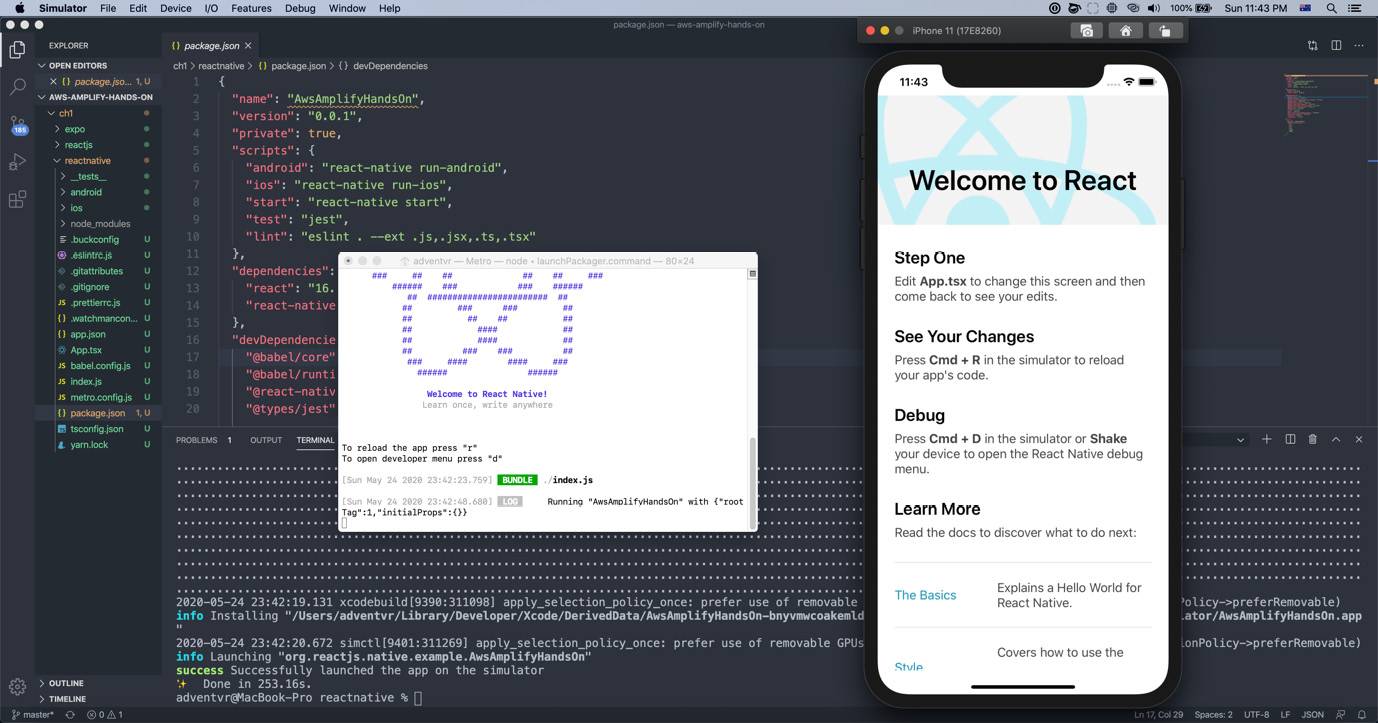
Figure 1.28 – Running the iOS React Native app
The Metro builder is working with the native iOS app in the simulator simultaneously in order to push the build result to the app as soon as there are new changes. Change something in the App.tsx file and save it (Command + S on a Mac or Ctrl + S on a PC/Linux). You should then be able to see that the app has changed accordingly in real time in the iOS simulator, as illustrated in the following screenshot:
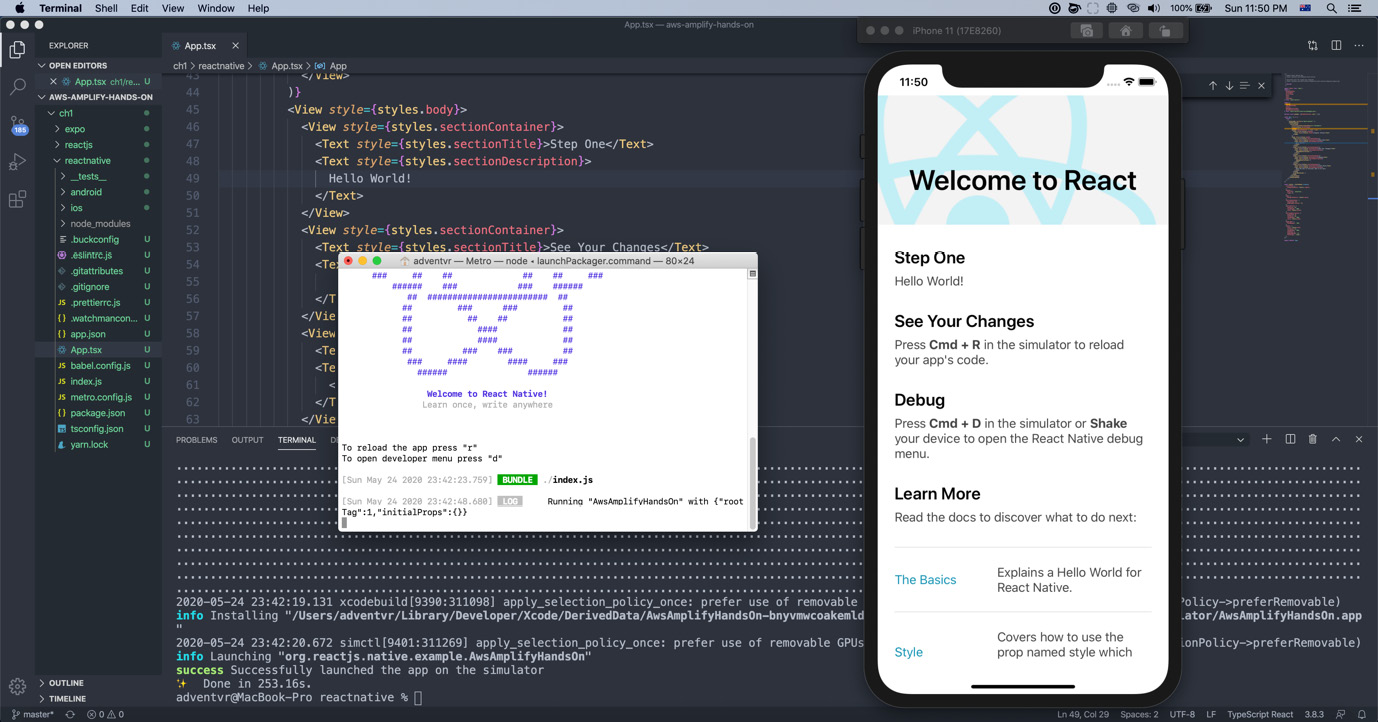
Figure 1.29 – Updating the iOS React Native app
If you run the yarn android command while leaving the iOS simulator and the Metro builder open in the terminal, you will see the Android app being built and launched with the Android emulator. When you make changes in the App.tsx file, you will see changes being updated on both virtual devices simultaneously, as shown here:
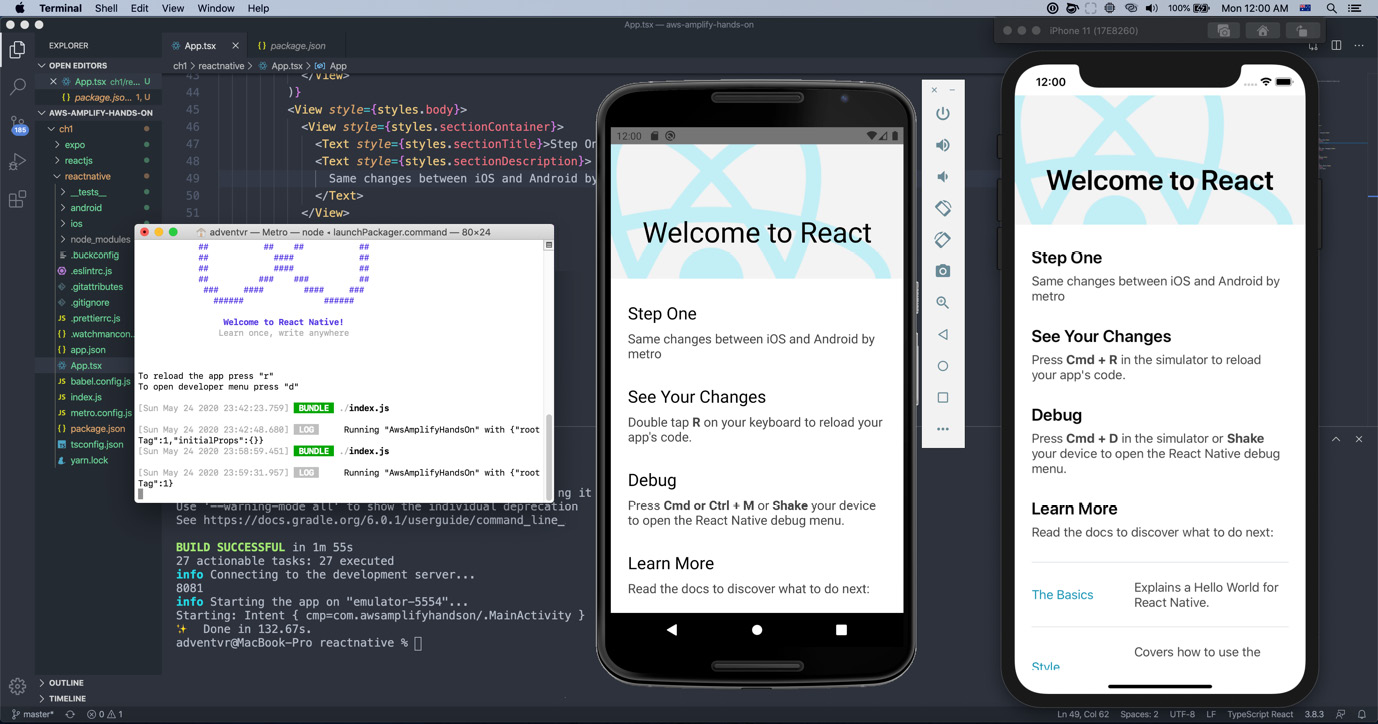
Figure 1.30 – Running both an iOS and an Android React Native app
You have now created at least one—or several—React and React Native apps if you followed the instructions in this chapter. You should now be familiar with the different CLIs and ways to create React and React Native apps.
Summary
You should now have a basic understanding of how to integrate or start an AWS Amplify project with React and React Native using TypeScript. It is important to understand the fundamentals and the options when creating your project with different React and Amplify CLIs, because your next project might have very specific requirements and you will want to start the project in the right way, without too many changes down the road.
Since React, React Native, and Expo are under rapid development and keep adding new capabilities every month, if you want to keep your knowledge up to date, you should always follow their websites closely to learn of all the new changes and apply them to your project accordingly. When I was halfway through the writing of this chapter, AWS completely changed the way the AWS Amplify UI works with their new library, which we will cover in the next chapter. Therefore, timing matters. If you are halfway through your project or are just starting a new project, it would be worthwhile us going through the next chapter together to see how to create an AWS Amplify app with the latest pre-built Amplify UI.