Home IoT & Hardware Python Robotics Projects

Python Robotics Projects

By Prof. Diwakar Vaish
books-svg-icon Book
eBook $39.99 $27.98
Print $48.99
Subscription $15.99 $10 p/m for three months
$10 p/m for first 3 months. $15.99 p/m after that. Cancel Anytime!
What do you get with a Packt Subscription?
This book & 7000+ ebooks & video courses on 1000+ technologies
60+ curated reading lists for various learning paths
50+ new titles added every month on new and emerging tech
Early Access to eBooks as they are being written
Personalised content suggestions
Customised display settings for better reading experience
50+ new titles added every month on new and emerging tech
Playlists, Notes and Bookmarks to easily manage your learning
Mobile App with offline access
What do you get with a Packt Subscription?
This book & 6500+ ebooks & video courses on 1000+ technologies
60+ curated reading lists for various learning paths
50+ new titles added every month on new and emerging tech
Early Access to eBooks as they are being written
Personalised content suggestions
Customised display settings for better reading experience
50+ new titles added every month on new and emerging tech
Playlists, Notes and Bookmarks to easily manage your learning
Mobile App with offline access
What do you get with eBook + Subscription?
Download this book in EPUB and PDF formats, plus a monthly download credit
This book & 6500+ ebooks & video courses on 1000+ technologies
60+ curated reading lists for various learning paths
50+ new titles added every month on new and emerging tech
Early Access to eBooks as they are being written
Personalised content suggestions
Customised display settings for better reading experience
50+ new titles added every month on new and emerging tech
Playlists, Notes and Bookmarks to easily manage your learning
Mobile App with offline access
What do you get with a Packt Subscription?
This book & 6500+ ebooks & video courses on 1000+ technologies
60+ curated reading lists for various learning paths
50+ new titles added every month on new and emerging tech
Early Access to eBooks as they are being written
Personalised content suggestions
Customised display settings for better reading experience
50+ new titles added every month on new and emerging tech
Playlists, Notes and Bookmarks to easily manage your learning
Mobile App with offline access
What do you get with eBook?
Download this book in EPUB and PDF formats
Access this title in our online reader
DRM FREE - Read whenever, wherever and however you want
Online reader with customised display settings for better reading experience
What do you get with video?
Download this video in MP4 format
Access this title in our online reader
DRM FREE - Watch whenever, wherever and however you want
Online reader with customised display settings for better learning experience
What do you get with video?
Stream this video
Access this title in our online reader
DRM FREE - Watch whenever, wherever and however you want
Online reader with customised display settings for better learning experience
What do you get with Audiobook?
Download a zip folder consisting of audio files (in MP3 Format) along with supplementary PDF
What do you get with Exam Trainer?
Flashcards, Mock exams, Exam Tips, Practice Questions
Access these resources with our interactive certification platform
Mobile compatible-Practice whenever, wherever, however you want
BUY NOW $10 p/m for first 3 months. $15.99 p/m after that. Cancel Anytime!
eBook $39.99 $27.98
Print $48.99
Subscription $15.99 $10 p/m for three months
What do you get with a Packt Subscription?
This book & 7000+ ebooks & video courses on 1000+ technologies
60+ curated reading lists for various learning paths
50+ new titles added every month on new and emerging tech
Early Access to eBooks as they are being written
Personalised content suggestions
Customised display settings for better reading experience
50+ new titles added every month on new and emerging tech
Playlists, Notes and Bookmarks to easily manage your learning
Mobile App with offline access
What do you get with a Packt Subscription?
This book & 6500+ ebooks & video courses on 1000+ technologies
60+ curated reading lists for various learning paths
50+ new titles added every month on new and emerging tech
Early Access to eBooks as they are being written
Personalised content suggestions
Customised display settings for better reading experience
50+ new titles added every month on new and emerging tech
Playlists, Notes and Bookmarks to easily manage your learning
Mobile App with offline access
What do you get with eBook + Subscription?
Download this book in EPUB and PDF formats, plus a monthly download credit
This book & 6500+ ebooks & video courses on 1000+ technologies
60+ curated reading lists for various learning paths
50+ new titles added every month on new and emerging tech
Early Access to eBooks as they are being written
Personalised content suggestions
Customised display settings for better reading experience
50+ new titles added every month on new and emerging tech
Playlists, Notes and Bookmarks to easily manage your learning
Mobile App with offline access
What do you get with a Packt Subscription?
This book & 6500+ ebooks & video courses on 1000+ technologies
60+ curated reading lists for various learning paths
50+ new titles added every month on new and emerging tech
Early Access to eBooks as they are being written
Personalised content suggestions
Customised display settings for better reading experience
50+ new titles added every month on new and emerging tech
Playlists, Notes and Bookmarks to easily manage your learning
Mobile App with offline access
What do you get with eBook?
Download this book in EPUB and PDF formats
Access this title in our online reader
DRM FREE - Read whenever, wherever and however you want
Online reader with customised display settings for better reading experience
What do you get with video?
Download this video in MP4 format
Access this title in our online reader
DRM FREE - Watch whenever, wherever and however you want
Online reader with customised display settings for better learning experience
What do you get with video?
Stream this video
Access this title in our online reader
DRM FREE - Watch whenever, wherever and however you want
Online reader with customised display settings for better learning experience
What do you get with Audiobook?
Download a zip folder consisting of audio files (in MP3 Format) along with supplementary PDF
What do you get with Exam Trainer?
Flashcards, Mock exams, Exam Tips, Practice Questions
Access these resources with our interactive certification platform
Mobile compatible-Practice whenever, wherever, however you want
  1. Free Chapter
    Robotics 101
About this book
Robotics is a fast-growing industry. Multiple surveys state that investment in the field has increased tenfold in the last 6 years, and is set to become a $100-billion sector by 2020. Robots are prevalent throughout all industries, and they are all set to be a part of our domestic lives. This book starts with the installation and basic steps in configuring a robotic controller. You'll then move on to setting up your environment to use Python with the robotic controller. You'll dive deep into building simple robotic projects, such as a pet-feeding robot, and more complicated projects, such as machine learning enabled home automation system (Jarvis), vision processing based robots and a self-driven robotic vehicle using Python. By the end of this book, you'll know how to build smart robots using Python.
Publication date:
May 2018
Publisher
Packt
Pages
340
ISBN
9781788832922


Chapter 1. Robotics 101

Hello world! As soon as we say the word robot, thoughts of science fiction start to surround us. We may recall the cartoon serial The Jetsons or think of the movie Terminator. But, as a matter of fact, robots as a species do not belong to science fiction anymore. They are as real as they can get. Look around you and point out any object; it probably wouldn't have been made without a robot. The modern era has been shaped by robots.

But then, you can also take a step back and think, wait a minute, aren't the things he is talking about called machines and not robots? Well, yes, you are very correct, yet very mistaken at the same time. It is cartoons and science fiction that have imparted an image of a human-like robot that is called a robot. But robots are much more than that.

Unfortunately, we do not have a concrete, universally agreed definition of robots, but, as I like to say, Any machine capable of performing physical as well as intellectual tasks can be called a robot.

Now, you may say that, according to my definition, even an automatic washing machine can be called a robot. Well, technically, yes, and why should we not call it a robot? Think of the things it is doing for you and what kind of automation has been adapted over the years. After you feed in the type of cloth it automatically washes, rinses, and dries as you would have done yourself in the 19th century. The point I am trying to make is that there is a huge variation of robots that we can think of, which can radically change the way we live. We need to think with a wider perspective—not just limit robot to look as a human adaption in form of humanoid robots.

We live in the golden era of robotics and automation in which the development of new products is as simple as it can get. What a decade back might have taken a team of engineers, can now be done by a person sitting in bedroom in just a few minutes, thanks to the open source world. At the very same time, there is hardware horsepower available to you by which you can literally build a super computer in your own home with just a few hundred dollars. We are surrounded by problems, some simple and others complex, which are waiting to be solved. The only missing chain in the whole process is you: an innovative mind that has the capability to exploit these technologies to solve the world's problems.

To make your mind capable of doing so, we will be starting of by understanding the roots and the basics of robotics. The goal of this book is not only to make the projects that are mentioned in the book but to make you understand how to exploit the resources to build your dream projects.

Finally, I would like to congratulate you on entering this amazing and futuristic field at the correct time. I always tell my students a rule, which I would like to share with you as well:

  • First is a scientist
  • Second is a researcher
  • Third is an engineer
  • Fourth is a technician
  • Last is a mechanic

What it means is that the earlier in the life cycle you enter any field, the higher in the hierarchy you can get. The later you come, the harder it is to climb to the top.

Enough talking—now let's get straight to business! We will cover the following topics in this chapter:

  • The hardware arsenal
  • Setting up Raspberry Pi
  • Programming
  • Playing with voltage
 

The hardware arsenal


Talking of robots, there are a few basic tangible components that they are made up of, which are as follows:

  • Computing Unit
  • Sensors
  • Actuators
  • Chassis
  • Power source

Firstly, we will be discussing the microcontroller and, during the course of book, we will be discussing the rest of the tangible components in detail as and when required.

Whenever you have been to buy a laptop or a computer, you must have heard the word microprocessor. This is the primary unit that has to make all the decisions. I call it the king, but what is a king without an empire? For the king to work, he needs some subordinates that can do the things for him, the same way in which the microprocessor needs a few subordinates such as RAM, storage, I/O devices, and so on. Now, the problem is that when we put in all these things the overall unit gets expensive and bulky. But, as we know, subsequently weight and size are very important factors when it comes to robots, so we cannot afford to have a big bulky piece of system running a robot.

Hence, we made something called a SoC. Now, this is a one man show as this small chip, has all the necessary systems for it to work inside that small little chipset itself. So, now you don't need to add RAM or storage or any other thing for it to work. These small microcontrollers can get really powerful but a downside is, once a manufacturer has made an SoC, thereafter no changes can be done to it. The size of storage, RAM, or the I/O cannot be changed. But we generally can live with these limitations as when programming the robots, you might not be using the entire juice of the microcontroller until the time you are running some serious artificial intelligence or machine-learning code.

One such great piece of hardware is Raspberry Pi. Yes, it sounds very tasty, but there is so much more to it. This is a super small yet extremely powerful microcontroller. It is often referred to as a prototyping board because of the fact that it is used by roboticists everywhere to bring out their ideas and to make them a reality in a quick time span. It is available all across the globe and is extremely cheap. You can literally stream HD movies, surf the internet, and do much more on just a $10 device. I can't think of something as ludicrous as this. It is fairly easy to use and you can use Python to program it. 

So, basically, it ticks all our boxes. This will be the primary weapon we will be using throughout the book.

So let me introduce you to Raspberry Pi! This is what it looks like:

There are various models of Raspberry Pi available on the market. But we will be using Raspberry Pi Zero W; this will cost you around $10 and it is easier to purchase than a Big Mac burger. Do make sure you buy the Raspberry Pi Zero with a W, which supposedly stands for wireless capabilities such as Wi-Fi and Bluetooth. There are a few more things that you will have to order or arrange for it to work. Here is a list of items:

  • Micro USB to standard USB adapter
  • Keyboard
  • Mouse
  • Micro SD memory card, 16 or 32 GB
  • Micro SD card reader
  • Micro USB power adapter (2 amp or more)
  • Micro HDMI to HDMI port
  • Breadboard
  • Bunch of jumper wires (male to male, male to female, and female to female)
  • 3V LEDs

As you will instantly make out from the image, there is a micro HDMI port onboard, over which you can hook up your HD monitor or a TV screen. Second there is a micro SD card slot. This will be the primary storage device for this computer. Other than that, you will also find two USB sockets and a camera bus. You may think this is it, but the best is yet to come. Raspberry Pi has something called GPIO, which stands for general purpose input/output. These are disguised as small 40 through-hole ports on one corner of the Raspberry Pi; this is what makes it super special.

Now, conventionally you would attach things to your computer that are compatible with it. So, hooking up a mouse, keyboard or a joystick is as easy as inserting a USB port, but what if you need to connect your computer to your light bulbs or your air-conditioner? Exactly, you can't. That's where GPIO comes in to save the day. These are pins which are very useful when it comes to robotics, as these can be used to connect various components such as sensors/motors. The beauty of these pins is that they can be used as either input or output based on what we program them for. So, as we will later see, each of these pins can be defined in the program to be either input or output based on our needs.

Now, out of these 40 pins, 26 are GPIO. The rest of the pins are generic power or ground ports. There are two more ports called ID EEPROM which at this point of time we do not require:

As you can see, Raspberry Pi is capable of giving us two types of power supply: 3.3V and 5V. These basically cater for most of our purposes.


Setting up Raspberry Pi


We will talk about the GPIO and other things to do with Raspberry Pi in a while. Firstly, we will understand how to set up this board for the first time.

The first thing you need to do is to make sure that the operating system of Raspberry Pi is ready. I am assuming that you are using a Windows PC, but if you are doing it on another OS as well, then there will not be much of a difference.

To install the OS, start your PC and follow these steps:

  1. Go to www.raspberrypi.org and click on DOWNLOADS
  2. Now click on RASPBIAN, you will see the following two options:
    • RASPBIAN STRETCH WITH DESKTOP
    • RASPBIAN STRETCH LITE
  3. We will be downloading RASPBIAN STRETCH WITH DESKTOP; this will give us the GUI interface for Raspberry Pi
  4. After downloading, unzip the package into a folder

Now we need to copy it to the memory card of Raspberry Pi. The memory card over which you need to copy must be formatted by low level formatting. There are basically two types of formatting. one which simply erases the index the other one which we know as low level formatting is the one in which we remove all the data from both the index and their physical memory location. There would be a button to toggle a low level format. Make sure it is clicked before you format your memory card for this function.  I would recommend using the SD card formatter by www.sdcard.org. Now open the formatter and you simply have to format it using the 32 KB option.

Note

Find more details and more up-to-date information here: https://www.raspberrypi.org/documentation/installation/installing-images/README.md.

Once done, you have to copy the image onto the SD card. The easiest way to do that is by using WinDisk Imager. You can download it online without any problems. Then simply select the image and the location on your SD card and start copying the image.

This could take a few minutes. After it is done, your SD will be ready. Plug it into Raspberry Pi and we will be ready to power it up. But before you power it up, plug in your monitor using the Micro HDMI to HDMI wire, connect the keyboard and mouse to Raspberry Pi using the Micro USB, and power it up by using the Micro USB adapter to standard USB adapter. Now, use the other USB port on Raspberry Pi to power it up using the micro USB power adapter.

Once you start it up, you will see a boot-up screen and within a few seconds you will be able to see the desktop. So, finally, our Raspberry Pi is up and running.

Go ahead and explore a few options, surf the internet, look at some cat videos on YouTube, and get yourself familiar with this mighty device.

By now, you must already be appreciating the power of Raspberry Pi. It may be slightly slower than your average computer. But, come on, this thing costs just $10!


Let's program


In this chapter, we will get you familiar with Python and how you can use the GPIOs on this device. To do this, go ahead and click on the Raspberry icon in the top left-hand corner. You will see the Python console 3.0. There could be an older version of Python as well. We will be using the newer version in this book.

Once the window opens, you will see the playground where you would be doing the coding. So now we are ready to write the first code for Python Robotics. Now let's see how it's done.

The first thing we will write is:
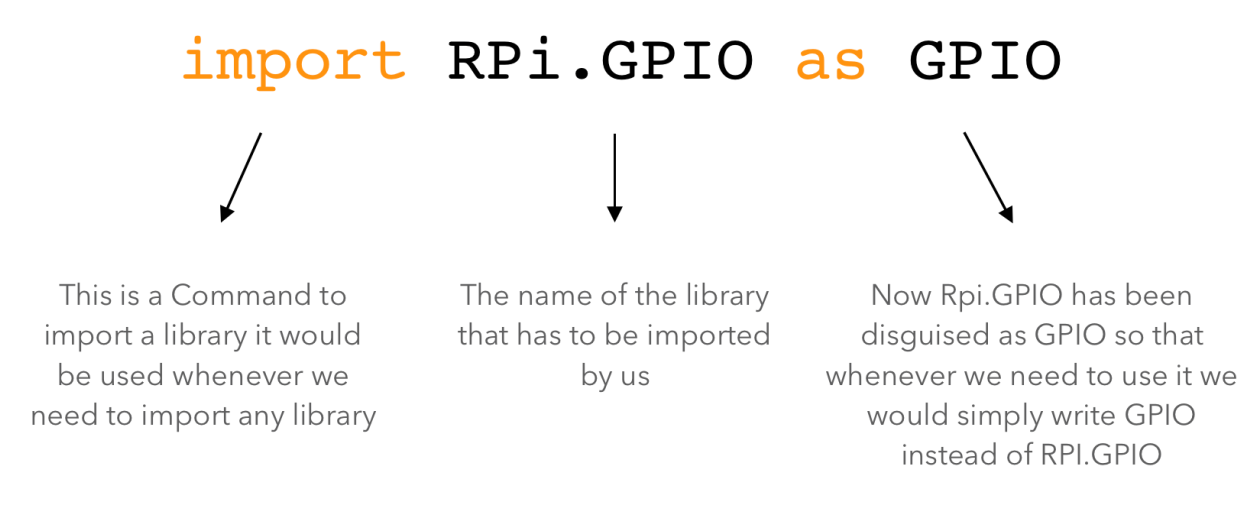
Almost all of the time when we start writing a program, we will start by writing the preceding line. Now, before we understand what it does, we need to understand libraries. Often while we are writing code, we will have to write the code again and again in multiple places. This takes a lot of time and certainly is not cool!

So, to solve this problem, we created functions. A function is a miniature program that we might think would be used over and over again. In this miniature program itself, we also mention what it would be called.

Let's say that there is a code in which we need to multiply two numbers again and again. So, what we do is we write the code once and make it a function. We also name this function Multiply.

So now, whenever we need to multiply two numbers, we don't have to write its code again; rather, we simply have to call the function to do it for us instead of writing the code to multiply. The problem is, how do we tell which number has to be multiplied?

There is a solution to that as well. As you might see later, whenever a function is called we put opening and closing brackets after it, such as multiply().

If the brackets are empty that means no user input has been given. If, for example, we have to multiply 2 and 3 we simply write Multiply(2,3).

We are giving the input as 2 and 3. The position of the input in the brackets is also important as the position in the brackets will define where in the program it will go.

Now, let's say you make functions such as:

  • Add
  • Subtract
  • Multiply
  • Divide

Say you stack them together. Then the pile of functions grouped together will be called a library. These libraries can have hundreds of functions. There are some functions which are already in the Python language so that the job is made simpler for the programmers. Others can be defined as open source or developed by you at your convenience.

Now, getting back to the point. We are calling the library RPi.GPIO; this is a library defined by Raspberry Pi. This will have functions that will make your life easier when it comes to programming Raspberry Pi. So, in the program, once we call the library, all the functions are at your disposal and ready to be used.

In the next line, we write Import.time. As you must have guessed, this is used to import a library time. What it does we will learn shortly.

The next line of code would be as follows:

Before we understand what it does, let's learn a bit more about GPIOs. These pins are hard numbered according to their physical positions in Raspberry Pi. However, we can change the numbering of the pins in the software for our understanding and convenience. But in this code, we will not be playing around with this and will set it do the default set by Broadcom, which is the manufacturer of the microcontroller of Raspberry Pi.

This line uses a function of the RPi.GPIO library called setmode. What this function does is that it sets the pin configuration of the setmode to (GPIO.BCM)—BCM is further a function of GPIO.

Now we can use the base pin configuration. Further to this, a specialty of the GPIO pins is that it can be used both as input and output. But the only condition is that we have to specify whether it has to be used as input or output in the program itself. It cannot do both functions at the same time. Here is how it is done:

The next line of code will be as follows:

Again, we are using a function of the library GPIO called output. What this does is that it sets up a specific pin of the board in a state which we want. So, here we have mentioned that the pin number 23 has to be set high. Just for the sake of clarity, high means on and low means off.

The next line of code will be as follows:

In this line, we are using a function from the library time. The function sleep basically freezes the state of all the GPIO pins. So, for example, if the pin 23 is high then it will remain high until the time the function sleep is executed. In the function sleep, we have defined the value as 3 seconds. 

Hence, for 3 seconds, the pin state of Raspberry Pi will remain as it was before this line of code.

Finally, the last line of the code will be:

This will be a common sight after every program. This function of the GPIO library will reset the state of every pin that has been used in the program—the state of all the pins will be low. Remember, it will only affect the pins that are used in the program and not any other pins. So, for example, we have used the pin 23 in the program, so it will only affect pin 23 and not any other pin in Raspberry Pi.

Finally, your program will look something like this:

Now, one thing that you must remember is that whatever code we are writing will be executed one line after the other. So, let's say we keep import RPI.GPIO as GPIO at the bottom, then the whole program will not work. Why? Because as soon as it goes to GPIO.setmode(GPIO.BCM) it will not understand what GPIO is, neither will it understand what setmode is. Hence, we always import the libraries as soon as we start writing the code.

Now, working on the same concept, it will execute the program in the following way:

  • GPIO.out(23,GPIO.High): It will turn pin 23 high/on
  • time.sleep(3): It will wait for 3 seconds while pin is still high
  • GPIO.cleanup(): Finally, it will set the state of the pin 23 to low

Now, to see whether the program is working, let's attach some hardware to check whether what we have written is actually happening.

Note

I am assuming that readers are already aware of how breadboard is used. If you are not familiar with it, just go ahead and google it. It will take 5 minutes to understand. It is super easy and will come in handy.

Now go ahead and connect the LED on breadboard, then connect the ground of the LED to the ground pin in Raspberry Pi, and set the positive/VCC to pin number 23 (refer the pin diagram).

You can also refer to the following diagram:

Once you are done, go ahead run the code and see what happens!

The LED will glow for 3 seconds and then turn back off again, exactly as we expected it to do. Now let's just play around with the code and do a slight modification. This time, we will add a few more lines marked in bold:

import RPi.GPIO as GPIO
from time
import sleep
GPIO.setmode(GPIO.BOARD)
GPIO.setup(23, GPIO.OUT)
while True:
  for i in range(3):
  GPIO.output(23, GPIO.HIGH)
sleep(.5)
GPIO.output(23, GPIO.LOW)
sleep(.5)
sleep(1)
GPIO.cleanup()

Before understanding what's inside the code, you will notice that not every line is aligned, they have been intended. What does this mean ?  A line indented together with other lines of code is called a block. So for example if you have a statement such as 

while True:
  for i in range(3):
  GPIO.output(23, GPIO.HIGH)
sleep(.5)
GPIO.output(23, GPIO.LOW)
sleep(.5)
sleep(1)
GPIO.cleanup()

Now in this line lets see how the code will run.

  • A while true loop would run, this will run the code that is inside it i.e. 
for i in range(3):
  GPIO.output(23, GPIO.HIGH)
sleep(.5)
GPIO.output(23, GPIO.LOW)
sleep(.5)
sleep(1)
  • Thereafter the code for I in range (3): would run. It will run the code inside the for loop until the value of I is in range, Hence the code below would run. 
GPIO.output(23, GPIO.HIGH)
sleep(.5)
GPIO.output(23, GPIO.LOW)
sleep(.5)

The above code can be referred to a block of code, which is inside the for loop. The block of code can be made by indenting the code. 

Now, let's see what it does. While True is a loop, it will run the for loop inside it again and again until the time the condition is not false. The condition we are using here is:

for i in range(3):

The maximum range is 3 and every time the statement runs it increments the value of the i by +1. So it basically acts as a counter. Let's see what the program will actually do.

It will check for the value of i and increment it by 1 thereafter. As the code progresses, it will glow the LED high for 0.5 seconds and then shut it off for 0.5 seconds. And then it will wait for 1 second. This will repeat until the while loop is false, as in the value of i becomes greater than 3 where it would get out of the program and terminate. Run the program and see if it actually happens.

By now, you understand how easy the programming is in Raspberry Pi. To go a step further, we will make another program and make some changes to the hardware.

We will be connecting five more LEDs from pin numbers 7 through to 12. We will make them switch on and off in a pattern.

Once connected, we will write the code as follows:

import RPi.GPIO as GPIO
from time
import sleep
GPIO.setmode(GPIO.BOARD)
GPIO.setup(7, GPIO.OUT)
GPIO.setup(8, GPIO.OUTPUT)
GPIO.setup(9, GPIO.OUTPUT)
GPIO.setup(10, GPIO.OUTPUT)
GPIO.setup(11, GPIO.OUTPUT)
while True:
  for i in range(7, 12):
  GPIO.output(i, GPIO.HIGH)
sleep(1)
GPIO.cleanup()

Now the code is fairly simple. Let's see what it means:

Before I tell you something more about the code, let's go ahead and run it.

When you run it, you will understand that as per the statement it is addressing the pins one by one and switching them to high after every 1 second.


Playing with voltage


So far so good! But did you notice one thing? We have been using Raspberry Pi as a switch—simply switching the various components on and off. But what if we need to vary the intensity of the LEDs that we have just programmed? Is it possible? The answer is no. But we can still get it done somehow!

Let's see how. Computers work in binary which means that they can represent either 0 or 1. This is because of the fact that the primary computing unit in any system is based on a transistor which can either be on or off representing 0 or 1. So, if we see this technically, computers are only capable of switching due to the binary architecture. However, there is a trick. This trick is called pulse width modulation (PWM).

Now, before I explain any of it in detail, let's go ahead plug in an LED on pin number 18, then copy this code into Raspberry Pi and run it:

import RPi.GPIO as GPIO
import time                             
GPIO.setmode(GPIO.BCM)       
GPIO.setup(18,GPIO.OUT)         

pwm= GPIO.PWM(18,1)
duty_cycle = 50
pwm.start(duty_cycle)

time.sleep(10)

GPIO.cleanup()

What did you notice? The LED will be blinking at once a second. Now let's tweak it a bit and change the PWM(18,1) to PWM(18,5). Let's run and see what happens.

You will have noticed that it is now blinking five times in a second. So the number 5 is basically representing the frequency as the LED is now flickering five times in a second. Now, again, rewrite the code and increase 5 to 50. Once you increase it to 50, it switches the LED on and off 50 times in a second or at 50 Hertz. So, it appears to you as if it is always on. 

Now comes the interesting part. Go over to your code and change duty_cycle = 50 to duty_cycle = 10.

What did you notice? You must have seen that the LED is now glowing way lower in intensity. In fact, it will be half of what it originally was. 

Let's see what is actually happening:

As you can make out from the diagram, the function is basically creating a pulse, the characteristics of which we are changing. The first characteristic is the frequency, the pulses generated in a second. In the code line pwm= GPIO.PWM(18,1) , we are basically telling the microcontroller to generate one pulse every second on pin number 1. In the second line, duty cycle is a percent value. It determines for how much percent of the time the pulse will be high. For the rest of the time of the pulse the output of the pin will be off. So, for the following code, the below bulleted points would be the characteristics:

pwm= GPIO.PWM(18,1)
duty_cycle = 50
  • Time/width of every pulse is 1 second
  • Percent of time it would on is 50%
  • Percent of time it would be off is 50%
  • Time it would be on is 0.5 seconds
  • Time it would be off is 0.5 seconds

When we increase the frequency more than 50 hertz then it is very hard for the human eye to make out if it is actually switching on or off. Theoretically, for 50% of the time the pin will remain high, and for the rest of the time it will be low. So, if we take an average then we can easily say that the overall voltage would be half of the original. Using this method, we can modulate the voltage output of any pin as per our requirements.


Summary


Now you must have understood how the GPIOs can be used as output and how, by applying conditions, we can change their behaviors.

In the next chapter, we will understand how these pins can be used as input as well. So come back, and see you there!

About the Author
  • Prof. Diwakar Vaish

    Prof. Diwakar Vaish is a robotics scientist and the inventor of Manav (India's first indigenous humanoid robot), the world's first mind-controlled wheelchair, brain cloning, and the world's cheapest ventilator. He has also been a guest lecturer at over 13 IITs and various other institutions. He is the founder of A-SET Robotics, a leading robotics research company based in New Delhi.

    Browse publications by this author
Latest Reviews (8 reviews total)
I can use it with my jobs
Buen producto a buen precio de oferta.
BIEN EXPLICADO, ejemplos interesantes para su realización.
Python Robotics Projects
Unlock this book and the full library FREE for 7 days
Start now