


With this book you will be able to set up an e-commerce solution within a week! So are you ready to sell your ideas with PrestaShop?
In this chapter we will:
Download and prepare the PrestaShop files
Make a database
Install PrestaShop
Implement post-install security
Have a look at your shop from a customer’s viewpoint
Have a look around your new admin control panel
Here we go...
Before you start a business, you have to know the product you are selling. If you are not convinced, the buyer themselves may think twice before buying it. Be focused on your chosen market and on your target customers. An example of a great e-commerce solution is www.amazon.com. Amazon, the biggest e-commerce solution in the world, began selling books from a garage with a singular focus on a chosen market and target customer.
Visit www.prestashop.com to get your free copy of PrestaShop. Click on the Download option. Select your favorite language and click on the big green button Download Now. It is optional whether you fill in the very brief registration information. When you click on the download button you should have a zipped file called prestashop_1.5.x.x.zip, where x.x is the version of PrestaShop you have downloaded. The version number you have doesn’t matter. As long as you follow the download link from the PrestaShop home page, you will have the latest stable version.
In the next tutorial, we will upload all the loose unzipped files to your web server. It is worth pointing out that you might save some time by uploading the zipped file and using your web host’s file manager to do the unzipping. As most web hosts use a slightly different system, I will guide you through unzipping first. But if you know how to use your web host’s file manager to do this, you could save some time while uploading. You decide. Unzip it now to prepare for the next guide and you will be left with a folder called prestashop.
To install PrestaShop on a computer, you will need a prepared package. WAMP for Windows, which you can download from www.wampserver.com, or if you are Mac user you could use MAMP, which can be downloaded from www.mamp.info. You can also use XAMPP to install PrestaShop in a different OS and you can download it from www.apachefriends.org/en/xampp.html.
To install PrestaShop on the Internet you will need a domain name, a web server like Apache, Nginx, or Microsoft IIS with PHP 5.1 or higher installed and enabled, and MySQL 5.0 or higher installed with a database created and FTP access.
Now that you have downloaded and unzipped the PrestaShop files, it’s time to put them onto your website ready to install. If you are hosting at home, this is a simple matter of putting them in the Apache home folder (see my downloadable guide if you’re unsure where this is).
If you are developing on a live server, then you need to transfer the files via FTP. Let’s do that step-by-step.
To make this as quick and easy as it can be, I will use a few Windows shortcuts in this short click-by-click guide. Just before you dive in, you will need your FTP username and password. If you don’t know it already, you can usually find this quite easily by looking in your account details in your web host’s control panel. Any doubts, give them a ring or send an them an email – after all, that’s what you pay them for!
Press the Windows key and tap the E key twice. You will have two Explorer windows pop up. Arrange them neatly one above the other. Alternatively, you can grab a copy of a dedicated FTP program such as FileZilla from www.sourceforge.net. There is a small learning curve doing this, but once you’re used to it, you will have more options when using FTP. This guide assumes you do not have FileZilla, but if you do, it won’t be a problem to interpret the guide.
Browse to the unzipped
prestashopfolder at the bottom of the window and click on it. We do not need the folder itself, just the contents.At the top window, you need to log into your website via FTP. In the address bar at the top of the screen, type
ftp://yourdomain.xxxand press Enter. When a pop-up window appears, enter your FTP username and password that you obtained earlier.Now at the bottom of the window, left-click on the very first file. Press the Shift key and then, using the down arrow key while still pressing Shift, scroll to the very bottom of the screen so that every single file and folder is highlighted.
Now let go of all the keys on the keyboard. Left-click and hold the left mouse button. You can now drag all the files from the
prestashopfolder on your PC up to your website in the top window.Wait for the files to upload. The time will vary according to the speed of your Internet connection.
PrestaShop needs a MySQL database to function. The files we have just uploaded are the web pages that will become your store and the PHP programming code that performs the actions required by your store.
For example, when a customer creates an account in your new shop, the programming code contained in the files that we uploaded will fill out and store the information in a completely separate computer program. This program is called a database server and the type of database server that PrestaShop uses is called MySQL. Usually, when you are pro-hosting, this server will be an entirely different physical computer to the one holding your files (the web server). As with many servers/computer programs, you need a username and password to access its functions. You also need a unique name for a database for your shop on that server, and you need to know the address locating the server. As an example, this could be mysql.yourdomain.xxx. Or it could be something completely different.
Now many web hosts will have already allocated database server details to your hosting account. If this is the case, then you only need to find them and make a note of them for the next phase of the installation.
Most likely your web hosts have a simple two-or three-click process for creating a database. You can then access the details of this newly created database in order to proceed.
Precise details will vary from host to host and also the order in which the options are presented (if at all). The database creation process goes like this.
If you already have a created database, that is okay. PrestaShop can function on a database used by other applications. However, to make sure that they do not conflict, or worse, damage each other, pay close attention to the How to install PrestaShop section to be sure of how to create a table prefix!
First of all, you need to log in to your hosting control panel. You are looking for an option called MySQL, MySQL databases, phpMyAdmin, or perhaps just Databases.
Click on MySQL databases or something named as Databases.
Now we need to make another database. Look for the option Create new, Make a database, or perhaps just Add. Click on it to see the options presented. The following is a screenshot of the database creation page on the DreamHost.com control panel. It serves as a good example because it has more options than most. If your screen has fewer options, that is okay. Just follow the guide for the bits you need.

Database Name is an important detail that needs to be remembered. It is case sensitive, so upper and lower case must be accurately recorded. Choose a name; again, it is arbitrary, but use something appropriate and not easily guessable, like
mydomainsomesecretnumber. There will be a maximum number of characters, so you might need to use a shortened version. Write it down or copy and paste it into Windows Notepad or on a similar application. It is possible that you do not have a field for a name or it has already been filled out automatically. That’s fine. Just write it down.Enter a memorable but unguessable password. Again this might be decided for you and it might not have this option at all. Re-enter the password if required. Write it down or copy and paste it in the Notepad or something similar.
If you get the choice to select versions for MySQL, tick/check the option for 5 or later.
If you get the option to Allow Direct Database Access, this is a definite No. We don’t want people to fiddle with our database from far away.
When you’re done, click to create the database— OK, Finish, Create, Add new database now, or whatever your web host decides to label their button with.
Now you should be able to see a summary of the database you created. Complete with the values you chose and the values chosen for you. As usual, write it all down or copy and paste it into Notepad or some similar application.
Now for the fun part, when you get to see some results. What we are going to do is run the PrestaShop auto-installer. This will be a series of web pages where you will enter information to allow the auto-installer to configure your store.
The sort of information that we will be entering is business information such as your shop name, personal details, and of course the database information gathered previously.
To get started, type your shop domain name into your web browser. It will automatically redirect you to the default start of the PrestaShop installation program. You should then perform the following steps:
First, just choose your language and tick on the licenses agreement. Then click on Next to move to the System Compatibility screen as shown in the following screenshot:

Check that you have all green ticks in PHP parameters and Write permissions on files, as in the preceding screenshot. On the Optional set-up you can have some crosses, but they are not obligatory. If you do, then click on Next to proceed and jump to the next step. If you see some scary red crosses, don’t panic because there are some simple solutions here. If you have all green ticks move on to step number 6.
If you have any red crosses under the PHP settings, then you need to contact your web host and ask them to make some changes for you. If your hosting package has the system requirements discussed earlier, it is most unlikely you have any crosses here. Also, if you have installed hosting on your own PC, they will all be ticks. If you have crosses and need to contact your web host, then read the next point first.
The next is Write permissions on files. This is the most likely area to have some crosses and also has the easiest remedy. In order for PrestaShop to install itself, it needs to modify (write to) various files and folders. A red cross indicates that the folder cannot be written to. Changing this is nice and easy. Log in to your website with FTP just as we did when we transferred the PrestaShop folders there. Locate any folders with a red cross, right-click on them, and select Properties. Then put a tick in the top two checkboxes under the Write column. Done! It is possible that you might need to use your web host’s file manager to do this step. Also, if you extracted the files on your web server, then the file permissions will probably not need amending at all. The last optional settings are just that, entirely optional. And again if you are pro-hosting, your web host will need to resolve this for you, but PrestaShop will still be functional without them.
Click on the Refresh these settings button to check if you have solved the problem(s) and then click on Next and read on.
The next is the System Configuration screen:

You might have probably guessed that this is where you will fill in all the database information that we collected earlier. I will go through each setting one at a time because some of the fields are described differently from host to host and by PrestaShop. I feel the need for a small table of explanations. Here it is:
PrestaShop field
Explanation/alternative name
This is the address of computer (server) with your database on it: Sometimes called “address”, “host name”, or just “database server”.
Type this in here exactly as it appears in your web hosting control panel. It could be something like
mysql.yourdomain.xxx.This is simply a name given to the database on the database server: On shared hosting environments, this is often the same thing as the username (or login as PrestaShop calls it).
Enter exactly as it appears in your hosting control panel.
Your MySQL username: On shared hosting environments, this is often the same as database name.
Enter exactly as it appears in your hosting control panel.
Your top secret sequence of letters and numbers (Shhh…).
This is the way to store your data in your database. You will see a drop-down menu with two options: InnoDB and MyISAM.
InnoDB is the default storage engine for MySQL and MyISAM was the default storage engine for MySQL.
Here select InnoDB, but if your hosting does not have this option, then you will need to use MyISAM.
This is a short series of letters placed before all the tables (sections) of your soon-to-be-created database. When an e-commerce shop of any type is created, there are dozens of tables created to store all the necessary information. If you think about it, all stores are likely to have similar table names (perhaps “customers” or “products”). When this occurs, adding a unique prefix prevents the new table destroying the old.
A prefix is a good idea at any time, a very good idea if you have any other uses for your database and essential one if you have more than one PrestaShop on your database.
If this is your first PrestaShop, I suggest leaving the prefix as it is, that is
ps_. But if this is your second or third, I suggest changing it tops2_orps3_.
Now click on the button Verify now! If everything goes smoothly you will see the following message: Database is connected. If not, please review all the fields and check it with your hosting provider.
Leave the Configure SMTP manually box unchecked. This is unnecessary for a pro-hosted environment. Then click on Next.
Enter your preferred e-mail address on your shop’s domain that you would like PrestaShop to use. PrestaShop will send e-mails to customers to thank them for orders, notify them of dispatch, and more. PrestaShop will also contact you to let you know about important events such as when people spend money!
Click on Next and your shop database will be made. You will see the following screenshot:

This page is really simple but with a little twist. Just fill in your Shop name and select the Main Activity as you like. As a piece of advice select Yes for Install demo products. Now select the country where your shop is based and its time zone. You can upload your Shop logo later, but if you want to do it now, you have to upload a 209 x 52 pixel graphic logo from your PC. To log in to your admin control panel use first and the last names along with the email and password. Do not select the Receive this information by e-mail checkbox, as we will enable this later. Click on Next and rejoice.
You have just made your first PrestaShop. Cool! A few more bits and pieces to fiddle with and you’re done. Was that difficult? In my opinion, if there is a technical side to running a PrestaShop e-commerce business, then that was probably about as geeky and technical as it gets! If you are reading this, you are heading for success.
Just a few, very quick modifications to your PrestaShop files and it’s done.
What we need to do is
delete the entire folder called install from your web server. The reason for this is that it contains the PHP code that configured your store. So it might be very easy for anybody who knows it is there to rerun the install process with erroneous information and mess up your store.
This is probably the quickest and easiest way to do it:
Press the Windows key and hit E once. This will bring up a new Explorer window.
In the address bar, type
ftp://yourdomain.comand hit Enter/Return.Enter your FTP username and password.
Find the
installfolder. It is nice and prominent, near the top, under theimgfolder.Right-click on it and select Delete. That’s it. Don’t close the FTP window, and read on.
Without the PrestaShop installation files, nobody can run the installation process again. So we just prevented anyone with a little bit of knowledge from reinstalling over our PrestaShop and causing us to have a bad day. Next we will take another precaution to protect our new shop.
The admin folder holds all
the web pages and PHP code that allows you to manage your shop. Almost any customization or configuration that you will make using your control panel, including the ability to log in, relies on this folder and the knowledge of its location. So you obviously you don’t want any Tom, Dick, and Harry sitting on their PC at www.yourdomain.com/admin trying to guess your password. And anybody who knows anything about e-commerce software knows that the default folder name for such functions is often admin. So we will now name it something more secret and personal.
You should already have an FTP window to perform these steps. If not, repeat steps 1 to 3 in the previous Time for action section and then come back here:
Find the
adminfolder.Right-click on it and select Rename.
Rename it something that is easy to remember but difficult to guess. I suggest treating your
adminfolder name like a password. Perhaps,admintrickypassword. Make sure to leave theadminfolder bit at the start. Then it would be safe from prying eyes and tampering fingers, but you and the PrestaShop system will know where it is.Close your FTP window.
Now, at last, it is time to see your shop! Visit www.yourdomain.com. It should look like the following screenshot:
If you haven’t already done this, then go and have a look at a PrestaShop that has some content. This will help you visualize approximately how your own store will take shape. You can do this at http://demo-store.prestashop.com/en/.
Now you can see the logo of your shop, a search bar, useful links such as contact, sitemap, or bookmark, select the Currency option, a Log in link, and the main menu in the top area of a website.
The following screenshot is the header. The header is the top area in a website:

On both sides of the web we have columns. On the left side, we have the main navigation.
On the right column, we have specials offers, latest products, and some information about your store.
In the middle of the website, we have the products. On the homepage there are featured products and one carousel, but when we surf along the categories, we see a list of products that belong to that category. When we click on a product, we have all the information about that product in this area.
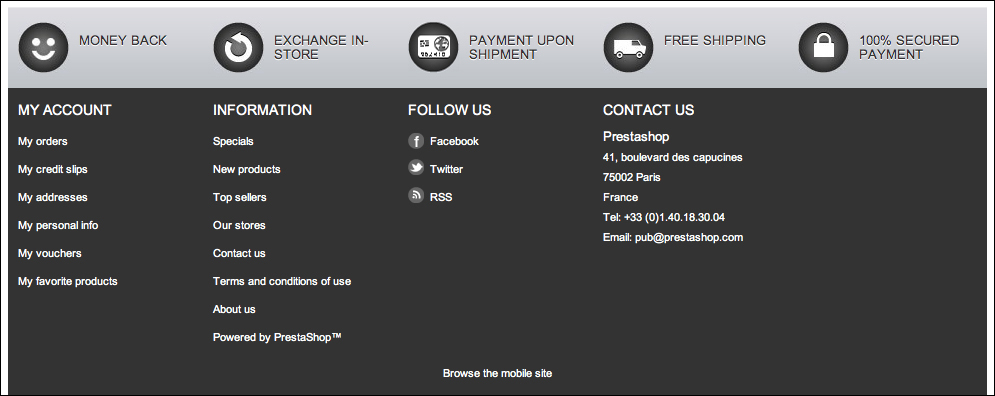
The latest part of this area is called the footer. We have useful links and contact details in this area, as shown in the following screenshot:
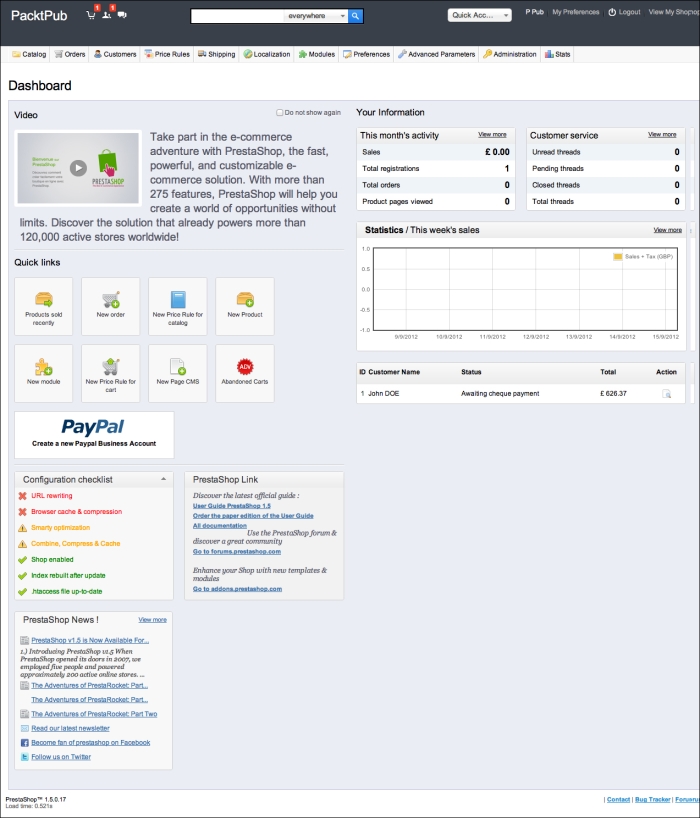
Now log in to your store control panel. This is where 90 percent of this book will take place, because here, you will add all your products, check your sales, change the design of your store, and so on. This is what you will see:
But if you see the following screenshot, you need to go back the Post-install security section.
Here is how to get there:
In your web browser type
www.yourdomain.com/youradminfoldername, whereyouradminfoldernameis the same name that you chose for youradminfolder previously.Enter the e-mail address you registered with and the password you gave on the last configuration page, when you installed PrestaShop.
Hit enter and you’re in.
Why don’t you have a look at the PrestaShop live feed? This contains topical news and information about PrestaShop direct from the creators. If there is an update available for PrestaShop, you will hear about it here.
You took your first look inside your store control panel. Now let’s click some buttons.
Here I will quickly run through some of the general functions contained within each tab and drop-down box. I shall also mention the chapters in which we will cover them in more detail. Why not explore as we run through them? A full control panel reference is contained in Appendix 1, Control Panel Quick Reference. From left to right, we have:
Catalog: On this tab we have everything we need to manage our product range and all related aspects. For example, as well as creating the products themselves (Chapter 3, Merchandising for Success), we can also give our customers manufacturer and supplier information to aid their buying decision (Chapter 2, The Back Office). We can assign advanced features to our catalog such as attributes, features, customizations, and attachments (Chapter 3, Merchandising for Success). We can also assign product tags to help customers and search engines easily find what they want (Chapter 4, Getting More Customers).
Orders: Here we can manage every aspect of post-purchase communication such as notifying customers of dispatch or a problem, making invoices available, and printing packing slips. All of this will be covered in Chapter 8, Ready to Sell.
Customers: The Customers tab allows us to view and edit our list of customers as well as creating groups of different types of customers. This, as we know, can be very useful (Chapter 8, Ready to Sell).
Price Rules: This tab lets us customize your customers experience. Here we can create discounts for specific carriers, products, suppliers, categories, manufacturers, combinations, or offer free shipping. It also lets us create and manage gift vouchers that can be purchased (Chapter 7, Checkouts and Shipping) or given away as a promotion (Chapter 8, Ready to Sell).
Shipping: Unfortunately, this tab can’t actually deliver stuff for you. It does everything that is related to delivering your customers’ orders. You can configure shipping types, costs, and durations in any combination to suit your business (Chapter 7, Checkouts and Shipping).
Localization: Here we can set up our shop for different languages, zones, countries that we deliver, states, currencies, taxes and tax rules, and translations. We will also go into depth in Chapter 7, Checkouts and Shipping.
Modules: Everything in PrestaShop is about module. If you put a shopping basket here, it’s a module; if you put a menu there, it’s a module. We will be in and out of the Modules tab all the time. We will also go into greater depth about modules in (Chapter 2, The Back Office and Chapter 5, Tools, Newsletters, Extra Income, and Statistics).
Preferences: This is the second most varied tab in the whole of PrestaShop. There are many things you can do here. We will be popping in here from time to time and then covering everything we missed (Chapter 5, Tools, Newsletters, Extra Income, and Statistics).
Advanced Parameters: Here we can check and set up different performances for our shop such as, cache, database backups, and logs (Chapter 5, Tools, Newsletters, Extra Income, and Statistics and Chapter 6, Security and Disaster Recovery).
Administration: We manage our preferences, add, edit or delete employees, set up profiles, and permissions (Chapter 6, Security and Disaster Recovery).
Stats: This topic is crucial. It is a very significant area where PrestaShop stands head and shoulders above its competitors. Capturing and using statistics (Chapter 5, Tools, Newsletters, Extra Income, and Statistics) will allow you to measure success and decide how to change and improve your shop (Chapter 9, Go… To the Future).
Here is a little challenge for you. Nothing very technical but a sort of PrestaShop “hunt the thimble”. What if you wanted to temporarily disable your shop? Maybe you wanted to close it for maintenance. Perhaps you want to close it down during development when you’re not actually viewing it. Can you find where to do it?
I promise you the solution is simple. But can you find out where is it hiding?
Solution: Click on the Preferences tab. Scroll down to Maintenance and select No. The Maintenance IP box even enables you to enter your unique Internet (IP) address so that only you can see the shop. This is a perfect, secure manner to develop your store. To get your IP address visit http://www.whatsmyip.org/. Enter it in the box on your Preferences tab and click on Save.
It is not important to know where everything is and how it works at this stage. As I mentioned before, we will approach each topic in the likely order of setting up a new business and not in a left-to-right manner. I just thought it might be nice to have a look under the hood before we get stuck in! This will hopefully help you to master PrestaShop more logically and to achieve my 7-day challenge.
Q1. Many web hosts charge per database or have a limit before forcing you to upgrade your package. How would you create almost unlimited PrestaShop installations on the same domain name and same database without overwriting the original?
Upgrading your web host package
Enable multistore
Contract different web hosts
Contract different web hosts and domains
Q2. Once configured, which tab would you most likely use to know how many visitors have visited your website?
Module
Customers
Stats
Shipping
Q3. What do you think would be the fastest way (least clicks) to begin the process of creating a new product?
Click on Catalog and then click on Product
Click on Catalog and then click on Categories
Click on Administration and then click on Menu, then add Product to the menu
Click on Preferences and click on Product
We learned a lot in this chapter about PrestaShop.
Specifically, we covered the following:
Obtaining PrestaShop: Where to download it from and how to prepare the files, including how to transfer them via FTP to your website.
MySQL databases: How PrestaShop uses the database, how to create a MySQL database, and how the different terms are used to refer to the database location.
PrestaShop installer: How to complete each step of the installer and filling out the slightly trickier pages like the database configuration page, and how to get around an intermittent bug in the installer.
The shop front: How to refer to different parts of the shop front.
The shop back: A brief look at where the different functions and tasks can be performed.
We’re now ready to fit your shop with a visually pleasing, unique, and sales-efficient design. This is the topic of the next chapter. So let’s get stuck in!
