


 Download code from GitHub
Most Common Modeling Mistakes That Prevent You from Achieving Photorealism
Have you ever tried to create a photorealistic scene in Blender? Are you looking for a step-by-step formula to help you achieve photorealism in Blender? Do you find yourself stuck getting the right settings? If so, you’re not alone.
In this chapter, we’re going to break down the three modeling mistakes that most 3D designers make that prevent them from achieving photorealism in Blender.
Modeling represents the foundation for what’s coming next: texturing, UV mapping, lighting, compositing, and rendering. Getting the foundation wrong will make all your efforts be in vain, so the goal of this chapter is to help you get the modeling foundation right.
The first mistake is relying on only your eyes to estimate the scale of objects you’re modeling. When it comes to photorealism, getting the right scale plays a crucial role. So, we’ll be discussing the Blender unit system and how to perform research to get the right, realistic measurements of objects before modeling them.
The second mistake is related to scale matching: most designers immediately dive into creating a 3D scene based on a real reference without doing any scale matching. This makes it really hard to get the same camera settings, such as position, rotation, and focal length, that an actual photographer would use. This results in an unmatched result to the reference you’re working with. To overcome this issue, we will learn to use fSpy, a tool that allows you to replicate the camera settings adopted by a photographer (focal length, camera position, and rotation) when taking a picture of an actual image and export it into Blender. We will explore how the fSpy interface works, how to use it, and how to install the fSpy add-on into Blender and import fSpy project files.
The third mistake is modeling without the bevel modifier on. By the end of this chapter, you will understand the importance of using the bevel modifier when modeling and the role it plays in achieving photorealism. You will also understand the different beveling settings and how they work inside Blender.
In this chapter, we’ll be covering the following topics:
- The importance of using a real-world scale
- Learning scale matching using the fSpy program
- The importance of using the bevel modifier when modeling
Technical requirements
This chapter requires a Mac or PC capable of running Blender Version 3.0 or above.
You can download the resources for this chapter from GitHub at https://github.com/PacktPublishing/3D-Environment-Design-with-Blender/tree/main/chapter-1
The importance of using a real-world scale
When creating complex scenes in Blender, it’s easy to fall into the trap of eyeballing the scale of objects when modeling them, without taking the right measurements. This can lead to multiple problems that will prevent you later on from achieving a photorealistic and eye-pleasing result.
We think our eyes are accurate – “I know how large this window is, it’s this size”; however, we’re really bad at estimating measurements simply because we give more emphasis to the things that we pay attention to and neglect the parts we deem unimportant.
This then affects the photorealistic aspect of your scene: you end up wondering what is wrong with your scene. Something just looks off and you don’t know what it is. You start messing around with the materials and the lighting, and maybe those are perfect but then you realize the foundation was wrong. So, it is important to get this modeling foundation right.
So, the solution is to always use a real-world scale.
Let’s say you’re designing a wood cabin; the first thing you need to do is research on Google: What is the height of a log cabin?.
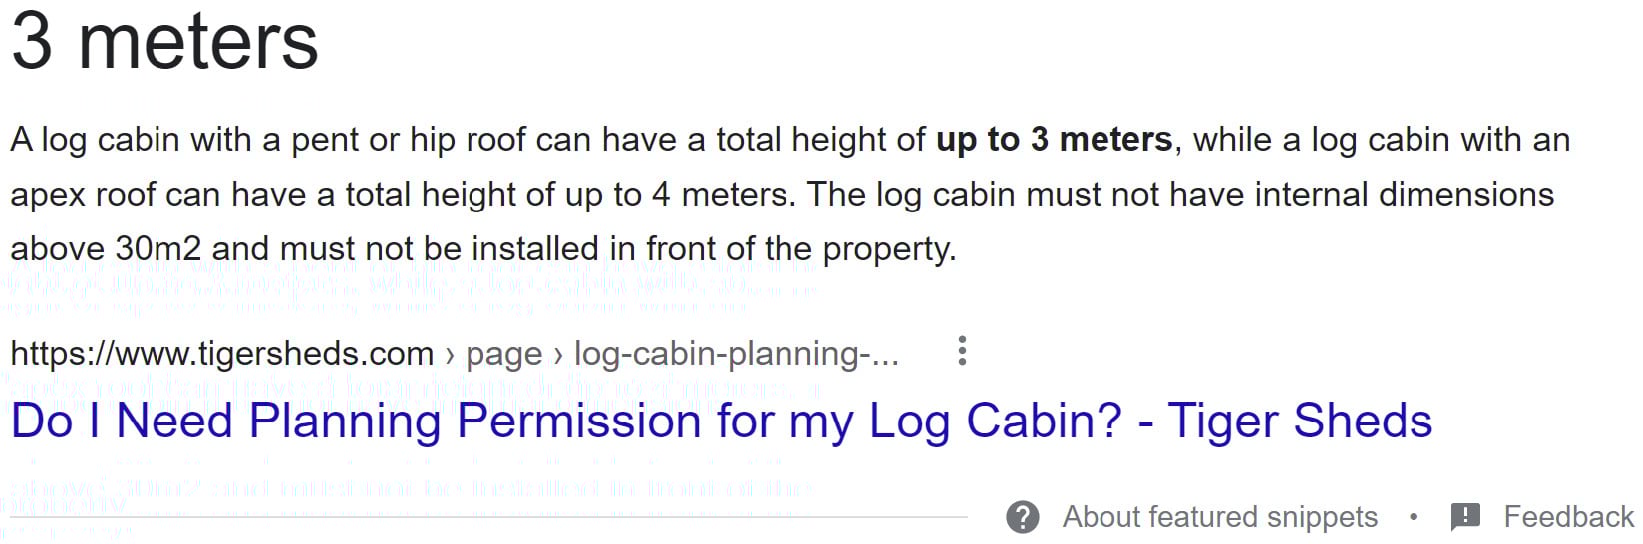
Figure 1.1 – Google search for the height of a log cabin
So, now we understand that a wood cabin must not exceed 3 meters in height, so everything between 2 and 3 meters should be reasonable. With the apex roof included, another meter is added.
Since we must not exceed 30 m2, we can give a dimension of 5 m wide and 6 m long (5 m × 6 m = 30 m2.).
Next, we will check the Blender unit scale:
- Go to Scene Properties.
- Click on the Units tab.
- Then choose the Unit System measurement that suits you.
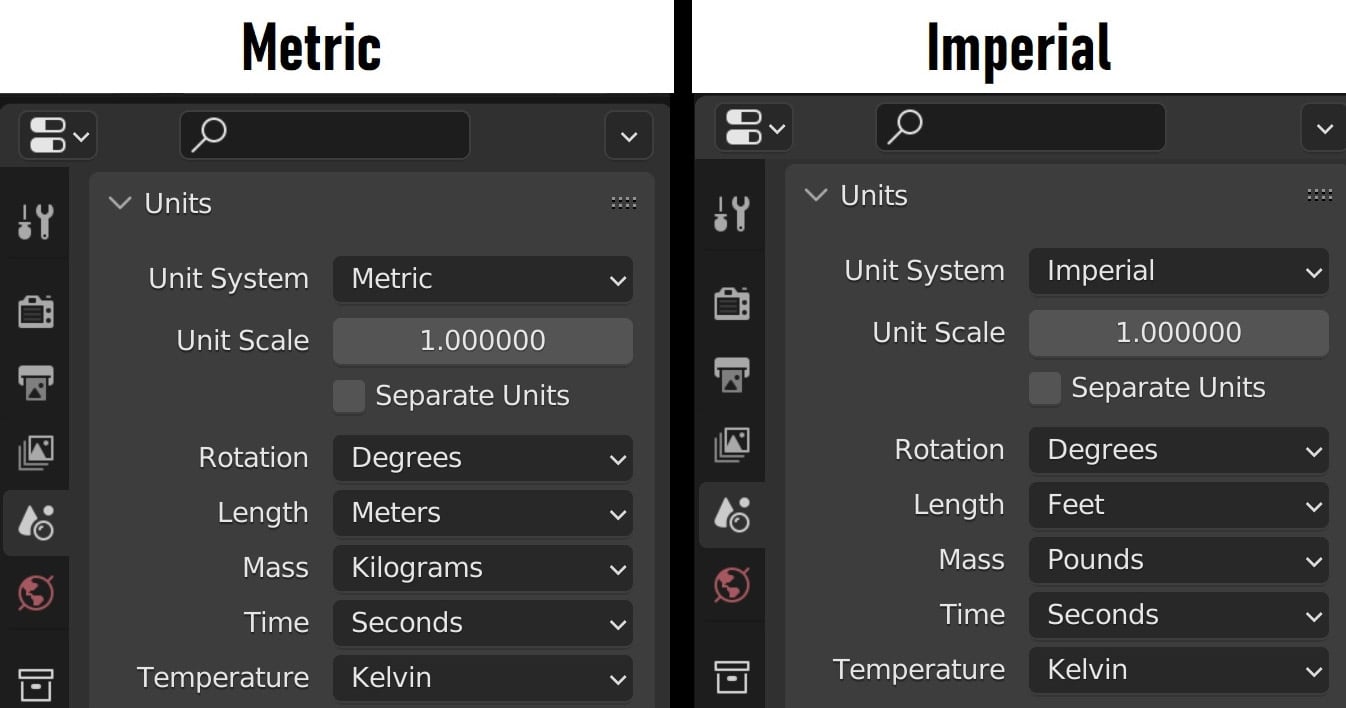
Figure 1.2 – Blender scene properties units system
Choosing Metric will measure the length in meters and mass in kilograms, unlike Imperial, which will measure the length in feet and mass in pounds. This is the right way to set real-world measurements in Blender.
Another good reason to always use a real-world scale is because of how physics simulation works in Blender. Physics in Blender, such as gravity, rigid body, and mass, relies on real measurements to work properly.
To emphasize this even more, let’s create a sphere; by default, the sphere will be 2 meters in diameter. Next, we go to Physics Properties, and we click on Rigid Body while making sure the sphere is selected. Under the Settings tab, you’ll see that Mass is set to 1 kg by default. This means that the 2-meter diameter sphere you’ve just created has a weight of 1 kg.
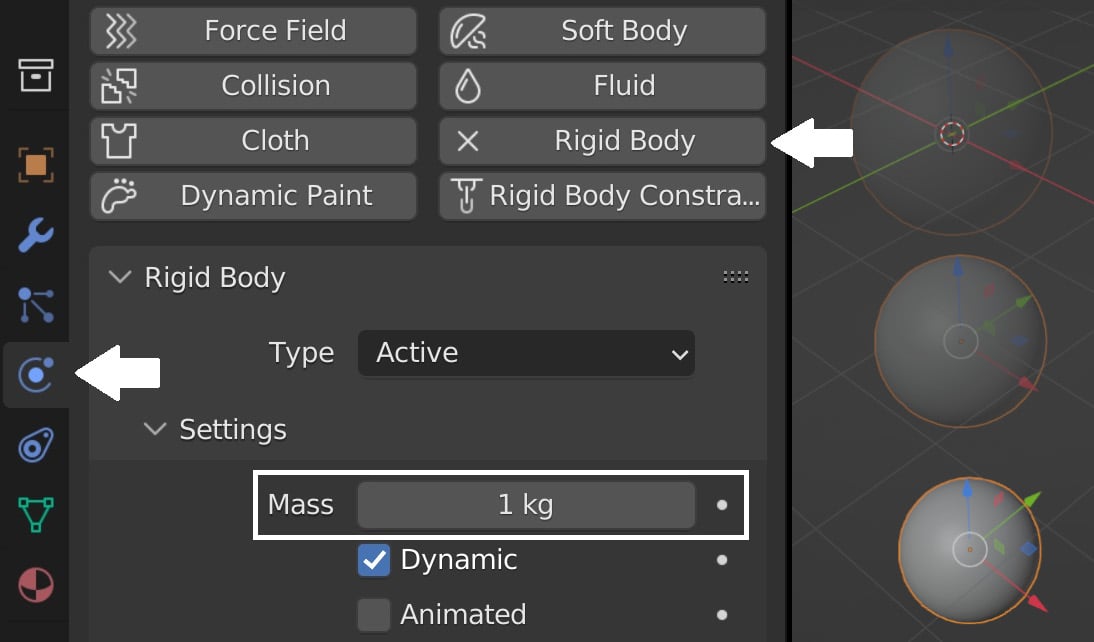
Figure 1.3 – Blender physics properties
Now, if you press the spacebar, the physics simulation will start. Our sphere will fall down due to gravitational force. If we change the scale of our sphere to something around 0.2 meters and give it a weight of 4.5 kg, our sphere will behave exactly like a bowling ball. Similarly, if we scale down our sphere diameter to 5 cm and a weight of 170 g, our ball will act like a billiard ball.
The bottom line is, always use a real-world scale: it’s crucial for achieving photorealistic results that match reality.
Now that we have seen the importance of using real-scale measurements when modeling, let’s learn scale matching. It’s an awesome trick that allows us to get almost the exact camera settings from an image reference, so that we can then easily recreate the scene in Blender.
Learning scale matching using fSpy
Next, let’s learn scale matching. To put things in perspective, let’s say you have a real reference that you want to replicate as a 3D scene. You can load it as a camera background, and start modeling it, but soon enough, you will encounter a big challenge, which is to match the same position, rotation, and focal length of the camera that took the shot.
You can see in this example the difficulties in matching the same log cabin reference:
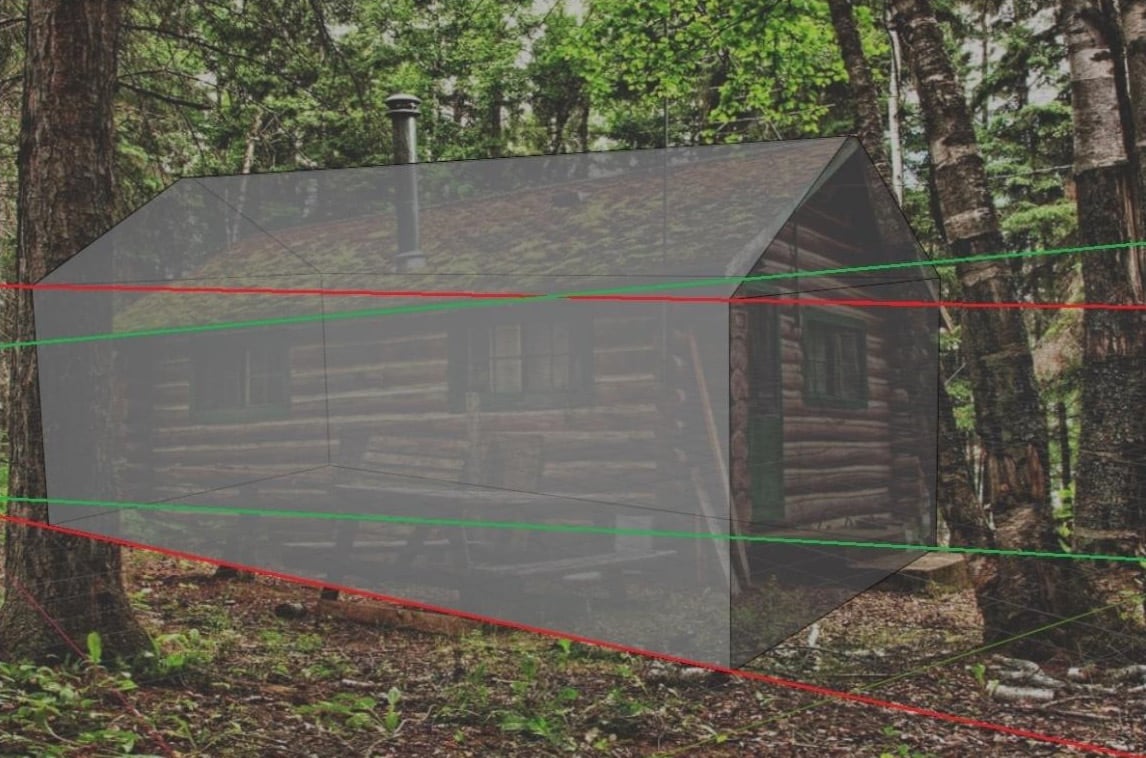
Figure 1.4 – Wood cabin model not matching the reference
Our objective is to place the modeled cube exactly on top of the cabin reference (the red lines must be on top of the green lines). The corners must match each other in order to have true camera matching; doing it by eye won’t cut it, so we need to do it the right way.
Luckily, we have fSpy, which is a free open source software program that allows us to estimate the camera parameters from an image reference and import it into Blender.
The way it works is as follows: you import the reference image whose camera settings you want to match, and you choose the number of vanishing points; you will find this feature on the top left side panel of the fSpy program.
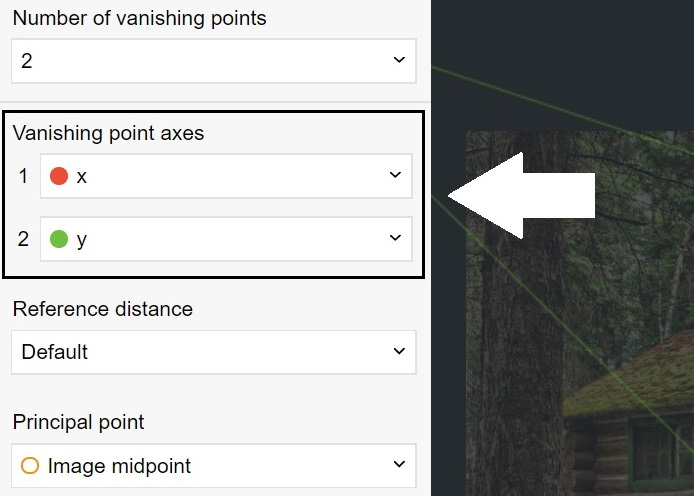
Figure 1.5 – Vanishing point axes in the fSpy interface
Basically, the number vanishing points depends on the type of reference you’re using:
- One vanishing point: This means that your reference has a point where all lines meet. If you follow any parallel lines in the reference, they will end up meeting at one point.
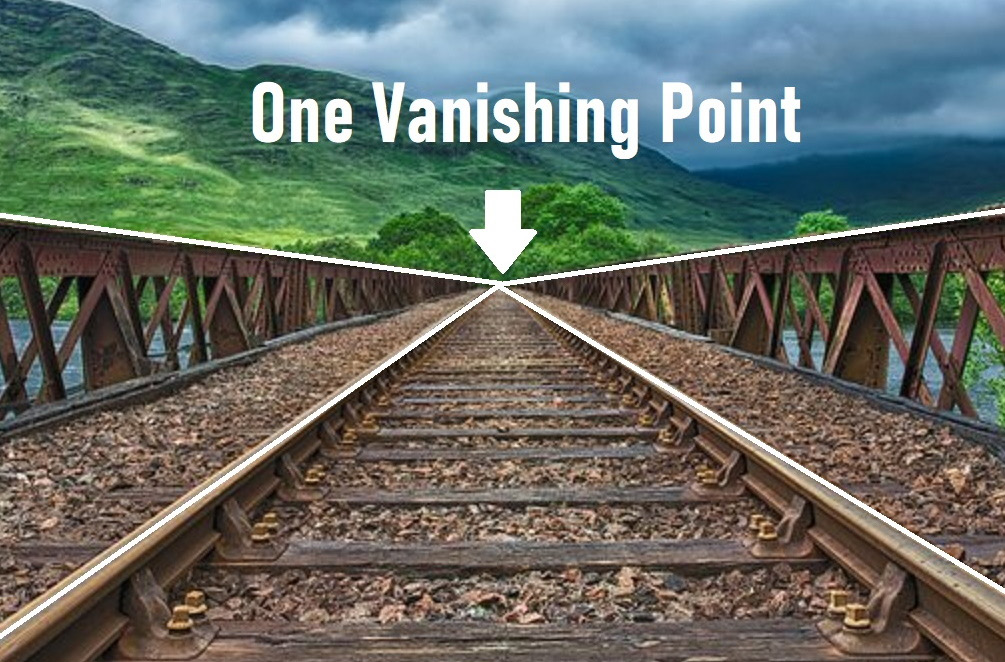
Figure 1.6 – Example of one vanishing point reference
- Two vanishing points: You can use two vanishing points in case there are two kinds of parallel lines in your reference, with each side seemingly slowly fading away into distance; they will meet at a certain point in the distance. An example would be something like this:
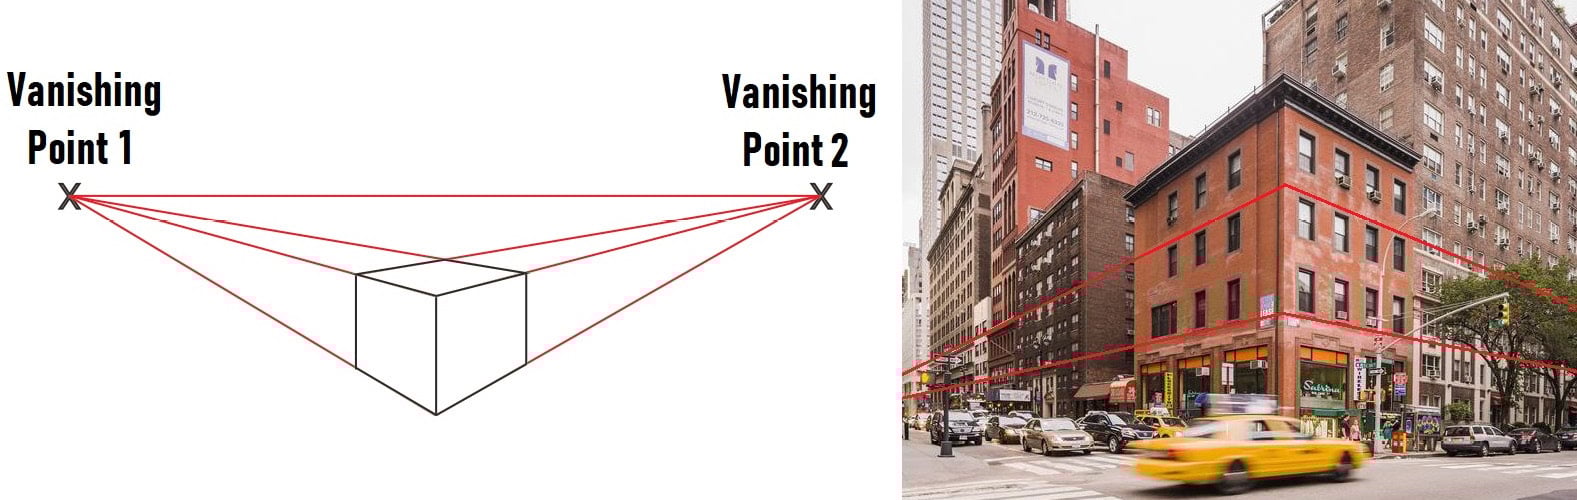
Figure 1.7 – Example of two vanishing points
The camera parameters are as follows: focal length, rotation, and position of the camera.
In our case, we will be using a wood cabin reference that has two vanishing points; you can tell this by following the wood lines on both the front and side faces of the cabin. You can download this image from GitHub at https://github.com/PacktPublishing/3D-Environment-Design-with-Blender/blob/main/Wood%20Cabin%20Reference.jpeg
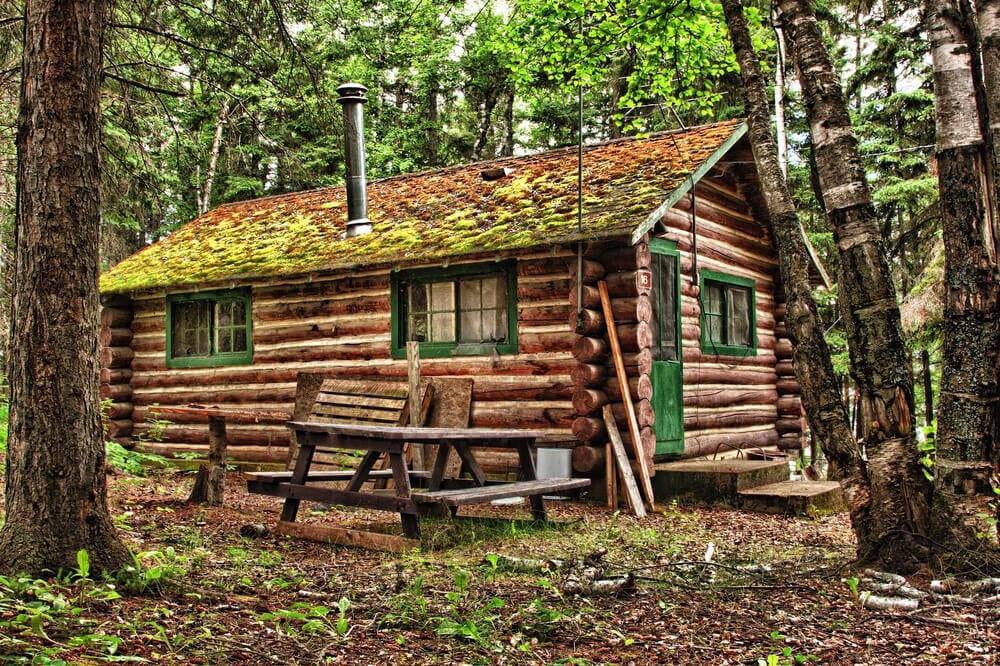
Figure 1.8 – Wood cabin reference
Alright, now let’s start using fSpy.
Downloading fSpy
First, let’s download fSpy. You can google fSpy or use this official website link: https://www.fspy.io.
Once on the webpage, we will do the following:
- Click the green Download button.
Figure 1.9 – fSpy download button
You will be directed to GitHub.
- Under Assets, we will be downloading the
fSpy-1.0.3-ia32-win.zipfile, which is 47.2MB Unzip it, and double click on the fSpy icon. - Inside the program interface, on the top bar, go to File -> Open Image.
- Choose the image reference shown in Figure 1.8.
If done right, this is what you will get:
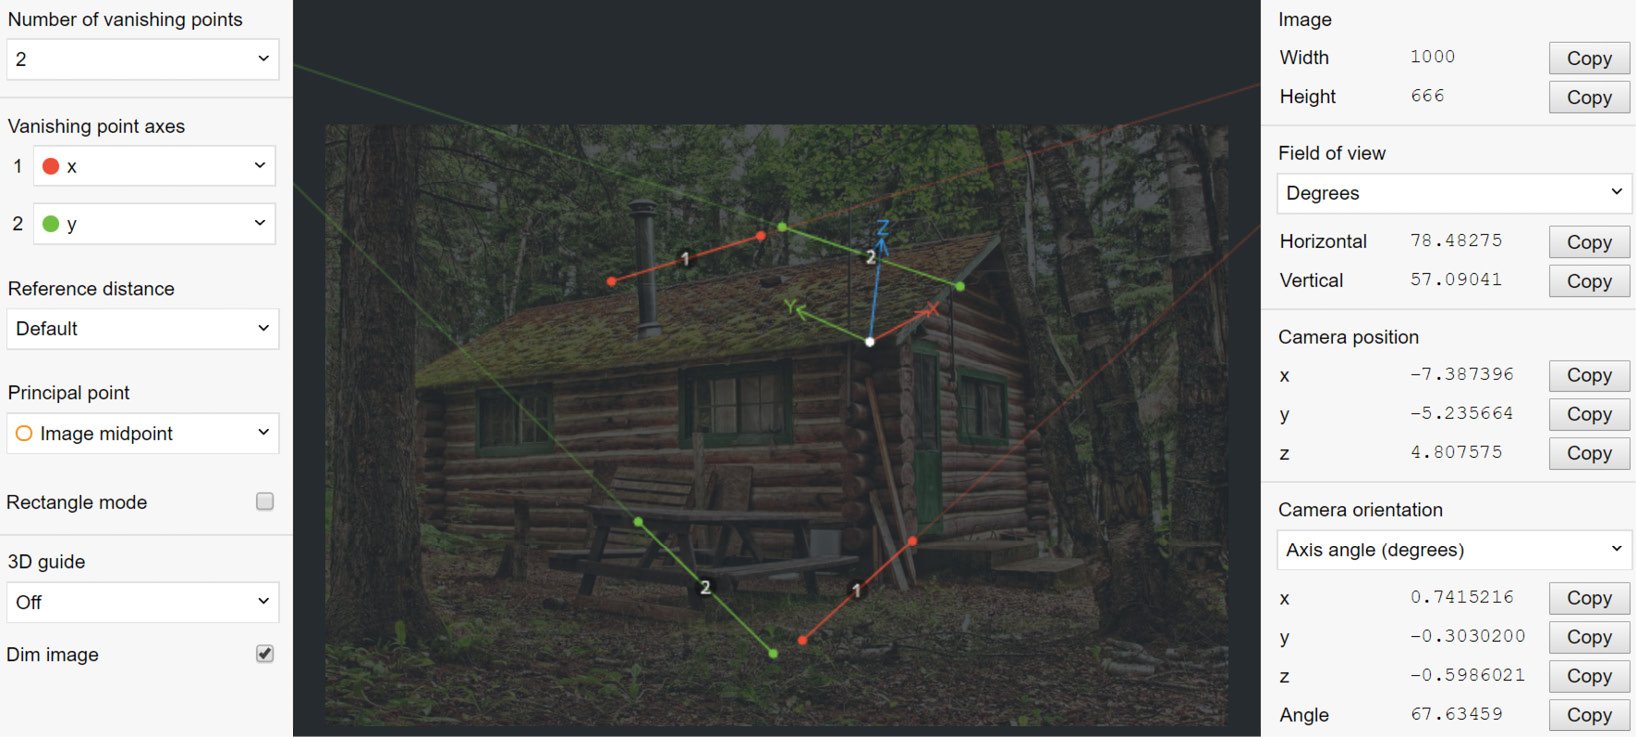
Figure 1.10 – Wood cabin reference loaded into fSpy
After downloading fSpy, put our image reference into it and set the x and z axes to match our reference lines. Now, it’s time to understand the fSpy interface and how we can manipulate it to get the best results.
Breaking down the fSpy tools
Alright, let’s get to work on using the fSPy tools:
- Make sure you’re using two vanishing points; you will find this feature on the top left side panel (see Figure 1.5).
- Make the image reference clear, then on the left side, down below, uncheck the Dim image box.
- On the left panel, switch the y axis to the z axis to get the vertical proportion of your reference.
- Align the x and z axes with the most obvious lines in our reference.
In our case, we can rely on the wood lines and roof. Make sure the lines you choose are far away from each other; this will allow the fSpy to caliber the scene much better.
The final result should be as follows:
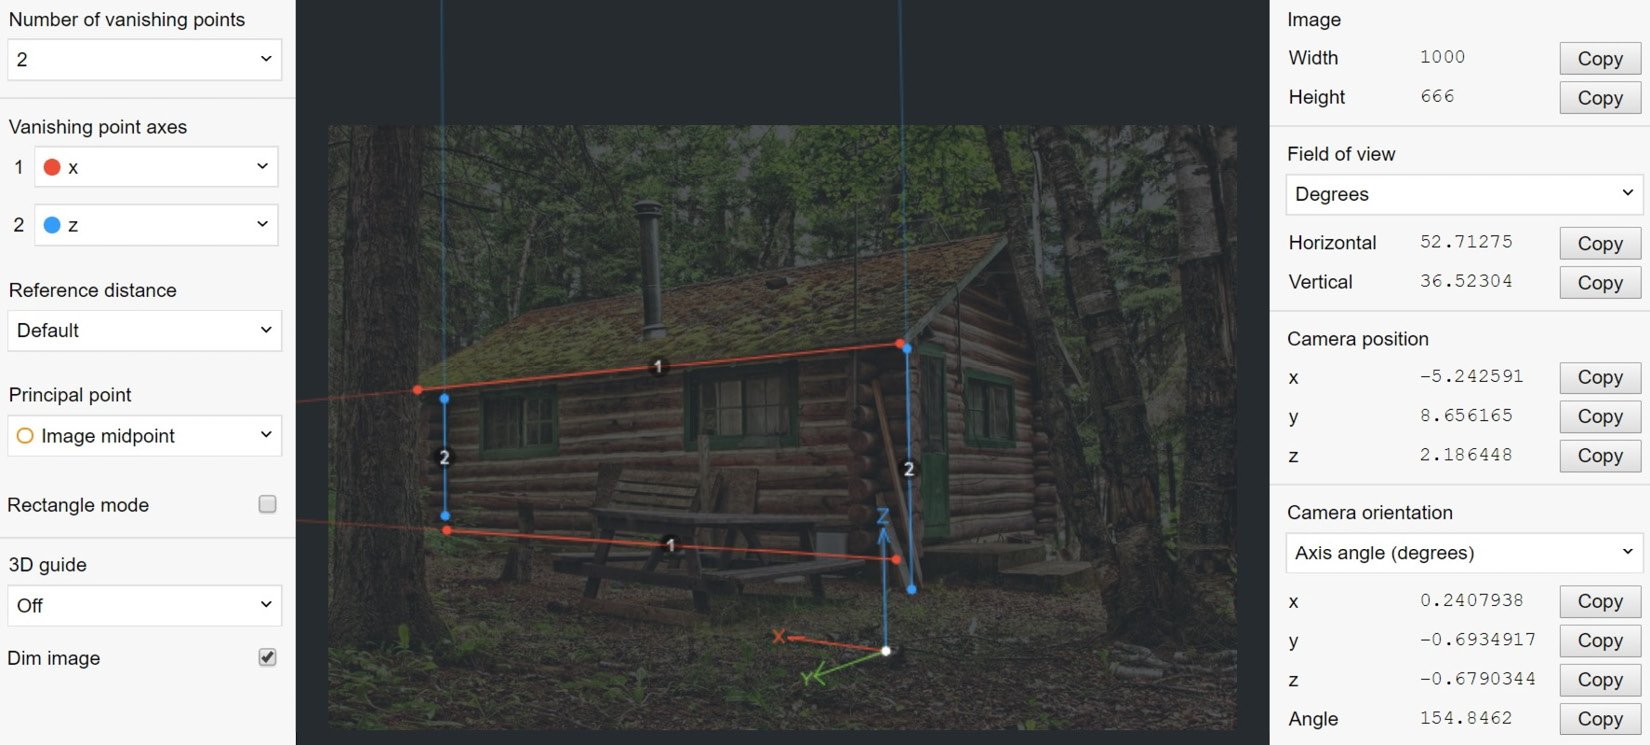
Figure 1.11 – fSpy vanishing point axes aligned with the reference lines
Sometimes the focal length generated by fSpy won’t be accurate, so you have to tweak it a little bit manually – it’s really easy to do so.
Adjusting the focal length
To adjust the focal length, perform the following steps:
- On the left panel, change Principal point to Manual. By default, Principal point will be set to Image midpoint. As soon as you change it to Manual, a yellow point will appear in the middle of your reference.
- If you grab it and move it a little bit, you will change the focal length of your camera. You will see that on the right panel under the Field of view tab, beside the Horizontal value:
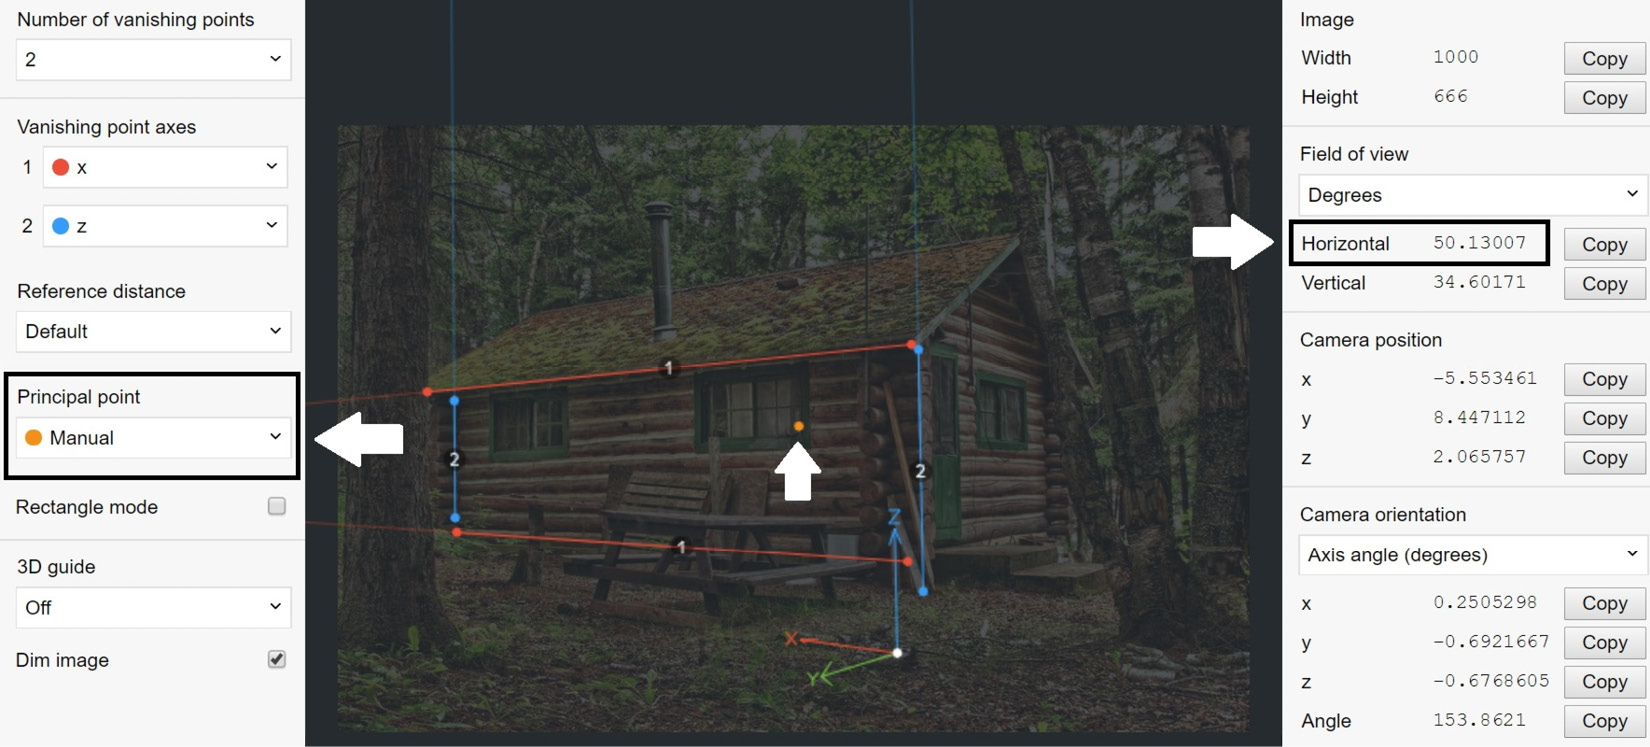
Figure 1.12 – Changing the focal length settings in fSpy
Alright, now let’s save this project: go to File then click on Save As and save the fSpy file to your desktop.
Exporting the fSpy file
Now, let’s export this fSpy file into Blender. To do that, we must install an addon that allows us to do this.
The addon is available at this GitHub link for download: https://github.com/PacktPublishing/3D-Environment-Design-with-Blender/blob/d71de483c88180ac12dc0e6738ce3a7425b00389/chapter-1/fSpy-Blender-Addon.zip.
Once you download the fSpy-Blender-Addon.zip file, make sure to not unzip this file.
Once you get the addon zip file, we can now jump into Blender and install it. So, in our Blender interface, click on Edit -> Preferences, click on Add-ons on the middle left side, then on the top right, click on Install and choose the fSpy-Blender-Addon.zip file. Then you should see a message below saying that the module is installed. Also make sure that you enabled the fSpy addon box Import-Export: Import fSpy project.
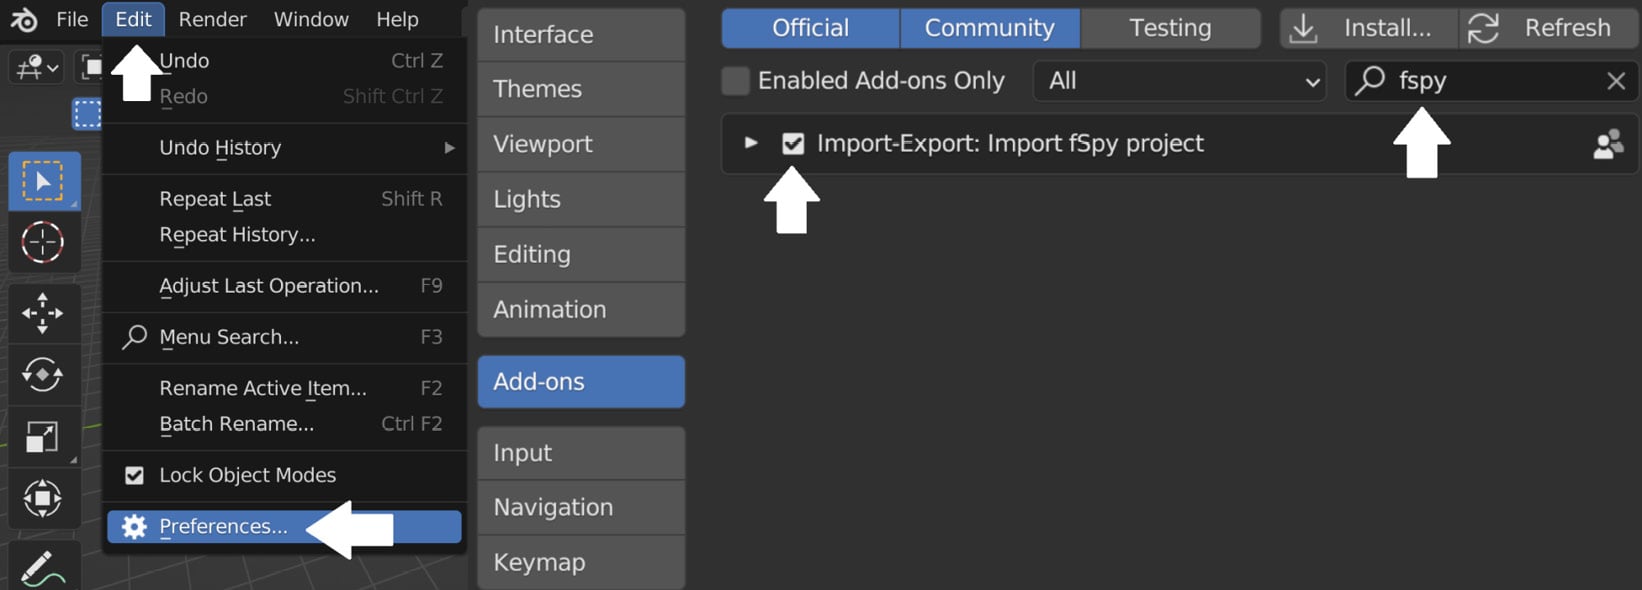
Figure 1.13 – Installing the fSpy add-on in Blender
Alright, now let’s import the fSpy file we created with the fSpy program. If you follow the previous steps, when you go to File and Import, you will see that you have the possibility to import fSpy files into Blender. Just click on Import and choose the fSpy file we created earlier, then you will see the following:
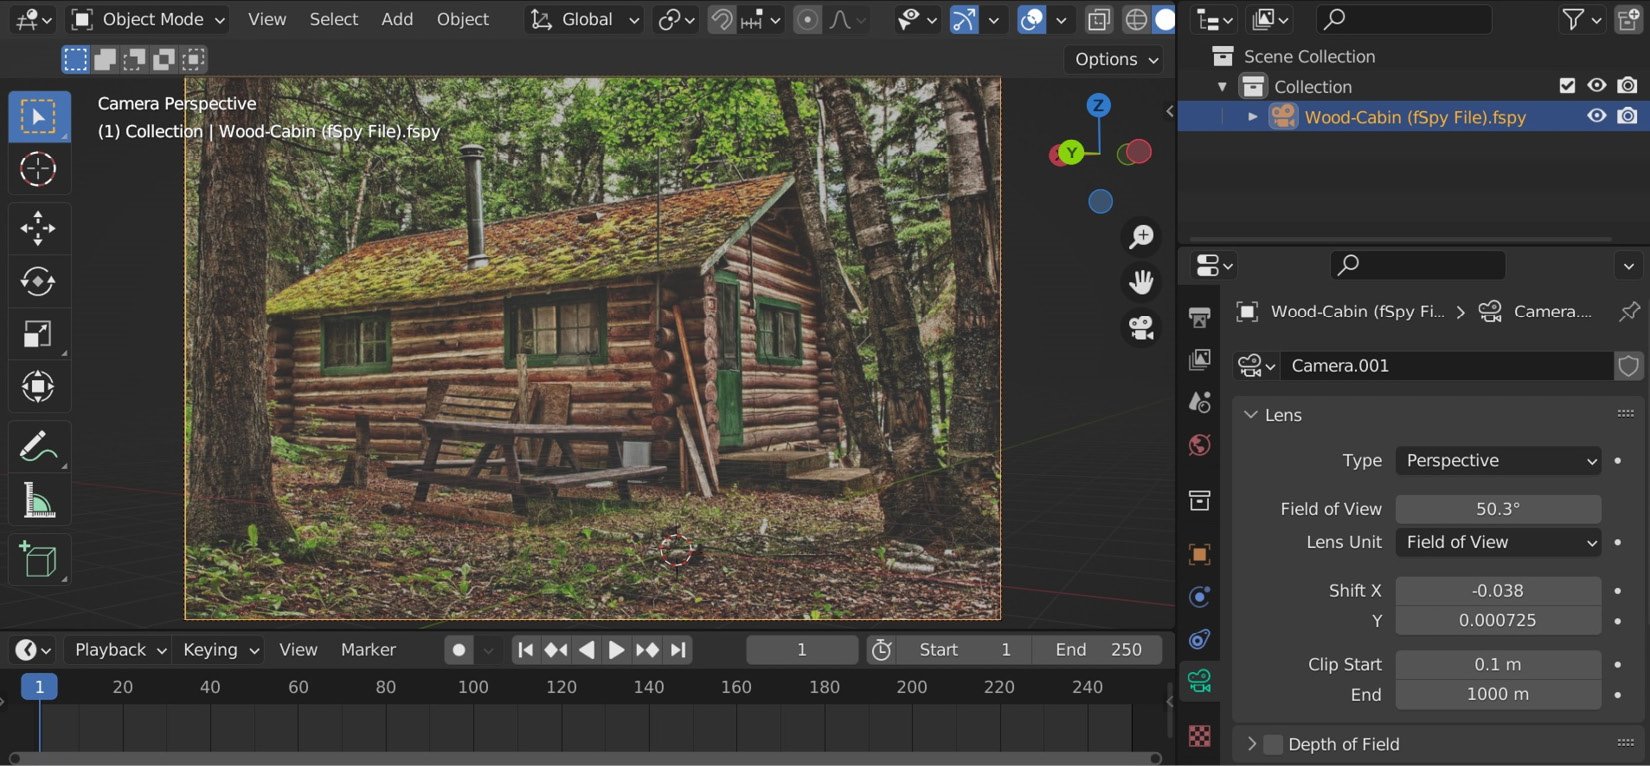
Figure 1.14 – Importing the wood cabin fSpy file into Blender
This is the benefit of using fSpy; now we have camera settings that match those of our photographer who took this shot. The same camera focal length, camera position, and rotation has been replicated. From now on, we can go and start building our scene.
Building our scene
First, let’s exit the camera view; you can do so by pressing the number 0 on the numpad.

Figure 1.15 – First three steps to creating the wood cabin scene
We begin by making a ground plane (1) and adding a simple cube (2), making sure it’s on the top of the grid.
Place the cube on the corner of the cabin reference:
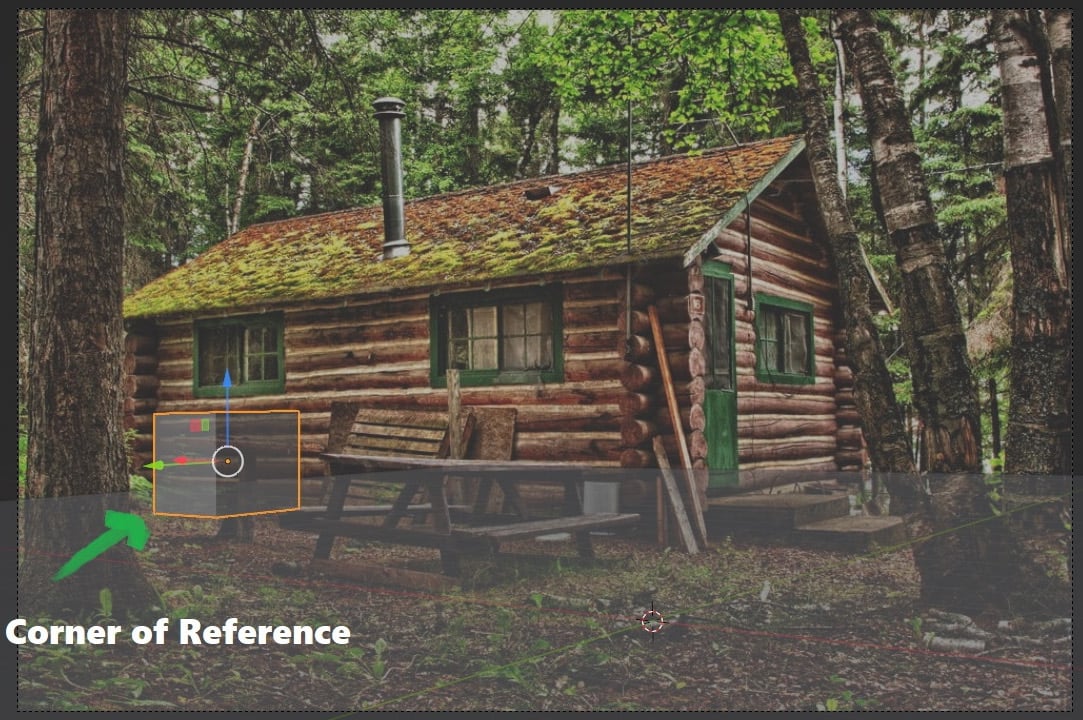
Figure 1.16 – Putting the modeled cube in the corner of the reference
Placing the cube on the corner of the cabin reference will allow you to get the right start. Otherwise, you will be stuck not knowing where to put the initial cube. Another note is to move the cube only along the x and y axes; we need to keep it on the floor.
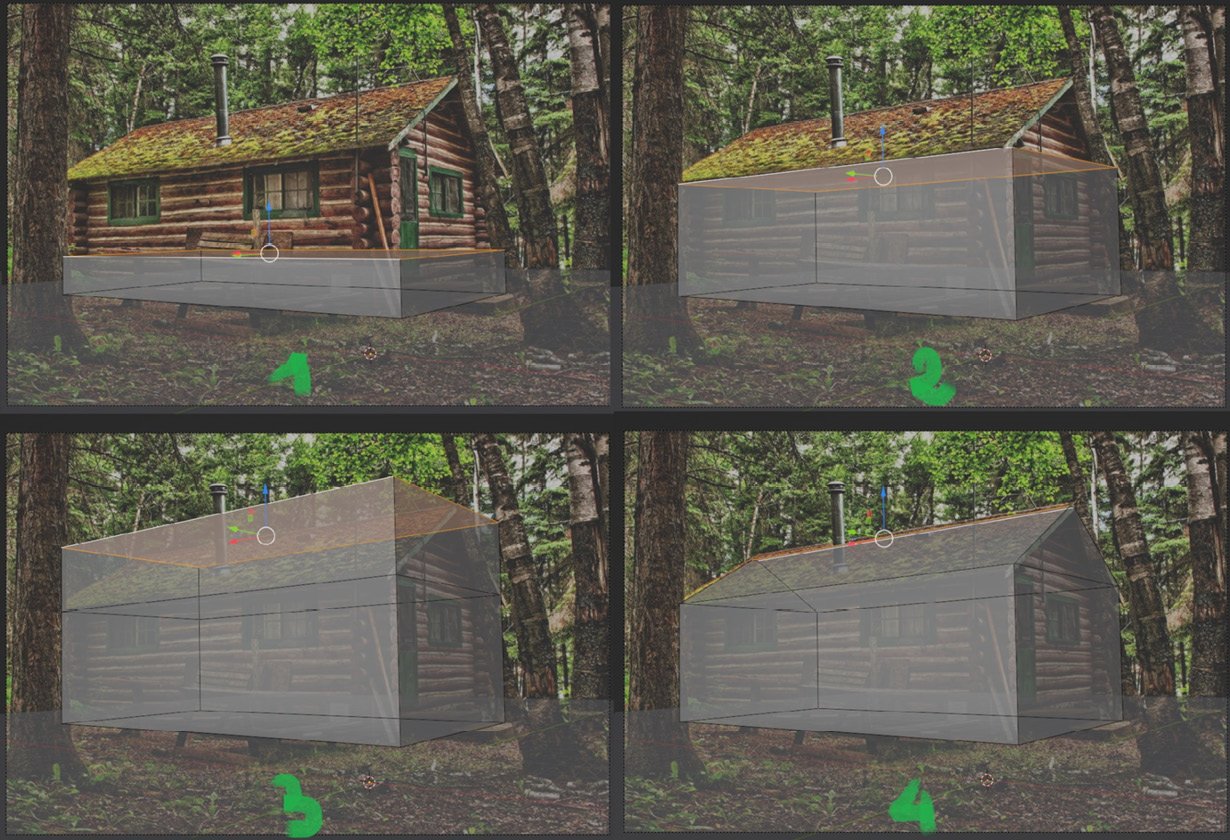
Figure 1.17 – Four steps to model the wood cabin in Blender
Next, we can proceed and create the basic shape of the wood cabin that we have in our reference:
- Select the cube and enter edit mode (press Tab to toggle between edit and object mode).
- In edit mode, select the front face, and move it to cover the length of the cabin wood. Also, align the backface with the back of the wood cabin reference.
- Select the top face and move it upward until it reaches the beginning of the roof.
- Press E to extrude it more upward until it reaches the top of the reference.
- You can scale it on the y axis to make that
Ashape.
As you can see, we will now have a perfect match to our reference image:
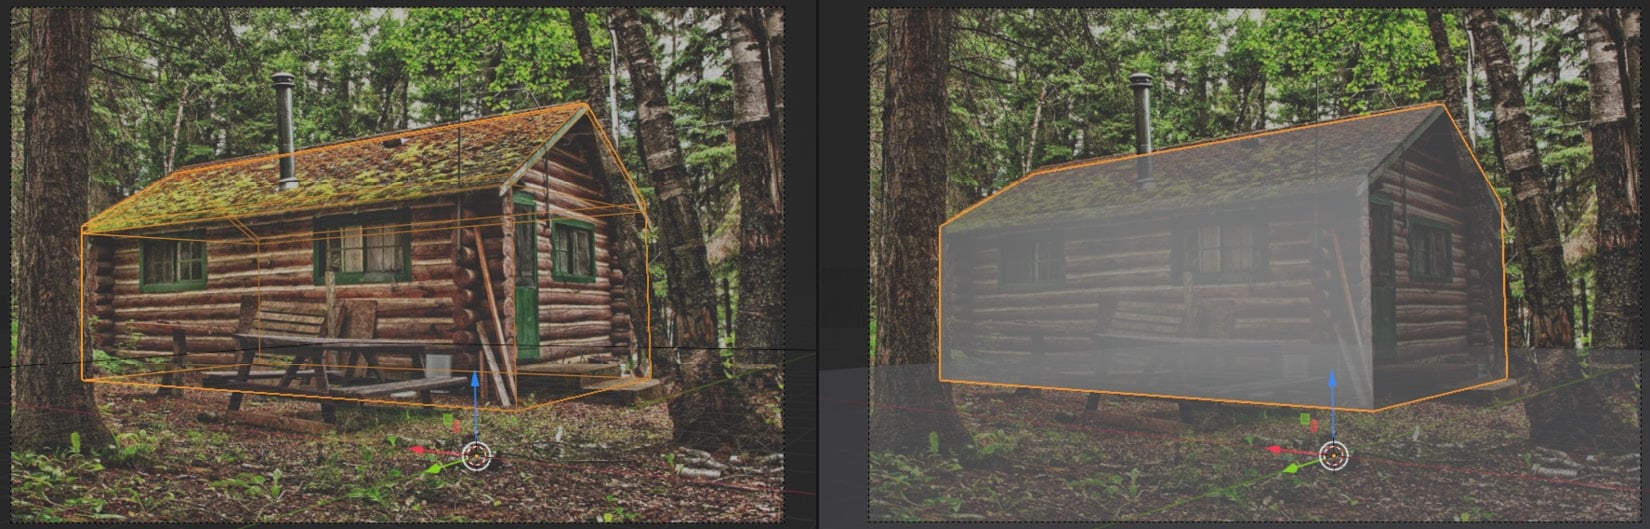
Figure 1.18 – The final result of the modeled wood cabin
Also, make sure that you are using the measurements we set earlier; to do so without distorting the camera angle, make sure that you scale everything up one at a time, the camera included.
Now that we have finished matching the same scale of our reference and made a simple wood cabin, you can see the beauty of scale matching; our camera settings in Blender now perfectly match the camera settings used to take the reference image. Both have the same focal length and rotation. This is an excellent start to achieving a photorealistic result.
Next, we will cover one of the most fatal mistakes that prevents most 3D designers from achieving photorealism: forgetting the bevel modifier.
The importance of using the bevel modifier when modeling
One of the fatal mistakes that most 3D designers commit that prevent them from achieving photorealistic results is modeling without using the bevel modifier. Let’s see a quick example in Blender to emphasize this theory.
Bevel modifier
The bevel modifier gives you the ability to bevel the edges of the mesh it is applied to. Basically, it adds edge lines in between the mesh corners (see Figure 1.17). It might seem like a simple step, but the effect the bevel modifier has is enormous for achieving photorealism; we’ll see that later.
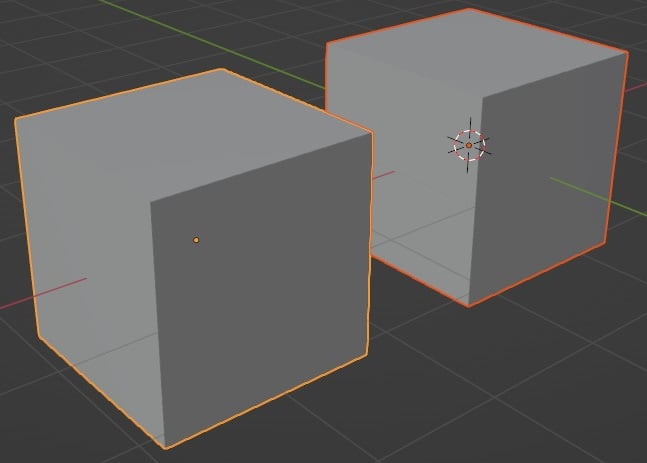
Figure 1.19 – Creation of two cubes
For our example, let’s use two cubes, one with the bevel modifier applied to it (red cube) and another without any beveling (blue cube). To apply beveling to the red cube, let’s perform the following steps:
- Go to Modifier Properties (wrench icon), select Add Modifier, and choose the Bevel modifier:
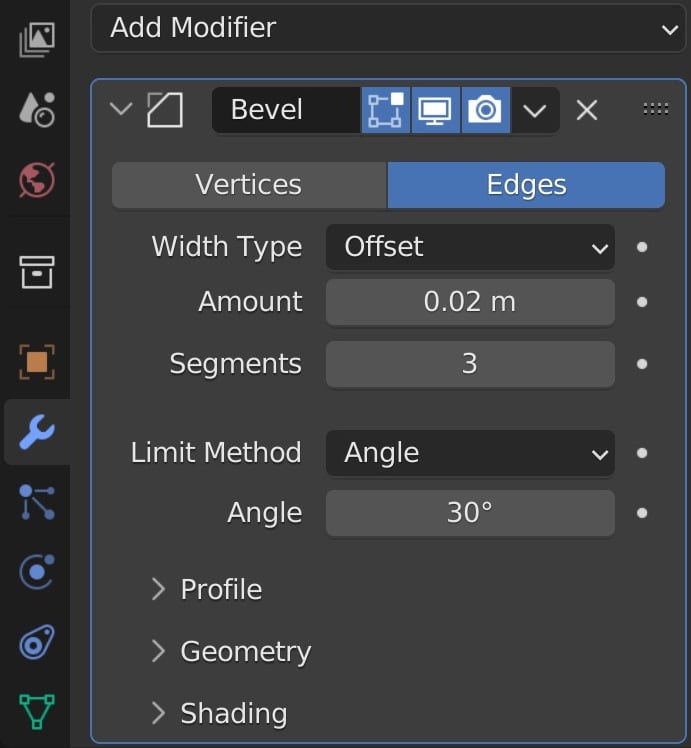
Figure 1.20 – Bevel modifier settings in Blender
- Set Amount to
0.02 m; this represents how large we’re going to be affecting the corners of our cube object. Basically, the one corner edge we got by default will be divided into two edges, and the distance between the two edges is the bevel amount. - Set Segments to
3; this indicates how many face loops there are going to be inside the bevel. - Select the beveled cube, then right-click and choose Smooth.
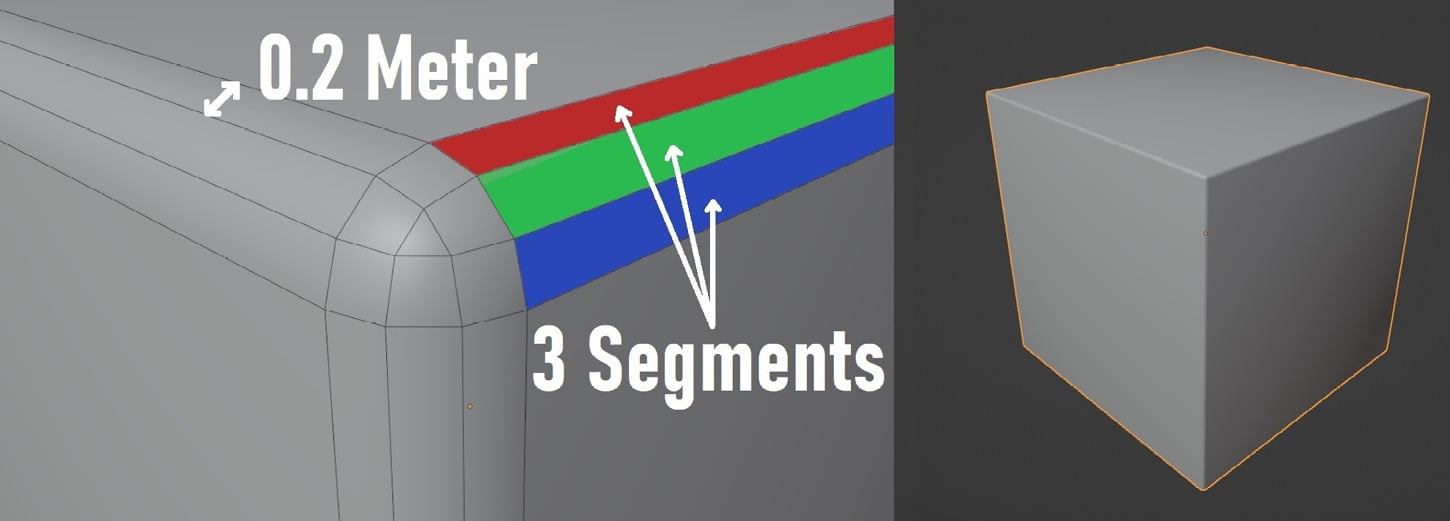
Figure 1.21 – Three cubes demonstrating the Amount, Segments, and Smooth bevel settings
The other cube will remain as default: no beveling will be applied.
When you add a source of light to the scene, you will see a big difference between the two cubes:
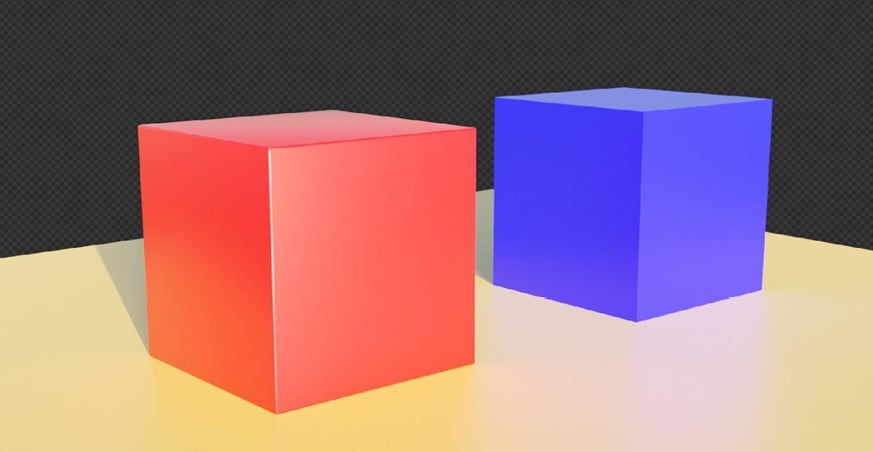
Figure 1.22 – Final render of the beveled and unbeveled cubes
The red beveled cube reflects light on its corners, which makes it more realistic. On the other hand, the blue cube looks fake right on the spot: its edges are 100% sharp and non-realistic.
In general, 3D software programs like Blender make everything perfect by default. When creating a cube, for example, it will come with these sharp 90-degree corners, something that doesn’t exist in real life. In nature, you’ll never find an object that has completely sharp edges. Even if you zoom in on a sharp knife (zoom really close to its edge), you’ll find some sort of beveling.
I’ve heard a saying that says, “Imperfection is the CGI perfection,” which means that in order to make objects photorealistic, we have to break the perfection that comes with CGI, and one of the first steps to break it is to always apply the bevel modifier.
Now with the measurements we set earlier and the help of the fSpy, we can set the right scale.
Summary
In this chapter, we went through the three modeling mistakes and how to fix them. Starting with scale matching, we discussed why it’s a bad habit to rely on eyes only when modeling, how the Blender unit system works, and how to set the right measurements of objects before modeling them.
Next, we installed and configured the open source fSpy to help us match the same proportions of a real wood cabin reference, following which we learned how to install the fSpy add-on and import the fSpy file into Blender and built the basic scene that resembles the real reference scale.
Finally, we discussed the importance of using the bevel modifier and why it’s crucial to achieving photorealism.
In the next chapter, we will be covering the second building block for photorealism, which is the creation of PBR materials. We will break down the components of PBR materials and understand the role of each channel and how it works. Finally, we will create an example of realistic wood material in Blender using procedural texturing.
