In this chapter, we will cover:
Applying basic settings in General Setup
Identifying and assigning interfaces
Configuring the WAN interface
Configuring the LAN interface
Configuring optional interfaces
Enabling the Secure Shell (SSH)
Generating authorized RSA keys
Configuring SSH RSA key authentication
Accessing the Secure Shell (SSH)
PfSense is an open source operating system used to turn a computer into a firewall, router, or a variety of other application-specific network appliances. PfSense is a customized FreeBSD distribution based on the m0n0wall project, a powerful but light-weight firewall distribution. PfSense builds upon m0n0wall's foundation and takes its functionality several steps further by adding a variety of other popular networking services.
This chapter covers the core settings needed for almost every pfSense deployment; whether that is a firewall, router, or even a wireless access point! Once pfSense is installed and configured according to the recipes in this chapter, you will have a fully-operation firewall plus router. At its most basic level, a pfSense machine can be used to replace the common home router when more functionality is desired. In more advanced configurations, pfSense can be used to establish a secure tunnel to a remote office, load-balance a web farm, or shape and prioritize all network traffic just to name a few example scenarios. There are literally hundreds of ways to configure and customize a pfSense installation.
Once pfSense is installed, there are two ways to access the system remotely—SSH and the WebGUI. An SSH connection will present you with the same low-level system menu that you would see on the screen if your machine is connected to a monitor. The SSH menu options are basic and very little configuration is done here. The entire configuration described in every recipe in this book is done through the WebGUI interface, unless specified otherwise, which is accessible through the IP address of any interface you configured during installation (such as 192.168.1.1).
This recipe describes how to configure the core system settings in PfSense.
All that's required for this recipe is a base installation of pfSense and access to the WebGUI. Some of these settings will have been configured during the installation process, but can be modified here at any time.
Browse to System | General Setup.
Enter a Hostname. This name will be used to access the machine by name instead of the IP address. For example, we can browse to
http://pfsenseinstead ofhttp://192.168.1.1:
Enter your Domain:

DNS Servers can be specified here. By default, pfSense will act as the primary DNS server and these fields will be blank. However, other DNS servers may certainly be used. Please refer to the Specifying alternate DNS servers recipe in Chapter 2, Essential Services for more information.

Check Allow DNS server list to be overridden by DHCP/PPP on WAN. This ensures that any DNS requests that can't be resolved internally are passed on and resolved by the external DNS servers provided by your ISP.

Enter a Time zone and leave the default NTP time server as 0.pfsense.pool.ntp.org.

I'd recommend the default Theme, pfSense 2.0's new pfsense_ng. The top menus are now static and won't disappear if you scroll down through the content of the page, a great addition to the UI.

This recipe describes how to identify a network configuration and assign the appropriate interfaces in pfSense.
You'll need to identify the MAC address for each Ethernet port on your pfSense machine before attempting to assign interfaces.
Access the console from the physical machine or enable SSH and connect remotely (see the Enabling the Secure Shell (SSH) recipe for details).
The home screen will display a list of interfaces, network ports, and IP addresses:

Choose option 1 to Assign Interfaces.
Skip setting up VLANs for now. See the Creating a Virtual LAN recipe in Chapter 5, Essential Services for more information.
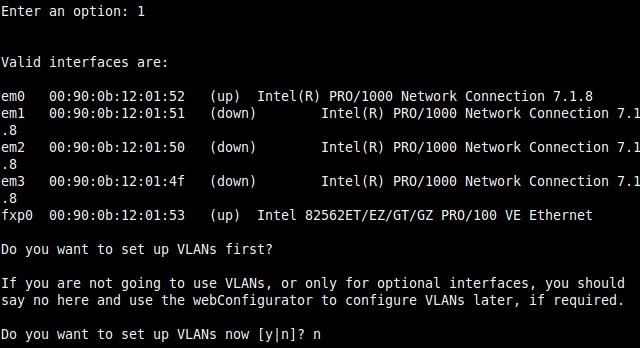
Assign each interface to the interface of your choice by matching the MAC address to the interface address on the display:

pfSense, like any other computer operating system, references each NIC by some unique value (fxp0, em0, em1, and so on). These unique identifiers are often associated with the driver being used and make it easier for us humans to use than the associated MAC address (00:80:0c:12:01:52). Taking that concept a step further, an interface is simply a named placeholder for each port: fxp0=WAN, em0=LAN, em1=DMZ, and so on.

This recipe describes how to configure the Wide Area Network (WAN) on the external interface of our firewall.
The WAN interface is your connection to the outside world. You'll need a properly configured WAN interface (as described in the previous chapter) and an Internet connection. In this example, a cable modem provides the Internet connection from our local Internet Service Provider (ISP), but pfSense will support every other major connection method.
Browse to Interfaces | WAN.
Check Enable Interface.
Choose an address configuration Type.
Leave MAC address blank. Manually entering a MAC address here is known as "spoofing". Your ISP has no way of verifying MAC addresses, so you can simply make one up. This can be helpful if you're trying to force your ISP to hand you a new IP address or a different set of DNS servers.
Leave MTU, MSS, Hostname, and Alias IP address blank.

Check Block private networks. This setting is usually only checked on a WAN interface.
Check Block bogon networks. This setting is usually only checked on a WAN interface.
Save changes.

We must first establish our connection to the Internet before we can configure pfSense to allow our other networks to access it. The example we've performed is typical of many SOHO environments. By placing our firewall as the only machine with direct access to the Internet, we are securing our environment by establishing complete control over the traffic that flows in and out of our networks. All traffic must now pass through our firewall and abide by our rules.
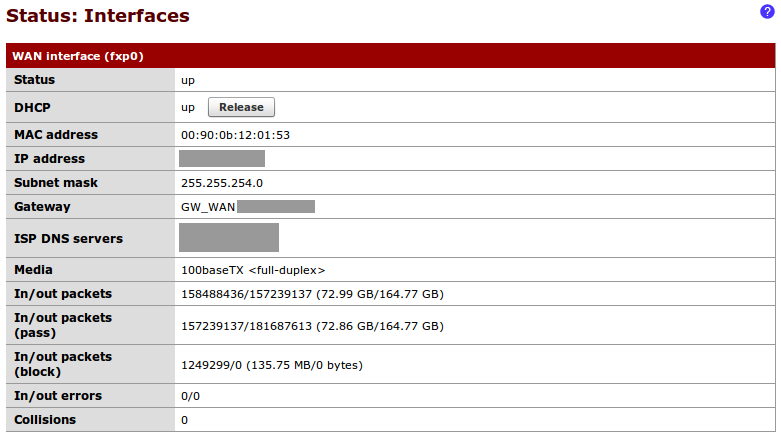
We can now connect our WAN device (cable modem) to the WAN Ethernet port we've defined on our pfSense box. Once the connection has been established, we can check the status of our WAN port from Status | Interfaces:
This recipe describes how to configure the Local Area Network (LAN) internal interface of our firewall.
The LAN interface is used to connect your devices to a secure internal network. A properly configured LAN interface is required.


You've just defined your first internal network. If you've been performing the recipes in order, you've now met the minimum requirements for a fully-functioning firewall! You've defined one external network (WAN) and one internal network (LAN). You can now define the rules and relationships to regulate traffic between the two.
You can now connect a switch to the LAN interface on your pfSense machine. This will allow you to connect multiple computers to your LAN network.
This recipe describes how to create and assign optional network interfaces to our firewall.
The optional network you'll create in this is example is commonly referred to as a DMZ. The idea is taken from the military concept of a de-militarized zone, in which some traffic is allowed to pass and some traffic isn't. The idea is that the area is controlled and clearly separate from your other areas. When applied to networking, a DMZ network follows this pattern:
Internet Traffic | ← DMZ ← LAN Traffic
Unsafe Internet traffic is allowed to enter the DMZ, to access a webserver for example. LAN traffic can also enter the DMZ; it wants to access the webserver too. However, the key lies in the last rule—no DMZ traffic is allowed to enter the LAN.
The DMZ network is our less secure network we'll allow certain external access to. To configure a DMZ, or any other optional network, we'll need an available interface.
Browse to an available interface, Interfaces | OPT1.
Check Enable Interface.
Set Description to DMZ.
Choose an address configuration Type, Static for our example.
Enter an IP address and the subnet mask. We'll use 192.168.2.1 and select 24 from the drop-down list.
Leave Gateway set to None.

Ensure Block private networks and Block bogon networks are unchecked.
Save the changes.

Apply changes.
Your DMZ network will allow external (WAN) access. Your DMZ will also allow access from the LAN, but it won't be permitted to send traffic to the LAN. This will allow devices on the Internet to access your DMZ resources (websites, e-mail, and so on) without being able to access any part of your private LAN network.
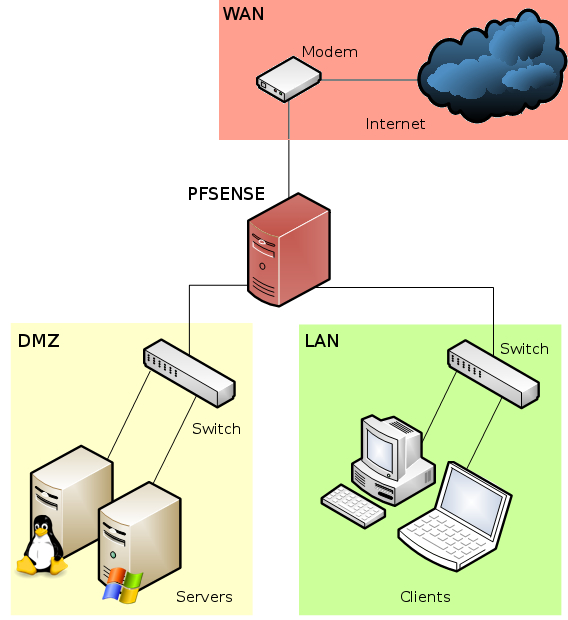
You could now attach a switch to your DMZ interface to connect multiple machines. If you've been following these recipes in order, a diagram of your network would look something like this:
This recipe describes how to enable the Secure Shell (SSH) service in pfSense.
SSH is a networking protocol that allows encrypted communication between two devices. Enabling SSH allows secure access to the pfSense console remotely, just as if you were sitting in front of the physical console.
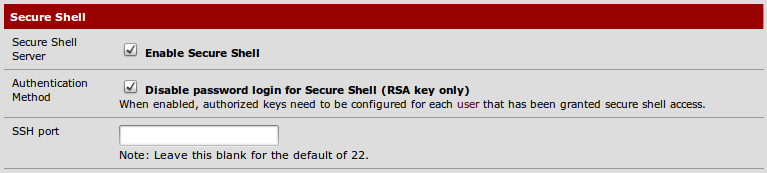
Browse to System | Advanced | Secure Shell.
Check Enable Secure Shell.
You will be prompted for credentials when you connect (use the same username and password as the webGUI), but checking Disable password login for Secure Shell will allow you to use RSA keys instead. See the next recipe for details.
Leave the SSH port blank to use the default port:

Save the changes and the SSH service will be started.
Enabling the Secure Shell turns on pfSense's built-in SSH server to listen to requests on the port you've specified (port 22 by default).
Note
Like all pfSense services (unless otherwise noted), the SSH service will listen on every available interface. Like other services, firewall's rules are used to grant or deny access to these services. See Chapter 3, General Configuration for more information on configuring firewall rules.
Changing the SSH authentication method to use RSA keys is a great way to secure access to your system. See the following recipe for details.
Additionally, you can change the port that SSH listens on. Doing so may increase security slightly by reducing the number of unauthorized login attempts, but you will need to remember what you have changed it to, or you will be unable to connect.
The Generating authorized RSA keys recipe
The Creating a firewall rule recipe in Chapter 3, General Configuration
This recipe describes how to create an authorized RSA key so a user can connect to pfSense without being prompted for a password.
Linux and Mac users will need to ensure ssh-keygen is installed on their system (almost all distributions have this installed by default). Windows users will need to download and install the PuTTYGen tool.
Generate an SSH key from a Linux/Mac Client as follows:
Open a terminal and run:
ssh-keygenSave the key to the default location of
/home/user/.ssh/and specify a pass code (optional, but recommended).Your public key is now located at
/home/user/.ssh/id_rsa.pub.
Generate an SSH key from a Windows client using PuTTY as follows:
Open PuTTYGen and generate a public/private key pair by clicking the Generate button.
Enter a passphrase (optional, but recommended).
Click the Save Private Key button and choose a location, such as
C:\MyPrivateKey.ppk.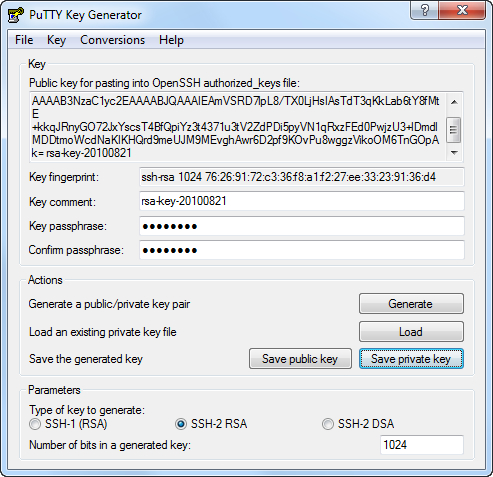
Highlight the public key that was generated in the textbox and copy and paste it into a new file, let's say
C:\MyPublicKey.txt. (Do not use the Save Public Key button, as that adds comments and other fields that are sometimes incompatible.)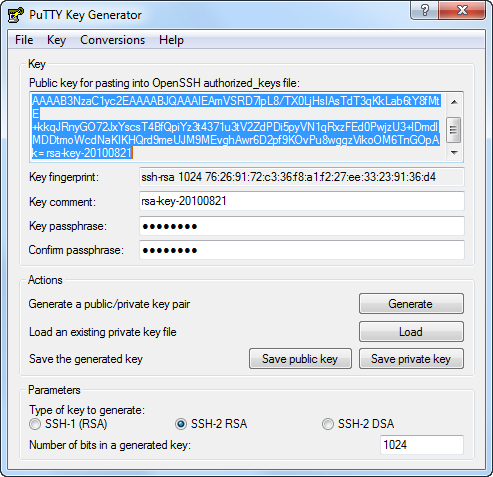
RSA keys have become a standard for securing client/server connections for any service which chooses to take advantage of it. A client generates a key pair—a private key file and a public key file (an optional pass-phrase can be specified for enhanced security). Now, any server administrator can request that client's public key and add it to their system. The client can then securely authenticate without typing in a password.
RSA key authentication is most often associated with SSH access, and is often referred to as SSH keys but that is misleading. RSA keys are generic and not specific to SSH. Although SSH often uses them, RSA keys can be used by any type of service that chooses to support them, such as VPN, VoIP, FTP, and so on.
This recipe describes how to configure pfSense to use an RSA key rather than a password for SSH authentication.
Browse to System | Advanced | Secure Shell.
Check Disable password login for Secure Shell (RSA key only).
Edit the user we will associate with the client's public key from System | User Manager | Edit admin.
Select Click to paste an authorized key and paste our client's public RSA key here. When pasted, the key should appear as a single line. Be sure your text editor didn't insert any line feed characters or authentication may fail.

Save the changes.
When we connect using an SSH client, we won't be asked for a password. Instead, the SSH server will use its copy of the public RSA key to send a challenge that can only be read if you posses the matching private key.
RSA private keys can also be stored encrypted on the client machine. The SSH client will prompt for a decryption passphrase for the private key before being able to use it for authentication with the server.
This recipe describes how to access the pfSense console from any Linux, Mac, or Windows client computer.
SSH must be enabled and configured on our pfSense box. Linux and Mac users will have the SSH client installed by default. Windows users will have to download and install PuTTY.
Connect via SSH from a Linux/Mac client as follows:
Open a terminal window and run:
ssh admin@192.168.1.1If you are using the default configuration, you'll then be prompted for a password.
If you are using RSA key authentication, you'll connect directly or be asked to enter the pass-phrase associated with your key. If you need to specify the location of your private key file, you can use the
-ioption as follows:ssh -i /home/matt/key/id_rsa admin@192.168.1.1If you've configured pfSense to use a different port, you can specify that using the
-poption, as in the following example:ssh -p 12345 admin@192.168.1.1
Connect via SSH from a Windows client with PuTTY as follows:
Open PuTTY and specify your hostname or IP address.
Specify an alternative port if necessary (default is port 22).
If you are using RSA key authentication, browse to your private key file from Connection | SSH | Auth | Private key file for authentication.

You'll connect and be prompted for a username.
You'll then be prompted for a password, or if RSA authentication is used, you'll connect directly or be prompted for your pass-phrase.
SSH allows access to the pfSense console menu from any computer that has an SSH client. You can even access the console from your phone if you install an SSH client on your mobile device.