


In this chapter, we will cover:
Connecting to a database
Getting data from a database
Getting data from a database by providing parameters
Getting data from a database by running a query built at runtime
Inserting or updating rows in a table
Inserting new rows when a simple primary key has to be generated
Inserting new rows when the primary key has to be generated based on stored values
Deleting data from a table
Creating or altering a table from PDI (design time)
Creating or altering a table from PDI (runtime)
Inserting, deleting, or updating a table depending on a field
Changing the database connection at runtime
Loading a parent-child table
Databases are broadly used by organizations to store and administer transactional data such as customer service history, bank transactions, purchases and sales, and so on. They also constitute the storage method for data warehouses, the repositories used in Business Intelligence solutions.
In this chapter, you will learn to deal with databases in Kettle. The first recipe tells you how to connect to a database, which is a prerequisite for all the other recipes. The rest of the chapter teaches you how to perform different operations and can be read in any order according to your needs.
Note
The focus of this chapter is on relational databases (RDBMS). Thus the term database is used as a synonym for relational databases through the recipes.
Through the chapter you will use a couple of sample databases. Those databases can be created and loaded by running the scripts available at the book's website. The scripts are ready to run under MySQL.
For more information about the structure of the sample databases and the meaning of the tables and fields, please refer to Appendix, Data Structures. Feel free to adapt the recipes to different databases. You could try some well known databases; for example Foodmart (available as part of the Mondrian distribution at http://sourceforge.net/projects/mondrian/) or the MySQL sample databases (available at http://dev.mysql.com/doc/index-other.html).
As part of the sample databases used in this chapter you will use the Pentaho BI platform Demo databases. The Pentaho BI Platform Demo is a pre-configured installation that lets you explore the capabilities of the Pentaho platform. It relies on the following databases:
|
Database name |
Description |
|---|---|
|
Administrative information including user authentication and authorization data. | |
|
Repository for Quartz, the scheduler used by Pentaho. | |
|
Data for Steel Wheels, a fictional company that sells all kind of scale replicas of vehicles. |
By default, all those databases are stored in Hypersonic (HSQLDB). The script for creating the databases in HSQLDB can be found at http://sourceforge.net/projects/pentaho/files. Under Business Intelligence Server | 1.7.1-stable look for pentaho_sample_data-1.7.1.zip.
It can also be found at svn://ci.pentaho.com/view/Platform/job/bi-platform-sample-data/.
These databases can be stored in other DBMS as well. Scripts for creating and loading these databases in other popular DBMS as for example MySQL or Oracle can be found in Prashant Raju's blog, at http://www.prashantraju.com/projects/pentaho/.
Beside the scripts, you will find instructions for creating and loading the databases.
If you intend to work with a database, either reading, writing, looking up data, and so on, the first thing you will have to do is to create a connection to that database. This recipe will teach you how to do this.
In order to create the connection, you will need to know the connection settings. At least you will need:
It's recommended that you also have access to the database at the moment of creating the connection.
Select the View option that appears in the upper-left corner of the screen, right-click the Database connections option, and select New. The Database Connection dialog window appears.
Under Connection Type, select the database engine that matches your DBMS.
Fill the Settings options and give the connection a name by typing it in the Connection Name: textbox. Your window should look like this:

Press the Test button. A message should appear informing you that the connection to your database is OK.
A database connection is the definition that allows you to access a database from Kettle. With the data you provide, Kettle can instantiate real database connections and perform the different operations related with databases. Once you define a database connection, you will be able to access that database and execute arbitrary SQL statements: create schema objects like tables, execute SELECT statements, modify rows, and so on.
In this recipe you created the connection from the Database connections tree. You may also create a connection by pressing the New... button in the configuration window of any database-related step in a transformation or job entry in a job. Alternatively, there is also a wizard accessible from the Tools menu or by pressing F3.
Whichever the method you choose, a setting window like the one you saw in the recipe shows up allowing you to define the connection. This task includes:
Selecting a database engine (Connection type:)
Selecting the access method (Access:)
Providing the Host Name or IP
Entering the User Name and Password for accessing the database.
A database connection can only be created with a transformation or a job opened. Therefore, in the recipe you were asked to create a transformation. The same could have been achieved by creating a job instead.
The recipe showed the simplest way to create a database connection. However, there is more to know about creating database connections.
If you intend to use the same database in more than one transformation and/or job, it's recommended that you share the connection. You do this by right-clicking the database connection under the Database connections tree, and clicking on Share. This way the database connection will be available to be used in all transformations and jobs. Shared database connections are recognized because they are bold. As an example take a look at the following sample screenshot:
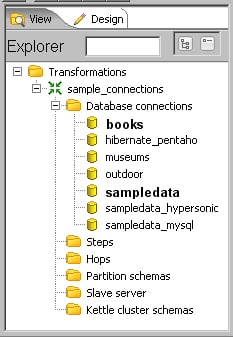
The databases books and sampledata are shared; the others are not.
The information about shared connections is saved in a file named shared.xml located in the Kettle home directory.
No matter the Kettle storage method (repository or files) you can share connections. If you are working with the file method, namely
ktr and kjb files, the information about shared connections are not only saved in the shared.xml file, but also saved as part of the transformation or job files even if they don't use the connections.
Instead of typing fixed values in the database connection definition, it's worth using variables. For example, instead of typing localhost as the hostname, you can define a variable named HOST_NAME and as host name type its variable notation as ${HOST_NAME} or %%HOST_NAME%%. If you decide to move the database from the local machine to a server, you just have to change the value of the variable and don't need to modify the transformations or jobs that use the connection.
This is especially useful when it's time to move your jobs and transformations between different environments: development, test, and so on.
The recipe showed you how to provide the general properties needed to create a connection. You may need to specify additional options—for example a preferred schema name, or supply some parameters to be used when the connection is initialized. In order to do that, look for those options in the extra tab windows under the General tab of the Database Connection window.
Kettle offers built-in support for a vast set of database engines. The list includes both commercial databases (such as Oracle) and open source (such as PostgreSQL), traditional row-oriented databases (such as MS SQL Server) and modern column-oriented databases (such as Infobright), disk-storage based databases (such as Informix) and in-memory databases (such as HSQLDB). However, it can happen that you want to connect to a database that is not in that list. In that case, you might still create a connection to that database. First of all, you have to get a JDBC driver for that DBMS. Copy the jar file containing the driver to the libext/JDBC directory inside the Kettle installation directory. Then, create the connection. In this case, as connection type choose Generic database. In the Settings frame specify the connection string (which should be explained along with JDBC), the driver class name, and the username and password. In order to find the values for these settings, you will have to refer to the driver documentation.
If you are not sure that the database connection will be accessible when a job or transformation runs from outside Spoon, you might precede all database-related operations with a Check Db connection job entry. The entry will return true or false depending on the result of checking one or more connections.
If you're used to working with databases, one of your main objectives while working with PDI must be getting data from your databases for transforming, loading in other databases, generating reports, and so on. Whatever operation you intend to achieve, the first thing you have to do after connecting to the database, is to get that data and create a PDI dataset. In this recipe you will learn the simplest way to do that.
Create a transformation and drop into the canvas a Table Input step. You will find it in the Input category of steps.
From the Connection drop-down list select the connection to the database where your data resides, or create it if it doesn't exist.
In the SQL text area, type the SQL statement that returns the data you need. So far you should have something like this:

Click on Preview. This will bring a sample list of rows so you can confirm that the data is as expected.
Press OK to close the Table Input configuration window, and you'll be ready to use the data for further manipulation.
The Table Input step you used in the recipe is the main PDI step to get data from a database. When you run or preview the transformation, Kettle executes the SQL and pushes the rows of data coming from the database into the output stream of the step. Each column of the SQL statement leads to a PDI field and each row generated by the execution of the statement becomes a row in the PDI dataset.
Once you get the data from the database, it will be available for any kind of manipulation inside the transformation.
In order to save time, or in case you are not sure of the name of the tables or columns in the database, instead of typing the SQL statement press the Get SQL select statement... button. This will bring the Database Explorer window. This window allows you to explore the selected database. By expanding the database tree and selecting the table that interests you, you will be able to explore that table through the different options available under the Actions menu as shown below:
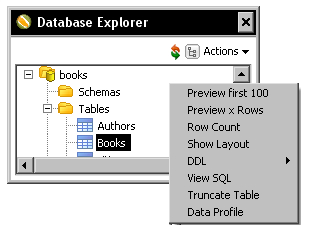
Double-clicking the name of the table will generate a SELECT statement to query that table. You will have the chance to include all the field names in the statement, or simply generate a SELECT * statement. After bringing the SQL to the Table Input configuration window, you will be able to modify it according to your needs.
Connecting to a database. In order to get data from a database, you need to have a connection to it. This recipe explains how to do this.
Getting data from a database by providing parameters. This recipe explains a more flexible way to run database queries.
Getting data from a database by running a query built at runtime. This recipe explains an even more flexible method.
If you need to create a dataset with data coming from a database you can do it just by using a Table Input step. If the SELECT statement that retrieves the data doesn't need parameters, you simply write it in the Table Input setting window and proceed. However, most of the times you need flexible queries; queries that receive parameters. This recipe will show you how to pass parameters to a SELECT statement in PDI.
Assume that you need to list all products in Steel Wheels for a given product line and scale.
Create a transformation.
Before getting the data from the database, you have to create the stream that will provide the parameters for the statement.
Create a stream that builds a dataset with a single row and two columns: the product line parameter and the scale parameter. For this exercise, you can do it just by adding a Data Grid step or a Generate Rows step. Doing a preview on the last step of your stream you should see something like this:

Now drag to the canvas a Table Input step, and create a hop from the last step of the stream created above, towards this step.
Now you can configure the Table Input step. Double-click it, select the connection to the database, and type the following statement:
SELECT productline
     , productscale
     , productcode
     , productname
FROM   products p
WHERE productline  = ?
AND   productscale = ?
Tip
Downloading the example code
You can download the example code fles for all Packt books you have purchased from your account at http://www.PacktPub.com. If you purchased this book elsewhere, you can visit http://www.PacktPub.com/support and register to have the fles e-mailed directly to you.
In the Insert data from step list, select the name of the step that is linked to the Table Input step. Close the window.
Select the Table Input step and do a preview of the transformation. You will see a list of all products that match the product line and scale provided in the incoming stream:

When you need to execute a SELECT statement with parameters, the first thing you have to do is to build a stream that provides the parameter values needed by the statement. The stream can be made of just one step; for example a Data grid with fixed values, or a stream made up of several steps. The important thing is that the last step delivers the proper values to the Table Input step.
Then, you have to link the last step in the stream to the Table Input step where you will type the statement. What differentiates this statement from a regular statement is that you have to provide question marks. When you preview or run the transformation, the statement is prepared and the values coming to the Table Input step are bound to the placeholders; that is, the place where you typed the question marks.
Note that in the recipe the output of the stream was a single row with two fields, which is exactly the same number of question marks in the statement.
Note
The number of fields coming to a Table Input must be exactly the same as the number of question marks found in the query.
Also note that in the stream the product line was in the first place and the scale in the second place. If you look at the highlighted lines in the recipe, you will see that the statement expected the parameter values exactly in that order.
Note
The replacement of the markers respects the order of the incoming fields.
Finally, it's important to note that question marks can only be used to parameterize value expressions just as you did in the recipe.
Keywords or identifiers (for example; table names) cannot be parameterized with the question marks method.
If you need to parameterize something different from a value expression you should take another approach as explained in the next recipe.
There are a couple of situations worth discussing.
In the recipe you received the list of parameter values in a single row with as many columns as expected parameter values. It's also possible to receive the parameter values in several rows. If instead of a row you had one parameter by row, as shown here:

The behavior of the transformation wouldn't have changed. The statement would have pulled the values for the two parameters from the incoming stream in the same order as the data appeared. It would have bound the first question mark with the value in the first row, and the second question mark with the value coming in the second row.
Note that this approach is less flexible than the previous one. For example, if you have to provide values for parameters with different data types you will not be able to put them in the same column and different rows.
Suppose that you not only want to list the Classic Cars in 1:10 scale, but also the Motorcycles in 1:10 and 1:12 scale. You don't have to run the transformation three times in order to do this. You can have a dataset with three rows, one for each set of parameters, as shown below:

Then, in the Table Input setting window you have to check the Execute for each row? option. This way, the statement will be prepared and the values coming to the Table Input step will be bound to the placeholders once for each row in the dataset coming to the step. For this example, the result would look like this:

When you work with databases, most of the times you start by writing an SQL statement that gets the data you need. However, there are situations in which you don't know that statement exactly. Maybe the name of the columns to query are in a file, or the name of the columns by which you will sort will come as a parameter from outside the transformation, or the name of the main table to query changes depending on the data stored in it (for example sales2010). PDI allows you to have any part of the SQL statement as a variable so you don't need to know the literal SQL statement text at design time.
Assume the following situation: You have a database with data about books and their authors, and you want to generate a file with a list of titles. Whether to retrieve the data ordered by title or by genre is a choice that you want to postpone until the moment you execute the transformation.
You will need a book database with the structure explained in Appendix, Data Structures.
Create a transformation.
The column that will define the order of the rows will be a named parameter. So, define a named parameter named
ORDER_COLUMN, and puttitleas its default value.Now drag a Table Input step to the canvas. Then create and select the connection to the book's database.
In the SQL frame type the following statement:
SELECT * FROM books ORDER BY ${ORDER_COLUMN}Check the option Replace variables in script? and close the window.
Use an Output step like for example a Text file output step, to send the results to a file, save the transformation, and run it.
Open the generated file and you will see the books ordered by title.
Now try again. Press F9 to run the transformation one more time.
This time, change the value of the
ORDER_COLUMNparameter typinggenreas the new value.Press the Launch button.
Open the generated file. This time you will see the titles ordered by genre.
You can use Kettle variables in any part of the SELECT statement inside a Table Input step. When the transformation is initialized, PDI replaces the variables by their values provided that the Replace variables in script? option is checked.
In the recipe, the first time you ran the transformation, Kettle replaced the variable ORDER_COLUMN with the word title and the statement executed was:
SELECT * FROM books ORDER BY title
The second time, the variable was replaced by genre and the executed statement was:
SELECT * FROM books ORDER BY genre
You may use variables not only for the ORDER BY clause, but in any part of the statement: table names, columns, and so on. You could even hold the full statement in a variable. Note however that you need to be cautious when implementing this.
Note
A wrong assumption about the metadata generated by those predefined statements can make your transformation crash.
You can also use the same variable more than once in the same statement. This is an advantage of using variables as an alternative to question marks when you need to execute parameterized SELECT statements.
Two of the most common operations on databases besides retrieving data are inserting and updating rows in a table.
PDI has several steps that allow you to perform these operations. In this recipe you will learn to use the Insert/Update step. Before inserting or updating rows in a table by using this step, it is critical that you know which field or fields in the table uniquely identify a row in the table.
Note
If you don't have a way to uniquely identify the records, you should consider other steps, as explained in the There's more... section.
Assume this situation: You have a file with new employees of Steel Wheels. You have to insert those employees in the database. The file also contains old employees that have changed either the office where they work, or the extension number, or other basic information. You will take the opportunity to update that information as well.
Download the material for the recipe from the book's site. Take a look at the file you will use:
NUMBER, LASTNAME, FIRSTNAME, EXT, OFFICE, REPORTS, TITLE
1188, Firrelli, Julianne,x2174,2,1143, Sales Manager
1619, King, Tom,x103,6,1088,Sales Rep
1810, Lundberg, Anna,x910,2,1143,Sales Rep
1811, Schulz, Chris,x951,2,1143,Sales Rep
Explore the Steel Wheels database, in particular the employees table, so you know what you have before running the transformation. In particular execute these statements:
SELECT EMPLOYEENUMBER ENUM
    , concat(FIRSTNAME,' ',LASTNAME) NAME
    , EXTENSION EXT
    , OFFICECODE OFF
    , REPORTSTO REPTO
    , JOBTITLE
    FROM employees
    WHERE EMPLOYEENUMBER IN (1188, 1619, 1810, 1811);
+------+----------------+-------+-----+-------+-----------+
| ENUM | NAME           | EXT   | OFF | REPTO | JOBTITLE  |
+------+----------------+-------+-----+-------+-----------+
| 1188 | Julie Firrelli | x2173 | 2   |  1143 | Sales Rep |
| 1619 | Tom King       | x103  | 6   |  1088 | Sales Rep |
+------+----------------+-------+-----+-------+-----------+
2 rows in set (0.00 sec)Create a transformation and use a Text File input step to read the file
employees.txt. Provide the name and location of the file, specify comma as the separator, and fill in the Fields grid.Now, you will do the inserts and updates with an Insert/Update step. So, expand the Output category of steps, look for the Insert/Update step, drag it to the canvas, and create a hop from the Text File input step toward this one.
Double-click the Insert/Update step and select the connection to the Steel Wheels database, or create it if it doesn't exist. As target table type
employees.Fill the grids as shown:

Save and run the transformation.
Explore the employees table. You will see that one employee was updated, two were inserted, and one remained untouched because the file had the same data as the database for that employee:
+------+---------------+-------+-----+-------+--------------+
| ENUM | NAME          | EXT   | OFF | REPTO | JOBTITLE     |
+------+---------------+-------+-----+-------+--------------+
| 1188 | Julie Firrelli| x2174 | 2   |  1143 |Sales Manager |
| 1619 | Tom King      | x103  | 6   |  1088 |Sales Rep     |
| 1810 | Anna Lundberg | x910  | 2   |  1143 |Sales Rep     |
| 1811 | Chris Schulz  | x951  | 2   |  1143 |Sales Rep     |
+------+---------------+-------+-----+-------+--------------+
4 rows in set (0.00 sec)
The Insert/Update step, as its name implies, serves for both inserting or updating rows. For each row in your stream, Kettle looks for a row in the table that matches the condition you put in the upper grid, the grid labeled The key(s) to look up the value(s):. Take for example the last row in your input file:
1811, Schulz, Chris,x951,2,1143,Sales Rep
When this row comes to the Insert/Update step, Kettle looks for a row where EMPLOYEENUMBER equals 1811. It doesn't find one. Consequently, it inserts a row following the directions you put in the lower grid. For this sample row, the equivalent INSERT statement would be:
INSERT INTO employees (EMPLOYEENUMBER, LASTNAME, FIRSTNAME,
            EXTENSION, OFFICECODE, REPORTSTO, JOBTITLE)
       VALUES (1811, 'Schulz', 'Chris',
              'x951', 2, 1143, 'Sales Rep')
Now look at the first row:
1188, Firrelli, Julianne,x2174,2,1143, Sales Manager
When Kettle looks for a row with EMPLOYEENUMBER equal to 1188, it finds it. Then, it updates that row according to what you put in the lower grid. It only updates the columns where you put Y under the Update column. For this sample row, the equivalent UPDATE statement would be:
UPDATE employees SET EXTENSION = 'x2174'
                   , OFFICECODE = 2
                   , REPORTSTO = 1143
                   , JOBTITLE = 'Sales Manager'
WHERE EMPLOYEENUMBER = 1188
Note that the name of this employee in the file (Julianne) is different from the name in the table (Julie), but, as you put N under the column Update for the field FIRSTNAME, this column was not updated.
Here there are two alternative solutions to this use case.
If you just want to insert records, you shouldn't use the Insert/Update step but the Table Output step. This would be faster because you would be avoiding unnecessary lookup operations. The Table Output step is really simply to configure: Just select the database connection and the table where you want to insert the records. If the names of the fields coming to the Table Output step have the same name as the columns in the table, you are done. If not, you should check the Specify database fields option, and fill the Database fields tab exactly as you filled the lower grid in the Insert/Update step, except that here there is no Update column.
If you just want to update rows, instead of using the Insert/Update step, you should use the Update step. You configure the Update step just as you configure the Insert/Update step, except that here there is no Update column.
The following is an alternative way for inserting and updating rows in a table.
Note
This alternative only works if the columns in the Key field's grid of the Insert/Update step are a unique key in the database.
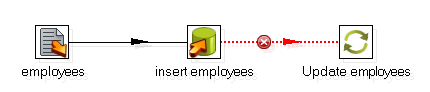
You may replace the Insert/Update step by a Table Output step and, as the error handling stream coming out of the Table Output step, put an Update step.
Tip
In order to handle the error when creating the hop from the Table Output step towards the Update step, select the Error handling of step option.
Alternatively right-click the Table Output step, select Define error handling..., and configure the Step error handling settings window that shows up. Your transformation would look like this:
In the Table Output select the table employees, check the Specify database fields option, and fill the Database fields tab just as you filled the lower grid in the Insert/Update step, excepting that here there is no Update column.
In the Update step, select the same table and fill the upper grid—let's call it the Key fields grid—just as you filled the key fields grid in the Insert/Update step. Finally, fill the lower grid with those fields that you want to update, that is, those rows that had Y under the Update column.
In this case, Kettle tries to insert all records coming to the Table Output step. The rows for which the insert fails go to the Update step, and the rows are updated.
If the columns in the Key field's grid of the Insert/Update step are not a unique key in the database, this alternative approach doesn't work. The Table Output would insert all the rows. Those that already existed would be duplicated instead of updated.
This strategy for performing inserts and updates has been proven to be much faster than the use of the Insert/Update step whenever the ratio of updates to inserts is low. In general, for best practices reasons, this is not an advisable solution.
Inserting new rows when a simple primary key has to be generated. If the table where you have to insert data defines a primary key, you should generate it. This recipe explains how to do it when the primary key is a simple sequence.
Inserting new rows when the primary key has to be generated based on stored values. Same as the previous bullet, but in this case the primary key is based on stored values.
It's very common to have tables in a database where the values for the primary key column can be generated by using a database sequence (in those DBMS that have that feature; for example, Oracle) or simply by adding 1 to the maximum value in the table. Loading data into these tables is very simple. This recipe teaches you how to do this through the following exercise.
There are new offices at Steel Wheels. You have the data of the offices in a file that looks like this:
CITY;PHONE;ADDRESS;COUNTRY;POSTALCODE
Sao Paulo;11 3289-3703;Avenida Paulista 1330;Brazil;01310-200
Sao Paulo;11 3104-1116;Rua Boa Vista, 51;Brazil;01014-001
Buenos Aires;11 4582-6700;Cabildo 2127;Argentina;C1428AAT
You have to insert that data into the Steel Wheels database.
For this recipe you will use the Pentaho sample database. If you don't have that database, you'll have to follow the instructions in the introduction of this chapter.
As you will insert records into the office table, it would be good if you explore that table before doing any insert operations. Here you have a sample query:
SELECT OFFICECODE, ADDRESSLINE1, CITY
FROM   OFFICES
ORDER BY OFFICECODE;
+------------+--------------------------+---------------+
| OFFICECODE | ADDRESSLINE1             | CITY          |
+------------+--------------------------+---------------+
| 1          | 100 Market Street        | San Francisco |
| 2          | 1550 Court Place         | Boston        |
| 3          | 523 East 53rd Street     | NYC           |
| 4          | 43 Rue Jouffroy D'abbans | Paris         |
| 5          | 4-1 Kioicho              | Tokyo         |
| 6          | 5-11 Wentworth Avenue    | Sydney        |
| 7          | 25 Old Broad Street      | London        |
+------------+--------------------------+---------------+
7 rows in set (0.00 sec)
Create a transformation and create a connection to the
sampledatadatabase.Use a Text file input step to read the
offices.txtfile with data about the new offices.From the Data Warehouse category drag and drop a Combination lookup/update step, and create a hop from the previous step towards this one.
Double-click the step, select the connection to the
sampledatadatabase, and typeofficesas the Target table.Fill the Key fields grid as shown:

In the Technical key field type
OFFICECODE. For the Creation of technical key fields leave the default values. Close the window.From the Output category of steps, add an Update step.
Double-click the step, select the connection to the
sampledatadatabase, and typeofficesas the Target table.In the first grid add rows with the text
OFFICECODEboth under Table field and under Stream field1. As Comparator choose =. This way, you will update the rows whereOFFICECODEis equal to the office code in your stream.In the lower grid add a row and type
PHONEboth under Table field and Stream field. Add a second row and typePOSTALCODEin both columns.Close the window.
It's time to save the transformation and run it to see what happens.
As you might guess, three new offices have been added, with primary keys
8,9, and10. Look at the results:SELECT OFFICECODE, ADDRESSLINE1, CITY FROM offices ORDER BY cast(officecode as unsigned); +------------+--------------------------+---------------+ | OFFICECODE | ADDRESSLINE1 | CITY | +------------+--------------------------+---------------+ | 1 | 100 Market Street | San Francisco | | 2 | 1550 Court Place | Boston | | 3 | 523 East 53rd Street | NYC | | 4 | 43 Rue Jouffroy D'abbans | Paris | | 5 | 4-1 Kioicho | Tokyo | | 6 | 5-11 Wentworth Avenue | Sydney | | 7 | 25 Old Broad Street | London | | 8 | Avenida Paulista 1330 | Sao Paulo | | 9 | Rua Boa Vista, 51 | Sao Paulo | | 10 | Cabildo 2127 | Buenos Aires | +------------+--------------------------+---------------+ 10 rows in set (0.00 sec)
In many situations, before inserting data into a table you have to generate the primary key. If the primary key is a simple sequence or the maximum primary key plus one, you can generate it by using a Combination lookup/update step.
In the recipe, for each row in your file, with the Combination lookup/update step, you look for a record in the offices table with the same values for address, city, and country.
Because the offices are new, (there aren't offices in the table with the same combination of address, city, and country values) the lookup fails. As a consequence, the step generates a key value as the maximum OFFICECODE in the table, plus 1. Then, it inserts a row with the generated primary key and the fields you typed in the grid.
Finally, the step adds to the stream the generated primary key value.
As a last task, we used that key to update the other fields coming into the file: POSTALCODE and PHONE.
The Combination lookup/update step is within the Data Warehouse category, because is mainly used for loading junk dimension tables. But as you could see, it can also be used in the particular situation where you have to generate a primary key.
In the recipe you generated the PK as the maximum plus one, but as you can see in the setting window, a database sequence can also be used instead.
Note
When you use the Combination lookup/update step for inserting, make sure that the columns that are not part of the list of key fields are nullable or have default values.
In the recipe the Combination lookup/update step just inserted new rows. Now suppose that you have a row that existed in the table. In that case the lookup would have succeeded and the step wouldn't have inserted a new row. Instead, it would just have returned the found OFFICECODE. That field would have been added to the stream, ready to be used further in the transformation, for example for updating other fields as you did in the recipe, or for being used for inserting data in a related table.
There are tables where the primary key is not a database sequence, nor a consecutive integer, but a column which is built based on a rule or pattern that depends on the keys already inserted. For example imagine a table where the values for primary key are A00001, A00002, and A00003. In this case, you can guess the rule: putting an A followed by a sequence. The next in the sequence would be A00004. This seems too simple, but doing it in PDI is not trivial. This recipe will teach you how to load a table where a primary key has to be generated based on existing rows as in that example.
Suppose that you have to load author data into the book's database. You have the main data for the authors, and you have to generate the primary key as in the example above.
Run the script that creates and loads data into the book's database. You'll find it at http://packtpub.com/support.
Before proceeding, verify the current values for the primary keys in the table where you will insert data:
SELECT MAX(id_author) FROM authors;
+----------------+
| MAX(id_author) |
+----------------+
| A00009         |
+----------------+
1 row in set (0.00 sec)
Create a transformation and create a connection to the book's database.
Use a Text file input step to read the
authors.txtfile.To generate the next primary key, you need to know the current maximum. So use a Table Input step to get it. In this case the following statement will give you that number:
SELECT
cast(max(right(id_author,5)) as unsigned) max_id
FROM authors
By using a Join Rows (cartesian product) step, join both streams. Your transformation should look like this:

Add an Add sequence step. Replace the default value
valuenamewithdelta_value. For the rest of the fields in the setting window leave the default values.Add a Calculator step to build the keys. You do it by filling the setting window as shown:

In order to insert the rows, add a Table output step, double-click it, and select the connection to the book's database.
As Target table type
authors.Check the option Specify database fields.
Select the Database fields tab and fill the grid as follows:

Save and run the transformation.
Explore the authors table. You should see the new authors:
SELECT * FROM authors ORDER BY id_author;
+----------+-----------+-------------+-----------+----------+
| lastname | firstname | nationality | birthyear | id_author|
+----------+-----------+-------------+-----------+----------+
| Larsson  | Stieg     | Swedish     |      1954 | A00001   |
| King     | Stephen   | American    |      1947 | A00002   |
| Hiaasen  | Carl      | American    |      1953 | A00003   |
| Handler  | Chelsea   | American    |      1975 | A00004   |
| Ingraham | Laura     | American    |      1964 | A00005   |
| Ramsey   | Dave      | American    |      1960 | A00006   |
| Kiyosaki | Robert    | American    |      1947 | A00007   |
| Rowling  | Joanne    | English     |      1965 | A00008   |
| Riordan  | Rick      | American    |      1964 | A00009   |
| Gilbert  | Elizabeth | unknown     |      1900 | A00010   |
| Franzen  | Jonathan  | unknown     |      1900 | A00011   |
| Collins  | Suzanne   | unknown     |      1900 | A00012   |
| Blair    | Tony      | unknown     |      1900 | A00013   |
+----------+-----------+-------------+-----------+----------+
13 rows in set (0.00 sec)
When you have to generate a primary key based on the existing primary keys, unless the new primary key is simple to generate by adding one to the maximum, there is no direct way to do it in Kettle. One possible solution is the one shown in the recipe: Getting the last primary key in the table, combining it with your main stream, and using those two sources for generating the new primary keys. This is how it worked in this example.
First, by using a Table Input step, you found out the last primary key in the table. In fact, you got only the numeric part needed to build the new key. In this exercise, the value was 9. With the Join Rows (cartesian product) step, you added that value as a new column in your main stream.
Taking that number as a starting point, you needed to build the new primary keys as A00010, A00011, and so on. You did this by generating a sequence (1, 2, 3, and so on), adding this sequence to the max_id (that led to values 10, 11, 12, and so on), and finally formatting the key with the use of the calculator.
Note that in the calculator the first A+B performs an arithmetic calculation. It adds the max_id with the delta_value sequence. Then it converts the result to a String giving it the format with the mask 0000. This led to the values 00010, 00011, and so on.
The second A+B is a string concatenation. It concatenates the literal A with the previously calculated ID.
Note that this approach works as long as you have a single user scenario. If you run multiple instances of the transformation they can select the same maximum value, and try to insert rows with the same PK leading to a primary key constraint violation.
The key in this exercise is to get the last or maximum primary key in the table, join it to your main stream, and use that data to build the new key. After the join, the mechanism for building the final key would depend on your particular case.
Sometimes you might have to delete data from a table. If the operation to do is simple, for example:
DELETE FROM LOG_TABLE WHERE VALID='N'
Or
DELETE FROM TMP_TABLE
You could simply execute it by using an SQL job entry or an Execute SQL script step. If you face the second of the above situations, you can even use a Truncate table job entry.
For more complex situations you should use the Delete step. Let's suppose the following situation: You have a database with outdoor products. Each product belongs to a category: tools, tents, sleeping bags, and so on. Now you want to delete all the products for a given list of categories, where the price is less than or equal to $50.
In order to follow the recipe, you should download the material for this chapter: a script for creating and loading the database, and an Excel file with the list of categories involved.
After creating the outdoor database and loading data by running the script provided, and before following the recipe you can explore the database. In particular execute the following statement:
SELECT   category, count(*) quantity
FROM     products p, categories c
WHERE    p.id_category=c.id_category
AND      price<=50
GROUP BY p.id_category;
+---------------+----------+
| category      | quantity |
+---------------+----------+
| kitchen       |       19 |
| lights        |       14 |
| sleeping bags |        5 |
| tents         |        4 |
| tools         |        8 |
+---------------+----------+
5 rows in set (0.00 sec)

SELECT   category, count(*) quantity
FROM     products p, categories c
WHERE    p.id_category=c.id_category
AND      price>50
GROUP BY p.id_category;
+---------------+----------+
| category      | quantity |
+---------------+----------+
| kitchen       |        5 |
| lights        |        1 |
| sleeping bags |        1 |
| tents         |        8 |
| tools         |        2 |
+---------------+----------+
5 rows in set (0.00 sec)
The highlighted lines above belong to the products that you intend to delete.
Create a transformation.
The value to which you will compare the price before deleting will be stored as a named parameter. So create it, name it
MAX_PRICE, and set50as the default value.Drag to the canvas an Excel Input step to read the Excel file with the list of categories.
Drag to the canvas a Get Variables step, to get the named variable as a field named
max_pricewith typeNumber.After that, add a Database lookup step. Configure it to get the
id_categoryfields based on the category descriptions in the Excel file. So far, the transformation looks like this:
Select the Database lookup step and do a preview. You should see this:

Finally, add a Delete step. You will find it under the Output category of steps.
Double-click the Delete step, select the outdoor connection, and fill in the key grid as follows:

Save and run the transformation.
Explore the database. If you run the same statements that you ran before starting the recipe, you'll note that all products belonging to the categories in the Excel file, with price less than or equal to $50 have been deleted. This is what you will see:
SELECT   category, count(*) quantity
FROM     products p, categories c
WHERE    p.id_category=c.id_category
AND      price<=50
GROUP BY p.id_category;
+---------------+----------+
| category      | quantity |
+---------------+----------+
| kitchen       |       19 |
| lights        |       14 |
| sleeping bags |        5 |
+---------------+----------+
3 rows in set (0.00 sec)

SELECT   category, count(*) quantity
FROM     products p, categories c
WHERE    p.id_category=c.id_category
AND      price>50
GROUP BY p.id_category;
+---------------+----------+
| category      | quantity |
+---------------+----------+
| kitchen       |        5 |
| lights        |        1 |
| sleeping bags |        1 |
| tents         |        8 |
| tools         |        2 |
+---------------+----------+
5 rows in set (0.00 sec)
The Delete step allows you to delete rows in a table in a database based on certain conditions. In this case, you intended to delete rows from the table products where the price was less than or equal to 50, and the category was in a list of categories, so the Delete step is the right choice. This is how it works.
PDI builds a prepared statement for the DELETE operation. Then, for each row in your stream, PDI binds the values of the row to the variables in the prepared statement.
Let's see it by example. In the transformation you built a stream where each row had a single category and the value for the price.
If you run the transformation with log level Detailed and look at the log, you will see the statement that is executed:
DELETE FROM products
WHERE price < ?
AND id_category = ?
The WHERE clause is built based on the conditions you entered in the Delete configuration window. For every row, the values of the fields you typed in the grid—max_price and id_category—are bound to the question marks in the prepared statement.
Note that the conditions in the Delete step are based on fields in the same table. In this case, as you were provided with category descriptions and the products table does not have the descriptions but the ID for the categories, you had to use an extra step to get that ID: a Database lookup.
Suppose that the first row in the Excel file had the value tents. As the ID for the category tents is 4, the execution of the prepared statement with the values in this row has the same effect as the execution of the following SQL statement:
DELETE FROM products
WHERE price < 50
AND id_category = 4
Looking for a value in a database table (Chapter 5, Looking for Data). Refer to this recipe if you need to understand how the Database lookup step works.
It's not uncommon that someone asks you to load a table that doesn't exist yet. These are some use cases:
You could write a CREATE TABLE statement from scratch and then create the transformation that loads the table, or you could do all that in an easier way from Spoon.
In this case, suppose that you received a file with data about countries and the languages spoken in those countries. You need to load the full content into a temporary table. The table doesn't exist and you have to create it based on the content of the file.
In order to follow the instructions, you will need the countries.xml file available for downloading from the book's site.
Create a transformation and create a connection to the database where you will save the data.
In order to read the
countries.xmlfile, use a Get data from XML step. As Loop XPath type/world/country/language.Fill the Fields grid as follows:

From the Output category, drag and drop a Table Output step.
Create a hop from the Get data from XML step to this new step.
Double-click the Table Output step and select the connection you just created.
In the Target table textbox type
countries_stage.Click on the SQL button. A window will appear with the following script:
CREATE TABLE countries_stage
(
  country TINYTEXT
, capital TINYTEXT
, language TINYTEXT
, isofficial TINYTEXT
)
;
Because you know that isofficial is just a simple flag with values Y/N, replace isofficial TINYTEXT with isofficial CHAR(1).
After clicking on Execute, a window will show up telling that the statement has been executed, that is, the table has been created.
Save and run the transformation. All the information coming from the XML file is saved into the table just created.
PDI allows you to create or alter tables in your databases depending on the tasks implemented in your transformations or jobs. To understand what this is about, let's explain the previous example.
A Table Output step causes Kettle to execute an INSERT statement against the database. The insert is made based on the data coming to the Table Output and the data you put in the Table Output configuration window, for example the name of the table or the mapping of the fields.
When you click on the SQL button in the Table Output setting window, this is what happens: Kettle builds the statements needed to execute that insert successfully. As in this example the table doesn't exist, and hence the statement generated by clicking on the button is a CREATE TABLE.
When the window with the generated statement appeared, you executed it. This causes the table to be created, so you could safely run the transformation and insert into the new table the data coming from the file to the step.
The SQL button is present in several database-related steps. In all cases its purpose is the same: Determine the statements to be executed in order to run the transformation successfully. In the recipe the statement was a CREATE TABLE, but there are other situations. These are some examples:
If you use an Insert/Update step and fill the Update fields: grid with a field that doesn't exist, Kettle generates an
ALTER TABLEstatement in order to add that field as a new column in the table.If you use an Update step and in the The key(s) to look up the value(s): grid type names of columns that are not indexed, Kettle generates a
CREATE INDEXstatement.If you use a Dimension Lookup /Update step in order to load a Slowly changing dimension, Kettle generates a
CREATE TABLEstatement including all the fields that are needed in order to keep that kind of dimension updated.
You can execute the SQL as it is generated, you can modify it before executing it (as you did in the recipe), or you can just ignore it. Sometimes the SQL generated includes dropping a column just because the column exists in the table but is not used in the transformation. In that case you shouldn't execute it.
Finally, you must know that if you run the statement from outside Spoon, in order to see the changes inside the tool you either have to clear the cache by right-clicking the database connection and selecting the Clear DB Cache option, or restart Spoon.
When you are developing with PDI, you know (or have the means to find out) if the tables you need exist or not, and if they have all the columns you will read or update. If they don't exist or don't meet your requirements, you can create or modify them, and then proceed. Assume the following scenarios:
You need to load some data into a temporary table. The table exists but you need to add some new columns to it before proceeding.
You have to load a dimension table. This task is part of a new requirement, so this table doesn't exist.
While you are creating the transformations and jobs, you have the chance to create or modify those tables. But if these transformations and jobs are to be run in batch mode in a different environment, nobody will be there to do these verifications or create or modify the tables. You need to adapt your work so these things are done automatically.
Suppose that you need to do some calculations and store the results in a temporary table that will be used later in another process. As this is a new requirement, it is likely that the table doesn't exist in the target database. You can create a job that takes care of this.
Create a job, and add a Start job entry.
From the Conditions category, drag and drop a Table exists entry, an SQL entry from Scripting, and a Dummy entry from General.
Link all the entries as shown:

Double-click the Table exists entry, choose a database connection, and as Table name type
my_tmp_table.Double-click the SQL entry, choose the same database connection as above, and in the SQL Script: type:
CREATE TABLE my_tmp_table (
CALC_1 NUMERIC(10,2),
CALC_2 NUMERIC(10,2),
CALC_3 NUMERIC(10,2)
);
Save the job and run it.
The table
my_tmp_tableshould have been created.Run the job again.
Nothing should happen.
The Table exists entry, as implied by its name, verifies if a table exists in your database. As with any job entry, this entry either succeeds or fails. If it fails, the job creates the table with an SQL entry. If it succeeds, the job does nothing.
The SQL entry is very useful not only for creating tables as you did in the recipe, but also for executing very simple statements, as for example setting a flag before or after running a transformation. Its main use, however, is executing DDL statements.
On the other side, in order to decide if it was necessary to create the table or not, you used a Table exists entry. In addition to this entry and before verifying the existence of the table, you could have used the Check Db connections. This entry allows you to see if the database is available.
Now, let's suppose the table exists, but it is an old version that doesn't have all the columns you need. In this case you can use an extra useful entry: Columns exist in a table. If you can detect that a column is not present, you can alter the table by adding that column, also with an SQL job entry.
PDI allows you to do the basic operations that modify the data in your tables, that is: insert, update, and delete records. For each of those operations you have at least one step that allows you to do the task. It may happen that you have to do one or another operation depending on the value of a field. That is possible with a rather unknown step named Synchronize after merge.
Suppose you have a database with books. You received a file with a list of books. In that list there are books you already have, and there are books you don't have.
For the books you already have, you intend to update the prices.
Among the other books, you will insert in your database only those which have been published recently. You will recognize them because they have the text NEW in the comment field.
For this recipe you will need the database which can be created and filled by running the script books_2.sql. You also will need the file books_news.txt that accompanies the material for this chapter.
As the recipe will modify the data in the database, before proceeding, explore the database to see what is inside. In particular run these statements and pay attention to the results:
SELECT count(*)
FROM   books;
+----------+
| count(*) |
+----------+
|       34 |
+----------+
1 row in set (0.00 sec)

SELECT id_title, title, price
FROM   books
WHERE  author_id='A00001';
+----------+----------------------------------------+-------+
| id_title | title                                  | price |
+----------+----------------------------------------+-------+
| 123-400  | The Girl with the Dragon Tattoo        |    37 |
| 123-401  | The Girl who Played with Fire          |  35.9 |
| 123-402  | The Girl who Kicked the Hornett's Nest |    39 |
+----------+----------------------------------------+-------+
3 rows in set (0.00 sec)

SELECT *
FROM   books
WHERE  title="Mockingjay";

Empty set (0.00 sec)
Create a new transformation, and create a connection to the book's database.
Drop to the canvas a Text file input step and use the step to read the
books_news.txtfile. As separator, type|. Read all fields as String except the price that has to be read as a Number with0.00as the Format.Do a preview to verify you have read the file properly. You should see this:

Use a Split Fields step to split the name field into two:
firstnameandlastname.Use a Database lookup step to look up in the
authorstable for an author that matches thefirstnameandlastnamefields. As Values to return from the lookup table: add theid_author.Check the option Do not pass the row if the lookup fails and close the window.
From the Output category of steps drag and drop to the canvas a Synchronize after merge step, and create a hop from the last step toward this one. Your transformation looks like this:

Double-click the step. As Connection, select the connection you just created. As Target table, type
books.Fill the grids as shown:

Select the Advanced tab.
As Operation fieldname, select comment. As Insert when value equal, type
NEW. As Update when value equal, typeIn Stock. Leave the other fields blank.Close the window and save the transformation.
Run the transformation.
Explore the database again. In particular, run for the second time the same statements you ran before doing the recipe. Now you will get this:
SELECT count(*)
FROM   books;
+----------+
| count(*) |
+----------+
|       38 |
+----------+
1 row in set (0.00 sec)

SELECT id_title, title, price
FROM   books
WHERE  author_id='A00001';
+----------+----------------------------------------+-------+
| id_title | title                                  | price |
+----------+----------------------------------------+-------+
| 123-400  | The Girl with the Dragon Tattoo        | 34.98 |
| 123-401  | The Girl who Played with Fire          | 35.99 |
| 123-402  | The Girl who Kicked the Hornett's Nest | 37.99 |
+----------+----------------------------------------+-------+
3 rows in set (0.00 sec)

SELECT *
FROM   books
WHERE  title="Mockingjay";
+----------+------------+-----------+-------+-------+
| id_title | title      | id_author | price | genre |
+----------+------------+-----------+-------+-------+
| 523-110  | Mockingjay | A00012    | 37.99 | Teens |
+----------+------------+-----------+-------+-------+
1 row in set (0.00 sec)
The Synchronize after merge step allows you to insert, update, or delete rows in a table based on the value of a field in the stream. In the recipe, you used the Synchronize after merge step both for inserting the new books (for example, Mockingjay) and for updating the prices for the books you already had (for example, The Girl with the Dragon Tattoo).
In order to tell PDI whether to execute an insert or an update, you used the field comment. Under the Advanced tab, you told PDI that it should insert the records where the comment was equal to NEW, and update those where the comment was In Stock.
Note that, because you didn't intend to delete rows, you left the Delete when value equal option blank. However, you could also have configured this option in the same way you configured the others. An example of that could be deleting the books that will stop being published. If you recognize those books after the expression out of market, you could type that expression in the Delete when value equal option and those books would be deleted.
The inserts and updates were made based on the fields you entered in the grids under the General tab, which work exactly as the grids in an Insert/Update or an Update step.
Let's see a little more about the step you used in this recipe.
The Synchronize after merge step is like an all-in-one step. It allows you to insert, update, and delete rows from a table all in a single step, based on a field present in the dataset. For each row Kettle uses the value of that column to decide which of the three basic operations to execute. This happens as follows.
Suppose that the Operation fieldname is called op and the values that should cause an insert, update, or delete are NEW, In Stock, and Discontinued respectively.
|
Operation |
How it works |
|---|---|
|
The insert is made for all rows where the field | |
|
The update is made for all rows where the field | |
|
The delete is made for all rows where the field |
You may wonder what the name Synchronize after merge has to do with this, if you neither merged nor synchronized anything. The fact is that the step was named after the Merge Rows (diff) step, as those steps can perfectly be used together. The Merge Rows (diff) step has the ability to find differences between two streams, and those differences are used later to update a table by using a Synchronize after merge step.
Deleting data from a table. For understanding how the delete operations work. Inserting or updating rows in a table and for understanding how the inserts and updates work.
Comparing two streams and generating differences (Chapter 6, Understanding Data Flows). For learning to use the Synchronize after merge step along with the Merge Rows (dif) step.
Sometimes you have several databases with exactly the same structure serving different purposes. These are some situations:
A database for the information that is being updated daily and one or more databases for historical data.
A different database for each branch of your business.
A database for your sandbox, a second database for the staging area, and a third database fulfilling the production server purpose.
In any of those situations, it's likely that you need access to one or the other depending on certain conditions, or you may even have to access all of them one after the other. Not only that, the number of databases may not be fixed; it may change over time (for example, when a new branch is opened).
Suppose you face the second scenario: Your company has several branches, and the sales for each branch are stored in a different database. The database structure is the same for all branches; the only difference is that each of them holds different data. Now you want to generate a file with the total sales for the current year in every branch.
Download the material for this recipe. You will find a sample file with database connections to three branches. It looks like this:
branch,host,database
0001 (headquarters),localhost,sales2010
0002,183.43.2.33,sales
0003,233.22.1.97,sales
If you intend to run the transformation, modify the file so it points to real databases.
Create a transformation that reads the file with connection data and copy the rows to results.
Create a second transformation, and define the following named parameters:
BRANCH,HOST_NAME, andDATABASE_NAME.Create a database connection. Choose the proper Connection Type:, and fill the Settings data. Type a value for the Port Number:, the User Name:, and the Password. As Host Name: type
${HOST_NAME}, and as Database Name: type${DATABASE_NAME}.Use a Table Input step for getting the total sales from the database. Use the connection just defined.
Use a Text file output step for sending the sales summary to a text file. Don't forget to check the option Append under the Content tab of the setting window.
Create a job with two Transformation job entries, linked one after the other.
Use the first entry to call the first transformation you created, and the second entry to call the second transformation. The job looks like this:

Double-click the second transformation entry, select the Advanced tab, and check the Copy previous results to parameters? and the Execute for every input row? checkboxes.
Select the Parameters tab and fill it as shown:

Save both transformations. Save the job, and run it.
Open the text file generated. It should have one line with sales information for each database in the file with the list of databases.
If you have to connect to several databases, and you don't know in advance which or how many databases you will have to connect to, you can't rely on a connection with fixed values, or variables defined in a single place as for example in the kettle.properties file. In those situations, the best you could do is to define a connection with variables, and set the values for the variables at runtime.
In the recipe, you created a text file with a summary sales line for each database in a list.
The transformation that wrote the sales line used a connection with variables defined as named parameters. This means that whoever calls the transformation has to provide the proper values.
The main job loops on the list of database connections. For each row in that list, it calls the transformation copying the values from the file to the parameters in the transformation. In other words, each time the transformation runs, the named parameters are instantiated with the values coming from the file.
In the recipe, you changed the host and the name of the database. You could have parameterized any of the values that made up a database connection, for example the user and password.
Connecting to a database. This recipe explains how to connect to a database by using variables.
Executing a transformation once for every row in a dataset in Chapter 7, Executing and Reusing Jobs and Transformations. With this recipe you will understand better the way the loop over the database connection works.
A parent-child table is a table in which there is a self-referencing relationship. In other words, there is a hierarchical relationship among its rows. A typical example of this is a table with employees, in which one of the columns contains references to the employee that is above each employee in the hierarchy.
In this recipe you will load the parent-child table of employees of Steel Wheels. The hierarchy of roles in Steel Wheels is as follows:
A sales representative reports to a sales manager
A sales manager reports to a vice-president
A vice-presidents reports to the president
The president is the highest level in the hierarchy. There is a single employee with this role.
You will load all employees from a file. These are sample rows in that file:
EMPLOYEENUMBER|LASTNAME|FIRSTNAME|EXTENSION|EMAIL|OFFICECODE|JOBTITLE|REP_TO

1002|Murphy|Diane|x5800|dmurphy@classicmodelcars.com |1|President|

1056|Patterson|Mary|x4611|mpatterso@classicmodelcars.com |1|VP Sales|dmurphy@classicmodelcars.com

1076|Firrelli|Jeff|x9273|jfirrelli@classicmodelcars.com |1|VP Marketing|dmurphy@classicmodelcars.com

1088|Patterson|William|x4871|wpatterson@classicmodelcars.com |6|Sales Manager (JAPAN, APAC)|mpatterso@classicmodelcars.com

...
As you can see, among the fields you have the e-mail of the employee who is above in the hierarchy. For example, Gerar Bondur is a Sales Manager, and reports to the employee with e-mail <mpatterso@classicmodelcars.com>, that is, Mary Patterson.
In order to run this recipe, either truncate the employees table in Steel Wheels, or create the table employees in a different database.
Create a transformation that inserts the record for the president who is the first in the hierarchy, and doesn't report to anyone. The transformation should read the file, filter the record with
JOBTITLE=President, and insert the data into theemployeestable.Create another transformation to load the rest of the employees. Define a named parameter named
LEVELthat will represent the role of the employees being loaded.Use a Text file input step to read the file of employees.
Use a Get Variables step to add the variable
LEVELas a new field namedlevel.Add a Filter rows step to filter the employees to load based on their role. In order to do that, enter the following condition:
JOBTITLE REGEXP level.Add a Database lookup to find out the employee number of the employee who is one above in the hierarchy: In the upper grid add a row with the condition
EMAIL = REP_TO. Use the lower grid to get the fieldEMPLOYEENUMBERand rename it toREPORTSTO.Add a Table Output step, and use it to insert the records in the table
employees. Your final transformation looks like this:
Finally create a job to put all together. Drag to the work area a START entry, and four Transformation job entries. Link all of them in a row.
Use the first Transformation entry to execute the transformation that loads the president.
Double-click the second Transformation entry and configure it to run the transformation that loads the other employees. Under the Parameters tab, add a parameter named
LEVELwith valueVP.*.Repeat step 10 for the third Transformation entry, but this time type
.*Manager.*as the value for theLEVELparameter.Repeat step 10 for the fourth Transformation entry, but this time type
Sales Rep.*as the value for theLEVELparameter.Save and run the job. The table should have all employees loaded, as you can see below:
SELECT
   EMPLOYEENUMBER N
 , LASTNAME
 , REPORTSTO
 , JOBTITLE
FROM employees;
+------+-----------+-----------+----------------------------+
| N    | LASTNAME  | REPORTSTO | JOBTITLE                   |
+------+-----------+-----------+----------------------------+
| 1002 | Murphy    |      NULL | President                  |
| 1056 | Patterson |      1002 | VP Sales                   |
| 1076 | Firrelli  |      1002 | VP Marketing               |
| 1088 | Patterson |      1056 | Sales Manager (JAPAN, APAC)|
| 1102 | Bondur    |      1056 | Sale Manager (EMEA)        |
| 1143 | Bow       |      1056 | Sales Manager (NA)         |
| 1165 | Jennings  |      1143 | Sales Rep                  |
| 1166 | Thompson  |      1143 | Sales Rep                  |
| 1188 | Firrelli  |      1143 | Sales Rep                  | | ...  | ...       |      ...  | ...                        |
+------+-----------+-----------+----------------------------+
23 rows in set (0.00 sec)
If you have to load a table with parent-child relationships, loading all at once is not always feasible. Look at the sampledata database. There is no physical foreign key from the REPORTSTO column to the EMPLOYEENUMBER column, but if the foreign key had existed, loading all records at once would fail because of the foreign key constraint. Not only that; in this case loading all at once would be impossible because in the file you missed the ID of the parent employee needed for the REPORTSTO column.
So, in this recipe there was one possible solution for loading the table. We loaded all employees, one role at a time, beginning by the president and followed by the roles below in the hierarchy. The transformation that loaded the other roles simply read the file, kept only the employees with the role being loaded, looked for the ID of the parent employee in the hierarchy, and inserted the records. For the roles you could have used fixed values but you used regular expressions instead. In doing so, you avoided calling the transformation once for each different role. For example, for loading the vice-presidents you called the transformation once with the regular expression VP.* which matched both VP Sales and VP Marketing.
