


In this chapter, we will cover the following recipes:
Installing WebLogic Server 12c
Creating the WebLogic domain
Distributing the domain files to remote machines
Starting the Node Manager
Starting the Administration Server
Saving and activating changes in the Administration Console
Protecting changes in the Administration Console
Extending and customizing the Administration Console
Enabling RESTful Management Services
Starting/Stopping the WebLogic Managed Server
Deploying applications
WebLogic Server is Oracle's flagship J2EE application server and is the foundation of the Oracle Fusion Middleware range of products, such as Oracle SOA Suite, Oracle WebCenter, and Oracle Service Bus. The new 12c version is being fully integrated with Oracle's Middleware products, and the system administrators who are already familiar with the core WebLogic administration tasks will be one step ahead of the market demand.
Oracle WebLogic Server 12c applications and systems deployed in production environments normally require performance, scalability, and high availability; these are usually not needed in a development environment. The recipes in this book focus on achieving these objectives.
This chapter condenses the core tasks a WebLogic administrator should know, such as downloading the correct package, installing it, and creating a WebLogic domain, configuring it, and managing it.
You should already be familiar with basic WebLogic installation, so this recipe covers the steps to a quick installation of WebLogic Server 12c in production environments.
This recipe will focus on a new install rather than upgrades or migrations.
It is important to navigate through Oracle's website and check if the chosen hardware and operational system architectures are supported in Certification Matrix before installing WebLogic Server. You should look for system requirements and supported platforms for WebLogic Server 12c. This is crucial for a production environment since Oracle Support verifies if you are running a supported configuration when an issue appears.
The book assumes the following hardware and software architectures for WebLogic Server 12c installations:
Operational systems based on Linux x86-64 (64-bit) are the most commonly used in production environments, and these instructions should cover other Unix architectures as well.
Note
The use of WebLogic Server in Microsoft Windows for production environments will not be considered in this book.
Oracle JRockit 6 for Linux x86-64 is the
Java Virtual Machine (JVM) that has been used through the rest of this book. Download it at http://www.oracle.com/technetwork/middleware/jrockit/downloads. The filename is jrockit-jdk1.6.0_XXX-linux-x64.bin, where XXX stands for the JRockit release and JDK version.
The package WebLogic Server 12
c
(12.1.1) generic installer (997 MB) for use with 64-bit JVMs should also be downloaded at http://www.oracle.com/technetwork/middleware/weblogic/downloads. The filename is wls1211_generic.jar.
Carry out the following steps to install WebLogic Server 12c:
Create a dedicated user to host and run WebLogic Server 12c in Linux. Log in as the
rootuser and create the user and the group namedwls, and define a new password for it:[root@prod01]# groupadd wls [root@prod01]# useradd -g wls wls [root@prod01]# passwd wls Changing password for user wls. New UNIX password: <new password> Retype new UNIX password: <new password>
Log in as the
wlsuser and set the correct file permissions:[wls@prod01]$ umask 027Run the JRockit installer in console mode and install JRockit:
[wls@prod01]$ ./jrockit-jdk1.6_xxx-linux-x64.bin -mode=consoleFollow the onscreen instructions and type
/oracle/jvmin theProduct Installationdirectory. You can just press Enter for all the other options. JRockit will be installed without the demos and with no source code.Run WebLogic Server 12c Generic Installer in console mode:
[wls@prod01]$ /oracle/jvm/bin/java –jar wls1211_generic.jar –mode=consoleFollow the onscreen instructions and type
/oracle/Middlewarefor the "Middleware Home" = [Enter new value or use default] screen. Press Enter to move forward.Skip the Register for Security Updates screen by typing 3 to navigate to 3|Receive Security Update:[Yes], then type
Noand thenYes. Press Enter to move forward.Type 1 to select the 1|Typical option on the Install Type screen.
The freshly installed
/oracle/jvmJDK should be selected. If not, add it by typing 1 for 1|Add Local Jdk.Press Enter to confirm all the other screens.
These install instructions will provide a clean and fresh WebLogic Server 12c installation in the prod01 hostname.
It also covers some basic user administration in Linux that can be skipped if you already have an operational system user.
Tip
Don't forget to set the correct file permissions with umask before installing WebLogic Server 12c.
Both JRockit and WebLogic Server were installed in the console mode option without any graphical interface. Production environments are more restricted, and console mode requires only a terminal; it is faster and does not need an X11 Server.
Generic installer is used to install WebLogic since it is the one that contains the native library for x86-64. The native library is important because it enables the use of a native socket reader that is much faster than the pure Java socket reader. This library enables what is called the performance pack on WebLogic and is mandatory in a production environment.
The installation process is very straightforward and only copies the files to their directories. The next step is to create a new WebLogic domain.
With WebLogic Server 12c installed, you can now create a new WebLogic domain.
The WebLogic domain is the central configuration entity of WebLogic Server. The domain should have at least one WebLogic Server instance with the role of the Administration Server. The Administration Server is the access point used for configuration, deployment, and monitoring.
More WebLogic Server instances can be created to be part of the domain. All other WebLogic Server instances of the domain that are not the Administration Server are called the Managed Servers. They should host the deployed applications and resources.
A WebLogic cluster can also be added to the domain. The cluster consists of one or more Managed Servers acting as one single entity. A single WebLogic Server installation is not restricted to one WebLogic domain, and more domains can be created using the same installation.
Before creating a new WebLogic domain, you have to plan and define its architecture. For production environments, it is mandatory to use WebLogic clusters with a minimum architecture of at least two WebLogic Server instances (the Managed Servers) in two different machines. The objective is to avoid having a single point of failure.
We will create a new WebLogic domain called PROD_DOMAIN with an administration instance (AdminServer) named PROD_AdminServer and a WebLogic cluster PROD_Cluster with the two Managed Servers PROD_Server01 and PROD_Server02. The two machines hosts are called prod01 and prod02. Since you have already installed WebLogic Server 12c in prod01, install it in prod02 as well. We will assume these names throughout the entire book.
The machines prod01 and prod02 should also have IP addresses assigned and be visible through the network. It's recommended to use the fully qualified domain name (FQDN) of the servers. In this recipe, and the rest of the book, prod01 is prod01.domain.local and the hostname of the prod02 machine is prod02.domain.local.
To create a new WebLogic domain, follow the ensuing steps:
Log in as a
wlsuser on the first machineprod01and navigate to the following folder:[wls@prod01]$ cd $WL_HOME/common/binStart WebLogic Configuration Wizard in console mode:
[wls@prod01]$ ./config.sh -mode=consoleFollow the onscreen instructions and type 1, and press Enter to select the Create a new WebLogic domain option on the Welcome screen.
Type 1 and press Enter to select the Choose WebLogic Platform components option on the Select Domain Source screen.
Press Enter again to continue with the Basic WebLogic Server Domain - 12.1.1.0 [wlserver_12.1] template.
On the Edit Domain Information screen, type the domain name
PROD_DOMAINand press Enter twice.Leave
/oracle/Middleware/user_projects/domainsunchanged on the Select the target domain directory for this domain screen and press Enter.On the Configure Administrator User Name and Password screen, set the WebLogic administrator username and password. Type the username as
wlsadminand type 2 to set the password and 3 to type the password again and confirm it. Press Enter to move forward.The Domain Mode Configuration screen is where you set the production mode. Type 2 and press Enter.
The installed JRockit should already be selected as
/oracle/jvmon the Java SDK Selection screen. Press Enter to continue.On the Select Optional Configuration screen, type 1 for the Administration Server and 2 for the Managed Servers, clusters, and machines.
On the Configure the Administration Server screen, type 1 to set the Administration Server name as
PROD_AdminServer. Leave the other options in their default values and press Enter to move to the next screen.Then add the two Managed Server instances on the Configure Managed Servers screen.
Type
PROD_Server01to add the first server, then type 2 to modify the listen address toprod01.domain.local. Type 3 to modify the port to8001, press Enter, and then type 5 to finish this server.Do the same for the second server and type 1 to add, type
PROD_Server02as the name, and type 2 to modify the listen address toprod02.domain.local. Type 3 to modify the port to8002. Press Enter to continue.Add the cluster on the Configure Clusters screen. Type
PROD_Clusterand press Enter to create it. Type 3 and modify the Cluster Address field toprod01.domain.local:8001,prod02.domain.local:8002.The next screen is the Assign Servers to Clusters screen. Type 1 to select
PROD_Cluster. Then type 2 to Select All and press Enter. Confirm it by pressing Enter again.Configure the two machines on the Configure Machine screen. Type
prod01and press Enter. Type 2 to change the listen address toprod01.domain.localas well. Type 4 when done.Add the second machine typing 1 and name it as
prod02. Press Enter and press Enter again to skip the Unix Machine screen.You will now assign the Managed Servers to their respective machines on the Assign Servers to Machines screen.
Type
1.1to chooseprod01and type 1 and press Enter. Now type1-2and press Enter assigning thePROD_AdminServerandPROD_Server01servers. Press Enter again to return.Type
1.2to chooseprod02, then type 1 and 1 again, and press Enter to finish.
A new domain was created in the console mode using the Configuration Wizard. Console mode was used instead of graphical interface mode due to the usual restrictions of a production environment.
The PROD_DOMAIN domain was created with one the Administration Server named PROD_AdminServer and one cluster PROD_Cluster containing the two Managed Servers PROD_Server01 and PROD_Server02.
The WebLogic domains can work in two different modes: production and development. The development mode is only recommended to be used in single WebLogic instance domains, normally at the developer desktop. The PROD_DOMAIN domain was created in Production mode, which deactivates some features such as auto-deployment.
Tip
It's good practice to use a prefix such as PROD when naming the domain, the cluster, and the servers. It can be hard to find WebLogic Server when working with a production farm that contains hundreds of WebLogic instances.
The domain contains what is considered to be a minimum architecture for a production environment. With the two Managed Servers of the cluster hosted by different machines, the platform avoids a single point of failure in the case of a machine crash.
You can create the domain using the Configuration Wizard in graphical mode with all the same options if you have a functional X11 Server.
A new domain is installed and configured in one machine (prod01). Since the architecture includes another machine (prod02), the domain files now have to be distributed in all the machines of the domain.
This recipe contains the steps to distribute the files either by using the built-in WebLogic tools pack and unpack or by copying them manually in the command line of the shell.
Create a new template of the domain using the pack command in the prod01 machine. With the template created in prod01, use the unpack command to distribute the files to the machine prod02 (and to all machines used by the WebLogic cluster).
Carry out the following steps to distribute the domain files:
Log in as a
wlsuser on the first machineprod01and navigate to the folder:[wls@prod01]$ cd $WL_HOME/common/binRun the following command:
[wls@prod01]$ ./pack.sh -domain=$DOMAIN_HOME-template=$WL_HOME/common/templates/domains/PROD_DOMAIN_template.jar -template_name=PROD_DOMAIN –managed=trueA file
$WL_HOME/common/templates/domains/PROD_DOMAIN_template.jarwill be created.Log in as a
wlsuser on the second machineprod02and copy the template fromprod01toprod02:[wls@prod02]$ scp wls@prod01:$WL_HOME/common/templates/domains/PROD_DOMAIN_template.jar $WL_HOME/common/templates/domains/Run the following commands to unpack the template:
[wls@prod02]$ cd $WL_HOME/common/bin
[wls@prod02]$ ./unpack.sh -template=$WL_HOME/common/templates/domains/PROD_DOMAIN_template.jar –domain=$DOMAIN_HOME
The unpack command will create the necessary files to host the WebLogic domain PROD_DOMAIN on the prod02 machine based on the template created with the pack command on prod01.
An entry to the PROD_DOMAIN domain will automatically be added to the nodemanager.properties file.
We can also distribute the WebLogic domain files manually. In this section, we will see how this can be achieved.
You can simply copy the domain files manually too; just don't forget to edit the nodemanager.domains file and add the domain entry.
As in the prior chapter and the rest of the book, the $DOMAIN_HOME environment variable points to the/oracle/Middleware/user_projects/domains/PROD_DOMAIN directory.
Log in as a
wlsuser on the machineprod02and copy the domain fromprod01:[wls@prod02]$ mkdir –p $DOMAIN_HOME [wls@prod02]$ scp –rp wls@prod01:$DOMAIN_HOME $DOMAIN_HOME/..
Edit the
nodemanager.domainsfile:[wls@prod01]$ vi $WL_HOME/common/nodemanager/nodemanager.domainsAdd the following entry if it doesn't exist:
PROD_DOMAIN=/oracle/Middleware/user_projects/domains/PROD_DOMAIN/
The Node Manager is the WebLogic Server utility to control the lifecycle—start, stop, restart—of the WebLogic Managed Server instances and the Administration Server.
In production environments, the Node Manager is needed to meet the high availability requirements.
In this recipe, the system administrator will learn how to start and stop the Node Manager.
The Node Manager is already installed with WebLogic Server 12c. There are two versions of the Node Manager: a Java version and a script version. This recipe will cover the Java version. The Java version is the most commonly used version, and it is more complete and more secure than the script version.
Log in as a
wlsuser on the first machineprod01and navigate to the folder:[wls@prod01]$ cd $WL_HOME/server/binStart the Node Manager in the background. Since it's the first time you are starting it, the
$WL_HOME/common/nodemanager/nodemanager.propertiesfile will be created.[wls@prod01]$ nohup ./startNodeManager.sh & [1] <PID> nohup: appending output to `nohup.out'
Do the same on the
prod02machine and on all the machines of the WebLogic domain.
You can leave the default values created for nodemanager.properties.
The Node Manager has started and is listening to port 5556. The <PID> value is the number of the newly created process.
Since the prod01 and prod02 machines were configured when you created the WebLogic domain PROD_DOMAIN, the Node Manager should be reachable and able to receive start and stop commands from the Administration Console.
In this section, we will see how to shut down the Node Manager:
There is no formal command to shut down the Node Manager, so you'll have to do it manually, killing the process:
Find the
<PID>value of the Node Manager process:[wls@prod01]$ ps aux | grep weblogic.NodeManager | grep -v grep | awk '{print $2} ' <PID>
Issue a
killcommand toPIDto finish it:[wls@prod01]$ kill <PID>Or, force the process to finish:
[wls@prod01]$ kill -9 <PID>
Administration Server is a WebLogic Server instance specific to administering a WebLogic domain through the Administration Console application at the /console URI.
It's a common task to deploy runtime applications to the Administration Server in development environments, but you should avoid doing it in production. Leave the Administration Server only to the administrative tasks of the console.
Since there is only one Administration Server per WebLogic domain, you have to start the Administration Server only in prod01.
To start the Administration Server, follow the ensuing steps:
Log in as the
wlsuser on the first machineprod01and navigate to the folder:[wls@prod01]$ cd $DOMAIN_HOME/binStart the Administration Server:
[wls@prod01]$ ./startWebLogic.shThe server will initiate the startup process and ask for the WebLogic Administrator username and password:
Enter username to boot WebLogic server: wlsadmin
Enter password to boot WebLogic server:
Type
wlsadminas the username and the<password>value you previously specified during domain creation.WebLogic Administration Server will start.
The Administration Server is now running and waiting for connections in the host and port that are specified during domain creation at http://prod01.domain.local:7001/console.
<Started the WebLogic Server Administration Server "PROD_AdminServer" for domain "PROD_DOMAIN" running in production mode.>
The system administrator should also create a boot.properties file to avoid entering the boot username and password in every WebLogic Server startup.
Specify a boot.properties file so the Administration Server doesn't ask for the username and password at startup.
Go to the Administration Server root folder:
[wls@prod01]$ cd $DOMAIN_HOME/servers/PROD_AdminServerCreate and enter a new directory:
[wls@prod01]$ mkdir security
[wls@prod01]$ cd security
Create a new file called
boot.propertieswithwlsadminas the username and the<password>value you specified:[wls@prod01]$ echo -ne "username=wlsadmin\npassword=<password>" > boot.properties [wls@prod01]$ cat boot.properties username=wlsadmin password=<password>
The next time you start WebLogic Administration Server, it will use the credentials from the
boot.propertiesfile. The file will also be encrypted:[wls@prod01]$ cat boot.properties password={AES}If68A2GSiO6Fa8w4j0giDJGR0FATHnfPsoZvpmF/Ipc\= username={AES}UYyIQYkN6z5o8PsS/IccG3VgZv6LP1zj+Ro1JBDb2ZE\=
You usually start the Administration Server as a background process in Linux.
Go to the WebLogic domain's
bindirectory:[wls@prod01]$ cd $DOMAIN_HOME/binStart the Administration Server in the background:
[wls@prod01]$ nohup ./startWebLogic.sh &
[1] <PID>
The <PID> value is the process ID of the Administration Server.
The standard output (stdout) and standard error (stderr) of the process will be appended to a file called $DOMAIN_HOME/bin/nohup.out.

The Administration Console is the central application for administering your WebLogic domain. The WebLogic domain PROD_DOMAIN was configured to start in production mode; this means you'll have to obtain the domain configuration lock before saving and activating changes. This protection is to prevent changes from other users during your edit session.
Carry out the following steps to save and activate changes:
Access the Administration Console with your web browser at
http://prod01.domain.local:7001/console.Obtain the configuration lock by clicking on Lock & Edit:

Make the necessary changes and click on the Save button to save it.
If there are any configuration changes pending, the Lock & Edit button should be labeled now as Activate Changes:

Click on the Activate Changes button to confirm the changes.
All saved changes made before activating the session are saved in the $DOMAIN_HOME/pending directory. It contains the new version of the configuration files (config.xml). As soon as the
Activate Changes option is clicked on, the Administration Server issues a command to all the WebLogic Managed Server instances to update the configuration. If any of the Managed Servers do not accept the new configuration, the changes are rolled back and the Administration Console will show a message. If the new configuration is accepted by the Managed Servers, the changes will be activated and the configuration files will be updated by all the servers and one very machine belonging to the domain.
The system administrator can also make configuration changes through WLST.
Under the hood, WebLogic Server uses a JMX framework that exposes WebLogic MBeans to manage its configuration. The Administration Console issues JMX commands as you make changes to Configuration Manager MBean. MBeans can be accessed through WLST.
Edit, save, and activate the changes through WLST:
Log in as a
wlsuser to shell and start WLST:[wls@prod01]$ $WL_HOME/common/bin/wlst.sh Welcome to WebLogic Server Administration Scripting Shell Type help() for help on available commands wls:/offline>
Connect to the Administration Server using
wlsadminas the user,<pwd>as the password, andt3://prod01.domain.local:7001as the server URL:wls:/offline>connect("wlsadmin","<pwd>","t3://prod01.domain.local:7001") Connecting to t3://prod01.domain.local:7001 with userid wlsadmin ... Successfully connected to Admin Server 'PROD_AdminServer' that belongs to domain 'PROD_DOMAIN'. wls:/PROD_DOMAIN/serverConfig>
Start the editing, make the necessary changes, and activate it in the end:
wls:/PROD_DOMAIN/serverConfig>edit()
Location changed to edit tree. This is a writable tree with
DomainMBean as the root. To make changes you will need to start
an edit session via startEdit().

For more help, use help(edit)
You already have an edit session in progress and hence WLST will
continue with your edit session.

wls:/PROD_DOMAIN/edit !>startEdit()
Starting an edit session ...
Started edit session, please be sure to save and activate your
changes once you are done.

wls:/PROD_DOMAIN/edit !>< make necessary changes >

wls:/PROD_DOMAIN/edit !> save()
Saving all your changes ...
Saved all your changes successfully.

wls:/PROD_DOMAIN/edit !>activate()
Activating all your changes, this may take a while ...
The edit lock associated with this edit session is released
once the activation is completed.

Activation completed

wls:/PROD_DOMAIN/edit> exit()
Exiting WebLogic Scripting Tool
Change management in a production environment is critical and has to be done with careful preparation and planning. WebLogic provides a way to save and later track all the changes made in its configuration.
This recipe focuses on how to enable the embedded configuration backup, how to enable the configuration changes audit, and how to automatically record a Jython script to all the changes made in the Administration Console that can be used later with WLST.
Carry out the following steps to protect the configuration changes:
Access the Administration Console with your web browser at
http://prod01.domain.local:7001/console.Click on the Preferences link.
Enable the following checkboxes:
Show Advanced Sections
Warn If User Holds Lock
Warn User Before Taking Lock
Click on the Save button.
Open the WLST Script Recording tab.
Enable the following checkboxes:
Append to File
Automatic Recording
Click on the Save button.
Click the
PROD_DOMAINlink on the Domain Structure on the left.Choose Change Log and Audit in the Configuration Audit Type drop-down menu.
Enable the Configuration Archive Enabled checkbox.
Set the number of back files in the Archive Configuration Count text field. Type
250as the value. The default value is50.Click on the Save button.
Activate the changes by clicking on the Activate Changes button.
You will have to restart the Administration Server for the changes to take effect.
The Preferences section changes will enable some messages in the Administration Console that will warn the user when the edit lock is already being used in another browser session. This is important in a production environment to avoid the changes being made by other administrators at the same time.
The WLST Script Recording changes will enable a Jython script to be recorded to every change made in the Administration Console. The script is recorded by default in the $DOMAIN_HOME root directory with a filename Script*.py.
With the backup configuration enabled, every time the domain configuration is modified, a JAR file containing the old configuration($DOMAIN_HOME/config/*) will be archived until the limit of 250 archives as you defined in Archive Configuration Count. Change the value so it suits your needs. JAR will be saved in the directory $DOMAIN_HOME/configArchive/config-XXX.jar. The lesser the XXX number, the older the configuration archive is.
The audit configuration registers every step and change made in the Administration Server log file (.log). The following example shows the wlsadmin user changing the JTA timeout from 30 to 300:
<BEA-159904><USER wlsadmin MODIFIED com.bea:Name=PROD_DOMAIN,Type=JTA ATTRIBUTE TimeoutSeconds FROM 30 TO 300>
Enabling the protection changes can also be done through WLST.
You can use WLST to make the exact same configuration changes. The exception is the Preferences section, which is a bunch of parameters from the Administration Console application and not from the WebLogic domain:
Log in as a
wlsuser to shell and start WLST:[wls@prod01]$ $WL_HOME/common/bin/wlst.shConnect to the Administration Server using
wlsadminas the user,<pwd>as the password, andt3://prod01.domain.local:7001as the server URL:wls:/offline>connect("wlsadmin","<pwd>","t3://prod01.domain.local:7001")Run the following WLST commands:
edit()
startEdit()
cmo.setConfigurationAuditType('logaudit')
cmo.setConfigBackupEnabled(true)
cmo.setArchiveConfigurationCount(250)
save()
activate()
exit()
The Administration Console is a Java web application based on the WebLogic portal that can be modified and extended. These console extensions can be used to customize the Administration Console layout, style, logos, and images, and also to add extra pages, and extra functionalities to monitor and manage WebLogic Server and deployed applications.
This recipe will focus on creating a simple console extension to change a few text elements of the PROD_DOMAIN the Administration Console.
This task requires you to have ANT installed. It can be downloaded at http://ant.apache.org. Download the latest stable build and install it. The filename should be apache-ant-XXX-bin.zip where XXX stands for the ANT version.
Carry out the following steps to customize and extend the Administration Console:
Log in as a
wlsuser to the first machineprod01and unzip ANT:[wls@prod01]$ cd /oracle [wls@prod01]$ unzip apache-ant-XXX-bin.zip
Create a symbolic link
antpointing to theapache-ant-XXXdirectory:[wls@prod01]$ ln -s apache-ant-XXX ant [wls@prod01]$ ls -l lrwxrwxrwx 1 wlswls 16 Aug 9 10:37 ant -> apache-ant-XXX drwxr-xr-x 6 wlswls 4096 May 22 06:24 apache-ant-XXX
Export the environment variables:
[wls@prod01]$ export JAVA_HOME=/oracle/jvm
[wls@prod01]$ export ANT_HOME=/oracle/ant
[wls@prod01]$ export MW_HOME=/oracle/Middleware
[wls@prod01]$ export WL_HOME=/oracle/Middleware/wlserver_12.1
[wls@prod01]$ export PATH=$ANT_HOME/bin:$JAVA_HOME/bin:$PATH
Change to the console extension templates directory:
[wls@prod01]$ cd $WL_HOME/server/lib/console-ext/templatesRun ANT to expand the Look and Feel Template (
laf):[wls@prod01]$ ant -f build-new-laf.xml -Dname=myConsoleExt -Ddir=/oracle/myConsoleExt Buildfile: /oracle/Middleware/wlserver_12.1/server/lib/console-ext/templates/build-new-laf.xml all: [mkdir] Created dir: /oracle/myConsoleExt [unzip] Expanding: /oracle/Middleware/wlserver_12.1/server/lib/console-ext/templates/laftemplate.zip into /oracle/myConsoleExt [move] Moving 1 file to /oracle/myConsoleExt/framework/markup/lookandfeel BUILD SUCCESSFUL Total time: 1 second
Extract and copy the default message bundle
global.propertiesto the project from theconsole.jarfile:[wls@prod01]$ cd /oracle/myConsoleExt/WEB-INF [wls@prod01]$ mkdir classes [wls@prod01]$ cd classes [wls@prod01]$ $JAVA_HOME/bin/jar -xf $WL_HOME/server/lib/consoleapp/webapp/WEB-INF/lib/console.jar global.properties
Edit
global.properties:[wls@prod01]$ vi global.propertiesChange the
window.titleandlogin.titlevalues from:window.title=Oracle WebLogic Server Administration Console login.title=Welcome
To:
window.title=My Company-Oracle WebLogic Server Administration Console
login.title=Welcome to "My Company"
Archive the
myConsoleExtextension and move the package to thePROD_DOMAINconsole extensions directory:[wls@prod01]$ cd /oracle/myConsoleExt [wls@prod01]$ $JAVA_HOME/bin/jar -cf myConsoleExt.war * [wls@prod01]$ mv myConsoleExt.war $DOMAIN_HOME/console-ext/
Restart the Administration Server.
Access the Administration Console login page and check the text changes.
Before the changes are made, it should look like the following screenshot:

And afterwards, you will notice the changes highlighted in the following image:
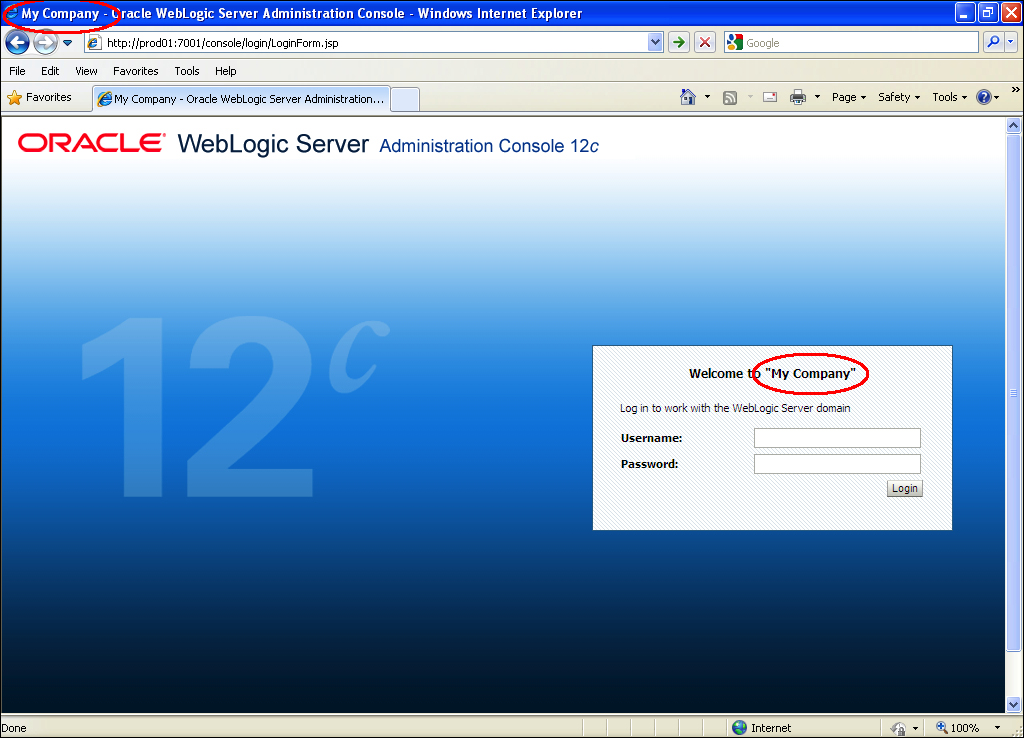
You created a myConsoleExt.war console extension application that changes some of the text of the Administration Console.
Other modifications can be made to the following resources to suit your customization needs:
Images:
/oracle/myConsoleExt/images/*/oracle/myConsoleExt/framework/skins/myConsoleExt/images/*Stylesheet:
/oracle/myConsoleExt/css/*/oracle/myConsoleExt/framework/skins/myConsoleExt/css/*JSP:
/oracle/myConsoleExt/framework/skeletons/myConsoleExt/*Text:
/oracle/myConsoleExt/WEB-INF/classes/global.properties
The global.properties file is the generic resource bundle that holds the text messages. Depending on the internationalization needs, you may create the appropriate files for each language. More details can be found at http://docs.oracle.com/cd/E24329_01/web.1211/e24966/bundles.htm#g1076214.
To remove the Administration Console extension or to add more pages and content to it, follow the given instructions.
Adding other content to Console involves developing a WebLogic portal web application, using NetUI, portlets, JSP, and other J2EE technology. It is a Java programming task, which is beyond the scope of this book.
You can check Oracle's documentation at http://docs.oracle.com/cd/E24329_01/web.1211/e24966/addcontrols.htm#CNSLX159.
WebLogic Server 12c introduces the possibility of monitoring WebLogic Server using RESTful Web Services with new RESTful Management Services.
RESTful Management Services is disabled by default. This recipe will enable it.
WebLogic Administration Server must be up and running.
To enable WebLogic RESTful Management Services, you have to access the Administration Console at http://prod01.domain.local:7001/console.
Carry out the following steps to enable RESTful Management Services:
Access the Administration Console with your web browser at
http://prod01.domain.local:7001/console.Click on the Lock & Edit button to create a new change session.
Navigate to Settings for Domain | General by clicking Home and then Domain or by clicking the
PROD_DOMAINlink.Check the Enable RESTful Management Services checkbox, as shown in the following screenshot:

Restart WebLogic Administration Server and all Servers of the domain.
RESTful Management Services exposes WebLogic Server instances and WebLogic clusters, applications, and data sources to be monitored using the HTTP GET method and RESTful formats, such as XML, JSON, and HTML.
The following table displays the resources to be monitored and the corresponding URIs to be accessed.
|
Resource |
URI |
|---|---|
|
Servers |
|
|
Specific Server |
|
|
Clusters |
|
|
Specific Cluster |
|
|
Applications |
|
|
Specific Application |
|
|
Data Sources |
|
|
Specific Data Source |
|
The following image illustrates a RESTful request to monitor all servers of the domain. It contains the name, state, and health of the Administration Server instance PROD_AdminServer. It also contains the WebLogic version, the machine that this server is running, open sockets, the Java version, the operational system, the Java heap size, and the Java heap in use. The PROD_Server01 and PROD_Server02 instances are down, and their state is also displayed as SHUTDOWN:

RESTful Management Services can also be enabled through WLST.
Log in as a
wlsuser to shell and start WLST:[wls@prod01]$ $WL_HOME/common/bin/wlst.shConnect to the Administration Server using
wlsadminas the user,<pwd>as the password, andt3://prod01.domain.local:7001as the server URL:wls:/offline>connect("wlsadmin","<pwd>","t3://prod01.domain.local:7001")Run the following WLST commands:
edit()
startEdit()
cd('/RestfulManagementServices/PROD_DOMAIN')
cmo.setEnabled(true)
save()
activate()
exit()
Restart WebLogic Administration Server and all servers of the domain.
This recipe will show how to start and stop the WebLogic Managed Server from the Administration Console.
The Node Manager must be up and running in each of the computers of the WebLogic domain.
Carry out the following steps to start and stop the WebLogic Managed Server:
Access the Administration Console with your web browser at
http://prod01.domain.local:7001/console.Navigate to the Settings for Domain page by clicking on Home and then Domain or by clicking the
PROD_DOMAINlink.Click on the Control tab.
Select the checkbox to the left of the WebLogic Server name, and click on the Start button to start the servers or the Shutdown button to shutdown. The Shutdown button has two options: When work completes or Force Shutdown Now. Select Force Shutdown Now.
Confirm the operation by clicking on the Yes button on the Server Life Cycle Assistant page.
When a start/stop operation is invoked for Managed Server, the Administration Console issues this command to the Node Manager. The Node Manager receives the startup parameters and credentials from the Administration Console and starts the Managed Server.
The Managed Server then contacts the Administration Server and checks for configuration changes and if necessary, updates it. If the Administration Server is not reachable, the Managed Server uses the local copy of the configuration from the $DOMAIN_HOME/config/* directory.
It's possible to start the WebLogic Server instances without the Node Manager; but unless you have your own monitoring and high availability method to the WebLogic domain, it is recommended to use the Node Manager in production environments.
The Managed Server can also be started and stopped using WLST.
Carry out the following steps:
Log in as a
wlsuser to shell and start WLST:[wls@prod01]$ $WL_HOME/common/bin/wlst.shConnect to the Administration Server using
wlsadminas the user,<pwd>as the password, andt3://prod01.domain.local:7001as the server URL:wls:/offline>connect("wlsadmin","<pwd>","t3://prod01.domain.local:7001")Run the following WLST command to start
PROD_Server01:start('PROD_Server01','Server')To stop the Managed Server, type the following command:
shutdown('PROD_Server01','Server')
The WLST method works the same way as the Administration Console. The Administration Console and WLST are both clients accessing the Node Manager, and both invoke start/stop operations on it.
You can use
the startManagedWebLogic.sh and stopManagedWebLogic.sh script located at the $DOMAIN_HOME/bin directory:
Go to the WebLogic domain's
bindirectory:[wls@prod01]$ cd $DOMAIN_HOME/binStart the Managed Server
PROD_Server01typing:[wls@prod01]$ ./startManagedWebLogic.sh PROD_Server01 t3://prod01.domain.local:7001The server will initiate the startup process and ask for a WebLogic administrator username and password:
Enter username to boot WebLogic server: wlsadmin
Enter password to boot WebLogic server:
Type
wlsadminas the username and<password>you previously specified at the domain creation as the password.The WebLogic Managed Server will start.
To stop the
PROD_Server01Managed Server, provide the credentialswlsadmin/<password>:[wls@prod01]$ ./stopManagedWebLogic.sh PROD_Server01 t3://prod01.domain.local:7001 Stopping Weblogic Server... Initializing WebLogic Scripting Tool (WLST) ... Welcome to WebLogic Server Administration Scripting Shell Type help() for help on available commands Please enter your username :wlsadmin Please enter your password :<password> Connecting to t3://prod01.domain.local:7001 with userid wlsadmin ... Successfully connected to Admin Server 'PROD_AdminServer' that belongs to domain 'PROD_DOMAIN'. Warning: An insecure protocol was used to connect to the server. To ensure on-the-wire security, the SSL port or Admin port should be used instead. Shutting down the server PROD_Server01 with force=false while connected to PROD_AdminServer ... Exiting WebLogic Scripting Tool. Done
Note
Scripts usage
startManagedWebLogic.sh <serverName> <admin_url>
stopManagedWebLogic.sh <serverName> <admin_url>
stopManagedWebLogic.sh <serverName> <admin_url> <user> <password>
The boot.properties file must
be created the same way it was created before in order to provide the credentials, otherwise WebLogic will not start.
Tip
WebLogic Server will look for the credentials provided in the boot.properties file under $DOMAIN_HOME/servers/<servername>/security/ when starting from the script.
On the other hand, the credentials will be stored automatically in $DOMAIN_HOME/servers/<servername>/data/nodemanager/boot.properties if the startup command is issued to the Node Manager. WebLogic Server will not ask for the username/password.
This recipe will cover the deployment of a J2EE Application archived file (EAR), but it also applies to Web Application (WAR), Resource Adapters(RAR), and other JAR archived files, such as libraries, EJBs, and Java classes.
The following steps will walk you through the process to deploy the application. The WebLogic administrator usually assumes the deployer role in a production environment, so make sure to define a well-structured procedure to deploy the applications and follow it.
This recipe will deploy an archived application file called myApp.ear. The application will be target of the
PROD_Cluster cluster instead of the individual Managed Servers.
Carry out the following steps:
Create a new directory to be the application installation directory using the syntax
/oracle/applications/<environment>/<application>/<version>:[wls@prod01]$ mkdir -p /oracle/applications/prod/myApp/v1 [wls@prod01]$ cd /oracle/applications/prod/myApp/v1
Create two directories:
[wls@prod01]$ mkdir app
[wls@prod01]$ mkdir plan
Copy the
myApp.earfile to theappdirectory.Access the Administration Console with your web browser at
http://prod01.domain.local:7001/console.Click on the Lock & Edit button to start a new edit session.
Navigate to the Deployments page by clicking on the link in the domain structure.
Type the path
/oracle/applications/prod/myApp/v1/appand click on Next.Select
myApp.earfrom the list and click on Next.Select Install this deployment as an application and click on Next.
Select the All servers from the cluster radio button from the
PROD_Clustercluster and click on Next.Leave the default options and click on the Finish button.
A new deployment plan file will automatically be created in
/oracle/applications/prod/myApp/v1/plan/Plan.xml.Click on the Activate Changes button to apply the changes.
The application should be in a Prepared state. Start the application by selecting the
myAppcheckbox and clicking on the Start button with the Servicing all requests option.
This procedure installs a simple enterprise application named myApp to the cluster PROD_Cluster in the WebLogic domain.
The application is distributed to the cluster using the default deployment option stage mode. In the stage mode deployment, the Administration Server prepares the myApp.ear file to be copied to the stages directory of each of the Managed Servers of the cluster PROD_Cluster. The directory is $DOMAIN_HOME/servers/<servername>/stage/<application>.
WebLogic will use this local copy until a new redeployment is made.
There are many options to achieve the same results when deploying.
You can use the command-line tool weblogic.Deployer to make deployment changes in a WebLogic domain.
To perform the same deployment of myApp.ear to the PROD_Cluster cluster, do the following:
Go to the WebLogic domain's
bindirectory:[wls@prod01]$ cd $DOMAIN_HOME/binSet the environment variables:
[wls@prod01]$ . ./setDomainEnv.shRun the
weblogic.Deployercommand line with the parameters:[wls@prod01]$ java weblogic.Deployer -adminurl t3://prod01.domain.local:7001 -username wlsadmin -password <pwd> -deploy -targets PROD_Cluster /oracle/applications/prod/myApp/v1/app/myApp.earThe following should be the output:
weblogic.Deployer invoked with options:  -adminurl t3://prod01.domain.local:7001 -username wlsadmin -deploy -targets PROD_Cluster /oracle/applications/prod/myApp/v1/app/myApp.ear
<Info><J2EE Deployment SPI><BEA-260121><Initiating deploy operation for application, myApp [archive: /oracle/applications/prod/myApp/v1/app/myApp.ear], to PROD_Cluster .>
The
myAppapplication should be deployed to thePROD_Clustercluster.
Now let's deploy the application through WLST using the following steps:
Log in as a
wlsuser to shell and start WLST:[wls@prod01]$ $WL_HOME/common/bin/wlst.shConnect to the Administration Server using
wlsadminas the user,<pwd>as the password, andt3://prod01.domain.local:7001as the server URL:wls:/offline>connect("wlsadmin","<pwd>","t3://prod01.domain.local:7001")Run the following WLST command to deploy the
myApp.earapplication to thePROD_Clustercluster:deploy("myApp", "/oracle/applications/prod/myApp/v1/app/myApp.ear","PROD_Cluster")The following should be the output:
Deploying application from /oracle/applications/prod/myApp/v1/app/myApp.ear to targets PROD_Cluster (upload=false) ...
<Apr 6, 2013 11:02:24 PM BRT><Info><J2EE Deployment SPI><BEA-260121><Initiating deploy operation for application, myApp [archive: /oracle/applications/prod/myApp/v1/app/myApp.ear], to PROD_Cluster .>
.Completed the deployment of Application with status completed
Current Status of your Deployment:
Deployment command type: deploy
Deployment State       : completed