


Over a period of time, people are in the process of finding ways to reuse existing applications to build new applications that are cheaper and faster and achieve interoperability between applications. Loosely-coupled integration of existing applications is required to achieve application agility for timely responses to the changing business requirements. BPEL is one of the leading integration technologies to implement agility for composite applications.
Web applications can be created in multiple ways that depend on the business requirements. There are four generations of web applications which are currently used by the businesses. The first generation web applications were simply informational and static in nature. The second generation web applications enabled interaction with end users and dynamically presented and performed simple transactions online. The third and fourth generation web applications are allowing businesses to perform complex business transactions online that have increased the need for simplifying system integration and reusability of existing enterprise applications with agility.
Organizations iteratively work on improving and modifying business processes to stay competitive in the market. This requires application implementations to be more flexible that by design adapt to the changes in business processes. In other words, most enterprise businesses need agility in creating and maintaining applications to run mission-critical businesses functions, and that requires a platform to quickly create and update business process and/or workflow services. Usually these business process services are composite services that depend on the multiple services within and between enterprises. The application's platform, that enables mission-critical business processes online, is easy to maintain if they are developed using technology components such as SOA and BPEL.
This book uses the JDeveloper IDE for designing and validating BPEL services and Oracle BPEL Process Manager (part of SOA Suite) platform, which has a runtime engine, for BPEL services.
BPEL stands for Business Process Execution Language. The standard body for BPEL is Organization for the Advancement of Structured Information Standards (OASIS) that produces worldwide standards incorporating industry consensus. The syntax of BPEL is XML-based and the current specification is WSBPEL Version 2.0.
BPEL is a programming language that has a mix of structured (blocks) and unstructured (control-links and events). BPEL is used for designing business processes that integrate web services into end-to-end process flow, and for the orchestration of business services. BPEL is mainly used for orchestrating services. The following figure shows the sample structure of a BPEL process:

A brief description of BPEL is given as follows:
BPEL is one of the leading specifications to standardize orchestration logic and process automation between web services.
The key benefit of BPEL is about leveraging more from existing application assets. BPEL enables legacy applications to be deployed as web services and orchestrated across platforms.
Identifying and documenting both the existing and new required high-level business process is a time-consuming but essential job.
BPEL enables developers to develop processes quickly by defining the order in which services will be invoked and provide an easy interface to connect processes from external systems.
Business Process Execution Language for web services provides a means to formally specify business processes and interaction protocols. BPEL is acting as a glue to bind web services into a cohesive business solution and facilitating their orchestrated interaction within and between enterprises.
Web service is an integration model created for allowing integration of systems built using heterogeneous tools and technologies. BPEL is one of the core components for defining composite web services to perform complex business functions.
BPEL syntax is based on XML. Therefore, it may not be a good idea to design and develop BPEL code by using a text/XML editor. A visual BPEL editor under JDeveloper IDE helps to develop and validate BPEL code easily without memorizing the BPEL specifications line by line. The following figure shows the interaction between a BPEL process and other services:

To deploy and execute BPEL processes, one needs Oracle Business Process Manager Engine. Currently Business Process Manager is part of Oracle SOA Suite. This book covers Version 11.1.1.16 of Oracle SOA Suite.
The following figure shows details of the components that interact with a sample BPEL service:

OASIS Web Services Business Process Execution Language (WSBPEL) is a vendor-neutral specification.
BPEL process manager is one of the components of the Oracle SOA Suite. The Oracle SOA Suite is a combination of multiple applications created by Oracle developers and deployed in a WebLogic container. For example, SOA Infra.ear, Adaptors, B2B, and so on.
Four separate main components/engines are included in SOA Suite. Each of these components has been created by Oracle developers using JSP, Servlets, EJB, JMS, RDBMS, and other system components.
BPEL Processes
Mediator
Business Rules
Human Task
BPMN (BPM Suite) is another component that can configure along with SOA Suite. SOA Infra is the core application. Similar to any enterprise web application, SOA Suite uses a database for storing the metadata information. For example, SOA Infra application uses database schemas for storing all the application information.
Oracle SOA Suite, along with JDeveloper IDE, enables the following:
Design and develop business services
Manage business services
Orchestrate services in to SOA composite applications
Provide a runtime engine for deploying and managing SOA composite applications
The following figure shows different service components of an SOA Suite:

JDeveloper packages various SOA components as SOA composite applications. SOA composite applications may contain some or all of the following components:
BPEL processes for process orchestration
Human workflows for modeling human interactions such as approving a salary increment for an HR system
Mediator for routing and transforming the messages (Oracle Service bus can be used for the same purpose
Spring framework for integrating Java interfaces to SOA Composite applications
Since Oracle SOA Suite runs on top of WebLogic container, you can deploy normal J2EE components as part of SOA composite applications; however, it may not be a good idea to use SOA Suite as a normal J2EE container. Separate the J2EE components and deploy it in another instance of WebLogic instances. Some of the J2EE components are listed as follows:
Following are the Oracle SOA Suite management applications and services as part of the SOA Suite installation:
Dynamic Monitoring Service (DMS):
http://{hostname}:{port}/dmsWeb Services Inspection Language (WSIL):
http://{hostname}:{port}/inspection.wsilDefaultToDo :
http://{hostname}:{port}/workflow/DefaultToDoTaskFlowMessagingService endpoint:
http://{hostname}:{port}/ucs/messaging/webserviceMessagingServices preferences:
http://{hostname}:{port}/sdpmessaging/userprefs-uiSOA-Infra:
http://{hostname}:{port}/soa-infra/Note
Please note, that for all the service endpoints, you need to replace the hostname and port. For example:
http://{hostname}:{port}/console
Where
{hostname}is a parameter that you replace with the hostname or IP address of your installation,{port}is the port number on which the server is listening for requests (7001by default).Example of the personal installation URL is as follows:
http://localhost:7001/console/
The concept of composition is to create enterprise solutions by assembling instead of building from scratch. Object-oriented programming allows for reusing the code within the applications. The concept of composite applications allows for reusing the existing applications.
As shown in the following figure, a brand new building is created by assembling pre-built components to cut down the construction time. Similar to creating a new building by assembling components, BPEL allows for creating business processes from existing services:

This section focuses on setting up the development environment to design and develop business process services using BPEL. The following figure shows the typical environment system components for designing and developing a BPEL service:
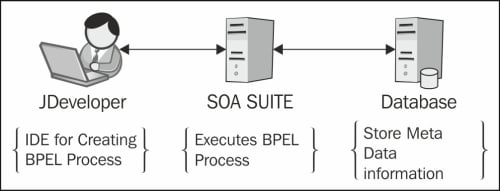
BPEL Process Manager is part of SOA Suite for Version 11.1.1.6. The development environment for creating and updating BPEL Process Manager requires the JDeveloper IDE with SOA Suite extension, a database with SOA Suite Schemas, and an SOA Suite.
The following are the steps to be followed:
Install Oracle JDeveloper
Install JDeveloper
Install SOA Extensions
Install SOA Suite Database Schemas
Install Oracle SOA Suite
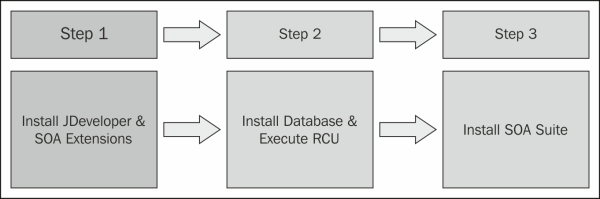
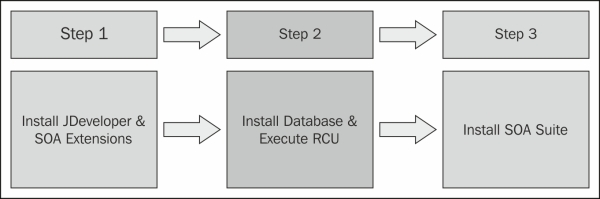
Setting up the development environment involves three major steps. As shown in the following figure, the first step is to install JDeveloper and SOA Extensions:
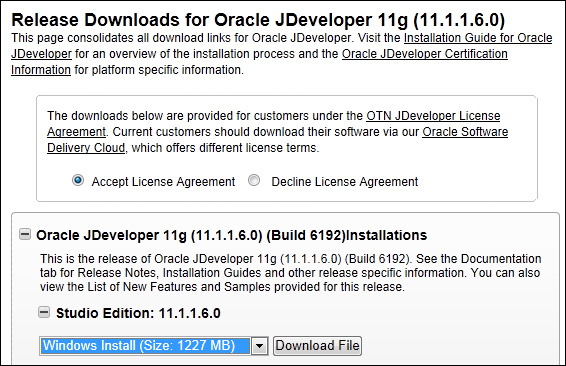
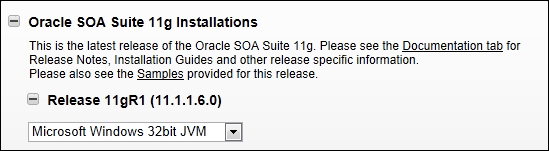
As shown in the following screenshot, download JDeveloper from the Oracle's website:
Tip
Install JDeveloper 11.1.1.6.0 or a newer version. Please note that installing JDeveloper Version 11.1.1.6 installs the following products preconfigured and ready to use with JDeveloper:
WebLogic Server Version 10.3.6
JDK
Install JDeveloper by executing
jdevstudio11116install.exe. One of the major steps for the installation process is configuring a new, or using an existing, middleware home directory. This will install WebLogic along with JDeveloper, as shown in the following screenshot:
You'll see the Middleware Home Directory screen (if needed, update the install directory), click on Next. Then select Complete and again click on Next.
The next screen will list the Middleware Home and Product Installation directories. Click on Next. We recommend keeping the default selection of All Users, as shown in the following screenshot and click on Next:

On the next screen you will find the installation summary. Click on Next on the Installation Summary window that will start installing the Oracle JDeveloper. On completion of the installation, you will see the congratulations window, as shown in the following screenshot. Please check the Run Quickstart option and click on Done:

On next window, click on Launch Oracle JDeveloper 11g and select the Default Role option and leave Always prompt for role selection on startup selected, as shown in the following screenshot and click on OK. On the next window, make sure to associate the file types of JDeveloper Application, JDeveloper Project, Java Source File, and Java Server Page with JDeveloper:

The SOA extension for JDeveloper contains SOA Composite Assembly, BPEL PM, Mediator, Human Task, Business Rules, and Adapters. These components are deployed and configured as part of SOA Suite installs. The JDeveloper extensions are only for design.
Perform the following steps to install SOA extensions. An alternative approach is to download the SOA Composite Editor – JDeveloper extensions from Oracle Fusion Middleware Products Update Center from Oracle's website.
Select Check for Updates from the Help tab, as shown in the following screenshot and then click on Next on the Welcome window:

Select Oracle Fusion Middleware Products and Official Oracle Extensions and Updates. Make sure you are connected to the Internet. Another alternative is to download the SOA extensions in the hard disk and manually configure it in JDeveloper:

Select the SOA composite editor. This will install the SOA extensions required for creating and updating BPEL services. Click on Next:

On the next window, it will display that it is downloading and installing the SOA extension for the JDeveloper. On a successful install, you will see the Installation Summary window, as shown in the following screenshot. Click on Finish to complete the SOA extension install and restart the JDeveloper. This completes the installation of JDeveloper with SOA Suite extensions:

As shown in the following screenshot, the second step is to install a database and execute an RCU script for creating SOA schemas:
This step assumes that you have got an Oracle database server installed and you have database admin privileges to run Repository Creation Utility (RCU). In the case of personal Oracle Express Database, start the database service if it is not running. One can use the Start Database option from the Start menu options.
Open a Windows shell command prompt and run sqlplus system/{password}@XE as sysdba to log in to Oracle Express Database.
The default limit of processes is not sufficient for creating the SOA Suite schema. Set the processes to 600 for all the SIDs, as given in the following lines of command:
SQL> alter system reset sessions scope=spfile sid='*';
SQL> alter system set processes=600 scope=spfile;
Make the changes effective immediately with the following command:
SQL> shutdown immediate
Using system Start menu's Start Database menu options start the Oracle Database service.
Validate the system settings with the following steps:
Connect to the database using a Windows shell command prompt and run
sqlplus system/{password}@XE as sysdba.SQL> show parameter session SQL> show parameter processes
Set the
RCU_JDBC_TRIM_BLOCKSvariable asTRUEbefore creating the schemas using RCU if your database is Oracle XE.In Windows, you need to navigate to Control Panel | Advanced system settings | Advanced. From under System Properties, click on Environment Variables. An Environment Variables dialog appears. From under the System variables section, click on New. A New System Variable dialog appears. Set the Variable Name as
RCU_JDBC_TRIM_BLOCKSand Variable Value asTRUE, as shown in the following screenshot:
For creating RCU schemas, execute
rcu.batfrom thebinfolder located at{FullPath}\rcuHome\BIN. Please note, thatrcu.batwon't work with the files and folders names having a space in them. It will display the repository creation utility (RCU). Click on Next on the Welcome window that will take you to the Create Repository step, as shown in the following screenshot:
Click on Next and enter the database information. Look in the
tnsnames.oraorlistener.orafiles located in the Oracle Database install directory for the database information. As shown in the following screenshot, ensure that you use the exact information from thetnsnames.orafile as the database information. For example, enter the value for Host Name as the database server hostname. If you are running the Repository Creation Utility on the database server itself, you may use Host Name aslocalhost, as shown in the following screenshot:
You can ignore the database support warnings. It will initiate the installation step of Checking Prerequisites with all the green ticks, as shown in the following screenshot. Click on OK:

The next screen allows you to add a prefix with database schemas. Usually the prefix
DEVis used for development environments,PRODfor production, and so on. Select the SOA and BPM Infrastructure components on the next window that will allow you to select Metadata Services, as shown in the following screenshot. Dependent schemas are selected automatically. If you choose to select other components, these install instructions may not match your experience. Also, you may have to increase processes in XE (you will get a message telling you what is required):
The preceding step creates the following database schemas:
Click on OK on the next window and choose a password for the database schemas, as shown in the following screenshot. It is recommended to keep the same passwords for all schemas for a development environment:

On the next window it will create tablespaces for the all the schemas created earlier:

Click on OK to create tablespaces in the database:

Click on Create. This will create all schemas in the database, as shown in the following screenshot. On the next window, click on Close. That completes the creation of database schemas for the SOA Suite:

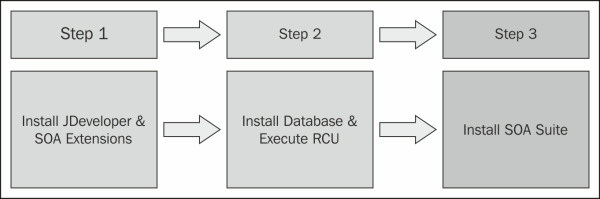
As shown in the following figure, the final step is to install the SOA Suite.
The Oracle SOA Suite Version 11.1.1.6 can be downloaded from Oracle's website.
Perform the following steps to complete the installation:
Extract all the disks from the ZIP archive into one folder and run
setup.exefromdisk1.To avoid the install error message, provide the location of JDK/JRE while running the
setup.exefile from the command line. You will need to passjreLocas a parameter tosetup.exe, as shown in the following command line:setup.exe -jreLoc C:\Oracle\Middleware\jdk160_24It will launch the install window, as shown in the following screenshot. Click on Next. On the next window click on Skip Software Updates and then click on Next:

It will start the SOA Suite installation and that will perform the Prerequisite Checks. On successful checks, we will get all the status as green, as shown in the following screenshot. Click on Next:

Please make sure that you have already installed WebLogic as a standalone install or as part of the JDeveloper install. On the next window, as shown in the following screenshot, enter the location of Oracle Middleware Home and click on Next:

On the next window, if you get the warning message that an existing Oracle SOA Suite 11g home has been detected, click on Yes to upgrade the existing Oracle SOA Suite 11g and then click on Next:

On the next window, we will get the installation summary, as shown in the following screenshot. Click on Install to start the SOA Suite installation:

On the next window, you will get the installation progress window that may take a few minutes to finish the install. On completion of the install, click on Next and that will take you to the Installation Complete window, as shown in the following screenshot. Click on Finish to complete the Oracle SOA Suite installation:

A typical development environment consists of the following:
One admin server
One managed server
However, you can perform the development with a single admin server as well.
A production environment will usually be a clustered environment consisting of multiple managed server and single admin instances.
To create an SOA Suite domain, perform the following steps:
Ensure that you choose Oracle SOA Suite for developers instead of Oracle SOA Suite in the Domain Configuration wizard.
Execute
config.batfrom command prompt, as shown in the following screenshot:
Alternatively, you can select Configure Application Server from the Windows Start menu, as shown in the following screenshot:

As shown in the following screenshot, select the Create a new WebLogic domain radio button and click on Next.

As shown in the following screenshot, select the Oracle products and then click on Next. On the next window, enter the desired domain name, domain location, and application locations, or leave the default values for them and click on Next:

Enter the user password and click on Next, as shown in the following screenshot. Store the password at a safe place, you will need it later:

On the next window, select Development Mode and select the Sun SDK 1.6 from under Available JDKs (in the following screenshot, the only available JDK is Sun SDK 1.6). Click on Next:

As shown in the following screenshot, enter the database information. Do not modify the schema user session. Please select and enter the data in the order as shown in the following screenshot:

If you receive a connection error do the following:
Sometimes, you may get the following error:

To resolve the preceding error, please ensure that you created schemas with the correct RCU version and are able to connect to the database with the username and password provided in the preceding screen.
Tip
Please note that we should not modify the username to the schemas. The username is selected by the utility. Change only the password. For a development environment, always prefix the schema with
DEV.Ensure that all the steps described in the RCU install session executed, including steps for changing the number of default Oracle database processes.
Shut down and start the database after the changes. The preceding changes are required only in the case of the database connection error messages. Test the JDBC connections for the SOA Suite database schemas and make sure it is green for all the schemas, as shown in the following screenshot. Click on Next:

On the next window you will see the configuration summary, as shown in the following screenshot. Clicking on Create will start writing the WebLogic domain setup files for Oracle SOA Suite. On the next window, you will see the progress of writing the domain setup files. Click on Done to finish setting up the WebLogic domain for Oracle SOA Suite:

Now, to start the admin server, go to the domain's
binfolder for which you wish to start the administration server using the following command:cd $BEA_HOME/user_projects/domains/<domain_name>/binFor Windows execute
startWebLogic.cmdFor Linux, execute
startWebLogic.sh
To start WebLogic, execute the startWeblogic.cmd script from the command prompt. Server logfiles are located as $BEA_HOME/ user_projects/ domains/ <domain_name> /servers/<ServerName> /logs / <ServerName>.log.
One can confirm that the WebLogic administration server started properly by looking at the message Service started RUNNING in the server logfile.
Start JDeveloper from the Start menu with the default role. In JDeveloper, from the Application tab, click on New and select SOA Application and then click on Next, as shown in the following screenshot:

Enter the Project Name and click on Finish, as shown in the following screenshot:

It will load the JDeveloper's Design view for developing SOA applications, as shown in the following screenshot:

Drag-and-drop a BPEL Process from Component Pallet to the JDeveloper canvas. The Create BPEL Process screen will appear on the JDeveloper console.
As shown in the following screenshot, you can name your BPEL process. In this case the name is the default BPELProcess1. In the Template field, select Synchronous BPEL Process. Executing Synchronous BPEL processes returns a result. The Asynchronous BPEL processes may not return any value:

As shown in the following screenshot, double-click on BPELProcess1 to view the BPEL:

After double-clicking on the BPEL process, a window, as shown in the following screenshot, will appear:

The next step is to debug the basic BPEL process. Currently, the business process has only receiveInput and replyOutput activity. Click on Run (or Make) to compile the project, as shown in the following screenshot:

After selecting Debug, the following dialog is displayed as no Default Run Target was specified in Run/Debug page of the Project Properties dialog.
Use the dialog in the following screenshot to specify the Default Run Target. Ignore any warning message about the non-existence of the
srcfolder:
From the Activities toolbar on the right-hand side of your window, drag an Assign activity and drop it between receiveInput and replyOutput. The following screenshot will appear after the changes:

You can rename it by double-clicking on Assign1.
An Assign activity is usually used for manipulating data. For example, Assign activity can be used for copying the contents of one variable to another.
Assign activity is mainly used for copying the XML data contained in one BPEL variable to another BPEL variable. The data in a variable is visible and shared among all process activities.
Partner Link represents a link to services. JDeveloper's Source tab allows you to make the changes to the sources if required. The following screenshot shows how the Copy Rules tab can be used for creating a copy rule and connecting the source and target types:
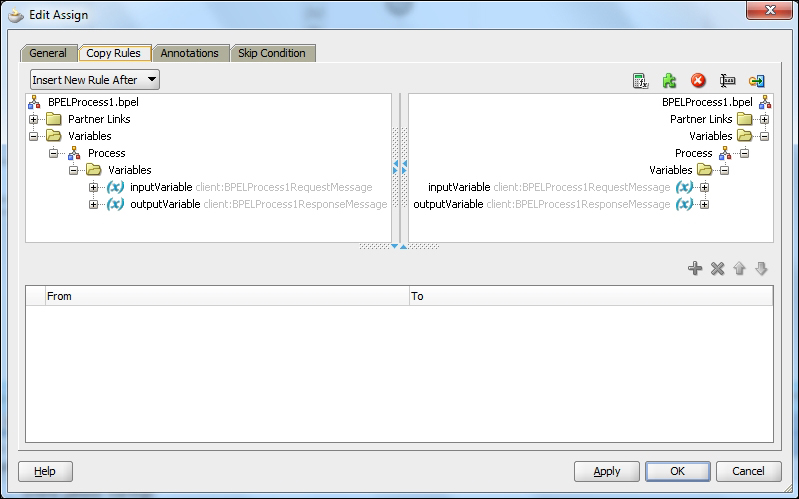
In the sample BPEL process being shown in the preceding screenshot, input data from an input string is being copied to an output string using the concat function of XPath.
XPath is language for navigating through elements and attributes in an XML document and finding information within an XML document. The syntax of XPath's concat function is as follows:
fn:concat(string,string,...)
It returns the concatenation of the strings. For example, concat("My","first","XPATH function!") gives the output as My first XPATH function.
While copying the value of an input string to an output string, use the concat function of XPath to combine the strings together to manipulate the data. The Assign activities in BPEL build the XPath queries.
It is recommended to use the drag-and-drop feature for copying and assembling functions. The source code example of the Assign activity is given as follows (you can view the source code from JDeveloper' Source tab):
<assign>
   <copy>
      <from expression="concat('BPEL working ',
         bpws:getVariableData('input', 'payload', '/p:input))"/>
      <to variable="output" part="payload" query="/p:result/p:message"/>
   </copy>
</assign>
Assign activity in BPEL can do the following:
The Assign syntax of the copy function is as follows:
<copy> <from...> <to...> </copy>
As shown in the following screenshot, select Deploy from the JDeveloper menu and select the project:

Select Deploy to Application Server, as shown in the following screenshot:

Enter a Connection Name. For example, enter
Weblogic:
Ensure that you start Oracle SOA Suite WebLogic server and database servers. Enter the WebLogic console user ID and password in the next screen.
As shown in the following screenshot, enter the server details that you want to deploy the service to. In case of a development integration environment, you may plan to deploy to a remote server. Enter the remote server information:

Ensure that the domain name is correct in the preceding screen. Click on Next. As shown in the next screenshot, click on the Test Connection button for testing the WebLogic connection.
If the application server box is empty, then do the following:
Ensure that the WebLogic application server and SOA managed server instances is up and running
Connect to an external WebLogic application server for deploying the services by providing the server information
Click on Next. In case of errors, ensure that you can connect to the WebLogic console using an external browser. If you are using a proxy for your browser, ensure that you use it while connecting from JDeveloper as well. Update or remove the proxy setting to remove connection errors:

As shown in the following screenshot, the next screen will display a message that the creation of the connection is complete. Click on Finish:

Follow the steps and test the connections. Use default port numbers configured while creating the WebLogic domain using the Configuration Wizard. Once connected, JDeveloper will recognize WebLogic in the dialog box, as shown in the following screenshot:

The SOA BPEL process manager is required for deploying the BPEL service. If you receive the following dialog box, ensure that the SOA servers are running in the local server, otherwise proceed with selecting the SOA server and finish the application connection process:

JDeveloper shows the following successful validation message:

To test the BPEL process, log in to Oracle's Enterprise Manager (EM) web interface using the following syntax:
http://{hostname}:/emLog in using an admin user and password:

As shown in the following screenshot, click on the default domain from SOA node on the left-hand side navigation bar and select BPELSample1. Click on the Test tab:

Ensure that the WSDL URL is correct and has
httpinstead ofhttps. Click on the Test Web Service button:
The result will be displayed, as shown in the following screenshot:

In this chapter you have developed an understanding of the concept and evolution of BPEL, installing SOA Suite and JDeveloper, creating and deploying basic BPEL services using JDeveloper and SOA Suite, and testing a BPEL service. The next chapter covers major aspects of BPEL language that includes the basic activities, structured activities, human workflow, correlation, and adapters. You will also learn how to create complex BPEL processes using JDeveloper and their use cases.


