


Before we delve into studying the PeopleSoft Financials applications, we need to understand that it is primarily an ERP application, meant to be used as a transaction processing system. Its core philosophy is driven by the need to record, process, and report accounting transactions of an organization.
In this chapter, we'll establish the understanding of core concepts of PeopleSoft applications—such as Chart of Accounts, Business units, SetIDs, Banks, User preferences, and related configurations. We'll also learn how to use an important tool known as Setup Manager, which is used in implementing PeopleSoft applications.
Note that these concepts are not related to a specific module and serve as the foundation for all subsequent modules in this book. A PeopleSoft Financials practitioner must understand these aspects to be able to successfully maintain and implement the applications.
This book relates to the version 9.1 of PeopleSoft applications. As a result, the concepts and screenshots in this book refer to the version 9.1. Some of the screens and basic concepts may be similar to previous PeopleSoft versions.
Any accounting system (be it manual or automated) is built on a structure that determines how the accounting information is recorded (and ultimately reported). Each organization determines the best possible way to capture and classify the vast number of accounting transactions that take place every day. This decision is a combination of two distinct factors:
The need to report the accounting data by various important parameters
Feasibility and ease of recording the accounting transactions
Let's take a very simple example to better understand this.
Global Vehicles Inc. is an automobile manufacturer, selling vehicles such as passenger cars, commercial vehicles as well as scooters. Its operations are spread across multiple countries. Let's say that its annual sales from all its vehicles are $100 million. The key challenge is to know where exactly these dollars are coming from.
Design an accounting system for Global Vehicles, so that it can answer questions like the following:
Which country is contributing the most to Global Vehicle's sales?
Which product family is lagging in terms of revenues?
What were the sales of passenger cars in USA?
Which is the best selling scooter model in terms of revenue?
Did you say, "Just make sure that you record all required pieces of information when each vehicle sale takes place"? You are absolutely right if you did!
One way of recording the sale transactions can be recording the Continent, Country, Product line, Vehicle model, and Sale Price. Thus, its sales data for January 2011 may look something like this:
|
Continent |
Country |
Product Line |
Model |
Sale Price |
|---|---|---|---|---|
|
North America |
USA |
Passenger Car |
Alpha |
USD 10,000 |
|
Europe |
France |
Scooter |
Gamma |
FRF 3000 |
|
North America |
USA |
Passenger Car |
Theta |
USD 30,000 |
|
North America |
Canada |
Passenger Car |
Theta |
CAD 33,000 |
|
North America |
USA |
Scooter |
Gamma |
USD 2,000 |
|
Europe |
UK |
Commercial |
Zeta |
GBP 40,000 |
As you can see, one can certainly answer the above questions if your accounting system can record all these attributes for each transaction.
Now let's go one step further. Say Global Vehicles has about 100 dealerships in the USA and wants to know the sales performance for each dealership. How can we address this additional requirement? Simple, by recording the dealership as an additional attribute for all the sales transactions.
You probably realize now that designing the structure of accounting information to be recorded is driven by how you wish to use the data. This structure (collection of all required attributes) is known as the Chart of Accounts (COA). All the attributes in COA are termed Chartfields in PeopleSoft parlance.
You would also be able to appreciate that the number of chartfields that an organization needs, depends on its business requirements. Having few chartfields will make the recording process simpler, but will not offer much insight into the recorded accounting data. On the other hand, having more chartfields will give a more meaningful picture of the accounting transactions, but at the cost of system performance. A PeopleSoft practitioner needs to balance an organization's reporting requirements and ease of use before recommending appropriate Chart of Accounts.
PeopleSoft Financial applications offer the following 25 chartfields:
|
Chartfield |
Length |
Comments |
|---|---|---|
|
10 |
This is a mandatory chartfield used to record corporate accounts and cannot be used for any other attribute. For example, an organization may use account # 100000 to record fuel expenses, while account # 200000 is used to record salary expenses for employees. | |
|
10 |
This chartfield is used only for statutory reporting to further classify accounting transactions. | |
|
8 | ||
|
5 |
Used primarily in education and government accounting systems. | |
|
10 | ||
|
5 | ||
|
5 | ||
|
8 | ||
|
6 | ||
|
5 |
Used if Project Costing module is implemented to track projects related details. | |
|
15 |
Used to track projects related details in Project Costing module. | |
|
15 |
Used to track projects related details in Project Costing module. | |
|
5 |
Used to track projects related details in Project Costing module. | |
|
5 |
Used to track projects related details in Project Costing module. | |
|
5 |
Used to track projects related details in Project Costing module. | |
|
10 |
Additional delivered chartfield by PeopleSoft. Activate it (and relabel if needed) to use. | |
|
10 |
Additional delivered chartfield by PeopleSoft. Activate it (and relabel if needed) to use. | |
|
10 |
Additional delivered chartfield by PeopleSoft. Activate it (and relabel if needed) to use. | |
|
5 |
Used for inter-unit transactions (transactions between 2 different business units) if only a single inter-unit account is used. This chartfield cannot be used for any other purpose. | |
|
10 |
Used for intra unit transactions (transactions between two separate Funds belonging to the same business unit) if only a single intra unit account is used. This chartfield cannot be used for any other purpose. | |
|
10 |
Used for intra unit transactions (transactions between two separate Operating Units belonging to the same business unit) if only a single intra unit account is used. This chartfield cannot be used for any other purpose. | |
|
10 | ||
|
4 | ||
|
4 | ||
Note that some chartfields (such as Account, Alternate Account, Project Costing Business Unit, Affiliate chartfields) are reserved for specific purposes and cannot be used to record any value other than its intended purpose. For example, the Account chartfield has to be used only to record corporate accounts used in accounting. However, there are no limitations on the use of other chartfields. Thus, it is not necessary that the Product chartfield has to be used to record a product. You can very well use it to record any attribute such as 'Country' or 'Continent' in the COA example discussed earlier.
As you can see, the given set of PeopleSoft chartfields may not really satisfy the organization's implementation requirements. This can be due to following factors:
Delivered chartfield names cannot be used
You may not need all of the given 25 chartfields
Given chartfields are not sufficient and you need to add additional chartfields (although this is highly unlikely)
To achieve this, you need to perform chartfield configuration activities.
Tip
Expert tip:
As far as the number of required chartfields is concerned, always think of your system's future requirements. Remember, it is extremely complicated to add a new chartfield to the COA if the system already has data using the old COA. If you think there is a possibility of new chartfield requirements down the line, include them in your COA even if you may not use them. You can simply keep it blank until the time it is needed.
The following operations can be performed on PeopleSoft delivered chartfields using standard configuration:
Changing the display order of chartfields on pages and reports.
Relabeling long and short names (descriptions) of chartfields.
Deactivating or activating chartfields.
Changing the display length of chartfields on pages and reports.
Changing Related chartfields for IntraUnit Affiliate chartfields.
Follow this navigation to perform standard chartfield configuration:
Setup Financials/Supply Chain | Common definitions | Design chartfields | Configure | Standard configuration
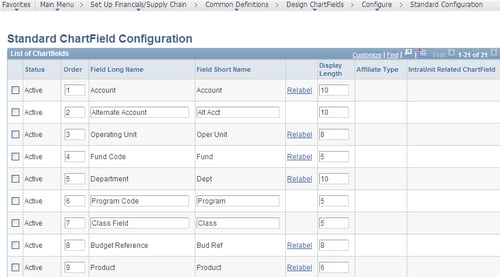
The following screenshot shows the partial Standard Chartfield Configuration page:
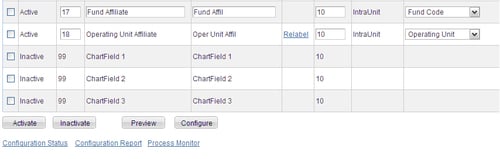
The next screenshot shows a part of the bottom half of the page:
In the COA example for Global Vehicles discussed earlier, we need to record the following attributes: Continent, Country, Product Line, and Model. Also, we anticipate that a new chartfield may be required in future to record 'Dealership'. Thus we need five chartfields for the COA (in addition to the Account chartfield). As you can see, PeopleSoft doesn't offer any chartfield by these names.
Therefore, we need to perform the following configuration activities:
Ensure that necessary chartfields are activated
Deactivate those chartfields that are not required
Relabel the active chartfields to reflect actual intended usage
Let's say that we decide to use following chartfields for our example (based on the available chartfield lengths):
|
Continent |
Operating Unit |
|
Country |
Fund Code |
|
Product Line |
Department |
|
Model |
Budget Reference |
|
Dealership |
Product |
|
Account |
Account |
To activate any chartfield that is inactive, select the checkbox next to it and click the Activate button:
To inactivate any redundant chartfield that is currently active, select the checkbox and click Inactivate button.
To change the display label of a chartfield, click the Relabel hyperlink. In the secondary page that opens, provide the new name to be used. For example, we need to relabel the Operating Unit chartfield as Continent as shown in the following screenshot:

Change display length of any chartfield in the Display Length column as required (provided it is not greater than original chartfield length).
Once configuration activities are complete, click Preview button to see what the new COA looks like.
Final step in the chartfield configuration process is to run the Full Configuration batch process. Click the Configure button to trigger this process.
The following operations can be performed on chartfields using advanced chartfield configuration:
Add new chartfields
Delete chartfields
Resize chartfields
Rename chartfields
Note that these changes have quite a wide impact on the PeopleSoft system, compared to standard configuration.
Follow this navigation to perform advanced chartfield configuration:
Setup Financials/Supply Chain | Common definitions | Design chartfields | Configure | Advanced configuration
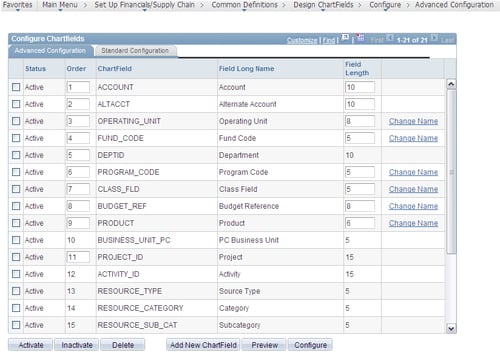
The following screenshot shows the Advanced Chartfield Configuration page:
Tip
Expert tip:
Advanced chartfield configuration is not advised by PeopleSoft. Always try to achieve the desired result by its corresponding action in standard configuration.
Activate an inactive ChartField instead of adding a new ChartField.
Inactivate a ChartField instead of deleting it.
Change the display length rather than the actual field length when reducing the size of a ChartField.
An ERP system like PeopleSoft financial applications needs to record and store enormous amounts of data. We need to understand the types of data that the system generates before getting into how it is done. Business Units and SetID form the basic structure of how the system records and accesses this data.
In PeopleSoft architecture, the data are categorized into the following two types:
Transaction data: These are the data elements that are generated due to regular business transactions. For example, an organization like Global Vehicles may create a purchase order for one of its suppliers to buy tires for its vehicles, create a vendor invoice (also known as voucher) to acknowledge that it needs to pay its supplier for received goods or issue a sales invoice when a vehicle is sold.
As you can see, amount of transaction data in a table that stores them, will keep on changing frequently as new transactions take place.
Master (Setup) data: These are the data elements that are needed to enable the system to perform its business transactions. For example, Global Vehicles may have a group of vendors from whom it buys components for its vehicles. It also may have a group of banks where it holds its bank accounts for its financial transactions.
What key differences do you see between such master data and the transaction data elements?
The first (and somewhat obvious) is the dynamic nature of transaction data. As we saw earlier, the number of sales invoices will always keep changing from day to day. On the other hand, how frequently can we expect changes in the number of vendors? True, there will be additions or deletions of vendors, but these changes will be far less compared to transaction data.
The second difference relates to the purpose of these types of data. Master data is needed to perform regular business transactions. For example, a vendor needs to be set up in the system before we can create a purchase order (a business transaction) to buy something from it. Similarly, we need to set up rules to calculate discount before we can create a sales invoice and decide how much discount can be given to a customer.
The third key difference lies in the way these data elements can be shared or need to be separated from each other. Let's assume that Global Vehicles' business has been structured by geography. Thus, it has following operating divisions: North America, Europe, and Asia.
Now let's consider the master data first. Is it possible that all these divisions can have a common vendor or bank? The answer is yes—a single vendor can sell car seats or tires to all the divisions. Similarly, a bank with a global presence can offer banking services to all these divisions. Thus, theoretically, master data can be shared by various groups within the organizations. Note that the master data doesn't always have to be shared, but can be if needed.
Let's consider the transaction data now. When the European division sells a car, can this transaction (sales invoice) be claimed (in other words, shared) by other divisions? The answer is no—the system must segregate sales invoices of Europe from those of North America and Asia divisions, in order to keep a track of them and ultimately report on the sales performance of each.
Thus, while master data can be shared, transaction data belonging to organizational units must be segregated by the system.
In PeopleSoft parlance, Business Unit is the organizational unit. It can be any entity that needs to maintain its account balances separately from each other for reporting. In the previous examples, we can say that Europe, North America, and Asia will be the business units of the organization.
However, if Global Vehicles wants to be structured by its line of business, we can create the following Business Units: Passenger car, Commercial vehicles, and Two wheelers. Note that transaction data tables will always have Business Unit as their primary key (to identify where they belong to). In other words, sales invoices, purchase orders, accounting journals, and so on are segregated by the Business Unit.
Business Unit configuration needs to be done for each module that is to be implemented. For example, to implement Accounts Payable and General Ledger modules, the Passenger Car BU needs to be configured for both the modules.
Ta bleset ID (or SetID, as it is commonly known) is used to segregate the master data. Depending on how we want to group the master data, an appropriate number of SetIDs are created. It is the SetID that determines which Business Unit can access which master data elements. This is a two step process:
Create SetIDs and group master data elements.
Associate a Business Unit with an appropriate SetID to control which master data elements it can access.
Assume that there are five suppliers (or vendors in PeopleSoft terms) for Global Vehicles. All these vendors need to be used by all its Business Units.
As all the master data elements (vendors) are going to be used by everybody, there is a need for only a single group (SetID) of vendors. Let's call this SetID 'GLOVH'. The Vendor table will contain the data as follows:
|
SetID (Primary Key) |
Vendor ID |
|---|---|
|
GLOVH |
VENDOR1 |
|
GLOVH |
VENDOR2 |
|
GLOVH |
VENDOR3 |
|
GLOVH |
VENDOR4 |
|
GLOVH |
VENDOR5 |
Now, we need to specify which rows of master data can be accessed by each Business Unit.
|
Business Unit |
Master data table |
SetID to be accessed |
|---|---|---|
|
Passanger Car |
|
|
|
Commercial Vehicles |
|
|
|
Two wheelers |
|
|
Thus, each BU can now access master data defined under 'GLOVH' SetID from the Vendor table.
Vendors 1 and 2 should be accessible only by Passenger Car BU, Vendors 3 and 4 should be accessible only by the Commercial Vehicles BU, while Two wheelers BU should have access only to Vendor 5.
Now we need three distinct groups of vendors. In other words, we need three SetIDs. Let's see how the data will be grouped in the Vendor table:
|
SetID (Primary Key) |
Vendor ID |
|---|---|
|
|
|
|
|
|
|
|
|
|
|
|
|
|
|
And finally, let's specify which BU can access which data rows under Vendor table:
|
Business Unit |
Master data table |
SetID to be accessed |
|---|---|---|
|
Passanger car |
|
|
|
Commercial vehicles |
|
|
|
Two wheelers |
|
|
Follow this navigation to configure SetID:
PeopleTools | Utilities | Administration | TableSet IDs
The next screenshot shows the TableSet ID page, where we need to configure the new value:

TableSet Control determines which master data rows can be accessed by a BU. We saw how to do this in the previous illustration. In reality, due to the very high number of data tables, this access is given for a group of tables, rather than a single data table. Let's take a look at how this is configured.
Follow this navigation to configure Tableset Control:
PeopleTools | Utilities | Administration | TableSet Control
The next screenshot shows the TableSet Control page for a Business Unit US001:

As you can see, the BU US001 can access all master data rows defined under SetID GLOVH in the group of records AM_19. Note that this record group contains the Vendor table among others. For other record groups, US001 will be to access master data values defined under a different SetID called SHARE.
The following illustration depicts a high level view of accounting entry creation and processing in PeopleSoft financial applications:

As you can observe, this illustration gives an overview of how different modules, such as Billing, Accounts Receivable, Accounts Payable, Asset Management, Expenses (also known as sub-modules or sub-systems) are integrated with General Ledger module. Each module creates accounting entries for business transactions that take place. For example, the Billing module creates accounting entries for sales invoices for customers; the Asset Management module creates accounting entries for fixed asset addition and depreciation activities, while the Expenses module creates accounting entries for each employee expense report that is processed. Note that these are just a few sample examples. We'll discuss the details of business transactions in respective chapters.
Once the accounting entries are created by a module, a batch process known as 'Journal Generator' performs subsequent activities. Note that Journal Generator process can create accounting journals from accounting entries generated by external non-PeopleSoft systems as well. It performs three critical tasks as part of the journal processing lifecycle:
Journal creation: Journal Generator process transforms these accounting entries into 'Journals'. A journal can be considered as a collection and summarized form of multiple accounting entries.
Journal edit: This process validates created journals based on the validation criteria to ensure that there are no accounting errors. If any errors are found, those journals are accordingly marked. They can be processed further only after their errors are manually resolved. Successfully validated journals are eligible for posting.
Journal posting: This process ensures that amounts in the journals are posted to appropriate General Ledger accounts. In other words, the Journal Post process updates the final account balances in General Ledger. These final account balances are then reported through financial statements such as Income statement and Balance sheet by the organization.
Let's consider a simple example to understand this process. Assume that an organization uses following accounts with hypothetical General Ledger balances:
|
Account |
Description |
Balance Type |
Balance Amount |
|---|---|---|---|
|
100000 |
Trade Receivables |
Debit |
$50000 |
|
200000 |
Customer sales |
Credit |
-$150000 |
Tip
'DR' denotes a 'Debit' transaction, while 'CR' denotes a 'Credit' transaction. PeopleSoft applications always denote credit amounts by a negative sign.
Now let's say that 4 new sales invoices – for $1000, $1500, $2000 and $2500 - are created in the Billing module on a particular day. As part of the invoice processing, the following accounting entries are created:
|
Invoice ID |
Type |
Account |
Amount |
|---|---|---|---|
|
|
DR |
100000 |
$1000 |
|
CR |
200000 |
- $1000 | |
|
|
DR |
100000 |
$1500 |
|
CR |
200000 |
- $1500 | |
|
|
DR |
100000 |
$2000 |
|
CR |
200000 |
- $2000 | |
|
|
DR |
100000 |
$2500 |
|
CR |
200000 |
- $2500 |
Each PeopleSoft module has a dedicated table to store these accounting entries. For Billing, above entries are stored in a table 'BI_ACCT_ENTRY'. Now these entries are ready to be processed by the Journal Generator process.
These entries are then consolidated into a journal as follows:
|
Journal ID |
Type |
Account |
Amount |
|---|---|---|---|
|
|
DR |
100000 |
$7000 |
|
CR |
200000 |
- $7000 |
Let's assume that the Journal edit process successfully validates this journal by ensuring that debit and credit totals in the journal are equal. If successfully validated, it marks the journal to be picked by the Journal Post process. Now the Journal Post process picks up this journal and posts these amounts to the appropriate accounts in General Ledger.
Thus, after this journal is posted, the final account balances will be updated as follows:
|
Account |
Description |
Balance type |
Balance amount |
|---|---|---|---|
|
100000 |
Trade Receivables |
Debit |
$57000 (50000+7000) |
|
200000 |
Customer sales |
Credit |
-$157000 (150000+7000) |
A typical PeopleSoft financials implementation requires the following configuration activities:
Set up a GL Business Units – We'll defer discussion of this activity to the chapter on General Ledger
Configure ledger templates
Configure Detail ledgers
Configure Detail ledger groups
Configure Ledgers for a unit
Configure Journal sources
Configure Accounting entry definitions
Configure Journal templates
As discussed earlier, PeopleSoft ledgers record posted net balances for a set of chartfield values (depending on how many chartfields are activated in the configuration) for each accounting period (such as month) and fiscal year.
A Ledger Template can be considered to be a framework of a ledger's attributes. Rather than using a ledger template for an individual ledger, it is linked to a Ledger Group. As a result, a ledger template applies to all the ledgers in a group. It essentially specifies various records and fields for a ledger that the system needs to report from.
Usually multiple ledgers are clubbed in a Ledger Group. We'll discuss the need for having multiple ledgers in a ledger group in the chapter for General Ledger. For the time being, let's just note that a ledger group can have one primary ledger and (if needed) up to nine secondary ledgers.
Follow this navigation to configure ledger templates:
General Ledger | Ledgers | Templates
The following screenshot shows a part of the Ledger Template page.

The following screenshot shows the remaining bottom portion of the Ledger Template page:

PeopleSoft delivers several default ledger templates (such as Commitment control ledgers, Standard ledgers, Average Daily Balance ledgers, and so on).
The preceding screenshot shows the ledger template used for standard detail ledgers. Each field in this screen refers to a table used for a specific purpose. Most of the fields in this definition here are used by background processes and do not affect the user transactions.
For a typical implementation, you need not change these default templates. However, we'll discuss a few important fields:
Record (Table) Name : This critical table stores the final chartfield combination balances for the posted transactions. For standard ledgers, this table is 'LEDGER'.
Account Chartfield : This table stores the values for the 'Account' chartfield. For standard PeopleSoft applications, it is
GL_ACCOUNT_TBL.Combo Data : This table stores the data used in determining whether a given combination of chartfield values is valid. In PeopleSoft terminology, this is known as 'Chartfield Combination Editing'. For standard ledgers, this table is
COMBO_DATA_TBL.Journal Line : This table stores the detailed journal line information for the journals. For standard ledgers, this table is
JRNL_LN.
Tip
Expert tip:
The given tables are extremely important in the sense that majority of General Ledger processing is based on them. These tables are used by various batch processes; hence such changes have a large impact requiring many code changes. To the extent possible, avoid making changes to delivered table values. Any changes to the delivered table values in ledger template need to be very carefully analyzed. In the rare event that these values are changed, all the journal processes need to be thoroughly tested to ensure that they are not impacted by these changes.
Closing Record Names : These fields specify the tables used in the closing process. The General Ledger chapter will discuss this process in detail.
Multicurrency Record Names : These fields specify the tables used in the multicurrency processing.
ADB Record Names : These fields specify the tables used in the Average Daily Balancing processing.
Ledger Loader Record Names : While ledgers can be configured from the online pages (as we will shortly see), they can also be loaded from external non-PeopleSoft systems. These fields specify the tables used during the external ledger load process.
Click the Field Definitions tab to see default field values populated by the system. These defaults are dependent upon the Default Ledger Type value in the previous tab.
The following screenshot shows the details of Field Definitions tab:

Account : Denotes the field name used for the 'Account' chartfield.
Monetary Amount : A journal line may contain amounts in two different currencies - Base currency of a Business Unit and Foreign currency (Transaction currency). This field stores the monetary amount in the base currency.
Posted Total Amount : This field stores the net balance amount for posted transactions of a chartfield combination.
Combination Edit Template : This field is mandatory for the Journal Edit process we discussed earlier. A value JOURNALS must be selected.
Corporate headquarters of Global Vehicles Inc. is located in the USA. Design a ledger structure to maintain its accounts and report the financial statements in USD. At the same time, it should be able to maintain all accounts in Euros and British Pounds (GBP) for internal reporting.
For the sake of simplification, we'll assume that COA for reporting in all currencies is the same. This can be achieved by maintaining three separate ledgers – one for USD balances, one for GBP balances and another for Euro balances. PeopleSoft General Ledger allows this flexibility to automatically post the journals simultaneously to multiple ledgers. We'll configure these three ledgers (named GLOBALUSD, GLOBALGBP, and GLOBALEUR respectively) and include them in a ledger group for the business unit. Let's see how to do it.
Follow this navigation to configure ledgers: General Ledger | Ledgers | Detail Ledgers
The following screenshot shows the Detail Ledgers page:

Note
Note that ledgers being master data elements (which can be shared by different Business Units) are defined by SetID. As we discussed earlier, a ledger needs to be linked to a ledger template. Thus, it inherits all the attributes that are defined for a ledger template.
Now our ledger is almost ready to start recording the accounting balances. The system knows which database tables and fields to refer to in order to update data from journals or retrieve data for reporting…all courtesy of the ledger template!
Follow this navigation to configure ledger groups:
General Ledger | Ledgers | Ledger groups
Ledger group configuration serves multiple objectives: Grouping multiple ledgers in a similar group (we'll see why we need to do this), specifying the edit tables for the relevant chartfields being used in the ledger, and specifying chartfield balancing options. Let's see each of these important functions in detail now.
We'll call our ledger group GLOBAL.
The Definition tab in the following screenshot , is where we can include multiple ledgers in a group:

We already saw why we need three different ledgers—to address different currency reporting requirements.
Having multiple currency requirements is just one of the possible reasons we need to define multiple ledgers in a group. Commitment control ledgers groups typically have multiple ledgers. We'll discuss them in detail in the Chapter 9, PeopleSoft Commitment Control.
When there are multiple ledgers in a ledger group, one ledger needs to be designated as the primary ledger, while the others are designated as secondary ledgers. PeopleSoft allows up to nine secondary ledgers in a ledger group. In other words, there can be a maximum of 10 ledgers in a group. Remember, it is not mandatory to always define secondary ledgers. If an organization has very straightforward reporting requirements, they can be addressed by a single primary ledger.
Now let's discuss the important fields that you see on the Definition tab:
Ledger Template : As discussed earlier, assign a ledger template to the ledger group so that all its ledgers inherit the template properties.
Keep Ledgers in Sync : This checkbox serves a very important function. If it is checked, the system ensures that journal transactions are posted automatically to all the ledgers in the ledger group. For example, for our ledger group, when a journal entry is created, the Journal Edit process posts it to all the ledgers (GLOBALUSD, GLOBALEUR and GLOBALGBP).
Ledger : Specify the ledger name that needs to be included in this ledger group.
Primary : Specify which ledger in this group is the primary ledger by checking this flag.
Translation : This checkbox determines if a ledger needs to be used by the currency translation process.
Base Currency : Specify the base currency for each ledger.
Inherit Base Currency : If we check this flag, the 'Base Currency' field is no longer available. This forces the base currency for each ledger to be the same as that of General Ledger BU.
The following screenshot shows the Chartfield tab. It is used to specify the edit tables for each chartfield being used by this ledger group:

View – No Effective Date: This field specifies the prompt table used for reporting prompts. Based on an organization's requirements, we can change it if needed. It'll determine which chartfield values are available for users.
The next tab on this page - Balancing - in the following screenshot, determines how the accounting entries are balanced:

Let's first understand the concept of balancing.
A sample journal entry looks something like this:
|
BU |
Account |
Dept |
Op Unit |
Product |
DR/CR |
Amount |
|---|---|---|---|---|---|---|
|
US001 |
123000 |
455 |
CPG |
INT40 |
DR |
$4500 |
|
US001 |
258000 |
155 |
TAX |
INT40 |
DR |
$1500 |
|
US001 |
215000 |
455 |
CPG |
INT40 |
CR |
-$6000 |
What is the most obvious thing about this accounting entry? Of course, the sum of debit and credit lines is equal. In other words, it is 'balanced'. Now can you say that debit and credit amounts are equal for each of the chartfields?
For BU US001 and Product value INT40, this is true. On the other hand, for Account, Department, and Operating Unit, accounting entries are not balanced.
Note that, no matter what happens, accounting entries have to be balanced for each Business Unit. However, if an organization maintains its balances for each Department or Operating Unit (or any other chartfield), then account balances have to be balanced for that chartfield as well.
The Balancing tab determines the chartfields by which the accounting entries must balance. Business Unit is always selected, while Account and Alternate Account are always excluded from balanced chartfields (in accounting terms, as an account can have only debit or credit balance, entries can never balance for an account). If an organization requires that, its entries should be balanced by additional chartfields, (Operating Unit, for example) the Balance checkbox should be selected for that chartfield. This is necessary when reporting needs to be performed by the Operating Unit.
The Journal Edit process ensures that for any journal, its accounting entries are balanced by the chartfields specified here. So, in the previous example (with entries balanced by BU and Operating Unit), our sample accounting entry would have been flagged as invalid since Operating Unit is not in balance.
Now that we have built the basic accounting structure in terms of ledgers, ledger groups, and templates, our PeopleSoft system is ready to record accounting balances. The last step is to link required ledgers to a General Ledger Business Unit.
Note that a GL BU can not only have multiple ledgers (or ledger groups) associated with it, but it can also have ledgers belonging to different types. It is possible that a BU may need to have a ledger group to maintain its budgets, another to record its accounting transactions. It also may have 2 different ledger groups to record transactions in different currencies. How many ledgers (and what types) are needed by a BU is entirely driven by the organization's processing and reporting requirements.
In addition to assigning ledgers/ledger groups to a GL BU, we also configure various processing options.
Follow the navigation to assign ledgers for a BU:
Set Up Financials/Supply Chain | Business Unit Related | General Ledger | Ledgers For a Unit
The following screenshot shows the Definition tab of the page. This is where we select ledgers/ledger groups for a BU:

There are three types of ledgers that can be selected here: Detail ledgers, Summary ledger, and Commitment control ledger. In a nutshell, detail ledgers are used to record actual accounting transactions. Summary ledgers on the other hand record only summarized versions of detailed accounting transactions. Commitment control ledgers record control budgets. We'll discuss the commitment control in greater details in Chapter 9, PeopleSoft Commitment Control.
Let's discuss some of the important fields in this tab:
Ledger Type : If Detail ledger is selected, only a Ledger Group field becomes available. If Summary ledger is selected, a Ledger field becomes available.
Balanced Ledger : Select this checkbox to force the ledger to be balanced. As we saw earlier, this means that the system will ensure that credit and debit balances posted to this ledger group are equal.
Journal Generator Default : Select this checkbox to make this ledger group the default for given BU. When Journal Generator creates journals from other sub-modules, it looks for the ledger group value on each accounting entry line. This value determines the ledger group where that entry will be posted. In case this value is missing on the accounting entry, Journal Generator will post it to the ledger group with this checkbox selected.
The following screenshot shows the next Journal Edit Options tab. This tab specifies how journal errors should be handled by the system:

Available error processing options are as follows:
Default to Higher Level Value : If this journal error is encountered, look at the processing option defined for the GL BU.
Suspend : Post the error amount or the amount needed to bring journals in balance to suspense account (specified using Suspense Chartfields hyperlink).
Recycle : If the error is encountered, mark the corresponding accounting entries as invalid and prevent them from posting until they are corrected and the journal is reprocessed by Journal Edit process.
Accept (only for Journal amount errors) : Ignore the error and continue processing.
The next tab on the page - Currency Options – is shown in the following screenshot:

This tab specifies the default currency options for the given GL BU and the given ledger.
The next tab on the Ledgers for a Unit page is Journal Post. The next screenshot shows details of this tab:

The configuration options on this tab control the posting and unposting of the journals for this ledger group:
D o not post Future-Dated Jrnls: If this checkbox is selected, the system prevents a journal from posting if the journal date is greater than the journal process date. Journal process date is set during the GL BU set up.
Automatic Post Reversals: Some transactions (known as accruals) generate reversing entries in the next accounting periods. If this checkbox is selected, the system automatically selects the future dated reversal entries to post when the original entries are posted.
The following screenshot shows the next Approval Options tab. The configuration options on this tab control the journal approval workflow process:

Based on organization's requirements, we can specify one of the following three options:
Default to Higher Level : Use the approval option specified during the GL BU definition:
Pre-Approved : If this value is selected, journal entries need not go through the approval workflow and the person entering them can post them from the journal entry page
Require Approval : If this value is selected, journal entries need to be approved through workflow before they can be posted
PeopleSoft offers two different workflow methods – Virtual Approver and Approval Framework. If Virtual approver method is selected, the following fields become visible:
Business Process Name : Specify the workflow business process that has been defined for journal approval
Approval Rule Set : Specify the workflow approval set for the selected business process that has been defined for journal approval
If Approval Framework method of workflow is used, the previous two fields are not available.
Tip
Building Virtual Framework workflow (including Business processes and Approval rule sets) requires strong technical skills. As a result, we will not discuss this area in our book.
In the example shown previously, the configuration will force regular journals to be approved, as per the business process rules defined. On the other hand, the budget journals are configured as Pre-approved, which means that they need not go through an approval process.
The last tab on the page is Commitment Control Options. It is shown in the following screenshot:

This tab enables the commitment control for the given ledger group. We'll discuss this in greater detail in Chapter 9, PeopleSoft Commitment Control.
Now that ledgers are ready to record Global Vehicles' accounting balances in multiple currencies, we'll turn our attention to the various sources that will generate the accounting entries and journals.
Perform necessary configurations, so that the PeopleSoft financial system can process journals created by the Billing module.
There are many possible sources which can create journal entries. PeopleSoft sub-modules such as Billing, Accounts Receivable, Accounts Payable, and more create their respective journals. In addition, we can create our own user defined journal sources to categorize manually entered journals. It is also possible that our PeopleSoft system receives journals created from external sources.
We can create as many journal sources as needed to tag the journal entries appropriately. For example, we can define a source 'EXT' for journals imported from an external system. There can be another source 'BI' for journals created by the Billing module.
A journal source is an important place where we can specify various processing options to handle journals from different sources differently. All the processing options we specified for a ledger are automatically inherited to journal sources. You'll see many of those options to be configured for a journal source as well. If an organization wishes to handle journals from a particular source in a different manner, we can do so by specifying that particular option at journal source level.
Note that configuration options specified at General Ledger business unit are overridden by those specified at the ledger. Options that we specify for a journal source override those specified for the ledger.
Follow this navigation to configure journal sources:
Set Up Financials/Supply Chain | Common Definitions | Journals | Source
The following screenshot shows the first tab Definition on the journal source page:

This tab is used to specify the name of the journal source and the effective date (the date from which it becomes active).
The next screenshot shows the next tab - Journal Options. Configuration options on this tab determine how various journal error options are handled for journals created from this source:

Can you recall where you have seen similar options? You are right if you answered Ledger Options For a Unit – Journal Edit Options!
If we select Default to Higher Level Value, the system looks at the configuration option specified for the ledger. If a particular error needs to be handled in a different way, specify the appropriate value here.
The following screenshot shows the next tab on the page - Currency Options:

The fields on this tab are again exactly similar to those we saw for a ledger. Specify a value depending on whether it needs to be different from the ledger value or select Default to Higher Level Value.
The last tab on the page - Approval Options – is shown in the following screenshot:

Specify how the journal approval workflow needs to be handled on this tab. If it need not be different from the configuration options for ledger, select Default to Higher Level Value.
We previously discussed that that Journal Generator process picks up the accounting entries created by a sub-module and transforms them into journals. We also learnt that each sub-module has a dedicated database table to store the accounting entries. It is the Accounting Entry Definition that provides these details of appropriate tables and fields for a sub-module to Journal Generator.
Follow this navigation to configure accounting entry definitions:
General Ledger | Journals | Subsystem Journals | Accounting Entry Definition
The following screenshot shows the accounting entry definition page:

Let's familiarize ourselves with some of the important fields on this page:
Tip
PeopleSoft delivers accounting entry definitions for various sub-modules, with all the details already populated. In most of the cases, we can use the delivered definitions without making any changes.
Record : This is the source table that stores the accounting entries for a particular sub-module. Journal Generator extracts the data from this table to create journals.
Record Update : After Journal Generator creates the journals, it updates this table with the journal details. Usually it is the same table from which accounting entries are extracted.
System Source : PeopleSoft has a pre-configured system source value for each sub-module. Ensure that the right source value corresponding to a module is selected.
Field Names : In the data fields in this section, specify the appropriate field value from the source table specified previously. For example, in the BI_ACCT_ENTRY table, the ACCOUNTING_DT field is used to store the accounting date.
Chartfield Mapping - Chartfield : These chartfields are used for summarizing accounting entries by the journal generator if Summarize to All Chartfield Level option is selected on the journal generator template page. If a chartfield is not listed here, it contains a blank value for the journals created from this accounting entry definition.
Chartfie ld Mapping - Summarize Chartfields: If the Summarize by Selected Chartfields option is selected on the journal Generator template page and this checkbox is selected for a chartfield, it is summarized during journal creation by the Journal Generator.
We'll discuss chartfield summarization shortly in the journal generator template section.
Now, in addition to the PeopleSoft sub-modules, sometimes journals need to be created from the accounting entries from external non-PeopleSoft systems. For such a scenario, PeopleSoft offers an accounting entry definition called GENERIC.
The following screenshot shows the details of GENERIC accounting entry definition:

As you can see, it uses a table JGEN_ACCT_ENTRY to read the accounting entries from. Thus, we need to ensure that these external accounting entries are stored into this table first. Also, the value for System Source field must be JGen-Other.
It's up to us to use any of the following three options to create journals from non-PeopleSoft systems:
Load accounting entries into
JGEN_ACCT_ENTRYtable and use the 'GENERIC'definition (if the mapping between the table fields and incoming data elements is simple).If needed, modify the '
GENERIC'definition by using a different table or view other thanJGEN_ACCT_ENTRY(if we need to use a different table to hold the incoming accounting entry details).Create a new definition and manually specify necessary fields (if organization requirements dictate that
GENERICdefinition cannot be used and a new dedicated definition must be used).
Now we come to the last important step in the configuration of ledgers and journals. In order to create the journals for the Billing module, we configured a Billing journal source and Billing accounting entry definition. Thus, now the system knows where to look for the Billing accounting entries.
Typically, accounting entries created by a sub-module belong to various types. For example, in case of Billing, they can be broadly categorized as regular billing entries (when customer invoices are created) and accrual billing entries (when revenue is recognized, but the customer invoice is not created).
In case of Accounts Receivable, accounting entries can be categorized as billing entries (based on customer invoices), payment entries (when customer payment is received), maintenance entries (when an outstanding invoice is written off, among other things) and so on.
We set Journal Templates for each of such various transaction types. This template determines how the Journal Generator summarizes the accounting entries to create journals. It also controls how the reversing journal entries are created.
Follow this navigation to configure journal generator templates:
General Ledger | Journals | Subsystem Journals | Journal generator Templates
The following screenshot shows the Defaults tab of journal generator template page:

The Defaults tab contains several options that need to be configured as follows:
Accounting Entry In Sync : Recall the Keep Ledgers in Sync checkbox on the Ledger Group configuration page. Checking this flag ensures that an accounting entry posted to the primary ledger in a ledger group is also simultaneously posted to other secondary ledgers as well. For example, when an accounting entry is posted to the GLOBALUSD ledger, PeopleSoft also posts this entry to GLOBALGBP and GLOBALEUR ledgers simultaneously.
Create One Journal For : This field controls how accounting entries are aggregated on the journals. Each line in the accounting entry in PeopleSoft has an application business unit as well as a General Ledger business unit. There may be multiple lines in an entry and it is possible that they may have different business units. Available options for the field are Application Business Unit (system creates a different journal for each subsystem business unit value present in accounting entry) and General Ledger Business Unit (system creates a different journal for each General Ledger business unit value present in accounting entry).
Reversal Code : In the case of some transactions (such as billing accrual), the accounting entries need to be reversed. This option controls if reversal entries should be created, and if so, when:
Do Not Generate Reversal : Journal Generator does not create the reversal entry, but it marks the journals with the reversal code
Beginning of Next Period : Creates a reversing entry dated the first business day of the next accounting period
End of Next Period : Creates a reversing entry dated the last business day of the next accounting period
Next Day : Creates a reversing entry dated the next business day
Journal ID Mask: A unique identifier is used to distinguish journals belonging to different transaction types we discussed previously. For example, we can denote all journals for regular billing to have journals IDs starting with BIR, while the journals for billing accruals journal IDs can start with BIA. System automatically uses this prefix for the journal IDs.
Thus a journal with ID BIA45276 can be identified as a billing accrual journal, while a journal with ID BIR27675 can be identified as a regular billing journal.
Note that it is not mandatory to have different journal ID masks for different transaction types.
The following screenshot displays the Summarization tab of the page. This tab controls how the accounting entries are summarized on the journals:

Again here we have the option to specify two different sets of summarization rules for two groups of accounts.
PeopleSoft offers the following summarization options:
Summarize t o Account, AltAcct: This means that accounting entries are summarized by the Account and Alternate Account (if used) in the journal, while all other chartfields are left blank
Summarize to All ChartFields: This option summarizes the accounting entries to unique combinations of all the chartfields on the Accounting Entry Definition page
Summarize by Selected CF's: This option summarizes the accounting entries to unique combinations of only those chartfields on the Accounting Entry Definition page that have the Summarize ChartField check box selected
You would be able to recall the part of the Accounting Entry Definition page in the following screenshot. This is where we specify which chartfield needs to be used for summarization:

Retain Detail: This option ensures that all accounting entries are distributed to the journal without any summarization and retain all chartfield value details.
If the organization needs to have a single summarization rule for all the accounts, select the option All Account Values and then select the appropriate Primary Summarization option.
If two different summarization rules are needed for two groups of accounts, carefully analyze how these account groups are organized. For the primary group of accounts, specify their values by either the Selected Account Values or Selected Tree Nodes options and then select the appropriate Primary Summarization Option. For all the remaining account values, specify the appropriate summarization option under Alternate Summarization Option.
Example: Accounting entries containing accounts 100001, 100002, and 100003 should be summarized to all chartfields, while all other entries should retain their entire chartfield details. In this case, configuration as shown in the following screenshot, will need to be done:

Every organization needs relationships with banks to conduct its business transactions. Just like any bank account that you hold—where you receive cash and make payments—organizations too need to have bank accounts. Banks are important for PeopleSoft Financial applications to receive as well as disburse cash for various modules such as Accounts Receivable, Accounts Payable, and Treasury applications. In this section, we'll discuss the following important and mandatory configuration options that need to be in place for business processing:
Configuring bank ID qualifier
Configuring bank
Configuring bank branch
Configuring external accounts
Configuring payment forms
Bank ID qualifiers are country pre-defined specific numerical values. This value drives the bank information that needs to be defined for a bank depending on the country it belongs to.
Follow this navigation to configure bank ID qualifiers:
Banking | Banks and Branches | Bank ID Qualifiers
The following screenshot shows the Bank ID Qualifiers page:

Global Vehicles Inc. has a banking relationship with 'US Bank' and holds a checking account at its New York branch. This account needs to be used to receive customer payments and issue checks to vendors. Perform the necessary configurations.
As banks can be shared by multiple business units, they are set up by SetIDs.
Follow this navigation to configure a bank:
Banking | Banks and Branches | Bank Information
The next screenshot shows the Bank Information page:

Let's understand some of the important fields on this page:
Type : We can define a bank belonging to following four categories—External (a banking organization that is outside the organization), Internal (an entity such as central treasury group that is part of the implementing organization), Netting (used for bilateral netting between Accounts Receivable and Accounts Payable transactions), and Origin (an intermediate entity that holds the organization's cash before being credited to bank account).
Bank ID Qualifier: As we saw earlier, bank ID qualifiers are defined for certain counties. Select the appropriate qualifier for the country of the bank.
Bank ID: Each bank has a unique code that identifies it. This is used to route the electronic transactions such as EFT and ACH. The bank with which our organization needs to do business, can supply this bank ID.
We can define as many branches for a bank as required. Let's define the New York branch for our bank.
Follow this navigation to set up a bank branch:
Banking | Banks and Branches | Bank Branch Information
The following screenshot shows the Bank Branch Information page:

To enter the address details for this branch, click the Address Information hyperlink. The system opens the Address Information secondary page. The next screenshot shows this page:

To enter the contact person details for this branch, click the Contact Information hyperlink on the Bank Branch Information page. This opens the Contact Information secondary page as shown in the next screenshot:

Add or remove any bank contact person details as needed by clicking + or – button.
To define the contact information, follow this navigation:
Banking | Banks and Branches | Contact Information
The following screenshot shows the Contact Information page, where relevant details of the contact person can be entered:

As we saw earlier, an external bank means a physical bank with which the organization carries out its business. For example, if the organization has banking relationships with HSBC or Citibank, these qualify to be called as external banks. Bank accounts that an organization holds in these banks are in turn called external accounts.
Follow this navigation to configure external bank accounts:
Banking | Banks and Branches | External Accounts
The next screenshot shows the first tab on the External Accounts page:

Let's familiarize ourselves with the important fields on this page:
Acco unt # : Enter the bank account number for this external account.
DFI Qualifier : DFI stands for 'Depository Financial Institution', which is the bank where this account exists. We can choose to use any of the identification types for this bank (such as Transit Number, SWIFT ID and so on.) depending upon the information provided by the bank.
DFI ID : Enter the unique ID for the bank.
BI, AR, AP, TR, EX: These checkboxes identify the module (Billing, Receivable, Payable, Treasury, and Expenses) for which this account is being used. As we need this account for Receivable and Payable modules, let's check their appropriate checkboxes. When the AR checkbox is selected, the Billing checkbox is also automatically selected.
Depending on the selected module, various account types get enabled or disabled in the chartfields grid at the bottom of the page.
DD/AR Draft Cash Ctrl: In the Receivables module, if we wish to use the 'Draft' payment method and want to use a control account before actually receiving customer payments, we need to select this checkbox (applicable only if Billing or AR checkboxes are selected).
Cash Clearing : If an organization uses cash control accounting (for AP, AR, or TR modules), this flag needs to be selected.
Stmt Accounting : This flag enables the chartfields for statement accounting. If we wish to install Treasury applications and it's their related bank statement accounting functionality, we can specify the chartfields for bank fees and interest amounts.
Drafts Payable : If we use the 'Drafts' payment method in the Payable module, select this checkbox.
Chartfields: For the selected modules, we need to specify the actual accounts for cash accounts (such as Cash-AR and Cash-AP). The chartfield values specified here are ultimately used by the system while creating accounting entries.
For example, when a check payment is issued to a vendor, the system creates an accounting entry as follows:
Debit Payables account
Credit Cash account
While the payables account is extracted from the voucher being paid, the cash account is retrieved from Cash-AP chartfields specified in this tab.
The following screenshot shows the next tab on this page—Signatories:

The Signatories tab stores the signatory person and the maximum monetary amount that he/she can approve. Note that this information is only for informational purposes and does not affect any processing.
Now let's consider the next important tab on the External Accounts page—Reconciliation. The following screenshot shows the details of Reconciliation tab:

This tab is used to set up the rules for reconciling the bank statement against the cash account positions in Treasury applications. As these are not in the scope of this book, we'll not get into the details. Suffice it to say that PeopleSoft offers three reconciliation methods: Manual, Semi manual, and Automatic.
The following screenshot shows Account Information tab on the page. This tab contains various configuration options used by Receivable and Payable modules:

We'll concentrate on some of the important fields on this page:
Remitte r ID: Although not mandatory, this field stores the remitter ID that the bank assigns to this bank account. When the EFT (Electronic Fund Transfer) method is used, the system creates EFT files with payment information and transmits to another bank. The receiving bank uses this remitter ID.
Check# Len: We can specify the maximum length of check numbers (up to 10 digits) that the Payable system issues.
Maximum Amount Per Paycycle, Maximum Amount Per Payment: These fields are used by bank replacement feature of pay cycles in Payable module. When the limits specified here are exceeded, pay cycle uses an alternate bank to issue remainder amount above the specified limit.
Deposit Type, Deposit Unit: Deposit types are configured in the Receivable module to identify categories of funds received in bank account. Deposit Unit refers to the Receivable business unit that is responsible for recording the received funds.
Payment Predictor: This checkbox determines how the customer payments received in this bank account are handled by the Receivable module. If checked, these payments are processed by a batch process named 'Payment Predictor', which matches them to the outstanding customer invoices. We'll see this feature in the Accounts Receivable chapter.
The following screenshot shows Collection Methods tab on the page. This tab specifies various options used to receive customer payments in this bank account. Thus, these options are more relevant for the Accounts Receivable module:

The following screenshot shows the Payment Methods tab on the page. This tab specifies various options used to disburse (pay) payments to external entities such as vendors or organization's employees through this bank account. Thus, this tab is more relevant for Accounts Payable module:

Payment Method : PeopleSoft offers the following payment methods to issue payments: Automated Clearing House, Direct Debit, Draft-Customer EFT, Draft-Customer Initiated, Draft-Vendor Initiated, Electronic Funds Transfer, Giro-EFT, Giro-Manual, Letter of Credit, Manual Check, System Check and Wire Transfer.
Last Ref Number : When PeopleSoft creates a payment, it assigns a unique number (known as Reference Number) to it. For example, in this case, we have specified that payments from this bank account will be issued as Checks. Now whenever the system creates a check, it assigns a check number to it. This number is always 1 greater than the value in this field.
As you can see, when the system creates a check next time, it will be numbered 0000000011. On the other hand, if we wish to force the system to issue checks starting from 0000000050, simply change the value in this field to 0000000049.
Form ID: There can be various layouts available for EFT, Check payments and Wire Transfers, depending upon the organization's requirements. For example, in case of check payments, Global Vehicles may have three or four different check layouts it uses with different banks. This field is used to specify the appropriate layout for issuing the payments. PeopleSoft delivers a few sample payment layouts for Check, EFT, and Wire transfers. We can either use them (with or without modifications) or create our own layouts.
So far we have seen some of the most important cross-module concepts and configurations, which serve as the foundation of PeopleSoft Financial applications. Another important system feature that controls how the system features are controlled for each individual system user is related to setting up user preferences. Technically speaking, this is more of a personalization feature that will drive which users get to do what as far as various PeopleSoft modules are concerned. Nonetheless, this is a crucial task that needs to be performed.
An important prerequisite for doing this task is of course creating user IDs in the first place. However, we'll discuss that in the PeopleSoft Security chapter.
Follow this navigation to access the User Preferences page:
Set Up Financials/Supply Chain | Common Definitions | User Preferences | Define User Preferences
The following screenshot shows the main User Preferences page. It contains hyperlinks to module specific user preference pages under Product Preference section. Hyperlinks for common user preferences are grouped under the General Preference section;

As you can see, this page allows us to define user preferences for various PeopleSoft modules as well as certain specific features such as Pay cycle. We'll quickly go through the settings for the financial modules and the cross-module preference options.
Click the Overall Preferences hyperlink to set up cross-module preferences. The following screenshot shows the Overall Preferences tab. This tab specifies the default Business Unit, SetID, and the Localization Country for the given user ID:
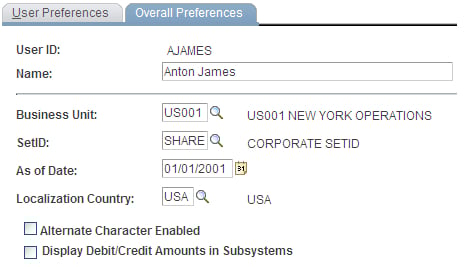
As you can see from the screenshot, for the user Anton James, the system will always use US001 as the Business Unit and SHARE as the SetID whenever he accesses a PeopleSoft page to enter a new transaction or retrieve data from the database. Of course, the user can always change this value, but defaulting simplifies the job to a large extent.
Click the Process Group hyperlink on the main User Preferences page.
The following screenshot shows the Process Group tab. This tab contains important configuration options for Accounts Payable and Receivable module features that can be selectively enabled for specific users:
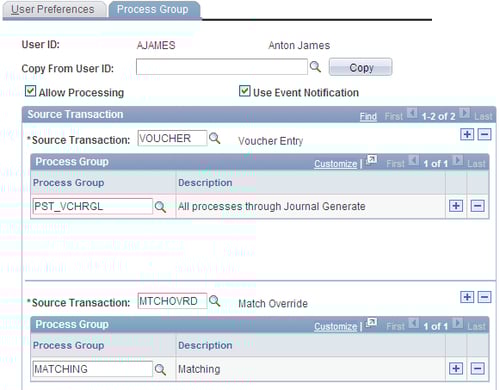
Source Transaction indicates a specific system feature from the Receivable or Payable module. PeopleSoft allows us to select from a group of 25 such system features. The screenshot shows two sample source transactions: VOUCHER (Voucher entry) and ARPAYWS (AR Payment Worksheet).
VOUCHER controls the processing options for the voucher entry function in Payable, while ARPAYWS controls the actions that a user can perform for Payment worksheets in the Receivable module.
In other words, we have just allowed Anton to use these two system features, while preventing him from using the remaining 23.
The Process Group indicates what level of privileges is granted to a user for a selected source transaction.
For example, PeopleSoft offers us the following options (Process Groups) as far as payment worksheets are concerned: ARACTIONA (Do not post), ARACTIONL (Batch standard), ARACTIONN (Batch priority), ARPOST (Post now), ARPOSTGL (Post now through to GL). To perform his job, Anton needs to be able to post the payment worksheets to GL. Thus, we will select the value ARPOSTGL in the Process Group field.
Allow Processing flag controls if on-demand processing is enabled for this user. PeopleSoft allows system users to run certain batch processes from the transaction screens. For example, a user can execute batch processes such as Voucher Post, Journal Generator, and so on. from the voucher entry page itself. He/She need not navigate to a different page just to run that particular process. This is known as on-demand processing.
Click the Billing hyperlink on the main User Preferences page.
The following screenshot shows the Billing tab.
Billing user preferences primarily control which batch processes are executed (or skipped) when they are triggered from a button on the Billing pages. Note that this doesn't apply if the batch processes are executed from their dedicated run control pages.
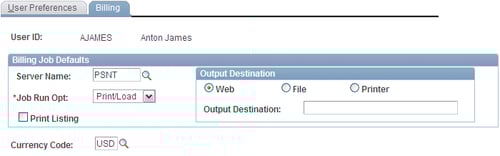
Server Name specifies the default server where the Billing processes will be executed.
Job Run Opt specifies if certain Billing processes are excluded from being executed. Selecting the 'Print/Load' option means the system runs all the processes in the multi-process job. Selecting the 'No Load' option skips the following processes: Currency Conversion, Load AR, Pre-load, Load GL, Commitment Control, and Standard Form 1080 and 1081 processes. We'll discuss these processes in Chapter 3, PeopleSoft Billing Module.
Click the General Ledger hyperlink on the main User Preferences page.
The next screenshot shows the General Ledger tab:
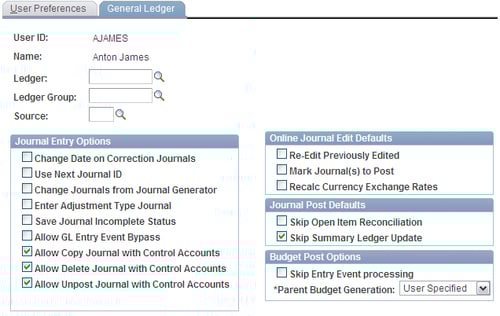
Use Next Journal ID field controls if this user can manually enter a journal ID when he/she enters a new journal. If this checkbox is selected, while creating a new journal, the system automatically disables the journal ID field and assigns the next number to the new journal. This is an important option to enforce the system generated numbering for GL users.
If the Change Journals from Journal Generator checkbox is selected, the user can modify the chartfields and amounts for the journals created by Journal Generator process. In PeopleSoft GL, journals can be either manually entered or created automatically by Journal Generator process. Manual journals can always be modified by system users. However limiting the capability to modify Journal Generator journals to only a select few users greatly improves the controls.
Click the Procurement | Payables hyperlink on the main User Preferences page.
The following screenshot shows the Payable Online Vouchering secondary page:
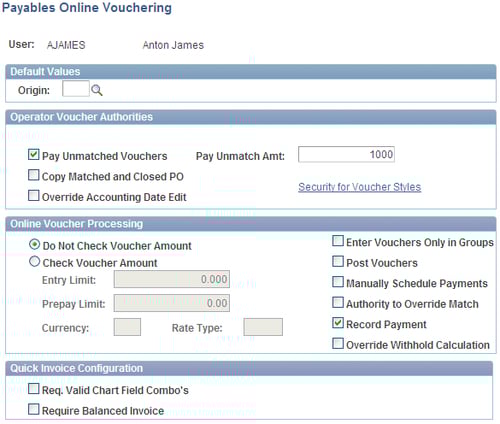
Pay Unmatched Vouchers and Pay Unmatch Amt: Typically when a voucher (vendor invoice) needs to be paid, it is first matched with a valid purchase order. This ensures that vendor payment is for a genuine purchase we made. If the system is configured accordingly, it does not pay a voucher unless it is matched.
However selecting the Pay Unmatched Vouchers checkbox allows a user to bypass the matching requirement and pay a voucher even if it is not matched. The Pay Unmatch Amt field specifies the maximum amount that can be paid without matching. As you can imagine, this is a very critical control mechanism and this privilege should be given (if at all) to only a few users.
Check Voucher Amount: If a user is responsible for entering vouchers in the Accounts Payable module, a limit can be placed on the maximum amount of voucher that he/she can enter. To do so, select the Check Voucher Amount button and enter the maximum permissible amount in the Entry Limit field along with the Currency.
Post Vouchers: Voucher amounts do not become part of total outstanding vendor liability until they are 'posted'. This field controls if a user can post an approved voucher.
Authority to Override Match: As mentioned earlier, matching process validates if a voucher is valid by checking it against a purchase order. If an error is found, the process marks the voucher as an exception (in other words, 'invalid'). Selecting this checkbox allows a user to override it and force a voucher to skip the matching process.
Click the Receivab les Data Entry 1 hyperlink on the main User Preferences page.
The following screenshot shows the Receivables Data Entry 1 tab:

Group Unit: In Accounts Receivable parlance, Group Unit refers to the business unit that tracks outstanding customer invoices (known as 'items').
Deposit Unit: In Accounts Receivable terms, Deposit Unit refers to the business unit that receives customer payments.
The business unit value used in these fields is used as the default value by the system whenever the user accesses the Receivable pages. The user can of course override these default values. However this greatly reduces the data entry efforts.
Click the Receivables Data Entry 2 hyperlink on the main User Preferences page.
The following screenshot shows the Receivables Data Entry 2 tab. This tab contains user preference options for the user to perform two important functions: Payment worksheets and Maintenance worksheets:
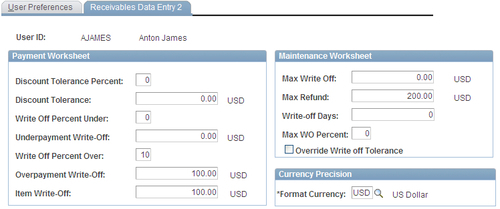
Payment worksheets are used to apply customer payment to its outstanding invoices. Maintenance worksheets are used to write off customer invoice amounts (partially or completely) and issue refunds to customers. For example, there may be an outstanding invoice for USD 1000. However it turns out that this customer may not (or will not) pay this amount (due to a variety of reasons). If he/she can pay only a part (say USD 700), we need to write off the remaining USD 300 (30% of the invoice amount). On the other hand, if the customer cannot pay anything, we will need to write off the entire amount of USD 1000.
Options under the Payment Worksheet section:
Discount Tolerance Percent, Discount Tolerance: These fields determine the upper limit of discount that can be given to a customer (known as 'unearned discount').
Write Off Percent Under, Underpayment Write-Off: When a customer pays less than the invoice amount, it is known as 'underpayment'. These fields determine the upper limit for the underpayment that can be written off.
Write Off Percent Over, Overpayment Write-Off: When a customer pays more than the invoice amount, it is known as 'overpayment'. The additional amount received can be written off rather than returning it to the customer. These fields determine the upper limit for the overpayment that can be written off.
Item Write - Off: This field determines the maximum amount that a user can write off on a payment worksheet.
Options under the Maintenance Worksheet section:
Max Write Off, Max WO Percent: These fields determine the maximum amount that a user can write off using a maintenance worksheet.
Max Refund: This field specifies the maximum amount that a user can refund to a customer.
Write - Off Days: This field determines the minimum age of an invoice before it can be written off.
Override Write off Tolerance: This powerful option enables a user to override all write off limits (specified for Business Unit, Customer and so on. Of course, the maximum write-off limits placed for the user still apply.
Configuring PeopleSoft Financial applications from scratch is certainly no easy task. A typical implementation involving multiple modules typically involves hundreds of configuration activities that need to be performed in a specific sequence. In this chapter so far, we have covered some of the critical configuration activities, but discussing each of them is quite impractical. So the million dollar question is—How do we ensure that we complete all the necessary setup activities in the right order?
Let's not worry…PeopleSoft has just the right tool to help us with exactly this. It is known as the Setup Manager.
Setup Manager lists all the tasks required for implementing a product (module) in the right sequence. In addition, it shows the navigation path to the page where required configuration needs to be done. A direct link is provided so that the user can reach the appropriate page. We'll quickly see how to use it.
Configure the PeopleSoft Billing module using Setup Manager.
Follow this navigation to access Setup Manager:
PeopleTools | Setup Manager | Manage Implementation Projects
The following screenshot shows the Manage Implementation Projects page:

As you can see, we can create the implementation project either by a product (such as Billing, Accounts Receivable, and so on) or a Business Process (such as Process customer payments, Receive goods, and so on).
For our business requirement, as we need to configure the Billing module, we'll create the implementation project by Product.
Click the Products button. As shown in the following screenshot, the system opens a page listing all the PeopleSoft modules for which the organization holds a license:

Check the Select checkbox next to the required module and click the View Summary button at the bottom of the page.
The system opens a new page with two tabs. The following screenshot shows the Product Summary tab:

The page shows all the features offered by PeopleSoft in selected product. As part of the implementation, one of the critical tasks is to determine which of these features are really needed for the implementing organization.
Let's assume that for our hypothetical Billing module implementation, we do not need the Balance Accumulation and Billing Summarization features. Remove these features from the list by clicking the '-' button next to them.
Click Save at the bottom of the page. The system opens a new page, which is shown in the following screenshot:

Enter the Project Name and Description and click OK. As shown in the next screenshot, the system opens a page showing the implementation project with given name:

Click the Generate Setup Tasks button in this page to automatically create the list of configuration tasks. The following screenshot shows the process status page:

This triggers a batch process in the background with its Run Status as Queued. When the process is completed, the run status automatically changes to Success.
Click the View Setup Tasks button to see the configuration activities. The following screenshot shows the Manage Setup Tasks page that opens:

This page lists out all the necessary configuration activities in the appropriate sequence.
The Status field shows the current status for the setup task. Place the cursor over the icon to see the status: Not started, In progress, or Complete.
Setup Task: Clicking the hyperlink transfers the control to the appropriate page in order to perform the required setup activity.
Click the Tracking tab to record progress of setup activities. The following screenshot shows the details of Tracking tab:

Assigned To: This is a free from text field, where details of person (or persons) responsible for this task can be entered. Note that this doesn't affect who actually performs a particular task.
Percent Complete: Again this field needs to be updated manually and is entirely informational. When you enter 100% in this field, the task status changes to Complete.
Click the Task Details tab. The following screenshot shows the details of Task Details tab:

Cross Database: This field indicates if a configuration option affects multiple modules.
Load Method: Indicates how configuration values can be entered into PeopleSoft system. Available options are: Component Interface, ETL, Other, and Online.
Let's look at a different set of tasks. The following screenshot shows a few setup tasks for the Billing module:

As you can see, configuring Adjustment Type and Book Code can be done by Online method alone. On the other hand, configuration for other tasks can be done either by Component Interface or Online method.
Let's understand these different configuration methods:
Online: Required configuration values can be entered manually on the online pages. For example, to configure Adjustment Type, the user can navigate to the appropriate page and enter as many adjustment type values as required.
Component Interface: When the volume of configuration values is quite high, this is the preferred method. PeopleSoft offers a utility called Excel to Component Interface. It essentially automates the data entry into PeopleSoft setup pages by reading data from pre-defined Microsoft Excel templates. For example, if there are 2000 Account values to be configured, it is much easier to put the data such as Account number, Description and so on, into the Excel template. The template contains all the field values that need to be entered on the PeopleSoft page. The Excel to Component Interface utility then reads these values from the template, validates them, and loads them one row after the other into the PeopleSoft component.
Other: You can write a customized program to load configuration values from an external source.
So, this is what we'll need to do as we go along the configuration of a PeopleSoft module:
Create an implementation project for a specific module. It'll show all the required configuration activities.
In the Tracking tab, assign each task to the concerned person (it may be yourself!) along with the planned start and end dates (although it is not mandatory).
Click the hyperlink for each task so that the system opens the required page and performs necessary system setups.
Once a task is completed, enter 100% as percentage completed, so that task status changes to Complete.
With this we come to the end of the first chapter where we learned some critical concepts about PeopleSoft Financial applications. We also saw some of the important cross-module configuration activities needed for a working financial system. Here is what we learned.
A Chart of Accounts is the foundation of PeopleSoft financial applications. It includes various attributes that need to be recorded for each accounting transaction. These attributes are called chartfields. We can perform Standard or Advanced configuration to modify delivered chartfields according to our needs. It is always advisable to use standard configuration instead of advanced configuration.
Business Unit is an organizational unit that independently maintains its account balances. Business Units of an organization can be organized on the basis of geography, line of business or any other parameter that we choose. All the financial transaction data such as invoices, journals, and purchase orders are segregated by Business Unit. A SetID is a collection of master data elements such as vendors, customers, banks, and so on. It determines which setup values can be accessed by a Business Unit. SetIDs allow master data to be shared by multiple BUs.
A ledger is the central piece in PeopleSoft financial applications. An organization's account balances are stored in the ledger. Journals consolidate the accounting entries created by various PeopleSoft modules and post them to ledgers. A batch process known as Journal Generator automates the journal creation process. After these journals are created, the Journal Edit batch process validates them. Another batch process - Journal Post - posts valid journals to the ledger, thus completing the journal processing.
Banks are used by an organization to receive customer payments as well as make payments to its vendors. Each bank can have as many branches as needed. Each branch can have multiple bank accounts associated with it.
Configuring a PeopleSoft module involves a large number of tasks that need to be completed in the right order. PeopleSoft delivers a tool called Setup Manager to help in the setup activities. It lists tasks necessary to implement a module in the appropriate sequence. It also provides navigation paths and hyperlinks to the PeopleSoft pages where setups need to be done.

