In this chapter, we will cover the following:
Defining a concurrent program
Making a concurrent program available to a user
Adding a concurrent program parameter
Creating a value set
Creating dependent parameters
Adding messages to the concurrent program log file
Reporting to the concurrent program output file
Scheduling the concurrent program
Creating multiple concurrent programs
Creating request sets
Installing the database objects
Creating a HOST concurrent program
Concurrent programs are commonly used within Oracle E-Business Suite as a mechanism to run an executable. Concurrent programs allow users to pass parameters to the executable, which enables it to behave in different ways. We are going to go through some recipes configuring and running concurrent programs. We are also going to show how you can view and write to log files and output files to record what is happening whilst the program is running. Before we get into that, there is a bit of important background knowledge that needs to be highlighted.
Firstly, in release 12, there are additional options when defining a concurrent program to integrate with business events. You can now raise an event at various points throughout the concurrent program lifecycle. This is an extremely useful feature for extending e-Business Suite. For example, developers can subscribe to events and from the event we can launch workflows, send messages to an advanced queue, or launch PL/SQL procedures.
There are some basic concepts that need to be explained before we get into creating concurrent programs and such like. In Oracle EBS, there are users defined on the system and that's how we gain access to the application. There are some pre-configured users such as sysadmin and we can also create our own users each time we want to provide access to someone else on the system. Users are assigned one or more responsibilities and these determine the access we have to the system in terms of the forms we can go into, the programs we can run, and the data we can see. A responsibility will have a menu associated with it which will define the forms that can be accessed. It will also have a request group associated with it which will determine which concurrent programs the responsibility can execute. This is a very basic overview and you are probably already familiar with these concepts. However, if you want to understand more then I suggest you do some more reading of the System Administration guides from the Oracle Release 12 Documentation Library portal available on the Internet.
A few other important points to note are as follows:
The responsibility that you will need to configure nearly everything relating to a concurrent program is Application Developer. The only thing you cannot do with this responsibility is give access to users. For this you will need to use the System Administrator responsibility. (Assign these responsibilities to your user if you do not have them already.)
You can launch concurrent programs through an online request, for it to be scheduled automatically or to be triggered programmatically by using Oracle's built-in APIs.
Concurrent programs can also be configured so that they can be made incompatible with other concurrent programs meaning that they cannot run simultaneously.
You can also group concurrent programs together and form a request set. This feature is useful if you need to create concurrent programs that are linked in some way but need to be run in a certain manner.
Concurrent programs can also be scheduled to run on a certain date or to be run on an ongoing basis indefinitely.
We are now ready to get started and in this chapter we will create a concurrent program that launches a PL/SQL procedure. We will look at the parameters that are used internally and we will also add our own parameters using value sets and a dependent value set. In addition, we will write to the log and output files to show runtime information used for logging and reporting. We will schedule the concurrent programs to run automatically at specified time intervals and will look at creating multiple concurrent programs and run them together as a request set. At the end of the chapter we will look at creating a different type of concurrent program.
In our first recipe, we are going to create an executable and then define a concurrent program that launches the executable. The executable in this example is a PL/SQL package that we want to run. We will start off with a little introduction and look at the types of concurrent programs we can create, the location of executable files on the server, and how to find the output and log files. We will then register a custom application which we need to register our executable and concurrent programs with. Therefore, this recipe will comprise of the following:
Introducing concurrent programs
Register a custom application
Configure an executable
Configure a concurrent program
We do not need any additional development tools to configure a concurrent program. However, the executable that we will be launching will have been developed using the appropriate development tool — Reports Developer, SQL Developer, Java, and so on.
There are a number of different types of executables that can be triggered using concurrent programs. We are going to briefly discuss each one as a bit of background before we get started.
The different types of concurrent programs that we can create are as follows:
Oracle Reports: This option is, like the name suggests, used for launching Oracle reports developed using reports builder. It is quite common to have requirements to extend an Oracle standard report. There are a number of options when configuring a concurrent program that specifically relate to Oracle Reports, such as the output format, saving and printing options, columns/rows, and style.
PL/SQL stored procedures: These types of concurrent programs call a database stored procedure. There are two mandatory parameters when calling procedures from a concurrent program, which are
errbufandretcode. The errbuf parameter is used to return error messages. Theretcodeis used to return the status of the concurrent program. PL/SQL procedures are stored on the database in the apps schema so this is where Oracle will look for the stored procedure at runtime. The recipes in this chapter have examples of PL/SQL concurrent programs so we will explain this in detail throughout the chapter.Host script: This is a program that is used to launch a shell script and is commonly used to perform operating system actions such as copying or moving files. Some important points to note are that the program needs to be put in the appropriate
BIN($PROD_TOP/bin) directory. Oracle, by default, uses the first four parameters so any parameters used in the shell script will need to start with the fifth parameter ($5, $6 ... , and so on). We will go through this in more detail later in the chapter as we will be creating a concurrent program calling a host file in one of the examples.Immediate: This is for backward compatibility only and was used to launch a subroutine. It is now recommended to use a PL/SQL Procedure or spawned process.
Java stored procedures: As the name suggests, these are executables written using Java. A concurrent program is then defined to execute the code. When interacting with the database, PL/SQL Procedures are still the best way to do any processing as it is a language specifically designed to do so. You can perform many tasks using PL/SQL or Java but there are certain tasks where Java would be the better choice, especially when it comes to interacting with the operating system or third party databases.
Multi Language Function: The execution file is an MLS function used for running programs in multiple languages. This means that a concurrent program can be submitted multiple times, each time in a different language.
SQL*Loader: This is a utility to be able to load bulk data into Oracle E-Business Suite. It uses a data file and a control file. The data file is the data and the control file is the definition of the fields in the data file. There is a third file which is the parameter file, which is also used to pass any additional parameters when processing begins. There are three files produced when processing completes, a log file, a discard file, and a bad file. The log file provides information about the execution of the load. The bad file is written to if there are any records that are rejected throughout the execution of the load. The discard file is written to when there are any discarded records during the load execution, for example, when selectively loading rows.
SQL*Plus: This is used to run an SQL*Plus script or anonymous block. It will get executed as if you were running the script on the command line through SQL*Plus.
Spawned: This is a program that is usually run on the operating system, such as C or Pro*C.
Perl Concurrent Program: This is used for executing programs written in CGI Perl. CGI stands for Common Gateway Interface and Perl is the most common language for writing CGI scripts. It is used for scripting, programming web interfaces/development, and is great for parsing.
It is worth noting that at runtime the executable will need to be placed at a specific location. Files are stored in the $PRODUCT_TOP of the application they are registered with. Under this directory, they will be in the directory related to the type of program it is. The following are a few examples of where executables will need to be stored:
A spawned program registered in the Payables application would be stored in the
$AP_TOP/bindirectory.A host program registered in the Receivables application would be stored in the
$AR_TOP/bindirectory.An SQL*Plus script registered in a custom application would be stored in the custom application top directory, for example, the
$XXHR_TOP/sqldirectory. If you are unfamiliar with the custom top discussed here then do not worry as we will discuss this throughout the book.A report that was registered in the Inventory application would be stored in the
$INV_TOP/Reports/Langdirectory.
Throughout the chapter we will be looking at the output and log files generated by Oracle EBS when we run a concurrent program. These files are produced during execution and we can write log messages or output messages throughout processing. The output file is used to produce output for the user to see what has been processed and the log file is used to write more technical or debugging messages, which may not necessarily be understood by the end user. An additional way to debug is to use APIs to write to the FND_LOG_MESSAGES table.
The location of log files can be found by querying the FND_CONCURRENT_REQUESTS table. The two columns you are looking for are logfile_name and outfile_name:
SELECT logfile_name, outfile_name
FROM FND_CONCURRENT_REQUESTS
WHERE request_id = <request_id>
The results of this query will give you the location of the output files for a given request_id. Alternatively, you can search for the files manually in the directory listed in the UTL_FILE_DIR parameter in the init.ora file. The log file will start with an l and the output file with an o. Both will be followed by the request_id and both will have a .req file extension.
Note
Downloading the example code
You can download the example code files for all Packt books you have purchased from your account at http://www.packtpub.com. If you purchased this book elsewhere, you can visit http://www.packtpub.com/support and register to have the files e-mailed directly to you.
We must register a new application in Oracle E-Business Suite to register our custom configuration with. A new application allows us to isolate custom code and/or configuration from the standard Oracle Applications code and configuration. When we define a custom application, we register the custom application name, application short name, application basepath, and application description with the Oracle Application Object Library. This is used to configure custom application objects such as responsibilities and forms as belonging to our custom application. This identification with the custom application allows any extensions to be preserved during upgrades. The application basepath is an operating system profile variable that points to the directories where the application object library will look to find the files associated with the custom application. At this point we are just going to configure our custom application. We will create the file structure and create a custom schema later in the book.
To register an application, perform the following steps:
1. Log in to Oracle with the System Administrator responsibility.
2. Navigate to Application | Register and the Applications window will open as shown in the following screenshot:

3. Enter a new record with the following data:
Application:
XXHR Custom Application
Short Name :
XXHR
Basepath :
XXHR_TOP
Description :
XXHR Custom Application
4. Save the record.
We will now configure the executable that our concurrent program will execute at runtime.
The responsibility we need to configure the concurrent program is Application Developer. The code for the following recipe is available in the following files: XXHREEBS_1_1.pks (specification) and XXHREEBS_1_1.pkb (body). Follow the readme_1_1.txt to install this package.
1. Log in to Oracle with the Application Developer responsibility.
2. Navigate to Concurrent | Executable and the Concurrent Program Executable window will open, as shown in the following screenshot:

3. Enter data as shown in the following table:
Item name
Item value
Executable
XXHR1001
Short Name
XXHR1001
Application
XXHR Custom Application
Description
Executable created for concurrent program recipe
Execution Method
PL/SQL Stored Procedure
Execution File Name
xxhreebs.first_concurrent_program4. Click the Save button in the toolbar (or Ctrl + S) to save the record.
5. Exit the form.
We have defined an executable that will be launched by the concurrent program we are about to configure next. The executable has to be created before we can configure the concurrent program. This executable is calling a database package which at present has very little in it. When calling a PL/SQL package from a concurrent program there are two mandatory parameters. These are errbuf and retcode. We must return a value that represents a completion status and this is done by assigning a value to the retcode parameter. If we look at the package specification we can see that there are three constant variables defined, called SUCCESS, WARNING, and FAILED. These are set to 0, 1, and 2 respectively and we will assign a constant variable to the retcode out parameter to return a value to the concurrent manager upon completion. Valid return values for the retcode parameter are as follows:
0 - Success
1 - Success & warning
2 - Error
We have assigned constant variables to make the code easier to read. The other parameter that is returned is the errbuf parameter. We can assign text to this parameter so that we can return error messages if any occur at runtime back to the concurrent program, so it will be displayed in the log file.
In this recipe, we will configure our first concurrent program. The concurrent program will run the executable that we have just defined.
1. Log in to Oracle and select the Application Developer responsibility.
2. Navigate to Concurrent | Program and the Concurrent Programs window will open, as shown in the following screenshot:

3. Enter data as shown in the following table:
Item name
Item value
Program
XXHR First Concurrent Program
Short Name
XXHR_FIRST_CONC_PROGApplication
XXHR Custom Application
Description
XXHR First Concurrent Program
Executable Name
XXHR1001
4. Click the Save button in the toolbar (or Ctrl + S) to save the record.
5. Exit the form.
So now we have configured the executable and also defined the concurrent program that launches the executable. These are the basic steps required to configure a concurrent program. As you will see there are a number of other regions on the screen and some buttons, and we will be looking at some of these later in the chapter. The next step is to run the concurrent program.
We have created our first concurrent program but now we want to run it. That is exactly what we are going to do in this recipe. However, before we can run it we need to do some configuration. The concurrent program needs to be assigned to a request group and the request group needs to be assigned to a responsibility. The responsibility will have a menu that calls the concurrent request functions. So we are going to perform the following tasks so that we can access and run our concurrent program:
Configure a menu
Register a custom application
Create a new request group
Create a new responsibility
Assign the responsibility to a user
Run the concurrent program
View the request
Note
Please note that it may well be the case that there is an existing responsibility, menu, and request group already defined.
This recipe will configure a menu which will be attached to the new responsibility we are going to create. This will determine the concurrent programs and forms we will be able to access.
To create a menu, perform the following steps:
1. Log in to Oracle with the Application Developer responsibility.
2. Navigate to Application | Menu and the Menus window will open, as shown in the following screenshot:

3. Enter data as shown in the following table for the master record:
Item name
Item value
Menu
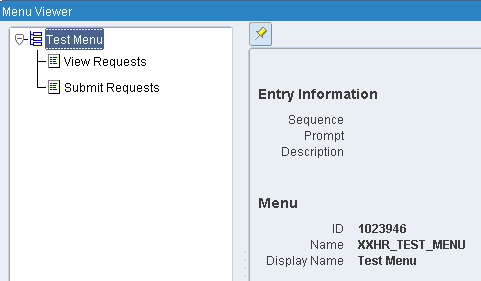
XXHR_TEST_MENUUser Menu Name
Test Menu
Menu Type
Standard
Description
Test Menu
4. Enter data as shown in the following table for the detail records:
Seq
Prompt
Submenu
Function
Description
Grant
10
View Requests
View All Concurrent Requests
View Requests
20
Submit Requests
Requests: Submit
Submit Requests
5. Click the Save button in the toolbar (or Ctrl + S) to save the record.
6. Exit the form.
The menu is what a user will see in the navigator when they are assigned a responsibility that has our menu assigned to it. More specifically the user will see the Prompt value which when selected will launch the function assigned to it. The menu can also be assigned a submenu. If you add a submenu the whole menu will be inherited and any functions it contains. We have created a simple menu that has the standard concurrent request functions added to it, so that we can run and view our concurrent program.
We can see the menu structure that we have created and how it may look to the user.
When we define a responsibility we can also assign a request group to it. A request group is a list of concurrent programs or request sets that a responsibility will see when they run a concurrent request. We are going to add a request group that will have our concurrent program in it.
To create a request group perform the following:
1. Log in to Oracle with the System Administrator responsibility.
2. Navigate to Security | Responsibility | Request and the Request Groups window will open as shown in the following screenshot:

3. Enter data as shown in the following table for the master record:
Item name
Item value
Group
XXHR Request Group
Application
XXHR Custom Application
Code
XXHR_REQUEST_GROUPDescription
XXHR Request Group
4. Now we are going to add the concurrent program we created in the Defining a concurrent program recipe. Navigate to the Requests region and enter data as shown in the following table for the detail record:
Type
Name
Application
Program
XXHR First Concurrent Program
XXHR Custom Application
5. Click the Save button in the toolbar (or Ctrl + S) to save the record.
6. Exit the form.
We have now created a request group that contains our concurrent program. When we assign the request group to our responsibility the concurrent program will appear as a list of concurrent programs when we want to run a request. The responsibility only has access to programs in the request set assigned to it.
Now to create our new responsibility that will run the concurrent program.
Perform the following steps to create a new responsibility called XXEBS Extending e-Business Suite:
1. Log in to Oracle with the System Administrator responsibility.
2. Navigate to Security | Responsibility | Define and the Responsibilities window will open as shown in the following screenshot:

3. Enter data as shown in the following table for the master record:
Item name
Item value
Responsibility Name
XXEBS Extending e-Business Suite
Application
XXHR Custom Application
Responsibility Key
XXEBSEEBS
Description
XXEBS Extending e-Business Suite
Data Group: Name
Standard
Application
XXHR Custom Application
Menu
Test Menu
Request Group: Name
XXHR Request Group
4. Click the Save button in the toolbar (or Ctrl + S) to save the record.
5. Exit the form.
Now we are going to create a user and assign the responsibility we created to the user.
To create a new user, perform the following steps:
1. Log in to Oracle with the System Administrator responsibility.
2. Navigate to Security | User | Define and the Users window will open, as shown in the following screenshot:

3. Enter data as shown in the following table:
Item name
Item value
User Name
TEST01
Password
<enter your password>
Description
TEST01 User
Password Expiration
<None>
4. In the Direct Responsibilities tab, add XXEBS Extending e-Business Suite to the responsibility field.
5. Click the Save button in the toolbar (or Ctrl + S) to save the record.
6. Exit the form.
Now we can run the concurrent program we have created.
To run the concurrent program, perform the following steps:
1. Log in to Oracle with the user that has the XXEBS Extending e-Business Suite responsibility assigned to it.
2. Navigate to Submit Requests | Submit and a Submit a New Request window will open, as shown in the following screenshot:

4. The Submit Request screen will open, as shown in the following screenshot:

5. Click on the Name field and select XXHR First Concurrent Program from the list of values.
6. Click on the Submit button.
7. A decision box will appear informing us that the request has been submitted.
8. Click on the No button as we do not wish to submit another request at this time.
9. Exit the form.
We want to see the outcome of the concurrent request and we can do this from the menu.
To view the request, perform the following:
1. Navigate to View | Requests, as shown in the following screenshot:

2. The Find Requests window will appear, as shown in the following screenshot:

3. Click on the Find button in the bottom-right hand side corner.
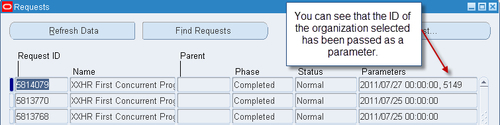
4. The Requests window will appear and you will see the concurrent program that was executed, as shown in the following screenshot:

5. You can see that the concurrent program has been completed successfully.
Note
The Requests screen does not automatically refresh so you will need to click on the Refresh Data button to refresh the screen until the Phase has changed to Completed.

We have now run the request we created. If you want to see details about the concurrent request then click on the View Details button. If you want to see any output click on the View Output button. The output file will often say there is no output as it will only display data if the executable program writes to the output file. If you wish to see log messages then click on the View Log button. Unless the executable program has written to the log file, you will see generic information about the concurrent request that is written by Oracle for every request. Developers often write information to the output and log files relating to the executable program that has been run.
In this recipe, we are going to add a parameter to the concurrent program XXHR First Concurrent Program. Parameters allow the users to pass values into the concurrent program. This can be used by the executable to impact the way it performs the intended task. We are going to add the parameter to the PL/SQL package and then change the return code based upon the value we pass in.
We will be adding a parameter to the concurrent program we have already created. We will also need to add the parameter to the code in the XXHREEBS package and we will use SQL Developer to make these changes. The following tasks will be performed in this recipe:
Adding a parameter to the concurrent program
Amend the
XXHREEBSpackage to add the new parameterAmend the
XXHREEBSto change the completion status of the concurrent programTesting the concurrent program
We are now going to add a parameter to the concurrent program to pass the date on which the request was run.
To add a parameter, perform the following steps:
1. Log in to Oracle with the Application Developer responsibility.
2. Navigate to Concurrent | Program and the Concurrent Programs window will open.
3. Press the F11 key to enter a query.
4. Type XXHR First% into the Program field and press the Ctrl + F11 keys together to execute the query.
5. The concurrent program we created in an earlier recipe will be returned, as shown in the following screenshot:

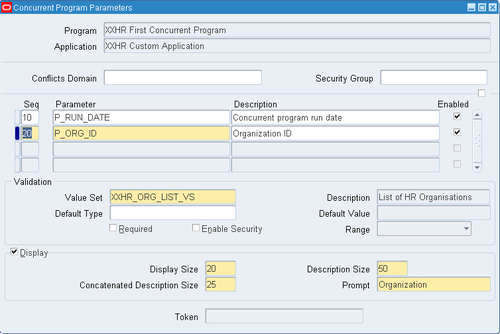
6. Click on the Parameters button to open the Concurrent Program Parameters window, as shown in the following screenshot:

7. Enter the following details as per the following table:
Item name
Item value
Seq
10
Parameter
P_RUN_DATEDescription
Concurrent program run date
Enabled

Value Set
FND_STANDARD_DATEDefault Type
Current Date
Required

Display
Display Size
11
Description Size
50
Concatenated Description Size
25
Prompt
Run Date
8. Click the Save button in the toolbar (or Ctrl + S) to save the record.
9. Exit the form.
We have now added a date parameter to the concurrent request. When we run the concurrent request, Oracle uses the records entered here to dynamically create a parameter screen. We can add parameters that are mandatory and based on a list of values if we wish. Also, we can hide a parameter to the user by checking the Display checkbox if required. We are going to add some more parameters to the concurrent program in the next few tasks but first we must add the parameter we just created to the procedure we call in the executable.
Now we are going to amend the XXHREEBS package to accept the new parameter we have configured. The parameter we configured is P_RUN_DATE.
We will need to use SQL Developer to amend the package so if you have not already done so, install SQL Developer. You can download SQL Developer from http://www.oracle.com/technetwork/developer-tools/sql-developer/downloads/index-098778.html.
We are now going to amend the database package to add the parameter we have just configured, as follows:
1. Open SQL Developer and connect to the apps user.
2. In the navigator, expand the Packages node and select the
XXHREEBSpackage.Note
You can add a filter on the Packages node in SQL Developer which will refresh the list much quicker. To do this highlight the Packages node and click on the filter icon. In the Filter window, select Name | Like | XXHR% in the filter criteria region and click ok.

3. The package specification will be opened in the editor as shown in the following screenshot:

4. Now edit the package specification by clicking on the package specification in the Packages node as shown in the following screenshot.
5. Scroll down the package specification code until you reach the
First_Concurrent_Programprocedure definition, shown as follows:PROCEDURE First_Concurrent_Program (errbuf OUT VARCHAR2, retcode OUT NUMBER);
6. Now add the parameter to the code after the first two mandatory parameters,
errbufandretcode. The program definition will look like the following:PROCEDURE First_Concurrent_Program (errbuf OUT VARCHAR2, retcode OUT NUMBER, p_run_date IN VARCHAR2);
7. Compile the package specification by clicking the compile icon (
 )in the editor toolbar.
8. The package specification will now look like the following:

9. Now we need to add the parameter to the package body, so click the open body icon as shown in the following screenshot and a new tab will open displaying the package body in the editor:

10. Scroll down to the
First_Concurrent_Programprocedure definition and add thep_run_dateparameter to the list of parameters, shown as follows:PROCEDURE First_Concurrent_Program (errbuf OUT VARCHAR2, retcode OUT NUMBER, p_run_date IN VARCHAR2) IS
11. Compile the
First_Concurrent_Programpackage body.
We are now going to add some code to the package to change the return status of the concurrent program. We will return a status of success if the date parameter we enter when we run the concurrent program is equal to the current date. When the date parameter is before the current date we will return a status of warning and if the date parameter is after today's date then we will return an error status.
We are going to amend the XXHREEBS package body to determine the return status of the concurrent program based upon the date parameter P_RUN_DATE that is passed in. The code for the following recipe is available in the following files: XXHREEBS_1_2.pks (specification) and XXHREEBS_1_2.pkb (body). The following are the steps taken to add the code to the existing XXHREEBS package.
To amend the package, perform the following steps:
1. Open SQL Developer and connect to the apps user.
2. Navigate to Packages and select the
XXHREEBSpackage.3. Add the following variable to capture the run date passed in and convert it to a date:
v_run_date DATE := TO_DATE(p_run_date,'YYYY/MM/DD HH24:MI:SS');
4. Edit the
First_Concurrent_Programprocedure by replacing the line of coderetcode := SUCCESS; with the following code after theBEGINstatement:IF TRUNC(v_run_date) = TRUNC(SYSDATE) THEN retcode := SUCCESS; ELSIF TRUNC(v_run_date) < TRUNC(SYSDATE) THEN retcode := WARNING; ELSIF TRUNC(v_run_date) > TRUNC(SYSDATE) THEN retcode := FAILED; END IF;
Note
Downloading example code
You can download the example code files for all Packt books you have purchased from your account at http://www.packtpub.com. If you purchased this book elsewhere, you can visit http://www.packtpub.com/support and register to have the files e-mailed directly to you.
5. The package body should now look similar to the following screenshot, which shows the three changes to the code we have made:

6. Compile the
First_Concurrent_Programpackage body.
Now we want to run the concurrent program testing the logic we have added in the PL/SQL code. If the run date parameter is entered as the current date then the concurrent program will complete successfully. If the concurrent program runs with a run date prior to today then the concurrent program will complete with a warning. If the concurrent program runs with a future date then it will complete with an error.
To test the logic we have added, perform the following steps:
1. Log in to Oracle with the XXEBS Extending e-Business Suite responsibility.
2. Navigate to Submit Requests and submit a single request.
3. Select the XXHR First Concurrent Program concurrent program and leave the
Run Dateparameter to the default date (which is the current date) and click OK.4. Click on the Submit button and when prompted to submit a new request, select No and the form will close down.
5. Navigate to the View Requests window and click on the Find button (to find all requests).
6. You should see that the concurrent program we just submitted has completed successfully. (If it is still Pending then click the refresh button until the status is Completed.)
In this recipe, we are going to add a parameter that uses a value set. A value set is a list of values and they are commonly used to extend e-Business Suite and in this recipe we are going to create a value set that is a list of organizations.
We are going to perform the following tasks:
Create a value set
Create a new parameter for the concurrent program
Modify the executable to accept the new parameter
Run the concurrent program
We are now going to create the value set that we will use as a list of values for our next parameter. The value set will contain a list of organizations.
To create a value set complete the following tasks:
1. Log in to Oracle with the Application Developer responsibility.
2. Navigate to Application | Validation | Set, and the Values Sets window will open as shown in the following screenshot:

3. Enter the following details as per the following table:
Item name
Item value
Value Set Name
XXHR_ORG_LIST_VSDescription
List of HR Organisations
List Type
List of Values
Security Type
No Security
Format Type
Char
Maximum Size
20
Validation Type
Table
4. Click on the Edit Information button and the Validation Table Information form will appear, as shown in the following screenshot:

5. Enter the following details as per the following table:
Item name
Value
Type
Size
Table Application
Human Resources
Table Name
HR_ALL_ORGANIZATION_UNITSValue
ORGANIZATION_IDVarchar222
Meaning
NAMEVarchar2240
ID
ORGANIZATION_IDNumber22
Where/Order By
SYSDATE BETWEEN NVL(date_from, SYSDATE) AND NVL (date_to, SYSDATE) ORDER BY name6. Click on the Save button in the toolbar (or Ctrl + S) to save the record.
7. Click on the Test button to test the code entered.
We have created a lookup that we can use in our concurrent program when we define the next parameter. The list will contain a list of organizations from the HR_ALL_ORGANIZATION_UNITS table.
We are just going to explore what happens to the information we store in this screen and how it performs at runtime.
Essentially this screen dynamically creates an SQL statement which is used to generate the list of values. The table columns region defines the values that are visible to the user and the value that is passed to the concurrent program. The Name value is what is displayed to the user. If there is no value entered for ID then it is passed as the parameter value, otherwise the value in ID is passed. The ID field is hidden from the user. In addition, if the value set is already used, that is, already mapped to a concurrent program, it cannot be modified.
We are now going to add a new parameter and use the value set we have just created in the previous recipe.
To create a new parameter, perform the following steps:
1. Log in to Oracle with the Application Developer responsibility.
2. Navigate to Concurrent | Program and the Concurrent Programs window will open.
3. Press the F11 key to enter a query.
4. Query back the XXHR First Concurrent Program concurrent program and click the parameters button.
5. Add a new parameter with the following details:
Item name
Value
Seq
20
Parameter
P_ORG_IDDescription
Organization ID
Enabled
Value Set
XXHR_ORG_LIST_VSDefault Type
Required
Display
Display Size
20
Description Size
50
Concatenated Description Size
25
Prompt
Organization
6. Click the Save button in the toolbar (or Ctrl + S) to save the record.
7. The completed screen will look like the following screenshot:
We are now going to add the parameter to the executable, which is the package called XXHREEBS.First_Concurrent_Program. If you wish to view the code then it can be found in the files XXHREEBS_1_3.pks and XXHREEBS_1_3.pkb. You can compile the package provided or add the parameter to the code manually below.
To add the parameter, take the following steps:
1. Open SQL Developer and connect to the apps user.
2. Navigate to Packages and select the
XXHREEBSpackage.3. In the code editor, scroll down the package specification until you reach the
First_Concurrent_Programprocedure definition.4. Now add the parameter to the code AFTER the
p_run_dateparameter. The program definition will look like the following:PROCEDURE First_Concurrent_Program (errbuf OUT VARCHAR2, retcode OUT NUMBER, p_run_date IN VARCHAR2, p_org_id IN VARCHAR2);
5. Compile the package specification and ensure it compiles without error.
6. Now we need to make the same addition to the package body. Open the package body.
7. Scroll down to the
First_Concurrent_Programprocedure definition and addp_org_idto the list of parameters, as shown in the following code:PROCEDURE First_Concurrent_Program (errbuf OUT VARCHAR2, retcode OUT NUMBER, p_run_date IN VARCHAR2, p_org_id IN VARCHAR2) IS
9. The program specification will look like the following:

10. The program body will look like the following:

Now we want to run the concurrent program testing that the concurrent program still runs successfully if the organization parameter is passed in.
To test the changes perform the following:
1. Log in to Oracle with the XXEBS Extending e-Business Suite responsibility.
2. Navigate to Submit Requests and submit a single request.
3. Select the XXHR First Concurrent Program concurrent program and leave the
Run Dateparameter to the default date (which is the current date).4. Select an organization from the list of values for the
Organizationparameter and then click OK.5. Click on the Submit button and when prompted to submit a new request, select No and the form will close down.
6. Navigate to View Requests and click on the find button (to find all requests).
7. You should see that the concurrent program we have just submitted has completed successfully. (If it is still Pending then click the refresh button until the status is Completed.)
If you now look at the following screenshot at the request once it has completed, the parameters field has an extra value which is the ID (your ID may well be different to the one in the screenshot dependent upon the organization you selected) of the parameter we have added:
In this next recipe, we are going to create a new parameter but this time we are going to make it dependent upon the parameter we created in the previous recipe.
We will be adding a parameter to the concurrent program we have already created. We will also be looking to change the package XXHREEBS so we will need to use SQL Developer to make these changes. The following tasks will be performed in this recipe:
Create a dependent value set
Create a new parameter for the concurrent program
Modify the executable to accept the new parameter
Run the concurrent program
We are now going to create a dependent value set. It will select a list of employees who belong to the organization chosen in the Organization parameter.
Perform the following steps to create the value set:
1. Log in to Oracle with the Application Developer responsibility.
2. Navigate to Application | Validation | Set and the Values Sets window will open.
3. Enter the details as shown in the following table:
Item name
value
Value Set Name
XXHR_PERSON_DEP_VSDescription
List of HR person records dependent upon organization
List Type
List of Values
Security Type
No Security
Format Type
CharMaximum Size
20
Validation Type
Table
4. Click on the Edit Information button and the Validation Table Information window will open.
5. Enter the details as shown in the following table:
Item name
value
Type
Size
Table Application
Human Resources
Table Name
per_people_f ppf, per_assignments_f pafValue
ppf.national_identifierChar20
Meaning
ppf.full_name||'- Employee Number : '||ppf.employee_numberVarchar2240
ID
ppf.person_idNumber10
Where/Order By
TRUNC(SYSDATE) BETWEEN ppf.effective_start_date and ppf.effective_end_dateAND TRUNC(SYSDATE) BETWEEN paf.effective_start_date AND paf.effective_end_date AND ppf.person_id = paf.person_id AND paf.primary_flag = 'Y'and paf.assignment_type = 'E' AND paf.organization_id = :$FLEX$.XXHR_ORG_LIST_VSNote
We should just examine the syntax in the Where/Order By field. The clause joins the two tables we have defined in the table name field. The syntax I want to focus on is the following line:
AND paf.organization_id = :$FLEX$.XXHR_ORG_LIST_VSThe
$FLEX$indicates that we want to base this upon another value set. It is followed by the name of the value set we want this to be dependent upon. A parameter that uses the value set must exist in another parameter defined in the concurrent program.6. Click the Save button in the toolbar (or Ctrl + S) to save the record.
7. Click on the Test button to test the code entered.
We have created a value set that is dependent upon another value set. We have already defined the p_org_id parameter that uses the XXHR_ORG_LIST_VS value set. When we run the concurrent program the parameter that uses this value set will appear disabled until a value has been entered in the dependent parameter.
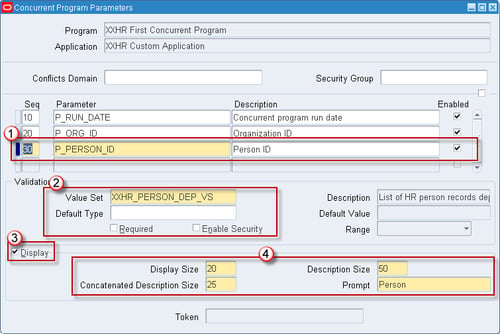
We are now going to add a new parameter called person_id and use the value set we have just created for the parameter.
Perform the following steps to add the new parameter:
1. Log in to Oracle with the Application Developer responsibility.
2. Navigate to Concurrent | Program and the Concurrent Programs window will open.
3. Press the F11 key to enter a query.
4. Query back the XXHR First Concurrent Program concurrent program and click the parameters button.
5. Add a new parameter with the following details:
Item name
Value
Seq
30
Parameter
P_PERSON_IDDescription
Person ID
Enabled
Value Set
XXHR_PERSON_DEP_VSDefault Type
Required
Display
Display Size
20
Description Size
50
Concatenated Description Size
25
Prompt
Person
The parameter should now look like the following screenshot:
We are now going to add the parameter to the executable, which is the package called XXHREEBS.First_Concurrent_Program. If you wish to view the code then it can be found in the files XXHREEBS_1_4.pks and XXHREEBS_1_4.pkb. You can compile the package provided or use the following instructions to add the parameter manually.
To add the new parameter to the code, perform the following steps:
1. Open SQL Developer and connect to the apps user.
2. Navigate to Packages and select the
XXHREEBSpackage.3. Now edit the package specification.
4. Scroll down the package specification until you reach the
First_Concurrent_Programprocedure definition.5. Now add the parameter to the code AFTER the
p_org_idparameter. The program definition will look like the following:PROCEDURE First_Concurrent_Program (errbuf OUT VARCHAR2, retcode OUT NUMBER, p_run_date IN VARCHAR2, p_org_id IN VARCHAR2, p_person_id IN NUMBER);
6. Compile the package specification.
7. Open the package body to add the
p_person_idparameter to the body.8. Scroll down to the
First_Concurrent_Programprocedure definition and addp_person_idto the list of parameters, as shown in the following code:PROCEDURE First_Concurrent_Program (errbuf OUT VARCHAR2, retcode OUT NUMBER, p_run_date IN VARCHAR2, p_org_id IN VARCHAR2, p_person_id IN NUMBER) IS
9. Compile the
First_Concurrent_Programpackage body.
Now we want to run the concurrent program testing that the concurrent program still runs successfully if the person_id parameter is passed in.
To run the concurrent program, perform the following:
1. Log in to Oracle with the XXEBS Extending e-Business Suite responsibility.
2. Navigate to Submit Requests and submit a single request.
3. Select the XXHR First Concurrent Program concurrent program and leave the
Run Dateparameter set to the default date (which is the current date).4. Select an organization from the list of values for the
Organizationparameter and then click OK. (If using a Vision instance select 'Vision Corporation', for example.)5. Select an employee record from the list of values for the
Personparameter and then click OK.6. Click on the Submit button and when prompted to submit a new request select No and the form will close down.
7. Navigate to View Requests and click on the find button (to find all requests).
8. You should see that the concurrent program we just submitted has completed successfully. (If it is still Pending then click the refresh button until the status is Completed).
In this recipe, we are going to write to the log file to show the values of parameters that are passed into the executable. This is useful as we need a way of debugging and logging activity when a program is being executed. We can also write other messages to the log file of the concurrent program to report activity when the executable runs.
The tasks we are going to perform in this recipe are as follows:
Create a profile option to turn logging on or off
Set the profile option value
Add a procedure to write to the log file
Writing to the log file
Running the concurrent program
Viewing the log file
Firstly we are going to create a profile option. This profile option is a simple profile that can be set to 'Y' or 'N'. If it is set to 'Y' then we can use it to write to the log file and if it is set to 'N' then we can choose not to write to the log file.
To create a new profile, perform the following:
1. Log in to Oracle with the Application Developer responsibility.
2. Navigate to Profile and the Profiles window will open, as shown in the following screenshot:

3. Enter data as shown in the following table:
Item name
Item value
Name
XXHR_WRITE_LOGFILEApplication
XXHR Custom Application
User Profile Name
XXHR Write to Concurrent Program Logfile
Description
XXHR Write to Concurrent Program Logfile
SQL Validation
SQL="SELECT MEANING \"Yes or No\", LOOKUP_CODEINTO :visible_option_value,:profile_option_valueFROM fnd_common_lookupsWHERE lookup_type = 'YES_NO'"COLUMN="\"Yes or No\"(*)"4. Click the Save button in the toolbar (or Ctrl + S) to save the record.
We have created a profile which will allow users to turn logging information on or off. Profile options can be a really useful way of setting values in our code without having to hard code.
There are often a number of ways to implement extensions or ways of doing things. As an example we could have created an additional parameter that uses a Yes/No value set that allows the user to write to the log file at runtime by setting a parameter value. It really depends upon how you want the program to run.
We will now set the profile to 'Yes' so that we can add code to our program that writes information to a log file.
To set the profile option value, perform the following:
1. Log in to Oracle with the System Administrator responsibility.
2. Navigate to Profile | System and the Find System Profile Values window will open as shown in the following screenshot:

3. In the Profile field type XXHR Write to Concurrent Program Logfile and click the Find button.
Note
You could have also just typed XXHR% and clicked the Find button. Then you would retrieve all of the profile options beginning with XXHR. You can use the wildcard (%) to search for specific text such as %HR%Write%Log%, which will also be just as acceptable and will help if you cannot remember the full name of the profile you are looking for. Just remember it is also case sensitive.
4. Set the Profile Option Name at Site level to Yes, as shown in the following screenshot:

5. Click the Save button in the toolbar (or Ctrl + S) to save the record.
We are now going to add the code to the executable, which is our package called XXHREEBS. If you wish to view the code then it can be found in the files XXHREEBS_1_5.pks and XXHREEBS_1_5.pkb. You can compile the package provided or use the following instructions to add the code manually.
To add a new procedure, perform the following steps:
1. Open SQL Developer and connect to the apps user.
2. Navigate to Packages and select the
XXHREEBSpackage.3. Now edit the package specification.
4. Declare a constant variable called
cv_write_to_logand assign to it the value of the profile optionXXHR_WRITE_LOGFILE, shown as follows:
5. Compile the package specification.
6. Edit the package body.
7. Add a procedure called
write_log, shown as follows:
8. Compile the package body.
Now we can add some messages to the First_Concurrent_Program procedure to write to the log file. We have already set the profile option to 'Yes' so every time we call the write_log procedure, the executable will write a message to the log file. So now we will add some messages to the log file. A good place to start would be to display the values that are being passed in as parameters.
To add messages to the log file perform the following steps:
1. Open SQL Developer and connect to the apps user.
2. Navigate to Packages and select the
XXHREEBSpackage.3. Now edit the package body.
4. Write to the log file with calls to
write_login our First_Concurrent Program procedure as follows:
5. Compile the package body.
Now we want to run the concurrent program testing that the code we have just added writes messages to the log file.
To run the concurrent program, do the following:
1. Log in to Oracle with the XXEBS Extending e-Business Suite responsibility.
2. Navigate to Submit Requests and submit a single request.
3. Select the XXHR First Concurrent Program concurrent program and leave the
Run Dateparameter to the default date (which is the current date).4. Select Vision Corporation from the list of values for the
Organizationparameter and then click OK.5. Select an employee record from the list of values for the
Personparameter and then click OK.6. Click on the Submit button and when prompted to submit a new request select No and the form will close down.
7. Navigate to View Requests and click on the Find button (to find all requests).
8. You should see that the concurrent program we just submitted has completed successfully. (If it is still Pending then click the refresh button until the status is Completed.)
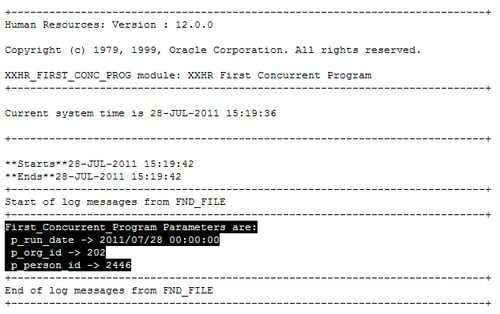
Once the concurrent program has completed successfully we can view the log file. Let's now have a look at the log file and see the messages that have been written to it.
To view the messages written to the log file perform the following:
1. Click on the View Log button in the View Requests screen and a browser window will open.
2. You will see that the messages we put into the
First_Concurrent_Programpackage have been written to the log file as highlighted in the following image:
Now that we have written to the log file to view log information, we want to write more user-friendly information to the user. We will make this more formatted so that it provides useful information to the user about the processing that has taken place.
The tasks we are going to perform in this recipe are as follows:
We are now going to add the code to the executable, which is our package called XXHREEBS. If you wish to view or copy the code then it can be found in the file XXHREEBS_1_6.pkb. You can compile the package body provided or use the following instructions to add the code manually.
To add a procedure to write to the output file perform the following steps:
1. Open SQL Developer and connect to the apps user.
2. Navigate to Packages and select the
XXHREEBSpackage.3. Now edit the package body.
4. Add a new procedure called
write_output, shown as follows:
5. Compile the package body.
We are now going to add a cursor to our procedure to get some data back so that it can be displayed in the output file.
To write a cursor to retrieve some data perform the following steps:
1. Edit the procedure
First_Concurrent_Programand add the cursor as shown in the following image:
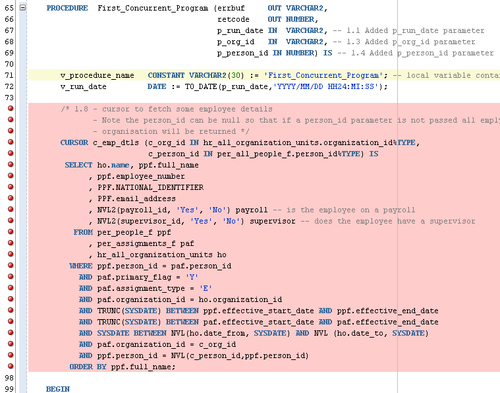
We are now going to add a cursor for loop to our procedure to get some data back, so that it can be written to the output file.
To add code to fetch data and write to the output file do the following:
1. Edit the
First_Concurrent_Programprocedure and add a cursorforloop to get the data. Make some calls to thewrite_outputprocedure to add the information to the output file as shown in the following image:
2. Compile the package body.
Now we want to run the concurrent program testing that the code we have just added writes messages to the log file.
To run the concurrent program to view the output file, perform the following:
1. Log in to Oracle with the XXEBS Extending e-Business Suite responsibility.
2. Navigate to Submit Requests and submit a single request.
3. Select the XXHR First Concurrent Program concurrent program and leave the
Run Dateparameter set to the default date (which is the current date).4. Select Vision Corporation from the list of values for the
Organizationparameter and then click OK.5. Select an employee record from the list of values for the
Personparameter and then click OK.6. Click on the Submit button and when prompted to submit a new request select No and the form will close down.
7. Navigate to View Requests and click on the Find button (to find all requests).
8. You should see that the concurrent program we just submitted has completed successfully. (If it is still Pending then click the refresh button until the status is Completed.)
Now we want to view the output file to see the messages we have written to it.
To open the output file to test our changes do the following:
1. Click on the View Output button and a browser window will open.
2. You will see that the messages we put into the
First_Concurrent_Programpackage have been written to the output file as shown in the following image:
There are two ways in which a concurrent program can be executed; it can be launched manually by a user or it can be scheduled to run automatically either on a one off basis or on a regular basis. In the next recipe, we are going to schedule the concurrent program we have created. It is important to note that when we schedule a concurrent program there is no user there to select the values for the parameters that are defined. Therefore, any required parameters we have added must have a default value. This can be done when entering the concurrent program but we are going to default a value for the organization.
We are going to complete the following tasks in this recipe:
Add default values for any required parameters
Schedule the concurrent program
We are now going to add default values for the parameters in our concurrent program that are required.
In our concurrent program XXHR First Concurrent Program we have three parameters:
P_RUN_DATEP_ORG_IDP_PERSON_ID
The first parameter P_RUN_DATE is not required and is already defaulted to the current date. The second parameter P_ORG_ID is required and so we are going to default this to Vision Corporation.
To add default values to our concurrent program parameters complete the following steps:
1. Log in to Oracle with the Application Developer responsibility.
2. Navigate to Concurrent | Program and the Concurrent Programs window will open.
3. Press the F11 key to enter a query.
4. Query back the XXHR First Concurrent Program concurrent program and click the parameters button.
5. Click on the
P_ORG_IDparameter and enter the following details to set the default parameter:Item name
Item value
Default Type
SQL Statement
Default Value
SELECT organization_id FROM hr_all_organization_units WHERE name = 'Vision Corporation'6. Click the Save button in the toolbar (or Ctrl + S) to save the record.
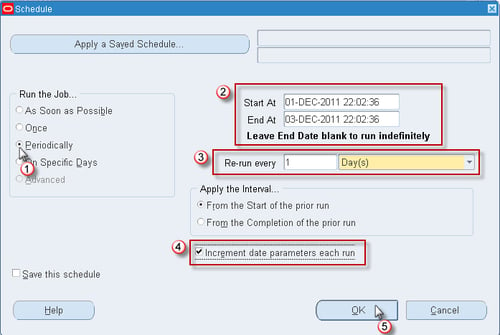
Now we are going to schedule the concurrent program to run on a daily basis for two days.
To schedule the concurrent program do the following:
1. Log in to Oracle with the XXEBS Extending e-Business Suite responsibility.
2. Navigate to Submit Requests and submit a single request.
3. Select the XXHR First Concurrent Program concurrent program and leave the
Run DateandOrganizationparameters set to their default values and click on OK:
4. Now click on the Schedule button. The screen dynamically changes when you click on each item of the Run the Job radio group.
5. Click Periodically.
6. Set Re-Run to every 1 Day(s).
7. Enter an End At value 2 days from the current date.
8. Check the Increment date parameters each run.
The steps are shown in the following screenshot:
2. Click on the Submit button and when prompted to submit a new request select No and the form will close down.
3. Navigate to View Requests and click on the Find button (to find all requests).
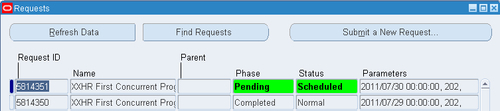
4. You should see that the concurrent program we just submitted has submitted two requests. The first will be set to run immediately and the second concurrent program is Pending with a status of Scheduled, as shown in the following screenshot:
It is quite common to have a requirement where we need to configure a concurrent program that is similar to an existing concurrent program. To prevent us having to configure the concurrent program from the beginning, Oracle has created a button that allows us to copy an existing concurrent program. In the next recipe, we are going to create a new concurrent program that is based upon the program we have already created.
The tasks we need to perform to achieve this are the following:
Copy an existing concurrent program
Add a concurrent program to a request set
We are going to copy the existing concurrent program and use the same parameters. We are also going to change the default parameter for the Organization parameter so that it defaults to 'Vision Operations'.
To copy an existing concurrent program definition, do the following:
1. Log in to Oracle with the Application Developer responsibility.
2. Navigate to Concurrent | Program and the Concurrent Programs window will open.
3. Press the F11 key to enter a query.
4. Type in XXHR First% into the Program field and press the Ctrl + F11 keys to execute the query.
5. The concurrent program we created in an earlier recipe will be returned.
6. Now click on the Copy to button and the Copy to window will open, as shown in the following screenshot:

7. Enter the data as shown in the following table:
Item name
Item value
Program
XXHR Second Concurrent Program
Short Name
XXHR_SECOND_CONC_PROGApplication
XXHR Custom Application
Include Incompatible Programs
Include Parameters
8. Click the OK button and the window will close and you will be returned to the Concurrent Programs window. You will notice that the concurrent program is now the new one we have just copied to, XXHR Second Concurrent Program.
9. Now click on the Parameters button and the Concurrent Program Parameters window will open.
10. Navigate to the parameter
P_ORG_ID.11. Change the select statement in the 'Default Value' field to the following:
SELECT organization_id
FROM hr_all_organization_units
WHERE UPPER(NAME) = 'VISION OPERATIONS'
Note
This query assumes that you are using a
Visioninstance. Modify the organization name in the query if you are using a different development environment.12. Click the Save button to commit the changes.
We are now going to add our concurrent program to our request set, so that it will be available from our responsibility when we run a new request.
To add the second concurrent program to our request group, perform the following:
1. Log in to Oracle with the System Administrator responsibility.
2. Navigate to Security | Responsibility | Request and the Request Groups window will open.
3. Query back the XXHR Request Group request group.
4. Now we are going to add the second concurrent program we created in the Requests region. Enter data as in the following table for the detail records:
Type
Name
Application
Program
XXHR Second Concurrent Program
XXHR Custom Application
5. Click the Save button in the toolbar (or Ctrl + S) to save the record.
6. Exit the form.
In this next recipe we are going to link the concurrent programs and run them together as a request set.
We are going to complete the following tasks in this recipe:
Run request set wizard
Add a request set to a request group
Run the request set
To create a request set we are going to run a wizard. The request set allows us to link concurrent programs together. Concurrent programs can be run sequentially or in parallel as a group. They can also be dependent upon the outcome of another program within the request set.
To create a request set using the wizard complete the following tasks:
1. Log in to Oracle with the System Administrator responsibility.
2. Navigate to Requests | Set and the Request Set window will open, as shown in the following screenshot:

4. Select the radio button called Sequentially (One After Another) and then click Next, as shown in the following screenshot:

5. Click on radio button called Continue Processing. This is what we want the request set to do if any of the programs end with a status of Error:

6. We now need to enter the details of our request set in the wizard as shown in the following table and click Next:
Item name
Item value
Set
XXHR20001
Application
XXHR Custom Application
Description
XXHR Employee By Organization

7. We now want to print the output files as each request finishes, so select As Each Request in the Set Completes and click Next as follows:

8. Now add the concurrent programs that we want to run in the request set so add the two programs we have created, XXHR First Concurrent Program and XXHR Second Concurrent Program, and click Finish as shown in the following screenshot:

9. The following message will appear; click OK:

10. The request set is then automatically created and the completed set will appear something similar to the following screenshot. We are going to first look at the Define Stages screen and the Link Stages screen to check the configuration:

11. Click on the Define Stages button to check that the concurrent programs are configured as required:

12. Check that the screen is configured as we expected and then close the Stages window to navigate back to the Request Set window.
13. Click on the Link Stages button and the Link Stages window will open as shown in the following screenshot:

We will now add our request set to the request group we have associated with the XXEBS Extending e-Business Suite responsibility.
To add the request set perform the following steps:
1. Log in to Oracle with the System Administrator responsibility.
2. Navigate to Security | Responsibility | Request and the Request Groups window will open.
3. Query back the XXHR Request Group request group.
4. Now we are going to add the request set we created in the Requests region. Enter data as in the following table in the Requests block:
Type
Name
Application
Set
XXHR20001
XXHR Custom Application
5. Click the Save button in the toolbar (or Ctrl + S) to save the record.
6. Exit the form.
Now we want to run the concurrent request set.
To run the request set take the following steps:
1. Log in to Oracle with the XXEBS Extending e-Business Suite responsibility.
2. Navigate to Submit Requests and click the OK button as shown in the following screenshot:

3. Navigate to the Request Set field and select the XXHR20001 request set from the list of values and click OK.
4. Click on the Submit button and when prompted to submit a new request select No and the form will close down.
5. Navigate to View Requests and click on the Find button (to find all requests) and you will see the request set as shown in the following screenshot:

6. You should see that the request set we just submitted is running.
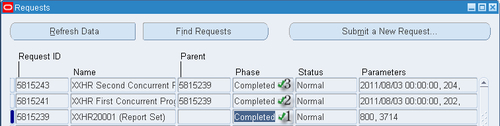
If you click the refresh button you will see the stages of the request set complete as they are executed. Once the request set has completed you will see three records in the Requests block. One for the set and one each for the concurrent programs in the request set as shown in the following screenshot:
We are going to create the database objects for the next examples, by using a script provided called 4842_01_01.sh In the next examples we will be configuring a concurrent program that calls a host program. The script we are going to run will create a sequence, synonym, and package for our host program call. We will also create a package that will handle all of the database transactions such as insert, update, and delete. Finally, we will create a sequence that will be used to generate a unique number for new filenames. The following provides details of how to run the script.
To create the database objects required for this chapter perform the following tasks:
1. Create a local directory
c:\packt\scripts\ch1where the scripts are downloaded and extracted to.2. Open Putty and connect to the application tier user.
3. Create a new directory on the application tier under
$XXHR_TOP/installas follows:cd $XXHR_TOP/install mkdir ch14. Navigate to the new directory
ch1as follows:cd ch15. Open WinSCP and transfer the files from
c:\packt\scripts\ch1on your local machine to the$XXHR_TOP/install/ch1directory on the application server, as shown in the following screenshot:
6. In Putty, change the permissions of the script with the following command:
chmod 775 4842_01_01.sh7. Run the following script to create all of the objects by issuing the following command:
./4842_01_01.sh apps/apps8. The script checks that all of the files are present in your
$XXHR_TOP/install/ch1directory and will prompt you to continue if they are all there, so type Y and press return.9. After the script has completed, check the
XXHR_4842_01_01.logfile for errors. (It will be created in the same directory$XXHR_TOP/install/ch1.)10. Run the following query to check that all of the objects have been created successfully:
SELECT OWNER, OBJECT_NAME, OBJECT_TYPE, STATUS
FROM ALL_OBJECTS
WHERE OBJECT_NAME LIKE 'XXHR_EMAIL%'
OR OBJECT_NAME LIKE 'XXHR%BATCH%'
ORDER BY 1, 2
11. This is shown in the following screenshot:

We have created a number of objects that we are going to use in the coming recipes. We have created a synonym to the apps user as all of our objects need to be accessed by this user. The sequence we have created will generate a unique number each time a new file is created. Finally, the package we have created contains all of the procedures and functions relating to database activity for calling our host program.
In this recipe, we are going to create two concurrent programs. The first concurrent program will call the second concurrent program through PL/SQL. The first concurrent program will also generate a file and place it in a directory on the database server. The second concurrent program will call a host program that will get the file we just created and will e-mail it to an e-mail account. To complete the recipe we will perform the following tasks:
The first thing we will do is create an executable that calls a PL/SQL package called xxhr_email_file_pkg.process_main. We will look into what the package does later on, so for now we just want to configure it.
To create the executable to call a database package perform the following steps:
1. Log in to Oracle with the Application Developer responsibility.
2. Navigate to Concurrent | Executable and the Concurrent Program Executable window will open.
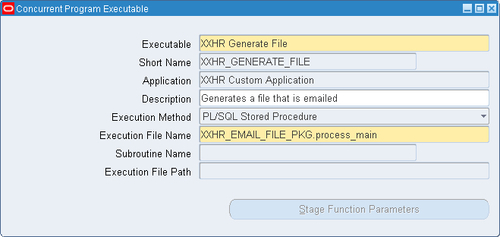
3. Enter data as shown in the following table:
Item name
Item value
Executable
XXHR Generate File
Short Name
XXHR_GENERATE_FILEApplication
XXHR Custom Application
Description
Generates a file that is emailed
Execution Method
PL/SQL Stored Procedure
Execution File Name
XXHR_EMAIL_FILE_PKG.process_main4. The form should now look like the following screenshot:
5. Click the Save button in the toolbar (or Ctrl + S) to save the record.
6. Exit the form.
In the following recipe, we will configure our concurrent program that calls the executable we have just defined.
To configure the concurrent program, perform the following:
1. Log in to Oracle and select the Application Developer responsibility.
2. Navigate to Concurrent | Program and the Concurrent Programs window will open, as shown in the following screenshot.
3. Enter data as shown in the following table:
Item name
Item value
Program
XXHR Generate File and Email
Short Name
XXHR_GEN_AND_EMAILApplication
XXHR Custom Application
Description
Generate XML file and email it
Executable Name
XXHR_GENERATE_FILE4. The form should now look like the following:

5. Click the Save button in the toolbar (or Ctrl + S) to save the record.
6. Click on the Parameters button to open the Parameters window.
7. Enter a first parameter with the following details:
Item name
Value
Seq
10
Parameter
P_SUBJECTDescription
Subject
Enabled
Value Set
240 Characters
Required
Display
Display Size
30
Description Size
50
Concatenated Description Size
25
Prompt
Subject
8. The Parameter screen should now look like the following screenshot:

9. Enter a second parameter with the following details:
Item name
Value
Seq
20
Parameter
P_EMAIL_TODescription
Email Address
Enabled
Value Set
100 Characters
Required
Display
Display Size
30
Description Size
50
Concatenated Description Size
25
Prompt
Email Address To
10. The screen should now look like the following screenshot:

11. Save and exit the form.
Now we will create an executable that calls a HOST file called xxhr_send_email_file. The name is case sensitive so ensure it is in lower case. Also the host file does not have any extension.
To create the executable to call a HOST file, perform the following:
1. Log in to Oracle with the Application Developer responsibility.
2. Navigate to Concurrent | Executable and the Concurrent Program Executable window will open.
3. Enter data as shown in the following table:
Item name
Item value
Executable
XXHR Email File From Unix
Short Name
XXHR_EMAIL_FILE_FROM_UNIXApplication
XXHR Custom Application
Description
XXHR Email File From Unix
Execution Method
Host
Execution File Name
xxhr_send_email_file4. The form should now look like the following screenshot:

5. Click the Save button in the toolbar (or Ctrl + S) to save the record.
6. Exit the form.
In the following recipe, we will configure our concurrent program that calls the executable we have just defined.
To configure the concurrent program, perform the following:
1. Log in to Oracle and select the Application Developer responsibility.
2. Navigate to Concurrent | Program and the Concurrent Programs window will open as shown in the following screenshot.
3. Enter data as shown in the following table:
Item name
Item value
Program
XXHR Email File
Short Name
XXHR_GEN_EMAIL_FILEApplication
XXHR Custom Application
Description
XXHR Email File
Executable Name
XXHR_EMAIL_FILE_FROM_UNIX4. The form should now look like the following screenshot:

5. Click the Save button in the toolbar (or Ctrl + S) to save the record.
6. Click on the Parameters button to open the Parameters window.
7. Enter a first parameter with the following details:
Item name
Value
Seq
10
Parameter
Subject
Description
Subject
Enabled
Value Set
240 Characters
Default Type
Constant
Default Value
Email Generated from EBS
Required
Display
Display Size
30
Description Size
50
Concatenated Description Size
25
Prompt
Subject
8. Enter a second parameter with the following details:
Item name
Value
Seq
20
Parameter
Email Address
Description
Email Address
Enabled
Value Set
100 Characters
Required
Display
Display Size
30
Description Size
50
Concatenated Description Size
25
Prompt
Email Address
9. Enter a third parameter with the following details:
Item name
Value
Seq
30
Parameter
Filename
Description
Filename
Enabled
Value Set
240 Characters
Required
Display
Display Size
30
Description Size
50
Concatenated Description Size
25
Prompt
Filename
10. Enter a fourth parameter with the following details:
Item name
Value
Seq
40
Parameter
Directory
Description
Directory
Enabled
Value Set
240 Characters
Required
Display
Display Size
30
Description Size
50
Concatenated Description Size
25
Prompt
Directory
11. Enter a fifth parameter with the following details:
Item name
Value
Seq
50
Parameter
Sent From
Description
Sent From
Enabled
Value Set
240 Characters
Required
Display
Display Size
30
Description Size
50
Concatenated Description Size
25
Prompt
Sent From
12. The parameter screen should now look like the following. Note: you need to scroll down to see the fifth parameter.

13. Save and exit the form.
When we defined our responsibility called XXEBS Extending e-Business Suite we assigned a request group to it called XXHR Request Group. We are going to add our concurrent programs, so that they will be available from the responsibility.
To update our request group perform the following steps:
1. Log in to Oracle with the System Administrator responsibility.
2. Navigate to Security | Responsibility | Request and the Request Groups window will open.
3. Query back the XXHR Request Group we created earlier in the chapter.
4. Now we are going to add the concurrent programs we created. Add the two concurrent programs as per the following table:
Type
Name
Application
Program
XXHR Generate File and Email
XXHR Custom Application
Program
XXHR Email File
XXHR Custom Application
5. Click the Save button in the toolbar (or Ctrl + S) to save the record.
6. Exit the form.
We have now added the concurrent programs to the request group used by the XXEBS Extending e-Business Suite responsibility. Our concurrent programs will appear in a list of concurrent programs when we want to run a request. The responsibility only has access to the programs in the request set assigned to it.
Our PL/SQL package uses a PL/SQL utility called UTL_FILE. We are going to write a file to the database server using this utility but we first need to see which directories we have access to. We will then create a name for a directory that we can use as a name for that directory.
To create a named directory, perform the following:
1. Open SQL Developer and connect as the apps user.
2. Run the following query to see what directories the file utility has access to:
SELECT * FROM dba_directories order by directory_name

3. We can see that there is a directory called
/usr/tmp, which is the one we will use to write our file to.4. We want to create our own name for it, however; to do this run the following command:
CREATE OR REPLACE DIRECTORY XXHR_XML_OUT AS '/usr/tmp'
/
5. If you run the query again you should see that our entry now exists in the table
dba_directories, as shown in the following screenshot:
We are now going to transfer our file over to the application tier in the $APPLBIN directory under the PRODUCT TOP directory. We will then make a symbolic link using the execution filename (without an extension) to fndcpesr, which is located in the $FND_TOP/$APPLBIN directory.
To install our host file, perform the following:
1. Open WinSCP and transfer the
xxhr_send_email_file.progto the$XXHR_TOP/$APPLBINdirectory on the application tier as shown in the following screenshot:
2. Open Putty and connect to the application tier with the OS user that owns the application tier. (Ensure that the environment is set — refer to Chapter 6 about setting the environment.)
3. Navigate to the
$XXHR_TOP/$APPLBINdirectory by typing the following command:APPS Tier> cd $XXHR_TOP/$APPLBIN4. Change the permissions of the
xxhr_send_email_progfile with the following command:APPS Tier> chmod 775 xxhr_send_email_prog5. Create a symbolic link for the file with the following command:
APPS Tier> ln -s $FND_TOP/bin/fndcpesr xxhr_send_email_file6. Check that the symbolic link has been created with the following command:
APPS Tier> ls -al7. You can see that the symbolic link has been created as shown in the following screenshot:

We are now going to test the concurrent program but before we do we will take a look at some of the code in the package and the host program we have configured, to see what is happening.
The concurrent program XXHR Generate File and Email will execute the PL/SQL package called XXHR_EMAIL_FILE_PKG.process_main. This package calls three procedures in the following order:
generate_xml:This procedure is called first and creates an XML message and stores the message in aCLOBvariable.create_xml_file:This procedure is called next and takes the data in theCLOBand creates a file on the server for the named directory we created earlier calledXXHR_XML_OUT.email_xml_file:This procedure is called last and submits a concurrent program through a PL/SQL command. The concurrent program that it runs is the XXHR Email File we created to call our host program. The host program gets the file from the server and e-mails it using the UNIXuuencodecommand.
The host concurrent program called XXHR Email File launches the host file we created on the application tier. The first four parameters in the host file are reserved for oracle. Therefore, the first parameter that we pass from our concurrent program is actually the fifth parameter in the host file. The host file validates the parameters that we pass in and then sends an e-mail using the UNIX uuencode utility. Now we want to run the concurrent program testing that the file is generated on the server and then e-mailed by calling the second concurrent program.
To run the concurrent program, do the following:
1. Log in to Oracle with the XXEBS Extending e-Business Suite responsibility.
2. Navigate to Submit Requests and submit a single request.
3. Select the XXHR Generate File and Email concurrent program.
4. Fill in the parameters as shown in the following table:
Subject
Email sent from EBS
Email Address To
<enter your email address here>
5. Click OK to submit the request as shown in the following screenshot:

6. Click on the Submit button and when prompted to submit a new request select No and the form will close down.
7. Navigate to View Requests and click on the Find button (to find all requests).
8. We can see in the following screenshot that there are two concurrent requests. The first is the one that we launched. The second is the program that is launched from our database package through PL/SQL:

9. You should see that the concurrent program we just submitted has completed successfully. (If it is still Pending then click the refresh button until the status is Completed.)
We can see from the following screenshot that the e-mail has been received at the e-mail address passed as a parameter when we launched the concurrent program:

We have run the concurrent program XXHR Generate File and Email, which in turn launched the XXHR Email File concurrent program. Both concurrent programs appear in the Requests screen. The file was generated on the database server and the host program picked up the file and e-mailed it to the e-mail address passed in as a parameter.