This chapter presents a number of recipes that show you how to get started with OpenShift using the web console and rhc command-line client. You will learn how to host your own WordPress blog with a button click, make source code changes and deploy them, and perform basic operations with the rhc command-line client. The specific recipes of this chapter are:
Creating an OpenShift Online account
Creating OpenShift domains using the web console
Creating a WordPress application using the web console
Uploading SSH keys using the web console
Working with the SSH key passphrases
Cloning the application to the local machine
Deploying your first change
Checking the application's gear quota and limits
Installing the OpenShift rhc command-line client
Setting up an OpenShift account using rhc
Enabling the autocomplete feature in an rhc command-line client
Viewing the account details using rhc
Specifying a different OpenShift server hostname
Updating rhc
A few years ago, I wanted to write a web application that would process a stream of tweets about a movie and then output the overall sentiment about it. This would help me decide whether I should watch a movie or not. So, I researched for a hosting provider and found out that I could rent a few virtual machines from Amazon to host my web application. This was my entry into the world of cloud computing. Cloud computing allows access to a shared pool of computing (both hardware and software) resources available as a service over the network, which is pay per use, has an elastic nature (that is, can be scaled up and down), and is available on demand. It has three delivery models:
Infrastructure as a Service (IaaS): This is the most fundamental delivery model where a user can provision compute, storage, and other resources such as network to run an application, but the user has to install and manage the application stack required to run the application. Examples of IaaS include Amazon EC2, Google Compute Engine, and Rackspace.
Platform as a Service (PaaS): PaaS provides an application development platform to help developers build their applications using the runtimes, tools, libraries, and services provided by the platform provider. Examples of PaaS include OpenShift, Cloud Foundry, and Heroku.
Software as a Service (SaaS): SaaS is a set of applications (or software) that run on the cloud and are available as a service. Examples of SaaS include Google Apps and Microsoft Office 365.
As a developer, I liked the concept of PaaS, as it enabled me to use my skillset to focus only on the application code and let someone else worry about managing the application stack and infrastructure for me.
OpenShift is an open source, a polyglot, and a scalable PaaS from Red Hat. At the time of writing this book, OpenShift officially supports the Java, Ruby, Python, Node.js, PHP, and Perl programming language runtimes, along with MySQL, PostgreSQL, and MongoDB databases, and a lot of other features. Along with all the supported services, OpenShift users can also leverage marketplace (https://marketplace.openshift.com/home) to try and use other cloud services managed by various partners. The services supported by the partners vary from databases such as ElephantSQL scalable PostgreSQL as a Service to SendGrid's Email as a Service.
OpenShift is an umbrella under which three subprojects coexist. These three subprojects differ in the way they deliver the OpenShift technology to the users, developers, and community members. Each of the subprojects is described as follows:
OpenShift Origin: OpenShift Origin is the open sourced, Apache License 2.0, community-supported version of OpenShift. It is the upstream feeder project to both OpenShift Online and OpenShift Enterprise. The project is available on GitHub at https://github.com/openshift.
OpenShift Online: OpenShift Online is the public-managed version of OpenShift. It runs on top of Amazon EC2 and uses a hardened and stabilized version of OpenShift Origin. Every OpenShift Online user is entitled to a free plan. The free plan gives users access to three small instances with 512 MB RAM and 1 GB of disk space. OpenShift Online is also available as commercial offering via Bronze and Silver plans. The commercial plans allow users to get more resources, storage, and Red Hat professional support. You can learn about the OpenShift Online pricing at https://www.openshift.com/products/pricing.
OpenShift Enterprise: OpenShift Enterprise is a Red Hat fully supported, private PaaS solution, which can run on enterprise hardware. OpenShift Enterprise can help make enterprises more agile and meet their business application demands.
This book will focus mainly on OpenShift Online, but the recipes apply to all three.
As a developer, you can interact with OpenShift in the following four ways:
Web console: This is the easiest way to get started with OpenShift, as it does not require you to install any software on your machine. You can log in to the web console and start creating applications. At the time of writing this book, the web console lacks all the features available in the command-line tool.
The rhc command line: This is a command-line tool that interacts with OpenShift. It is available as a Ruby gem. It is the most powerful way to interact with OpenShift because it exposes all the OpenShift functionalities.
IDE Integration: If you are a developer who likes to do most of the coding from within an IDE, then you will be happy to know that OpenShift has first class integration with various IDEs such as Eclipse, IntelliJ IDEA, Zend Studio, and Titanium Studio.
The REST API: You can write your own client using the OpenShift REST API. You can use this API to write plugins for IDEs such as NetBeans or write another command-line client. You can read the REST API documentation at https://access.redhat.com/knowledge/docs/en-US/OpenShift/2.0/html-single/REST_API_Guide/index.html.
The important OpenShift components are shown in the following diagram:

As shown in the preceding diagram, a developer interacts with OpenShift using one of the client interfaces, that is, the web console, rhc command-line client, or IDE support. OpenShift has the following three main components:
Broker: All the clients interact with the broker using a well-defined REST interface exposed by the broker. The broker is responsible for all application management activities. It is a Ruby on Rails application that manages user logins, DNS management, and general application orchestration.
Node: This is a set of RHEL instances that provides a multitenant environment for end user applications.
Gear: A gear is a secure container that runs inside a node and host user applications. It is constrained by CPU, disk space, and memory.
Note
The broker and nodes use the ActiveMQ message queue to talk with each other. They both have the MCollective client installed on them to send instructions to each other.
Now that you know what OpenShift is and how you can work with it, let's kick off the first chapter. This chapter presents a number of recipes that gets you up to speed quickly by giving you information you need to create cloud applications using OpenShift. You will learn how to create your first OpenShift application using the web console, clone the application using Git, make your first source code change, and finally deploy that change to OpenShift. If this is the first time you are working with OpenShift, then you will be amazed by the speed at which you can create and deploy applications on OpenShift. This chapter will also cover how to install the rhc command-line client and perform some basic operations using it.
In this recipe, you will learn how to create an OpenShift Online account. You can sign up for an OpenShift Online account for free; all you need is a valid e-mail address.
To create an OpenShift Online account, you need a web browser and a valid e-mail address.
Follow these steps to create an OpenShift Online account:
Open a web browser and go to the sign-up page at https://www.openshift.com/app/account/new.
Enter the details required to create a new account and then submit the form.
After signing up, you will receive an e-mail in your inbox that contains the verification link. Click on the verification link to verify your e-mail address. This will redirect the browser to a web page, asking you to accept the legal terms to use OpenShift Online, as shown in the following screenshot:

Click on the I Accept button and the browser will redirect to the getting started web page.
In this recipe, you learned how to create an OpenShift Online account. From a user's perspective, OpenShift Online is the easiest way to get started with OpenShift because you do not have to deploy and manage your own OpenShift installation.
When you sign up for OpenShift Online, you will be associated with a free plan. At the time of writing this, Red Hat gives every user three free gears on which to run their applications. A gear provides a resource-constrained container to run one or more cartridges. A cartridge provides the actual functionality required to run the application. OpenShift Online currently supports many cartridges such as JBoss, Tomcat, PHP, Ruby, Python, MongoDB, MySQL, and so on. Gear provides RAM and disk space to a cartridge. At the time of writing this book, each gear is 512 MB of RAM and 1 GB of disk space. A user can upgrade to the Bronze or Silver plan to get access to more and bigger resources. You can refer to the pricing web page at https://www.openshift.com/products/pricing for up to date information.
After creating the OpenShift Online account, the first step is to create a domain. A domain or namespace is a logical container for applications. It forms parts of an application URL and is unique to an account. In this recipe, you will learn how to create a domain using the web console.
Open the OpenShift Online login page at https://openshift.redhat.com/app/login in your favorite web browser and then sign in using your OpenShift Online credentials.
To create a domain or namespace, go to the account settings web page at https://openshift.redhat.com/app/console/settings and enter a unique name. A domain or namespace should be unique across all the users. This means that you can't use
osbookas a domain name because the OpenShift account associated with this book usesosbook.Click on the Save button to create a new domain, as shown in the following screenshot:

After the domain is created, you will see a message, The domain 'osbook' has been created, on your screen. Instead of
osbook, the message would refer to your domain name.
OpenShift requires you to have a domain before it can allow you to create applications. A domain represents a logical container for the applications under an OpenShift account. All the OpenShift applications must belong to a domain. It is unique across all OpenShift users and is a part of the application URL. For example, if your application name is myapp and your domain name is osbook, then your application URL will be http://myapp-osbook.rhcloud.com. A domain can contain as many as 16 alphanumeric characters and cannot have spaces or symbols. It is also sometimes called a namespace.
A user can join domains created by other OpenShift users. This allows users to work as a team. Depending on the OpenShift plan or configuration, a user will able to create more than one domain. The free plan does not allow a user to create more than one domain name, but you can still join other domains. We will discuss domains in detail in Chapter 2, Managing Domains.
You can see the created domains listed on the application settings web page at https://openshift.redhat.com/app/console/settings. This can be seen in the following screenshot:

In this recipe, you learned how to create a domain using the web console. You can view the details of a domain by clicking on the domain name web link. The following screenshot shows the domain details:

In the preceding screenshot, you can see that there are no applications associated with this domain. As per the free plan configuration, you can only use small gears. If you uncheck the Allow small gears checkbox, then you will not be able to create any applications. You can also invite other users to join your domain by clicking on the Add members… web link. Team collaboration will be covered in detail in Chapter 2, Managing Domains. You can also delete a domain by clicking on the Delete this domain… button.
In this recipe, you will create your first OpenShift application using the web console. The web console, as mentioned in the Introduction section, is a web interface to OpenShift that developers can use to quickly create and manage applications. You will use the OpenShift WordPress quickstart in order to create a fully configured application. If you do not have a blog, now is the time to have your own personal blog for free.
Open the login web page at https://openshift.redhat.com/app/login in your favorite web browser and log in using your OpenShift credentials.
Follow these steps to create a WordPress application using the web console:
Go to the applications web page at https://openshift.redhat.com/app/console/applications and click on the Create your first application now web link.
Under the Instant App section, click on the WordPress 3.9 instant app. At the time of writing this book, the WordPress version is 3.9, as shown in the following screenshot:

Enter a name for the blog and click on the Create Application button. I have used
blogas the name of the WordPress application, as shown in the following screenshot:
After the application is created, you will be directed to a page that shows the MySQL connection details. You can view the newly created application details by clicking on Continue to the application overview page.
Your WordPress blog will now be running at
http://blog-{domain-name}.rhcloud.com/. Replace{domain-name}with your OpenShift account domain name.
A quickstart is a preconfigured OpenShift application that provides a repeatable way to spin up an application with its source code and dependencies such as databases. You can view the list of actively maintained quickstarts at https://www.openshift.com/quickstarts. Note that the OpenShift team does not support these quickstarts. They are just to help you get your favorite project (mostly open source) running on OpenShift. In this recipe, you used WordPress quickstart to quickly scaffold a WordPress application. You selected the WordPress 3.x quickstart in the web console and gave it a name. An application name can contain 32 alphanumeric characters at most. The WordPress quickstart uses a public Git repository, which installs the WordPress application. It also defines the cartridges it will use. The WordPress quickstart uses the PHP 5.3 and MySQL 5.1 cartridges.
To create an application, click on the Create Application button. This will create an application container for us, called a gear, and set up all the required SELinux policies and cgroups configuration. OpenShift will also set up a private Git repository using the quickstart public Git repository. It will install the MySQL database on the application gear. The quickstart source code references the MySQL database using the environment variables. You will learn about OpenShift application details in Chapter 3, Creating and Managing Applications.
Finally, OpenShift will propagate the DNS to the outside world. The application will be accessible at http://blog-{domain-name}.rhcloud.com/. Replace the {domain-name} part with your own unique OpenShift domain name, sometimes called a namespace. Open the http://blog-{domain-name}.rhcloud.com/ link in your favorite browser and set up your WordPress installation. After the setup, you will have your own WordPress blog and you can start blogging.
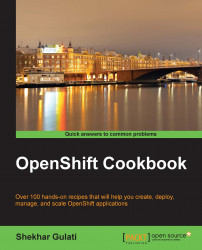
In this recipe, you learned how to create a WordPress application using the OpenShift web console. You can also view the application details by going to the Applications tab and then clicking on the application, as shown in the following screenshot:

In the preceding screenshot, you can see the state of the application, that is, Started. You can restart the application by clicking on the restart button next to Started. The application uses the PHP 5.3 and MySQL 5.1 cartridges. To view the database password, you can click on the show web link. To add the phpMyAdmin 4.0 MySQL web client, click on the Add phpMyAdmin 4.0 web link. Next, click on the Add Cartridge button to add the phpMyAdmin 4.0 cartridge.
The cartridge will be available at https://blog-{domain-name}.rhcloud.com/phpmyadmin/. The phpMyAdmin credentials are the same as the database credentials.
Secure Shell (SSH) is a network protocol that guarantees robust authentication, data encryption, and data integrity between two networked machines that connect over an insecure network. It uses the client-server architecture and transparently encrypts the data between the client and server. SSH clients communicate with SSH servers over encrypted network connections. There are plenty of free and commercial products available that implement the SSH protocol. SSH has various authentication mechanisms where OpenShift uses the public-private key pair authentication mechanism. Other SSH authentication methods such as password authentication and host-based authentication are beyond the scope of this book.
In this recipe, you will learn how to create a public-private key pair and upload the public key to your OpenShift account. OpenShift uses SSH for the following purposes:
Providing a secure and encrypted connection between your machine and application gear
Allowing remote access to your application gear
Working with your application Git repository and deploying code to OpenShift
Port forwarding, which allows users to connect to OpenShift services such as databases from their own machines
To complete this recipe, you will need the OpenSSH SSH connectivity tools installed on your machine. These are very common as they come bundled with most Linux installations, Macintosh OS X, and almost all Unix-inspired operating systems. Microsoft Windows also has plenty of free and commercial SSH clients as mentioned at http://www.openssh.com/windows.html. Also, if you use PuTTy on your Windows machine, then you can refer to the official documentation at https://www.openshift.com/developers/install-and-setup-putty-ssh-client-for-windows.
To verify that the OpenSSH client tool is installed, run the following command:
$ ssh -V
OpenSSH_6.2p2, OpenSSL 1.0.1e-fips 11 Feb 2013
Perform the following steps:
Run the
ssh-keygencommand to generate a new pair of SSH keys. Thessh-keygencommand is one of the SSH tools installed by OpenSSH. This command will generate a key pair in the.sshfolder under the user's home directory:$ ssh-keygen -t rsa -b 2048 -C 'SSH keys to connect with OpenShift'Go to the Settings web page at https://openshift.redhat.com/app/console/settings and paste the content of the public key. The public key is the key with the
.pubextension. After pasting the public key content, click on the save button.Go to the Applications web page at https://openshift.redhat.com/app/console/applications and click on the application for its details, as shown in the following screenshot:
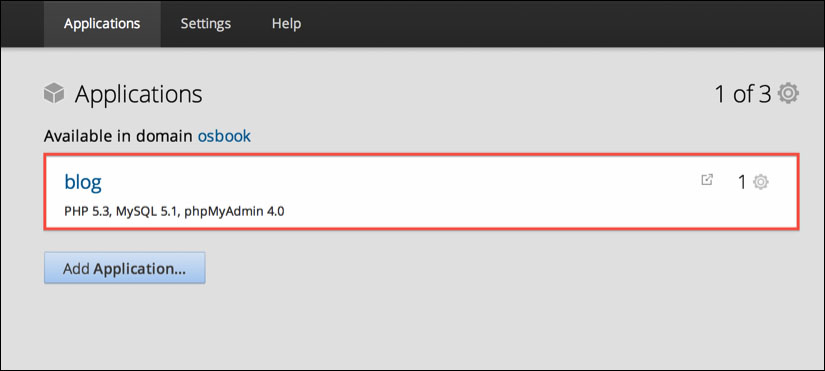
Next, view the application SSH details by clicking on Want to log in to your application?, as shown in the following screenshot:
Copy the application SSH information shown in the following screenshot:

Open a new command-line terminal on your local machine and run the following command. Here, you will list the directories in the application's gear home folder. Replace the SSH information with your application SSH information.
$ ssh 52b823b34382ec52670003f6@blog-osbook.rhcloud.com ls
app-deployments
app-root
git
mysql
php
phpmyadmin
First, let's try to understand what you did in the preceding section. In the first step, you created a new pair of SSH keys. The ssh-keygen utility can take a number of options. Three of the many options used are as follows:
The
-toption is used to specify the type of the key. It can be either RSA or DSA, and in this case, the RSA key type is used. Note that OpenShift supports both the RSA and DSA key types.The
-boption is used to specify the number of bits in the key. For RSA keys, the minimum size is 768 bits and the default is 2048 bits. Generally, 2048 bits is considered sufficient.The
-Coption is used to provide a comment, which can be useful to identify a key. This is appended to the public key.
The ssh-keygen command prompts the user with a few questions, as shown in the following command:
$ ssh-keygen -t rsa -b 2048 -C 'SSH keys to connect with OpenShift'
Generating public/private rsa key pair.
Enter file in which to save the key (/home/vagrant/.ssh/id_rsa):
Enter passphrase (empty for no passphrase):
Enter same passphrase again:
Your identification has been saved in /home/vagrant/.ssh/id_rsa.
Your public key has been saved in /home/vagrant/.ssh/id_rsa.pub.
The key fingerprint is:
ad:59:8a:02:e6:94:35:92:a3:b9:94:93:c8:9a:30:47 SSH keys to connect with OpenShift
The key's randomart image is:
+--[ RSA 2048]----+
|                 |
|   .             |
|  E o            |
|o+o= .   .       |
|***     S o      |
|+O..   . =       |
|+ . . . +        |
|     .           |
|                 |
+-----------------+
Firstly, this command asks the user to provide the SSH key filename and its location. The default filename for RSA keys is id_rsa for a private key and id_rsa.pub for a public key. The default location to store these keys is the .ssh folder under the user's home directory.
Secondly, it asks the user to provide a passphrase. In order to not use a passphrase, just press Enter twice. The passphrase is used to secure the private key. If you enter a passphrase, you will be prompted to enter the passphrase every time you perform any operation that requires SSH. In the next recipe, you will learn how to use a passphrase without entering it each time.
When you run any SSH client, such as ssh, to connect with an SSH server, the client uses the private key to prove your identity to the server. The server uses the public key for authentication. If the authentication succeeds, then the connection proceeds. Otherwise, you will get an error message.
In the second step, you uploaded the public SSH key to the OpenShift account. OpenShift copies the public key into an authorization file on the application gear at ~/.ssh/authorized_keys. Thereafter, when an SSH client requests a connection to the application gear, the SSH server running on the application gear consults the authorized_keys file to find the matching public key.
From step 3 to step 5, you learned how to find the SSH information for an application using the web console. In step 6, you tested the SSH connection by executing the ls command on the application gear. The first time you connect to an SSH server, you will be asked whether you want to connect to the server. This is because the client does not know about the server. The SSH client consults the known_hosts file at ~/.ssh/known_hosts for the server information. If there is no entry in ~/.ssh/known_hosts, then it will ask for confirmation, as shown in the following command:
$ ssh 52b823b34382ec52670003f6@blog-osbook.rhcloud.com ls

The authenticity of host 'blog-osbook.rhcloud.com (54.221.64.115)' can't be established.
RSA key fingerprint is cf:ee:77:cb:0e:fc:02:d7:72:7e:ae:80:c0:90:88:a7.
Are you sure you want to continue connecting (yes/no)? yes

Warning: Permanently added 'blog-osbook.rhcloud.com,54.221.64.115' (RSA) to the list of known hosts.

app-deployments
app-root
git
mysql
php
phpmyadmin
After you enter yes, a new entry will be added to the known_hosts file at ~/.ssh/known_hosts. The known_hosts file at ~/.ssh/known_hosts acts as a database, and the client will check this file for the server entry on every subsequent request.
You can decide to use another name or location for the SSH key pair. You can create another SSH key using the ssh-keygen utility. This time, name the key openshift_key:
$ ssh-keygen
Generating public/private rsa key pair.
Enter file in which to save the key (/home/vagrant/.ssh/id_rsa): /home/vagrant/.ssh/openshift_key
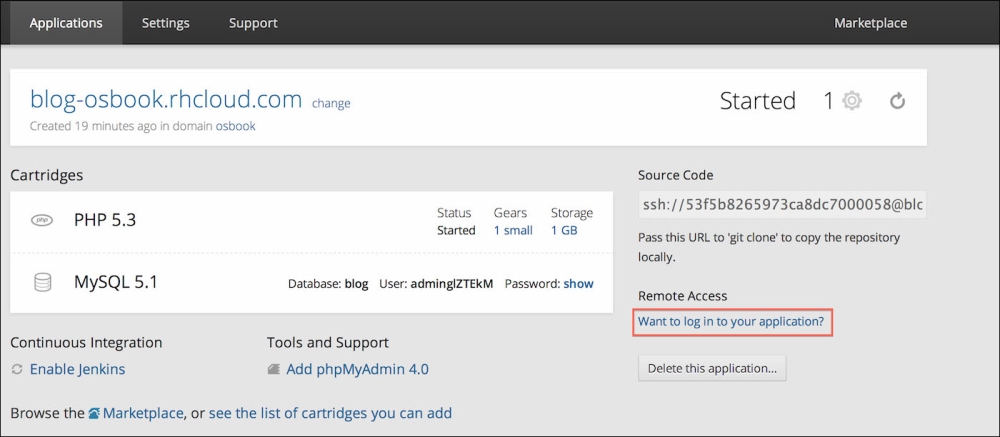
Go to the OpenShift account settings web page at https://openshift.redhat.com/app/console/settings and delete the existing key, as shown in the following screenshot:
Now, upload the openshift_key.pub SSH key to your OpenShift account as discussed previously.
Run the ssh command again. This time, you will get an error, as the SSH client used the default key to connect with the SSH server. The default key name is id_rsa. Now, let's try to run the ls command on the application gear to confirm whether we get the Permission denied error:
$ ssh 52b823b34382ec52670003f6@blog-osbook.rhcloud.com ls
Permission denied (publickey,gssapi-keyex,gssapi-with-mic).
Tip
To get debug information, you should use the following command:
ssh -v 52b823b34382ec52670003f6@blog-osbook.rhcloud.com ls
To get even more debug information, you should use the following command:
ssh -v -v -v 52b823b34382ec52670003f6@blog-osbook.rhcloud.com ls
The number of –v options in the preceding command defines the verbosity.
To connect with the application gear, you have to connect using openshift_key. To use a different key, run the following command:
$ ssh -i /home/vagrant/.ssh/openshift_key 52b823b34382ec52670003f6@blog-osbook.rhcloud.com ls
The -i option is used to tell the SSH client to pick a different SSH key.
In the Uploading SSH keys using the web console recipe, you learned how to create a new SSH key pair and upload it to an OpenShift account. The SSH key pair was created with an empty passphrase. The passphrase is a password to protect the private key. The empty passphrase avoids reentering a passphrase every time you use the key, but it might cause some security concerns. This recipe will walk you through the process of securing your SSH keys while avoiding having to re-enter the passphrase every time you use the key.
To step through this recipe, you will need the OpenSSH SSH connectivity tools installed on your machine.
To make sure that the OpenSSH client tool is installed, run the following command:
$ ssh -V
OpenSSH_6.2p2, OpenSSL 1.0.1e-fips 11 Feb 2013
The output of the preceding command will depend on the operating system and OpenSSH version installed on your machine. If you get ssh: command not found, then the OpenSSH tools are not installed on your machine.
This recipe will use the WordPress application created in the Uploading SSH keys using the web console recipe.
Perform the following steps to use SSH key passphrases:
Passphrases can be added during key creation time or to an existing key without regenerating a new key pair. As you have already created the key pair in the Uploading SSH keys using the web console recipe, we will reuse this key pair. You will use
ssh-keygento add a key pair to the existing key:$ ssh-keygen -p Enter file in which the key is (/home/vagrant/.ssh/id_rsa): Key has comment '/home/vagrant/.ssh/id_rsa' Enter new passphrase (empty for no passphrase): <Enter passphrase> Enter same passphrase again: <Enter passphrase again> Your identification has been saved with the new passphrase.
Now, if you try to SSH into the application gear, you will be asked to enter the passphrase.
Next, run the
ssh-agentcommand. Thessh-agentcommand, which is a part of the OpenSSH toolbelt, is another tool that stores your passphrase securely so that you do not have to re-enter the passphrase. You can run thessh-agentcommand by typing the following:$ ssh-agent $SHELLTo add the passphrase, run the
ssh-addutility:$ ssh-add Enter passphrase for /home/vagrant/.ssh/id_rsa: <Enter passphrase> Identity added: /home/vagrant/.ssh/id_rsa (/home/vagrant/.ssh/id_rsa)
Connect to the application gear to see the SSH agent in action. You will notice that you are not asked to enter the passphrase:
$ ssh 52b823b34382ec52670003f6@blog-osbook.rhcloud.com ls
app-deployments
app-root
git
mysql
php
phpmyadmin
Exit the shell to end the
ssh-agentsession. If you try to connect with the application gear now, you will be asked to enter the passphrase:$ ssh 52b823b34382ec52670003f6@blog-osbook.rhcloud.com ls Enter passphrase for key '/home/vagrant/.ssh/id_rsa':
The ssh-agent utility stores the SSH keys in memory. It caches the private keys and responds to the authentication queries from SSH clients. The ssh-add utility is used to add and remove keys from ssh-agent. In step 1, you added the passphrase to your existing key. By default, it will use the default key, id_rsa, in the .ssh folder, but you can provide another SSH key file using the -i option. Now, SSH into the application gear and you will be asked to enter the passphrase:
$ ssh 52b823b34382ec52670003f6@blog-osbook.rhcloud.com ls
Enter passphrase for key '/home/vagrant/.ssh/id_rsa':
Step 2 starts the agent by forking the existing shell. It sets some environment variables required by the SSH agent. Next, in step 3, you add the SSH key into the agent. It asks for the passphrase to decrypt the private key. After decryption, it adds the private key to the agent's cache.
Finally, in step 4, you connect to the application gear using the ssh client. This time you will not be asked to enter the passphrase as the agent already cached the private key.
You can terminate the agent or log out from the shell to end the session.
Every OpenShift application has a private Git repository that houses the application source code. OpenShift uses Git not only as a version control system but also to build and deploy the application using Git's action hooks. In this recipe, you will learn how to get the source code of the OpenShift application on your local machine.
You will need Git installed on the operating system before stepping through this recipe. For Debian-based Linux distributions, you can install Git with apt-get install git as the root. If you are on Fedora or any other Red Hat-based system, you can install Git with yum install git-core as the root. Mac and Windows users can download the Git package from the official download site at http://git-scm.com/downloads.
This recipe will use the WordPress application created in the Creating a WordPress application using the web console recipe.
Perform the following steps to clone the repository:
Go to the Applications tab in the web console at https://openshift.redhat.com/app/console/applications and click on the application to view its details, as shown in the following screenshot:

Copy the Git repository URL mentioned on the application detail web page, as shown in the following screenshot:

Open a command-line terminal, go to a convenient location on your machine, and execute the
git clonecommand. Replace the repository URL with your application Git URL:$ git clone ssh://52b823b34382ec52670003f6@blog-osbook.rhcloud.com/~/git/blog.git/
The first and second steps helped us to locate the application Git repository URL. As discussed in the preceding section, OpenShift uses Git as revision control and a source code management system. Every application has a private Git repository. A Git repository contains all the information needed to retain and manage the revisions and history of a project. OpenShift uses the SSH transport protocol to work with Git repositories. To create a secure communication channel between the local machine and application gear, Git uses the SSH key setup discussed in the Uploading SSH keys using the web console recipe. Nobody will be able to clone your application repository unless you add their public SSH key to your account.
In step 3, you cloned the application Git repository using the clone command. The git clone command created a new Git repository based on the original application repository URL. The difference between Git and other version control systems is that Git clones the full copy of the repository, in addition to the working copy, of all the files in the repository. The clone command will create a new directory on your local filesystem with the same name as the application.
You can also specify a different folder name with the git clone command. Suppose you want to clone the application in the myapp folder. To do this, execute the following command:
$ git clone ssh://52b823b34382ec52670003f6@blog-osbook.rhcloud.com/~/git/blog.git/ myapp
If you want to allow any of your friends or team members to clone your repository, just add their public key to your account. Follow the Uploading SSH keys using the web console recipe to upload the public SSH key. We will discuss team collaboration in detail in Chapter 2, Managing Domains.
In the Cloning the application to the local machine recipe, you learned how to clone an OpenShift application Git repository using the git clone command. The next logical step after cloning the repository is to make a change, commit it, and finally deploy it. In this recipe, you will learn how to deploy the source code changes to OpenShift applications.
Perform the following steps to deploy your first change:
Go to the OpenShift web console and navigate to the PHP 5.4 application creation page at https://openshift.redhat.com/app/console/application_type/cart!php-5.4.
Enter the name of the application. I have used
myappas the application name.Click on the Create Application button to create a new application.
Clone the application's Git repository on your local machine by following the steps mentioned in the Cloning the application to the local machine recipe.
Open the
index.phpfile inside the application source code root directory. Go to the following line of code inindex.php:<h1>Welcome to your PHP application on OpenShift</h1>
Replace the preceding line of code with this:
<h1>Updated the application</h1>
Commit the change to the local repository using Git:
$ git commit -am 'modified index.php'Push the changes to the remote repository hosted on the OpenShift application gear using the following Git command:
$ git push origin masterAfter
git pushsuccessfully completes, open thehttp://myapp-{domain-name}.rhcloud.com/application in your favorite browser. You will see your first change.
The OpenShift deployment process is based around Git. From step 1 to step 4, you created a PHP 5.4 application using the web console and cloned the application on your local machine. In step 5, you made a simple change to the index.php file. This change has not yet been committed to the local repository. Git, being a distributed version control system, has a concept of local and remote repositories. You can continue working (making changes and committing them) on your local machine as long as you want, and when you are ready, you can push the changes to the remote Git repository.
In step 6, you committed the change to your local Git repository using the git commit command. You used the -a and -m options. The -a option tells the git command to automatically stage the modified and deleted files, but new files are not touched. To commit a new file, you have to first stage the file using the git add command and then commit it:
$ git add test.html
$ git commit -m 'new html file'
Step 7 pushes the local commits to a remote repository. When you clone a repository, the cloned repository maintains a link back to its parent repository via a remote called origin. A remote is a handle or reference to another Git repository. The remote information is stored in a configuration file called config under the .git folder. You can open the .git/config file and view the origin remote information as follows:
[remote 'origin']
  url = ssh://52bbf209e0b8cd707000018a@myapp-osbook.rhcloud.com/~/git/blog.git/
  fetch = +refs/heads/*:refs/remotes/origin/*
As shown in the preceding code, a remote consists of two different parts. The url part is the name of the remote repository in the form of a URL. The fetch part specifies how a reference should be mapped from the namespace of one repository into that of another.
The output of the git push command is as follows:
$ git push origin master
Counting objects: 7, done.
Compressing objects: 100% (4/4), done.
Writing objects: 100% (4/4), 404 bytes | 0 bytes/s, done.
Total 4 (delta 3), reused 0 (delta 0)
remote: Stopping PHP cartridge
remote: Waiting for stop to finish
remote: Stopping MySQL cartridge
remote: Stopping PHPMyAdmin cartridge
remote: Waiting for stop to finish
remote: Building git ref 'master', commit 3933f99
remote: Building PHP cartridge
remote: Preparing build for deployment
remote: Deployment id is b78e5efd
remote: Activating deployment
remote: Starting MySQL cartridge
remote: Starting PHPMyAdmin cartridge
remote: Database already configured.
remote: Starting PHP cartridge
remote: Result: success
remote: Activation status: success
remote: Deployment completed with status: success
To ssh://52bbf209e0b8cd707000018a@blog-osbook.rhcloud.com/~/git/blog.git/
   e83c2a7..3933f99  master -> master
This is how the process works:
Git takes the
masterbranch changes, compresses them, and transfers all the missing objects from your local repository to the remote repository namedorigin.Next, a pre-receive action hook is invoked on the application gear. Git hooks are custom scripts, which Git will run at specific events like
push. You can write scripts in bash, Perl, Python, Ruby, or whatever you have. The pre-receive hook receives a list of all (new or old) the refs that are to be updated. The pre-receive action hook in the application gear Git repository stops the PHP and other cartridges, checks the deployment integrity, and configures the deployment metadata.Lastly, the postreceive action hook is invoked on the application gear. It receives a list of all the updated refs. The postreceive action hook in the application gear Git repository archives the application repository, builds the application, starts the PHP and other cartridges, and then finally deploys the application.
Instead of using the git push origin master command, you can also use git push. The origin part is the default remote and master is the default branch, so they are not required.
In this recipe, you will learn how to check the application resource limits.
To step through this recipe, you will need the OpenSSH SSH connectivity tools installed on your machine. This recipe will use the WordPress application created in the Creating a WordPress application using the web console recipe.
To check the resources consumed by your application, run the following command. Here, you replace the SSH URL with your application SSH URL. To find the SSH URL of your application, refer to the Uploading SSH keys using the web console recipe.
$ ssh 52bbf209e0b8cd707000018a@blog-osbook.rhcloud.com quota -s
The OpenShift applications run inside gears that have limited resources. Every gear, depending on its size, has a definite amount of resources. The quota -s command can be used to check the resources consumed by the application and the limits imposed on the gear.
The output of the quota -s command is shown as follows:
Disk quotas for user 52bbf209e0b8cd707000018a (uid 2187):
     Filesystem  blocks   quota   limit   grace   files   quota   limit   grace
/dev/mapper/EBSStore01-user_home01
                   124M       0   1024M            2898       0   80000
The first column is the name of the filesystem that has quota enabled for it. The second column shows how many blocks the user is currently using. The fourth column tells us the storage limit. Gears in free tier have access to 1 GB of disk storage. The sixth column tells us the number of files created by the application. The eighth column shows the maximum number of files a user can create. Gears can create a maximum of 80,000 files. The gears also have limited RAM memory. Small gears have 512 MB of RAM, medium gears have 1 GB of RAM, and large gears have 2 GB of RAM. The medium and large gears are only available in the Bronze and Silver commercial plans.
The rhc client is the most powerful and feature-rich command-line client utility, which users can use to work with OpenShift. It is built using Ruby programming language and packaged as a Ruby gem. The rhc source code is available on GitHub at https://github.com/openshift/rhc.
To install rhc, you will need to have Ruby 1.8.7 or above installed on your machine. You can check whether Ruby is installed on your machine by running the following command:
$ ruby --version
ruby 2.0.0p247 (2013-06-27 revision 41674) [x86_64-linux]
The output of the preceding command will depend on the operating system and Ruby version installed on your machine. If you receive ruby: command not found, then Ruby is not installed on your machine. Install Ruby on your operating system. You can download the package for your operating system from the official website at https://www.ruby-lang.org/en/downloads/.
Open a new command-line terminal and run the following command:
$ gem install rhc
This command will install the rhc gem required to work with OpenShift.
OpenShift packages the rhc command-line utility as a gem. A gem is a reusable piece of code or a command-line utility to help automate tasks. RubyGems is a package manager for the Ruby programming language that provides a standard format for distributing Ruby programs and libraries. This software allows a developer to download, install, and use software packages on their machine. The gem command allows you to work with RubyGems.
When you run the gem install command, the gem command-line tool fetches the package and its dependencies from the central repository and installs them. The central gem repository is available at http://rubygems.org.
After the command successfully finishes, you can check the version of rhc using the following command:
$ rhc --version
rhc 1.27.4
The gem install command also generates the documentation for the installed packages. You can use the Ruby ri command-line tool to view the documentation offline. For example, if you want to list all the classes for which ri can show documentation, then run the following command:
$ ri --list
This command will list all the classes and their methods for which you can view the documentation. To view the documentation of the CLI class method of the RHC class, execute the following command:
$ ri RHC::CLI
The output will be the documentation for the CLI method, as follows:
= RHC::CLI
(from gem rhc-1.27.4)
------------------------------------------------------------------------------
Run and execute a command line session with the RHC tools.

You can invoke the CLI with:
  bundle exec ruby -e 'require 'rhc/cli'; RHC::CLI.start(ARGV);' -- <arguments>
You can disable the documentation generation by using the following command:
$ gem install rhc --no-document
In the Installing the OpenShift rhc command-line client recipe, you learned how to install the rhc command-line client. After installation, the first operation you have to perform is to set up the OpenShift account. In this recipe, you will learn how to set up your account using rhc.
To complete this recipe, you will need to have rhc installed on your machine. Refer to the Installing the OpenShift rhc command-line client recipe for instructions.
To set up an OpenShift account, open a command-line terminal and run the following command:
$ rhc setup
Before you can use the rhc client to work with OpenShift, you have to set up the account.
The setup command does the following:
It first asks you to provide your OpenShift credentials to authenticate with openshift.redhat.com.
After successful authentication,
rhcasks whether it should create an authorization token. An authorization token allows you to access the OpenShift server without entering the password with every command. It stores the token in the.openshiftfolder under the user'shomedirectory. By default, the token is valid for 30 days, which means that after this you have to authenticate it again.Next, the
setupcommand creates a file calledexpress.confin the.openshiftfolder under the user'shomedirectory. Theexpress.conffile stores the basic configuration required byrhcsuch as the OpenShift server location, your OpenShift username, and whether or not to create and use authorization tokens.If no SSH key exists in the
.sshfolder at~/.ssh, then therhcsetupcommand will generate a new key pair using thessh-keygenutility.After generating the new SSH key pair,
rhcwill upload the public SSH key to the OpenShift server. OpenShift copies the public key into an authorization file on the application gear calledauthorized_keysat~/.ssh/authorized_keys. In the Uploading SSh keys using the web console recipe, you uploaded the public SSH key using the web console. It will prompt you to provide the name of the key or use the default name generated by thesetupcommand.Next,
rhcchecks if Git has been installed. Therhc setupcommand will run a simple check against your local configuration and credentials to confirm that the configurations have been completed. It will also run a series of tests to check whethersshhas been configured properly and whether your system can communicate with OpenShift servers.Finally,
rhcasks the user to create a domain if one is not already created. In the Creating OpenShift domains using the web console recipe, you created the domain using the web console.
You can run the rhc setup command anytime while working with OpenShift. Every time you run the rhc setup command, it will use the configuration properties defined in the express.conf file. If you want to generate a new, clean configuration, you can use the --clean option. This will run the setup command again, ignoring any saved configuration options stored in express.conf:
$ rhc setup --clean
The rhc command-line utility supports autocompletion. This involves rhc predicting a command that the user wants to type in without them actually typing it completely. This is very helpful for new users who do not know all the commands supported by rhc. In this recipe, you will learn how to enable autocomplete for the rhc command-line client.
To step through this recipe, you will need to have rhc installed on your machine. Refer to the Installing the OpenShift rhc command-line client recipe for instructions.
To enable autocompletion, perform the following steps:
Run the
rhc setupcommand again with theautocompleteoption:$ rhc setup --autocompleteThe previous step will generate a file named
bash_autocompletein the.openshiftfolder at~/.openshift. To enable autocompletion, you have to add the~/.openshift/bash_autocompleteline to the.bashrcor.bash_profilefile present in your user's home directory. The.bashrhcfile on my Fedora box is as follows:# .bashrc . ~/.openshift/bash_autocomplete # Source global definitions if [ -f /etc/bashrc ]; then . /etc/bashrc fi # User specific aliases and functions
Note that on Mac OS X, you have to add
~/.openshift/bash_autocompleteto your~/.bash_profile. On Mac OS X, the new Terminal windows and tabs are always considered login shells, so this is a necessary step for OS X users.Reload or restart the shell to allow these changes to take effect.
You should try to understand what you have done in the preceding section. In step 1, you ran the setup command with the autocomplete option. This generated a bash script called bash_autocomplete in the .openshift folder at ~/.openshift. This bash script defines a custom completion function called _rhc for the rhc command-line client. Bash will execute this function when the rhc tab key is typed at the prompt and will display possible completions.
In step 2, you sourced the bash_autocomplete file by adding ~/.openshift/bash_autocomplete to the .bashrc script. This will make sure that the autocompletion functionality is available for each shell.
Finally, in step 3, you restarted the shell to load the _rhc function. Now, if you type rhc and then press the Tab key, it will show you all the rhc commands:
$ rhc
account                   app-tidy                  deployment-list  member-list // removed all commands for brevity
Most of the rhc commands have options, which you can provide. To view all the options for a command, type in -- and press Tab. For example, to view all the rhc setup command options, type in rhc setup -- and press Tab:
$ rhc setup --
--autocomplete     --clean            --create-token     --no-create-token  --server
In this recipe, you will learn how to view your account details using rhc.
To complete this recipe, you will need to have rhc installed on your machine. Refer to the Installing the OpenShift rhc command-line client recipe for instructions.
To view the account details, run the rhc account command as follows:
$ rhc account
This is all you need to do to view the account details.
The rhc account command shows details about the currently logged-in user. When you run the command, it makes a REST call to the OpenShift REST API using the authentication token generated during rhc setup. The REST API returns a JSON response, which rhc will render in a human-readable format:
$ rhc account
Login openshift.cookbook@gmail.com on openshift.redhat.com
----------------------------------------------------------
  ID:                 52b8112ae0b8cdc308000018
  Plan:               Free
  Gears Used:         0
  Gears Allowed:      3
  Domains Allowed:    1
  Allowed Gear Sizes: small
  SSL Certificates:   no
The account details include whom you are logged in as, which OpenShift server you are connected to, your OpenShift user ID, the OpenShift plan you are using, the number of gears as well as the gear size used and allowed, the number of domains allowed, and whether you can use SSL certificates or not.
You can also view the account details in the web console by navigating to the account web page at https://openshift.redhat.com/app/account.
You can also view details of any of your other OpenShift accounts by passing the -l or --rhlogin option. The -l or --rhlogin option is a global option available with every command. When you use -l or --rhlogin, you force the rhc client to use the user-specified login:
$ rhc account --rhlogin user@example.com
You can log out from your current session on the server by using the rhc account-logout command. This ends the user's current session and deletes the authorization token files in the .openshift folder at ~/.openshift:
$ rhc account-logout
You can also use rhc logout as a short alternative to rhc account-logout.
This recipe talks about how you can configure a different OpenShift server hostname. By default, when you set up your OpenShift account using the rhc setup command, rhc is configured to work with the public OpenShift PaaS hosted at openshift.redhat.com. However, it is possible to use a different OpenShift installation, which can be either an OpenShift Enterprise or an OpenShift Origin installation.
To step through this recipe, you will need to have rhc installed on your machine. Refer to the Installing the OpenShift rhc command-line client recipe for instructions.
Open a command-line terminal and run the following command to use a different OpenShift server hostname:
$ rhc setup --server <My OpenShift Installation Hostname>
Replace <My OpenShift Installation Hostname> with the OpenShift server hostname.
The rhc setup command takes an option, --server, which allows a user to specify the server hostname. When you run the rhc setup command with the new server location, the setup command will perform all the actions required to configure your OpenShift account to work with the new server. The setup command will overwrite the express.conf file in ~/.openshift with the new server hostname. The rhc client will get configured to work with the new OpenShift server.
You can also configure the server by directly editing the express.conf file at ~/.openshift/express.conf. The libra_server property is as follows:
# The OpenShift server to connect to
libra_server=openshift.redhat.com
Change the preceding code to a new server hostname:
# The OpenShift server to connect to
libra_server=<Your OpenShift Installation>
The OpenShift command-line tool, rhc, is the most powerful and popular way to work with OpenShift. In this recipe, you will learn how to update rhc to the latest version. OpenShift Online has a three-week release cycle, and most of the time, the rhc client tool is also updated to either support a new feature or fix a bug. So, it always helps if you use the latest version of rhc.
To be ready for this recipe, you will need an already installed rhc. No other prerequisites are required.
To update the rhc gem, run the gem update command:
$ gem update rhc
This is all you need to do to update the rhc command line to the latest version.
rhc is a Ruby gem and RubyGems is a package manager like many other package managers. It uses a central repository, which hosts installable packages. When you run the gem update command, this command-line tool fetches the latest packages from the central repository and installs them.
When you start working with rhc, you will soon have multiple versions of the rhc gem installed on your machine. You can uninstall all the previous versions using the cleanup command. This command will uninstall old versions of installed gems in the local repository:
$ gem cleanup rhc