


Within the past few years, the popularity of interactive web maps has exploded. In the past, creating interactive maps was reserved for large companies or experts with lots of money. But now, with the advent of free services like Google and Yahoo! Maps, online mapping is easily accessible to everyone. Today, with the right tools, anyone can easily create a web map with little or even no knowledge of geography, cartography, or programming.
Web maps are expected to be fast, accurate, and easy to use. Since they are online, they are expected to be accessible from anywhere on nearly any platform. There are only a few tools that fulfill all these expectations.
OpenLayers is one such tool. It's free, open source, and very powerful. Providing both novice developers and seasoned GIS professionals with a robust library, OpenLayers makes it easy to create modern, fast, and interactive web-mapping applications.
In this chapter we will
Learn what OpenLayers is
Discuss some web mapping application concepts
Make our First Map
Cover concepts behind OpenLayers, such as Object Oriented Programming
Provide information on resources outside of this book
OpenLayers is an open source, client side JavaScript library for making interactive web maps, viewable in nearly any web browser. Since it is a client side library, it requires no special server side software or settings—you can use it without even downloading anything! Originally developed by Metacarta, as a response, in part, to Google Maps, it has grown into a mature, popular framework with many passionate developers and a very helpful community.
OpenLayers makes creating powerful web-mapping applications easy and fun. It is very powerful but also easy to use—you don't even need to be a programmer to make a great map with it. It's open source, free, and has a strong community behind it. So if you want to dig into the internal code, or even improve it, you're encouraged to do so. Cross browser compatibility is handled for you—it even works in IE6.
OpenLayers is not tied to any proprietary technology or company, so you don't have to worry so much about your application breaking (unless you break it). At the time of writing, support for modern mobile and touch devices is in the works (with many proof of concept examples), and should be in the official library in the near future—if they aren't by the time you're reading this.
OpenLayers allows you to build entire mapping applications from the ground up, with the ability to customize every aspect of your map—layers, controls, events, etc. You can use a multitude of different map server backends together, including a powerful vector layer. It makes creating map 'mashups' extremely easy.
We said OpenLayers is a client side JavaScript library, but what does this mean?
When we say client side we are referring to the user's computer, specifically their web browser. The only thing you need to have to make OpenLayers work is the OpenLayers code itself and a web browser. You can either download it and use it on your computer locally, or download nothing and simply link to the JavaScript file served on the site that hosts the OpenLayers project (http://openlayers.org). OpenLayers works on nearly all browsers and can be served by any web server or your own computer. Using a modern, standard-based browser such as Firefox, Google Chrome, Safari, or Opera is recommended.
When we say library we mean that OpenLayers is an API (Application Programmer Interface) that provides you with tools to develop your own web maps. Instead of building a mapping application from scratch, you can use OpenLayers for the mapping part, which is maintained and developed by a bunch of brilliant people.
For example, if you wanted to write a blog you could either write your own blog engine, or use an existing one such as WordPress or Blogger and build on top of it. Similarly, if you wanted to create a web map, you could write your own from scratch, or use software that has been developed and tested by a group of developers with a strong community behind it.
By choosing to use OpenLayers, you do have to learn how to use the library (or else you wouldn't be reading this book), but the benefits greatly outweigh the costs. You get to use a rich, highly tested and maintained code base, and all you have to do is learn how to use it. Hopefully, this book will help you with that.
OpenLayers is written in JavaScript, but don't fret if you don't know it very well. All you really need is some knowledge of the basic syntax, and we'll try to keep things as clear as possible in the code examples.
Note
If you are unfamiliar with JavaScript, Mozilla provides phenomenal JavaScript documentation at https://developer.mozilla.org/en/javascript.
First off—what is a 'web-mapping application'? To put it bluntly, it's some type of Internet application that makes use of a map. This could be a site that displays the latest geo-tagged images from Flickr (we'll do this in Chapter 11), a map that shows markers of locations you've traveled to, or an application that tracks invasive plant species and displays them. If it contains a map and it does something, you could argue that it is a web map application. The term can be used in a pretty broad sense.
So where exactly does OpenLayers fit in? We know OpenLayers is a client side mapping library, but what does that mean? Let's take a look at the following screenshot:

This is called the Client / Server Model and it is, essentially, the core of how all web applications operate. In the case of a web map application, some sort of map client (e.g., OpenLayers) communicates with some sort of web map server (e.g., a WMS server or the Google Maps backend).
OpenLayers lives on the client side. One of the primary tasks the client performs is to get map images from a map server. Essentially, the client has to ask a map server for what you want to look at. Every time you navigate or zoom around on the map, the client has to make new requests to the server—because you're asking to look at something different.
OpenLayers handles this all for you, and it is happening via asynchronous JavaScript (AJAX) calls to a map server. To reiterate—the basic concept is that OpenLayers sends requests to a map server for map images every time you interact with the map, then OpenLayers pieces together all the returned map images so it looks like one big, seamless map. In Chapter 2, we'll cover this concept in more depth.
A map server (or map service) provides the map itself. There are a myriad of different map server backends. A small sample includes WMS, Google Maps, Yahoo! Maps, ESRI ArcGIS, WFS, and OpenStreet Maps. If you are unfamiliar with those terms, don't sweat it. The basic principle behind all those services is that they allow you to specify the area of the map you want to look at (by sending a request), and then the map servers send back a response containing the map image. With OpenLayers, you can choose to use as many different backends in any sort of combination as you'd like.
OpenLayers is not a web map server; it only consumes data from them. So, you will need to be able to access some type of web map service. Don't worry though. Fortunately, there are a myriad of free and/or open source web map servers available that are remotely hosted or easy to set up yourself, such as MapServer.
Note
Throughout this book, we'll often use a freely available web mapping service from OSGeo, so don't worry about having to provide your own.
With many web map servers you do not have to do anything to use them—just supplying a URL to them in OpenLayers is enough. OSGeo, OpenStreet Maps, Google, Yahoo!, and Bing Maps, for instance, provide access to their map servers (although, some commercial restrictions may apply with various services in some situations).
The Google, Yahoo!, Bing, and ESRI Mappings API allow you to connect with their map server backend. Their APIs also usually provide a client side interface (at least in the case of Google Maps).
The Google Maps API, for instance, is fairly powerful. You have the ability to add markers, plot routes, and use KML data (things you can also do in OpenLayers)—but the main drawback is that your mapping application relies totally on Google. The map client and map server are provided by a third party. This is not inherently a bad thing, and for many projects, Google Maps and the like are a good fit.
However, there are quite a few drawbacks.
You're not in control of the backend
You can't really customize the map server backend, and it can change at any time
There may be some commercial restrictions, or some costs involved
These other APIs also cannot provide you with anything near the amount of flexibility and customization that an open source mapping application framework (i.e., OpenLayers) offers
So, what's with the Layer in OpenLayers? Well, OpenLayers allows you to have multiple different 'backend' servers that your map can use. To access a web map server, you create a layer object and add it to your map with OpenLayers.
For instance, if you wanted to have a Google Maps and a WMS service displayed on your map, you would use OpenLayers to create a GoogleMaps layer object and a WMS layer object, and then add them to your OpenLayers map. We'll soon see an example with a WMS layer, so don't worry if you're a little confused.
Like layers of an onion, each layer is above and will cover up the previous one; the order that you add in the layers is important. With OpenLayers, you can arbitrarily set the overall transparency of any layer, so you are easily able to control how much layers cover each other up, and dynamically change the layer order at any time.
For instance, you could have a Google map as your base layer, a layer with satellite imagery that is semi-transparent, and a vector layer all active on your map at once. A vector layer is a powerful layer that lets us add markers and various geometric objects to our maps—we'll cover it in Chapter 9. Thus, in this example, your map would have three separate layers. We'll go into much more depth about layers and how to use and combine them in Chapter 3.
The website for OpenLayers is located at http://openlayers.org/. To begin, we need to download a copy of OpenLayers (or, we can directly link to the library—but we'll download a local copy). You can download the compressed library as either a .tar.gz or .zip, but both contain the same files.
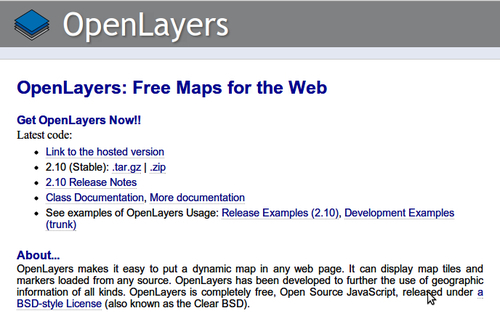
Link to the hosted version: If you do not want to actually download OpenLayers, you can instead link to the OpenLayers library by adding this script URL to your site in a <script> tag.
2.10 (Stable)
.tar.gzor.zip: This should show the latest stable release (2.10 at the time of writing). You can download it as either atar.gzor.zip; if you are unsure of which to get, you should download the.zipversion.2.10 Release Notes: This highlights things that have changed, bugs that have been fixed, etc.
Class documentation, more documentation: These are links to the API documentation, which we will make heavy use of throughout the book. I recommend opening it up and keeping it up while working through the examples.
See examples...: OpenLayers provides a rich array of examples demonstrating features of the library; if you're ever stuck or looking for a good example—go here.
Let's download the OpenLayers library. After you're done, you should have the OpenLayers library files set up on your computer.
Go to the OpenLayers website (http://openlayers.org) and download the
.zipversion (or if you prefer the.tar.gzversion).Extract the file you just downloaded. When you extract it, you'll end up with a folder called OpenLayers-2.10 (or whatever your version is).
Open up the OpenLayers folder. Once inside, you'll see a lot of folders and files, but the ones we are concerned with right now is a file called
OpenLayers.jsand two folders,/imgand/theme. We'll be copying these to a new folder.
Create a new folder outside the OpenLayers directory; we'll use
~/code/(if you are on Windows, thenc:/code). You can name the folder whatever you like, but we'll refer to it as thecodefolder. Inside the code folder, copy over theOpenLayers.jsand two folders (/imgand/theme) from the previous step. Your new folder structure should look similar to this:
We just 'installed' OpenLayers by copying over a pre-built, compressed JavaScript file containing the entire OpenLayers library code and two directories containing assets (images and stylesheets). To use OpenLayers, you'll need at a minimum the OpenLayers.js file and the img and theme folders.
If you open the OpenLayers.js file, you'll notice it is nearly unreadable. This is because this is a minified version, which basically means extra white space and unnecessary characters have been stripped out to cut down on the file size. While it is no longer readable, it is a bit smaller and thus requires less time to download. If you want to look at the uncompressed source code, you can view it by looking in the OpenLayers source code folder you extracted.
You can, as we'll see in the last chapter of this book, build your own custom configurations of the library, including only the things you need. But for now, we'll just use the entire library. Now that we have our OpenLayers library files ready to use, let's make use of them!
The process for creating a map with OpenLayers requires, at a minimum, the following things:
Including the OpenLayers library files
Creating an HTML element that the map will appear in
Creating a map object from the Map class
Creating a layer object from a Layer class
Adding the layer to the map
Defining the map's extent (setting the area the map will initially be displaying)
Now we're finally ready to create our first map!
Let's dive into OpenLayers and make a map! After you finish this section, you should have a working map, which uses a publicly available WMS server backend from OSGeo.
Navigate to the
codedirectory that contains theOpenLayers.jsfile,/imgand/themedirectories. Create a file here calledindex.html. This directory (/code) will be referred to as our root directory, because it is the base (root) folder where all our files reside.Add in the following code to
index.htmland save the file as an.htmlfile—if you are using Windows, I suggest using Notepad++. Do not try to edit the file in a program like Microsoft Word, as it will not save properly. The following code will also be used as the base template code for many future examples in this book, so we'll be coming back to it a lot.Tip
The lines numbers in the code are for demonstration purposes; do not type them in when you are writing your code.
1.<!DOCTYPE html>
2.<html lang='en'>
3.<head>
4.    <meta charset='utf-8' />
5. 	<title>My OpenLayers Map</title>
6.    <script type='text/javascript' src='OpenLayers.js'></script>
7.    <script type='text/javascript'>
8.
9.        var map;
10.
11.       function init() {
12.           map = new OpenLayers.Map('map_element', {});
13.           var wms = new OpenLayers.Layer.WMS(
14.               'OpenLayers WMS',
15.               'http://vmap0.tiles.osgeo.org/wms/vmap0',
16.               {layers: 'basic'},
17.               {}
18.           );
19.
20.           map.addLayer(wms);
21.           if(!map.getCenter()){
22.               map.zoomToMaxExtent();
23.           }
24.       }
25.
26.    </script>
27.</head>
28.
29.<body onload='init();'>
30.    <div id='map_element' style='width: 500px; height: 500px;'>
31.    </div>
32.</body>
33.</html>
Open up
index.htmlin your web browser. You should see something similar to:
We just created our first map using OpenLayers! If it did not work for you for some reason, try double checking the code and making sure all the commas and parentheses are in place. You can also refer to the Preface where a link to code samples used in the book is given. By default, we're given a few controls if we don't specify any. We will use the file we created as a template for many examples throughout the book, so save a copy of it so you can easily reference it later.
The control on the left side (the navigation buttons) is called the PanZoom control. You can click the buttons to navigate around the map, drag the map with your mouse/use the scroll wheel to zoom in, or use your keyboard's arrow keys. We'll cover controls in far greater detail in Chapter 6.
Now, let's take a look at the code—line by line. Before we do that, let's include a quick reference to the line numbers at which the requirements from the previous section occur at. These are the core things that you need to do to have a functioning map.
Including the OpenLayers library files:
Line [6]
  <script type='text/javascript' src='OpenLayers.js'></script>
Creating an HTML element for our map:
Lines [30] and [31]
  <div id='map_element' style='width: 500px; height: 500px'>
</div>
Creating a map object from the Map class:
Line [12]
  map = new OpenLayers.Map('map_element', { });
Creating a layer object from a Layer class:
Lines [13] to [18]
  var wms_layer = new OpenLayers.Layer.WMS(
    'WMS Layer Title',
    'http://vmap0.tiles.osgeo.org/wms/vmap0',
    {layers: 'basic'},
    {}
  );
Adding the layer to the map:
Line [20]
  map.addLayer(wms_layer);
Defining the map's extent:
Lines [21] to [23]
  if(!map.getCenter()){
    map.zoomToMaxExtent();
  }
Lines [1] to [5]: Sets up the HTML page. Every HTML page needs an <html> and <head> tag, and the extraneous code you see specifies various settings that inform your browser that this is an HTML5 compliant page. For example, we include the DOCTYPE declaration in line [1] to specify that the page conforms to standards set by the WC3. We also specify a <title> tag, which contains the title that will be displayed on the page.
Note
This is the structure that all our code examples will follow, so this basic code template will be implicitly assumed in all examples that follow throughout the book.
Line [6]: <script type='text/javascript' src='OpenLayers.js'></script>
This includes the OpenLayers library. The location of the file is specified by the src='OpenLayers.js' attribute. Here, we're using a relative path
. As the index.html page is in the same folder as the OpenLayers.js file, we don't have to worry about specifying the path to it. The file could be either on your computer or another computer—it doesn't matter much, as long as the browser can load it.
We can also use an absolute path
, which means we pass in a URL that the script is located at. OpenLayers.org hosts the script file as well; we could use the following line of code to link to the library file directly:
<script type='text/javascirpt' src='http://openlayers.org/api/OpenLayers.js'></script>
Notice how the src specifies an actual URL—this is how we use absolute paths. Either way works, however, throughout the book we'll assume that you are using a relative path and have the OpenLayers library on your own computer/server. If you use the hosted OpenLayers library, you cannot be sure that it will always be available, and it may change overnight (and changes when the library is updated)—so using a local copy is recommended.
Line [7]: Starts a <script> block. We'll set up all our code inside it to create our map. Since the OpenLayers library has been included in line [5], we are able to use all the classes and functions the library contains.
Line [8]: var map;
Here we create a global variable called map
. In JavaScript, anytime we create a variable we need to place var in front of it to ensure that we don't run into scope issues (what functions can access which variables). When accessing a variable, you do not need to put var in front of it.
Since we are defining map as a variable at the global level (outside of any functions), we can access it anywhere in our code. Soon we will make this map variable our map object, but right now it is just an empty global variable.
Line [11]: Creates a function called init
. When the page loads (via body onload='init();' on line [29]), this function will get called. This function contains all of our code to set up our OpenLayers map. If you are familiar with JavaScript, you do not have to put all the code in a function call—you could, for instance, just put the code at the bottom of the page and avoid a function call all together. Creating a function that gets called when the page loads is a common practice and so we will be doing it throughout the book.
Line [12]: map = new OpenLayers.Map('map_element', { });
Remember that global map variable? Well, now we're making it a map object, created from the OpenLayers.Map class. It is also referred to as an instance of the Map class. We'll talk about what this means later in this chapter in the Object Oriented Programming section. The map object is the crux of our OpenLayers application— we call its functions to tell the map to zoom to areas, fire off events, keep track of layers, etc.
Now, let's look at the right hand side of the equal sign (=): new means that we are creating a new object from the class that follows it. OpenLayers.Map is the class name which we are creating an object from. Notice that something is inside the parenthesis: ('map_element', {}). This means we are passing two things into the class (called arguments, and you pass them in separated by a comma). Every class in OpenLayers expects different arguments to be passed into it, and some classes don't expect anything.
The Map class expects two parameters. The first argument, map_element, is the ID of the HTML element that the map will appear in. The second argument, { }, are the map options, consisting of key:value pairs (e.g., {key:value}). This is also called JavaScript Object Notation, a way to create objects on the fly. We'll cover this in more depth very shortly in the next section. Also, you are not required to include this argument if it is empty (even though we just did it), but we are just doing it here for consistency.
Because we passed in map_element as the first parameter, we will have an HTML element (almost always a <div>) with the ID of map_element. The HTML element ID can be anything, but for the sake of clarity and to avoid confusion, we call it map_element.
Line [13]: var wms = new OpenLayers.Layer.WMS(
Here, we create a layer object for the map to use from the WMS subclass of the Layer class. In OpenLayers, every map needs to have at least one layer. The layer points to the 'back end', or the server side map server, as we discussed earlier. The layer can be any of a multitude of different services, but we are using WMS here. WMS, which stands for Web Map Service , is an international standard defined by the Open Geospatial Consortium (OGC).
The arguments we can pass in for layers are dependent on the layer class—we cover layers in detail in Chapter 3. If you don't want to wait, you can also check out the documentation at http://dev.openlayers.org/docs/files/OpenLayers/Layer-js.html to see what arguments different layers of classes expect.
Notice we don't include everything on one line when creating our layer object—this improves readability, making it easier to see what we pass in. The only difference is that we are also adding a new line after the commas which separate arguments, which doesn't affect the code (but does make it easier to read).
Line [14]: 'WMS Layer Title',
This is the first parameter passed in; the layer's title. Most layer classes expect the first parameter passed in to be the title of the layer. This title can be anything you would like, the main purpose of it is for human readability—it is displayed in controls such as the layer list.
Line [15]: 'http://vmap0.tiles.osgeo.org/wms/vmap0',
The URL is the second parameter that the WMS layer class expects to receive. For now, we're using a publicly available WMS service from OSGeo. We will cover in depth the WMS in Chapter 3. For now, all you need to know is that this is the base URL, which the layer will be using.
Line [16]: {layers: 'basic'},
The third parameter is an anonymous object containing the layer properties (similar in format to the previous options object on line [12]), and is specific to the WMS layer class. These are the things that are actually added (more or less) straight into the GET call to the map server backend when OpenLayers makes requests for the map images.
In OpenLayers, we pass in anonymous objects to classes a lot. In JavaScript, anonymous objects are comma separated key:value pairs, and are set up in the format of {key1:value1, key2:value2}. They are, basically, objects that are created without deriving from a class. This format is also referred to as JavaScript Object Notation.
When we say key1:value1, it's similar to saying "key1 = value1", but we use a colon instead of an equals sign. We can also create an anonymous object and pass it in instead of creating it on the line, for example:
  var layer_parameters = {layers: 'basic'};
  var wms = new OpenLayers.Layer.WMS('layer_title', 'url',layer_parameters, …);
With a WMS layer, we need to pass in, at a minimum, a layers key. In this case it has the value of 'basic'. This layer parameter specifies layers that exist on the map server. So, when you ask the WMS server from a map image with the layer 'basic', it sends you back an image that is composed of that layer. You can also ask for multiple layers from the map server. In this case, we only want the WMS service to give us back an image that contains a layer called 'basic'.
Let's get back to the code.
Line [17]:
{ }
The fourth parameter is an optional options object, an anonymous object in the format we just discussed. These properties are generally shared by every OpenLayers Layer class. For instance, regardless of the Layer type (e.g., WMS or Google Layer), you can pass in an opacity setting (e.g., {opacity: .8} for 80 percent opacity). So, regardless of whether you are working with a WMS or a Vector layer, this opacity property can apply to either layer.
Note
Since this is the last thing passed into the Layer object creation call, make sure there is not a leading trailing comma. Trailing commas are a common error and are often tedious to debug.
This options object is optional, but we will often use it, so it's a good habit to keep our code consistent and provide an empty object (by {}), even if we aren't passing anything into it yet.
Line [18]: );
This simply finalizes the object creation call.
Line [20]:
map.addLayer(wms);
Now that we have a
wms_layer object created, we need to add it to the map object. Notice we are calling a function of the map object. There are actually a few ways to go about adding a layer to a map object. We can use the above code (by calling map.addLayer), where we pass in an individual layer, or we could use map.addLayers:
map.addLayers( [layer1, layer2, ...] );
Here, we pass an array of layers. Both methods are equally valid, but it may be easier to pass in an array when you have multiple layers.
You can also create the layer objects before you create the map object and pass the layer objects into the map when you create it, for instance:
map = new OpenLayers.Map('map_element', {layers: [layer1, layer2, …]});All ways are valid, but we will usually use addLayer or addLayers throughout the book.
Line [21] - [23]:
if(!map.getCenter()){
  map.zoomToMaxExtent();
}
Finally, we must specify the map's viewable area. Here, the actual code that moves the map is map.zoomToMaxExtent(), which zooms the map to the map's maximum extent. It is inside an if statement. This if statement checks to see whether the map already has a center point.
The reason why we add in this check is because, by default, your map can accept a specially formatted URL that can contain an extent and layers to turn on/off. This is, in more common terms, referred to as a permalink. If we did not check to see if a center has already been set, permalinks would not work.
Note
By default, your map adds an argParser control which will try to pull information from a permalink. We cover this in Chapter 6, but to see it in action now you can simply add the following to your URL, which will zoom the map to the same coordinate and zoom level: ?zoom=4&lat=56&lon=-116
So, your URL might look like c:/code/index.html?zoom=4&lat=56&lon=-116
There are a few ways to set the map's extent. If you know you want to show everything, the map.zoomToMaxExtent() function is a quick and good way to do it. There are other ways as well, such as
map.zoomToExtent(new OpenLayers.Bounds([minx,miny,maxx,maxy]);
There are even more ways though. If you know a specific location you want the map to start at, this is another way to do it:
  map.setCenter(new OpenLayers.LonLat(x,y));
  map.zoomTo(5);
Where x,y are the Lon/Lat values, and 5 is the zoom level you wish to zoom to. By default, your map will have 16 zoom levels, which can be configured by setting the numZoomLevels property when creating your map object.
More ways exist, but these are the most common strategies. The basic idea is that you need to specify a center location and zoom level—setting the extent accomplishes this, as does explicitly setting the center and zoom level.
Line [24]:
}
This simply finishes the init() function.
Lines [26], [27]:
These lines close the script tag and head tag.
Line [29]:
<body onload='init();'>
This starts the body tag. When the page is finished loading, via the onload='init();' attribute in the body tag, it will call the JavaScript init() function. We have to wait until the page loads to do this because we cannot use the map div (or any HTML element) until the page has been loaded. Another way to do this would be to put the init() call in a JavaScript tag at the bottom of the page (which would not be called until the page loads), but both methods accomplish the same thing.
When browsers load a page, they load it from top to bottom. To use any DOM (Document Object Model) elements (any HTML element on your page) in JavaScript, they first have to be loaded by the browser. So, you cannot reference HTML with JavaScript before the browser sees the element. It'd be similar to trying to access a variable that hasn't yet been created. Even though we have JavaScript code that references the map_element div at the top of the page, it is not actually executed until the page is loaded (hence the need for the onload and init() function call).
Line [30] and [31]:
<div id='map_element' style='width: 500px; height: 500px'></div>
To make an OpenLayers map, we need an HTML element where the map will be displayed in. Almost always this element will be a div. You can give it whatever ID you would like, and the ID of this HTML element is passed into the call to create the map object. You can style the div however you would like—setting the width and height to be 100 percent, for instance, if you wanted a full page map. It would be best to style the elements using CSS, but styling the div in line like this works as well.
Lines [32] and [33]: These lines finalize the page by closing the remaining tags.
Now, let's talk about how this stuff works from a more theoretical and technical level. OpenLayers employs Object Oriented Programming (OOP) techniques, meaning that to use with the library, we create objects from built in classes that OpenLayers provides.
What does this mean? You already are familiar with what classes and objects are, but you just may not know it. Think of the concepts of a class and object in terms of the parts of speech. For example, think of what the abstract idea of a noun means—a person, place, thing, or idea. Noun itself (the abstract idea) is a class. But the actual, concrete words that qualify as a noun are objects.
Ironman and Batman are two separate words (or, in terms of OOP, two objects), but they belong to the same noun class. A class is primarily used to generate objects; we interact with objects. Consider these two sentences:
"Noun was in a fight with noun."
"Ironman was in a fight with Batman."
Now, the second sentence is more of an actual sentence. We use the words Ironman and Batman in the sentence (which are objects; they are instances of the noun class). We don't use noun (a class) in the sentence, because interacting with a class like this doesn't make much sense. This is one of the important concepts of OOP—we interact with objects, and we generate objects through classes.
Madlibs, for those unfamiliar with it, is a game where you are given text with some missing words. The point is to come up with words to fill in the blanks, but each blank can only contain a certain type of word (noun, adjective, verb, and so on). The type of word is a class and the actual word you insert is an object.
Finish this sentence, by replacing verb and noun with verb and noun 'objects':
I verb up to the noun. It's about 7 or 8 o'clock. I looked at my noun. I was there, to verb on my throne as prince of noun(place).
You just did a Madlibs, demonstrating some of the concepts of OOP. As you can see, it doesn't make much sense to read the sentence as "I verb up to the noun". Since verb and noun are classes, we don't use the actual term verb or noun in the sentence.
So, the idea would be to generate separate objects, one of the class noun and one of the class verb. For example, the previous sentence could be completed like: "I pulled up to the house". Pulled and house are objects that are instances of the verb and noun classes, respectively.
We use words that belong to those classes, which are objects. Another term used when referring to objects is instance, which is used to designate the class the object is derived from, for example, Frodo (a person / hobbit) is an instance of a noun.
The same concept applies to programming. The only thing we can really do with a class is to create an object from it. Objects are derived from classes—you can interact and do things with objects, but not with classes. So, in OpenLayers, we need to create objects from the built in classes to be able to really do anything. The main thing we need are map and layers objects. If we want to create an OpenLayers map, we need a map object, and we create it in the following manner:
var map = new OpenLayers.Map( … );
The new declaration means that we want to create a new object from the OpenLayers.Map class. The ellipsis (...) in the parenthesis presents things we pass into the class to create our object, called arguments
. Each class expects different arguments to be passed into it. It is similar to the Madlibs example—the noun class accepts only certain words. If we were to create a word object in JavaScript, the code may look something like this:
var my_word_object = new Noun('Ironman');Here, we pass in 'Ironman' to the noun class, and now we have our word object. Because the Noun class only accepts nouns, this would work fine. If we try to pass in a verb, for instance, it would not work because the noun class cannot accept things that are verbs. Similarly, the Map class expects different arguments to be passed into it than the Layer class does.
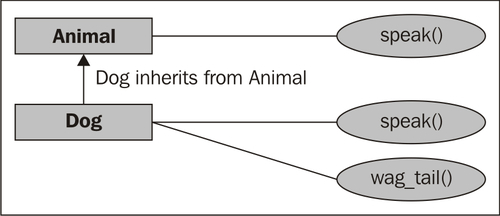
There are also subclasses, which are classes derived from another class and inherit all the attributes from the 'base' class it inherits from. Subclasses can also override properties and methods that they inherit.
For instance, let's say we have a Dog class that is a subclass of the Animal class. The Dog class would inherit all the attributes of the base Animal class—such as, perhaps, a speak method. Now, the Dog class would override the speak method and it would bark (or 'yap' annoyingly) when called. The Dog class might also provide additional methods that weren't in the base Animal class, such as, perhaps, a wag_tail method.
Note
'Base' class and 'Subclasses' are both classes; the terminology just helps to clear up what class inherits from what other class.
There are many subclasses in OpenLayers, for example, the GoogleMap Layer class is a subclass of the base Layer class, and the Navigation control class is a subclass of the base Control class. Subclasses are still classes, and the exact same concept applies; we still need to generate objects from the class to use it.
The previous section was just an introduction to OOP. While you don't necessarily need to know a whole lot more about OOP concepts to use this book, a great resource to learn more about the concepts can be found at http://en.wikipedia.org/wiki/Object-oriented_programming.
Tip
Classes are easy to spot in OpenLayers code. By convention, in OpenLayers (and many other places) class names are CamelCased, which means the first letter of each word is capitalized, while objects are not. For example, MyClass would be an example of a class name, while my_object would be an example of an object.
Our coverage of the sample code was not meant to be extremely thorough; just enough to give you an idea how it works. We'll be covering OOP concepts in more detail throughout the chapters, so if anything is bit unclear, don't worry too much.
As OpenLayers is a library and provides functions for you, it is important to know what those functions are and what they do. There are many places to do this, but the best source is the API docs.
The API documentation is always up to date and contains an exhaustive description of all the classes in OpenLayers. It is usually the best first place to go when you have a question. You can access the documentation at http://dev.openlayers.org/docs/files/OpenLayers-js.html. It is continually updated and contains a wealth of information. We will constantly refer to it throughout the book, so keep the link handy! Sometimes, however, the API docs may not seem clear enough, but there are plenty of other resources out there to help you.
Books are great, but they're basically just a one way form of communication. If you have any questions that the book does not answer, Google is the best first place to go. Mailing lists and IRC are other great resources. Sometimes it's hard to formulate the right question, but there is help!
The extension website for this book can be found at http://vasir.net/openlayers_book. Current, up to date corrections and code fixes, along with more advanced tutorials and explanations, can be found there—and also on my blog at http://vasir.net/blog. You can also grab the code and more information about this book at Packt Publishing's website for the book, located at https://www.packtpub.com/openlayers-2-1-javascript-web-mapping-library-beginners-guide/book.
The OpenLayers mailing list is an invaluable resource that lets you not only post questions, but also browse questions others have asked (and answered). There are two main OpenLayers news groups—Users and Dev. The Users lis t is where the majority of questions are asked. Dev is reserved for development of the OpenLayers library itself. If you have questions about how to use OpenLayers, they belong in the Users list, not the Dev list . You can subscribe to the mailing list at http://lists.osgeo.org/mailman/listinfo/openlayers-users.
There are various ways to browse the content, and I prefer to use Nabble. You can view the lists at http://osgeo-org.1803224.n2.nabble.com/OpenLayers-f1822462.html.
Tip
Please do a thorough search before posting questions, as it is likely that a question similar to yours has already been asked and solved. If you have a question about using OpenLayers, please use the User list. Please do not post questions to the Dev list, unless it has to do strictly with development of the OpenLayers library itself.
When posting a question, please be as thorough as possible, stating your problem, what you have done, and the relevant source code (e.g. "I have a problem with using a WMS layer. I have tried this and that, and here is what my source code looks like..."). A good guideline for asking questions in a way that will best elicit a response can be found at http://www.catb.org/~esr/faqs/smart-questions.html.
Internet Relay Chat (IRC) is another great place to go if you have questions about OpenLayers. IRC is used for group communication; a big chat room, essentially. If you have exhausted Google and the mailing list, IRC provides you with real time with other people interested in OpenLayers.
Generally, the people who hang out in the OpenLayers chat room are very friendly, but please try to find an answer before asking in IRC. The server is irc.freenode.net and the chat room is #openlayers. You can download an IRC client online; a good Windows one is mIRC (http://mirc.com). More information about how to use IRC can be found at http://www.mirc.com/install.html.
Traditionally, OpenLayers has used SVN as its revision management system. At the time of writing, however, the source code repository location is hosted at GitHub. You can access the entire code repository at http://github.com/openlayers/openlayers.
Feel free to download a copy and play around with it yourself. There is a process to actually get your code permanently added to the official source code base, but it cannot hurt to download a copy of the code base and look around it yourself to figure out how it's really working!
In this chapter we were introduced to OpenLayers and learned a bit about it.
We saw what Web Map Applications are and how they work. After that, we created our first map with OpenLayers, then analyzed how the code works. Then we covered a fundamental concept, Object Oriented Programming, which we'll need to know about while really working with OpenLayers. Lastly, resources for help and information outside this book were provided.
Now that we have a basic handle on OpenLayers, we'll jump straight into debugging OpenLayers. By doing so, we'll cover more thoroughly many of the concepts that we've discussed, such as how OpenLayers requests and receives map images, and how it puts them together.