


Building a game is like building a house. Except this is a crazy house with rooms sticking out everywhere, and at any time someone might decide to add another room just here, and remove a room over there. You had better have a good foundation!
This chapter will take you through the process of setting up the foundation to build your game. You will learn, how to set up a development environment using Visual Studio. Next, you will set up the game loop, which is the foundation for every game ever created. Finally, you will set up the development environment to use OpenGL as your rendering engine.
The development environment is the set of tools that you use to edit, compile, and run your program. There are many development tools out there; some tools are glorified text editors, while others are entire suites of tools that are integrated into a single application. These more advanced suites are known as Integrated Development Environments (IDEs).
Microsoft's Visual Studio is by far the most widely used IDE, and the good news is that you can obtain and use it for free. Go to https://www.visualstudio.com/en-us/products/visual-studio-express-vs.aspx and follow the links to download the latest version of Visual Studio Community, previously known as Visual Studio Express. Visual Studio Community is not a trial version and will not expire. You will probably see trial versions of Visual Studio being offered, so make sure you download the free version of Visual Studio Community.
Visual Studio offers several languages to program in. We will be using C++ throughout this book. When you first use Visual Studio, you may be asked which language you want to set up the development environment for. I recommend that you choose the C++ settings. However, you will still be able to use Visual Studio for C++ even if you choose a different default programming language.
Visual Studio Community 2013 was the current version at the time this book was written. All of the screenshots you see in the book are from that version. It is quite likely that a later version of Visual Studio will have come out by the time you get your hands on this book. The general functionality stays the same from one version to another, so this should not be a problem. If you are using a different version of Visual Studio, then the exact location of some commands may not be the same as in the screenshots in this book.
Tip
Microsoft differentiates between programs written for Windows Desktop and those written for Windows Universal. Ensure that you download Visual Studio Community Express for Desktop.
When you first start Visual Studio, you will be asked for a few options, so I thought I'd cover them here:
If you are asked which programming language you would like to set up as your default development environment, it really doesn't matter which language you choose. If you think you will be using C++ a lot, then pick C++. If you pick another language as your default you will still be able to code in C++.
You will be asked to sign into your Microsoft account. If you have ever used MSN, Hotmail, or Windows Messenger, then you already have a Microsoft account. At any rate, if you don't have a Microsoft account you can use your own e-mail address to create one, and it doesn't cost anything.
You may be asked to set up a developer license for Windows. Just click I Agree and it will be done. Again, no charge!
As Visual Studio can do so many things, it may be a bit intimidating the first time you use it. I have been using Visual Studio for over 20 years and there are still parts of it that I have never needed! Let's take a look at the key components, in the following screenshot, that you will use every day:
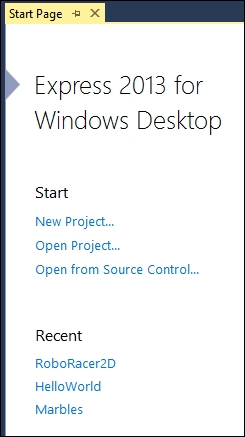
The start screen, as shown in the preceding screenshot, allows you to quickly start a new project or open an existing project. The most recent projects that you have worked with can be quickly accessed from the list of recent projects.
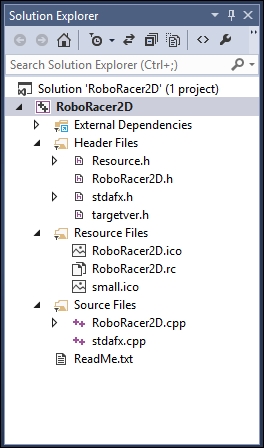
The Solution Explorer panel allows you to navigate and work with all of the code and other resources in your project. If you do not see the Solution Explorer window on your screen, click View | Solution Explorer.
From this window you can:
Double-click on any item to open it
Right-click to add existing items to the project
Right-click to add new items to the project
Create folders to organize your code
The Standard Toolbar panel contains buttons for the most common tasks:
Save the current file
Save all modified files
Undo and Redo
Run the program
Tip
There are basically two ways to run your program. You can run the program with or without debugging. Debugging mode allows you to set checkpoints that stop the program and let you view the state of variables, and perform other operations while the code is running. If you run the program without debugging, you will not be able to do these things.

The center of the IDE is dominated by the code window. This is where you type and edit your code. You can have several code windows open at once. Each code window will add a tab across the top, allowing you to switch from one piece of code to another with a single click:
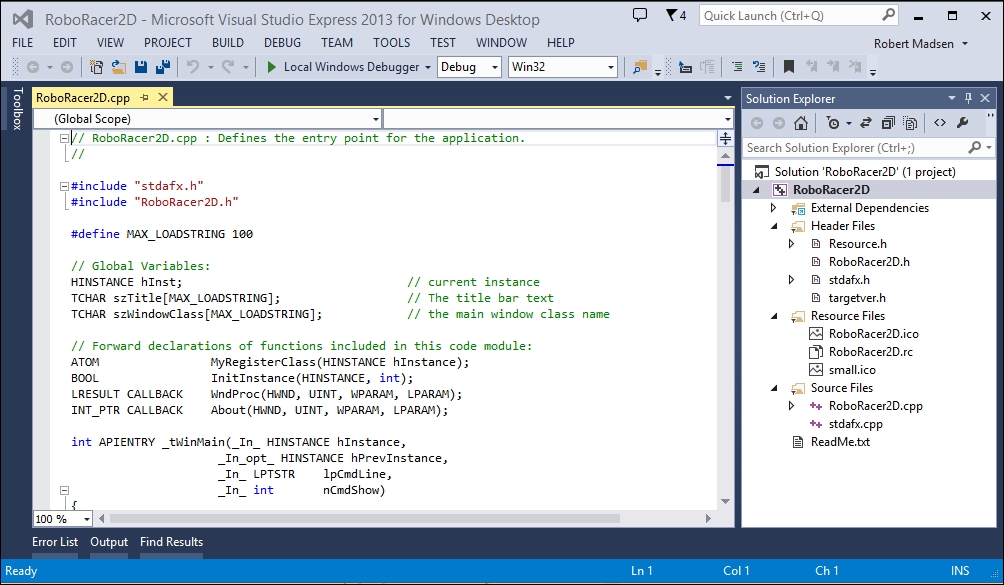
You will notice that the text is color-coded. This allows you to easily see different types of code. For example, the comments in the code in the preceding screenshot are in green, while the C++ objects are in blue. You can also zoom in and out of the code by holding down the Ctrl button and using the scroll wheel on the mouse.
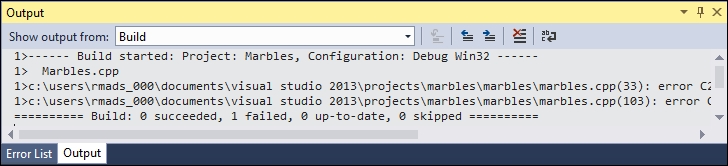
The output window is typically at the bottom of the IDE. This window is where you will look at to see the status of the current run, and where you will find errors when you try to compile run your program.
If you see an error in the output window, you can usually double-click on it, and Visual Studio will take you to the line in code that caused the error:
It's time to stop reading and start doing! We are going to use Visual Studio to start our game project.
Open Visual Studio and click the New Project link in the start window.
Navigate to the left-hand side panel and select Win32 under the Visual C++ branch of Templates.

Select Win32 Project in the center area.
Give the project a name. The first game we will be working on is a 2D robot racing game that we'll call
RoboRacer2D.Choose a folder location to store the project, or just leave the default location.
The solution name is almost always the same as the project name, so leave that as it is.
Leave Create directory for solution checked.
Click OK.
On the next screen click Finish.
We need to tell Visual Studio how to work with Unicode characters. Right-click on the project name in the Solution Explorer panel and choose Properties. Then select General. Change the Character Set property to Not Set.
Congratulations! You have now created your Windows application and set up your development environment. It's time to move on to creating the framework for your game.
The game loop is the primary mechanism that moves the game forward in time. Before we learn how to create this important component, let's briefly take a look at the structure of most games.
There are three phases to most games: the initialization phase, the game loop, and the shutdown phase. The core of any game is the game loop.

The game loop is a sequence of processes that run continuously as long as the game is running. The three main processes that occur in the game loop are input, update, and render.
The input process is how the player controls the game. This could be any combination of keyboard, mouse, or control pad. Newer technologies allow the game to be controlled via a sensing device that detects gestures, while mobile devices detect touch, acceleration, and even GPS.
The update process encompasses all of the tasks required to update the game: calculating where characters and game objects have moved, determining whether items in the game have collided, and applying physics and other forces in the game.
Once the preceding calculations have been completed, then it is time to draw results. This is known as the render process. OpenGL is the library of code that handles the rendering for your game.
Tip
Many people think that OpenGL is a game engine. This is not accurate. OpenGL—the open graphics language—is a rendering library. As you can see, rendering is only one process involved in the execution of a game.
Let's take a closer look at each stage of the game so that we can get a better idea of how OpenGL fits in.
There are certain parts of the game that must be set up only once before the game can run. This typically includes initializing variables and loading resources. There are certain parts of OpenGL that must be initialized during this phase as well.
Once the initialization is complete, the game loop takes over. The game loop is literally an endless loop that cycles until something tells it to stop. This is often the player telling the game to end.
In order to create the illusion of movement, the render phase must occur several times a second. In general, games strive to render at least 30 frames to the screen every second, and 60 frames per second (fps) is even better.
When the game does end, it isn't enough to just exit the program. Resources that are taking up precious computer memory must be properly released to the reclaim that memory. For example, if you have allocated memory for an image, you will want to release that memory by the end of the game. OpenGL has to be properly shut down so that it doesn't continue to control the Graphics Processing Unit (GPU). The final phase of the game is to return control to the device so that it will continue working properly in its normal, nongaming mode.
Now that we created our RoboRacer2D project in Visual Studio project, let's learn how to modify this code to create our game structure. Start Visual Studio and open the project we just created.
You should now see a window with code in it. The name of the code file should be RoboRacer2D.cpp. If you don't see this code window, then find Solution Explorer, navigate to RoboRacer2D.cpp, and open it up.
I'll be the first person to admit that the Windows C++ code is both ugly and intimidating! There is a lot of code created from you by Visual Studio when you choose the Windows desktop template to create your project. In fact, you can run this code right now by clicking DEBUG from the menu bar and then choosing Start Debugging. You can also press the F5 key.
Go ahead and do it!

You will see a window telling you that the project is out of date. This simply means that Visual Studio needs to process your code and turn it into an executable—a process called building the project. For the computer science majors out there, this is where your code is compiled, linked, and then executed by the operating system.
Click Yes to continue.

Congratulations! You have now created and run your first program in Visual Studio. It may not look like much, but there is a lot going on here:
A fully sizeable and moveable window
A working menu system with File and Help choices
A title bar with RoboRacer2D
Working minimize, maximize, and close buttons
Keep in mind that you haven't written a single line of code yet!
Now that you see it, feel free to use the close button to close the window and return to Visual Studio.
But wait, this doesn't look like a game!
If you are thinking the RoboRacer2D program doesn't look much like a game, you are correct! In fact, to make a game we typically strip away about everything that you now see! However, for this demonstration, we are going to keep the window just like it is, and worry more about the code than the appearance.
Every program has a starting point, and for a Windows program the entry point is the _tWinMain function. Look for the following line of code:
int APIENTRY wWinMain
The _wWinMain function will start running and will set up everything required to run a Windows desktop program. It is beyond the scope of this book to go into everything that is going on here. We will just take it for granted that the code we are looking at sets things up to run in Windows, and we will focus on the things that we need to modify to make a game.
It turns out that _wWinMain already sets up a loop. In a similar manner to games, Windows programs actually run in an endless loop, until they receive some kind of event that tells them to stop. Here's the code:
// Main message loop:
while (GetMessage(&msg, nullptr, 0, 0))
{
  if (!TranslateAccelerator(msg.hwnd, hAccelTable, &msg))
  {
    TranslateMessage(&msg);
    DispatchMessage(&msg);
  }
}
As you can see, these lines of code set up a while loop that will continue to run until the result of the GetMessage call is false.
Again, we won't worry about the exact details, but suffice to say that GetMessage constantly checks for messages, or events, that are sent by Windows. One particular message is the quit event, which will return a result of false, ending the while loop, exiting the _tWinMain function, and ending the program.
Our goal is to modify the Windows message loop and turn this block of code into a game loop:
StartGame();
//Game Loop
bool done = false;
while (!done)
{
  if (PeekMessage(&msg, NULL, 0, 0, PM_REMOVE))
  {
    if (msg.message == WM_QUIT)
    {
      done = true;
    }
    else
    {
      TranslateMessage(&msg);
      DispatchMessage(&msg);
    }
  }
  else
  {
    GameLoop();
  }
}
EndGame();
Study the preceding code. You will see that we have added three new functions: StartGame, GameLoop, and EndGame.
StartGamecomes before the Windows message loop, which means that everything inStartGamewill run once before Windows enters its loop. We will put all of the game initialization code in theStartGamefunction.EndGamecomes after the Windows message loop. This means that the code inEndGamewill only execute one time after the Windows message loop has exited. This is the perfect place for us to release resources and shut the game down.GameLoopis interleaved in the Windows message loop. Basically, the code is saying, "Keep running until you receive a Windows message to quit. While you are running, check to see if Windows has passed any events that need to be handled. If there are no messages to handle, then run our game."
Tip
Order is important. For example, you have to declare these functions before the wWinMain function. This is because they are called by wWinMain, so they have to exist before tWinMain uses them. In general, a function has to be declared before the code that uses it.
In order for these new functions to be valid, go to the line just before the _tWinMain and enter some stubs for these three functions:
void StartGame()
{
}

void GameLoop()
{
}

void EndGame()
{
}
The idea here is to help you see how easy it is to convert the standard Windows message loop into a game loop.
We have spent a lot of time so far talking about game loops and Visual Studio. We are finally going to discuss the main topic of this book: OpenGL!
OpenGL makes it possible to render sophisticated 2D and 3D graphics on your computer screen. In fact, OpenGL is also the technology behind most mobile devices and tablet devices.
OpenGL works in conjunction with your device's graphics device to draw graphics on the screen. Most modern computing devices have two processors: the Central Processing Unit (CPU) and the Graphics Processing Unit (GPU).
Drawing modern 2D and 3D graphics is a very processor intensive task. In order to free the computer's main processor (the CPU) to do its job, the GPU takes on the task of rendering to the screen. OpenGL is a language that tells the GPU what to do and how to do it.
Tip
Technically, OpenGL is an API, or application programming interface. Another way to understand this is that OpenGL is a library of code that you can access once you have included the proper headers in your code. There are different versions of OpenGL. This book uses OpenGL 1.1. Although this is the very first version of OpenGL, it is included in all versions of Windows and provides the building blocks for all future versions.
By the way, you have probably heard of the "other" graphics engine—Microsoft's DirectX. Similar to OpenGL, DirectX allows programmers to talk to the GPU. A lot of people want to know the differences between OpenGL and DirectX, and which is the best choice.
Although there are certainly going to be fans and defenders of both technologies, the only real difference between DirectX and OpenGL is the specific way that you code them. Both technologies are about the same when it comes to features and abilities.
There is one advantage that OpenGL has over DirectX. DirectX only works on Microsoft technologies, while OpenGL works on Microsoft technologies and many others, including most modern cell phones, and the Apple Mac line of computers.
I remember when I was first learning OpenGL. I searched in vain, looking for the link to download the OpenGL SDK. It turns out that you don't have to download the OpenGL SDK because it is already installed when you install Visual Studio.
You do want to make sure that you have the latest OpenGL driver for your video card. To do that, go to http://www.opengl.org/wiki/Getting_started#Downloading_OpenGL and follow the appropriate link.
In order to use OpenGL in our program, we will need to add some code. Open the RoboRacer2D project that we have been working on, and let's do this!
Everything that you need to use OpenGL is found in the OpenGL32.dll lib file. It's up to you to tell Visual Studio that you want to use the OpenGL library in your project.
Right-click on Project | RoboRacer2D properties.
Tip
By the way, Visual Studio first creates a solution, and then puts a project in the solution. The solution is the top entry in the Solution Explorer hierarchy, and the project is the first child. In this case, make sure you right-click on the project, not the solution.

For the Configuration drop-down box, make sure you select All Configurations.
Open the Configuration Properties branch, then the Linker branch.
Click the dropdown for Additional Dependencies and choose <Edit…>.
Enter
OpenGL32.libinto the dialog window and click OK.
Close the Property Pages window.
Even if you are writing a 64 bit application, you will use the OpenGL 32 bit library.
Next, we need to tell Visual Studio that you want to include the OpenGL headers in your program. If you take a look at the top of your code, you will see several headers already being loaded:
#include "stdafx.h"
#include "RoboRacer2D.h"
Just below these lines, add the following:
#include <Windows.h>
#include <gl\GL.h>
#include <gl\GLU.h>
Tip
GL.h is the main header for the OpenGL library. GLU.h stands for GL Utility and is an additional library of features that make OpenGL a little easier to use. These headers correspond to the OpenGL32.lib and Glu32.lib libraries that we added to the project.
Congratulations! You have set up the development environment to use OpenGL and you are now ready to program your first game.
We covered a lot of ground in this chapter. We learned how to set up your development environment by downloading and installing Visual Studio. Next, we created a C++ Windows Desktop application.
We discussed the structure of most games and the importance of the game loop. Recall that an average game should run at 30 fps, while top-end games shoot for 60 fps to provide smooth animations.
Finally, we learned about OpenGL and how to initialize OpenGL in your project. Remember, OpenGL is the graphics engine that will be responsible for drawing every image and piece of text to your screen using the power of your GPU.
After all this work, there still isn't a lot to see. In the next chapter, we will go into all of the details of how to render your first image to the screen. Believe it or not, getting your development environment properly set up means you have already accomplished a great deal toward creating your first game using OpenGL.